Lord Gruntfuttock
-
Posts
13099 -
Joined
-
Last visited
-
Days Won
27
Everything posted by Lord Gruntfuttock
-

Chris.QCRs 1980 Harley Davidson Sportster XLH1000
Lord Gruntfuttock replied to Chris.QCR's topic in Two Wheels
Bonus of woodchips soaking up ironhead oil widdles... -
LG's British Seagull outboard
Lord Gruntfuttock replied to Lord Gruntfuttock's topic in Other Projects
A much better lunchtime experience. I put yesterday's failure down to grabbing an old can out of the shed and not agitating it enough / not testing spray pattern before applying. Same can went mint today anyway... And some bits arrived from Simply Seagulls yesterday, should be able to assemble it over the weekend...- 48 replies
-
- 5
-

-
- seagull
- two-stroke
- (and 5 more)
-
LG's British Seagull outboard
Lord Gruntfuttock replied to Lord Gruntfuttock's topic in Other Projects
Could live with that actually. If only I hadn't hit it with a scraper in fit of rage/frustration... It's only a small square block tbh so not a major to clean up again. Mainly the waste of paint that graunches my cogs... -
LG's British Seagull outboard
Lord Gruntfuttock replied to Lord Gruntfuttock's topic in Other Projects
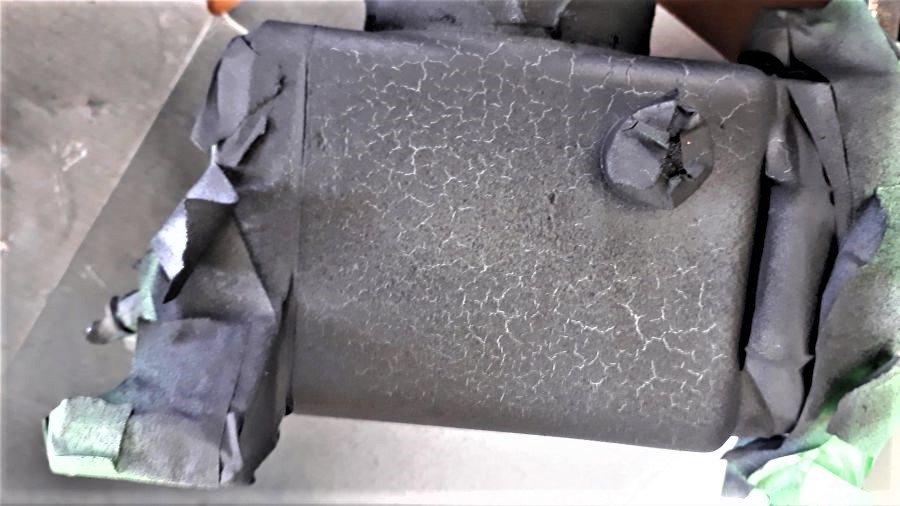
Here's the yuck...
- 48 replies
-
- 2
-
-
- seagull
- two-stroke
- (and 5 more)
-
LG's British Seagull outboard
Lord Gruntfuttock replied to Lord Gruntfuttock's topic in Other Projects
Aaaand fucked up the paint job. Rushed home at lunch and cos time pressured I either didn't shake can enough / was too cold (unlikely) / applied too heavy an application and got a lovely crazed affect I didn't want. (potentially cos Duplicolor paint on VHT primer?) Of course I tried painting over it with second coat to 'fix it' and it doubled down the crazing. So scraped it off and will sand back when dry enough and start again. Every time I try to take shortcuts it bites me and makes more work. You'd think a person would learn...- 48 replies
-
- 1
-

-
- seagull
- two-stroke
- (and 5 more)
-
LG's British Seagull outboard
Lord Gruntfuttock replied to Lord Gruntfuttock's topic in Other Projects
Wife gone out so back in the shed. Cleaned the engine block up but the paint pretty much fell off and was quite rusty under the grime... So 5 mins with a wire brush gave me this... and bombed it with some primer... Will paint it black if I find some suitable engine paint tomorrow...- 48 replies
-
- 7
-
-
- seagull
- two-stroke
- (and 5 more)
-
LG's British Seagull outboard
Lord Gruntfuttock replied to Lord Gruntfuttock's topic in Other Projects
Might dab a bit of 'direct to rust' satin black on the bits that need it... Did some things today. Stripped the Villiers carb, not too bad inside, a few previous bodges made it tricky to get apart, but they're a simple beast... And cleaned, lubed, reassembled and ready to go... And assembled the ignition too. Didn't feed the brown wire corrrectly but didn't notice till I checked old pics. Should run under the insulation plate in the points box, but soldered now so she'll be right. There's a new Villiers condenser under there too... And araldited a new felt pad to the sprung steel arm... Looks good, hope it works...- 48 replies
-
- 13
-
-
- seagull
- two-stroke
- (and 5 more)
-
Would you like some more bits...
-
LG's British Seagull outboard
Lord Gruntfuttock replied to Lord Gruntfuttock's topic in Other Projects
Cut small notches with Ali diamond dremel disc and seems to locate ok... And soldered a copper tab on for the HT contact. Snotted a bit of gasket paper underneath and it has a small dimple for the sprung HT lead contact... And finally separated gearbox cover, was really stuck on, and took some effort to get it off without fucking it. Many decades of oxidation holding it in place so big relief to get this apart... And been using the Stahlwille Whitworth spanner I picked up for 50c at a charity store. Knew it would come in handy one day... Then spent the rest of the morning tidying shit up and sorting bits in boxes. Ignition bits... Fuelly bits... And gearbox bits... So now just a case of cleaning and reassembling. Feel much more organised now...- 48 replies
-
- 10
-
-
- seagull
- two-stroke
- (and 5 more)
-
LG's British Seagull outboard
Lord Gruntfuttock replied to Lord Gruntfuttock's topic in Other Projects
So I should build a foil for my seagull powered dinghy then...? Here's a pole piece with M5 stud, doesn't look out of place... And the new coil arrived so I did a bit last night. It's a bit shorter so made up some spacers, used a 7/16" bolt to fill magnetic air gaps at end of rod, a tight fit so I tapped the hole to M4 so I could get them out if they got stuck.. and made a couple of plastic spacers as well, pic shows comparison to original coil... And how it looks in place (but upside down so I could see grub screws)... Problem now is the BA thread? [edit - not BA, standard 5/32"] grub screws only just touch the edge of the coil rod, and I broke one of them trying to tighten it enough to prevent the coil from turning. I'll probably tap out the grub screw thread to metric, and either screw the metal spacers to the new coil or file notches/flats in both pieces so they locate in the right position. Also have to make a brass/copper contact pad for the HT lead to connect to. Coming together though...- 48 replies
-
- 4
-
-
- seagull
- two-stroke
- (and 5 more)
-
Yeah I'm looking at adding a discreet hub motor to an old BSA/Raleigh type pushy. 250W appears about the same size as a dynohub so wouldn't look out of place, just not sure it's grunty enough. Will prob go 350W 36V front hub but may look a bit shit on the front (want to keep Sturmey Archer rear hub)...
-
Sweet. Details on front hub motor please... Thinking of buying one on Ali 11-11 sale in a few days.
-
It’s a Vanden Plas Princess 1100 my good man
Lord Gruntfuttock replied to Agent75's topic in Project Discussion
I actually really like this. Something about the luxury wood trim on a tiny base design tickles my fancy... And another NEGATIVE is that it will be a punishing Barry-magnet... -
LG's British Seagull outboard
Lord Gruntfuttock replied to Lord Gruntfuttock's topic in Other Projects
Decided to paint drive tube while weather was good. Sanded rough chrome with emery paper on the lathe, and cos I couldn't be bothered cleaning the gun, I brush painted it with Durepox, also on lathe. Lazy winning... And after a couple of coats it looks ok, both ends are in pretty good nick so left them chrome. Will see how it weathers...- 48 replies
-
- 11
-
-
- seagull
- two-stroke
- (and 5 more)
-
LG's British Seagull outboard
Lord Gruntfuttock replied to Lord Gruntfuttock's topic in Other Projects
Yeah eco friendly... One bit of online advice was to tickle the carb till you see rainbows on the water. That and the 10:1 oil smoke should make Greta very upset... Gave it a burst this morning. Was into it at 7:30 cos my carport gets glorious morning wood sun. Set up a chair to work in comfort... And gearbox goo, as expected. There is no seal so they run in an emulsion of gearbox oil and water... So nobody told me that damn near EVERY fastener shears off when working on seagulls... Although I got most gearbox screws out except this centre one. Resisted heat, spray and impact driver... So drilling the only option. Was a bastard to get straight as too tight to get drill in properly... And success. With this apart I discovered the water pump vanes were very worn... Same deal nearly everywhere. Not sure if i'll try to replace the buggered screws/bolts or tap out to metric. Is stainless a bad idea for galvanic reasons...? And the horribly dented exhaust tube received some very inexpert beating over a bit of old scaffold pipe... And came up surprisingly well with some scotchbrite and WD40... The driveshaft tube is pretty rusty however, will prob paint it. Enough for the day today though, will take stock and look at what bits I need/can make up to start putting things back together...- 48 replies
-
- 11
-
-
- seagull
- two-stroke
- (and 5 more)
-
Just sit right back and you'll hear a tale, a tale of a fateful trip That started from this tropic port, aboard this tiny ship... Bought an old Seagull outboard as it was local and I was inspired by @Abarth 's spectacular glitter flake blue model. I know nothing about these things, apart from old and two-stroke. That seems reason enough. Serial number denotes a 1957-58 Century model, nominally 4hp, and first thing I did was knock up a wooden stand so I could have a decent look and see what's missing (it turns over at least)... On getting it home I remembered I had an old dinghy behind the shed. This was a bad debt recovery job, and was covered in years of grime and tree trimmings. Dragged it out for a look and water blasted it. Seems ok actually, a Reflex Funfisher model, but needs rotten wood replaced and has some cracks in the glass from tree branches hitting it that need repaired... Back to engine, made up a pull start cord and heaving on it gave no spark, suspected a shorted primary lead looking at the tape on the wire, so popped the flywheel off by the official service sheet method of lifting the thing up and clouting it with a hammer. Sure nuff, the primary lead insulation was koozed, and the condensor had seen better days... unfortunately the coil had no reading on the secondary winding, so looked into options. There are all sort of Barry fixes, and some insist it is normal to have no continuity and they work alright when the HV jumps any gaps, but I'd rather have as much confidence as possible in a 60 yr old engine out on the water. Looked at replacing with a different type of coil altogether, but found another Villiers coil that should work, though it is a bit shorter and I'll have to make some spacers... Was a mission getting old coil out. Managed to get the screws out, with penetrant, heat, tapping, more heat and a proper screwdriver, but the studs resisted all methods using two nuts locked together, so instead of stripping the nuts I got them out with vice grips. They are probably usable again, but as they're a weird cycle thread/BA mix I just tapped out the pole pieces to M5 and will use stainless studs when I reassemble it... Currently waiting for bits, so might just clean things up a bit till they arrive...
- 48 replies
-
- 11
-
-
- seagull
- two-stroke
- (and 5 more)
-
Maybe a slight headlight adjustment too...
-
Can you stop making cool stuff while making me feel inadequate please...?
- 5 replies
-
- 11
-
-

-

-
Otago/Southland Meat discussion thread
Lord Gruntfuttock replied to TimShadboltfan27's topic in South Island Region
I'll be there 12'ish. Going out to check on the beach house we never use. I'm so rich... (would be much richer if stopped investing in shitty old cars/bikes/engines)...- 1055 replies
-
- 1
-
-
- meat raffle
- meat raffle
- (and 1 more)
-
Beautiful...
-
McLeans Island Swapmeet - 11-13 October - 2019
Lord Gruntfuttock replied to - i5oogt -'s topic in South Island Region
Can someone post pics of this event pls? Always wanted to check it out... -
Seconded. Just read thread and think I liked every post. Great to see each stage, very informative...
-
Interesting. Love me the durepox, but it is spendy...
-
Yeah think some o-rings produce it if burned too...
-
Enjoying the build thread. The whole 'accidentally bought a weird British thing now fixing it' is proper OS..
- 90 replies
-
- 10
-