ajg193
-
Posts
7,795 -
Joined
-
Last visited
-
Days Won
1
Everything posted by ajg193
-
Nek minnit, hot summer day and your legs get covered in molten hot glue Does it have any mounting tabs so you can affix it securely to your vehicle?
-
With the help of Jane we managed to add some more data points to the graph. Roads were kind of all over the place though so the data is still noisy. One day we should have enough data to make smooth graphs.

-
Just like anything old and electrical, if you touch it or look at it funny it will break. Best to just enjoy it while it works.
-
I wonder how many there are out there that haven't been certed for engine swaps, must be quite a few
-
Hyperblade's KP61 Racecar "KP61R" Discussion
ajg193 replied to Hyperblade's topic in Project Discussion
I've found in my car with an inverter powering a dash laptop I occasionally get a complete system lock up - requiring a restart of the laptop. Seems to be caused by random surges from the inverter. (I'm not using the original power supply on the laptop so the barrel plug kind of just flops around in the socket) Is your tablet just powered by USB? -
On the bright side you got your money's worth out of the expensive VTNZ WoF fee. And you got to drive your car.
-
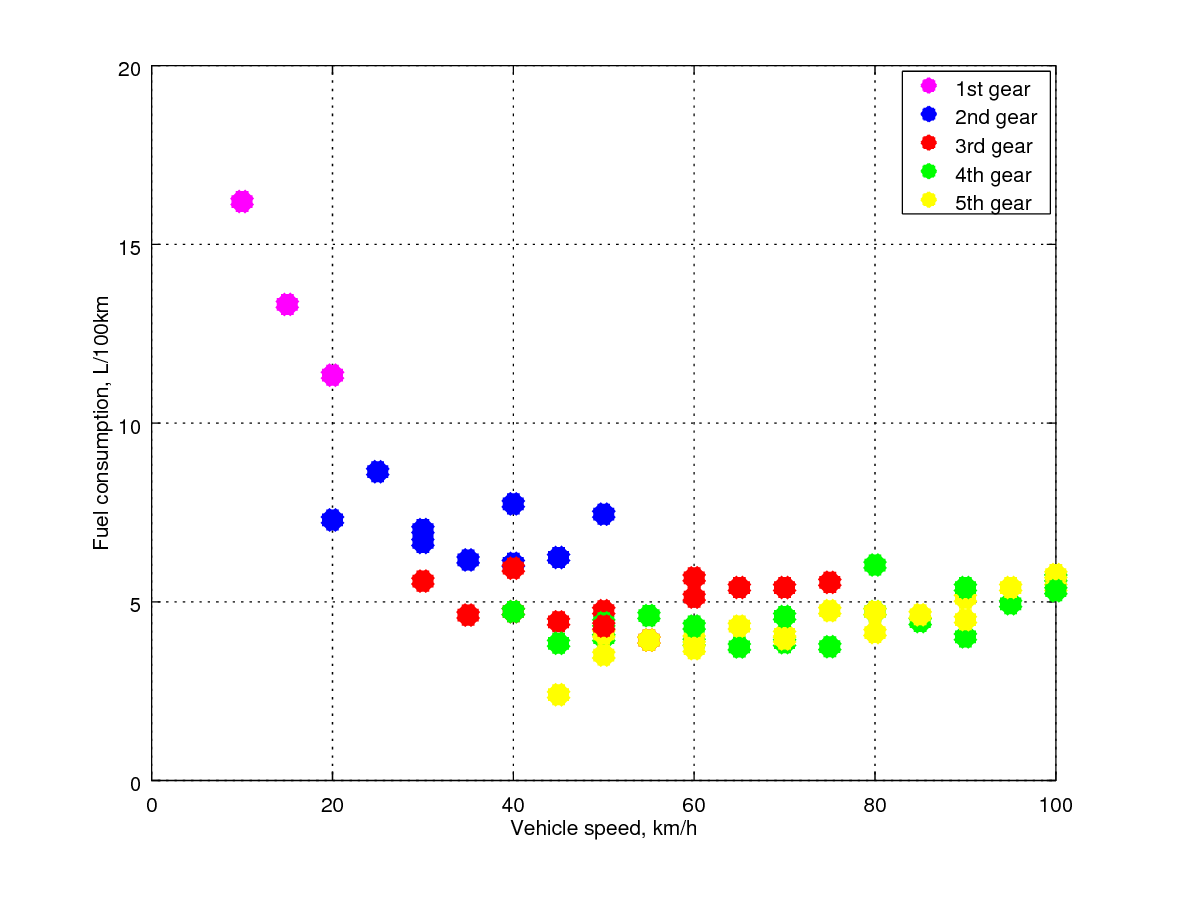
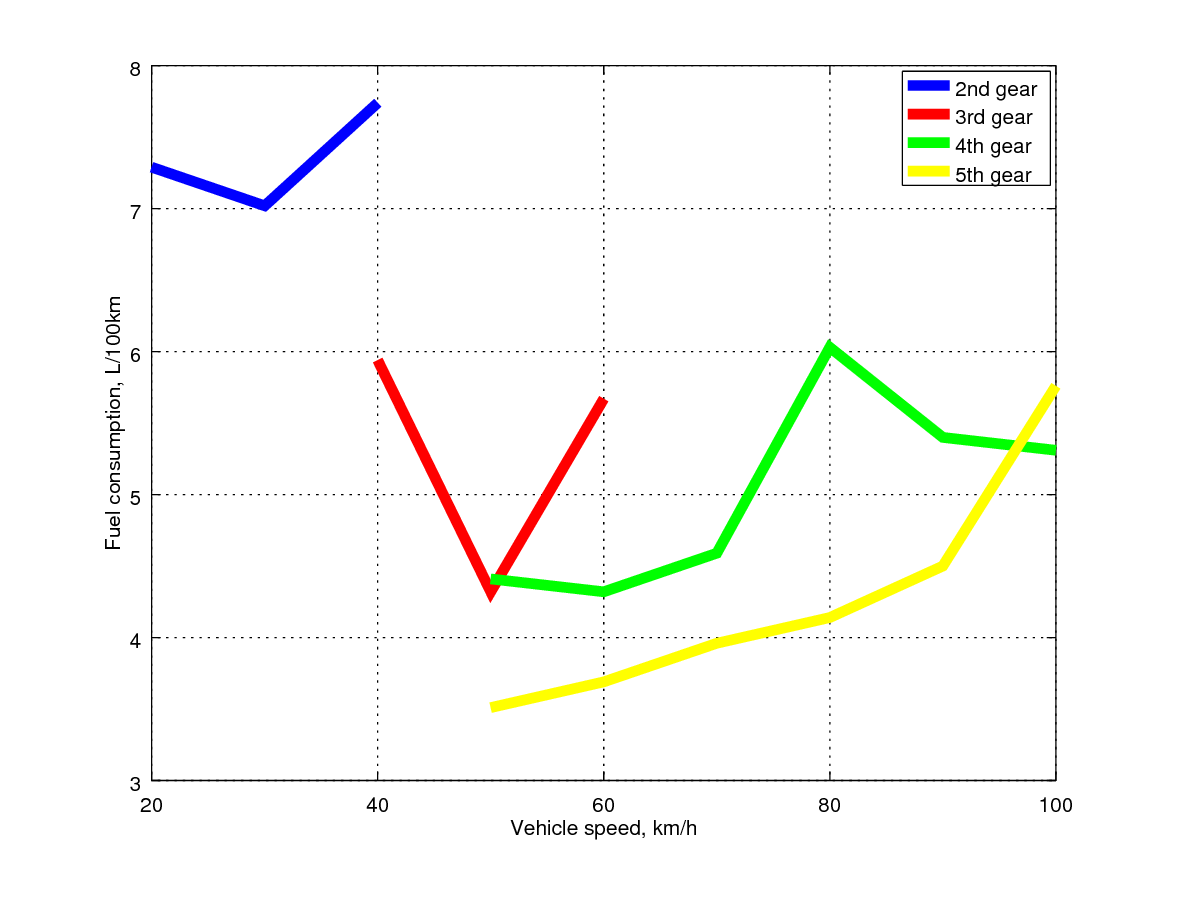
I did some fuel consumption calculations today. The MicroSquirt/TunerStudioMS seems to over estimate fuel consumption by about 10% - My belief is that this is due to my injector dead times being larger than estimated in the software. Then again, this could also be due to my data being collected from an ill-conditioned system as I only based these results off of about 35 km of driving. For the fuel consumption tests, I had the headlights on and held the car at a steady(ish) speed on a flat road to take the readings. For the fuel figures obtained for anything other than 5th gear, there was a fair bit of noise in the consumption signal as I had difficulty writing down the numbers while driving (a passenger would be useful next time). Also the samples were taken over a very short time period, with slight undulations in the road etc. For the 35 km trip, the computer estimated a fuel consumption of 2.26 L. The actual fuel consumption was 2.04 L. This gives a fuel consumption of about 5.9 L/100 km, which is very good considering I wasn't being nice to the car during this time. It's actually on par with the best result I ever had with the carburetor driving like a granny. Fuel consumption at 80 km/h in 5th gear is about 4.2 L/100 km. I think the 4th gear value is unreasonably high and I will have to take the reading again at some point. The same goes for the 100 km/h 4th gear result as earlier indications today suggested it was about 10% worse than in 5th gear. The values in the graph have been corrected by 10% to allow for computer error. Judging by these numbers, if I drive 70 km/h constantly (at sea level, without wind, in the dry) I should be able to make it to Auckland on a single tank of fuel. Conclusion: Car is great on fuel now, more testing is needed.
-
Out of interest, where did you take it and why did it need deregistration? Last I heard you can just stick your rego on hold if you temporarily export a car. You should be able to get it re registered at a VINZ/VTNZ and maybe AA station.
-
Not sure if it has been mentioned/tried, but what is the condition of your O2 sensor?
-
The guys at VTNZ were happy with the EFI system when I took it for a WoF this morning. The guy took a look at the engine, then the chassis tag, then the engine number and then scratched his head. He walked over to me and I was sure he was going to be grumpy but he just said "well done, it looks good. Good to see someone finally doing a tidy job of the wiring on a car." WoF obtained, now legal for another 6 months. I guess it's about time I put up a bit of a technical post with regards to the EFI conversion. The EFI system uses an original 4KE inlet manifold, injectors, regulator, runners, plenum, valve cover and throttle body. Most other bits were scrounged together from the internet: - TPS is from LS1 - IAT sensor is from LS1 - CLT sensor is from LS1 - MAP sensor is from a Mira - Fuel pump is Aeroflow "500 hp?" (smallest one I could find) - Air filter housing is from an EP9X Starlet - O2 sensor is Innovate LC-2 - Intake piping is 45 mm silicone hose, with a 63-45 reducer where it connects to the filter housing The ignition coil needed to be moved towards the brake booster in order to clear the EFI valve cover, looking at old brochures/documentation this appears to be the case with factory EFI Starlets also. In order to make the OEM injectors play happily with the MicroSquirt ECU I need to add some inline resistors as the injectors are low impedance (2.6 Ohm or there abouts). I ended up using 1x 10 Ohm 25 watt panel mount resistor per injector and these worked fine. I also have a stack of 8 Ohm and 4.7 Ohm resistors sitting around that I thought I would have to used if the 10 Ohm ones were too high resistance. The resistors are bolted to the panel that the ECU is mounted to. In order to make the ECU work reliably with a fuel only setup I need to replace the R20 resistor on the board with a higher power unit, so I used a 1000 Ohm, 0.5 watt resistor and this has been fine. A bead of silicone gasket goop was run around the inside of the ECU housing and the ECU was bolted to a plate which mounts directly to the existing bolts holding the radiator overflow bottle to the inner guard - the ECU is on the back side of the inner guard, above the plastic liner and seems to be in a fairly dry area that doesn't seem to have any moisture/dust issues so far. The loom runs through the existing hole in the inner guard that the indicator light wires went through. The loom is tied to existing mounting points along the chassis rail to keep it away from the exhaust manifold ( :/... long story there). The exhaust manifold for the carburetor setup has a huge hole in it for heating the bottom of the original intake manifold. This hole is now covered by a 6 mm thick aluminium plate which has been shaped to allow the intake manifold and runners to clear (well actually sit on). There were sections of the intake manifold which needed to be ground down in order to fit the manifold with the plate on the exhaust manifold but there is still enough thickness remaining that cracking shouldn't be an issue. The O2 sensor is placed in the exhaust system at the final collector, at an angle of about 35 degrees from the horizontal and has quick response. For the fuel line setup, I just put a brass T into the line at the tank, with one branch going to the old feed line (4.5 mm now return), one branch going to the fuel pump (8 mm) and the remaining branch going to the tank (5.5 mm hole). The high pressure fuel line from the pump is just a soft line, following the existing fuel line and using the existing brackets where possible (from OEM there is space for extra lines). I run the power feed lines to the pump alongside the fuel lines. The fuel pump is mounted to the chassis using an Integra fuel pump bracket and a piece of angle iron. The Integra bracket has a rubber isolation mount where the pump goes into it so there isn't too much vibration - the pump is still quite loud though so I might cover it with some silicone hose to try and damp the sounds. The pump bracket mounts between the tow bar and chassis using the original fuel tank strap. There is currently no baffling in the tank, I may look into it in the future - but I haven't had any issues yet in the 1,000+ km I have driven it. The fuel filter is a Ryco Z200 unit and fits perfectly into the original fuel filter mount in the engine bay and has barbed fittings on each end so it was simple to install. The fuel pump is running through a 20 Amp fuse, all of the injectors are running through a single 5 Amp fuse, the O2 sensor is running through a 5 Amp fuse, the ECU is also running through a 5 Amp fuse. The factory idle speed control valve seems to be a bit out of specification and doesn't open up far enough when cold - which required using foot throttle to keep it idling for the first 10 seconds or so. I bypassed the idle valve by using a heater control valve connected to the choke cable - giving easy manual control of the idle / cruise control. One day I will look into either modifying the factory valve to get more flow when cold or I will install an electrically controlled unit ($$). But for now I am happy using the choke cable when cold. I needed to make up some support braces for the intake plenum and air filter housing. The brace for the air filter housing connects to the alternator bracket, the exhaust manifold and two points on the filter housing. The two braces for the intake plenum are just simple flat bar which has been bent to shape and connect the plenum to the engine block at the OEM locations. At first I only had a brace on the front of the plenum to the engine block but there was a horrid vibration at around 4,000 - 4,200 rpm. Adding the second brace fixed this vibration. I was initially having issues with the IAT sensor heat soaking and leaning out the idle, causing the car to stall. This was fixed by changing the settings in the ECU so it completely ignores IAT at idle just uses the coolant temperature as estimated inlet temperature. All in all, the only hole that needed to be drilled in the car was for the O2 sensor to go into the exhaust, other than that everything was OE Toyota or fabricated to fit with the original holes and mounting locations. The engine definitely has more power now compared to with the carburetor, with a lot more torque around the 3000 rpm area. The engine also runs much smoother and is much more responsive to throttle inputs - no more slight stuttering during rapid transitions. The engine does seem to be a bit easier to stall though, but I'm sure this is just something to do with the VE map not being very well tuned in the <800 rpm region. The Auto Tune feature of TunerStudioMS is an absolute champ, all you have to do is define a target AFR table and let it do its thing (as well as setting up some sensible filters). Auto tuning makes it really easy to fiddle with settings such as IAT control or your actual physical setup. Two to three minutes of driving and it has pretty well returned the tune to near perfect, a feature definitely worth the money. I'd also recommend getting an inverter or something so that you can power your tuning laptop for more than an hour or two while driving. I'd be interested to throw it onto a dyno at some point to see exactly what it is putting to the ground. Does anyone know of someone with a cheap to use dyno around Christchurch? (Only really need to do one run). One of the next jobs on the car will be to look into getting the radiator recored as the fins on this one are starting to rot off and I don't really want to risk cooking the engine. I'll also look into getting the last of the rust dealt with at some point (little spot under the hatch window seal). I may throw some pretty graphs of the VE tables and other logs up tonight when I get home.
- 90 replies
-
- 12
-

-
It should be fine. Those settings are all controlled by a simple dialog box asking what stroke and how many cylinders your engine has.
-
Any more info RE Swapmeet?
-
A logic level MOSFET is your friend. If you're switching inductive loads, make sure to put a diode in parallel with the load.
-
They say that they have it on file that it has a modified fuel system and that it won't affect my premiums. /Insurance companies are known to be bastards.
-
Just signed up there now, waiting for approval. I don't really want to ask all over the place as I will probably end up just coming across as a wingeing bastard trying to skirt the law. TBH a cert is most likely the best thing to do.
-
Yeah, I've read over what is on there and I haven't found something that explicitly states for EFI conversions. Seeing as it isn't specified in the document that must mean it is required to be certed. " LVV Certification is always required for any engine or drive - train - related modifica tions unless specified below : (if modification does not appear below, always refer to LVV Certifier"
-
That's pretty much the same info I got from the VIRMs. The only hole drilled in the car was on the exhaust for the O2 sensor and I don't really class the exhaust as a structural member of the car (although I do occasionally use it to drag myself around while under the car). Soft line for the high pressure fuel line is acceptable for general cert, isn't it? I'm just running it through the OEM brackets where they are available and through P clips mounted to the existing P clips holding the original line in place where needed. I haven't actually checked if the clips are spaced less than 350 mm (this is the requirement, isn't it?) apart but I'm fairly certain they are within that limit. I have no issue with taking it for a cert if I have to, but if I don't technically have to then I would rather save the money. Does anyone know where the exact law is that states that it would need a cert? I wouldn't mind a bit of light/mid/heavy reading. I'll probably book the car in tomorrow afternoon for next week.
-
@cletus Cert for conversion to EFI, is it absolutely necessary? No holes drilled in chassis or whatnot, retaining original tank. Original engine. Power increase should theoretically* be within the 20% threshold (JDM KP with 78 hp vs NZDM KP with 66 hp (increase of 18%) VTNZ reckons they would give me a WoF without a cert. Insurance company is happy as-is. Cert man Don Hoff reckons it needs a cert, $495. I haven't really got any issue with this, it just puts a bit of a dent in the wallet. The engine bay isn't exceedingly packed tightly with stuff, but there isn't much space for a drill to get in for putting a cert plate in, is it fine to get the cert plate put under the carpet in the boot (plates are ugly, etc)? Thanks *Bum dyno says it is more than 20% though
-
I shall be in attendance, assuming nothing breaks.
-
Day after tomorrow
-
Yoeddynz and Hannah's HB Viva Wagon Discussion
ajg193 replied to Willdat?'s topic in Project Discussion
You know it's a proper oldschool Barry engine when the valves have been given the Makita one way -
Brawr's 1984 KP61 Toyota Starlet Sprint - Discussion
ajg193 replied to DAD's topic in Project Discussion
What's the cost to get the car to/registered in England? -
89420-97201 One of these, everything is the same except 4840 instead of 4841 I think I set something along the lines of 180 kPa @ 5.00 V and 10 kPa at 0.00 V (standard lower limit) to get 100 kPa at sea level on a 100 kPa day. It's off a little Charade or something, I didn't actually pay enough attention to the car I pulled it off.
-
From broke to having brokers, my price Range is Rover
ajg193 replied to UTERUS's topic in Other Projects
Tang? -
Turns out in the excitement of getting the engine running I forgot to secure the loom out of the way of things. It contacted exhaust manifold and melted through an injector ground wire, locking injectors 1 and 2 full open. I've now fixed up the loom and tidied some stuff up, securing the loom properly. I pulled the head off the engine yesterday to make sure the flooding and fuel diluted oil didn't damage any cylinders (long story behind that choice). It all looks good in there so I'll throw a new gasket/oil/filter in on Tuesday and should hopefully be away laughing. I'm also going to install a fuel pressure gauge, even if only temporary I also put on a more durable MAP sensor. I calibrated the upper end of the readings to give atmospheric, but still need to see about calibrating the low end. It's a denso unit and I haven't found any data sheet for it.