

63Ragtop
-
Posts
17,953 -
Joined
-
Last visited
-
Days Won
93
Everything posted by 63Ragtop
-
So any thoughts on the speed holes idea? I'm a bit worried about rain getting in? maybe set the number plate like this? I've spent age's trying to get the engine lid sitting better, not 100% yet but much better, the gap under the vents use to be huge, you could see the top lip that is ment to tuck under the body, alot of bending, tweaking and test fitting. Welded up the 1300 badge holes all smoothed out now Still trying to suss out what to do about the hinges? both pretty hammered! I separated the inner panel from the scrap on the other lid I had. but so far I'm to chicken to cut into my lid. these hinges are in much better nick. my options are, a; grind down the shitty old welds and hope there is enough metal to hold everything together. b; cut just the hinge area and let it into my inner panel c; or undo all the spot welds and replace the whole inner panel. what would brain boitano do?
-
Yep nice rims, paint a 01 on the doors and a redneck flag on the roof, done.
-
Dremels are also handy fucking things for getting into small space's. tailgate looks a millions times better! well done.
-
not much of a update today guys, mocked up the rear end again just to make sure. the friggin bumper is still a little to low to get the rubbers on(hu hu) but at least it's flat/even. I did find another great use for the dremel try starting a drill right on the edge like this with a huge powerdrill. And started planning some extra air/speed holes! if you look at the top pic, the plan is to space out the number plate. Would like to weld in some later/kab style vents also.
-
yeah man to funny! tidy ride bro will look sweet layed out.
-
rat rat rat ratt awesome, when's it on the road?
-
So I did some awesome parenting yesterday, little girl=massive nap, little boy=DVD/Xbox LOL resulting in this another small milestone.
-
nah, they are staying, the horn sits behind the right hand one, don't want to take to much off o it will start looking like this
-
So most people wouldn't sweat about small details like this, but we an't most people now are we? did some photochopping to keep the motorvation up, as the hood I got doesn't have the crest and the oval fenders don't have holes on top been thinking about a very mild custom/shaved angle, as i already have the dreaded one piece windows. at the mo, no aerial no knuckle guards o the handles no fender top lights yes, now we are talking!
-
That sucks man, my first car ended like this, I didn't cry, was Hulk angry!!RAGE!!
-
Very excited as last night, I tacked in the engine trays on both sides! Both bumper mounts are fully welded and smoothed out on the weekend. Will post some pics soon, feels great to have it back in one piece, the dremal will be very handy for getting into these tight corners once the trays are welded, such a awesome little tool, BIG thank you to my brotherinlaw Rob who I nicked it off, chur! Pics of burnt melted metal from the welding side good penetration(snigger) both trays in check out my fast and furious rear wing, neon baby! plug plug plug plug inside everything seems to be in the right place
-
nice work bro, that is one sweet patch work quilt. one of my best mates owns one of these with a Sti V WRX engine/box, brakes etc. very cool.
-
I thought you where going to die in the last one, didn't realize you where drifting/thought you'd just lost it! HAHA
-
That looks awesome, the new rims suit the colour of the car!
-
Been doing lots of mocking up There is alot going on back here when you think about it, fenders need to fit right, the valance needs to fit right, the bumper mount need to fit the inner fenders right and be in the right place so the bumper irons go thru the fenders in the right place, aaarrrrrrgghhhhh! Anyway! I harvested these from the rusty baja I chopped up bought one of these at supercheap for $14 drilled the valance and the inner fenders to match the fender holes welded the little suckers on also spent a couple hours with the grinder and wire wheel getting ready to weld the bumper mounts and engine tray things back on soon this thing helps getting into the corners of the engine bay as cheap insurance I stuck a bit of weld on the inside of the bumper mount nuts, then painted with super etch the rest with the weld thru stuff nice to be putting things back on the painful thing is having to drill heaps of holes in my lovely handmade panels so I can plug weld the mounts back on, oh well.
-
you so crazy! i like it!
-
Cheers boys, it's like anything though, practice, practice... Prolly looks better in the pics than real life, it's not 100% perfect, a bit of bog will be needed, still better than half a kg of lead in the bottom of the engine lid, always wondered why the spring wasn't strong enough to keep the lid open.
-
Suggestions, theories, comments or queries //oldschool.co.nz/index.php?/topic/33947-63ragtops-63ragtop/page__hl__ragtop
-
So in the above pic you can see the start of the repair panel I thought I'd have a crack at making This is actually the second attempt to make this piece, the first one I just kind of free styled it, which is why it failed, I had to take a much more measured approach. so after much fuckingabout.... it might actually be getting close. And the newest addition to my high tech arsenal of metal working tools, behold! I made this out of a old post so i could make a start on the outside of the lid, chop chop choppity chop check out the rust holes! fitting up the patch tacked up didn't notice that the lids shape had relaxed after I'd cut a hole in it, about 5mm's of wonk nailed the second one better the under side, many little cuts to get the metal to fold under. the outside all ground down and primed with the lip all smoothed out not bad!
-
Been meaning to update this for age's, not that I've done heaps, just keep chipping away. everything still seems to fit Started on the engine lid and found it's full of lead! oldschool right there! removed the inner panel 50 years of crud found some factory paint this is lead also, and crud fixed up the engine bay side trays and the engine bay corners all that was left after removing the lead and rust
-
THIS is awsome. fucking well done that man! love the beer/40oz holder.
-

sheepers MS51 of hyperbolic enlightenment and anomalies
63Ragtop replied to QCADTA's topic in Project Discussion
choice car bro, looks the shit all layed out on it ass, you do some cool stuff. Look after that hand! -
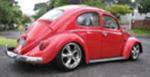
Looks so right with the 5's and thin whitewalls, good job!
-
haha, I like the broom in the last pic!
-
Sweet wagon, can't believe a car that size came with drum brakes! good upgrade.

