Evan
-
Posts
4,153 -
Joined
-
Last visited
Content Type
Forums
Downloads
Events
Gallery
Everything posted by Evan
-
Nah didn't leave it that long, will try overnight.
-
Anyone know of a solvent that strips epoxy primer off/out of a gun? I got a bit lazy on my last couple of clean outs and have a bit caked in/on the thing. have tried Acetone/MEK/generic gunwash which got the thinner stuff off but not the thicker areas.
-
Iwata AZ3, got mine via Blackwoods which was cheapest source of them I could find https://nzsafetyblackwoods.co.nz/en/iwata-az3-hte2-gravity-spray-gun-600ml-pot-1-8mm-each-02976657
-
Marquip 16
-
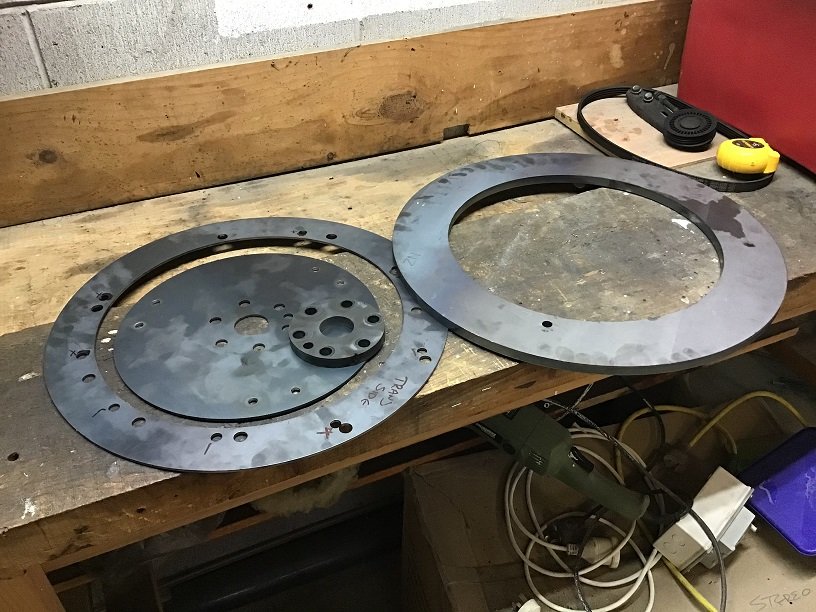
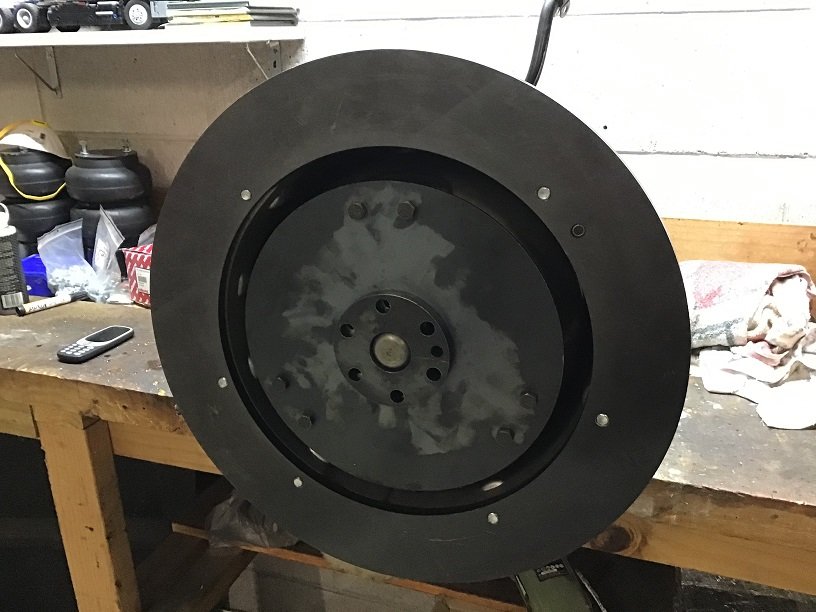
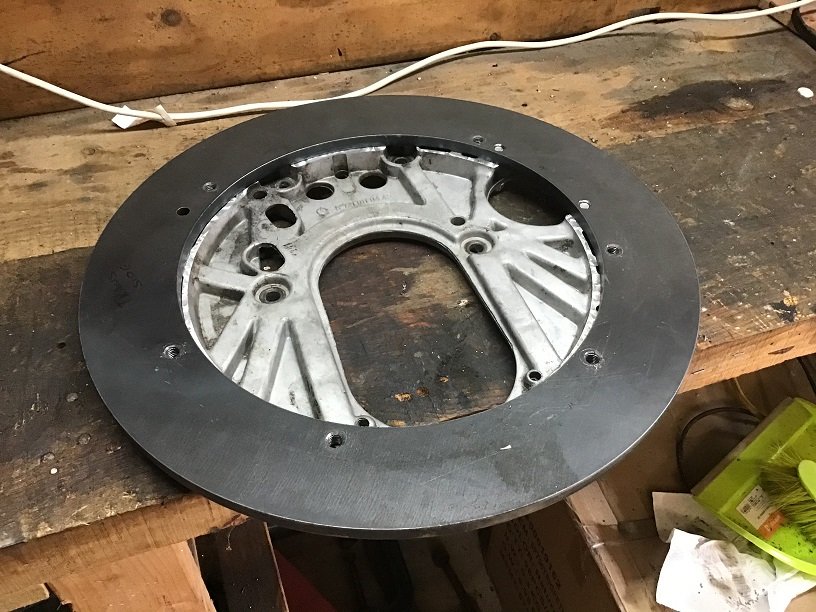
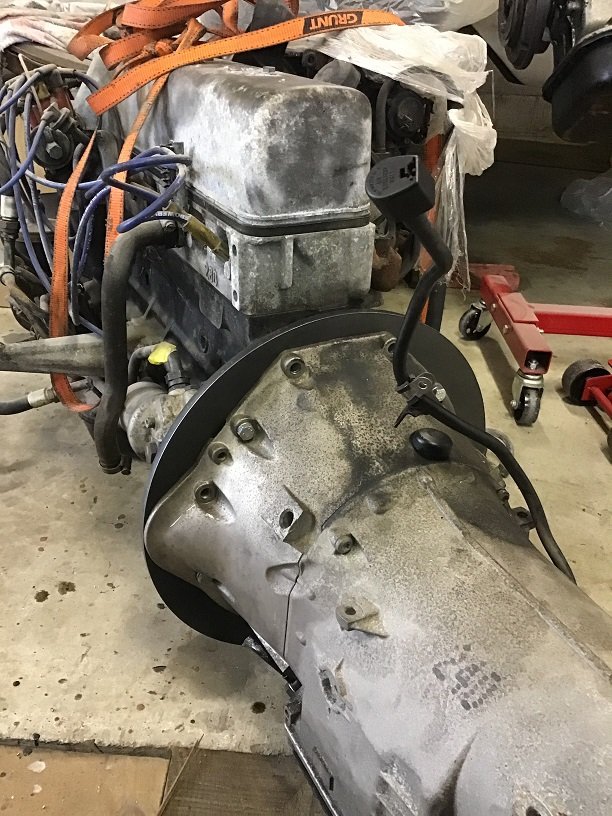
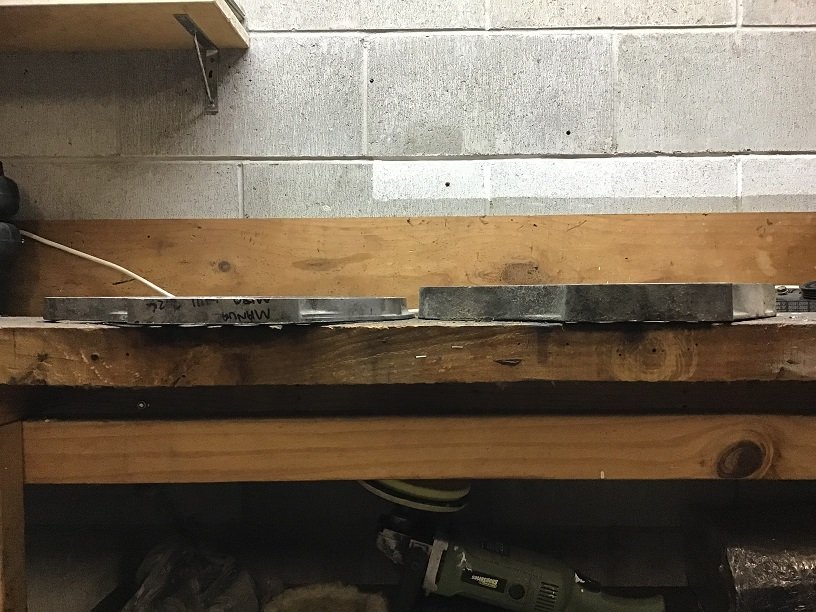
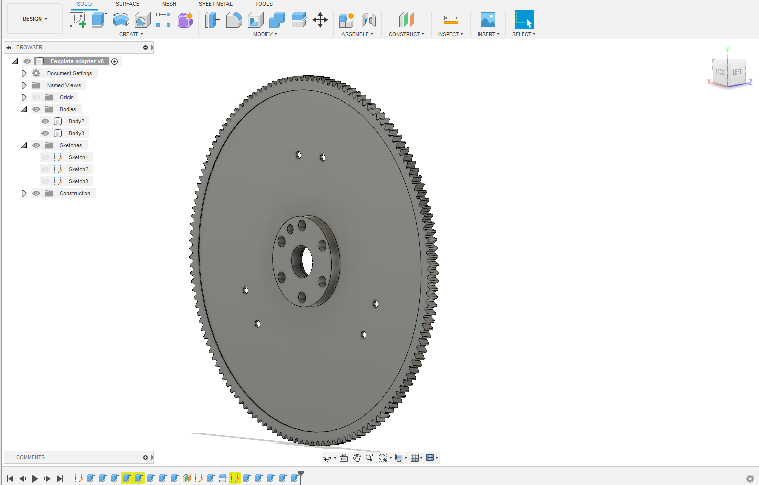
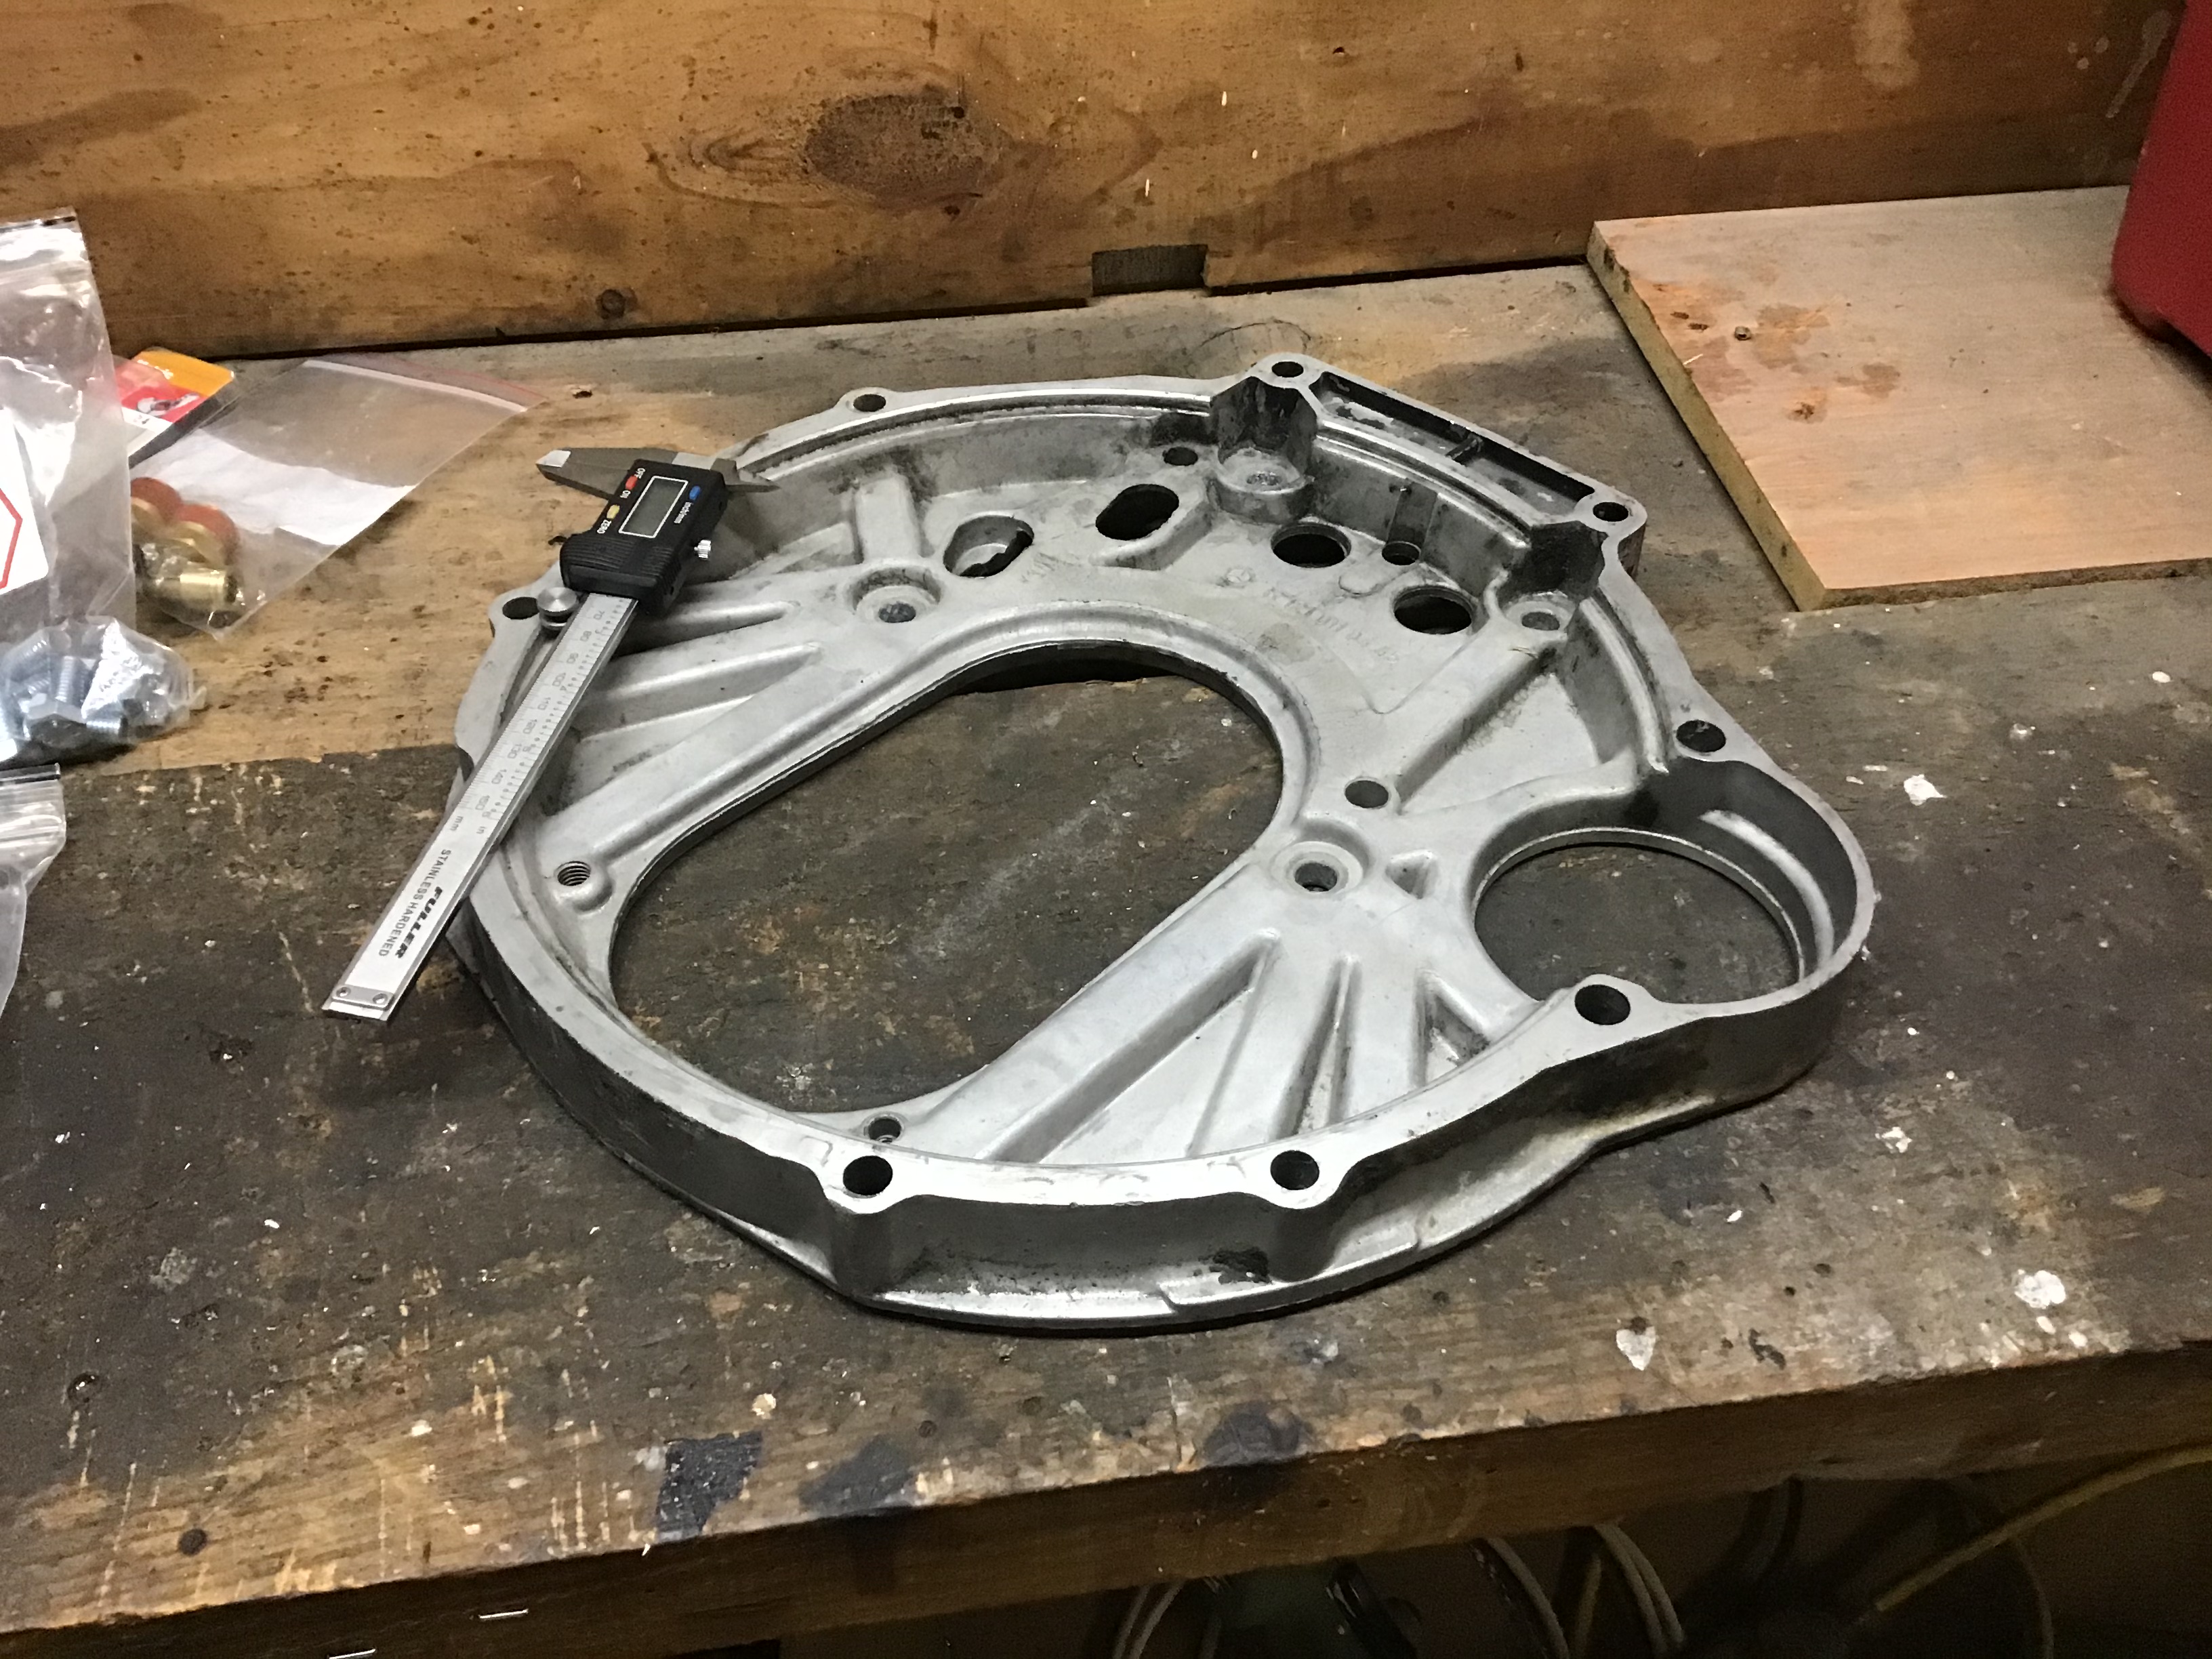
Trans adapter time. As mentioned earlier the 722.6 doesn't bolt up to a M180/M127/M129/M130 engine even through the bolt patterns look very similar (with the inline engine version of a 722.6 bellhousing at least). So I had a conundrum on how to go about this, taking into consideration things like starter location, ring gear location, keeping things concentric, making sure the torque convertor is seated once its all together etc. There's several things that ended up providing the answer for me. Firstly the starter; On the M130 the starter is on the right hand side of the engine, the factory sandwich plate that sits between the engine and gearbox has a provision for the starter. however on the 722.6 trans the starter clearance bulge is on the the left hand side. So which side of the motor do you want your starter? if you scroll up a post of two you'll see the oil filter housing sits on the left hand side of the motor, right where the starter would be, so you can't make use of the 722.6s starter mount. In which case you're now using the engines OG starter, which means you'll want to keep the ring gear in the original location... So I yoinked the manual trans off that engine and too some measurements and drew some circles in Fusion360 Then realized I'd mucked up the overall diameter of the thing, luckily this was prior to sending away files to the laser cutters. Sent some files off and they sent back some lumps of metal Have a 12mm spacer for the end of the crank, and a 3mm thick flexplate, plan is to scavenge one of the ring gears off the manual flywheels I have and weld that to the flexplate. I spent a rainy Sunday attempting to measure the bolt pattern for both the engine and the trans and had a test piece cut out of 3mm plate at the same time (the disc on the left) if my measurements were right I was going to get a thicker one cut and run that but you can see from the ticks and crosses on it only about a 1/3 of the holes lined up. Ended up getting a 12mm thick piece laser cut (the disc on the right) that utilized one of the factory dowel pins on the trans, that was to be my starting point. clamped precariously in place, the OD was large enough to blank off the now unneeded starter bulge on the left hand side Went around and marked out the holes I'd be using that didn't clash with any of the holes I would need on the sandwich plate, tapped one of them using the shitty tap set I had before buying a Volkel tap set based on someone on heres recommendation, holy moley did that improve my outlook on life. Whoever made that recommendation deserves an ice cream. Ended up here: Jealous of my phone? Whilst doing that the torque convertor was sitting on the bench next to the trans, at some point I moved the trans and knocked the converter onto the floor which caused a drama for later on but we won't talk about that. Did some maths at this point. Decided if I wanted to run a 12mm thick adapter plate I'd need to reduce the thickness of the sandwich plate by ~11mm, a buddy came through and was able to do that for me, I have a spare plate if this doesn't work out, comparing the two post surgery: That's the relatively easy side done, next step was to join that to the engine whilst keeping the trans concentric to the crank (well as much as I could anyway). There's a small win here in that the OD of the pilot on the torque convertor is the same as the ID on the end of that crank where the pilot bearing would normally go for the original manual trans (35mm). I carried this measurement over to the ID of the crank spacer so the Torque convertor could locate on it, the spacer picks up the OG dowel pin on the end of the crank so based on that assumption of it being a straight line I bolted the spacer up to the crank and slid the trans up to it, docking the torque convertor pilot in the hole. Took a brave pill and wiggled it so the trans looked straight up and down against the engine, rather than tipped to one side, and marked out the two holes for the starter then drilled and tapped those. Bolted everything back together, so far everything is lining up. took the trans off, leaving the adapter bolted to the sandwich plate on the engine, removed these two as one: Was then able to flip it over, mark out some holes and drill and tap those. Then the moment of truth, putting it all together... Booyah! that shit is attached. Had to do a bit of fettling but was bugger all. I need to change the blade on my vertical bandsaw so I can trim the excess off the OD of the adapter. Current issue is that its too tight between the flexplate and the converter, they rotate as one without being bolted together. We didn't get exactly 11mm off the plate when we machined it down, it ended up being about 11.2mm which I think is part of where the problem is, it's bringing the trans and engine too close together, in hindsight I probably should have aimed for 10mm. I think to get around this I might skim a bit off the end of the converter so it can sit further inside the bellhousing when seated, but I'm not sure how much clearance the input shaft of the trans should have inside the converter before it bottoms out, surely 1mm less isn't the end of the world? Anyone got any insight?

- 26 replies
-
- 23
-

-

-
Here: https://mercedes-lager.de/shop/Mercedes-DB-190-C-110010_33 original part numbers are 1106370135 and 1106370235 Niemoeller (who I got some other panels through) also list them although slightly more expensive https://www.niemoeller.de/en/w111/w111-014-mercedes-benz-220seb/B014/630101/d63012-side-member-bottom-left-repro if you have a google you’ll find them listed in various places, I would say they’re all getting them from the same manufacturer, the first link was the cheapest I found at the time.
-
When you turn the boost up you really want to be changing the impeller too though right?
-
Make sure you get the matching Caterpillar/Cummins/Volvo banner for across the top of the windscreen.
-
It’s currently with someone Greg knows, so long as they come through we should be sweet as.
-
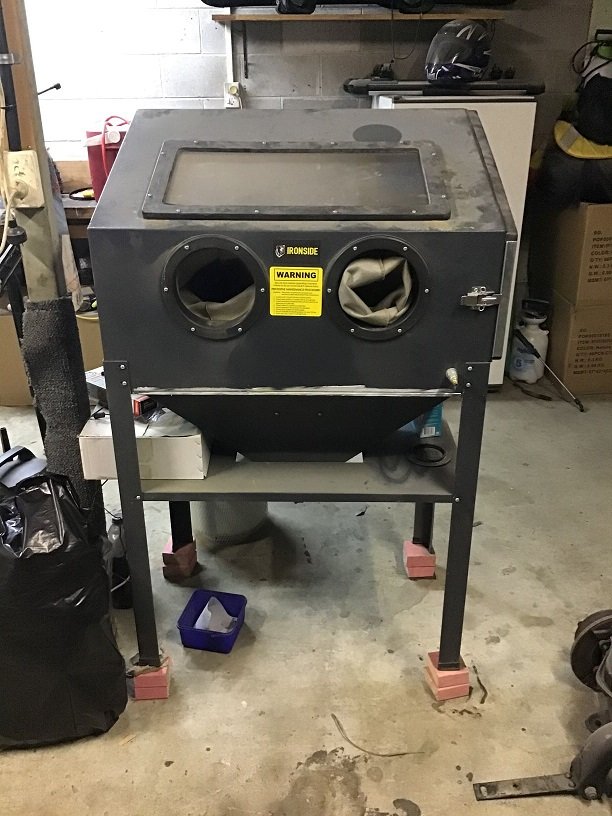
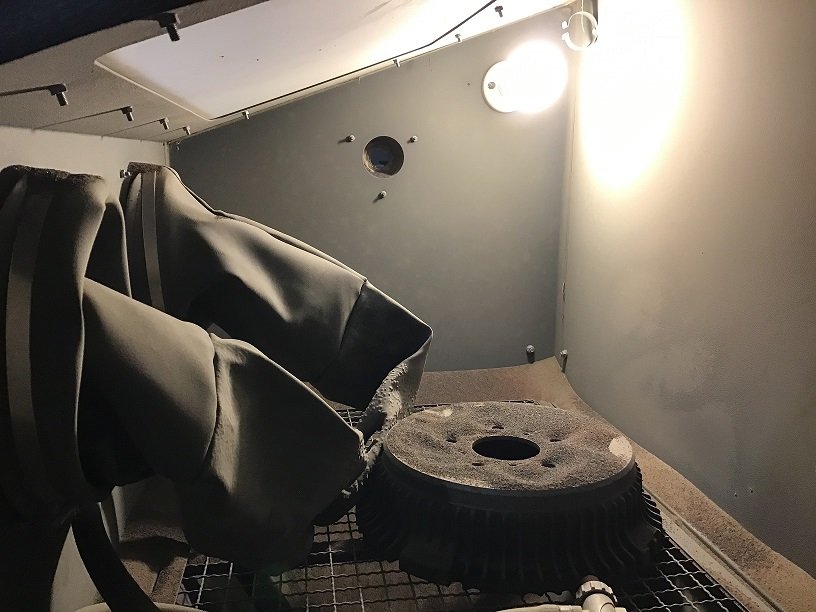
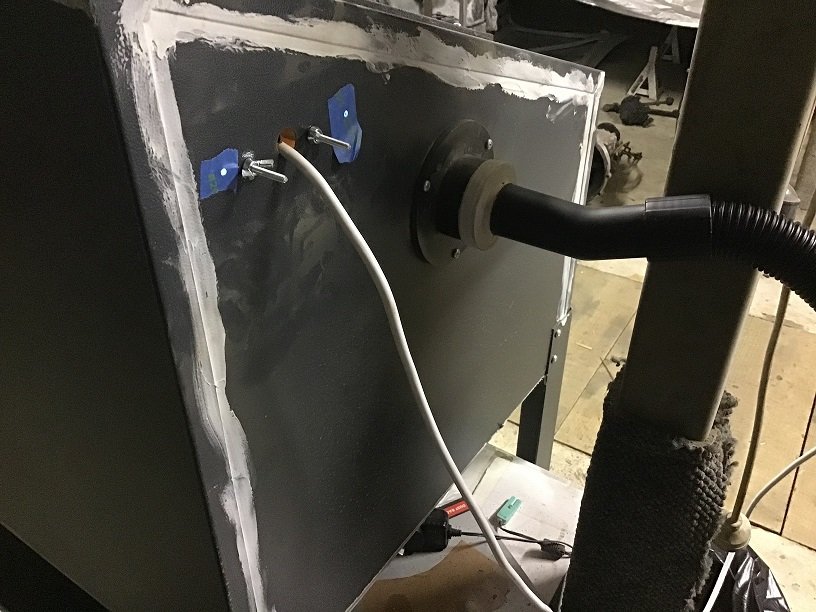
I'm pretty far down the barry-modifing-his-blasting-cabinet rabbit hole. I've got one of these 220L freestanding Topmaq units. The legs are precisely 2x 45mm pieces of framing timber to short for it to be comfortable standing in front of for long periods of time. As everyone knows the lights in these things are terrible, my one died shortly after purchase so I ummed and ahhed about what the best (cheapest) solution was going to be while giving me the ability to replace the light (cheaply) when it dies again. Ended up buying the cheapest bayonnet light bulb socket from Mitre 10 along with the cheapest extension lead they have, cut the end off the lead and wired it to the socket, mounted that in the box. now when the bulb gives up I just throw another $4 bulb at it. (hasn't died yet and works A+) Ran it without a Vacuum for awhile until I couldn't live with the misery any longer so went and bought the cheapest 20L Ozito one from Bunnings, expecting it to burn out immediately but it hasn't quit yet. make sure you run your vac with a bag in it, means you don' t block up the filter and you don' t have to use one of those separate dust extractor arrangements. Did a quick 3D print of an adapter to attach vac hose, also seam sealed the outside of the cabinet. Its all very ugly but the only place I get noticeable leakage now is the door seal (which I've doubled up the seal on). I've also had the issue with water getting through the water trap and plugging up the gun. To sort this I've now got a 10m long hose (red one in the pic) coming out of the compressor and going into a chilly bin full of water before exiting and into a couple water traps, I've got a bunch of ice cream containers filled with water in the freezer so whenever I do some blasting/painting I drop a 2kg block of ice in the chilly bin, this cools the hot air going through the red hose straight out of the compressor so any moisture condenses before it runs through the 2 water traps (one Aliexpress one, one Toolshed one). that way the water traps are able to do their job. Have also cut the pickup in the bottom of the tank on an angle so it picks up media better. Now the window eventually goes frosty from all the shit flying around hitting it. I'm not sure what other units have but these ones have a 5mm thick sheet of glass with a 1mm sheet of plastic (Acrylic?) over top, so a total thickness of 6mm. My screen ended up to the point it was like trying to peak through a frosted bathroom window. Again I wanted a cheap solution that was repeatable in future when it frosts up again, I didn't want to muck around with a glass just due to hassle of getting sheets in the correct size, so another trip to mitre 10 netted me a 1200x600 sheet of 3mm thick clear acrylic. cut this into 4x 600x300 sheets and doubled them up to get the original 6mm thickness whilst have 2 spare sheets, next time it frosts up (hasn't yet) I'll throw the inner sheet away and install a new one. /Barry out, for now.
- 41 replies
-
- 23
-
-
-
Looking forward to this making an appearance in Titan Tuesday’s
-
Anyone in the Te Awamutu/Hamilton area got a mill and able to reduce the thickness of this by 11mm for me? Can pay in peanut slabs/ice creams etc. Evan.
-
I think that last line is a bit misleading, I’m reading it as they’ve removed the other 3 wheels at a cost of $42.50 ea (totalling $127.50 of the $236) balanced all four wheels ($10ea?) then done an alignment which would be the $80 or whatever remainder. but just ask them to clarify
-
Popup headlight conversion pls.
-
Now that you’ve sorted the cooling thing can you now fit a PTO so you can run a mower/log splitter/saw mill/wood chipper.
-
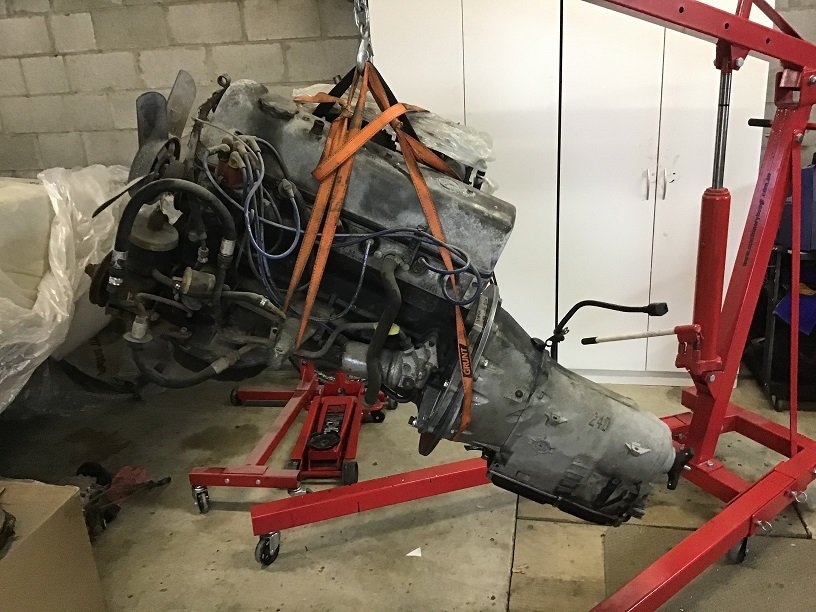
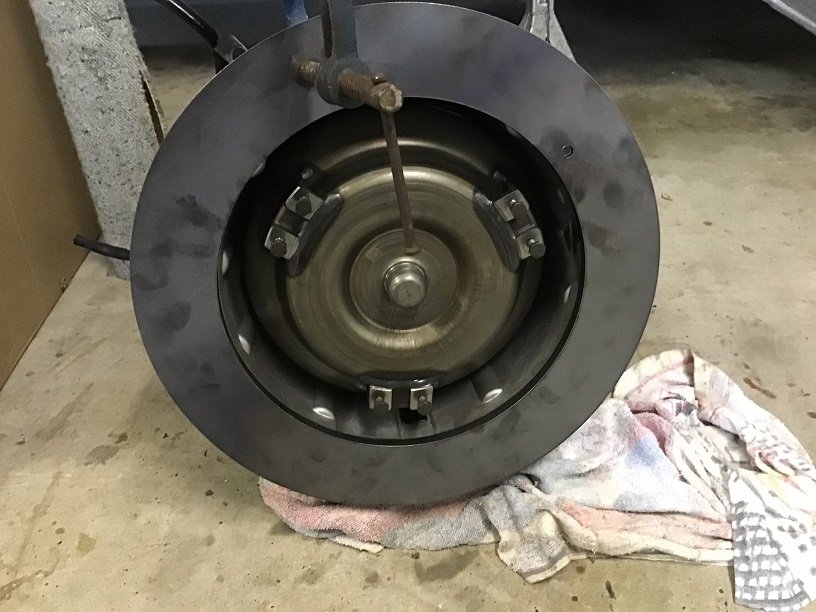
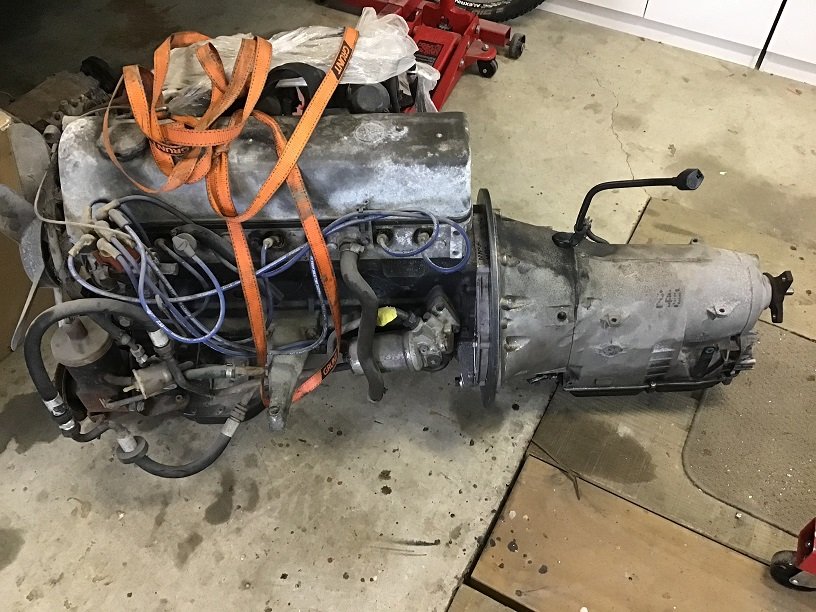
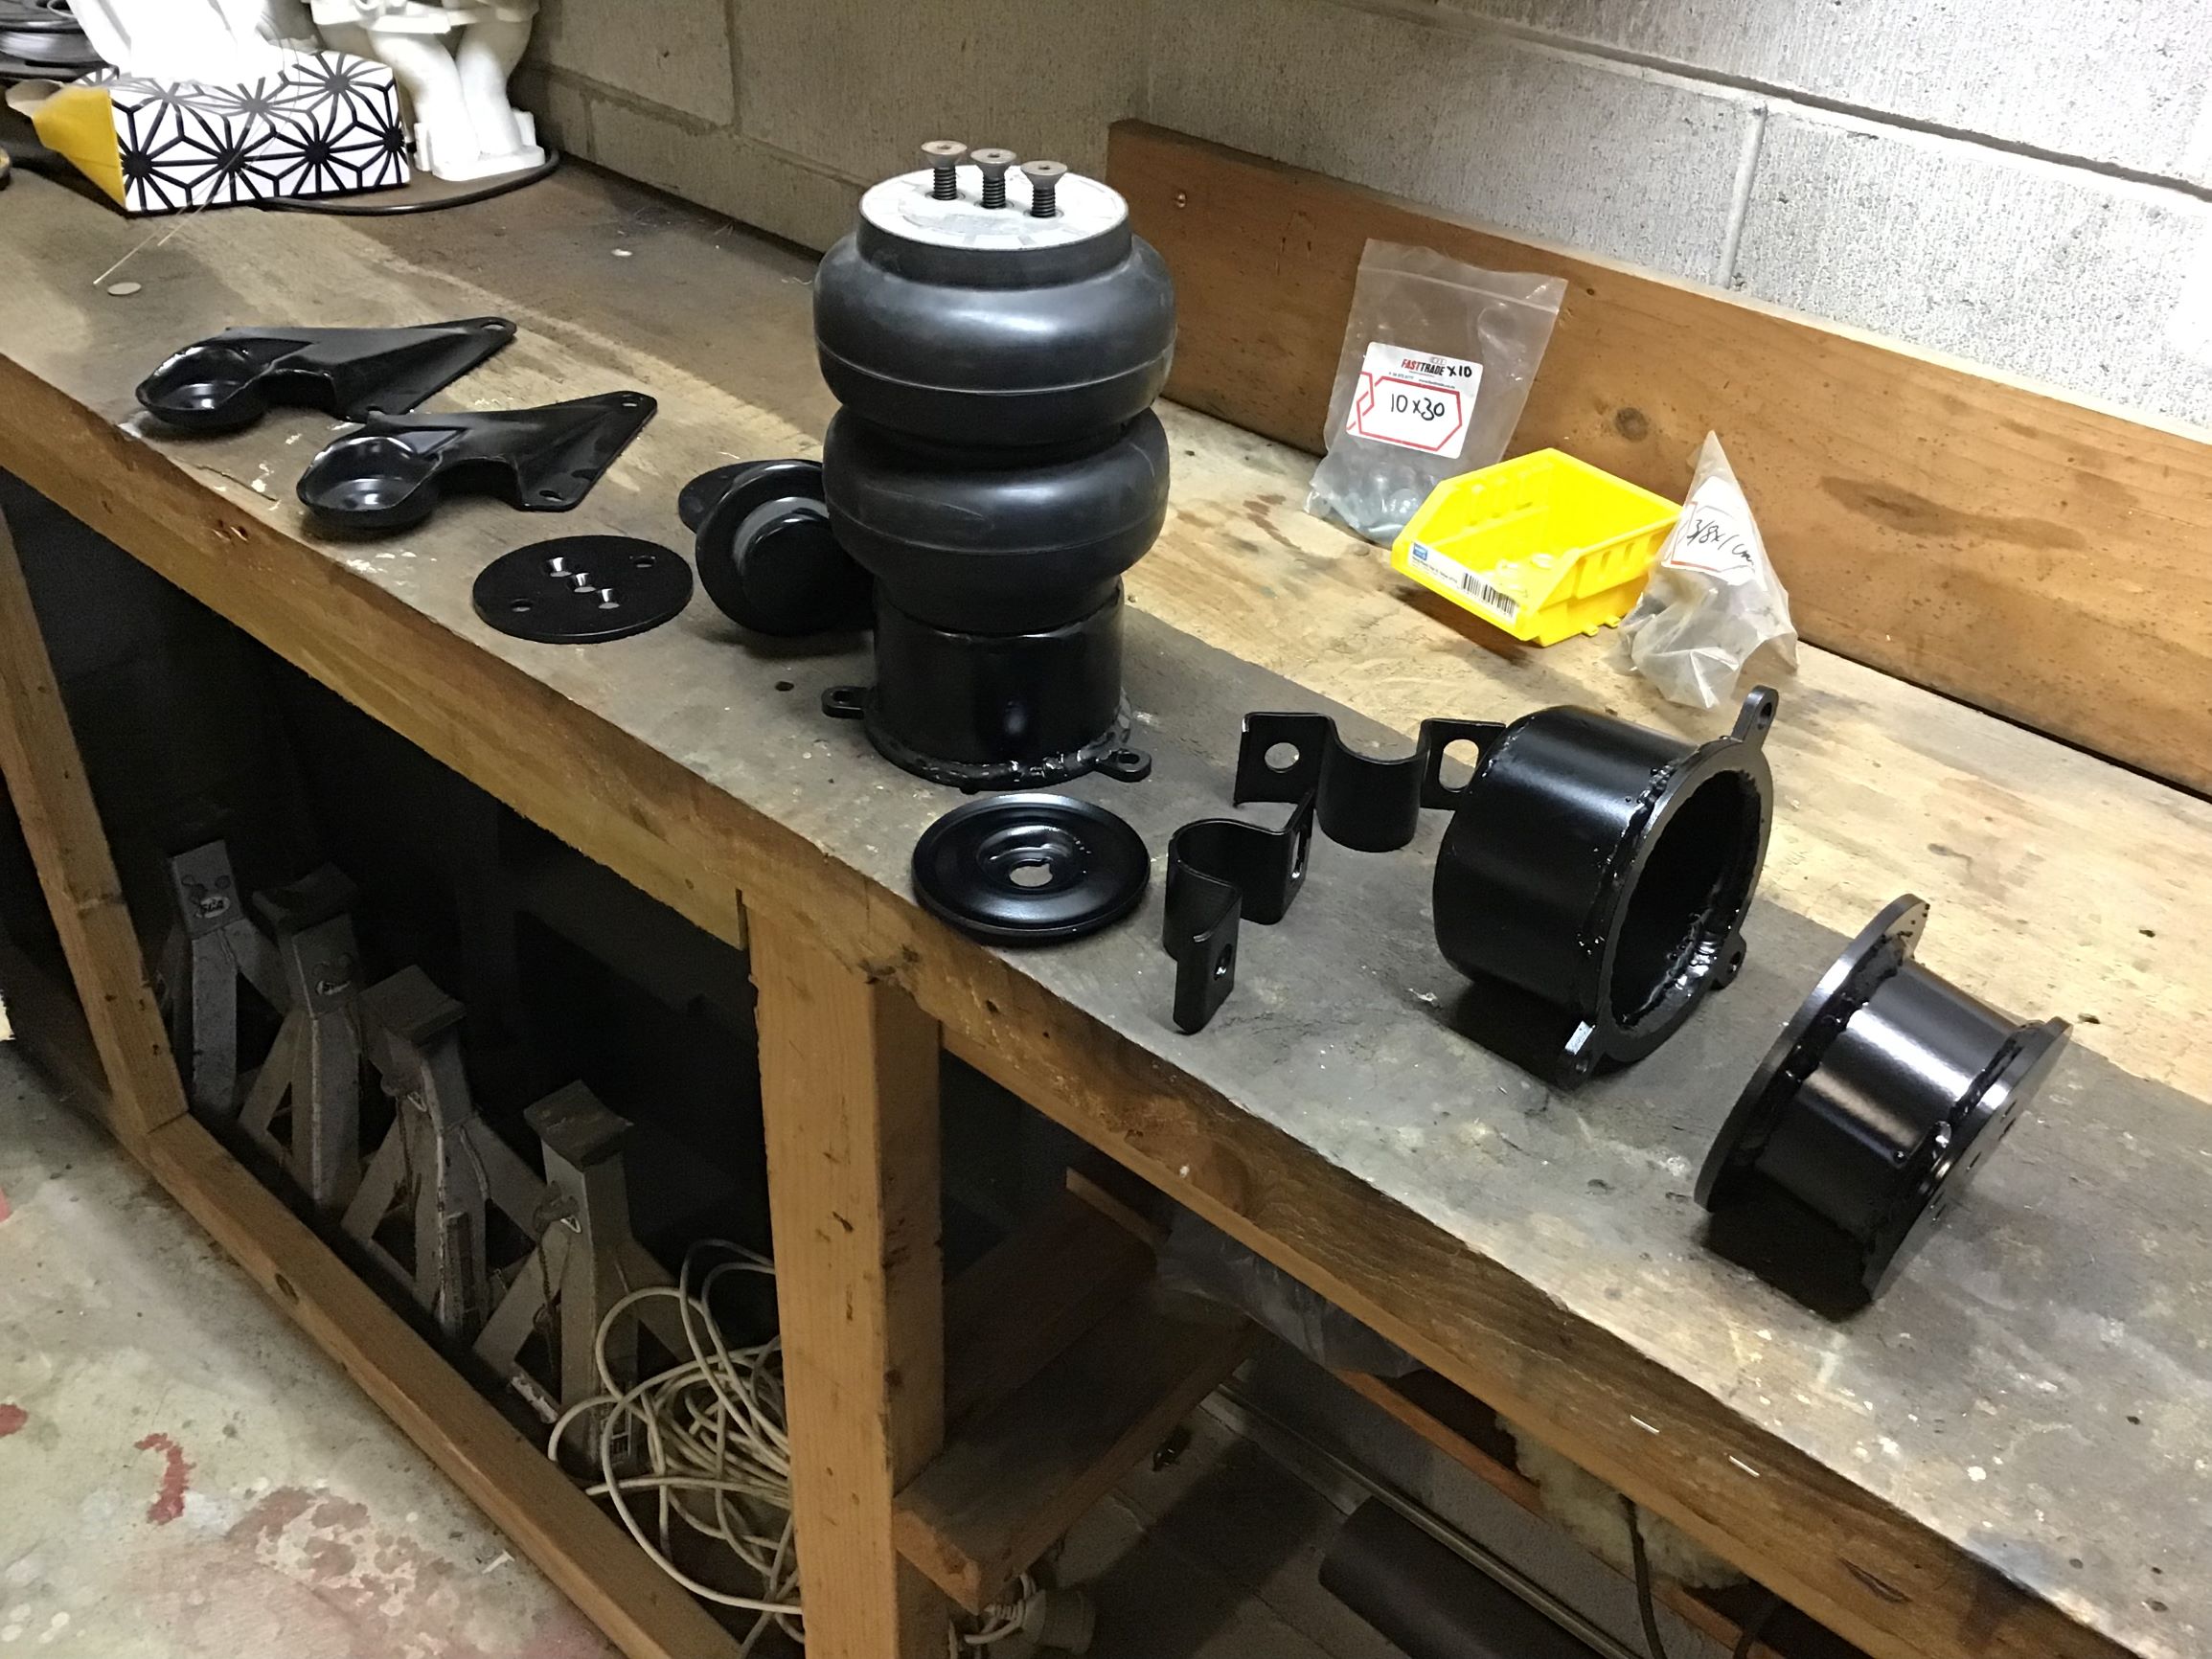
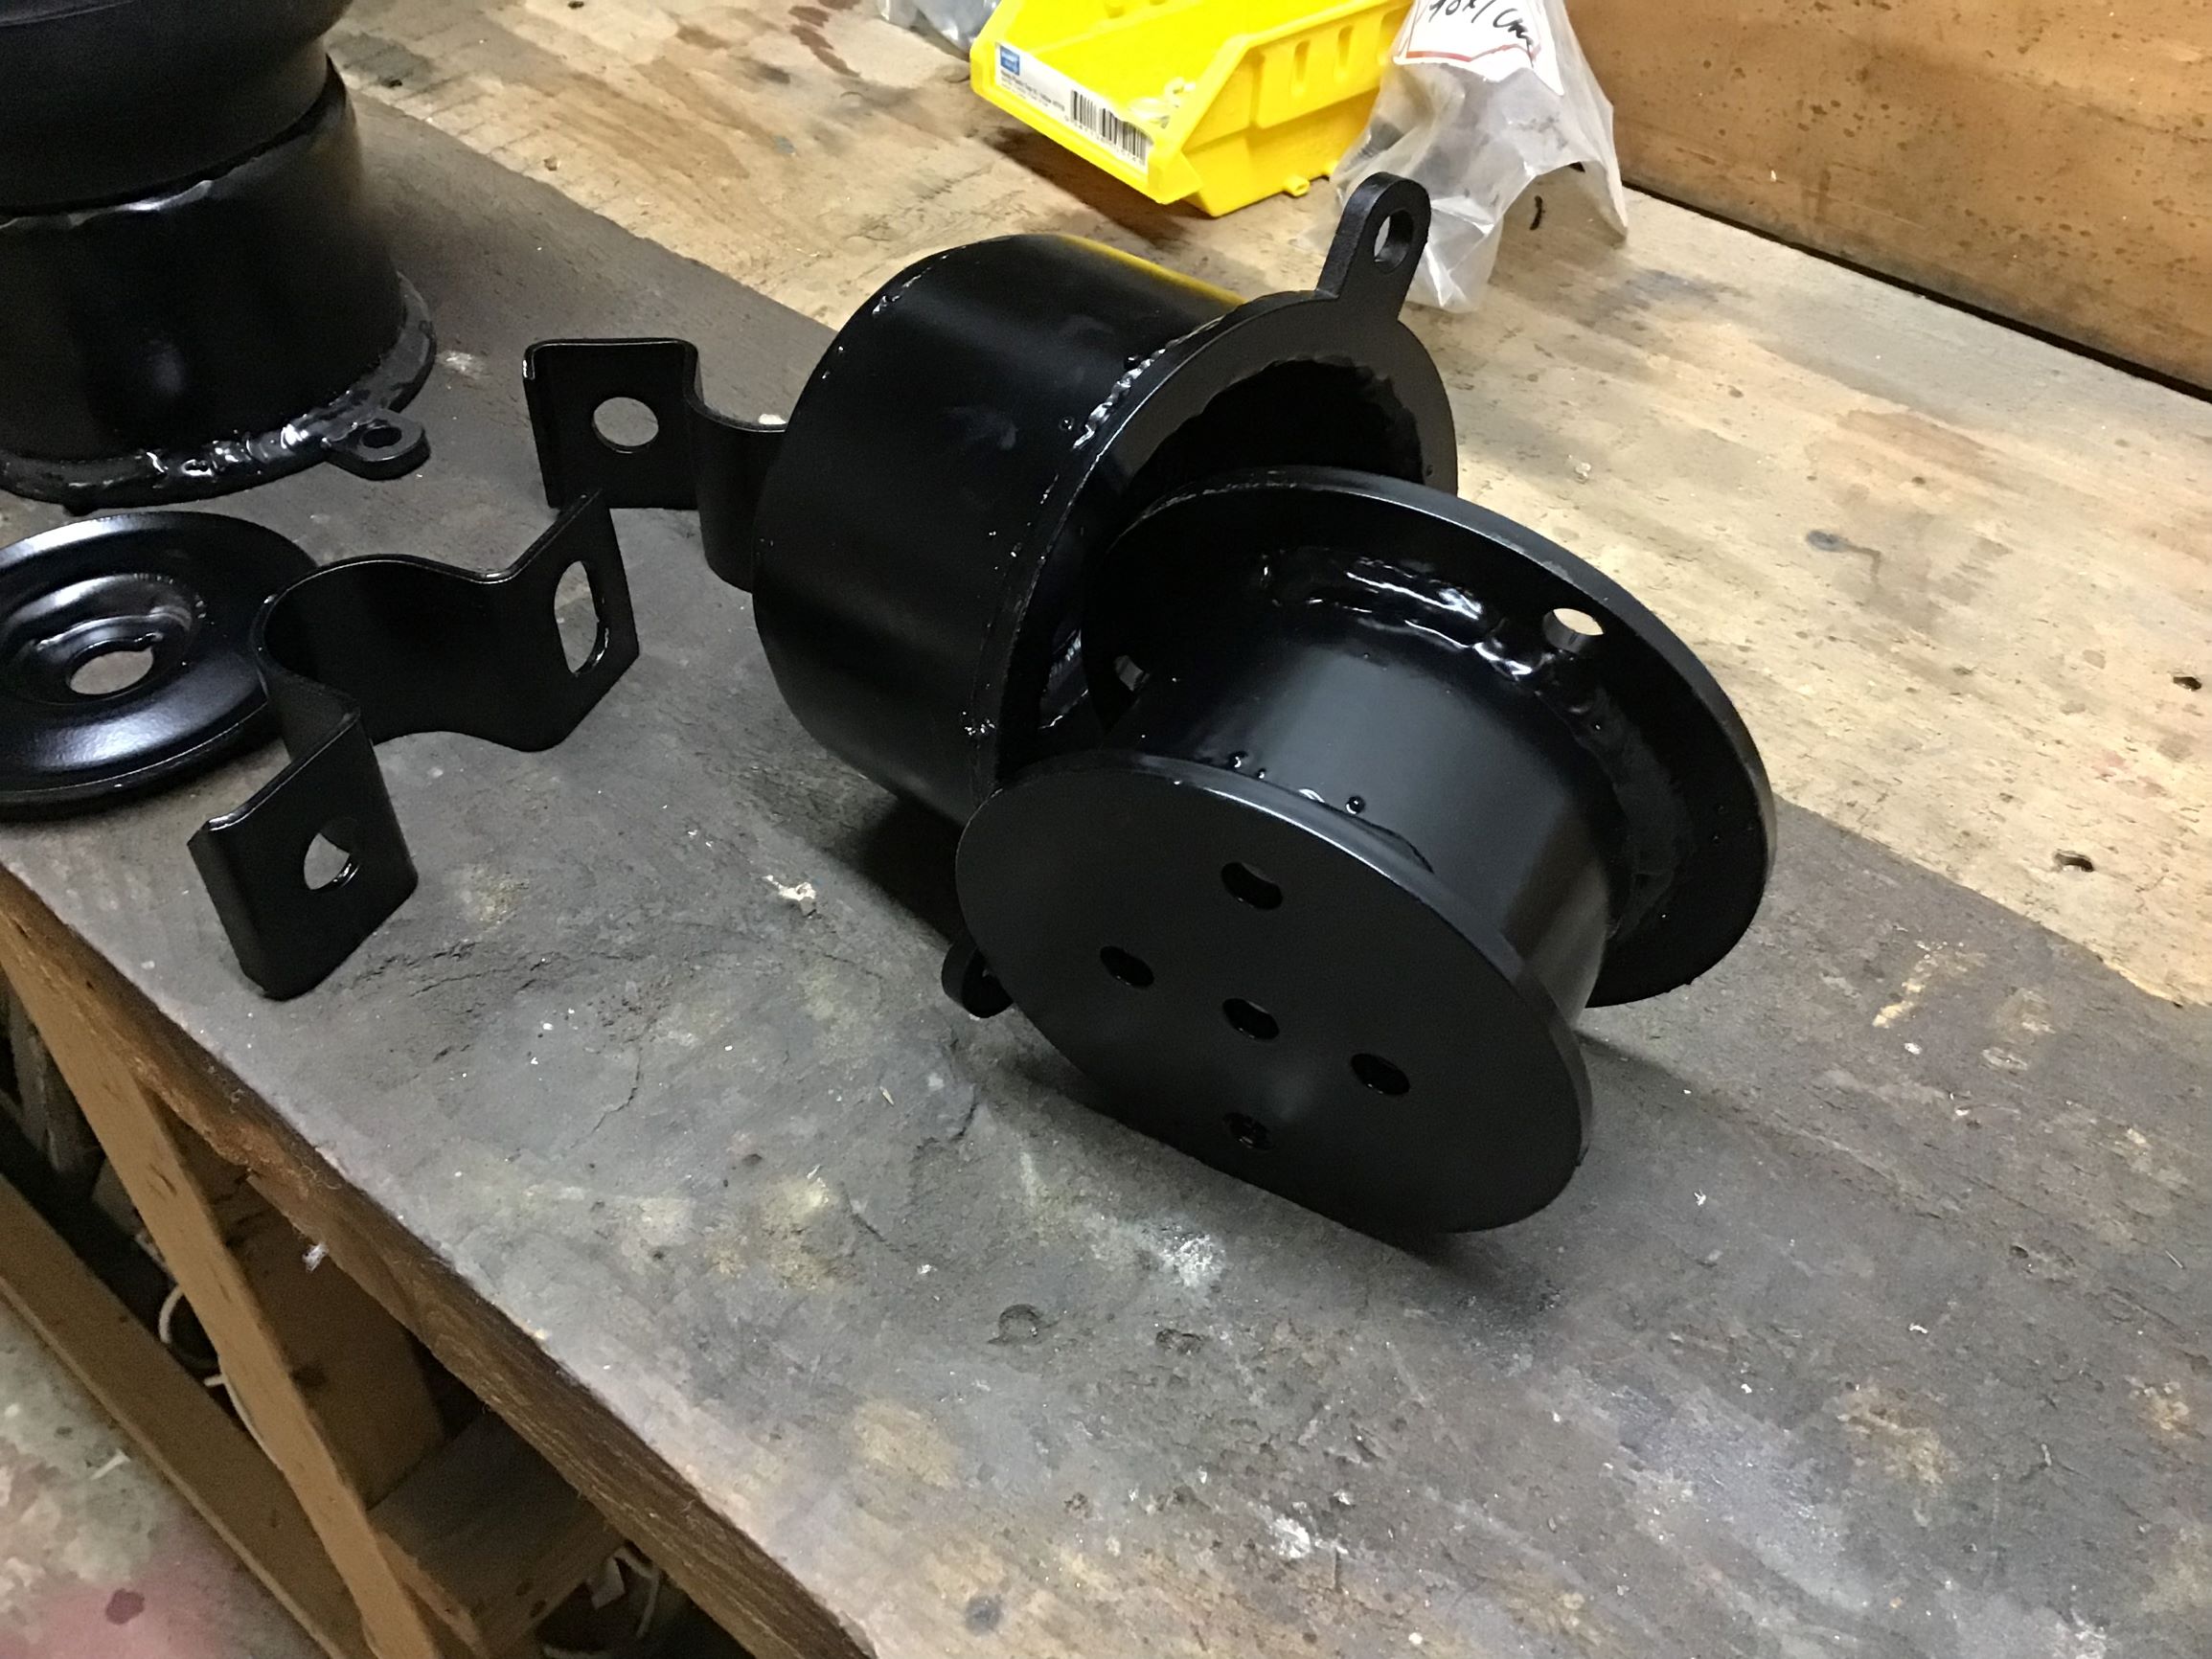
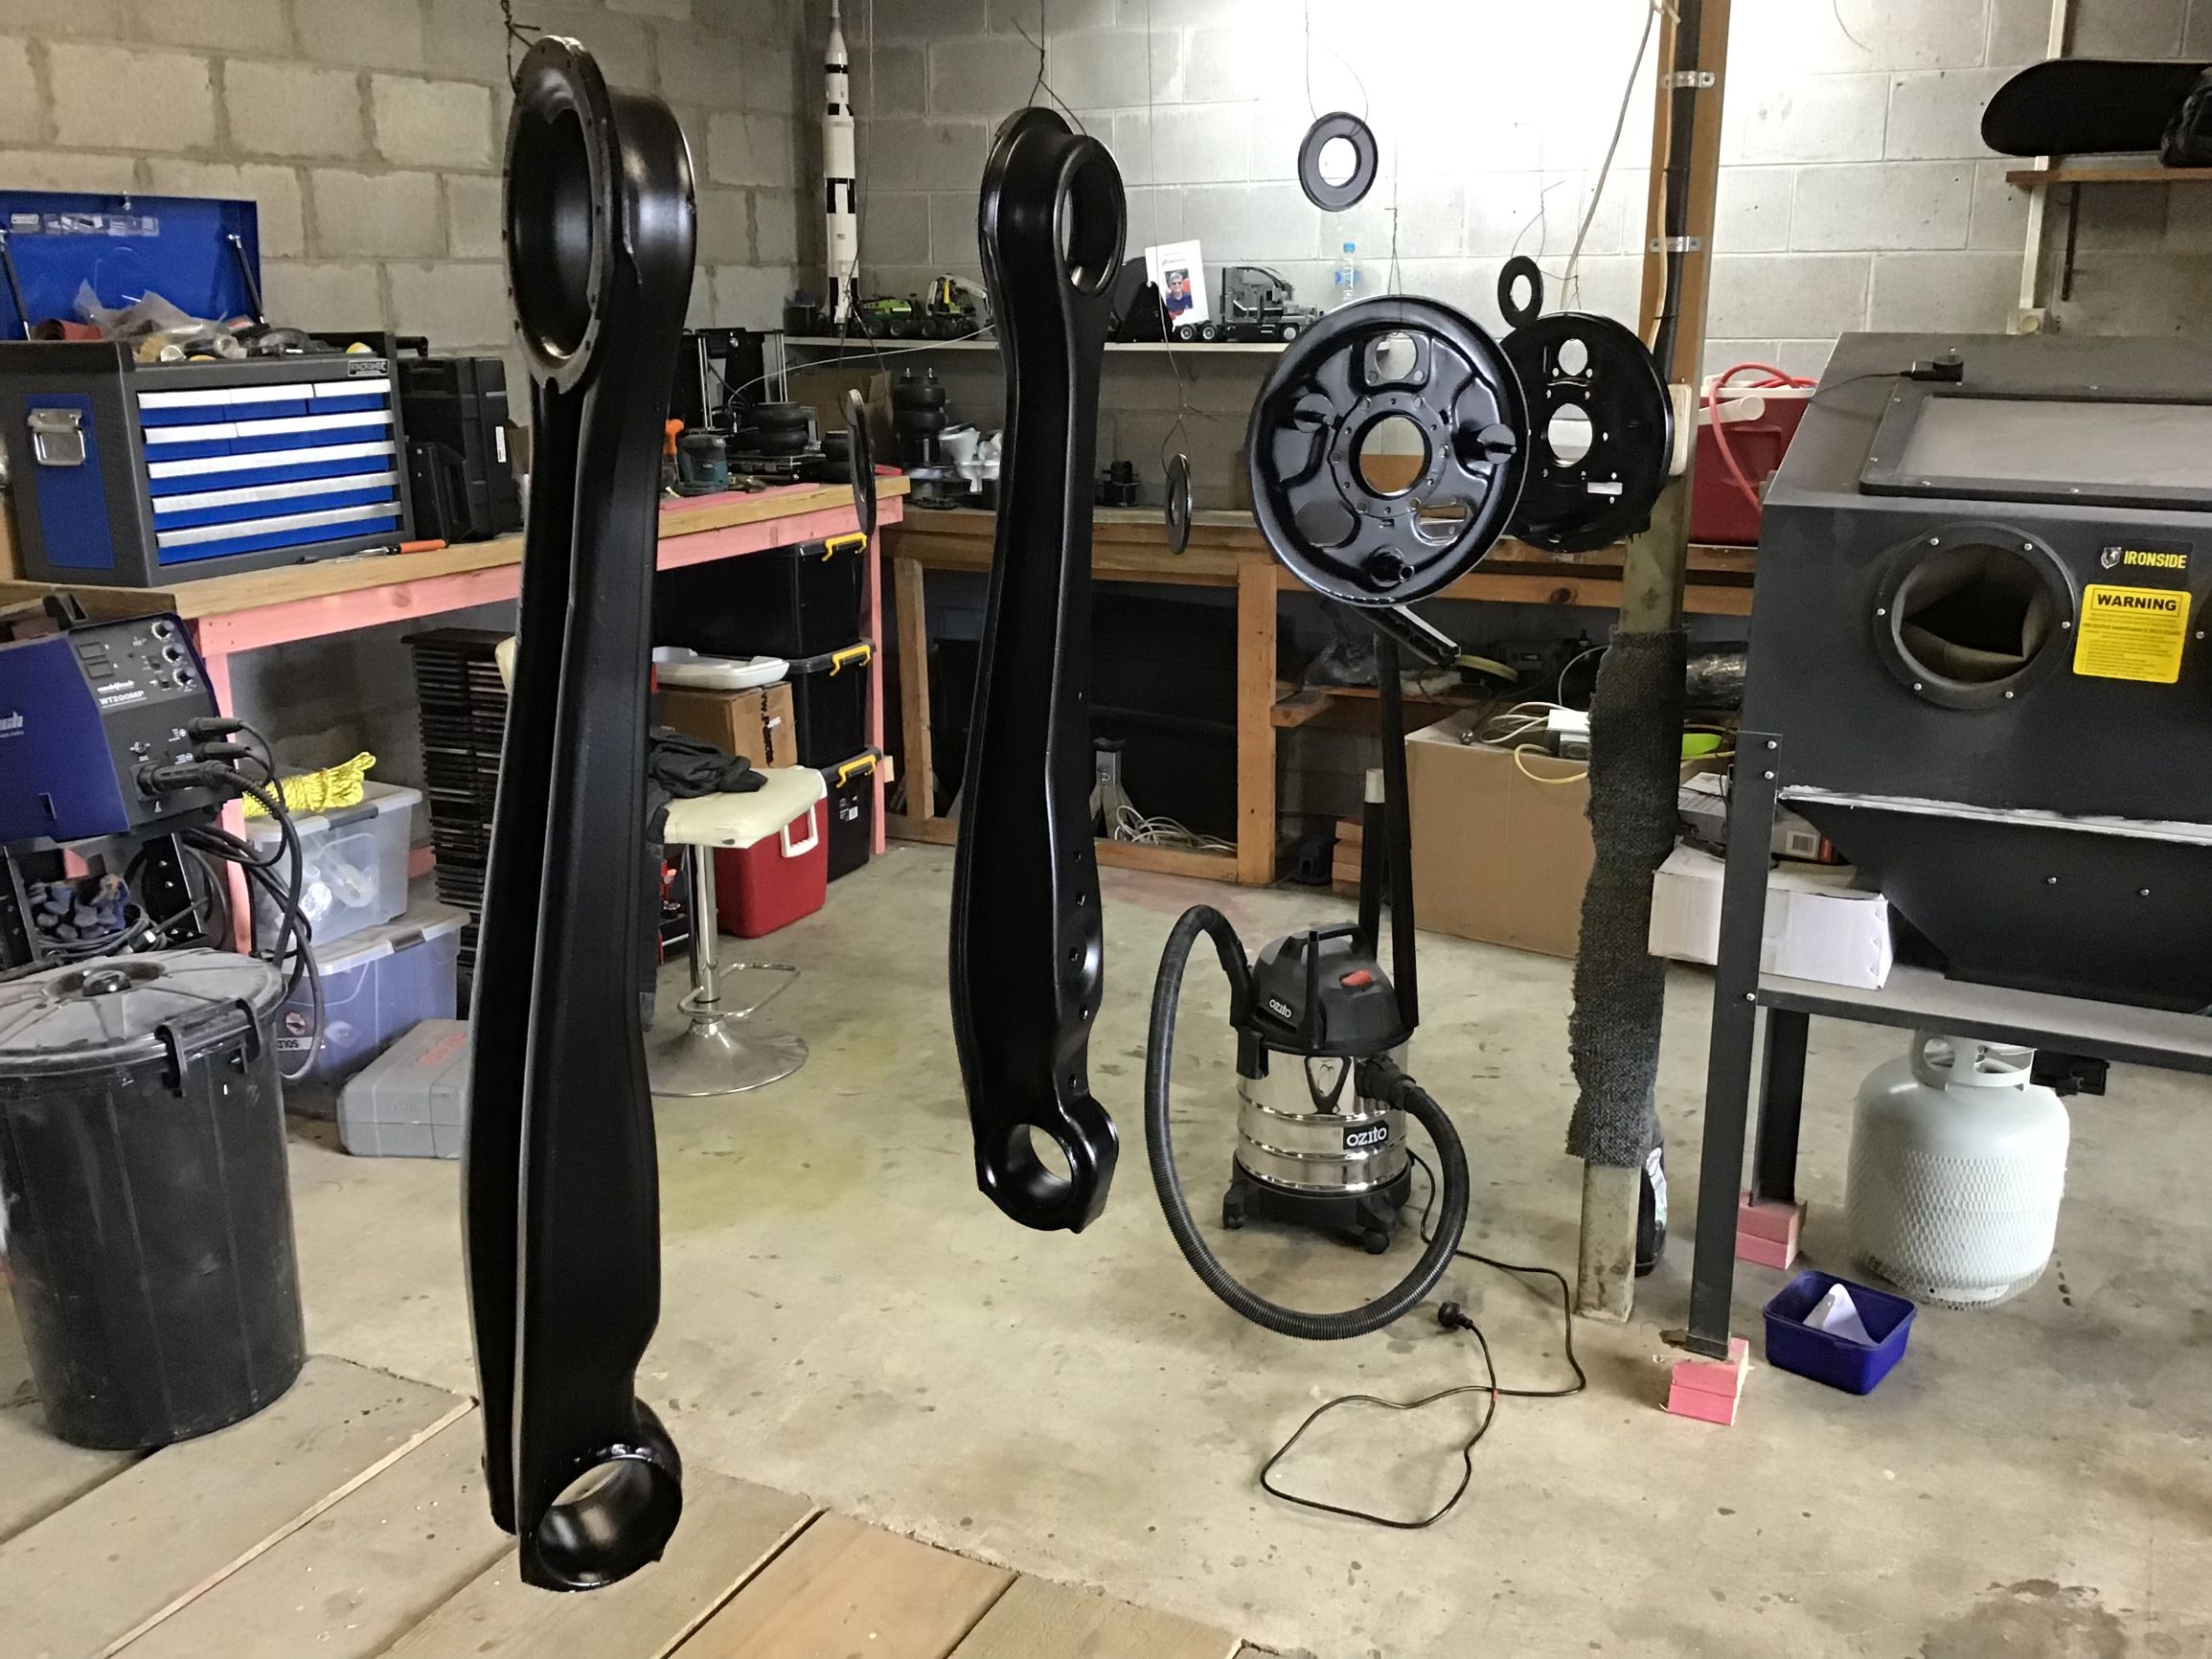
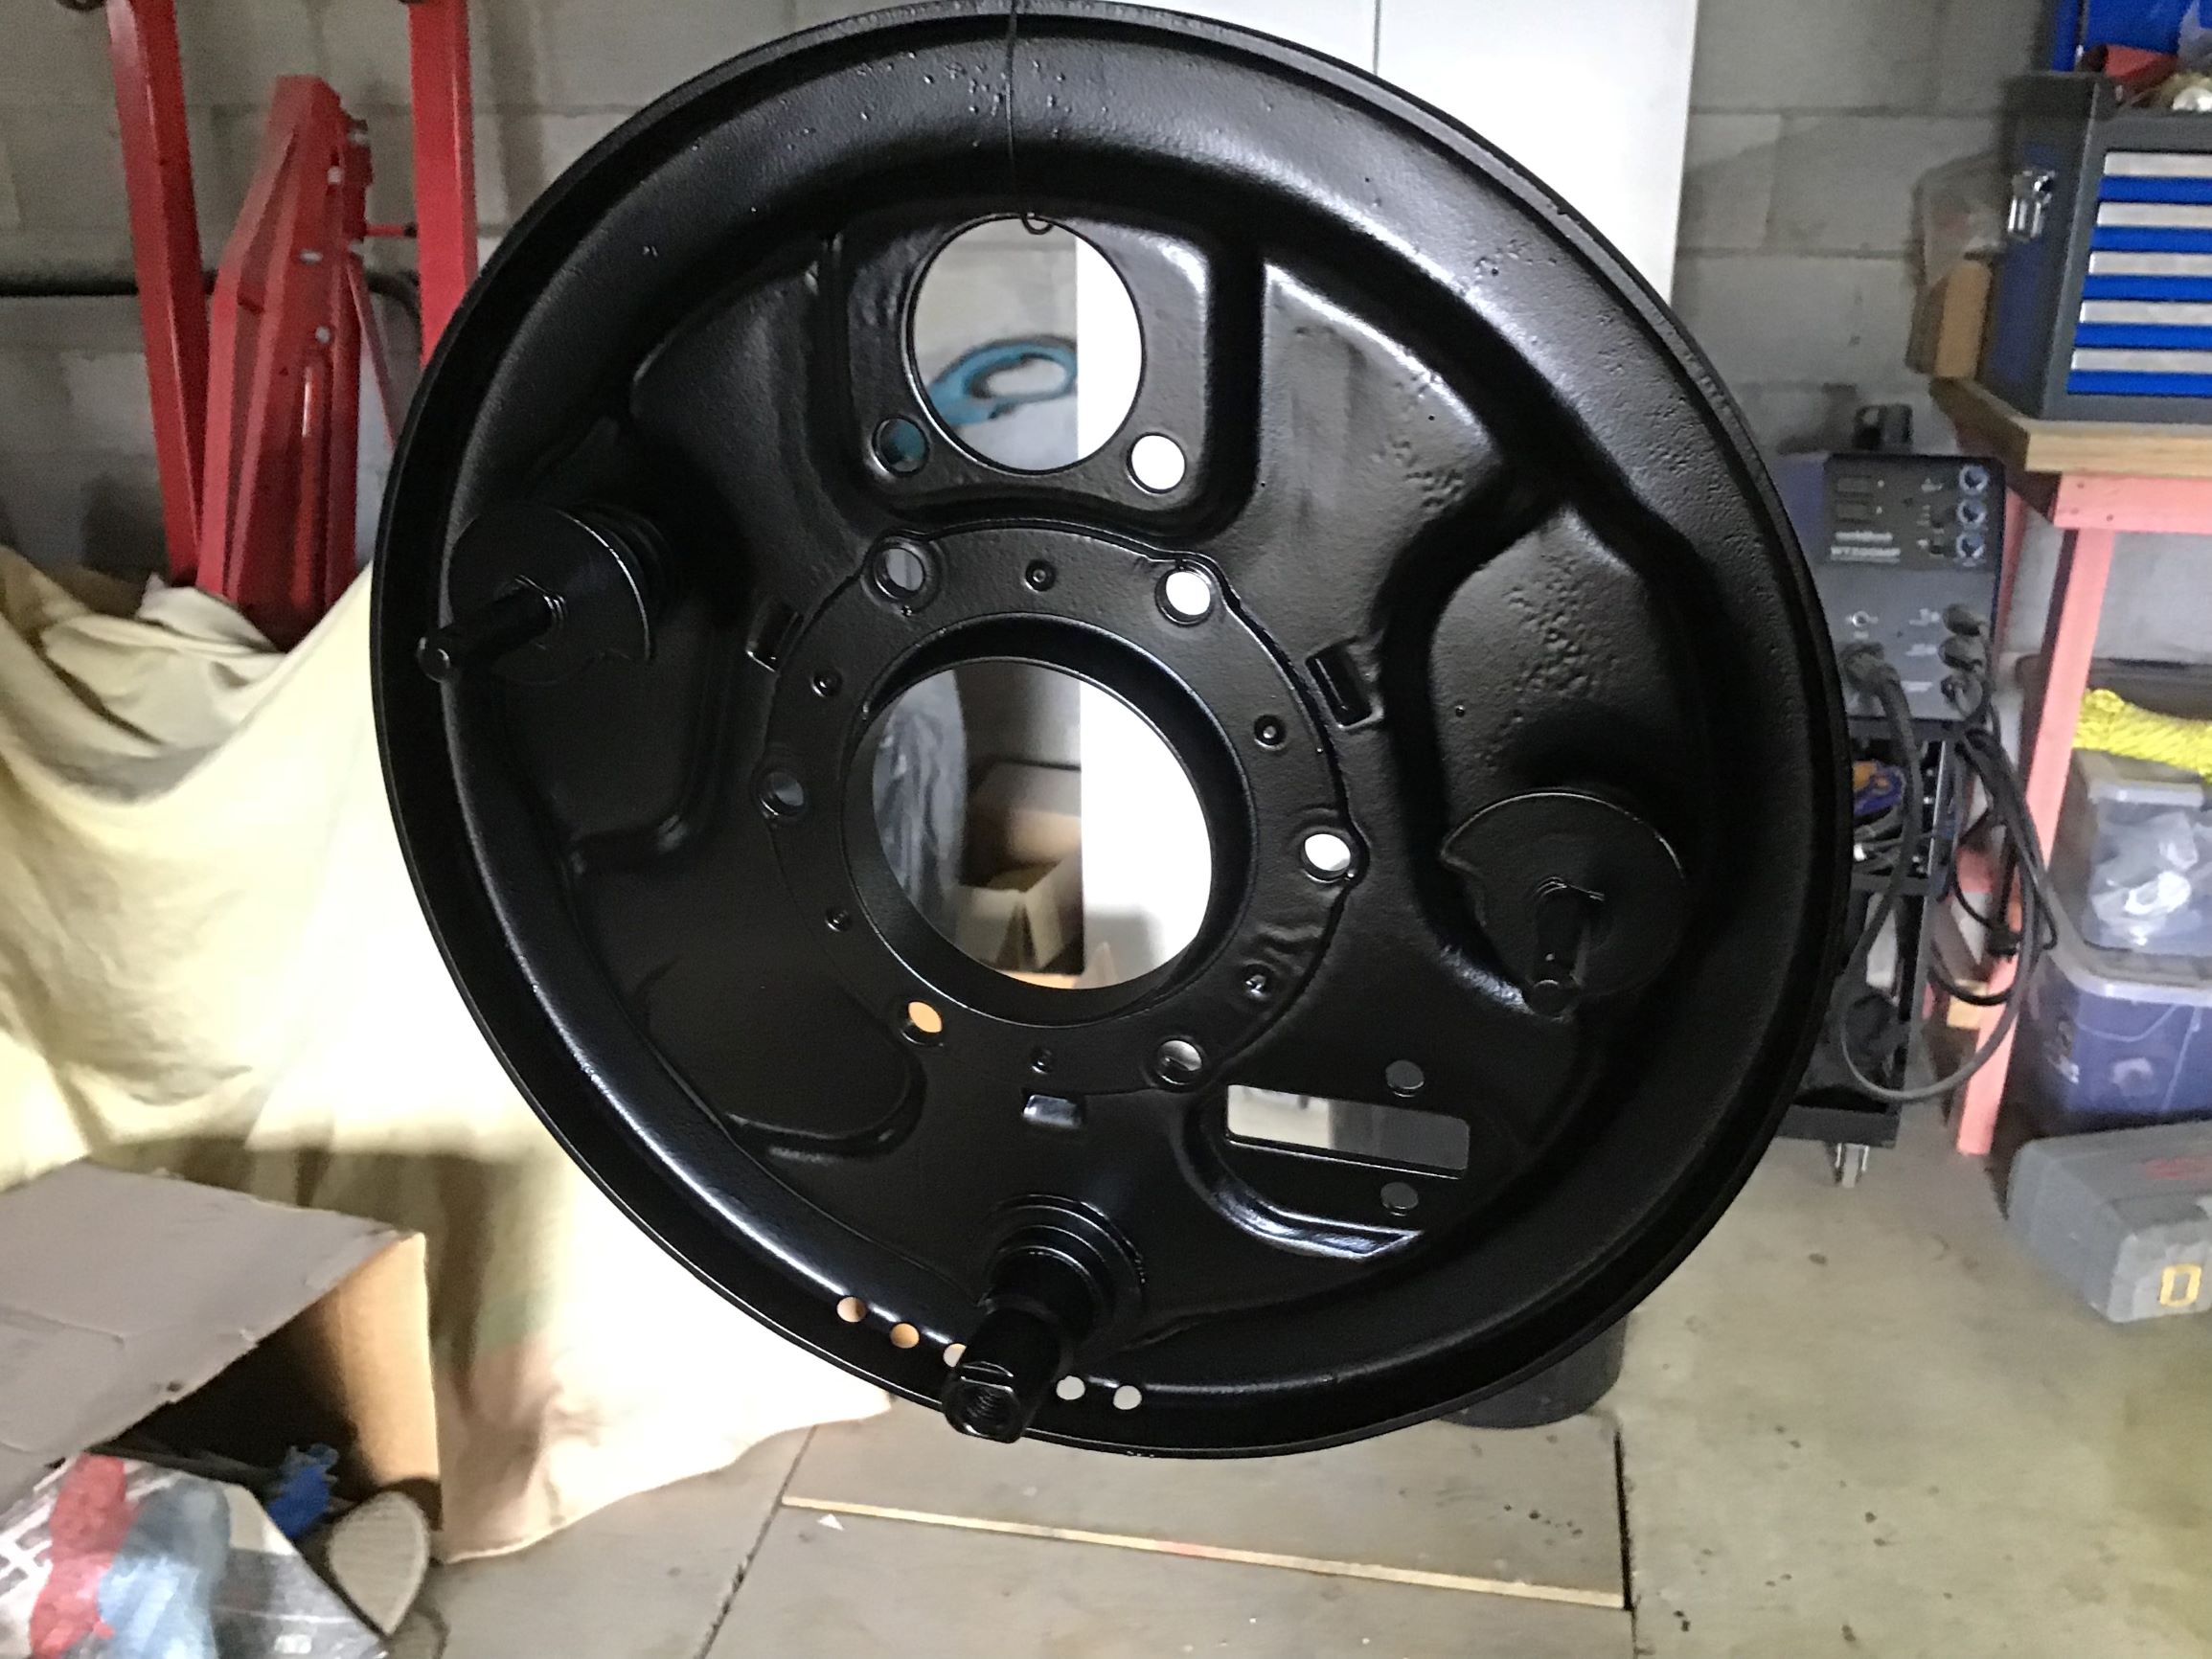
Recently picked up one of those generic 220l freestanding blasting cabinets, so I could set to work blasting/primering/painting the rear suspension/bag mounts etc in several batches. Such a time consuming task but super satisfying seeing once scummy parts come out looking new. Need to replace the window and do an LED light upgrade to the blasting cabinet before I can do anymore (the front suspension bits). Can't see shit in it anymore. Ended up cutting the wheel bearings off the half shalfs so I could paint the drum brake backing plate. Don't have a press so might try the axle in freezer, bearing in oven trick for fitting the new bearings I have before I go door knocking around the neighbourhood trying to find someone with a press I can borrow. Then I can finally get the diff back together in one piece. The whole diff hangs from a rubber bush that sits in the boot floor, I've got a new one of these bushes on its way from Germany as the original is suitably flogged but it seems the replacement one is on the slow boat so who knows when that will get here, but I need it to refit the diff so bit of a stalemate there. Also picked up a 722.6 trans out of an early 2000s W203 that suffered a timing chain failure (like most of them do). these don't bolt up to the M180/M130 family of engines so I need to make up an adapter plate, which is my next job will also need a controller for it but that can wait. I've gone the complicated route of gaining a lock up torque convertor and a 5th gear, but a man wants what a man wants. Until next time.
- 26 replies
-
- 27
-
-
Anyone else following this guy on YouTube? He built the Draco bush plane that he later crashed, this is his latest build, it is off-the-chart for DIY Carbon Fibre work
-
-
Where did you get your DOT push to connect bulkhead fittings?
-
Have you considered making an extra LWB version?
- 800 replies
-
- 13
-
-

-
-
Have a question on retrofitting rear seatbelts, my Merc ('65 Fintail) would of originally had fixed diagonal seatbelts for the rear seats - there's an OEM mount in the top of the parcel shelf and in the bottom rear bulkhead/firewall towards the centre, but no mounts in the rear wheel tub area so can't have been 3 pointers, just a two point diagonal. Id like to upgrade this by poking a hole into the rear wheel arch to add a 3rd point and fit retractable unit to the factory mount on the rear parcel shelf and maintain the factory centre mount for the receiver. however I see there is this in the standards factsheet: "2.5 Attachment requirements for all seatbelt anchorages 2.5(1) A seatbelt anchorage, other than a complete anchorage system where all components of the anchorage are provided, positioned, and installed by the vehicle manufacturer, including all associated hardware, fasteners, and reinforcements, must: (a) attach to a permanent part of the vehicle structure such as a pillar, floor section, or inner wheel arch; and (b) incorporate doubler plates, and where applicable a crush-tube, tubular spacer, or solid packer, which are designed and attached as specified in 2.6 and 2.7; and....." Should I be interpreting that in a way that, because my complete system of anchorage points are not OEM - only 2 of the 3 would be, I need to double plate the OEM mounts as well as the one I'm installing in the wheel arch?
-
You’re just going to have to wrap you block in carbon and shoot for 600hp then.
-
Compound charging the 3L would be way cooler. /ling
-
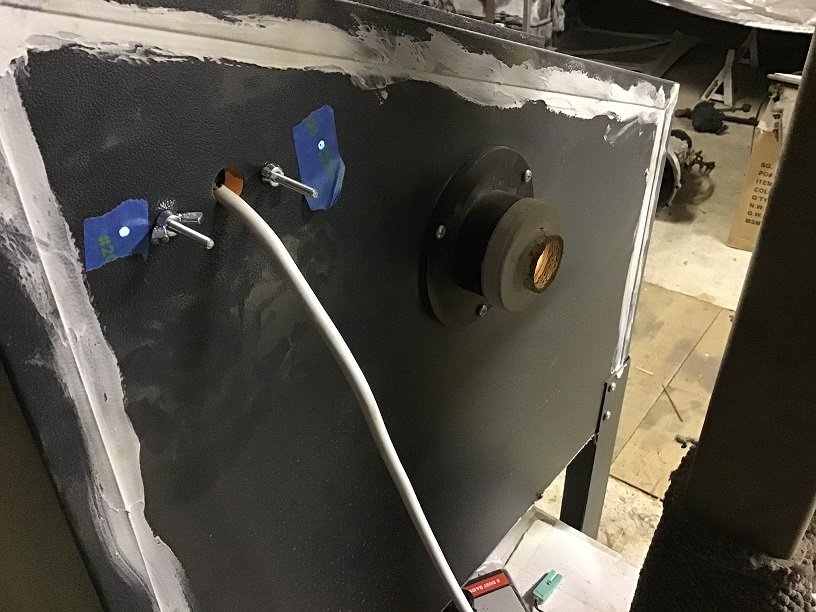
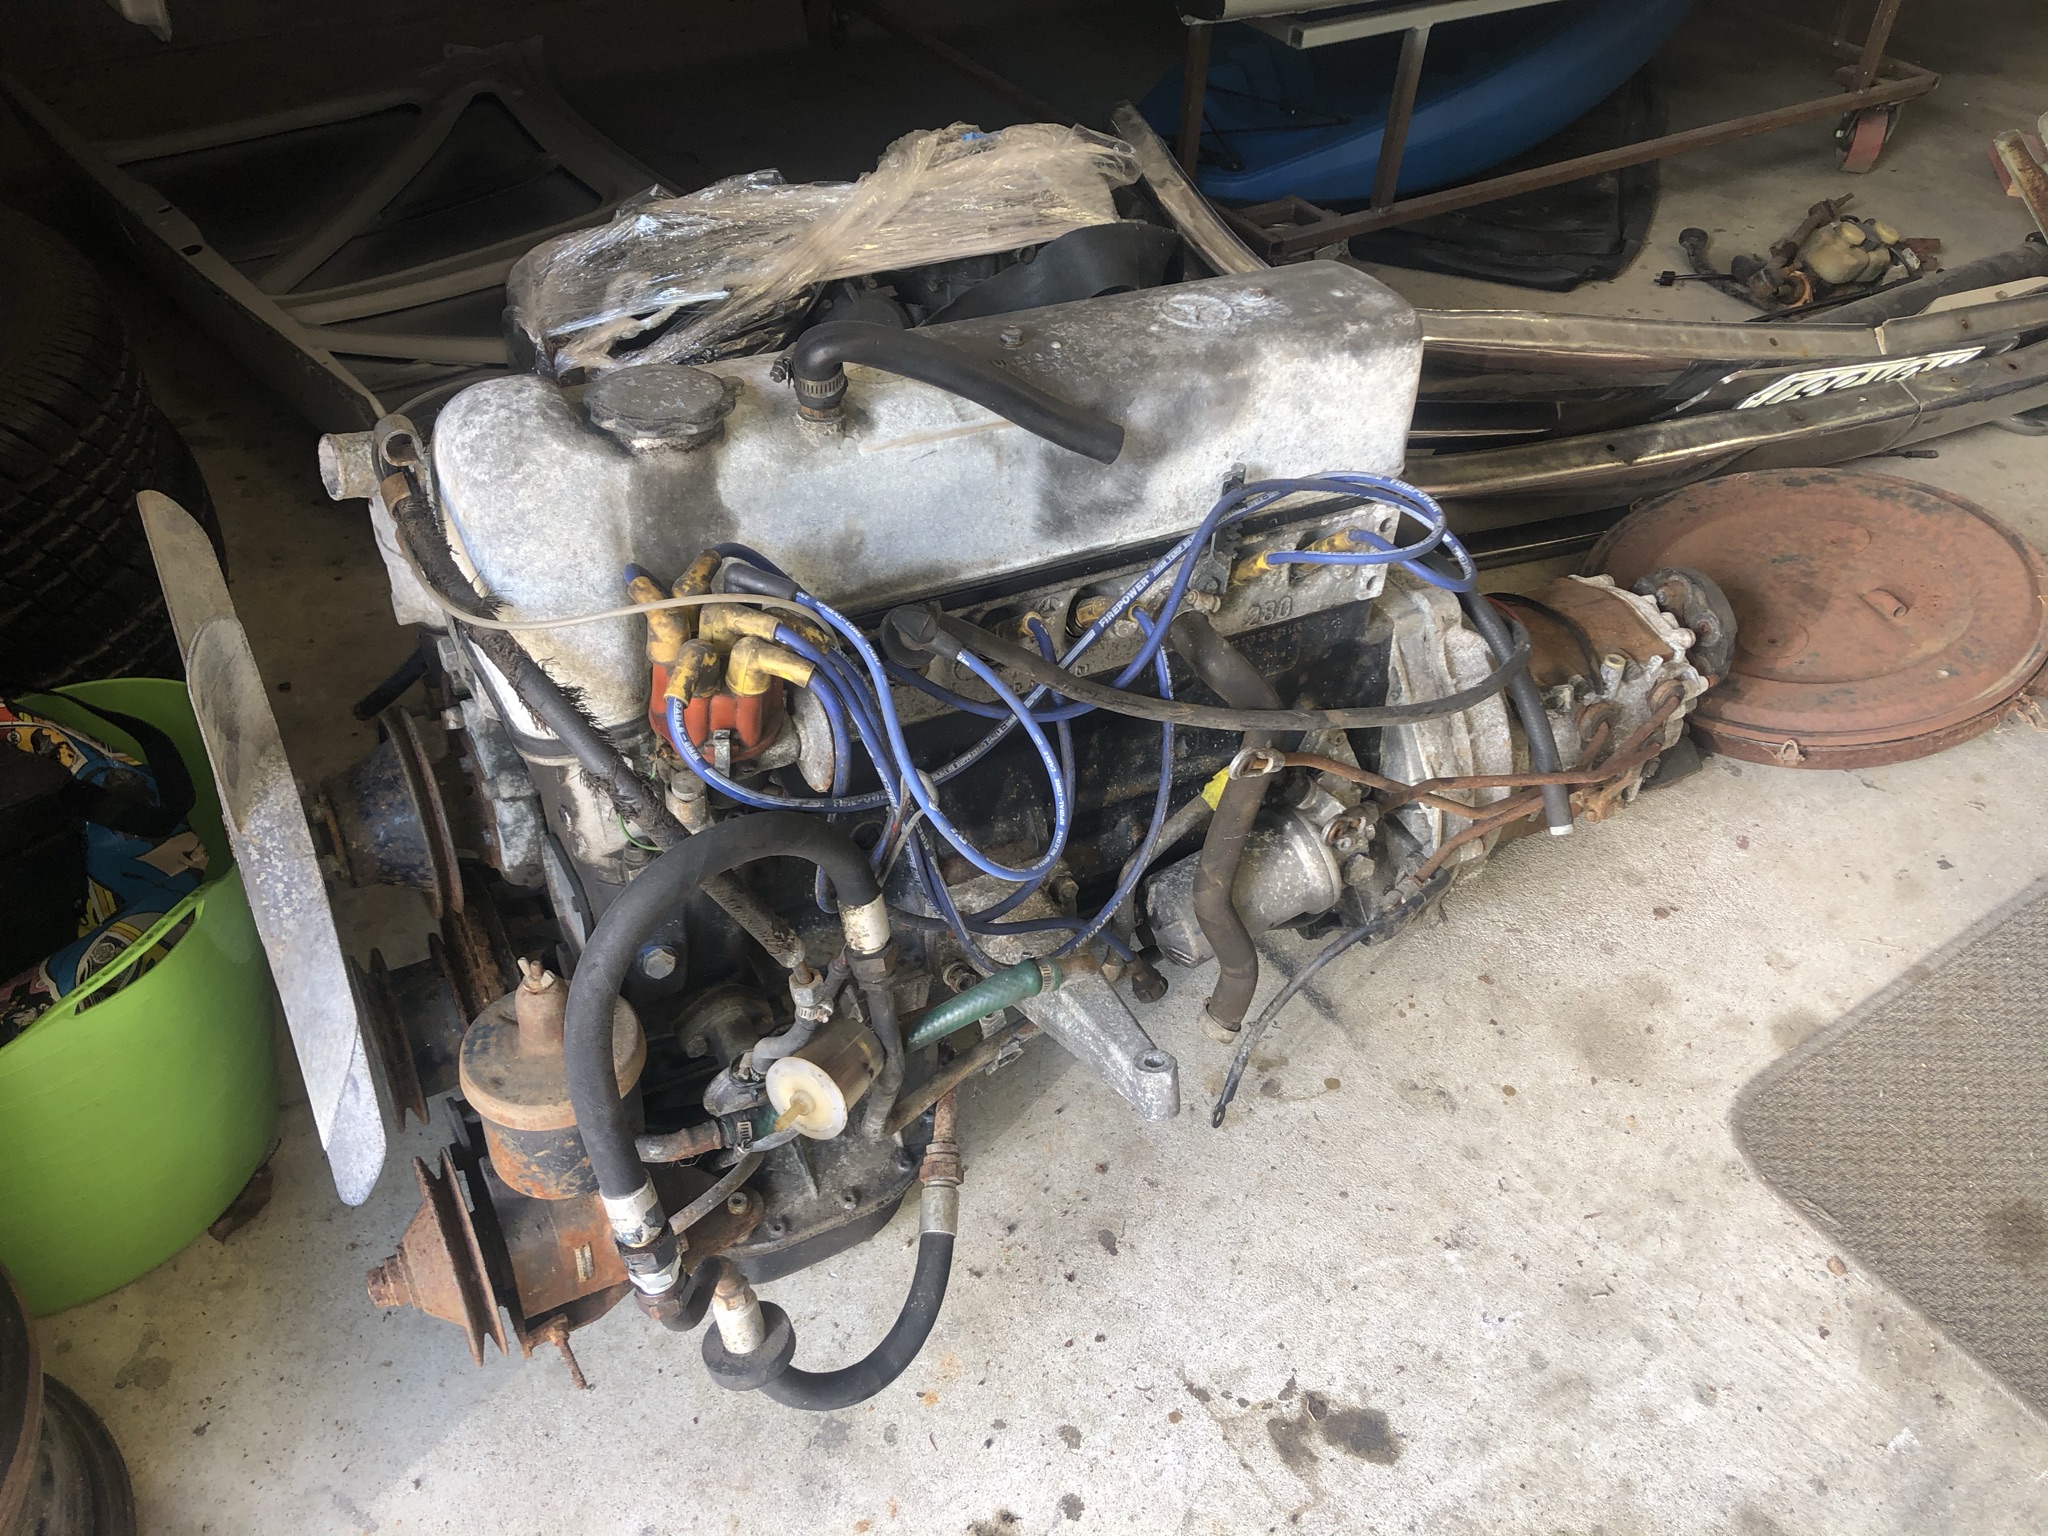
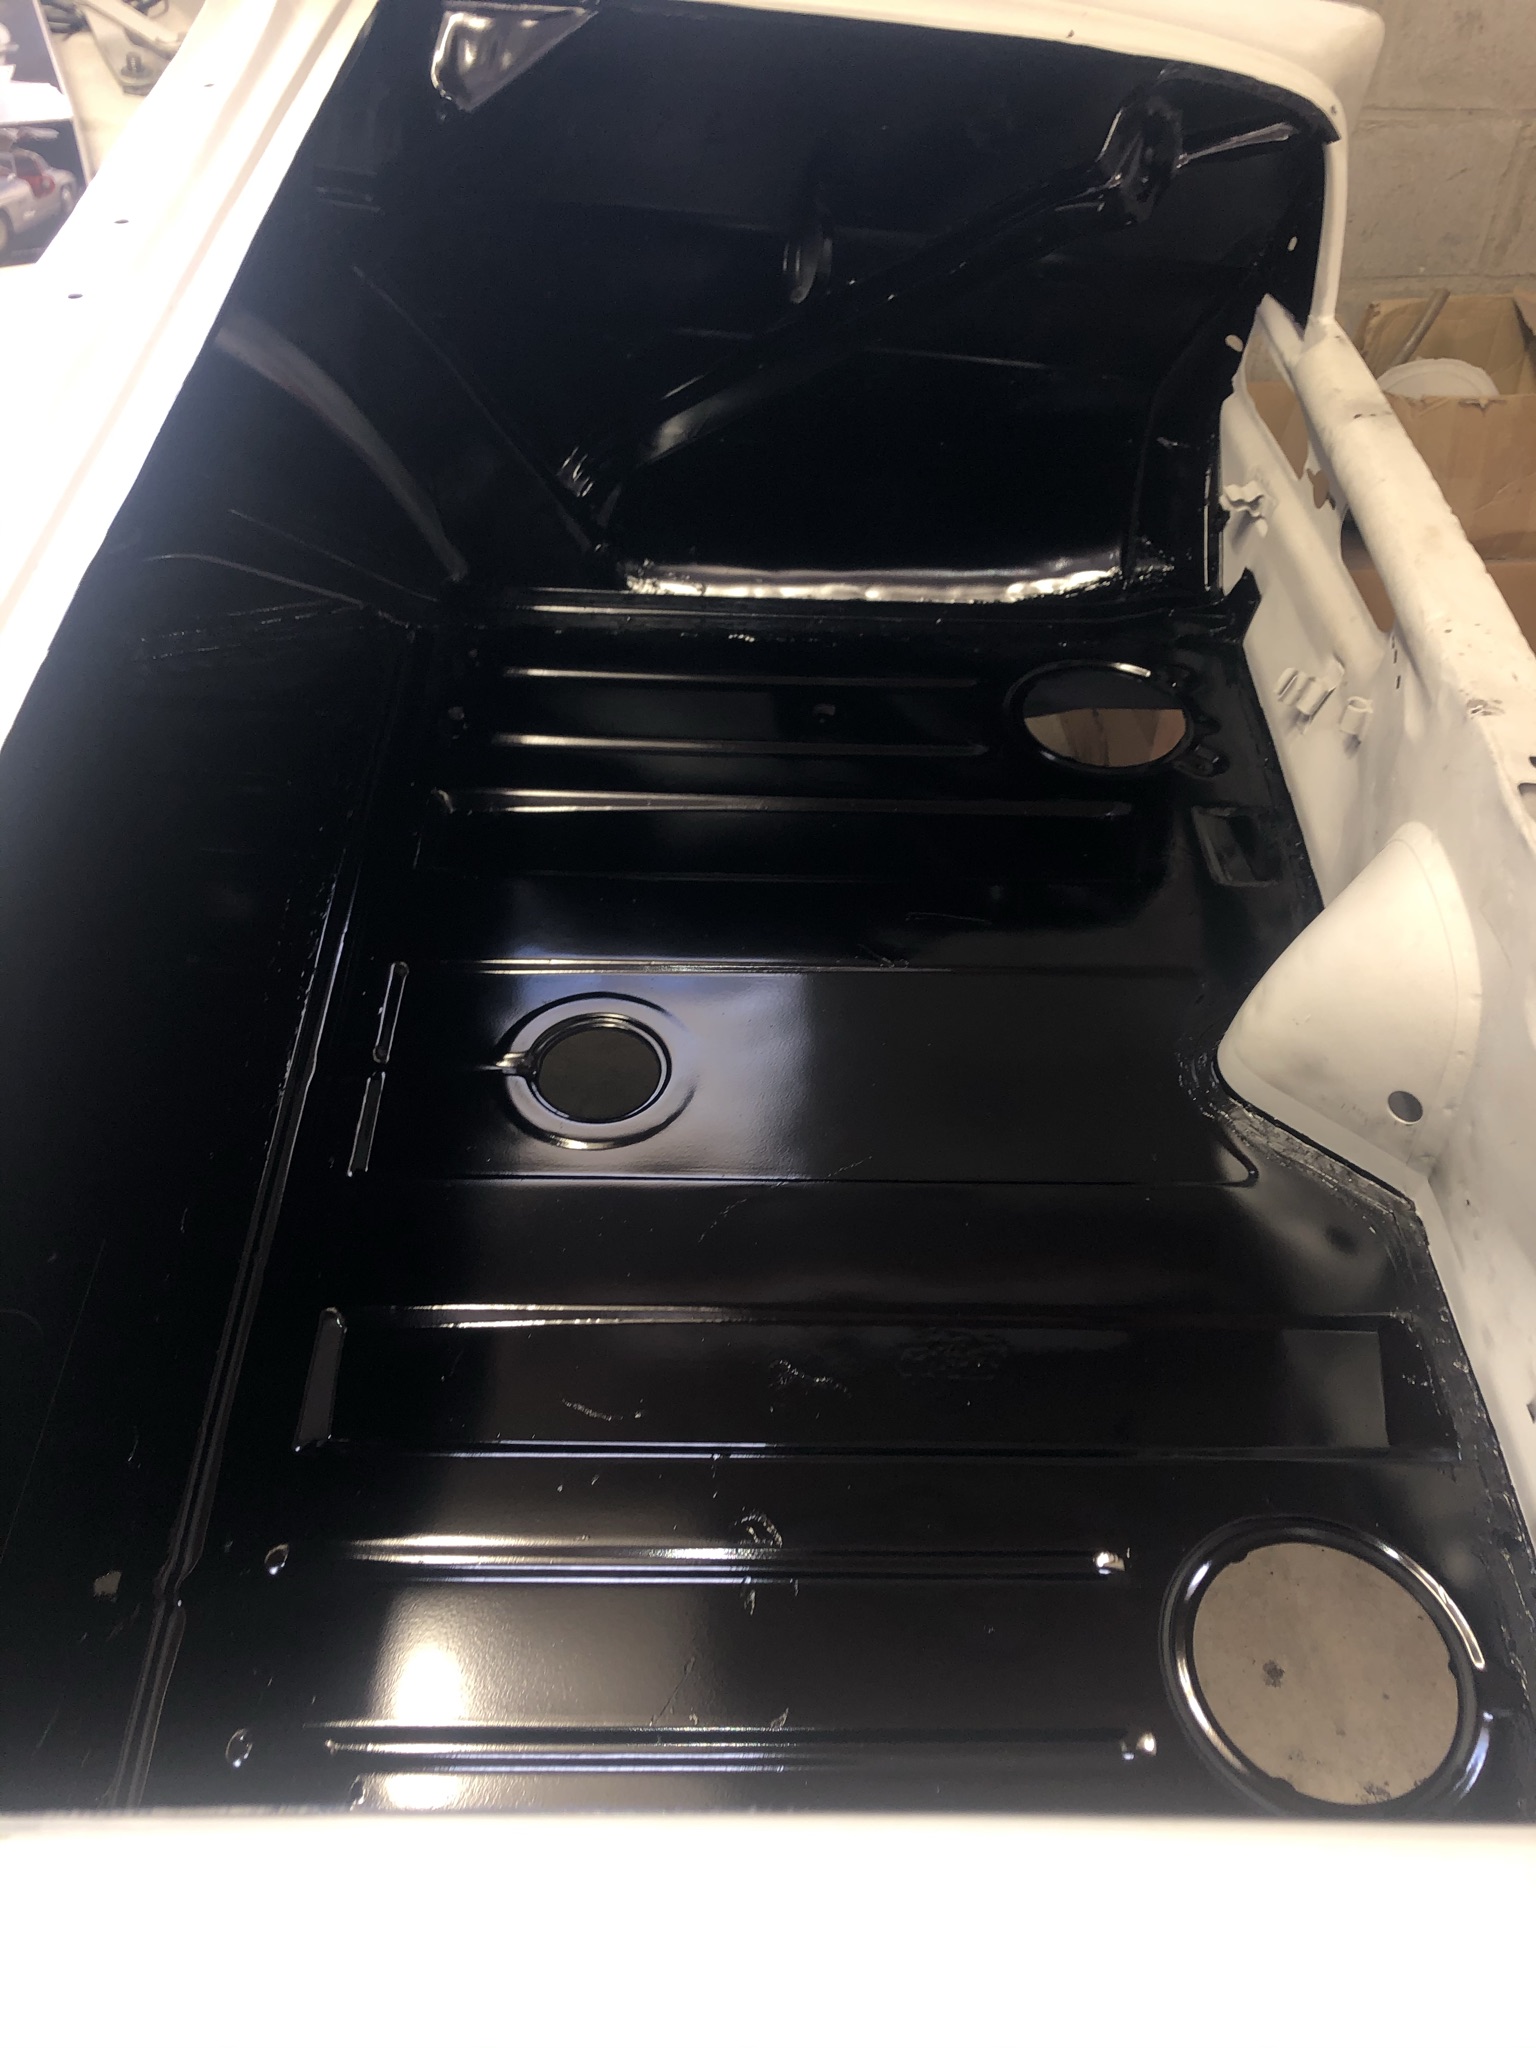
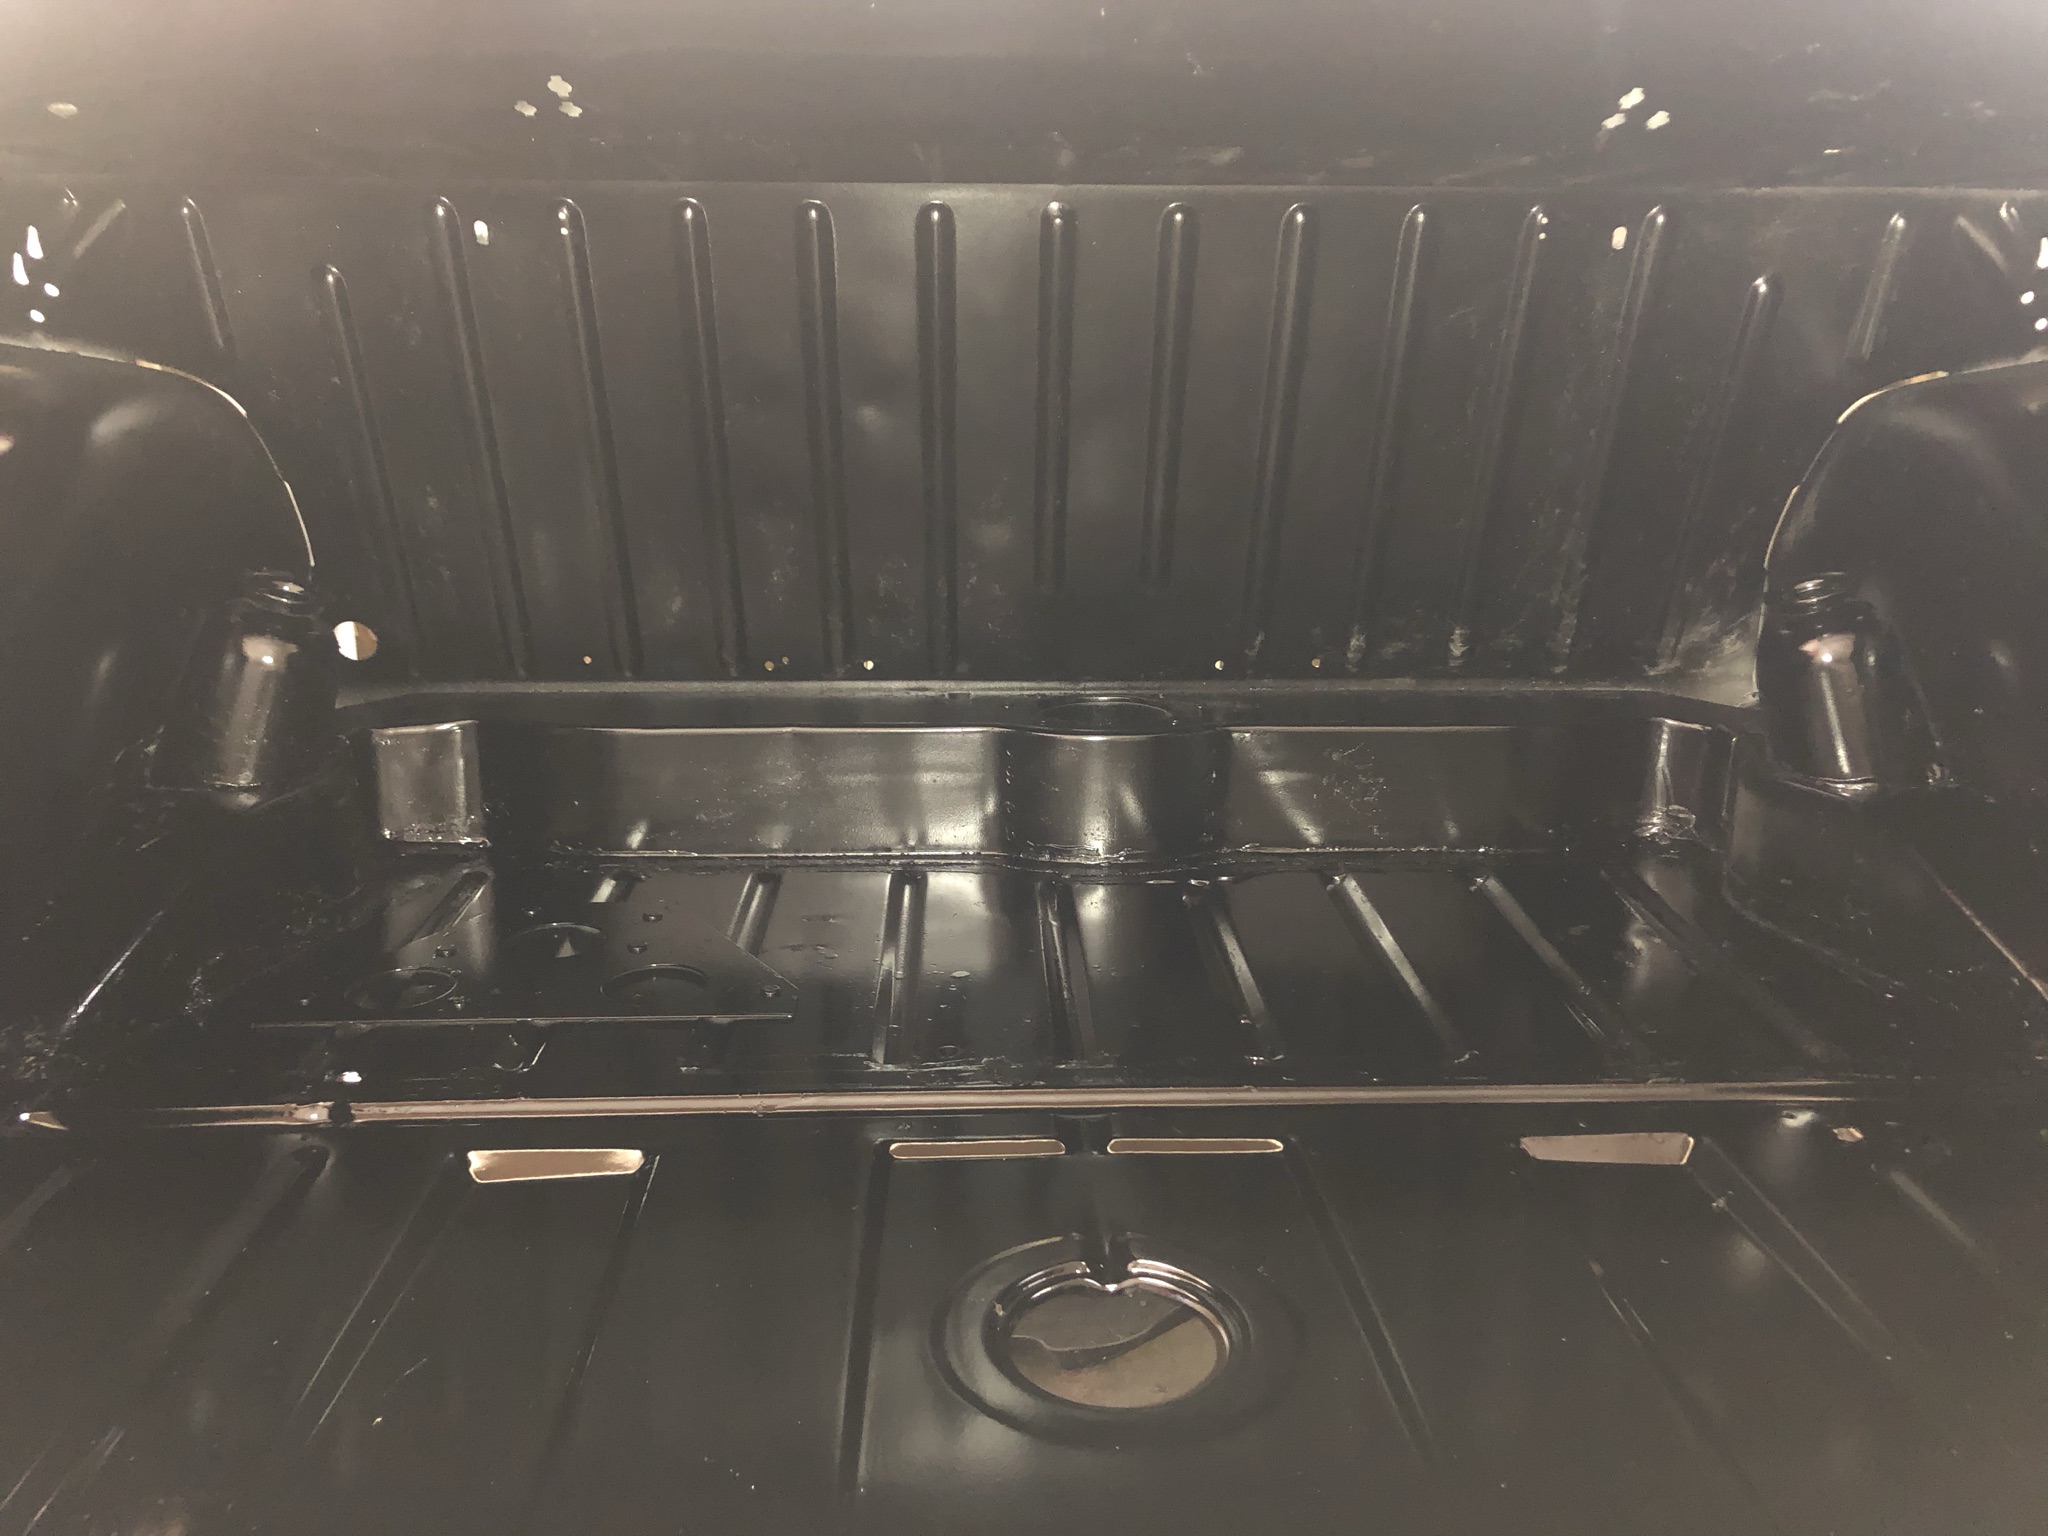
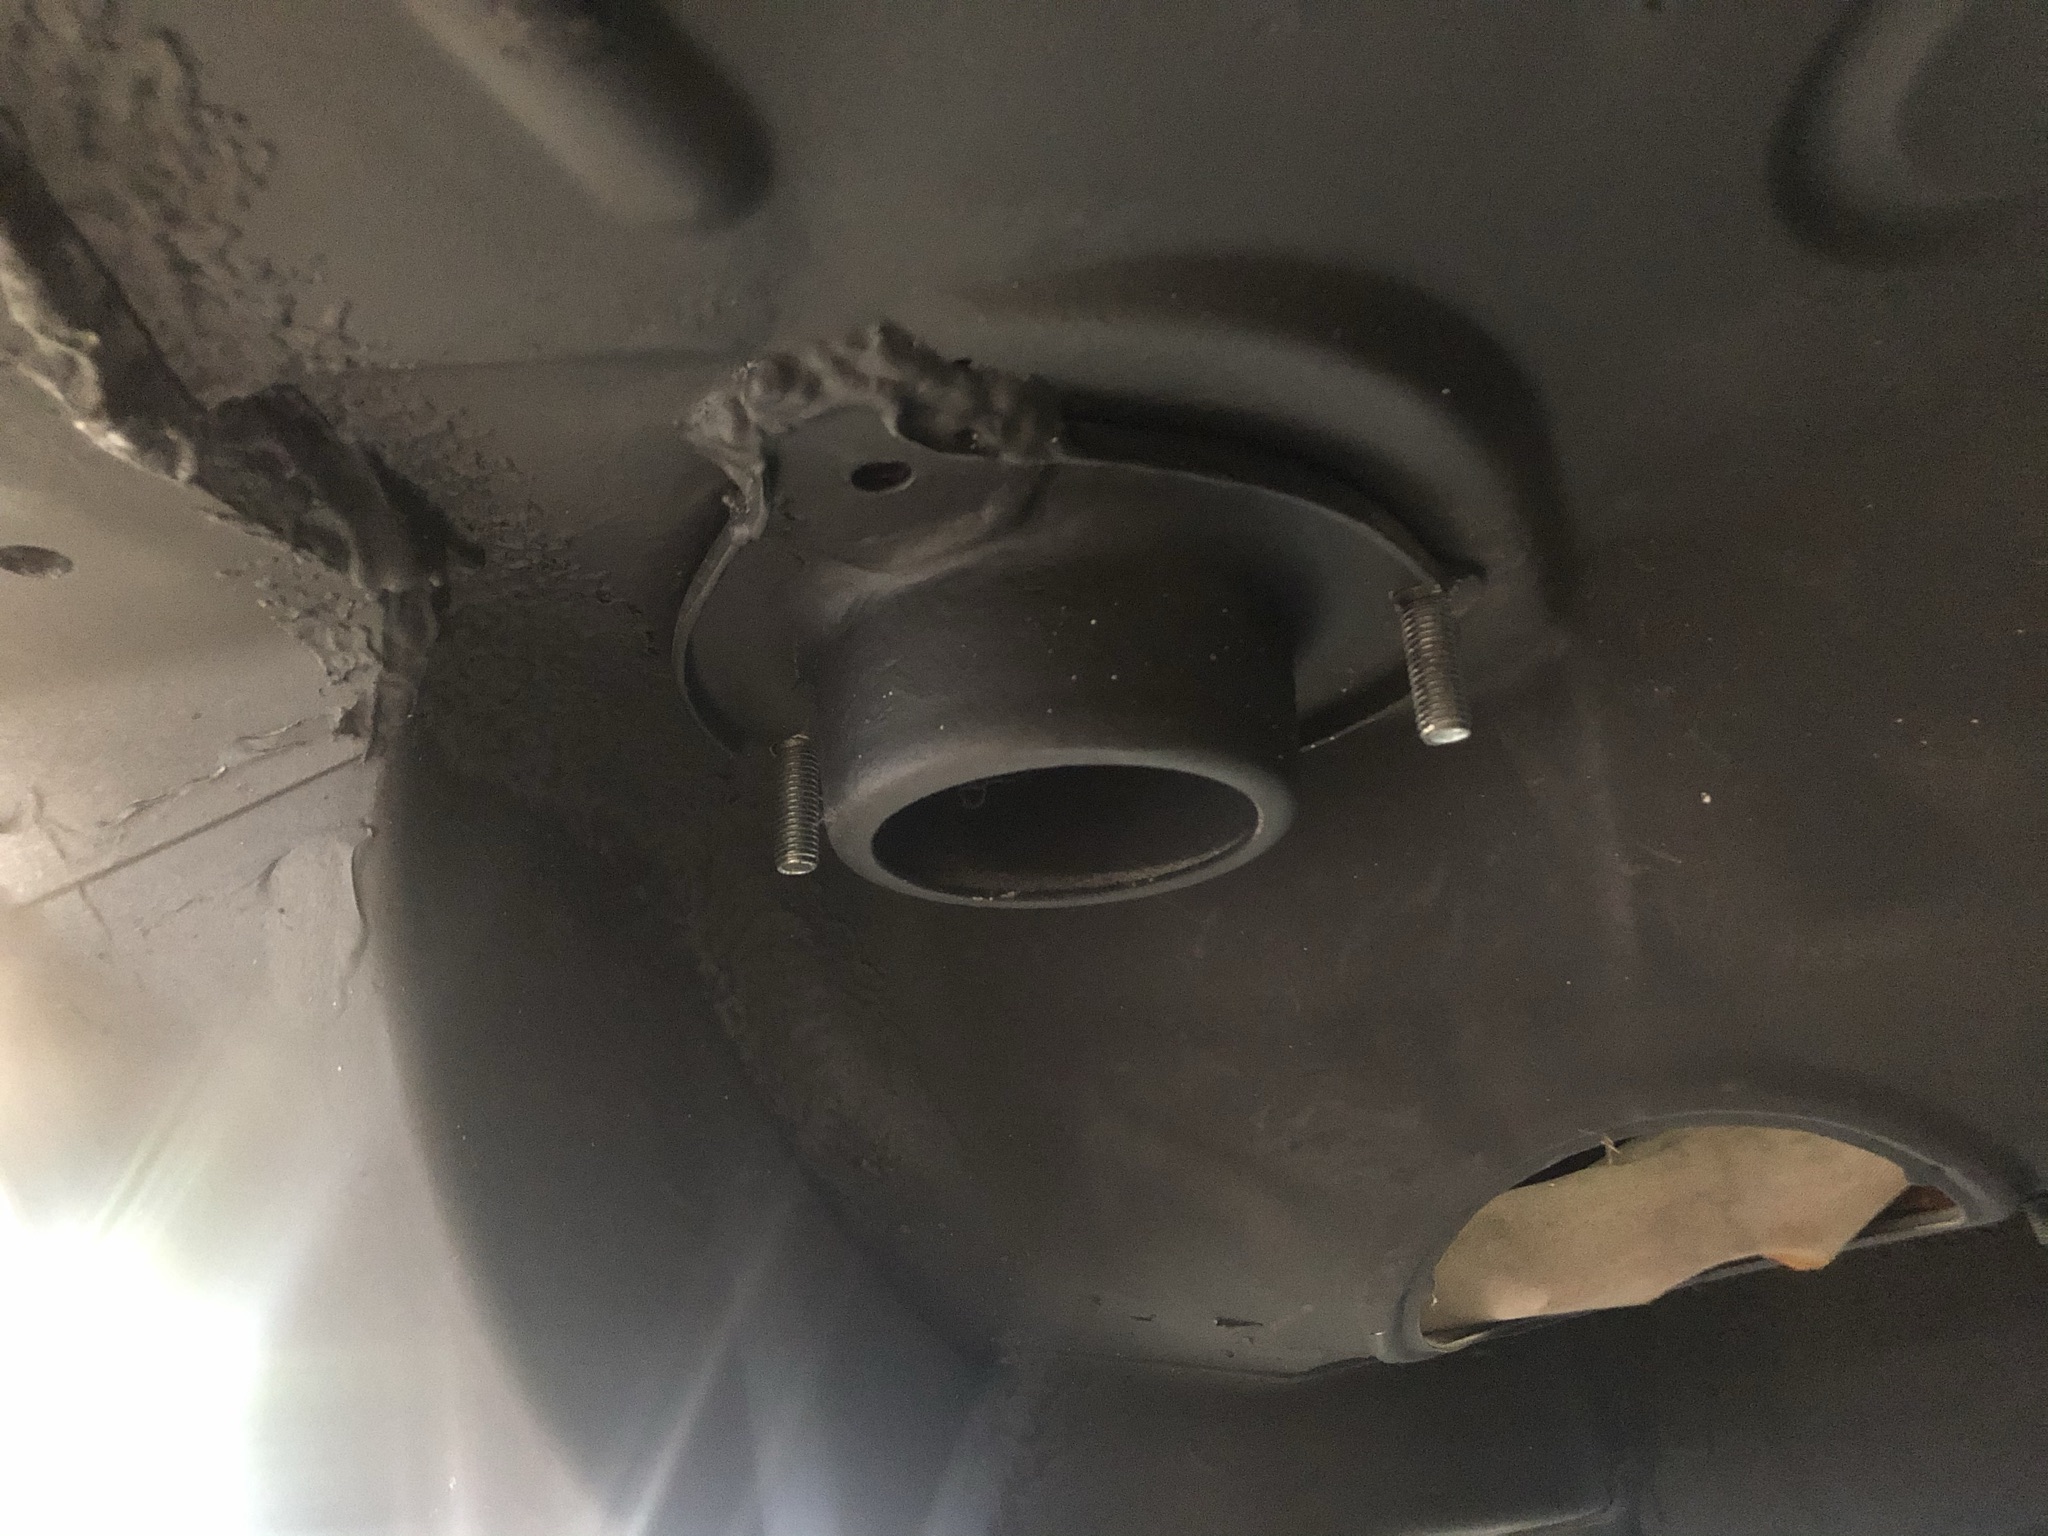
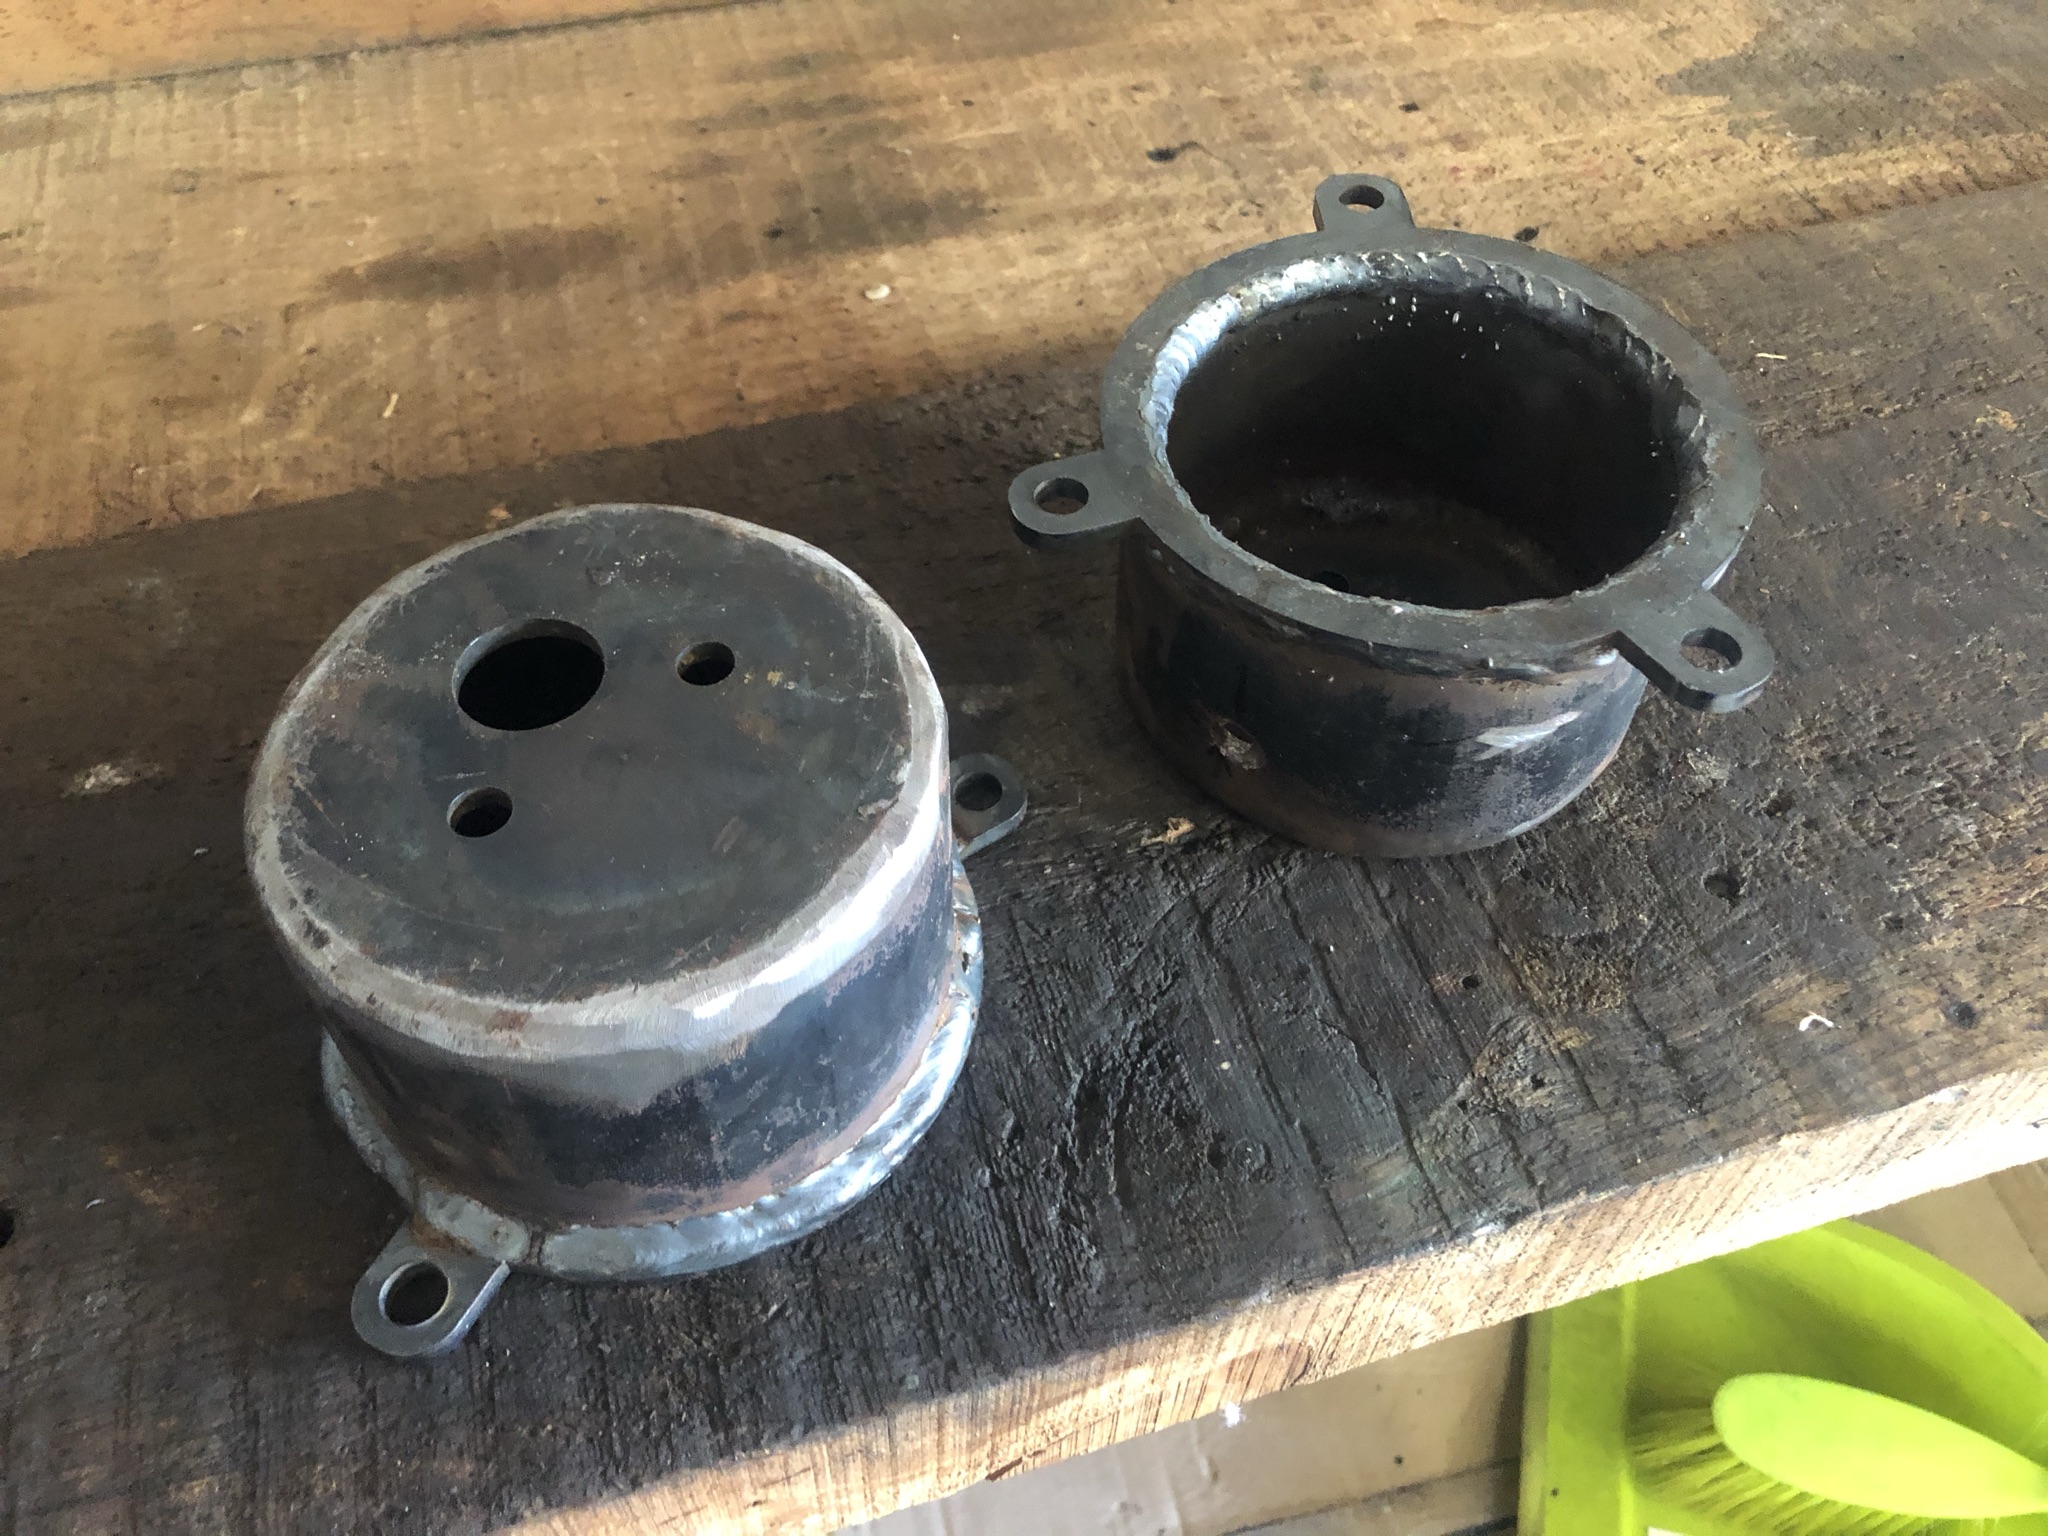
Howdy, been awhile. Life got in the way there for a bit; moved out of Auckland (subsequently moved house a couple of times with the Merc spending a bit of time in storage), had a baby etc. but Xmas holiday period has allowed me to make some progress. I wasn’t happy with the tabs I had welded on the upper rear airbag mounts, so ages ago I drew up some flange things and had them laser cut, finally got around to cutting the old tabs off and welding on the new flanges so thats all much tidier. Drilled some holes in the car so the aforementioned mounts have some way of attaching to the car, front two bolts come through from underneath the rear seat; the rearmost hole had a captive nut welded on the topside as it’s inside an enclosed box section of the car (welding upside down can suck a pineapple) Gave it a prime and a paint to match the rest of the underside The engine I mentioned is in no hurry to rotate, I spent some time trying to free it up with various liquids and heat but nah, Piston 1 isn’t budging. Was scrolling Facebook marketplace one evening looking for a transmission and stumbled across a guy selling another engine for cheap approx 800m from Sentra Daves place in sunny Onehunga so bought that. This motor is an M130 out of a W108, the last variation of the M180 engine family. Displaces 2.8 litres (vs 2.2l), make 160ish hp when new with improvements including larger valves in the head and 7 main bearings vs 4 in the smaller displacement versions. This one runs (although the cam has seen better days). An added bonus was that it came with a power steering pump attached and the power steering box from the W108 it came from - which bolts into a W111 as they’re the same chassis, So I need to source a shorter steering column from a W108 to suit and then I’ll gain power steering. (KY if you see this I still want that V8 so don’t panic) Spent the last couple of months leading up to Xmas buying various supplies to put some paint on things, including a couple of spray guns based on YouTube recommendations. Got a chance to give the boot floor a sand up then smooched some seam sealer around the place and waited for it to stop raining. Got a chance to mask it up, wipe it down and blow over a fresh layer of epoxy primer followed by some 2k satin black For my first foray into spraying paint it came up not bad.jpeg, couple of rookie balls ups mainly consisting of me dropping the air hose on the boot floor whilst trying to reach under the parcel shelf etc which has left a couple marks but it’ll all end up hidden under a rubber mat/carpet so I’m happy as with it. Rear tail light panel will end up body colour (which isn’t black). I’ll probably need to go back and brush on a couple bits that I couldn’t get the gun too. Progress feels good though.
- 26 replies
-
- 24
-
-
-
Does that mean one year WoFs on 30 year old parts?