Bling
-
Posts
24,230 -
Joined
-
Last visited
-
Days Won
3
Everything posted by Bling
-
Depends how much bigger you are talking. Pretty sure my exhaust was smaller diameter pipe and slipped inside my muffler so was an easy job. I grabbed it locally though so I knew it would all work. Been a while, they may have even flared me a bit of pipe to make it a closer fit.
-
I roll a LED lantern if it's going to be hard to see. Just positioned off to side as suits.
-
It depends what you want to be welding too. If just panel steel, then just learn on that. I'd have to relearn thicker material welding as 99% of mine is sub 1mm thickness. With practice the settings don't tend to matter too much, for spot welding at least. As long as you're in the ballpark, it will work. Might just be shorter or longer on the trigger to do the spot. Not long enough and it will just sit on the top. Too long and you have a bigger hole to weld up...
-
Agreed on the hot spots vs beads for panel work. Sure it's doable to do beads, but the panel is going to banana pretty bad. Hot spot and leave time between hitting the same spot again. I don't think I did anything other than spot welding on all of my car repairs. It's all tuna can spec thickness so doing spots is sweet.
-
If you had the oven plugged in rather than hard wired you could just unplug it to make use of the capacity?
-
If anything Co2 will give more penetration, profile should be down to wire speed, or speed of torch I guess. Flow rate i'm not sure, maybe 10-15l/minute? Been a while. That's pure CO2.
-
Maybe try pulling back the wire speed to get it a bit lower profile. Good penetration though on a lot. Just maybe more wire into the job than needed. Pros feel free to chime in lol.
-
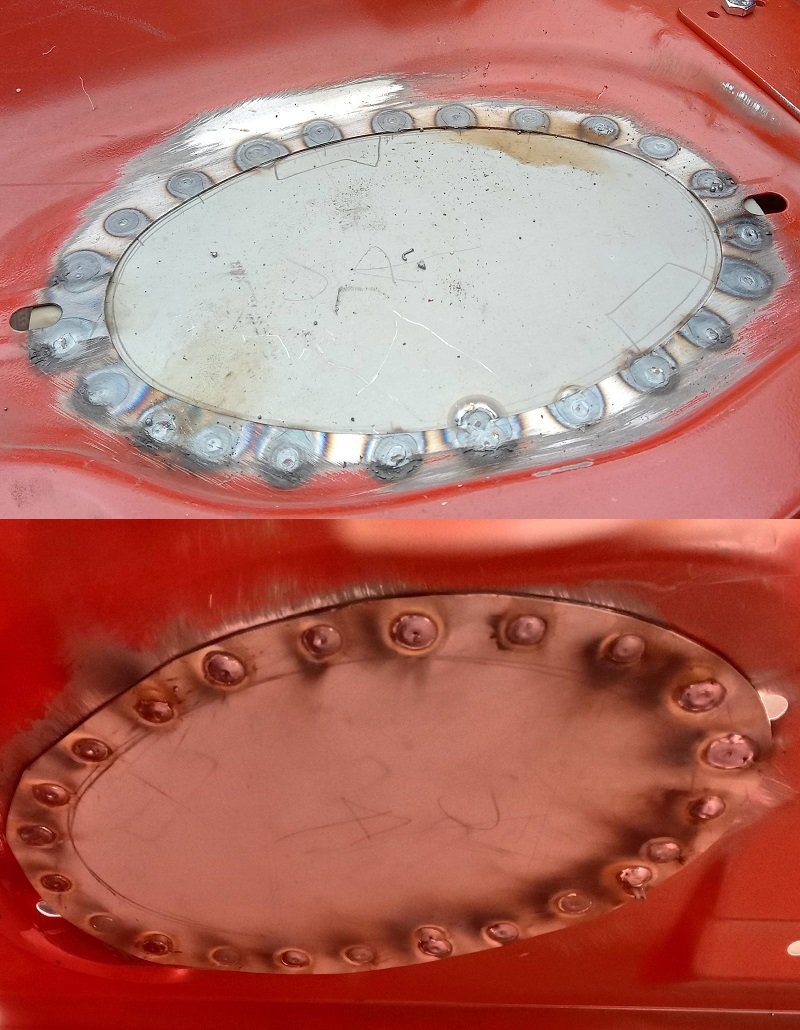
Underside? A lot look quite proud of the base material so seems like they are on top rather than penetrating. I'd want to be closer to 50% of the bead on the top and 50% showing on underside. This is one I had to do, 5mm holes punched in the section I welded into the car, welded from below. Top half is topside, so showing penetration. Bottom half was where I was in my boot on my back in pain. This was good enough to get the tick for filling in a speaker hole. But shows the welds are quite flat on underside and showing some penetration and heat rings around the welds.

-
A vote here for no flares if you can make it work. I just really like how that current front wheel arch design is shaping up. It will still look sweet if you fit more dish in by going flares, but vote stands. Especially if going spacers and no more cell phones fitting in the lip. 2c etc, great project.
-
Maybe try https://www.mrpltd.co.nz/ They tend to focus on certain platforms, but may know who to use if they can't sort it.
-
Depends what you are doing I guess. Was it lap weld of two panels? You'd see evidence of the weld a lot clearer on the underside if penetration was good. Last weld I did was plug weld two panels together and you could see the plugs from both sides of job. Perhaps wind the wire speed back a bit and leave the other settings as is. If I could get to my welder I'd chuck up examples of cold welds and welds with good penetration. Can't even get to my bench though. Not saying that job will fall apart at all. But in a case where you need more strength, it may be lacking. Also don't do it for a job so could be off mark. But that's my experience.
-
What's the backside look like? Looks a little cold as the edge of the slugs isn't melted into the base material. Just guessing anyway, could be wrong, backside will give the answer.
-
I'd flick them a message. Checked my previous orders and it says warehouse NZ. But NZ Toyota can't order the parts so I really doubt that is accurate. USA order may ship direct from Japan rather than between warehouses first maybe. Try another NZ address? I just added the top light to cart and it makes no mention of the shipping issue. I haven't hit go though, so perhaps that happens when you place the order. edit, saved all my cart items and left just the light. added the other two items and shipping stayed the same. I'd still not be 100% convinced they have stock. But i'd try another addy and try again.
-
They ship to NZ fine. Are there items listed anymore? Mine used to show out of production or similar.
-
That would make sense, desirability wise. '97 here, just took it slow as you suggest. But who wants to flat tow fast around town anyway.
-
Flat towed my old auto rav4 to mechanics 8km low speed. Thrashed that thing for years and no issues, so it can't be too bad if the above rules are followed. Wasn't it's first tow either as I helped the original owner tow it home after it sheared the cam pulley off the cam.
-
I have a less than 50% success rate on parts being available, certainly doesn't stop me!
-
Just don't get your hopes up too high on them being available.
-
Pretty detailed video that may be of use.
-

Tomble's 1983 Starion GSR-X fumbling / hand-holding / discussion
Bling replied to tomble's topic in Project Discussion
Suspension looks good. Might want to check with your certifier about the amount of shock that needs to be threaded into the strut, pretty sure it's 50mm as per your manual. May have been thread diameter too though... been a while since I crossed that bridge. Just handy to know as that will drop you another 20mm. -
I think we can comment in here? (mod can delete if not, seems the go though). That thing has come up MINT! Gotta be better than new now. Anyone that even mentions chequebook isn't someone worth talking to. They clearly don't understand what it's like to have no time to complete such a project. So I wouldn't let any potential haters worry you. Getting that bike back on the road and immaculate, is a million times better than it sitting in a shed getting no love. Well played, awesome bike.
-
Could depend how much distance you need from the ball to the flat section. Could cut a flat bit of plate so it's a nice tight fit around the shaft below the ball. A U shape piece, if the thickness allowed, that might be strong enough to be the tongue. Could always weld more plate on the sides under the plate when installed and rack is level. Could still slip it off when not in use. But when in use it uses the force of the bolts to hold it all together. Shouldn't be able to move as it will be jammed against the whole diameter of the bar. I have a similar, but not quite as bad problem. The tongue on mine is minimal around the back of the ball. So if my rack doesn't work i'm just going to make a small metal plate in a donut shape and bolt it between the ball and tongue. Same sort of solution to the above, but my plate won't need to be as thick as it's supported.
-
Probably not. You'll probably find they all go by the LVVTA spec as nothing for them to gain by saying yeah stretch our tyres and we'll take responsibility if you stack it. Too many numpities took stretch too far so now it's tightened up. Any old documents that did exist are probably no longer valid. Why even worry? You don't seem too worried about suspension working properly so just run the tyres you want and deal with any issues that may or may not occur lol. This should still be current: https://www.lvvta.org.nz/documents/infosheets/LVVTA_Info_01-2009_Tyre_Size_to_Rim_Width_Compatibility_Guide.pdf The above table is also referenced in the WOF VIRM, so can be a fail if the inspector is looking.
-
I don't know Sierra, but know that in my car, if you do that conversion you need to strengthen both the bottom mount and shock tower. From memory anyway. Correct that shit ain't made to work like that. Not on the road anyway, if it's race car then anything probably goes.
-
Check what TGP hoses are worth, from memory not bad. If available anyway. edit: amayama doesn't look bad, $14US for a front, picked random KP so YMMV.