Bling
-
Posts
22908 -
Joined
-
Last visited
-
Days Won
3
Everything posted by Bling
-
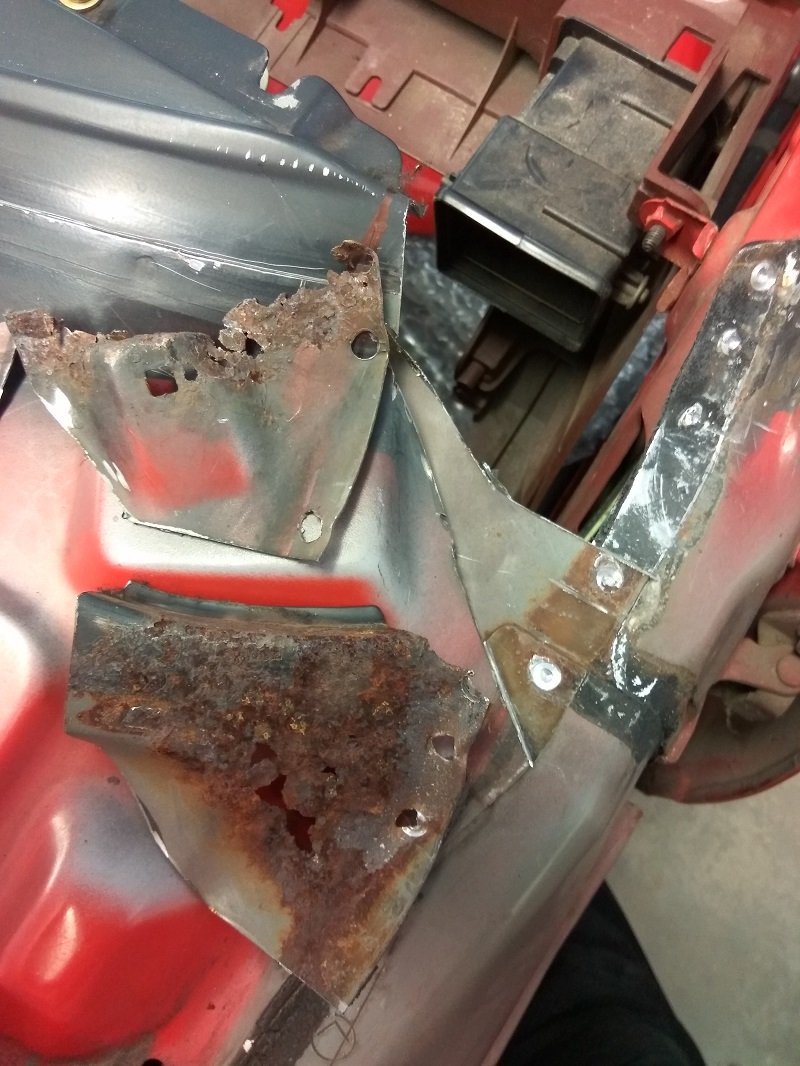
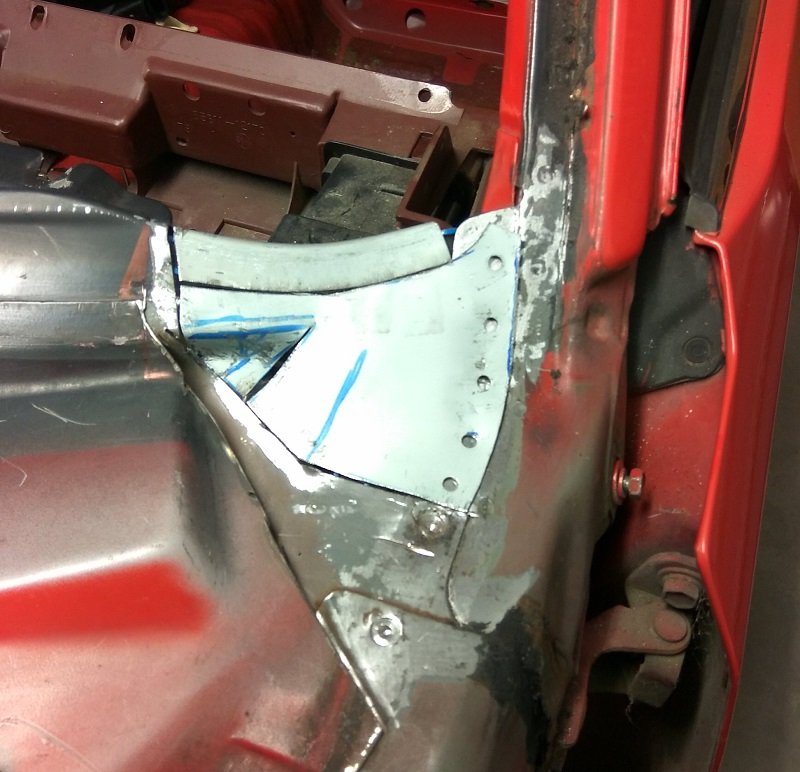
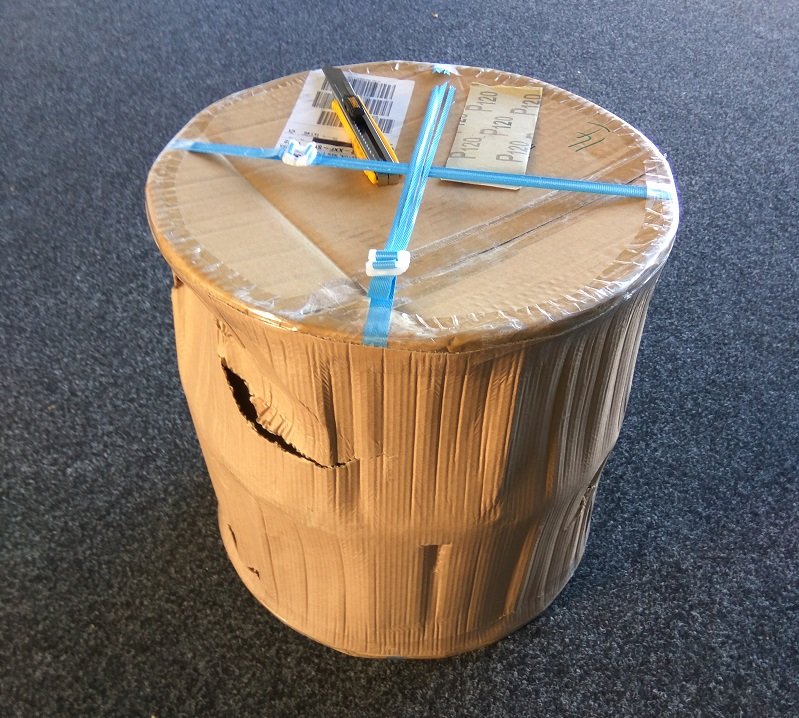
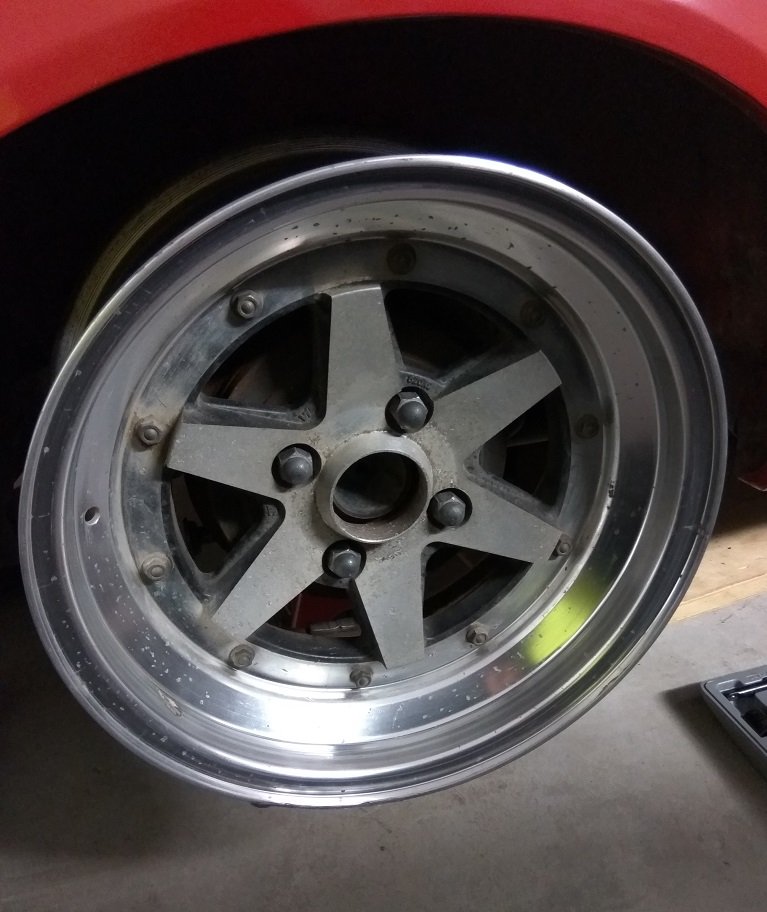
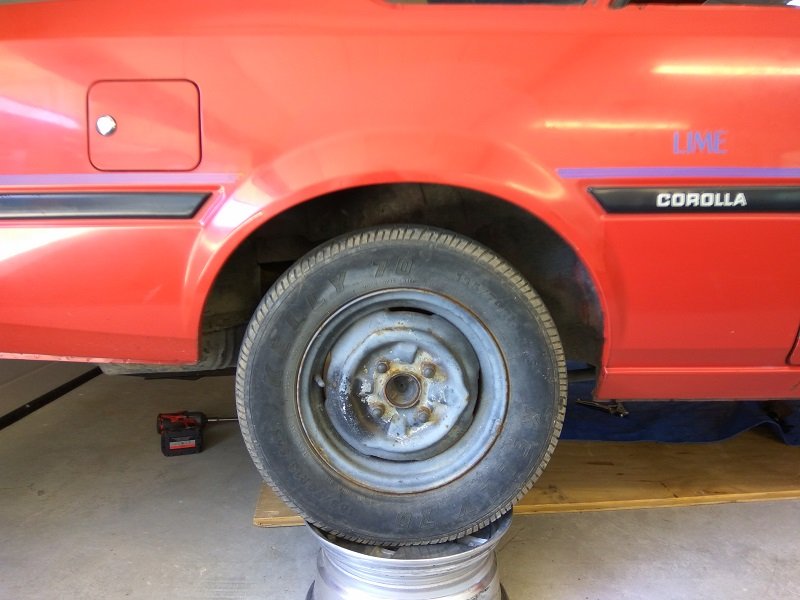
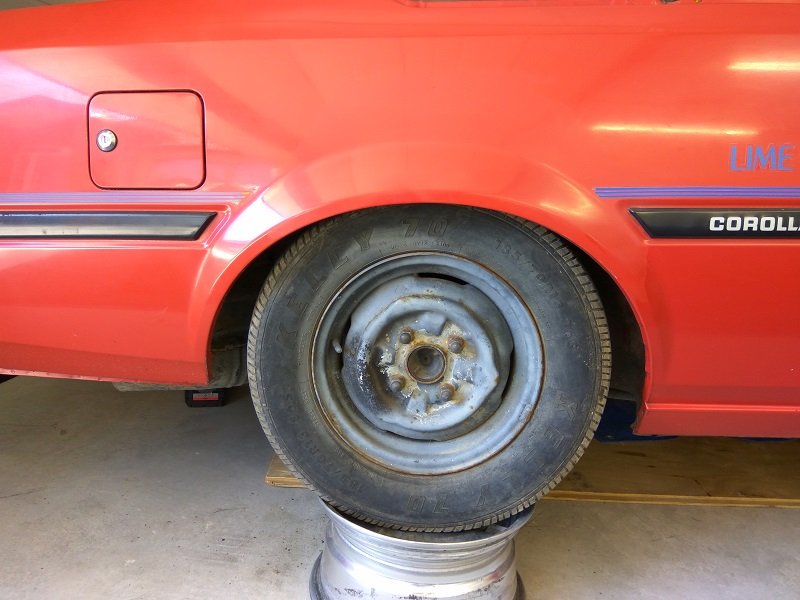
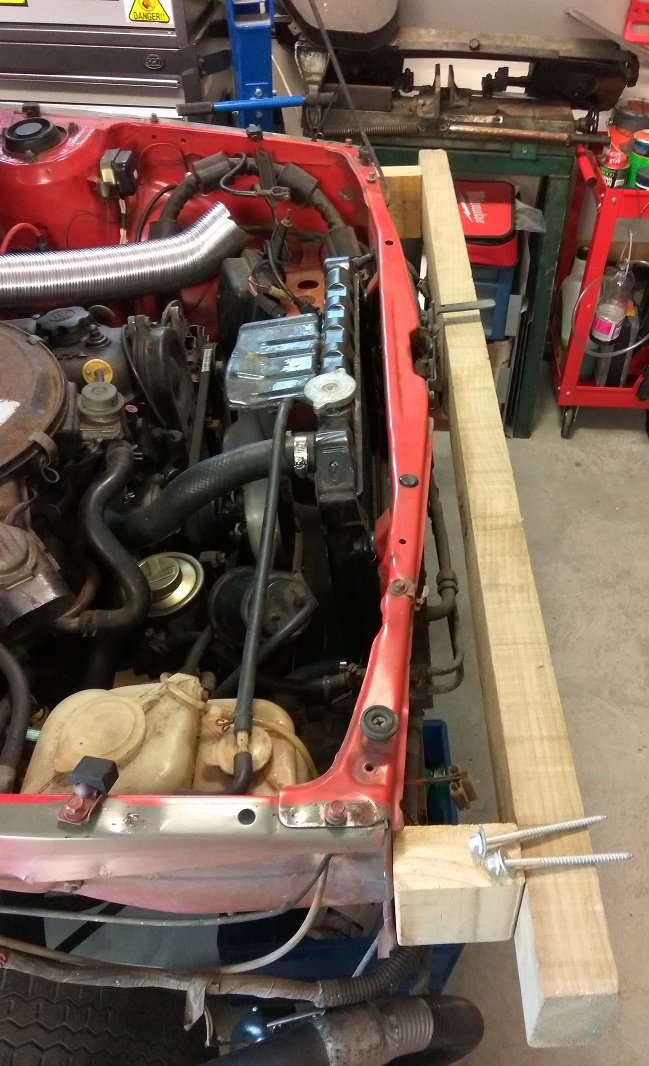
Haven't done bugger all on this recently. Had been trying to source some cert happy 14" wheels, but that didn't happen. Wheels held the build up a little bit as I needed them to start working out other things that will happen later. Anyway, some pics of the limited progress since last update. "Built" a frame to straighten out the headlight area of the front. Didn't take too long with a handful of long tek screws, to get it much closer to the right shape. Happy enough with the results, so that will get a primer / paint later on. Amazingly complicated alignment tool: Previous to that I had removed the rusty A pillar section shown earlier. Before, with the two layers removed. After, with one section made up, i'll make the top section when I have this one welded in and epoxy primered up. Then weld that over the top, epoxy, paint. Meanwhile, this turned up, with a friend another day. And unwrapped Wheel specs: SSR XR-4 Longchamps, 15x7-1(x2) and 15x7+11(x2). Lost count of the hours spent browsing Yahoo to find a set or even a pair that matched the offsets I measured I wanted. Well worth the time in the end, but it did drive me half insane, finally finding some, only to be outbid by twice my budget. Nothing super wide or dished, but they will sit well on the car I feel, and I can wrap them in damn good tyres. Similar dish on the rear to my 14x7.5-1, but with 10 times the number of tyres available, an easy choice in the end. I also removed some unnecessary weight from the rear of the car, to help sort the ride height. Shocks and springs, overrated. Before: After: I will be home alone for the whole Xmas break, so will be aiming to get the car completely back together (for now) with all of the rust cut out and replaced with new steel. Epoxied up and some red spray cans to tidy up the repairs. Then I can start the next stage which will get quite expensive, rather quickly. Until then, let me know what i've done wrong here.

- 23 replies
-
- 23
-

-
I have come across similar areas on my project car. I am leaning towards doing nothing with such areas, they have lasted 35 years with nothing more than surface rust. My thought was that sealing any seams near it, could end up trapping moisture. Especially if you can't prep it 100% legit. Right or wrong, doing nothing works for me, I have enough proper rust problems to sort. Tempted to Amazon source a full face 3m mask for relatively not much, for all paint chobs. Still need to get around to sourcing the epoxy primer too and some colour matched spray cans. edit- not as cheap as I thought after all, half mask might have to do.
-
Do you have one at all? Could get it recored for $$$
-
Send photos to POR15, see what they say.
-
Can still roll in a car with a busted drive shaft though, Roman provided proof of this. My theory, and it's only a theory, is that nothing should be within the hoop except the driveshaft. Credit to @Roman for the pic
-
Would be less than ideal the driveshaft coming loose and grabbing the cable to give you sweet rear braking. 2c
-
Is it rusting from the inside? As in moisture inside the frame is feeding the rust? I just really can't see moisture getting through the paint to the frame.
-
Mags on to stock wheel hubs. For cert do you need hub-centric rings when using tapered wheel nuts? Cheers
-
Probably too lazy TBH. Kaiapoi has some carnival / show and shine on the 1st dec too https://www.eventfinda.co.nz/2018/kaiapoi-toyota-show-and-shine/waimakariri?fbclid=IwAR0dsh0MWMFj-ZqhGM-oVvFNgHCfEwmUhflNUsabrHBfJizlYzCJBiN7LV8
-
So uhhh was there one tonight? Not that I mind eating alone, lol.
-
Certainly worth whipping the whole thing apart and cleaning it out. I had brake balance issues on mid 90 toyotas and found both times TINY bits of dirt in the proportioning valves. Different cars. Pulled apart and all cleaned up for perfect balance come WOF time.
-
Metal ready goes on before the paint, I assume this was done though?
-
Nah not turbo, just a typical 80's econobox engine. Folding up steel could work, just a bit of work due to space / angles, so wondering what the norm is. There were a few bits on the factory exhaust, but i've cut the cat out and replaced it with a longer section of pipe as there was a gap from cat to engine pipe to start with. So putting on a longer bit of pipe and removing cat seemed like a good plan.
-
When building an exhaust, how much clearance would be suitable from a floor pan? Most of floor has fabric sound deadening on top side. Want to tuck it up as high as I can without needing heat shielding. Is 20mm fine? If shielding is a good idea, what do people use? How much movement would one expect from a FR chassis exhaust? All of the questions. Stock 1500cc engine with 38mm tube.
-
They work 24/7 too, so unless you want to buy new filters each time, put them in something sealed when not in use.
-
What is the suspension setup? Is steering arm and hub one piece or can you space down steering arm with RCA? (out of interest)
-
Sorry I should have made it clearer, I was jumping on the bump steer question band wagon. Not commenting about his setup, I lack the know how to make comment on that bit.
-
My brain melted trying to comprehend that lot... In theory, if you can keep the strut distance the same as factory, or close to it, there shouldn't be much change from factory in bump steer, correct? So for example, a shorter strut installed, with RCA spacers attached to bottom should keep the strut length not too different. It's all about keeping the steering arm connection close to stock distance from top hat position. Yeah / nah?
-
Was it perfectly clean and do you have flux?
-
Using the rods you speak of. You're right about cleaning the area first, you'd want nice and fresh metal before any methods. Just thought the above video was pretty sweet. I wonder how well it would work for fixing mag wheel gouges.
-
Get someone that can join coke cans with a tig to weld it up for you. Unless you want this to be a DIY job.
-
Toyota ILAM were adamant that our CVT contains a magic lifetime fluid. I guess the lifetime of a typical vehicle is 10 years, before they want you to buy a new one. So correct in that respect.
-
Car is looking sharp! You really need to bite the bullet and fix that bonnet though, detracts from all the time and effort you've put into the rest of the panel job. 2c
-
Yeah i'd do that ^^, can probably get it at M10 / bunnings for bugger all. Then you can work out lengths and go from there.
-
Have seen them mentioned a bit in the past, Xcel-Arc (or similar too). I'd search for "welder" on here and read all the threads about buying a welder, some pretty solid advice contained within.