Stu
-
Posts
1458 -
Joined
-
Last visited
Everything posted by Stu
-
I love how the first sniff of a 1nz conversion and DaveScience is in there with the maths. I heartedly approve. #1nztheworld #morerevs
-
Same, happily throw in a fiddy to see another block put in this thing asap
-

Stu's 4agte 85 EP71 Starlet and 4age 84 AE86 Levin
Stu replied to Stu's topic in Projects and Build Ups
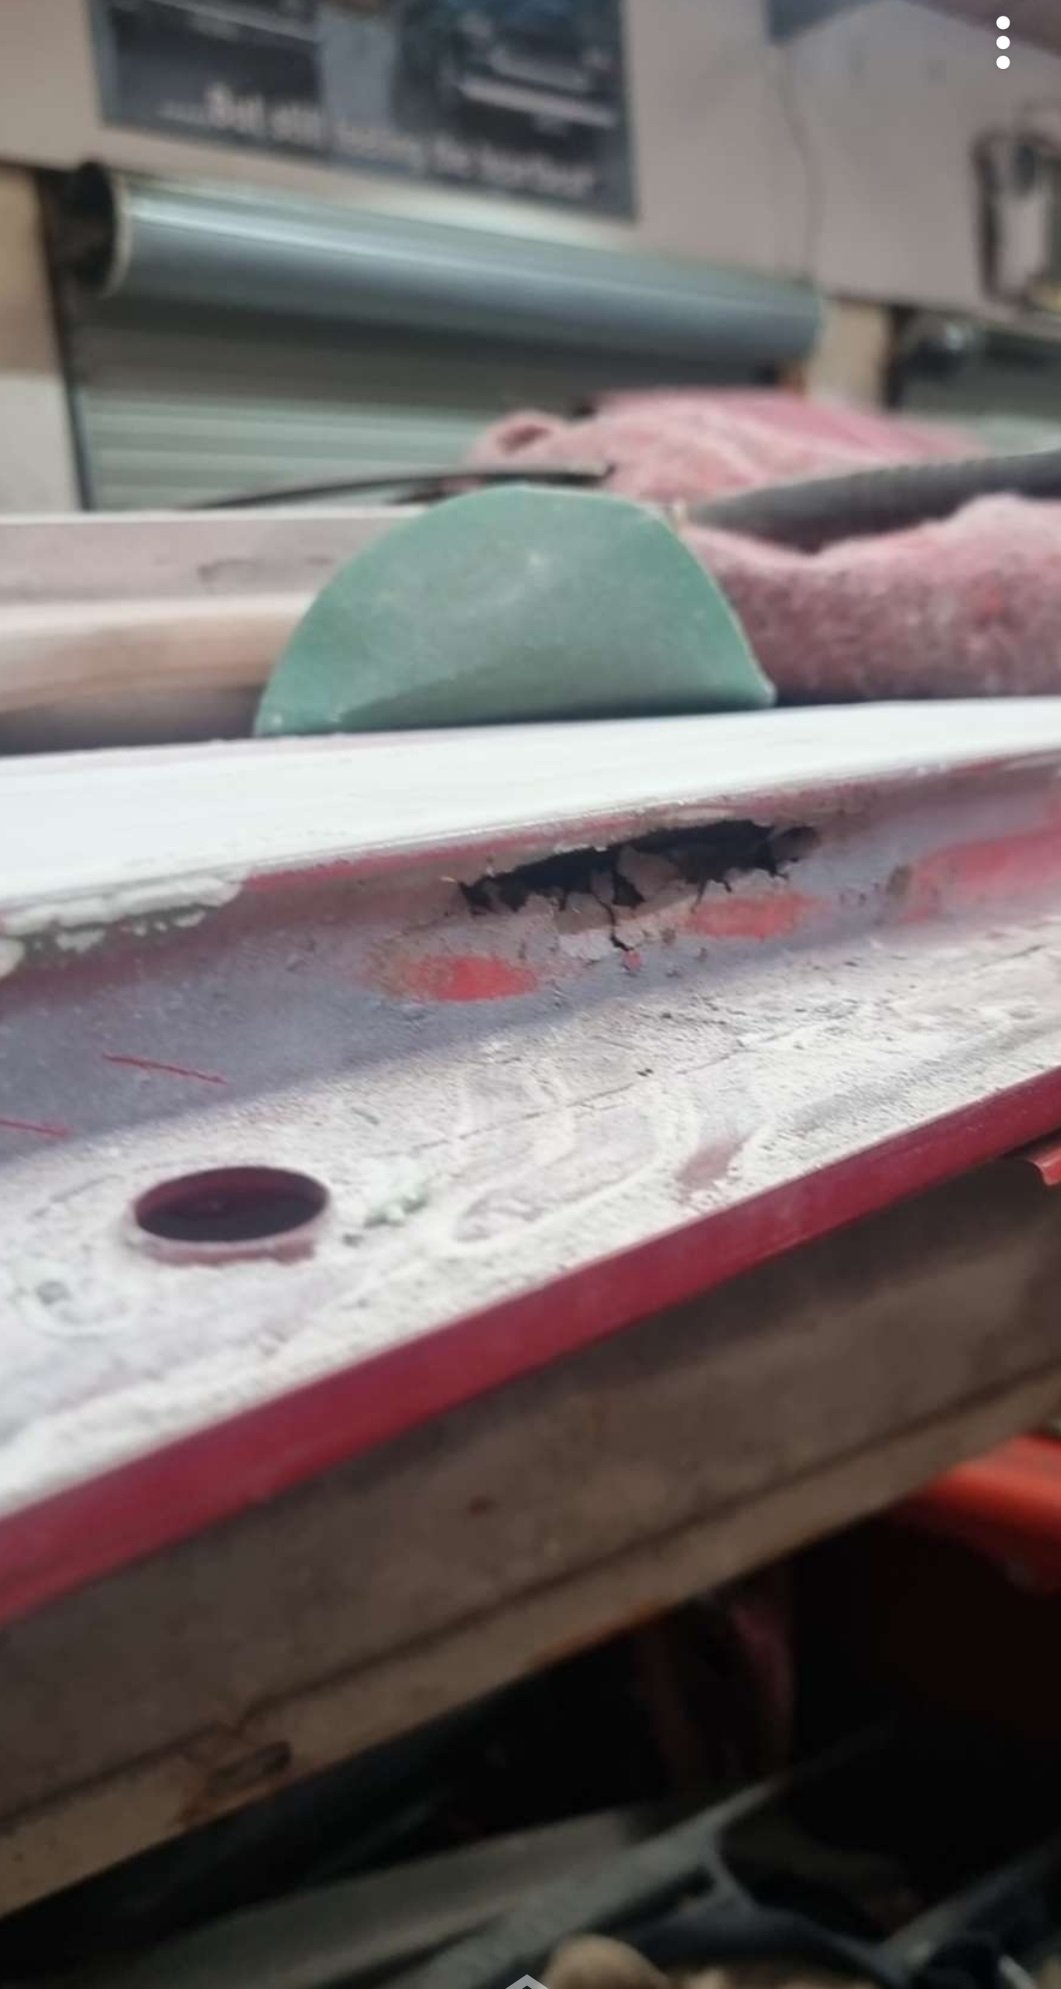
Oh yeah, also found another hole in the NA 4age EP71. Fuck I hate bodywork. Everything else is looking good though so hopefully in the next month or so it will be close to ready to paint.
-
Stu's 4agte 85 EP71 Starlet and 4age 84 AE86 Levin
Stu replied to Stu's topic in Projects and Build Ups
Holy hell, two updates within 6 months?! I think I've mentioned before that there isn't a lot of real estate for the ecu and wideband etc to be mounted so I've been taking advantage of every piece of space available to mount things. Ecu's laying on the floor or stuffed loose in a glove box is a pet hate of mine. I needed to find a space to mount the CAN-EGT amplifier and the Spartan3 wideband and worked out there is some clear space between the back of the glovebox and the blower box which might do the trick. I drew up a mount and once again the GC @Roman 3D printed it and it came out great - admittedly it took two goes because my tape measure was faulty... Anyway, got there in the end. The two little caps are to capture the cables so they don't move and put stress on the plugs. Everything fits well and the CAN-EGT clips into place solidly, glad that worked out. This is where its going to live. So everything is starting to take shape now, and ive buttoned up the drivers side. I need to find some new clutch and brake pedal rubbers, a fog light switch, replace the few bulbs in the cluster/console as there are a couple not working, find a black bonnet release lever, and give everything a clean. I'm still hunting for the head light and wiper switch bezels that have the dimmer and intermittent text on them as the switches are the adjustable ones but mine don't have the text on them. Also managed to get the factory radio running again and have been listening to a few classics. I like the factory dash insets for storing tapes. Last year I got in on a group buy for some carbon weather shields so fitted those too. And here's the alternator all rebuilt/upgraded. Have fitted that now, waiting on a belt to show up then the charge circuit stuff is all done. I'm working on the engine loom at the moment - plan is to have the injection circuit and the coils circuit to have plugs to the main harness so if I ever decide to change them its only the sub harness that needs changing rather than the whole loom. Anyway, more on that once its done.- 31 replies
-
- 14
-

-

-
Stu's 4agte 85 EP71 Starlet and 4age 84 AE86 Levin
Stu replied to Stu's topic in Projects and Build Ups
Update time: Blue EP71 I've been thinking about what to do with this car and have finally come to a bit of a plan. Currently its under cover in dry storage and gets largely forgotten about for months at a time. Every now and then I take the cover off, stand around pondering things while it gets a heat cycle or a short drive, then put it all away again. Its reasonably functional in its current form, is a total animal to drive (read FUN), and works well enough. I'm sure I could jump in it and rattle off more high 11sec quarter mile runs (possibly quicker) or go hit a track without too much effort. But there are a few small things that past Stu did that current Stu isn't so happy with. I'd like to swap back to the taller ratio gearbox with the new Cusco LSD I've got sitting on the shelf to see if one less gear change on the quarter mile would make a difference. I've also got the new S2 GTX2867 to go on, all the stainless bends/pipe for the upgrade to a 3 inch exhaust. I'd pour some new engine mounts at the same time, change the hot side intercooler pipe, finally fit the front lip properly, rewire the main power feeds, put some high impedance big injectors in it and do away with the ballast resistors, maybe upgrade the ecu to an extreme, wire up the speed sensor and clutch position sensor so I can setup proper launch control etc. I'm motivated, but the reality is that I don't have time for this with house renovations, a growing business, caravan build and the AE86 being priorities. So, for now this thing will continue to stay parked up for the most part and the aim is to refresh it over winter 2023 and get it ready for OS drags 23. So for now all Ive done is have the alternator upgraded/rebuilt, bought a new battery, pulled the spare gearbox out of storage to fit the new diff, and ordered a few vband clamps. #boring I'm hoping that in the next month or so I can find a weekend to give it a good clean as it got put away filthy so at least I feel its not being neglected. And here's one of my favourite pics to keep the motivation going: Other EP71 The beater has had significant rust and panel work done to it since I bought it and its "nearly" ready for paint. A really good mate of mine is tackling most of the work and has done an amazing job - I'm very thankful as I just don't have the time to do it myself. I actually bought a donor shell to take doors/hatch/guards and a few cuts from as there was a fair bit of rot. It will never be a show car but its looking miles better than it was and Im looking forward to getting it back on the road for general hooning. Will take it up and dyno it with KPR at some point and finally use the ramps that allow the dyno to take FWD cars that I built aaaages back. This is an old photo and its much further on now but you get the idea. Ive picked up a full Si body kit for it (side skirts, front lip, boot spoiler) which I'll paint up when the rest of the car is ready. I'm on the hunt for some different wheels for it but unsure what I really want - should really stick with 15's for cert but tempted to find some 14's. The 86 I haven't really touched this much until lately while Ive been waiting for Caravan parts to arrive. Changed out the front strut brace for a Cusco one. Fitted a kill switch in the engine bay and tidied up the main powers - will likely move the earth point to further forward on the chassis leg so its not seen. I want to eventually run a big fuel pump and big coils etc so rather than relying on old relays etc I setup a new relay/fuse box up under the dash on the passenger side. Have run the feeds through to the battery and will hook them into the factory main fuses as there is a slot free. Just trying to track down a fuse to suit then thats done. You can see the link bracket mounted onto the underside of the heater box - there's not alot of real estate to hide stuff. Ive also drawn up a mount for the Spartan3 and the EGT amplifier that DaveScience aka @Roman is going to 3d print for me - thanks bro! This will mount to the side of the blower casing behind the glove box so will be nicely hidden. Ive drawn up all the wiring diagrams now so any spare time will be on wiring the engine from now on. Thats it for now- 31 replies
-
- 16
-
-
-
Damn thats cool! Nice work Clint! Not long till smokey 11's?
-
A mate of mine owned that from last time I saw, pretty cool
-
Option A : EFI that bitch so the seat clears and much nicer running, then chop what ever needs chopping/strengthen what ever needs strengtherizing (yes thats a word... well it is now) to make it stay where it is for visual smug face when the seat is lifted (cert man is being lazy with no cutting preference). Option B : See above.
-
Ive got it on a small solar panel so its always topped up so couldnt tell you sorry
-
These could be an option? https://dcpower.co.nz/product/batteries/starting/vision-hp12-116w/ Ive got one in my 86 is it cranks it over pretty quick!
-
Nice work! Didnt really do much, just glad to see another project running!
-
Thanks @Mof, will check them both out. I'm not sure what the condition of the tanks are like yet but I'm expecting them to be filled with sploogy goodness. The new levelers are not exactly the same as the old ones but they were cheap and are longer plus are able to be bolted on which is handy. I got the rear leveler angle brackets made and zipped into place so bolted them on with some temporary fixings. On the front end the coupling base was a bit rusty and the cross bar under the LPG bottle bracket was bent and pretty second hand. So they both got diced off and I cleaned everything else up. There were a few small rusty pits that I ground out to clean steel, welded up and ground smooth. I zipped on a new coupling base which is much thicker steel for piece of mind, and used a piece of channel to recreate the bottle base reusing the old strapping which is fine. Cleaned it all up and layered on some hammerite. Still a bit to go but reasonably happy with progress. New jockey wheel to buy and fit (this has been a bit of a dick finding a replacement). front levelers to change out, bolt on a new chain, fit the new tow hitch, setup the brake lines, run new wiring as its currently speaker wire, replace the LPG bottle strap fixing and the LPG hose, then paint it all.
-
For sure! The new ones have a 19mm hex head on them so my plan is to use the battery driver I have to do them up Haha no progress on wheels yet but thats not far away. I've got a new set of hubs sitting at work ready to test fit onto the existing stub axles. I'm 50% expecting to have to muck around finding the right bearings but I'm hoping this will work. If it does then 4x114 is the new pattern so some good 14's can be fitted. I've got commercial tires lined up that are only 9mm taller than the 13's on there now. Once its all confirmed its going to work I'll be shopping for a pair of something old and rad.
-
More progress. With help from my trusty friends Mr Grinder, Mr Plasma and Mr Big Fucking Hammer, the offending rusty sections are no longer. It wasn't very hard to do, just drilled out some rivets thru the floor into the cross member, then chopped the thing out. Also had to zip off the levellers and chop back on one of the chassis rails that was a bit poked. Grabbed some new steel and wizzed some black hammerite on it where it contacts the floor, then metal poo sticked it in place. So a little bit of finishing work and that's the rust gone from the back thankfully. I'm grabbing some new levellers today, and will whip up some brackets so they bolt on this time incase I do something dumb like driving off with one down and they need to be replaced again. Ive also figured out the weird water tank thing is infact 240v hot water so once the welding is done will whip the cover off and check it out while repainting the chassis. I want to convert from the manual foot pump for the water to a 12v one that I have and will be replacing all the lines etc too. Im guessing the tank is filled up with spiders and gunk so will have to give that a good flush out and sanitize.
-
As an advocate of small wrong wheel drive cars with silly power Im sure you will easily get a 13 with some good traction. I don't think my EP71 runs much more power than you and its in the high 11s.
-
Great result! This should be a handfull to drive and so little boost too!
-
That guy has alot to answer for (past and future) I struggle with the same thing
-
Into the chassis work now. I spent a bit of time making a few preliminary inspections of the draw bar and rear of the chassis with a wire wheel on the grinder and some sanding discs. There's a couple of bits I'll grind back further or cut out and patch, but generally is seems ok. I did some ringing around local sand blasting companies and shit the bed a bit at the price some of them wanted to blast the underside for me. I found a guy just up the road who actually listened to what I wanted him to do and had a much more reasonable price so dropped it off yesterday morning. We slammed it up on the hoist which meant I could have a better look at everything. There's a few spots of surface rusting that I'll need to check over once its blasted but there wasn't any surprises - I know there is a section in the back that I'll need to cut out once its done. Pre-blasting: Then a few hours later I got the call that is had been done. They also have covered it with Epiphos which will help for the next stage and also hold any flash surface rusting at bay for a little while. Generally things are pretty good under there. I'm going to be replacing the wiring, brake lines, gas lines and more than likely the water lines too. This is the one area I knew about and will chop out and replace. I'll pick up some steel this week and sort it after work one night all going well. The leveling jack things are pretty poked so will get some new ones and zip them on before painting/sealing the underside. One thing I noticed while peering at the water tank enclosure was that there is some sort copper pot thing that takes up about a 3rd of the space. Its on the right hand side of the photo below. I'm not entirely sure what its for, its got insulation around which you can just see between it and the floor. So it maybe hot water storage? I didn't think they had hot water on board so will need to barry a bit more and find out what it is. My plan is to drop the tank and give it a clean out anyway so will no doubt figure it out then. Anyway, its back at work and I'll try to make some more progress next week. Have a new second hand fridge lined up too but it will require the kitchen being modified to suit unfortunately. I just can't justify spending the money for new unit.
-
Bit more progress.... or more steps backwards? I suckered Ash into cleaning the inside of the van out over the weekend while I was at work using the CNC machine for another project. She quite quickly filled the skip bin with all the old crap that we wont ever use. She also took one look at the carpet and out that came too. Glad she did as it highlighted a couple of leaks that I hadn't spotted before. They are caused by water getting in through the wall panel joins under two of the windows - you can see one in the last picture of the previous post above. My uncle had put tape over it by the looks which didn't really work. So I opened the windows, took the frames out, drilled out the rivets, split the panels and took a look inside the walls. Everything looks great in there with no signs of rust etc so I sealed it all up and fitted new rivets before putting the window frames back in. I've subsequently tested the areas with the hose and its all water tight now. Checking over the floor it does look pretty shit in a few places and there are stains where the water has been, but its actually structurally fine so we will give it a really quick sand/clean then recover the floor with a timber look vinyl. You can see where the water was coming in behind the swab to the left of the fridge, I'll replace the wall paneling there, luckily it hidden by the squab anyway. Another job that doesn't excite me at all is recovering the squabs, so Ash is going to get an upholsterer she knows to do it all for us. Much easier to pay the money and get it done fast than spend a week of Sundays and do a shit job. The fridge is fucked so have tossed that out and am on the hunt for a new one. Im tempted to start again with the kitchen and make a whole new one with a single piece top and a new cooker too. Will worry about that later on. Chassis tidy up and wof are first to do.
-
Please enter this in dirt drags...
-
Shitballs that is looking amazing! Keep it up!
-
Over the last couple of weeks I managed to get a second hand coupling off a mate and swapped that on just so it can be moved. Also fitted new lights which were surprisingly cheap at $50 for all four. Ended up running the gauntlet and driving it across town to work where it will sit so I can work on it. It seemed to tow fine so I think the duratorques are still good even after sitting since 2008. Will eventually get new hubs, wheels and brakes. In the mean time I gave it a quick waterblast clean up. Here's before: During and after: There's heaps of hard to remove gunk still to go and I'm thinking of hitting it with some wet and forget or something and let it sit for a week or two then hot wash scrub it to get the rest off. Its come up pretty good regardless. Couldn't resist the urge so gave a bit of the blue a quick cut back to see what its going to come up like, and was pleasantly surprised at the result for such a quick hit. With some decent effort it should come up pretty well! Will caramel wheel off all the graphics and replace them as we have a vinyl cutter which will probably be as far as I go with the thing. Next is ordering the brakes etc and hitting the chassis with the wire wheel to see what its like.
-
Thanks man! I have a lead on some 5x114 hubs so maybe thats the best bet
-
Definitely going to 14inch commercial tyres! Just need to find some cool rims
-
Thanks for the info! I've sorted getting it transported to work so will be getting stuck in as soon as its here. I'm keen to get a decent width wheels in there once Ive measured the available space.