flyingbrick
-
Posts
11652 -
Joined
-
Last visited
-
Days Won
2
Everything posted by flyingbrick
-

Tech Spam thread - because 1/4" BSP gets 5 hand spans to the jiggawatt
flyingbrick replied to Roman's topic in Tech Talk
Can you pop up a photo of the shaft and indicate which surfaces are fucked? -
Tech Spam thread - because 1/4" BSP gets 5 hand spans to the jiggawatt
flyingbrick replied to Roman's topic in Tech Talk
The pressure gauge will be on the injector side of the regulator -
Damn, killing it! Use antisieze on those stainless bolts too
-
Tech Spam thread - because 1/4" BSP gets 5 hand spans to the jiggawatt
flyingbrick replied to Roman's topic in Tech Talk
nah just do it and be smart about application. Obviously thick coats of ceramic insulative paint will be a fail. I think there have been quite a few tests done about painted intercoolers and the results werent anything worth remembering. -
i did some hammering and glued in the front inside corner then made up and started gluing in the outside front corner.... then my welder went from being AWESOME to being gayyyyyyyyy. Must be new liner time as wire keeps getting stuck and it then wraps around the drive roller.. did it 3 times and i had a ragequit.
-
I wouldn't try to copy anyone else I think with what you have done virtually ANY color scheme will look great! even if you just buffed and polished the crap out of the current tank. edit.. oh and im no expert but i like the side panels- they always make the bike look more together and finished kinda (just my opinion)... i think they could do with being recessed an inch or two each side tho- could ya cut them down and push them in further?
-
Awesome I wonder if that area would look better with the rear tank mount/bolts painted black so they kinda dissappear
-
Just checked out this thread- bloody love the way you think with the cut down gas bottles and leaf sprung front end. Im pretty keen to use some of those bottles for my catch can... love repurpopsing shit like that
-
I'm not sure if you are talking about the slop that poly bushes have in the center when unloaded or not...what vehicles bind up a rubber bush when steering?
-
Good question. I believe some do BUT I would like to think/ assume that this doesn't as it's supposed to be a special mix just for bushes. I compared it to some plain nylon at work and it's quite different feeling Nylon vs poly seems to be a popular topic these days with many people for and against each Worst case I have some spare joints for my panhard/watts link now
-
After a ton of reading it actually seems like maybe this newer nylon stuff is actually better in many applications.. its silent for one! " The benefit of nylon over urethane is that urethane binds. The squeaking you hear is binding and releasing. This happens because urethane is a pretty crappy bearing material. It simply isn't designed for it. Nylon is a much better bearing material to improve on it you can then go to spherical bearings, bronze or roller bearings. Binding in twisting suspension components is obviously a bad thing but a little bit of binding is better than the massive deflection capable in some OEM rubber bushings and with a routine greasing schedule you can reduce the problem so urethane is an upgrade in that sense. Where urethane excels is in non twisting positions like shock bushings, bump stops, isolation pads or subframe bushings and if you are willing to put up with the harshness motor mounts. If you are going all out then any twisting bushing (sway bar, control arm bushings and the like) should be nylon, bronze, spherical or some of the other choices."
-
Thanks for the input mate. Not 4 link but am copying this style of suspension (used on many cars from factory and an aftermarket upgrade on mustangs etc.. easy to setup and good all round setup...plus a bit different which I like.) Am using my front leaf spring mounts as the side arm mounts, should work well according to the internet The front of the torque arm will be designed so that there isn't a spherical being loaded in (what I think is) the wrong direction. Did consider sphericals but was worried about them wearing out..people make it sound like you have to change them after every drive haha.

-
Thanks sentra. I have had a reply back from speedway motors which basically says they will remedy one issue but not help with the nylon vs poly bush issue. I have provided all proof that their staff provided incorrect information 2 months ago so hopefully they will come to the party.. Its nearly $200 worth of bushed ends and it doesnt look that easy to find poly replacement inserts.. (i havent looked that hard though...but why should i) With that said, @cletus have you seen any issue with nylon bushed ends? It appears to be some sort of special nylon which is made specifically for bushes and i now notice that places like magoos etc sell these same nylon bushes for use on 4 bar setups so they must be okay and i must be overreacting? Nylon is just not known as being a supple material haha. Mostly worried that the small amount of articulation my diff has will loosen my lock nuts and pivot at the bar ends. PS, im not doing a 4 link setup- just using that as an example as very similar.
-
http://www.speedwaymotors.com/Speedway-Forged-Stainless-4-Bar-Rod-End-3-4-16-RH-Thread-Polished,226096.html?OriginalQuery=91008038 Got left and right of these. Listed as 4 bar ends.. See in the questions they reply to me and say they are poly...but when I look up the replacement bushes for these they are nylon. Strangely enough they have told me that their nylon and poly bushes are not interchangeable as bore of joint is different. Anyway.. I have written to them a polite but annoyed email as they made a few errors in my order (like one joint completely the wrong size in the wrong opened packaging)
-
How hard are the poly bushes? I spent a lot of time finding the right rod ends for my Ute- ordered them using the shops own staff for guidance however I'm positive these bushes are too hard for my application.. very fuckin hard- can hardly push a fingernail in... Not what I was expecting tbh and I wonder if they are actually nylon rather than poly- their website isn't clear and I feel their staff may be guessing.
-
Wow not sure why I haven't stayed up to date with this- damn you are good at this rust repair stuff. Where did you get those neat magnets from?
-
Bolted in the new pedal assembly with some rivnuts through firewall. It had to be mounted far higher than expected so I need to either make a new gas pedal arm or use a longer pad. No biggie and I deserve the bother for poor planning haha. But aside from that I'm happy as..it will work well.
-
Wow that's an awesome idea! I like it
-
Yeah that haha.
-
Hey man. Still need to get a few gauges for it.. to be perfectly honest I can't remember what I decided to do about the indicator lamps.. I think I will use the plastic flat led things, mask off the symbols with professional cut vinyl and spray black then clear (like I did the switches) I ended up not being happy with those stainless bolt ones.
-
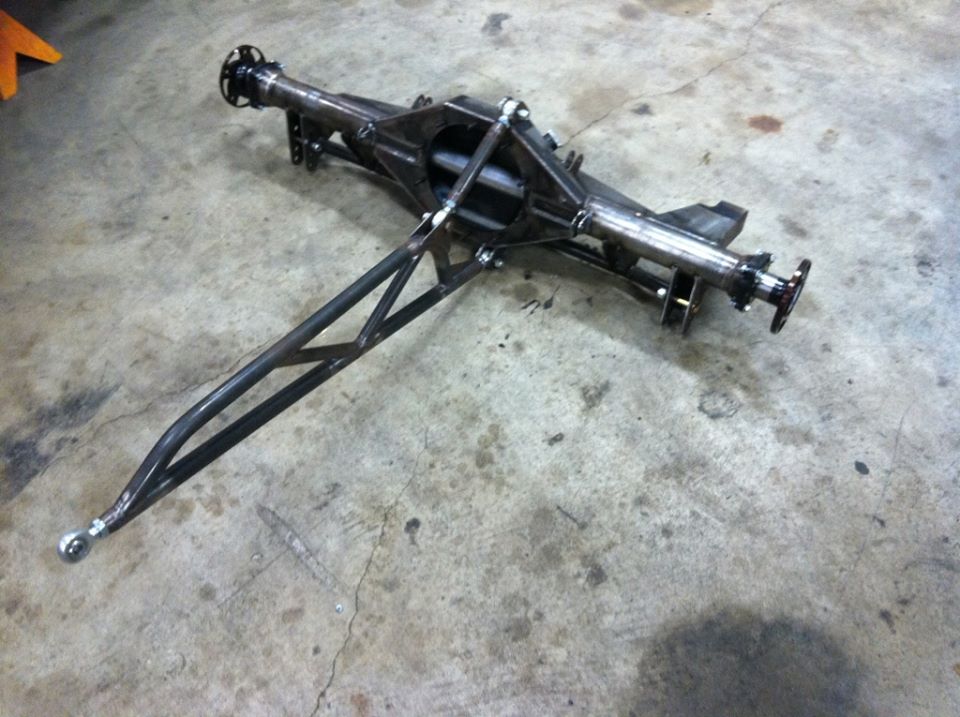
Sheet metal is poo, got some spuds and chromoly tube then Tig welded the start of some rear arms/links. Waiting on bushed rod ends to arrive from America. I'm so paranoid that I actually emailed a meturoligist (is that the word?) To ensure I was using the correct process for chromoly.
-
propeller
-
I have always thought these were a good looking bike! Don't be too harsh on your riding gears damage! sounds like it did its job pretty well (eg you didnt mention losing skin ) glad ur ok
-
First bit of floor in! Damn photo makes it look much less complex and note flat than it actually js
-
This is the most racecar looking piece I have ever made.. When the car was last together (quite some time ago now) the throttle pedal feel was terrible. I tried different cables and spring rates etc but always felt like it should have been better..maybe I'm just used to more modern things....I dunno. So the goal here was to reduce the cable length significantly- the snake will now come through the firewall and start directly behind the carb rather than above the gas pedal. I was going to use an aluminium or stainless tube but then found a carbon tube cheap on AE. I bought bearings from AE too- the housings are self aligning and they are CHEAP. Next I measured up the factory gas pedal assembly, copied it's basic geometry, made some quick drawings and had these cut. And bent the pedal pad Then this morning I took some aluminium And made these ends up in aluminium. they have lots of drilled and tapped holes for mounting the arms. And here it is together with the ends pressed in. It looks totally badass and is pretty cool to hold and play with as it's SOOOOO light and rigid....a shame it will never be seen haha. The pad will be welded on when it's bolted into car and I know that angles etc are right.
- 137 replies
-
- 19
-


.jpg.1817fb3fa5abf836764c96a2b2390ad6.jpg)
.jpg.d669f6c1638223f1d9ae06b374156d3c.jpg)