

Nominal
-
Posts
34186 -
Joined
-
Last visited
-
Days Won
319
Everything posted by Nominal
-
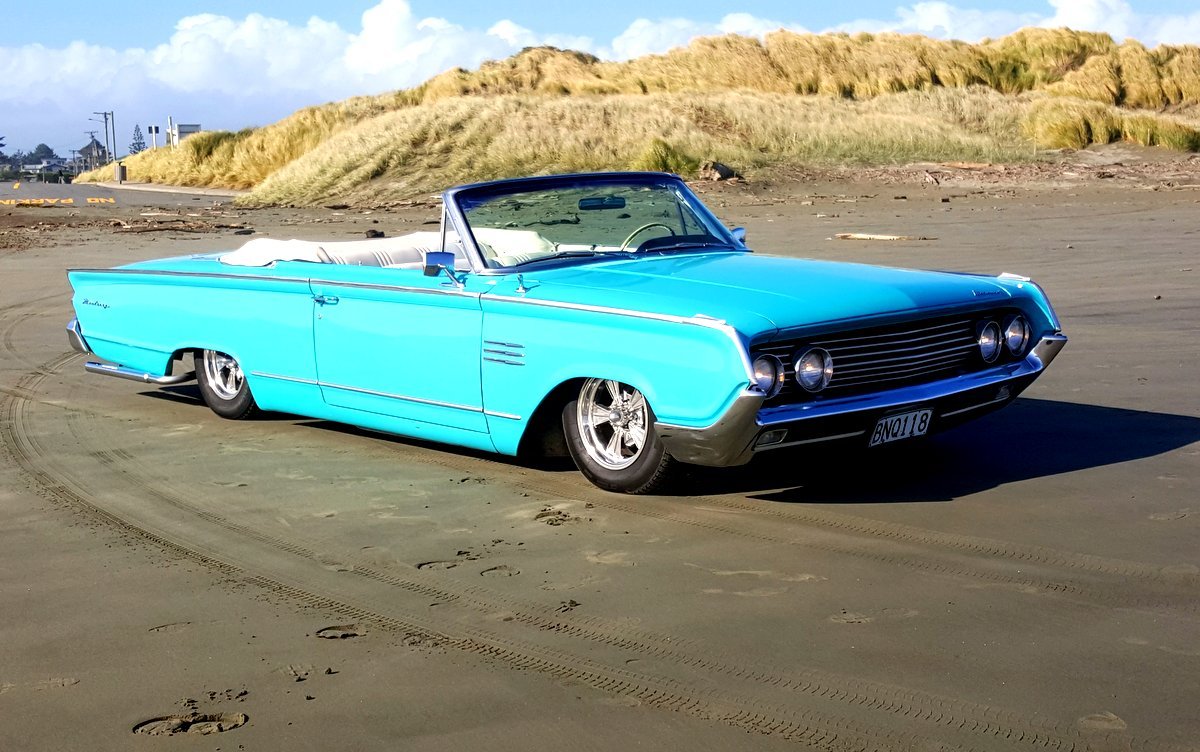
I'm in the process of building such a system to bag my Mercury - triangulated 4-link. You don't need a watts link (it would possibly be a bad idea to add one) as the angled links handle the side-to-side location. I have used the front leaf spring mounts, so the lower arms are about 620mm center to center which should be long enough. This is a big car though, with long springs. They are set up to be about level at the expected ride height. Upper links are angled down at the front at ride height for packaging reasons (clearing the stock shock mounts) but I think this will be OK. There are rules in the HCTM about link sizing and so forth. I have used rubber bushes from the Mount Shop, just picked out something that I hoped will work. I have made my own adjustable ends using some all-thread (1" though) because the link size is big for a heavy car. You will probably be able to use something off-the-shelf for a Cortina.
-
Talked to Andy Smith today - he said linking it to the Neutral/Park switch will be OK. I'll wire it legit for the cert. Since I'm fitting a fancy ECU controlled one it might be nice for it to work while driving though. I'll need to add a relay to the neutral switch circuit as the switch is just wired in series with the starter switch, which isn't very convenient.
-
This is what (some of) the rules say (from the pdf on the LVVTA website which ought to be up date) . I understand that people used to use the park brake warning light, but that isn't allowed anymore. An air-bag system fitted to a low volume vehicle must be designed and installed in such a way that either: (a) the air-bag system is only able to be operated whilst the vehicle is stationary; or ( the air-bag system can be operated whilst the vehicle is in motion, provided that: (i) the ride-height of any part of the vehicle is electronically prevented from being adjusted or changed when the vehicle is being driven over a speed of 20 kph (12 mph); and (ii) the vehicle automatically reverts to its pre-determined correct ride-height when a speed sensor determines that the vehicle is traveling faster than 20 kph (12 mph).
-
That's not great if you have an engine-driven compressor is it? Will check with cert man tomorrow. Actually the rules let you be adjustable up to 20kmh or so IIRC, but I don't have an easy way to detect that, and don't want to get into building a speed-sensitive switch right now.
-
Anyone know if linking the airbag controls to the neutral switch will be OK for cert (i.e controls only work if car is in neutral/park)?
-
How did you do the breather? Drill and tap a port?
-
That moment when you remember that the centre of a 9" housing is not the same as the centre of the pumpkin because of the pinion offset. Oh well, the bracket is only tacked on.
-

Wellington Monthly Meet - Discussion thread
Nominal replied to KKtrips's topic in Lower North Island Region
Gonna be camping in the wops on this date (with oldschool holden though). -
OK, so springs extracted with grinder. I don't thing that nut (the rusty thing at bottom left) was going to come undone. A package arrived from Airride NZ - I think this is the last big order. Only plumbing fittings and P clips needed now. Also picked up some 25mm Sch 80 tube for the 4-bars. Pipe sizing is weird. No dimension on this stuff is 25mm.
-
So, park at Mitre 10 then?
-
Wellington Monthly Meet - Discussion thread
Nominal replied to KKtrips's topic in Lower North Island Region
K.O. Have ski bag in Holden, but it leaks like a sieve! -
At the rear, I needed to get the axle out so I can deal with the front spring mounts. The old leafs look a bit shagged..... Got it all unbolted after some persuasion with long breaker bars and a rattle gun. Having the car on a lift is great, but it is a bit tricky to remove heavy parts from under the car. After a bit of a wrestle with jack stands and trolleys there is a large hole to fill. At least I won't have to swap in a 9" - it comes with one from the factory.
-
This means that the bag needs to sit down into the lower A-arm, roughly even with the bottom of the arm. Which means some cutting.... I later had to cut a lot more away from the arm for clearance to the bag sides. So, it goes together like this. I think this is roughly ride height. It's designed so that the bag ends are parallel at ride height. Should look like this.... Sorting the shocks and mounts was a hassle. Due to the way the chassis is designed I needed to have the lower shock mount located further out towards the ball joint. This means a longer shock stroke is needed. Even with the longest I could locate (something from a Valiant) I need to limit droop travel a bit, but I don't expect to be getting the front end airbourne so hope this works out OK. Inner guard needed to be cut for the upper mount. The upper mount has another piece that locates right down the depth of the chassis. It's all made from 6mm plate, so won't be going anywhere. Having one side worked out meant that the other side was quicker - just duplicate... I needed to fill in the gaps to rebuilt the A-arm strength. I used some donated 3.5mm plate for this. After chewing through a few cut-off wheels I realised I could use the Nibbler to shear this size. It did work OK, but the small pieces of plate were hard to hold on to when it was running. Here's the arms tacked together, ready to go off to the tig man. I should get them back this week. Anyone know where to go for crack testing in Wellington? Also acquired the airbag controller setup.
-
OK, so front suspension progress. Dirty old stock system I made a spring compressor from some threaded rod. and a couple of steel plates/tubes Dealing with loaded springs makes me nervous, so I didn't want to leave any way for it to escape. It's a beefy spring, weighs about 10kg. Static weight on front of car is right around 1000kg. Upper mounts are made from steel tubing, plates, and some threaded rod that goes through the old upper shock mount. I didn't want to have to cut/weld the chassis spring pockets while the whole car is assembled, so the top of the airbag sits just below the pocket.
-
Palmy and Welly combined meet @ Otaki - 7th Dec
Nominal replied to Pee Dubs's topic in Lower North Island Region
Good to catch up again. The weather did get better later in the afternoon up here. Took a few pics. GM Represent! -
OK, so the front end is progressing OK. Lower A-arms are off getting tig welded (needed for cert) and I should get them back tomorrow. Where should I go for crack testing in Wellington? Have acquired some Falcon front discs which look promising to use on the Merc stubs (the Falcon discs are integral with the hub). Pulled the stock single-pot MC off and it looks like the mid-70's US Ford dual M/C will work fine. Pics of all this to come. Current problem is getting the leaf springs off. The pic shows the front mounting to the chassis. There is a big shouldered bolt that runs through the spring bushing, then bolts to the outer side of the chassis rail. There is an access hole to the nut inside the chassis rail.... and through the big X-crossmember too. However the thread and nut look well rusted (probably haven't been removed for 50 years), so getting it apart will be a challenge. I think I'm going to need a grinder with a cutting disc.
-
Palmy and Welly combined meet @ Otaki - 7th Dec
Nominal replied to Pee Dubs's topic in Lower North Island Region
Should be on track to meet convoy in Otaki or at Loco. -
Looking pretty!
-
Palmy and Welly combined meet @ Otaki - 7th Dec
Nominal replied to Pee Dubs's topic in Lower North Island Region
Harsh! They have one of these there... -
Oh yes! //oldschool.co.nz/index.php?/topic/34053-my-chevettes-90s-flashback/
-
Leads to me recalling the (bad) old days of rebuilding a Chevette 1256 in the bedroom of the flat I was living in. Apart from never staying in tune (electronic ignition should help that) it went OK.
-
Nice - looks remarkably un-rusty!
-
sidewaysickness 1971 Ford LTD/Galaxie
Nominal replied to sidewaysickness's topic in Project Discussion
White wedding - cool! -
Suggest you stop using it until fixed (unless death wish). Check that frame is earthed properly as a starting point.

