

Nominal
-
Posts
37,235 -
Joined
-
Last visited
-
Days Won
344
Everything posted by Nominal
-
The plating man wouldn't do the fuel tank as-is as tanks don't plate well. So, I cut the top out of it and dropped it off this week. I'll have to weld it back together which will damage some of the plating, but should be an improvement overall. I also welded plate over the bottom of the pump mounting threads - one less place that has to be sealed. Found this old pic of one of the diff donors. The dude I bought it off drove it up from Waikanae like this, holes and all. Might have been dark. I thrashed it around the paddock a bit, but it was easy to get stuck, and caught on fire once (too much easy-start) so I eventually pulled the rear axle and scrapped the remains.
-
Cut some new metal. Also need two new reinforcing rings that mount the headlight. Rust city. Scratch up some 3mm plate Cutting this stuff is a bit of a workout for the Nibbler, but it is quicker/cleaner than using a grinder with cutting wheel, especially for curved bits. Need to be hammered flat then welded into rings.
-
Get 'cher wagon out and play with it!
-
The flattened tubes probably aren't hurting too much.
-
Maybe - depends on whether your cert man reads oldschool I have kept with the rocker switch as it's easy to use in most circumstances (sometimes hard to see the light-up colours due to where I have it mounted). Generally I want to be either low, ride, or high. Sometimes the front/back adjustment is handy, but I had never used the corner settings until a couple of weeks ago for a laugh.
-
See second pic
-
It's the green/red rocker switch.
-
I have accuair, but with the single switch controller so there is no obvious single corner control. The rules are pretty clear though, and he is following them.
-
Nah, there's heaps available at a price. Call Whangamata ReaL Estate Ltd 0800 658 499 WHANGAMATA listings from email I got today. 1/118 BROOK PLACE -Modern 1 Bedroom unit-Max 2 Tenants, Owners live on the premises in separate house- Peaceful street.1 Bathroom Shower and Bath,1 superking bed,1 tv,1 freeview,1 m/wave,1 fridge, Gas BBQ, No Pets, No Tents, No laundry facility, LINEN SUPPIED FOR BED,BYO Towels and Tea Towels, Bond $200. Peak $200 P/N PHOTOS 2/118 BROOK PLACE-Modern 1 Bedroom unit-Max 2 Tenants, Very peaceful street, Owners live on premises in seperate house,1 Bathroom 1 Shower ,1 Queen bed,1 Tv,1 Freeview,1 M/wave,1 Fridge, Gas BBQ, No Pets, No Tents, No laundry facility, LINEN SUPPIED FOR BED,BYO Towels and Tea Towels, Bond $200. Peak $200 P/N PHOTOS 139 EVERITT -2 Storied Home Partially fenced-Max 8 tenants - 3 carparks-4 Bedrooms, 1 Bathroom, 2 Toilets .Fire place. 4 Queen Beds. 2 TV, 1 Cd,1Dvd,1 video,1 microwave, 1 fridge/freezer , 1 freezer , 1 dryer, 1 w/machine, No pets, No tents, Gas BBQ, Outdoor furniture, BYO Linen i.e Sheets & pillow cases, towels & tea towels $200 Bond ,$80 Clean.$50 Let fee. Peak Rate $320 P/N PHOTOS 104A LINTON- 2 bedrooms, Max allowed 5 , 1 bathroom, 1 queen bed, 1 single bed, 1 bunk, TV (freeview) , CD , DVD, microwave, Gas BBQ, electric heating, Outdoor furn, outdoor shower, Fridge freezer, 2 carparks, washing machine, No pets or tents, BYO linen i.e sheets + pillowcases, T towels + towels Bond $200, Beach hop $260 PHOTOS 114 LINTON - 4 bedroom plus sleep-out. 2 Bathrooms (1 in sleep-out) sep toilet.8-10 Max. Prefer two families.1 queen bed, 2 double, 6 single, TV, DVD, Microwave,2 x Fridge/freezer, waste disposal, washing machine, dryer, electric heating, Gas BBQ, outdoor furniture,3-4 car parks. Partially fenced.NO pets or tents. BYO linen: i.e. sheets, pillow cases, towels & tea towels. Bond $200 Clean $110, Peak $350 P/N PHOTOS 1/504 OCEAN-Handy to beach, Williamson Park, Surf club, 4 bedrooms, Max allowed 8, 1 bathroom (toilet & shower- nothing flash - downstairs), 2 queen, 4 singles, TV, DVD, CD, BBQ, microwave, fridge freezer, fridge and freezer, washing machine, NO pets & tents, NO wheelchair access, BYO linen i.e. sheets + pillowcases, towels + Tea towels. Bookings subject to $200 bond. Clean $100 Shoulder $250 P/N, Peak $300 per night. PHOTOS 305 PAPANUI - 3 bedrooms ,Max allowed 8, 1 bathroom inside (shower & bath) , 1 queen bed, 1 double bed, 2 single beds, 1 dble pull-out/sofa bed, TV, CD, Video, microwave, BBQ, outdoor furn, “outside shower” is in a utility and includes a shower, tub and toilet, 1 fridge, 1 fridge freezer, washing machine, No pets, Tents on application only, plenty of parking. BOND $200, Clean fee $70, BYO linen i.e. Sheets + Pillowcases, T Towels + Towels - Peak $300 per night PHOTOS 141 PATUWAI : 3 bedrooms, max allowed 7, 1 bathroom, 2 queen, 2 singles, DVD, CD, 2 X TV's, Sky Decoder, microwave, dishwasher, waste disposal, fridge freezer, Washing machine, dryer, outdoor shower, outdoor furniture, BBQ, parking for 3-4 cars, has fireplace. tents on application, NO pets, Has wheelchair access, BYO linen i.e. Tea Towels, Towels, Sheets & Pillow Cases - Refundable bond $200 cleaning fee $95, Beach Hop Peak $400 P/N. PHOTOS 426A RANGI - 2 bedroom 1 bathroom, max. 4 adults or 2 adults + 3 children. 2 Queen beds, 1 bunk set. TV, Freeview, DVD, Microwave, Fridge/Freezer, Washing machine, Electric oil heater, Gas BBQ. Outdoor furniture, 2 car parks, NO pets or tents. Not fenced. BYO sheets, pillowcases, towels and tea towels. Bond $200, Peak $240 P/N, . PHOTOS 100 TANGAROA-Kiwi Bach beach front,Breath taking views, private 3 bedrooms+ annexe, Max allowed 6 (negotiable),2 car parks ,1 boat park. 2 bathroom, 2 queen bed,5 single beds, TV, Microwave, 2 fridge freezer, washing machine, gas BBQ, outdoor furniture set,Outdoor shower, NO pets or tents, Not fenced, No wheelchair access, BYO linen i.e Sheets + Pillowcases, Tea Towels and Towels, $200 bond, Compulsory $100 clean , BEACH HOP Peak $450 P/N PHOTOS 115A TANGAROA - EASTER + BEACH HOP COMBINED (Will look at reduced rate for longer period) About 100m from main beach, 4 bedrooms, Max allowed 8, 3 bathrooms, 1 king bed, 3 queen beds, 2 x TVs sky decoder bring own card, microwave, 2 heat pumps, fridge and fridge freezer, waste disposal, washing machine, double garage, 3 car-parks, gas BBQ, outdoor furniture, outdoor shower, NO pets or tents, partially fenced, No wheelchair access, BYO linen i.e. sheets and pillowcases, Towels and Tea towels, Bond $200. Peak $500 P/N PHOTOS 162 TIROHANGA- - 4 bedroom, 1 bathroom, Max.8. 2 queen beds,3 single, 1 combo dble/sgle bunk set. TV, Fridge/freezer, dishwasher, washing machine. Gas BBQ, Outdoor furniture, outdoor shower, fireplace, gas hot water. carport, 4 car parks.NO pets or tents. Partially fenced .BYO linen: i.e. sheets, pillowcases, towels and tea towels. Refundable bond $200. Cleaning fee $110. Peak $ 400 P/N PHOTOS 102B TUI- 2 bedroom cottage, max allowed 6, sunny position, 1 bathroom, 1 queen bed, 1 double bed, 1 bunk set, TV, Freeview, CD, DVD, Video, microwave, Gas BBQ, 2 carparks, outdoor table and chairs, 1 fridge freezer, washing machine, NO pets or tents, partially fenced, No wheelchair access, BYO linen i.e. sheets & pillowcases, tea towels & towels, $200 bond.Clean $70, Off peak $150 P/N, Peak $200 per night $240 per night Beach Hop PHOTOS 1/135 WAIREKA- 3bedrooms + Bunk room,Garage,2 car parks, Max allowed 8, 2 Bathroom, 1 queen beds,1 double bed,1 single bed, 1 combo dble bunk, 1 single bunk bed, 1 TV, CD, DVD, Gas BBQ, , outdoor furniture, fridge upstairs, freezer downstairs, microwave, waste disposal, dishwasher 1 drawer works. Washing machine, Heat pump, strictly NO pets or tents, No wheelchair access, BYO linen i.e sheets and pillowcases towels and tea towels, Bond $200,Clean $100, off peak $240 p/n, Shoulder $280 p/n, Peak $ 320p/n. PHOTOS
-
Depends what you want to see. Friday is a bit more open out at Onemana. Saturday is the big day in town with heaps of people. Sunday has a market with less cars around. If I was just visiting I'd probably do Friday or Saturday afternoon, then stay until the evening and watch the bands (on the street) and cruising.
-
OK, so who is coming to watch us win the 34 Ford prize? We'll be arriving Wednesday and staying until Monday this year to avoid the Sunday rush home/falling asleep on the Desert Rd. New pad in The Square down the port end of town.
-
Sunny taihape.
-
Packed and stacked.
-
Because More Power Mouse I guess.
-
Eventually I suppose.
-
Totally worth it. There is a few shops on the south end of Levin that I haven't looked in lately.
-
So shiny!
-
This place in Foxton is pretty good http://www.myantiqueshops.co.nz/goldies_junk_n_disorderly.html
-
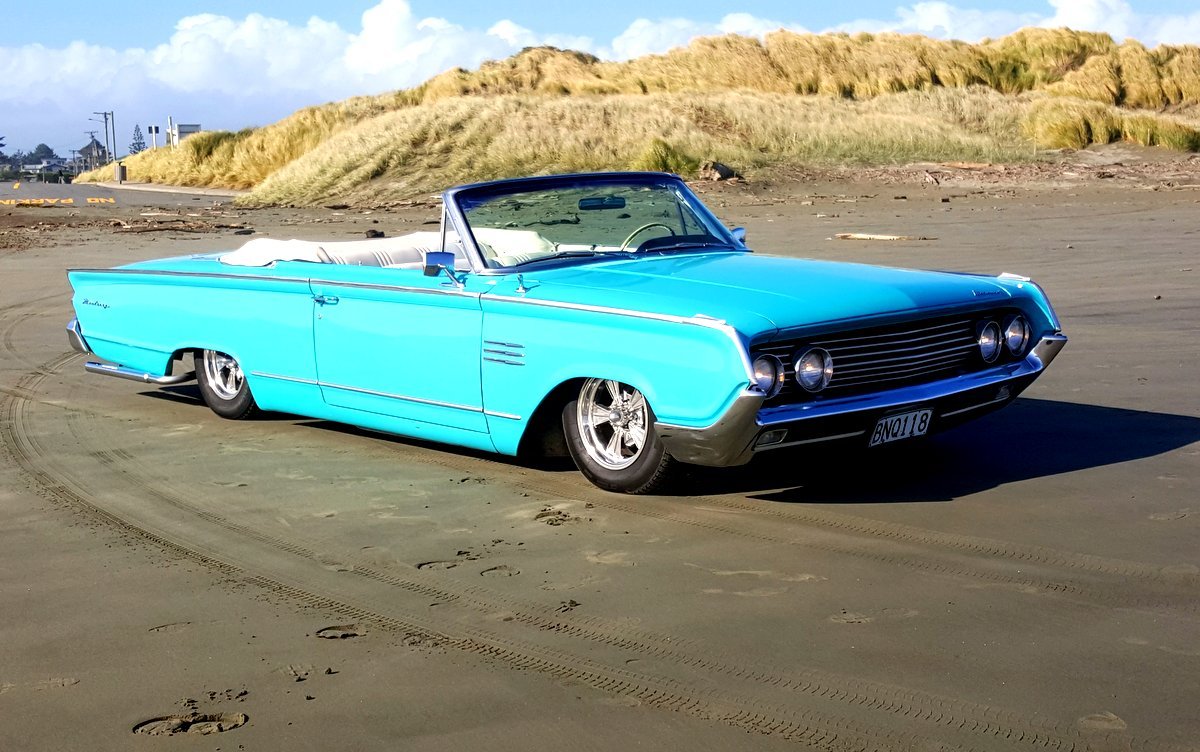
Good luck! I even called into the LVVTA office and had a chat, still didn't arrive until after BH. Son pic is cute - my son is 16 now and has just passed his learners. Was 3 when we bought the Mercury.
-
Should move along nicely now. Last year I found that this is a very busy time for the certification people and the LVVTA office, as heaps of people want cert before beach hop.
-
Suh-weet
-
Good effort on getting it done in a short time!
-
Zat would be ideal. If I know the time I wait at Rod Cliftons in Te Horo
-
OK, looks like I have everything set up to go on Thursday now
-

mtbtimr & Sammy1222's 1972 Austin 1300 Discussion
Nominal replied to mtbtimr's topic in Project Discussion
New rad should be sufficient with the stock fan/plumbing setup shouldn't it? If it was mine I'd try it like that first - make sure the fan is attached the correct way around.
