Lord Gruntfuttock
-
Posts
13102 -
Joined
-
Last visited
-
Days Won
27
Everything posted by Lord Gruntfuttock
-

Lord Gruntfuttock's 1973 Honda Trail 90 (CT90)
Lord Gruntfuttock replied to Lord Gruntfuttock's topic in Two Wheels
The chrome bars around the engine, with the bash plate underneath? Think they attach underneath with the footpeg bolts. Will see if I can find a pic... -
What engine is in this one...?
-
Mate had one. Put a 350 in it, remember it bellying badly hooning over a railway line and ripping the fuel tank open...
-
SHIZZLs Super Hunter smack talk fred
Lord Gruntfuttock replied to shizzl's topic in Project Discussion
Sort of sad it's losing it's heart. Offset by the thought of a rotary Hunter... -
Lord Gruntfuttock's 1971 XY Fairmont
Lord Gruntfuttock replied to Lord Gruntfuttock's topic in Projects and Build Ups
Up early to get some niggling things done, quite nice ticking things off... and a few things to tidy up, but she's on 4 wheels for the first time in 3 years... Still got a noise from the dust shield to sort, brakes to install properly, and steering tie rods to align but that can wait till it's in the other shed. Plan is to put this in house garage and shift the bikes out to my man-shed, might even get a couch out there if space allows, will be next weekends job... Will need some manpower to shift it, but the other garage has a large concrete driveway so will be easier to fill the big hole in the engine bay using the crane.- 149 replies
-
- 19
-

-
Lord Gruntfuttock's 1971 XY Fairmont
Lord Gruntfuttock replied to Lord Gruntfuttock's topic in Projects and Build Ups
Got first spring in the other night, but wasn't happy with how it sat so pulled it and rotated it against the anti rotation tab better. Bloody easy job using the old impact driver on the spring compressors... And sitting much better... And torqued up the ball joints, needed a hardened washer to space the split pin correctly in the castellated nut. Also did some research on which way to align the pin, such a Barry-argument minefield. Turns out this way is the one used by the aviation industry (as opposed to bending them round the side of the nut), plus it is easier when there are clearance issues, but really doesn't make too much difference... And driver's side done, and new shock in, also torqued and pinned suspension rod arms etc. This is the easy side as the other one is against the shed wall... Discovered the new tie-rods weren't painted so painted them black like all other suspension bits, will install them tomorrow... And I'm over the cheap fittings that come with supplied gear, spring washers chewed out at only around 25 ft-lbs. replaced them with decent stainless ones... And installed new rotors. I'd packed the bearings 3 yrs ago but that had gone hard, so cleaned them out with solvent and repacked them. I'm not fitting the brake pads yet as I have to push the car into the other shed and new pads will probably rub. I just loosely bolted the calipers in position till it's moved... And repeated the job on the other side, all went ok but the rotor is rubbing on the dust shield so I'll pull it tomorrow and bend the shield back into place... So a big day, and frustratingly short of getting it mobile, should get there tomorrow though...- 149 replies
-
- 20
-
-
Lord Gruntfuttock's 1971 XY Fairmont
Lord Gruntfuttock replied to Lord Gruntfuttock's topic in Projects and Build Ups
Adjusted valve lash on the weekend, rotated each pushrod till I just felt resistance, then 1/2 turn more and locked them in position. Did the #1 TDC, then 180 deg, then 270 rotate method to do all valves, and went though each cylinder in turn after that rechecking them, seems ok... Then braced myself for looking at the suspension, that had been removed 3 yrs ago and not looked at since (apart from a half hearted attempt at the driver's side). Wasn't too bad, started by scraping out the passenger side wheel well, nearly 50 yrs of accumulated crud made a greasy mess on the floor, swept it up (filled half a bucket) and cleaned with petrol. All the while cramped up against the wall, wish I'd taken a before pic... Had no idea where I'd got to on drivers side so rechecked torque, some bolts were tight, some only done up with fingers. Had a bit of trouble finding torque specs but went with: Top arm pivot bolts - 90 ft-lbs Lower arm pivot - 90 ft-lbs Lower arm to strut rod bolts - 65 ft-lbs Strut rod to under body bracket - 50 ft-lbs Spring saddle to upper arm bolts- 25 ft-lbs Ball joint mounting bolts - 30 ft-lbs And was going to do ball joints to steering knuckle at 80 ft-lbs but the castellated nut screwed past the split pin hole before any torque was applied, so I'll need some hardened washer spacers, will grab some today... I went though old pics and set the suspension strut camber eccentrics, and thread lengths approximately where they were on disassembly, will do the same for the steering tie-rods so hopefully it's driveable before I get it aligned properly. So things are clean, upper and lower arms and strut rods in place and almost ready to put the new springs in... Looking fwd to seeing how these sit...- 149 replies
-
- 16
-
-
Sounds like they were all at it. Blagging knives off the yanks and building stuff. Doing the old 'homer on the bosses time', with bullets... He also made a pendant for my nana by cutting the huia out of an old sixpence and sticking it on a heart shaped bit of plexiglass from the windscreen of a zero (bloody Mitsi's). Think my sister has that...

-
I asked him if he ever wanted to go back. Pretty strong 'Hell no' was the answer. Told me it was hellishly hot and the water rations were so low they'd save half their tea to shave with. If they didn't shave they'd get jungle sores from ingrown hairs from the heat and sweat. Also said the clothes rotted off them. About the only things he ever said about it really. Apart from when a few of them swam to a chiefs burial plot on some island and looted it of carved shells, my mum's still got some. Bloody NZ bogans.... Would quite like to go myself some day.
-
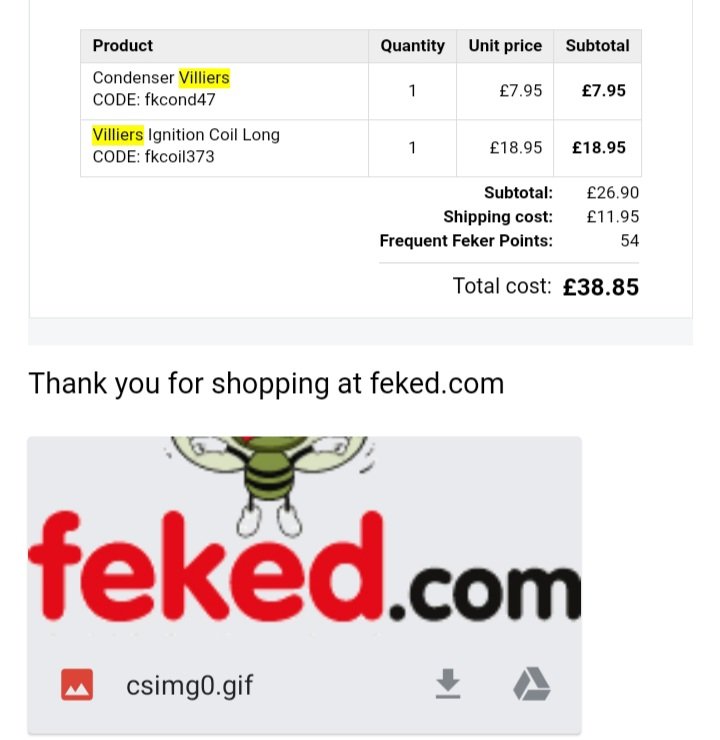
LG's British Seagull outboard
Lord Gruntfuttock replied to Lord Gruntfuttock's topic in Other Projects
Had to look it up. Outfit called Feked.com No idea what exchange rate is like now
- 48 replies
-
- 2
-
-
- seagull
- two-stroke
- (and 5 more)
-
Sweet, cheers for the pic. Probably Springfield Armory, maybe a Garand? Looks like we have the same carpet...
-
Yeah hear that, this stuff was all wrapped in a plastic bag in a damp container. I've also got artillery shells, bits of plane and Japanese bullets he brought home squirelled away somewhere...
-
I may have posted this before, but tidying up over the weekend I found some of the stuff my Graddad gave me before he died. He served in the Pacific in WW2, fighting alongside the US Marines, then I think he was wounded and came home, after seeing some pretty bad things (he swore never to own a Japanese car). This knife is one of the objects he made/modified, a US marine fighting knife with the handle he made out of perspex from shot down Japanese planes... I always thought it was a Ka-Bar (Knife attachment, Browning automatic rifle) but the markings show it was the earlier PAL model RH-36, made under licence to equip US troops... Some Barrying tells me "The PAL was one of the most used 'commercial' knives during WW2. Before the intoduction of the Ka-bar there was a serious lack of fighting/utility knives and many marines purchased commercial hunting knives to overcome this shortage until the PAL-36 was supplied. Originally the knife was designed by Remington and when their cutlery deartment was bought by PAL they kept the original dsignation RH-36 (Remington Hunting, Blade type 3, Blade length 6")..." Some of his campaign stuff, should get this framed really...
- 1289 replies
-
- 24
-
-

-
Lord Gruntfuttock's 1971 XY Fairmont
Lord Gruntfuttock replied to Lord Gruntfuttock's topic in Projects and Build Ups
Torqued up heads, 70 lbs on short bolts and 80 on longer ones, supposed to prevent any head gasket leaks after torquing intake doing it like that. Then removed old intake gaskets, cleaned up surfaces with brakleen, and installed a new thermostat while things were apart. Then dug out my old bits, I'd labelled the lifters and pushrods so they went back in same place, sadly I'd dated it too, Feb 2017, that's a long time sitting... Problem with using polystyrene was bits getting stuck in the pushrod holes, glad I checked... So cleaned them out before re-installing them, used assembly lube on lifters and top end of pushrod... And when gubbins were in, ran a bead of sealant on each end of block and insterted intake locating studs.. And a tiny bit of sealant around water passages on gaskets, don't think it's needed but easy to do now... And a thin smear on underneath of manifold... And the beads look like the right amount of goo was used... And assembled, Nice to have things buttoned up... Setting valves next, quite looking forward to a non-messy job...- 149 replies
-
- 29
-
-
Lord Gruntfuttock's 1971 XY Fairmont
Lord Gruntfuttock replied to Lord Gruntfuttock's topic in Projects and Build Ups
More cleaning up bits, just scraped off any old gasket then some solvent and scotchbrite, messy but easy, also cleaned up any loose bits with cotton buds... shouted myself some new dowels and popped on the gaskets... and heads loosely in place, I'll torque em up and clean up the intake next...- 149 replies
-
- 14
-
-
Must be able to find a generic seal by dimensions...? Cool looking scoot btw.
-
Yetchh's "more problems than I expected" bay kombi
Lord Gruntfuttock replied to yetchh's topic in Project Discussion
Never had anything to to with these air-cooled things, following with interest... -
Right Petrol for my 65 Impala Stock 283 Small Block
Lord Gruntfuttock replied to Che65vy's topic in Tech Talk
Phwoaarrr... -
Right Petrol for my 65 Impala Stock 283 Small Block
Lord Gruntfuttock replied to Che65vy's topic in Tech Talk
Before I changed to alloy heads I used to put a squirt of Moreys in with every fill on the Fairmont. No idea if it did anything, but felt like I was doing the right thing. Also, pics of Impala... -
Stick it on at an angle like the cool kids number plates...
-
Why weren't you weighing in on the slipper chat in spam...
-
Lord Gruntfuttock's 1971 XY Fairmont
Lord Gruntfuttock replied to Lord Gruntfuttock's topic in Projects and Build Ups
Water pump was new not too many miles ago, and I was surprised at the corrosion considering I always run inhibitor in the coolant... Only really on the backing plate, inside seemed sweet... And I imagined a new pump would do the same pretty soon, so I cleaned it up and epoxied the plate while I was painting other stuff... Should hopefully stay a bit cleaner. Similarly cleaned up the sump and laid gasket on the block after installing the oil pump (that I'd messily primed beforehand)... And loosely buttoned up, will torque when the sealant has set a bit, didn't want to squeeze cork out... Used Permatex #2 sparingly on the timing cover gasket, looks ok (forgot to assembly-lube fuel pump eccentric but can get that through hole)... Coupldn't find a backing plate gasket in my new kit, but found one in the garage from previous builds. Assembled on dining room table in the sun for max danger while wife at netball... And pump on, so nice using new ARP bolt set. Looked at making up my own, but they're oddball lengths so this was easiest... And ready to start putting the top end on now, be nice to get it bolted up, always nervous when engines are left open too long (only been a few years)...- 149 replies
-
- 15
-
-
Good to see progress on this, interesting about the wheel sizes, score on selling the wrong ones, plus the random gasket...
-
Yeah it does. My only reservation is it resembles the bikes ridden by those violently homosexual SOA blokes...
-
Seagull life...