kseries.rookie
-
Posts
944 -
Joined
-
Last visited
Content Type
Forums
Downloads
Events
Gallery
Everything posted by kseries.rookie
-
Thats looking awesome man, i'm enjoying the progress. Out of curiosity, are hard tails legal in NZ??
-
I enjoy seeing the updates - please don't give up man!
-
300cc kit?
-
Yeah, I ordered a new one. It was only $35, it should arrive in the next couple of days. Cheers for the advice/confirmation
-
Had an interesting situation with the Hyobanger last week.. Starting the bike in the morning as per norm but when I pulled my hand off the starter button the starter motor didn't stop I hit the kill switch.. Was still going Turned the key off.. Was still going So I had to disconnect the battery real quick cause I didn't wana burn out the starter When I put the cable back on the battery the starter would engage.. Yep, so the starter is getting constant power regardless of the key situation/kill switch situation I pulled the fairings off and checked all the cables, they all looked fine. Pulled apart the RH Switch block to see if there was any shorting there but that was all good Disconnected some stuff to see if that made a difference (ignition, switch block etc).. nothing I sent a snapchat out to the boys to see if anyone had any suggestions which some replied with some helpful knowledge but nothing I hadn't already done Bit the bullet and loaded the bike up to take to an actual motorbike mechanic Unloaded the bike, explained the situation I got in the car and I got a snapchat from a mate. I nearly didn't check it and thought fuck ill check it at home, im hungry I wana leave but he said "sounds like the solenoid is stuck on bro.. Give it a wack or two" I had done this.. but obviously not hard enough Surely enough.. Gave it a couply decent love taps and it was fixed.. Loaded bike back on and head home. I dunno if I need a new solenoid but they're cheap enough to replace so I will order a new one in a minute but yeah.. No big bill from the motorcycle shop so thats a win
-
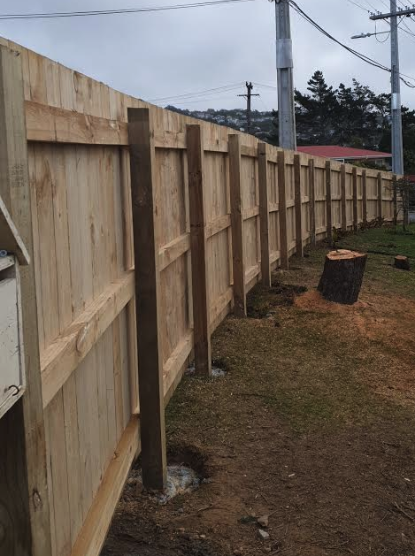
 made a fence
-
Thats cool man, digging the dark vibes. Gonna black out that timber framing too?
-
This guy has some GS500 (?) forks in his inventory which I believe he was selling pretty cheap (read: 80 bucks) https://www.trademe.co.nz/motors/motorbikes/parts-for-sale/wrecking-bikes/listing-2225279875.htm?rsqid=0ad63fc094024239b3887569bcfa7f85-001 Just in case you didn't want to go down the ali line
-
Up the mighty GN
-
GN was due a birthday and with me moving house next weekend my shed is pretty much packed up so I hijacked my mates workshop/knowledge today Plan of attack/parts list for the day include - New cam chain - New guides - New drive chain - New sprockets - Oil and filter - Headlight mesh install - New bars - New mirrors (I didn't like them so went back to bar end, as they looked like a bloody praying mantis) - New spark plug It was actually pretty clean inside Yeah so this is what the new bars look like It's much more of an upright riding position, it's cool but I personally prefer the down low vibes Mrs is unsure, so she can ride it for awhile and see if it's just a case of getting used to No more ticking engine, it sounds like a GN should Che
-
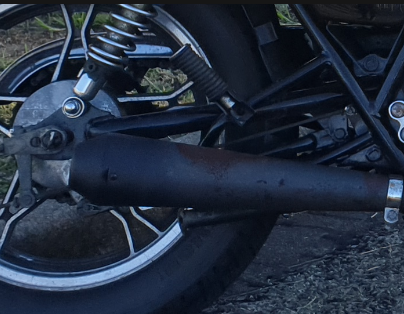
Yeah man, went from 'cone' style to a straight pipe style. The cone was getting hella rusty. I don't have a photo of the state before I took it off but this was a month before hand so imagine double this to this I picked that one up from trademe for something like $60. It's literally a straight pipe, no baffles so it is loud but it's still within being able to pass a WOF AliX have some cheap mufflers, you just have to wait 4 weeks for it to arrive and most likely re-paint it because it's been damaged along the way. You could always try on my cone shape to see if you like the sound/style? I'm in wellington and love any excuse for motorcycle bants
-
Spanners 1985 Honda Rebel 450 w Bandit 600 engine
kseries.rookie replied to spanners's topic in Two Wheels
I laughed out loud This looks like a fun project. Subscribed for more updates -
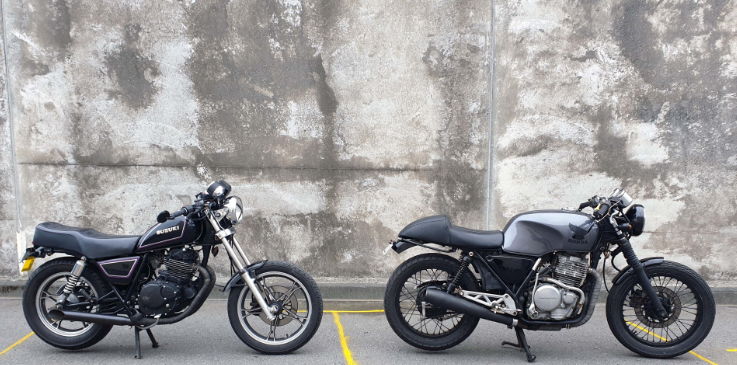
New exhaust, guards and tail light on the GN Also, first time riding with the GB and GN
-
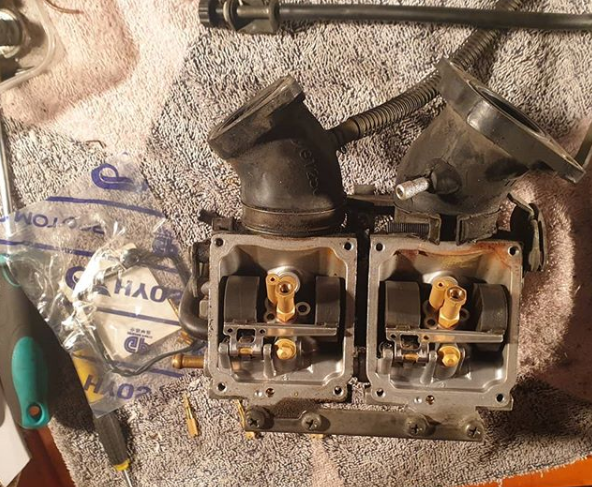
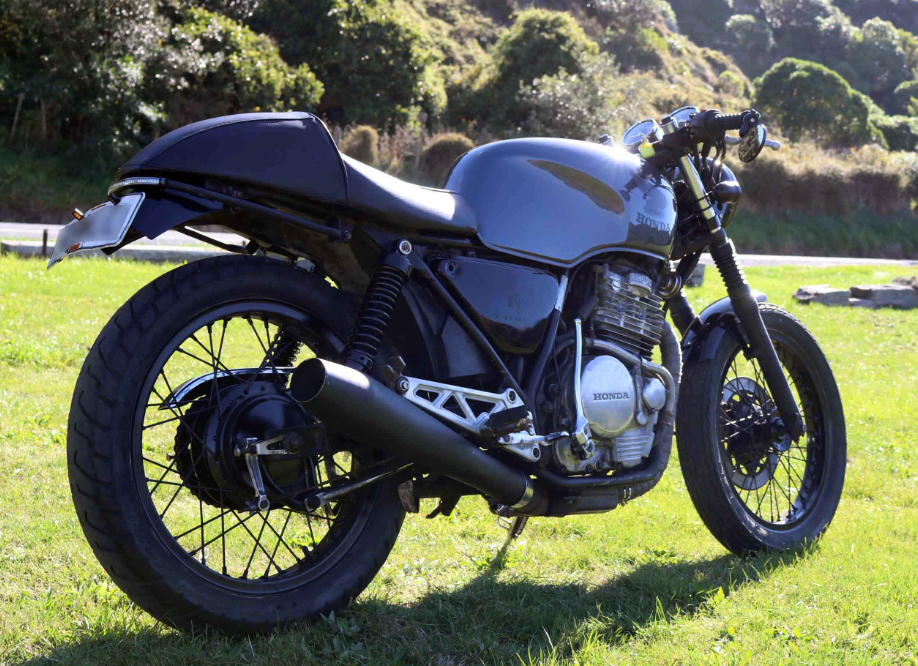
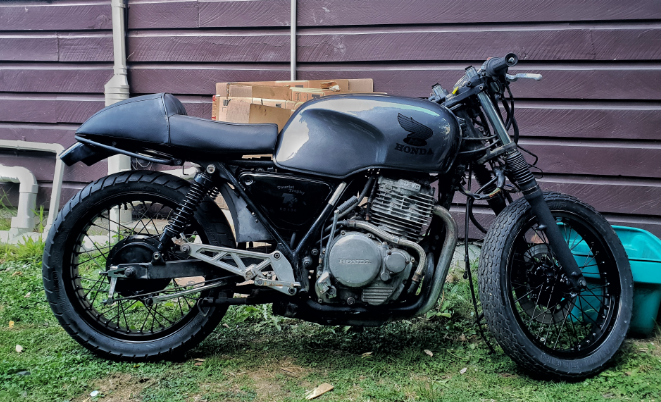
The Hyosung was beginning to take it's time to start, sometimes first click of the start button but sometimes a few goes.. My current house has a little hill on the driveway which would allow me to bump start it which worked every time but less than ideal.. Easter break meant I had some time to do some things which meant whipping off the carbs, giving a clean and replacing the jets During this process I also noticed two air leaks. Fixed those, replaced jets/seals and gave it a kick this morning and it was an instant start up. Job done, pic for thread
-
That looks clean!
-
Paint code is KH2 - Show me some photos if you do! Got in some seat time today. Took pics because it doesn't count unless you take a photo, right? I need to do something with the footpegs.. They vibrate a lot at 100kmph.. Wouldn't do my bung knee's any good on a long trip Any suggestions?
-
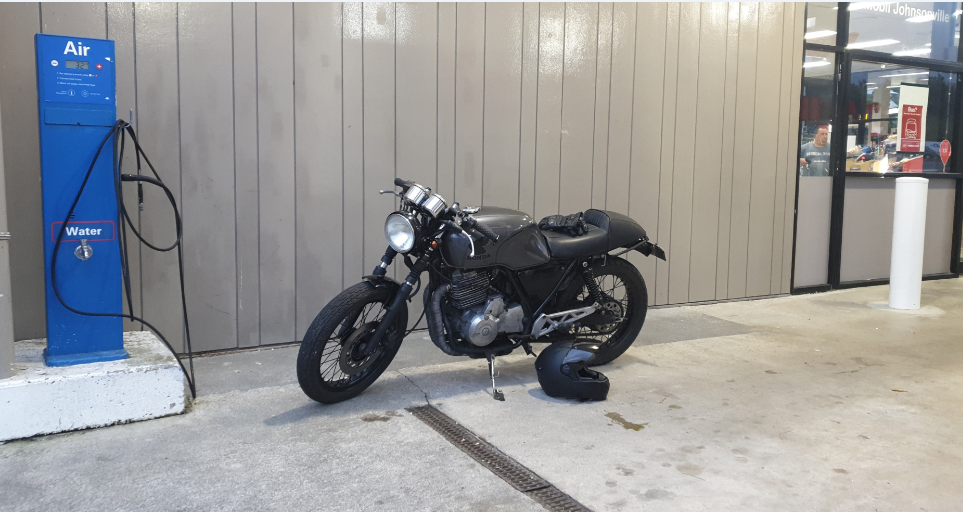
Thanks man! Well, thats the big tick done - WOF Complete! Failed as expected but only on the reflectors and he had some on deck so brought those off him. Happy with that result I rode it home from the mechanics which was approx. 15 minutes on the highway. Initial thoughts are it feels small.. A bit like a gorilla on a rollerskate haha Felt good at 100kms an hour. It's got a "speed" light that comes on at around 85kms an hour which is a big red light.. Thats got to go because even though I know about it, it still makes me heart skip a beat thinking there is an oil issue. Needs a good clean, a couple little things here and there but otherwise it's a cool little bike! The "build" isn't over yet. I've just brought a new house which has a garage (woop!) so i'll be able to get it up on a lift and have more room to work with which I am super excited about. Cheers to all tho have followed so far and have been interested in the process so far - appreciate it
- 43 replies
-
- 11
-

-
Crystal clear. I did wonder if you were going to run the m-unit along side the buttons. I love the simplicity of their stuff. Not in terms of wiring cause fook dat, but such a smart simple device. I like the time out of the indicators but 30 seconds might feel like a lifetime? Those buttons aren't too bad, especially concidering the OG motogadget ones have a heavier price tag. I love the M-Lock. I saw a bloke put the little cylinder thing inside a guitar AUX type plug and then the female side on the top yoke. He would push in the plug into the female side and that would effectively be his key. Does that make sense? So genius and such a cool little custom modification Im eager/excited to see the whole process with the wiring and all Keep us posted
-
Do you have the link available for these? Out of curiosity - how will you run the buttons? Lets say for example, the left side.. Top button = left indicator - press again and it's off Bottom button = Right indicator - pretty again for off What about the other side? You will need high beam, pass, horn, engine on, engine start So much cleaner with the small controls but keen to hear the logistics of running these chur
-
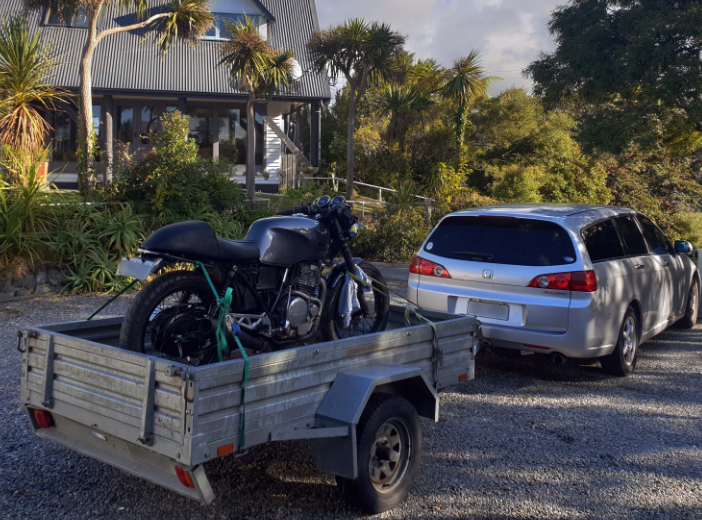
Thanks team! I'm certainly enjoying the process. I banged it on the back of a trailer today and took it down for a WOF check. I've never used this guy before but he comes highly recommended and has had quite a few GB's in there over the year. Seemed like a pretty straight up/no bullshit kind of guy which I like. Not much room between me and the ground so I want a thorough check.. It was cool seeing all the necks it snapped driving through town. I heard a few people make comments about the "cool bike" haha Obligatory photo for thread. Hondaception
-
I can relate so hard with so much haha.. Polishing spoke wheels - I gave up and painted black Itchy body from wrap - I had to throw out the clothes I wore to wrap my exhaust the first time. Second time I did it wet and used welding gloves and wore a long sleeve haha. Good read man, i'm looking forward to seeing the final result. That tank looks lush
-
Chris.QCRs 1980 Harley Davidson Sportster XLH1000
kseries.rookie replied to Chris.QCR's topic in Two Wheels
Such a bad ass bike man -
I recently did this on a tank that was pretty rusty and the difference was literally day and night. Simple process, pop down to bunnings and get yourself some hydrochloric acid (or if you've got a mate whos a concrete guy they will have barrels which I am sure you can poach some off) Bang in some water. I did about a 30/70 mix (Acid 70) and put in the acid.. It's dangerous shit so make sure you're wearing minimum gloves, face mask and goggles.. Nasty shit if you get it in your eyes. Let it sit for approx an hour, turn on the side, again on the side etc etc.. Once thats done, drain the solution. Fill the tank back up nearly full to the top with water and add some baking soda, table spoon by table spoon until the water stops fizzing when you put it in. Shake said water around, repeat the last step Empty and you're away laughing. I did have little bits of rust floating around the tank afterwards which was a pig to get out but I just lopped off a piece of garden hose and jimmied up an attachment to the vacuum cleaner and sucked out the rusty particles. Not sure if this is the proper way or not but it worked for me haha E: Water before acid, always! As I said, twice.. it's nasty stuff
-
At the stage above I still had a fair bit to do, including finish the wiring up front and mount headlight, indicators etc. Things like exhaust, mount pegs, polish engine and do a hand/eye check to make sure I haven't forgotten anything. I completed the above (apart from polish engine) and took it for it's first test ride which was a success! I came home and wrote another list of things I needed to do And that my OSGC's is where we are at today. All I have left to do is mount the new exhaust pipe and take it down for a warrant. Fingers crossed there aren't any hidden surprises What's your thoughts?
-
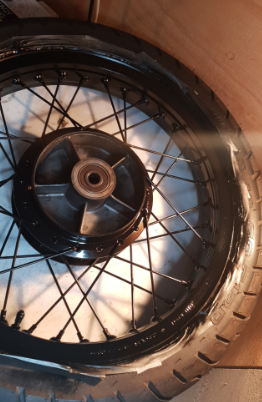
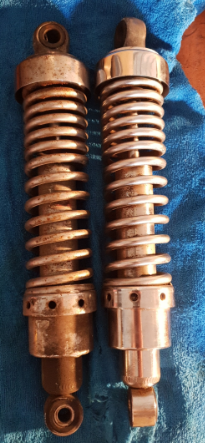
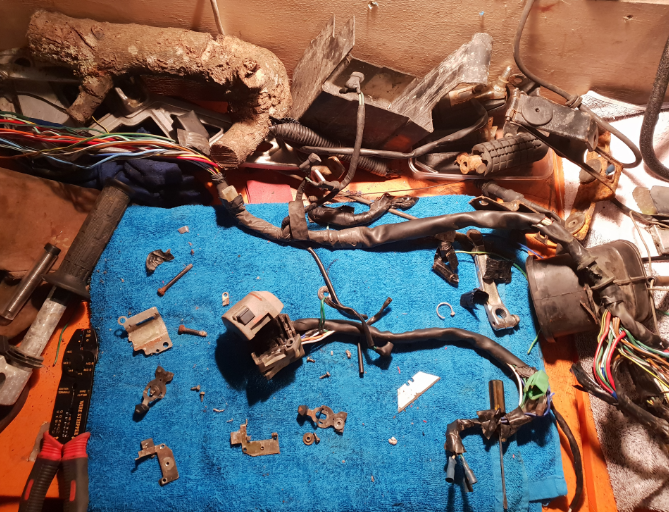
Wheels were next, as well as rear shocks. I plan to replace the rear shocks with something decent but I wanted to do something about the ones I had in the interim. Left is how they came, right is after a clean before I went to town with some sand paper Below is the "finished product" Back to electrics.. It was time to wire up my new tail light (integrated indicators) For the life of me I couldn't get the tail light to work. I knew it wasn't a faulty light as I was able to test on a known working circuit so was time to figure out what was wrong. Fortunately I had a spare loom so I split that up and started tracing the wire back to the front of the bike. I tested the wire at both ends and was able to get continuity so ruled that out. Tested the power where it was coming from and was also getting power. So it was time to test the switches. This was a pig of a job.. So many little fiddly buggers Put all back together and still the same problem. I went back to square on and found it was the feed that was feeding the tail light that was buggered.. I found the speedo back light feed and just rewired it to that feed. Job done and was able to keep it nice and tidy too. I assembled the bike now that all my painted bits were dry and rolled it out of the shed for some Vit D for the first time in 4 months and gave the shed a good clean
- 43 replies
-
- 12
-