

toyworld
-
Posts
63 -
Joined
-
Last visited
Everything posted by toyworld
-
yeah cheers spence will do just being lazy asking on here really
-
i dont see why not i can tell most the toyota 86 codes from a glance....maybe its a factory color for a chev i duno but just seeing all those pink mopars puts me off cars all together
-
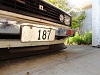
hey looking for a paint code, would anyone happin to know what this could be ??
-
3au starter motor same as 2tgeu
-
i just view the tig welded sitch like get something your local shop can repair and consider what material and its thickness you plan on welding. most common branded machines work fine mitech cigweld lincoln or miller are all ok machines and capable of achieving good quality strong welds. a cheap mitech handles the jandel pretty dam good, a lincoln or miller isnt really that much better imo
-
due to the cars worth use a second hand chain and guides, new tensioner from wherever.. bm parts or bm workshop? thats the typical fix on old rattley chain m42s
-
swwet as man its basic stuff making coilovers, all i was getting at is check with ya certifier beforehand to avoid an extra hassel. you can get bilstein sleave kits from autolign, big range of coilover springs too. crack testing isnt a big deal either its about 120 at sgs or southern assurance/institute
-
yeah you need cert for adjustys if ya car didnt come with them from factory. tig and mig both do the same job thats pretty obvious shit. but i talked to wayne martin a couple days ago & he said "theres afew new rules it has to be tig welded and magnetic particle tested/crack tested" thats what im being told by the cert guy i use here in christchurch
-
struts have to be tig welded and crack tested to pass cert these days
-
basicly the same as any other cambelt, it goes something like this.. remove top timing belt cover rotate crank to tdc observe tdc marks on cam pulleys maybe loosen off waterpump pulley, remove ax belts etc remove R/H engine mount, suport engine if nessary rattle off main crank bolt remove crank pulley centre and lower covers loosen belt tensioner bolts push tensioner back lock bolt back up remove cambelt and then reverse order to assemble, can ensure belt is fitted correctly by spinning engine round twice and geeking marks, make sure tension on belt is right. check condition of ax belts etc can replace tensioner bearing water pump any leaking oil seals if you want.. its up 2 you
-
the problem is that proper window sealant is designed to stay kinda runny so it tends to leak out and make a mess around the seal/on paintwork. its beter not to use sealant if you can but if you got hard rubbers or gaps use sealant no doubt
-
Sweet thought i might start sharing something for a change. Weather you got a valiant or old toyota its the same deal it should take no more then 3-4 minutes to install a rear window..... u need some soft rope, i didnt have any this time round i ended up using an internet cable put the rubber seal on the window and run the rope inside the seal lip all the way round finishing at the bottom centre. now sit the window in the car with the rope on the inside slowly pull the cable out and the lip gets pulled onto the inside of the car, go all the way round youll probly find it easy to finish the last bit off in one of the bottom corners. done
-
cut some rust sorted the pedal box & the heater pipes out accel cable etc just a whole bunch of little jobs welded a different bracket on the pedal box so the steering column bolts in the centre not off to one side like it did pedal also hit lip spoiler off 85 20v sporting gold stacks
-
they flood easy too. put ya foot flat on the pedal and winde it over for ages, hook up some jumper leads if you have too. i wouldnt bother pulling egi fuse or anything. plugs will be wet, shitty old s.plugs dont help either, you can check one if you want. next oil change use promar mbl8 as per instructions
-
yo if the sun visor mirror is on the (RH) drivers side then Lisse maybe a girls spec trim/model
-
in the early 90s the landtransport system got computers, everything was paper before that so chances are they probly wont have f-all details about it
-
dropped a 20v in the ae70 sprinter today, it went in like any other 4age, used rwd alt & thermostat had to make afew pipes with bypass and a block/offcut of alloy on rear of head to bypass water, i didnt have a mill handy so drilled afew holes so deap & took to it with crc/non ferous bit on a die grinder. evrything pressure tested algud about 30mm clearance to firewall
-
yo this is my other project soon to be daily hack, im gona ditch the rear seat and lay some plywood down with tiedowns so i can slide my tool chest/welder in the back. maybe throw some roof racks on it? gotta love that factory paint colour under the bonnet
-

Cam's Toyota AE86 Trueno Racecar - Yes, Another One!
toyworld replied to Ned's topic in Project Discussion
whats up with holley regs, do they play up? -
they both just lower the mounting hole, both of them will work fine, its just plate welded and some holes so shouldnt matter what ones you get man. had some t3 ones maybe 5-6 years ago and made acouple sets similar but used 4mm, the t3 ones were 10mm plate and heavy not that it makes a noticeable difference both ajps and t3 make some good products access to a angle grinder, drill and a mig will also do the j o b
-
its been awhile since ive seen the nz made ones advertised they were on trademe for abit, so maybe have a look on that ajps site, t3 make some ok stuff but alot of it is to heavy and oversized imo
-
yo have you looked at other brands that aint made of 10mm plate.... i think ajps or some nz guy up north does a nice set thats not so overkill and probly same or cheaper price
-
this turned up from jp today & heres a shot from a couple years back. sold the sev and its now a group b replica in the nz rally.
-
Toyworld's (where the best toys come from) AE85 Racer.
toyworld replied to Vintage Grumble's topic in Project Discussion
with the input shaft located in the spigot bearing
