Bling
-
Posts
24,231 -
Joined
-
Last visited
-
Days Won
3
Everything posted by Bling
-
Thanks. Yeah nervous for the first check would be an understatement. Not an easy task to fit a whole bunch of parts that weren't supposed to fit to your car. While at the same time meeting the requirements that comes with going down the cert path. LVVTA PDF's have been bedtime reading for quite some time.
-
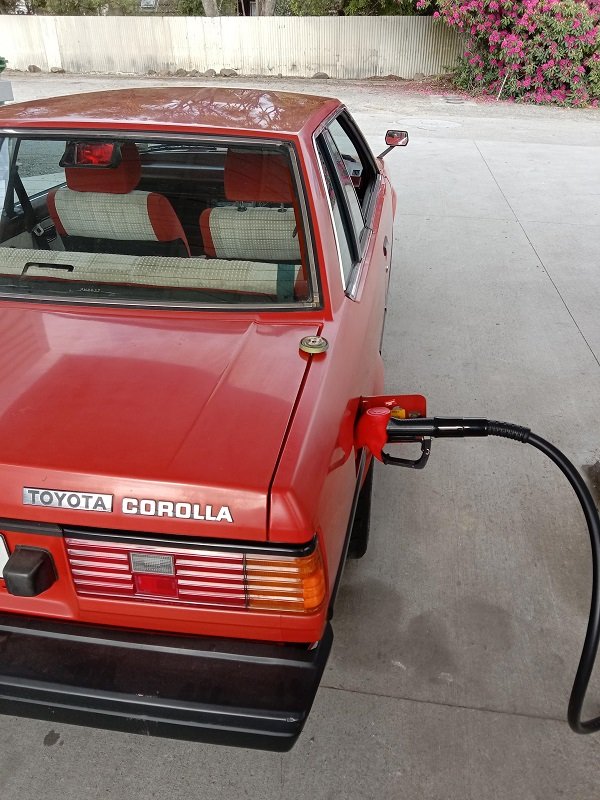
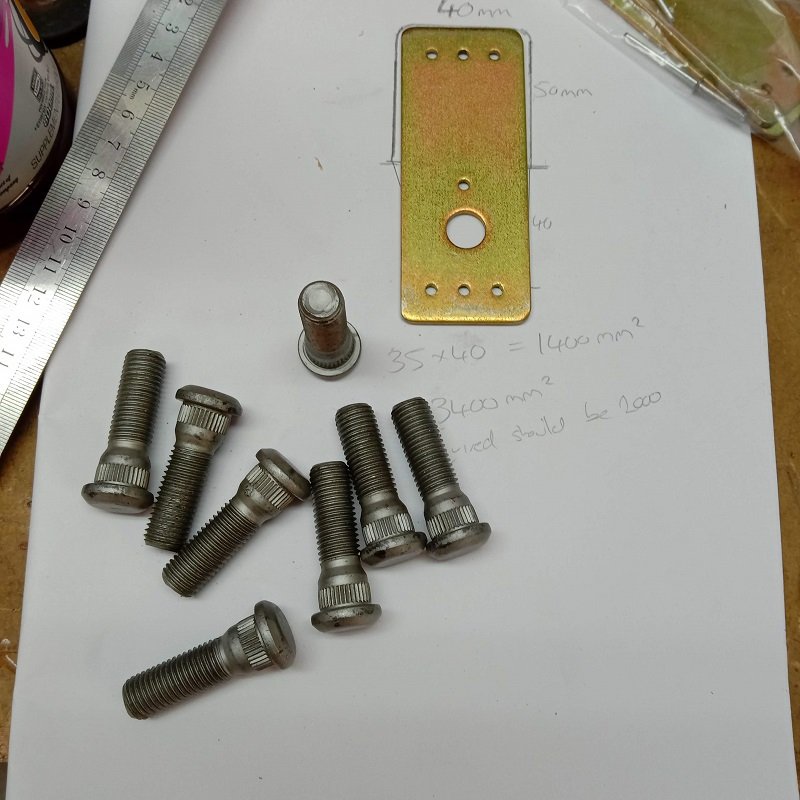
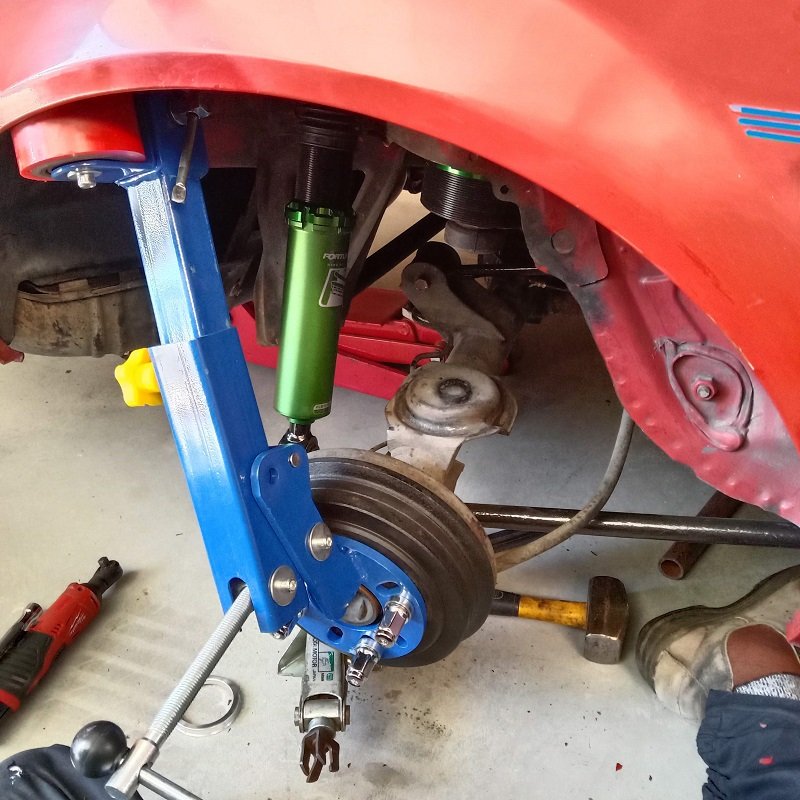
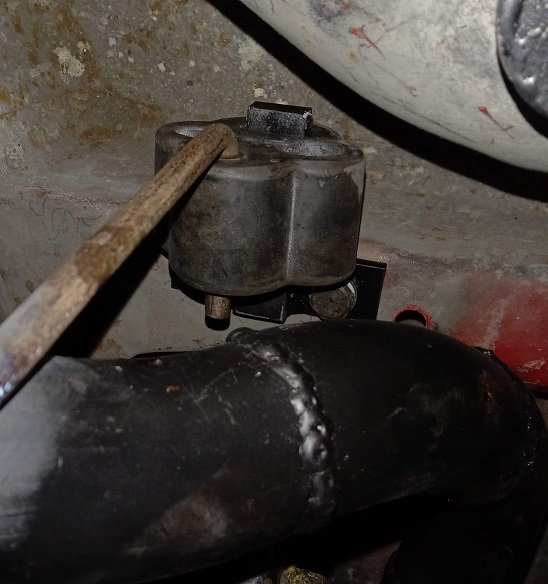
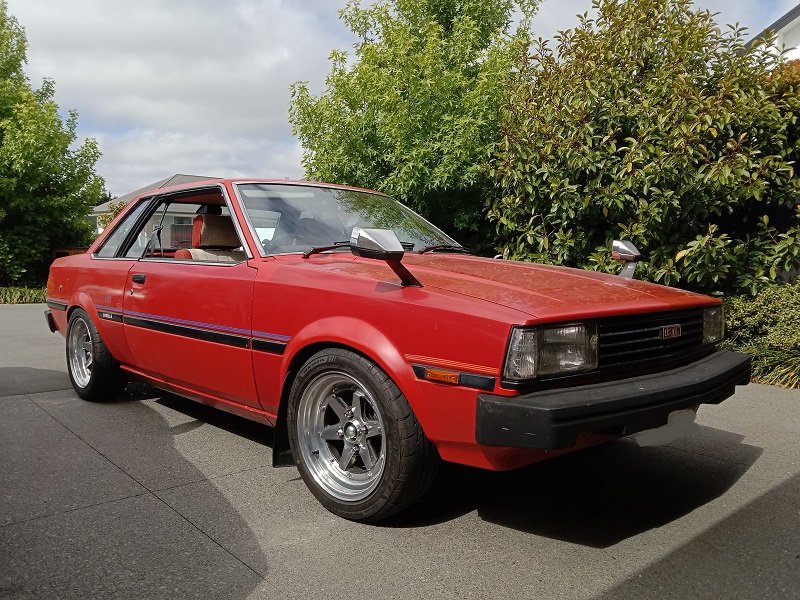
So yeah, where the fuck did that time go... Have been working on this a bit harder over the last few months, was supposed to be done before child number two arrived, but that never happened. Anyway, took it to local workshop a while back for them to tidy up quite a few loose ends that I just didn't have time to do. Had them check my timing belt job, set timing, tune what they could and put it through a WOF check. Funnily enough it didn't pass. The sheet was filled with many of the problems I had asked to be fixed lol... so they could have saved some ink and fixed my list first, but minor thing. So I got it back running a bit better, but on a knife edge between stalling when coming to a stop, or running on when shut off. I've fiddled with it so that I doesn't stall now, and will leave it at that. I have a rebuild kit for the carb, so at some point that will probably get fitted. For now it drives fine for cert etc, so it's down the list to do. Then I took it down for an alignment and made the technicians Friday well and truely, two hours later he was looking a bit out of patience haha. But I now had a failed WOF sheet and an alignment sheet. So it was time to book it in for initial cert check. Turns out they are busy chaps as the estimated 3-4 weeks turned into 7 weeks away. To be fair, it was a good few weeks between calls as I wanted to do WOF / alignment before booking as didn't want there to be any surprises. So 6 weeks later and with a week till check, I figured I better check everything was ready to go. Nope, carb had decided to play up quite a bit since it had been parked up. The battery I purchased to get the car shipped down had finally had enough so it was off to SCA to get a new one. Didn't fix the carb, but it sure made the time between firing it up and fiddling less than the battery charge it needed each time. Battery was always on the list as well as a full tank of gas, don't want to be that guy when dropping the car for cert. So anyway, dropped it in a week ago and it came back with a few things to sort. Nothing too major. Rear seatbelt mounts didn't exist they were just drilled through a single skin at compliance. So that was one item to sort, what a nightmare too, so little space to work with. Ended up laying in the boot for a few hours getting them to fit nicely. Suspension travel was not adequate in back, so I have sorted that now hopefully. Gained quite a bit of travel, while still meeting all of the cert requirements. Wasn't sure i'd be able to get it done with my springs, but certifier and Clint both had ideas to help with that. So got that sorted and gained around 30mm travel. Wheel studs up front slightly too short. I set myself up with this one as I had been using factory nuts for all my testing of turns etc. Then put on some nicer ones I didn't check the engagement, it's less of course. So hit up Mark at Toyota as 2+ years ago he had sent me a photo of the wheel stud options in case I needed new ones. They arrived next day, so they are on my list to fit now. Of all the jobs on the list, they are the easiest, so they will be done last. That was the list to rectify, along with sorting the exhaust to not hit the car. Exhaust wasn't too bad, but I had the front joint fixed and that involved them jamming the exhaust against the trans. So I pie cut the exhaust at the trans and rewelded it bent down. this lead to problems further down the exhaust where it hit a crossmember just above the diff. So I grabbed a mount from SCA on the weekend and welded a dropper from that to the exhaust. I have plenty of support stopping the exhaust from dropping, just none from stopping it heading upwards. Wasn't really on my radar at the time, but with it being lowered and a lot firmer than factory, something had to give. So that's all fitted now and so it's rubber on rubber with minimal distance for that travel. So it shouldn't stressed the rest of the exhaust, and it stops all noises. Sorting the suspension took me probably 1.5 days of solid head scratching and removing and reinstalling most of the rear end with small adjustments. Such a PITA with the limited space I have. I also wasted a lot of time forgetting to include droop in my travel calculations. Was getting pretty hard to get decent travel till I remembered that counts, duh. Some pics. Filling it up with the good stuff Studs that need to go in, as well as working out plate area vs the space I have to fit them. Got it sorted, trimmed them a bit, while staying within the requirements, zinc'd then painted. Still well and truely have the clamping area I need after being trimmed (not shown). They will be bolted into the car with 5mm bolts, one of which will pass through a sheetmetal packer. I'll then use the provided rivets to finish securing the packer between the plates and jobs done. Gave this side another tickle, I didn't want to fuck with the exterior look of the fenders on the car, front or rear. So that meant I needed to get as much space as I could on the inside. Rear is nice and easy to add clearance without compromising anything. Will give it all a paint up as some flaked off the inside. Don't want any rust forming in the now formed channel, so will sort that out too. Thankfully there were two threaded holes in the car above exhaust. So I cut some steel and made a solid as fuck bracket to bolt to the car. Then bend up some round bar and curved it around the exhaust. Zap zap later and with some molten steel in my armpit I was done. It's not supporting any weight in this setup, it only prevents or at least reduces greatly, the rate at which the exhaust can travel upwards. I had both ends of the mount enter it from opposite sites with the hope this will prevent it being able to physically come apart. Seemed to work in my head, time will tell. Didn't want to weld caps on the ends as it would make removing the mount impossible later. To remove it now you have to unbolt it from the car to slide it off the exhaust. And hopefully how it will sit when finished. So I now have till the end of this month to tidy up all of the list, when i'll drop it back in for recheck. Pretty sure I have all of the things sorted after speaking with certifier today. It's basically as low as I can get it with the 15x7s in this offset, with factory fenders and sufficient suspension travel. It's been 4 years of mostly struggles to get to this point, so the weight on my shoulders is finally starting to lift. That's all folks.

- 23 replies
-
- 36
-

-

-
You guys must have beating the ladies off with sticks with gun shows like that. Has been a laugh to follow on Insta, well played chaps.
-
Could be worth popping in to a PBtech store if you're near one. They tend to have lots on display. See what you think works for you size wise, weight wise, available tough cases etc. Happy to then compare options if your weighing some up. If you wanted a pc and had a budget I could write up the specs to go for easy. But I think you should "try some on" in store and see what you like first. Just so many variables for me to recommend any one unit. Will you want it for desktop use with keyboard etc. Cameras are at least dirt cheap now for great units.
-
Depends on tablet too, some will have SD card slot, which would make transferring photos easy. Failing that you can probably buy an adapter to card reader depending on what ports it has. What is the budget?
-
Perhaps a Windows Surface product? https://www.pbtech.co.nz/category/computers/tablets/windows-tablets Not sure on the drop proof, but i'm sure you could get cases. Depends on budget too I guess. But with Windows at least it will do everything you need.
-
+1 for aliexpress non-setting butyl rope, works well.
-
No personal ownership experience with iPads myself, but even older ones my mum has replaced still look perfectly fine to me. So as far as resolution and display quality goes, i'd save the $500 and go 9th gen iPad. Both options are going to be amazing compared to what she has now. As for being outdated, for those basic tasks even much cheaper devices (not iPad) will handle them for years to come. So I wouldn't be concerned about that when comparing those two devices.
-
Don't open that can of worms. Are you leaving the blocks in with this setup or removing them and having the pack made to suit?
-
Sell bricks, buy old wetback, ???? Profit warm vines
-
I failed hard to get my jobs done so didn't make it. Perfect day for a cruise too! Hope the turnout was good, the feed was good and the beersies were cold for those partaking.
-
Just sell them and buy equally low key wheels that are the right width? I just don't see any way that would work and be even remotely legal. Probably a cheaper exercise too, even if that is ignored. Should be able to work out the offset you need based on what you have now and the extra inboard width you are wanting.
-
I'd start the design by looking at the deck building guides on Bunnos / M10 / ITM websites. They often include the building code sections relating to beam sizes for spans and spacings etc. 2.8m is a fair span, especially if you are piling your junk up there. Adding that extra post on the 2.8m length and one against shed wall, with a double beam between them could cut down on timber needed. 150x50 would probably be decent for 1.4m spans with the loading. Like I say though, the guides have the code that will be super handy for working it out.
-
How do you know? But seriously, i'm surprised there are only three. Unless that was just three for your year / factory lol.
-
That exhaust makes mine look like I stacked dimes on it.
-
https://www.tasart.co.nz/shop/hobby-craft/special-effects/krylon-glitter-blast/ Not sure on the spray gun method, but they glitter all those sweet whips so it must be a thing.
-
What a waste of time that stop start is.
-
Modern cars including a Swift? Impressive if so, didn't think they'd care enough to let grandma check her engine stats.
-
I had similar problems with my compressor, although its a big unit it had the most pathetic valve on the bottom that gummed up really fast. Replaced with elbow and 1/2" gas ball valve, ear muffs on job to drain that now. As for the coating, i'd be surprised if it did anything but fall to bits and clog your valve. Even when they do fuel tanks after acid dipping I think it's not THAT reliable. I just leave mine empty with valve open when not in use and hope for the best.
-
I paid just under a hundy for test with co2 fill. So in that ballpark, but more for the gas in your case.
-
Yeah +1 for 0.6mm wire. You can weld some pretty thick stuff with it in a pinch. But for panel work, it's perfect. I've even gone as far with 0.6mm wire as to repair a table for someone which had reo bar as legs. Sure it wasn't ideal, but it welded the 12mm bars together more than well enough. Obviously for that job thicker wire would be easier. But for panel work 0.6mm is the go for sure. Have used it for 0.5mm sheet, 2mm brackets, thicker box sections, no worries. 99% of my welding is on just shy of 1mm sheet.
-
We can agree to disagree. What length / spec springs do you have in the starlet? Project photos don't work now for me to look. But I assume you don't have keeper springs if you have the most suitable springs. I can't remember if FA ones are 150mm or 200mm (the normal ones MRP supply). How did you determine platform height if adjusting it is such a no no? Pretty sure you would have used the platform to provide some of the height setting for your car. The whole point of adjustable platform is that you can have the springs setup as needed, then move change the car height independently. Multiple ways to lower a car, none of which make the other obsolete. If you don't want to make use of the platform adjustment, you wouldn't buy suspension with it one would assume. To me the body adjustable platform is just another lever you can pull to get the required results.
-
Yeah you can set any suspension up wrong or right though. With either method. If you have a suitable main spring and keeper setup, I don't see the harm in moving that up and down to change height. Not an expert and no plans to be one. When you can't get off the shelf options for a platform though, you have to come up with your own solution. Sometimes buying a few pairs of springs, likely custom made, isn't suitable for the wallet.
-
I'm intrigued as to what you are driving with this setup. Is it legit balloon tyres or just a poor choice of wrong offset wheels?
-
Yeah cylinder size / type will depend on usage as well. I had my owner cylinder (6.8kg)tested in the last couple of years and filled with CO2 for ~$100 all up. No plans to start any rusty projects in the future so it will likely need another test at next fill. No rental to worry about makes it pretty cheaper motoring welding.