yoeddynz
-
Posts
19,480 -
Joined
-
Last visited
-
Days Won
158
Everything posted by yoeddynz
-

Yoeddynzs 1965 Hillman Imp. Chasing Flappy whirrs
yoeddynz replied to yoeddynz's topic in Projects and Build Ups
Update. I hate paint prep. I could never be a car painter. Ugggghhh- so boring. Sand, fill, sand, fill, sand... luckily I have a belt sander... (Joke) Then cover the whole lot in white filler primer and spot all the bits I missed. FFS.... In between all the filling and sanding I did a few other bits. Just to take a break from sanding really but also because these jobs are ones I cant do once its painted. The engine lid (bonnet at back?) I'll be using is the fiberglass item from the race car. It fits OK and is very light plus its the much nicer looking sport item with extra vents. However it was fitted to the race car on pedestals and held down with sprung latches (I dont know the proper term for these so I just made some names up) I wanted it to fit like an original lid so I had glue some steel brackets to it. Plus it sat flat along the front edge so an extra bit of steel welded between the brackets with a curve set in would fix that issue. I welded some m6 bolts in so making captive studs. The job in photos... Brackets bolted to hinges and ready for glue.... Lid glued on and taped in place over night... It works! Yay... Now to hold it down with original style handles. I had a set of handles on one spare lid and some working latches on another. I cut things up, broke rusty bits, oiled this, wire brushed that, ground this, drilled that and other fettling until I had some working bits I could glue onto the F/glass lid. Photos of the process... Again leaving for a few hours until the glue set (which btw is Sellys 'The One' adhesive and sealer which is really good stuff for all sorts Of jobs I have found) and once I fitted the handles in place they worked a treat. Panel gaps are ok too for a F/glass lid... Part of the body prep was spraying Resene Industrial 440 epoxy primer over a few bare steel parts and the roof. I sprayed the fan assembly and radiator shroud while I was at it. Looked much better for some quick spraying and will be nice and durable... Then back to sanding. Finally I had it at a point where I could slap some primer on. It took a long time to sort the side out that had the massive cave in and dents. Its still not perfect and never will be. The bonnet too- given I had rebuilt most of the complicated front edge in steel I was not surprised that it needed a skim of filler and its still not perfect. Show car it wont be... Now this was to be the first time I have used 2 pack paint. I have previously painted cars in single pack acrylic (lacquer?) and they've come up OK but not very durable. Shane who owns the paint shop, Custom Colors, next door to where I used to work, gave me some advice and helped sort me out the right stuff for the job. This stuff is nasty and I was not going to risk breathing in vapours filled with all sorts of crap for the sake of painting an Imp. So I bought a decent full face mask and an air feed kit. I also splashed out and spent big monies on a Hvlp spray gun too! $60 at Supercheap in a sale. It'll do the job fine for the amount of work I'll be doing. I appreciate the lovelyness of all the Devilbiss and Iwata guns but not the $500 plus price tags. Also- big thanks goes out to the friendly helpful fella, Mort, at Patersons paint supplies in Nelson. So to the paint booth. Well actually to the workshop in which I had thrown some sheets over the pushbikes, strung some clothesline across the width from which hung some the doors and bonnet and shuffled things about so not to trip over whilst waddling about in my stormtrooper white coveralls making Darth Vader sounds from within my airfed mask. Its summer so I am pretty much always barefoot as is the way in NZ. However in order to not end up with primer covered tootsies I wore some old socks. I dusted everything down this morning and swept the place out, blew the car down. I opened the roller doors to an exact amount to allow just enough flow to pull the mist out (which did not work...) and preceded to very carefully and patiently clog my spray gun up. Some paint ended up on the car though. It was certainly a big lesson. This paint, a heavy primer, certainly goes off quick in the pot and at first I had not thinned it down enough. Combined with a 1.4mm tip size more suited for thinner top coats and I ended up making a mess of my bench as I frantically cleaned out the gun, tipped away one pot of paint, cursed a bit (a lot), turned the music up, and got back to spluttering my primer all over the place. I got there in the end, muttering to myself the whole time 'not to worry..its only the primer stage' and the car now looks resplendent in white. Amazing how a lovely coat of uniform colour makes something look so much neater. Also amazing how a lovely coat of primer shows up all the little pits, chips, dents, edges. Fcuk. On with the sanding. Luckily there is really only one part that I don't like which is on the horizontal swage line near the 'big dent job'. Its too flat and needs the edge building up with a bit more filler... But screw that for now. I cleaned the gun, turned the lights off and went out for a bike ride.- 120 replies
-
- 41
-

-

-
It could make for the iradiant looking cabbages...
-
Ha ha cool. Marshlands is the site that just keeps on giving. I'm amazed that there are still cars there. I thought they were all destined to be crushed?
-
Damn I'd love to rebuild a truck /4wd in similar style using all new or repassivated fastners. So clean. So neat. Such big boys tamiya model building fun.
-
Photos of the fine looking hitchhiker please. Did he have a nice body? Please tell me you have also swapped over those wing mirrors. Kevin says 'meow'..
-
Yoeddynzs 1965 Hillman Imp. Chasing Flappy whirrs
yoeddynz replied to yoeddynz's topic in Projects and Build Ups
Crikey its hot here! Perfect time to spend hours in a workshop filling and sanding then, with the occasional bike ride and swim to keep my sanity. I don't really get too excited about paintwork. In fact- really posh paint jobs, all shiny and bling just dont suit old cars imo. But I realise that if I want to sell this car down the line (to fund the Viva project etc) then its going to need to look nice. But going back a week from now I finished a few tiny welding jobs and added some much needed seatbelt mounting points. This car being a really early one only had diagonal belts and the positioning was horrible along with mounting points that were only holes through thin panel steel. I welded long sections of 20x10 fms inside the A pillars for the top mounts and then some plates to the floor and inner sill in all the appropriate size steel and nuts. I also cut and shut the rear seat base frame so it would clear the radiator pipe tunnel.. I then had to sort out the removable rear valance/cross member. I have three to use. The race car one was hacked about and rusty. A spare one I'd collected from the Christchurch Imp graveyard was rusty and dented. The original one from this shell was just rusty. I chose that one. I started by cutting out the unneeded and quite heavy original engine mount part. Then rebuilt it all, removing the rot, adding in a length folded steel along the width to support a small bit of box section. Why? Well because I like bicycles and I like to travel to places for nice bike rides and why would I choose to do such a thing in a boring modern car! Much more fun to go on road trips to biking places in a interesting old car... So, just like on my Rx3 and my previous Viva I added a mounting point for custom made bike racks to suit each car. For this Imp though I wanted something that will be hidden by the number plate when not in use. I'll make a basic rack to suit. Then together Hannah and I painted this and any other remaining bare steel with industrial 440 epoxy primer. It already started looking better... Now back to that filling and sanding. Its been a week of many 30 degree days here, often hotter at mid day. According to our thermometer yesterday was 34 ! Our place is like suntrap and we don't get the wind that even our neighbours over the road get. Great for winter but can get very hot in summer. Luckily the workshop faces directly north to the sun and with both doors open we get good light and a gentle enough breeze through to keep it from turning into too much of an intense oven. Plus it takes the filler dust out! Inside the 'not so hot' oven... Still a yucky job and to stop giving up I have to keep reminding myself that 'a good paint job is 95% preparation' etc etc. Yawn. pffff. I'll report back in a week or two, broken and covered in dust.- 120 replies
-
- 26
-
-
-
Discuss here about Yoeddynz's little Imp project...
yoeddynz replied to yoeddynz's topic in Project Discussion
#win at rear engined goodness. -
Discuss here about Yoeddynz's little Imp project...
yoeddynz replied to yoeddynz's topic in Project Discussion
Yeah the old boy aint that keen on randoms just dropping in and I can understand why. There's a fair bit of stuff there (although the best bits, the Imps, the Datsuns and the Saab 99s are all gone....) -
Discuss here about Yoeddynz's little Imp project...
yoeddynz replied to yoeddynz's topic in Project Discussion
Only if the seats are slid forwards though. But that won't be often (no kids/just cat life) But yeah.. Its quite spacious inside for a little car. -
Yoeddynzs 1965 Hillman Imp. Chasing Flappy whirrs
yoeddynz replied to yoeddynz's topic in Projects and Build Ups
With the pipework tunnel pretty much finished I moved onto the seat rails. I had bought some MX5 seats a fair while back with the intention of fitting into the Imp. However, rather than have them sit around doing nothing I ended up fitting them into my Viva wagon. They were great but didn't quite suit it. I then bought a lovely pair of Recaros, fitted them to the wagon and have the Mx5 seats once again for this car. I had sort of roughed out how I wanted to fit them a while back but not sure exactly where to mount the supports. I needed a Datum. So I scored this beauty... Strangely it came fitted in a freshly imported Hiace van from Japan that I did a load of rust repairs to. The owner didn't like it and agreed to give it to me if I got a decent standard Toyota replacement. This was harder than I thought as most of the old Toyota steering wheels from that era of Hiace have become loose on the top of wheel and so twist in ones hands feeling horrible. But eventually I found a decent replacement, got my prized wheel and promptly fitted it to a boss kit I ordered from overseas. With it taking pride of place I sat the seats in the car and made some carefully measured brrmmm brrmmm sounds and worked out the seat placement... Before work could continue on fitting the seats I needed to machine some locating spacers. But in order to do that I needed to fit the brand new 16mm centre height tools to our replacement lathe of which the stock tool post was set to an absurdly high 12mm, meaning it could only use the little baby 12mm tools available (odd for what is a fairly medium sized lathe). So I needed to machine the tool post down with our old drill mill ... Then I machined these... Which allowed me to sit the seats neatly onto fabricated supports that I welded across the floor, the rear passenger one strengthening the floor where the new pipe tunnel is... I bolted the seats in and was very happy. The seats can go right back giving heaps of leg room for my lanky body but slide forwards more then enough to get into the back. I have mounted them quite far inboard to line them up as best I can with the pedals... I had finished off the pipe tunnel too, leaving it exposed at the back for fitment of pipes. I'll cover those bits with removable lids and will have to modify a section of the rear seat base for clearance. I'll sort out the finishing details once I have welded up the stainless pipe I have bought. Oh also- ages back when I was stripping out the green Imp (number 3 Imp) I found the build sheet. A neat thing to find... I like this bit...- 120 replies
-
- 34
-
-
Hi Dave- yeah the show was really good. We met Gary there and he said you'd gone back to Ireland for a catch up. Ideas please Nelson oldschool folk- shall we do a bbq/beach meet somewhere? I'm now figuring that our next meet would have to be after the new years fiasco anyway so a bit of time to think up some ideas. Perhaps you know a good circuit and cafe stop we could do. Or a visit to some museum or other place of interest. Or will there be enough interest to have a simple meet somewhere just for a bbq and catchup.
-
Discuss here about Yoeddynz's little Imp project...
yoeddynz replied to yoeddynz's topic in Project Discussion
I'll just duct tape a camera onto Kevins back. He follows us about all day. Rough edit it in the evening and throw some loud euro house music on in background then post. Sorted. -
Discuss here about Yoeddynz's little Imp project...
yoeddynz replied to yoeddynz's topic in Project Discussion
Hey thanks for the lovely comments. Nah i have never considered it. I don't consider myself very confident behind a video camera and start getting a bit paranoid/self conscious about my voice. So I've always just been happy behind the keyboard. However I do love writing build threads in the hope that not only will they entertain but that they'll also inform others enough and help- just as so many threads out there have taught me back. We are right in the middle of tidying up our housetruck for sale and once its sold will be starting a new house on wheels of which I am really bloody excited about! Being able to build your own cheap house is something that is ever more important these days and with the whole new trendy 'tiny house' thing having really kicked off there is certainly a lot of interest out there. I could perhaps do a vblog for that build and just see how it goes and how I fair. -
Discuss here about Yoeddynz's little Imp project...
yoeddynz replied to yoeddynz's topic in Project Discussion
Oh. That sux. -
Discuss here about Yoeddynz's little Imp project...
yoeddynz replied to yoeddynz's topic in Project Discussion
Snifter Green (are snifters still available???) is similar to the original wagon colour. Not keen on matching green cars. -
Discuss here about Yoeddynz's little Imp project...
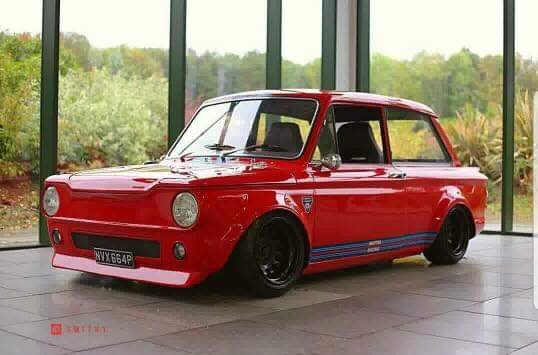
yoeddynz replied to yoeddynz's topic in Project Discussion
Yeah I quite like gulf blue. But wouldn't do the whole scheme because its a bit over done I feel. I do like this imp in martini colours though even though I'm not normally a fan of red...
-
Jamies RX7.. aka the money gobbler discussion
yoeddynz replied to J4m13's topic in Project Discussion
Ooooh I cant wait to see this ^ ! -
Shame if probetalk has gone downhill. Good info on there and much less Crap than on the mx6 forums. Probetalk... Should be about aliens...
-
The only thing you need to swap across are the exhaust valve followers. Bin the ze inlet followers and replace with the exhaust followers from the de. (and appropriate springs too iirc)
-
I think the general concensus among enthusiasts is that they are safe to 8000. After that the oil pump will struggle to keep up flow (for long periods in race cars that is) and anyway- power falls away beyond 7k so not much point. The stock hydrulic followers will also pump up. The last G4 engines had solid lifters to cope ( although I already know that you have been nerdy enough to learn all this just like the rest of us K seres geeks Certainly the rod ratio and block/crank stiffness would allow far higher revs if cam profiles allowed. I remember reading about a fella who started building a k8 that was going to have a 12k redline... but he gave up due to cam costs etc. Most who race them anywhere after 8k rpm run external pumps. There is also this, one of my most watched vids. Fuck me this car sounds so angry and I do love it so...
-
Yoeddynzs 1965 Hillman Imp. Chasing Flappy whirrs
yoeddynz replied to yoeddynz's topic in Projects and Build Ups
This morning we met up with a older fella who had got in contact with me via Oldschool. He has a Sunbeam imp. Very tidy little car fitted with a later Talbot 930 engine . Took it for a spin. First time I have driven an Imp since Hannah had hers in 2002. I had forgotten how fun they are to drive and its was just the inspiration I needed to crack on with finishing my project...- 120 replies
-
- 31
-
-
Yoeddynzs 1965 Hillman Imp. Chasing Flappy whirrs
yoeddynz replied to yoeddynz's topic in Projects and Build Ups
I moved the shell onto the hoist and removed the last bits of rot, tiny bits around the front arch.. Work then continued on the cooling circuit. I need to get the pipes from the engine up to the front. Most people with Imps doing a front radiator conversion either run the pipes inside (too hot), under the gear change in the centre tunnel (I want to keep that easily accessible and to do it properly without having pipes below the floor line I'd still need to make some tunnels to close over) or they use the existing heater hoses (too small). The setup in the race car was like this... Fine for a race car but way too hot and in the way for a road car. I have had the intention of fabricating a separate tunnel to house the pipes ever since getting the race car. This is because if I was to run the pipes inside no matter what I try and do to insulate them there will be a fair bit of heat escaping into the cabin, plus they'll take up more room. With a tunnel the heat can instead radiate out into the airflow there should be very little transfer into the cabin. They'll take up less room and with a simple false floor above the tunnel in the front the passenger should not even know.... Plus any leaks go to the ground, the pipes can be easily attended to and the well.. it just seems a neat way to do it So I started by chopping down the removable cover (covers where the brake pedal mount would be on a l/h drive car) so I can weld it back in for a neater stiffer area. Then I marked out some lines and started cutting away... Then I cut and folded some tunnel sections up and welded them in. I have tried to keep the curves as gentle as possible without encroaching too far into the footwell. I had to make sure the pipes would be clear of the front suspension arc. Meanwhille Hannah kept busy stripping useful parts out of the racecar shell... I cut more bits out, formed more tunnel sections and ended up with a lovely clear tunnel front to back... I now need to fit the rear seat in and see how I can avoid passengers getting a hot bum. I'm not sure how close it sits to the metal base. I might just have to wrap the pipes and make some heat shields as i can box it lower due to the rear swing arm mounting point box section. I'll also add a bracing section near the front across the floor where the new pipe tunnel has potentially created a 'side impact crumple zone' or something.. Then its seat mounting time. Then paint prep!!!! That will be where things start to get very, very, very tricky! What colour? I have my mind on a on a few different light blues and even some light greens. Decisions...- 120 replies
-
- 40
-
-
Sounds great eh. Just a 2.0 litre too. Similar cam profile to the klze though.
-
RE; the throttle cable pulley. I worked back from my pedal. I worked out how much cable that pulled, after having extended its arm to pull as much as possible. I think it was something like 40mm. Then I machined a round pulley the appropriate diameter which opened 90 degrees with 40mm of pull. But as you know from the thread it was too linear. So I just offset the centre and set it so roughly the first 25mm of pull only opened the throttle 1/3rd or what ever. It was pretty simple ruler, compass and 3.14 stuff really. Worked a treat. Damn I'm still so tempted to put a V6 in my wagon...especially after listening to my mates car here....
-
whats the spacer look like? I might have a spare you can have. But yeah- make one from chopping board or wood will be fine too. Use heart Rimu. It has a lovely dense grain that looks great in nice varnish...