yoeddynz
-
Posts
19,489 -
Joined
-
Last visited
-
Days Won
158
Everything posted by yoeddynz
-

Yoeddynz's 1985 Hino N0915 housetruck build.
yoeddynz replied to yoeddynz's topic in Project Discussion
Really? Wow. I never realised that. Yet I have never heard of a catastrophic incident involving an old caravan. I guess another aspect as to why they specify toughened is stopping shards of glass being around at an accident scene eh. -
Yoeddynz's 1985 Hino N0915 housetruck build.
yoeddynz replied to yoeddynz's topic in Project Discussion
Your housetruck or a friends? Our housetruck goes to its new home tomorrow if the weather is nice. I'll do a little update. -
Yoeddynz's 1985 Hino N0915 housetruck build.
yoeddynz replied to yoeddynz's topic in Project Discussion
Heya- the only requirement is that the glass is either toughened or covered with Lexan (not perspex/acrylic) - or just shuttered over for travel/cof test. This is so joe blogs doesn't get a huge shard of house window pane slicing through him if a window was to get smashed etc etc. We did a mixture of lexan on most of the leadlight windows, which happens to nicely act as a double glazing, or toughened glass made to size. For the latest cof, after we had added a large window, we made a shutter to fit over the window for travelling. Its not pretty but works. Cof man was super chilled and really didn't give a shit about the house part. He just wanted to know the truck was safe. (house is considered a load) Different story for buses or any vehicle where occupants can legally be seated in the rear while vehicle is moving- in that case windows must be toughened or covered in lexan on BOTH sides- again due to risks from shards of glass in an accident. EDit- just saw your pm but will keep answer up on here for advice for others eh. Oh and yeah- rego as motor home. Cant remember the benefits . Might be cheaper rego plus not needing a TSL etc -
The size of that crane in the layby where you parked up to fix ya auto linkage- wow!!!!
-
How were they to deal with at Vinz? Deon has left and I have heard from a couple of people that the place has gone a bit 'mean and grumpy' since.
-
Fuck this is so cool- I know your feeling when its all one the road cert'd etc. It looks choice! So cool to see a rego plate on it- its the little things eh but they mean so much. Now please go park it next to some fellas 'big' ford ranger and laugh at him I might have to steal our hino firetruck and meet up with you for some cool proper 4wd truck photos!
-
Nissan Micra k11 - Mandy goes to a new happy home.
yoeddynz replied to yoeddynz's topic in Other Projects
Yep- decision made! Chosen by cat! -
Nissan Micra k11 - Mandy goes to a new happy home.
yoeddynz replied to yoeddynz's topic in Other Projects
So a quick update. Moved some cars about the yard a few days ago so I could get @Tumeke Triumph wagon onto our hoist. It was quite fun lining up the little cars and snapping some pics.. Still not sure which of the 1.3 engines we'll keep as yet to do compression tests. Once we know we can then work out the order of parts swapping. But more importantly - we have pretty much decided on the names.. Milly is the light blue one- the first. Seems to have the peppiest of the 1.3 , most likely due to having been trashed the most by various previous owners inc one who used it for food deliveries. Molly is the 2nd one- the dark green one with the full fat list of options. I think her heart is a little bit of an oil burner and this is still a common excuse I'll stick to when arguing my case in the economy run we did. Plus her tyres are wider and were flat.. The new one, the darling of the bunch in striking yellow has been named Minky. She is such a clean wee car, low mileage and gives her best when trashed- which is all you can do when faced with our local hill because that little 1.0 with slushbox combination requires it. So other than driving them we have not yet done any work or swaps. It will wait until after xmas time probably because we are behind on paid work etc. But still buying bits- stuff that we don't need but couldn't resist. I bought this from Ebay... I love car brochures and this one has not disappointed.. Must get some driving gloves for our sports march we are building... I think that Molly is a G# going by the spec sheets etc.... But possibly a mixture of G# and Autostrada. Looks like the Autostrada but they dont list them with the LSD or rear discs that Molly has. Certainly has the Autostrada seats though... I'll be looking to change my wardrobe attire to more in order fit in with the upper society levels of Micra ownership... Millies magic crystal that Hannah loves so much is an optional extra... And with such fantastic things like that crystal and all the other great features that a Nissan K11 micra/march offers its no wonder that passengers are obviously fucking thrilled to take a seat in one!... So back to our collection Big storm rolled through yesterday morning. Very heavy period of rain. Discovered today that both Milly and molly have got leaks into the passenger side floor. FFS- I thought we'd avoid all this sort of shit with the British cars but alas no. It appears that the Japanese can make cars just as leaky as the poms. I have looked into it and apparently there's a seal for the air intake under the scuttle panel that can shrink/perish. Not been an issue for us until this huge deluge. So ow Molly and Milly have their passenger carpets lifted up on blocks of wood and I'll have to pull Mollies carpet out I think- such is the Japanese efficiency of its carpets at sucking up water. Meanwhile Minky sat there, dry as a bone- pulling cheeky little facelifted smirks at the other two. Another tick for her while the others are in the dog box. Drove Molly inside this even so I can pull the seats out. Noticed a puddle of coolant on the workshop floor. Jacked her up and looked around to discover a weeping water pump - dripping from its drain hole... Grrrrrrr !!!! Oh Molly. Here's another nail for your coffin. A distant snigger was heard emanating from Minkys direction.- 213 replies
-
- 10
-

-

-

-
Nissan Micra k11 - Mandy goes to a new happy home.
yoeddynz replied to yoeddynz's topic in Other Projects
I've been eyeing up that. However would like to find/buy the earlier discontinued fujimi pfl kitset but they sell for heaps! I was watching one on yahoo and it went beyond my budget. pft...
-
You've built your Morris v8 subframe and mounts already. I'm impressed! Some black paint and you're done.
-
Yoeddynzs 1965 Hillman Imp. Chasing Flappy whirrs
yoeddynz replied to yoeddynz's topic in Projects and Build Ups
Ooooh its been over two months since I updated this thread. I have not touched this engine since stashing all the bits under the bench out of harms way, throwing a blanket over the main block on the bench and spending most of my time since then buying up many Micras, working on the housetruck and building the mezzanine floor in the shed. Oh and some of that paid work thing too because we do have a mortgage to pay. However - I still have a little bit of progress up my sleeve to report before we get up to real time. So I can do an update and hopefully soon I'll be back into working on the engine. I'm very much looking forward to moving in upstairs because I can whittle away on the project even easier. Well at least I think it'll work out like that? There's still a load of sawdust to create yet before we can move in though. So where I left off last time was in making the start of the adaptor plate/engine side of the bellhousing. I needed a flywheel to work out its depth, due in part because I am intending on using a concentric slave cylinder, one that was left over from the Ford Mundano that we had robbed ages ago for its engine to fit into the Viva wagon. I had a Subaru Leone 1800 ring gear to suit the gearbox. I needed a clutch setup to suit and started hunting a variety of places. I found a brand new subaru Leone clutch disc going cheap on trade me so I snapped that up pronto. Now a suitable pressure plate. I was just going to buy a Subaru item but had realised that it wouldn't have worked - hence my question to you all in the last update - but no one on here came forward. Someone on retro rides forum won the prize though and guessed the issue. Whilst out on a run, my head clear and thinking of things it suddenly dawned on me that the pressure plate tension straps would now be in compression due to the Hondas anti-clockwise rotation (or clockwise when looking at the pressure plate). Luckily there's loads of clutch components available for early Hondas with their anti clockwise engines and I ended up sourcing a new pressure plate from a mid 80s Honda accord/prelude that would fit the bill and suited the new subaru leone clutch disc I'd already bought. The pressure plate was cheap from Rockauto - turning up only 5 days after ordering. They always amaze me! Clutch sorted and sitting on the bench. I could now measure up and start on a flywheel. I had Dylan @ThePog draw up a cad file of what I wanted- the right diameter and pilot holes for the adaptor bolts. He suggested that I get them to leaser cut pilot holes for the pressure plate bolts while at it and this saved some time. Got my plate cut and picked it up from Dylan's - giving me another chance to marvel at his Dynafari. I first set it up and bored it out a 1/4 way through to fit perfectly onto my flywheel hub I had previously made (this hub also has the surface that the rear main seal run against)... I could then seat the flywheel onto the hub, clamp them down and drill right through into the hub. Drill out to tapping size, tap the hub holes, clearance the flywheel holes and finally countersink and spot face the flywheel holes to suit some fancy bolts I bought - these need to sit near flush with the flywheel surface to clear the clutch disc damper springs. Pics... Flywheel now bolted to its hub I set it up in the lathe for machining... Then gave it a skim. Checked it again, double checked it and then triple checked it. All good. I then machined the required step onto the face to suit the factory specs for the clutch. Next thing was to add the ring gear I add. Now this was a bit tricky because my lovely old Mitutoyo vernier calipers (one of the first tools I bought when starting my apprenticeship) were not big enough to measure that diameter. My old work place I did my time at had some lovely 600mm Mitutoyo calipers in a lovely wooden case. They were one of the treasured items of the tool room and I used to love using them. I had priced up some 600mm items from a variety of other brands but wayyyyy too expensive for me. I'll still keep looking because they'd be handy for many jobs. Might find some second hand. But that didn't help me when I wanted to do this flywheel now So I made an extension from some stainless I tigged together, replicating the end of my calipers. Taped in place securely and hey presto- I had a new updated tool. Never perfect like the real thing so I had to really triple check my measurements but managed to turn the flywheel down to give me just the right amount of interference fit I wanted from a shrink fit. Into the bench top oven the ring gear went, heated up and it dropped on to my machined step nicely. Cooled down and its not going anywhere. With that in place I rechecked it all and got the throw out on the flywheel down to about 3 or 4 thou. Super happy with that. My clutch kit now bolted on in place and I have something I can set my bellhousing depth to suit... I have added the required dowels and its all done. I'll get the flywheel, clutch and crank balanced together before assembly of the engine. So that will be the next update I think. Machining the spacers that will become part of the engine side of the bellhousing adaptor. Then I need to finish off making some chain tensioners to suit the oil pump drive chains. However I still have plenty of other jobs to do on the housetruck and the mezzanine. Those are a priority whereas this is just a fun little project. But I must mention that today whilst out on a bicycle ride we had about 50 various motorbikes pass us on part of a charity run. I spotted a bright metallic blue Goldwing 1500 go past and as it accelerated up the hill we were on it had that distinctive flat six exhaust note and just sounded superb! It certainly got me tingling and all I thought of was that sound coming from my Imp A good incentive!- 120 replies
-
- 51
-
-
-
this is a good build to watch. It popped up as a suggestion and Ive not yet watched it all the way through but already hooked!...
-
Nissan Micra k11 - Mandy goes to a new happy home.
yoeddynz replied to yoeddynz's topic in Other Projects
I'll deal with the increase. Way too many other pprojects going on right now. Sadly I have also lost my local cert fella Barry Dowler - he's too busy doing council things and has stopped doing certs . I need to seek out the other cert fella in nelson, or go to chch etc. I must do an update on that... still have some progress up my sleeve to report on -
what's the width, offset and centre bore of those alloys ?.........
-
VK304's 1988 Nissan Vanette w/ added SR20DET
yoeddynz replied to Willdat?'s topic in Project Discussion
You have the same lightweight safety boots as I wear.... -
So how heavy are those alloys? Are they 4 x 4" ?
-
Nissan Micra k11 - Mandy goes to a new happy home.
yoeddynz replied to yoeddynz's topic in Other Projects
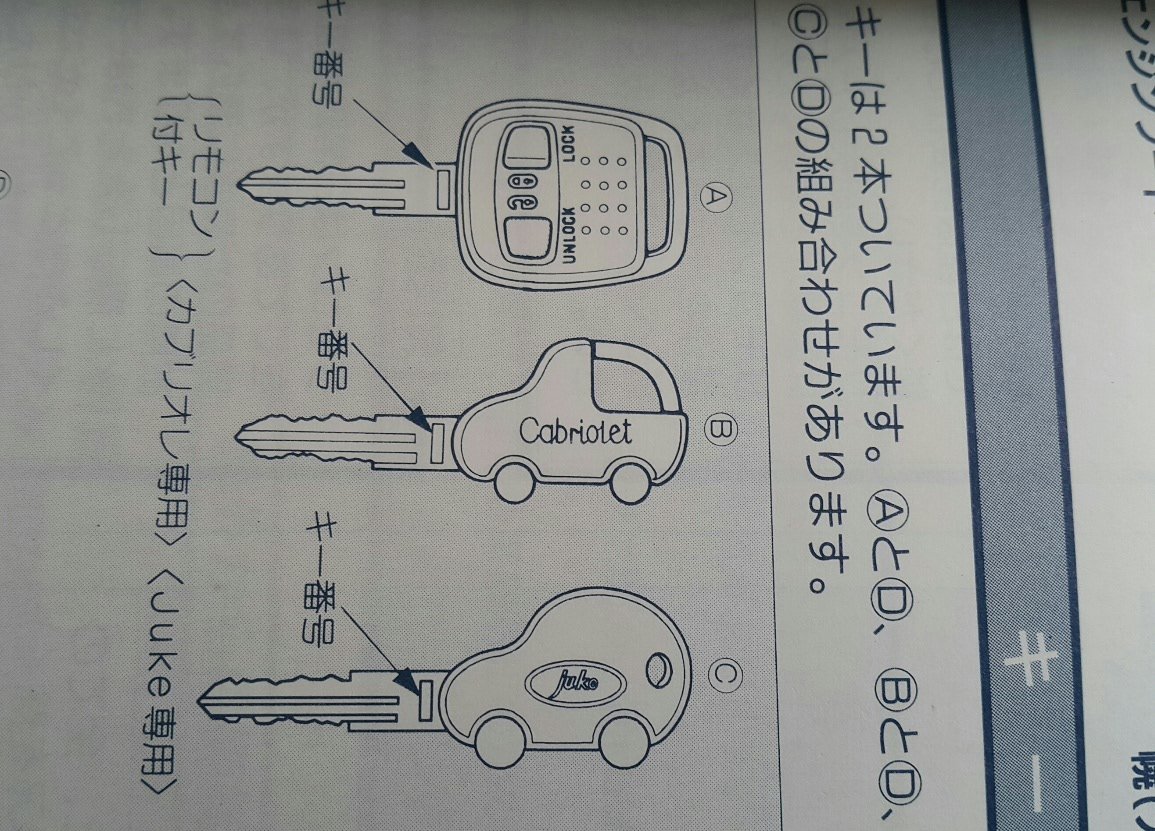
These keys. I want one!...
-
Nissan Micra k11 - Mandy goes to a new happy home.
yoeddynz replied to yoeddynz's topic in Other Projects
@anglia4 this one here- as spotted already by 2 other (becoming micra spotters) oldschoolers .... -
Nissan Micra k11 - Mandy goes to a new happy home.
yoeddynz replied to yoeddynz's topic in Other Projects
We are intending to build a new garage in the yard next year. It will be sited next to the boat shed. Maybe 6 x 4 meters. Big enough for one car and a few bikes. Hannah wants to put up an old style sign on the front that says 'Nissan Maindealer" with a picture of Nelson Mandela in a Micra- 213 replies
-
- 11
-
-
-

-
Nissan Micra k11 - Mandy goes to a new happy home.
yoeddynz replied to yoeddynz's topic in Other Projects
oooh yes please! Not that we need another. But just in case... -
Nissan Micra k11 - Mandy goes to a new happy home.
yoeddynz replied to yoeddynz's topic in Other Projects
So we now have 3 micra children.... It was a lovely sunny day to make a trip to the big smoke that is Nelson city. We took the Imp, partly because the Argentinian girl selling this latest march acquisition wanted to see the it but mainly because I knew it would look cool convoying home together, yellow and blue- like a swedish flag. or like the jersey I wore to one of the oldschool nats- see if you can spot the blue... Had lunch and arranged to go pick up the latest march (yet to be named by us but was called Tweety by its owner). A bit of chat, handed over a wad of cash and took a photo... I got first drive heading home. Wow at all of the LOLs piloting a 1.0litre Micra with an auto box. Actually really neat about town- would be perfect for a city. But point it at a hill or into a good headwind and it has to put some real effort in. Not where near as peppy as a 1.3 manual but still neat enough. The car has a full set of lowering springs, I reckon maybe 30mm drop. They seem ok but it has not got the anti sway bars like our other two have and the subsequent rolling around corners is quite noticeable. LH speaker doesnt work and the original tape deck fitted is shite. Mustn't grumble. This car just looks so neat and I love the colour. Took some snaps on way home... Fuel time. Will be interesting to see if this little 1.0 uses less fuel because small engine or actually uses more because small engine working hard- especially when attached to a slush box. Oh - which I think is actually a normal 3 stage auto? I have only ever driven one cvt before - in a newer Tiida and it was distinctive in the way it worked. But the box in this little car (Mandy?) shifts up in stages, with a pronounced jolt, just like any other auto. I presumed that all K11 autos were CVT but maybe not? Hannah's smile (at the style/size/colour/correct amount of doors but not at the performance...)... Note how much lower it sits. We got home with Imp leading over the hill because I wanted to hoon it in the imp and this micra wont allow such fun. Took more pics. I'd have lined up the 2nd micra (megan?) but its battery was completely flat having sat unused for 2 weeks now. Whoops. So we pushed it into the shed and took these.. Found these in the new micras glove box (Mary?), all in Japanese but interesting and neat to have nonetheless... Hmmmmm. So three K11s in a row. We will just use Milly and the new one (Meredith?) for general trips out and about until after xmas since they are both road legal and then look to doing the big swap of parts. Will attempt to just do most in one hit and just enjoy a week of micra lego. I wonder when the 4th one will pop up?......- 213 replies
-
- 20
-
-
-
Alex and Hannahs bushblock shinanigans. Look at my deck..
yoeddynz replied to yoeddynz's topic in Other Projects
Cool- thanks mr deetee- glad you enjoyed the read. Its fun for me to post it up (its like a nice diary I can go back to) There will be heaps more happening over the next few months that's for sure -
Well that is a neat idea and I think we will all look forward to the updates!
-
Yay for a project thread finally!!! Wow @ the rust. Yes- you should buy a shrinker stretcher. I wish I had bought one years ago! Just buy it and think this- once you have finished your resto you can sell it on to the next person who needs one. Everyone wins. I bought one from Machinery house- I got the double headed one on a stand, worked using foot pedals, because nice to have two free hands. Plus its a pain swapping the jaws all the time between shrink and stretch. https://www.machineryhouse.co.nz/S2262 https://www.machineryhouse.co.nz/S2263?gclid=Cj0KCQjwreT8BRDTARIsAJLI0KJRbUiZ46_2w-t1EpOY_ir-ShXCqsf3NLOZBzuocM2R1hhuj6UuUx0aAo0PEALw_wcB
-
Oh cool! Me and hannah randomly met Ken when we moved back to NZ way back in 2010. Spotted his old place in lyttleton with Marinas outside, he spotted me foaming a bit and introduced himself. Became friends (without even having to dirty my hands with Marina ownership I might add....)
.jpg.e92566e07a476225cea348ff53bac1b5.jpg)