Kiwibirdman
-
Posts
1,131 -
Joined
-
Last visited
Everything posted by Kiwibirdman
-
Sorry to Hi Jack this, I have the MK 2 calipers on my caravan, are new discs available, the VTNZ WOF guy got excited about the minor pitting on the disc face.
-
Sick kids, not going to make it. Bugger
-
Wife is out of the country, might be able to duck down for a quick bite between being a taxi for the kids.
-

Avenga's 1UZ V8 powered 1980 Avenger Wagon
Kiwibirdman replied to Avenga's topic in Project Discussion
I saw the car at the Painters when I was down there a couple of weeks ago. Looks really good. Are you local to Birkdale? -
Stress, when the mind over rides the bodies desire to stay next to the fire and go out into the fucking cold and look at old cars and talk shit. I will be there.
-
I may be in the Ellerslie area and need a Burger.
-
piazzanoob's 1964 ford Galaxie 500 seeedaan
Kiwibirdman replied to piazzanoob's topic in Project Discussion
It's coming along nicely. Keep up the good work!! -
Kiwibirdmans 1962 EJ Holden Wagon
Kiwibirdman replied to Kiwibirdman's topic in Projects and Build Ups
Well overdue for an update. Been side tracked with giving the 2 bedroom flat in our basement a full birthday, repainted everything, new carpet and lino, new toilet, vanity etc etc. All finished now and new tenants moving in next week end. Work has been mad busy as well and to be honest going down into the garage when its cold and the fire is on has lost its appeal. Anyway enough there has been progress. I pulled the new alloy Gemini radiator I bought a while ago out of its box and sat it in place. should be all good once the hole in the support panel is trimmed back 10mm on each side. I had the top panel blasted and painted, it just needs a quick blast of rattle can black to match the rest of the engine bay. I went to bolt it in place and found that all the captured nuts are full of paint and crap. I went to the local bolt shop and bought replacement bolts for the guards and front panels. About 45 1/4 UNF bolts with flat washers and spring washers and a tap to clean up the threads. There are a few 5/16 bolts as well. Even though each item is cheap all together it starts to add up. I have had the modified wring loom from @vk327 in the garage for a while. Still in the box that he sent it back to me in, I haven't even opened it up to have a look. I'm heading off for a week tomorrow, family holiday for the school holidays. The following week the wife and kids are away skiing (I wonder why I have no money) so should be able to get some serious garage time in. Promise photos in the next update. -
SR2’s 1947 Vauxhall “Rigamortice” Discussion thread.
Kiwibirdman replied to sr2's topic in Project Discussion
Just saw your update. You are suffering from a very common affliction of people who can do stuff. That is doing it yourself because paying someone lots of money to do a worse job hurts too much. I suffer badly myself. Now back to work on the car!!! -
Nice piece of kit.
-
I had the one in the Holden built at ADL in Penrose. Everything new except for the yoke. Cost about $750.
-
Nice work!! What is the front end?
-
Kiwibirdmans 1962 EJ Holden Wagon
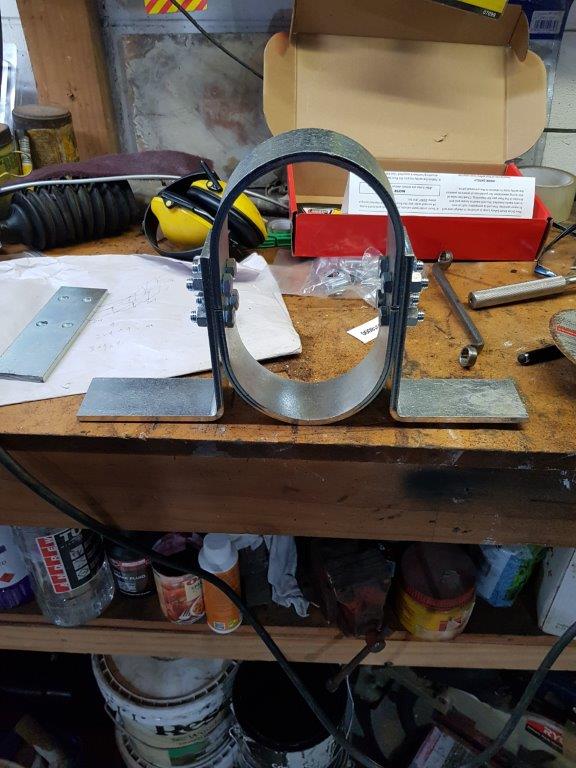
Kiwibirdman replied to Kiwibirdman's topic in Projects and Build Ups
Finally some time in the garage. Drive shaft is in and started playing round with the driveshaft loop. Here it is bolted together on the bench The box it came in must be something special or I got ripped off, $100 from STA parts. There is a flat area on the floor that will let me mount the loop just behind the UJ. I have cut the mounting parts down by about 2/3 and drilled new holes. I still need to make the backing plate out of some 3 ml plate, tomorrows job. I ordered an ignition module to replace the one that never came with the motor, that turned up a couple of days ago. Lastly had a good talk with the guy who does the loom mods. Turns out he is a member here @vk327 , NZ is truly a small place.
-
Kiwibirdmans 1962 EJ Holden Wagon
Kiwibirdman replied to Kiwibirdman's topic in Projects and Build Ups
After posting last night I found a guy on trade me who does wiring loom modifications. I spoke to him this morning and the more I think about it the better the idea is. The looms he does will have the relays and fuses mounted under the dashboard which gets some stuff out from the engine bay. Time for a bit more thinking and checking the piggy bank. -
Kiwibirdmans 1962 EJ Holden Wagon
Kiwibirdman replied to Kiwibirdman's topic in Projects and Build Ups
Easter has almost been and gone. The problem with having a wife,kids, house, other cars and a life is things get in the way. I got the Silverado cleaned and wheels swapped end to end(good bye 4 hours all up) painted a ceder wall on the house ( 2 coats and look amazing but day gone) as well as 2 dinners out and 20 people round for Easter Sunday brunch. A good weekend but not much on the car. I did get the wiring loom out without having to pull the engine. I spend a lot of time with the wiring diagram and the spaghetti that passes for a loom. The loom is in 3 main parts that I need. The power train loom pretty much all remains. I'm going to tidy it up and a few things get moved around. The knock sensor has been moved to the other side of the motor and I'm shifting the ignition module to the fire wall so that part of the loom will be about a metre shorter. Some careful work with a soldering iron and heat shrink will be good here. The loom that has the main power ( battery, feed to the starter and alternator) will also remain with a couple of fuses that have to be mounted. The Main Wiring Harness only has a few bits that I need, mainly the relays for the fuel pump, EFI and Engine fan. So most of this loom can go and the more I think about it using the feeds off the original loom for the car I can switch the relays using the original ignition switch. What I really need to do is write another list and just start knocking things off. Once all the big stuff is mounted in the engine bay (radiator, air intake) then the smaller stuff (ignition Module, relays, fuses) can be mounted. . -
Kiwibirdmans 1962 EJ Holden Wagon
Kiwibirdman replied to Kiwibirdman's topic in Projects and Build Ups
Since it is the Auckland monthly meet tomorrow I thought that a bit of progress is in order. I have been distracted with doing wood working on the house, spending time with the family and having to earn a dollar or two. The plan was to have a look at the passengers exhaust manifold and make sure everything clears, fit the drive shaft and possibly the drive shaft loop. I'm tryng to clear as much stuff as possible from the garage floor and put it on the car. First off I couldn't get the manifold in. Turns out the car has to be jacked well clear of the floor. The brake lines are almost OK, 50mm clearance as according to the book except for the last bit. Easy fixed by cutting the end off the pipe and flaring again. The big issue was the wiring loom for the engine came out where the exhaust is at the back of the motor. No way of pulling the loom up, only 10mm of gap to the firewall and about 30mm of loom. Engine will have to come forward which means taking it off the mounts and making space. Not hard but will chew up a fair bit of time and swearing. Drive shaft and loop are still on the floor. On a positive note my brother in law is printing off a copy of the wiring loom and plug pin outs I got off the interweb. Let the fun begin over Easter. -
The book says 50mm.
-
I'll check the distance in the manual. Its getting pretty congested down there.
-
Kiwibirdmans 1962 EJ Holden Wagon
Kiwibirdman replied to Kiwibirdman's topic in Projects and Build Ups
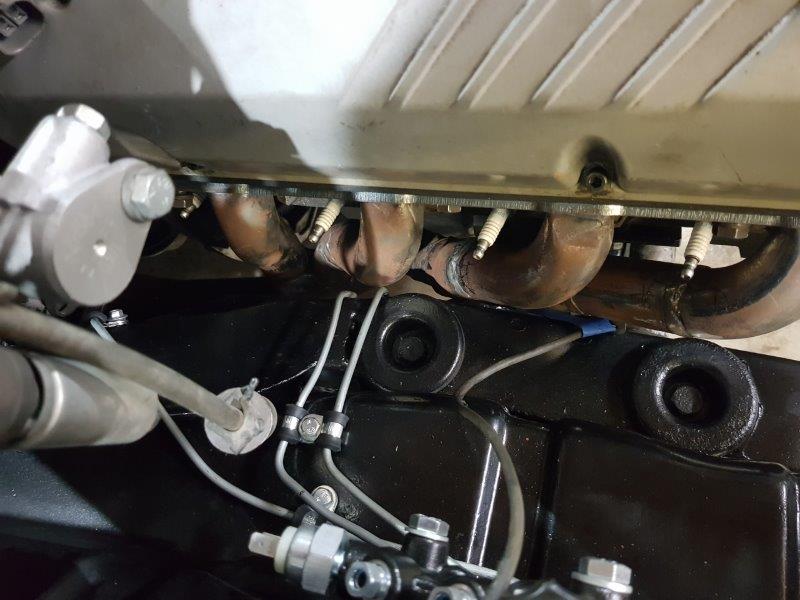
I put the drivers side header in Wednesday night. I put the front back up on stands to get a bit of height and used my trusty length of 4x4 on the jack to lift the motor. All good this time, no more busted fingers. One issue....... I have decided that this needs to be called the twice done car with the number of things that have been done and then redone. The left hand pipe goes to the drivers side brake so this can be moved away a bit, the other one goes around the front of the motor so it will get rerouted up in front of the exhaust.
-
Kiwibirdmans 1962 EJ Holden Wagon
Kiwibirdman replied to Kiwibirdman's topic in Projects and Build Ups
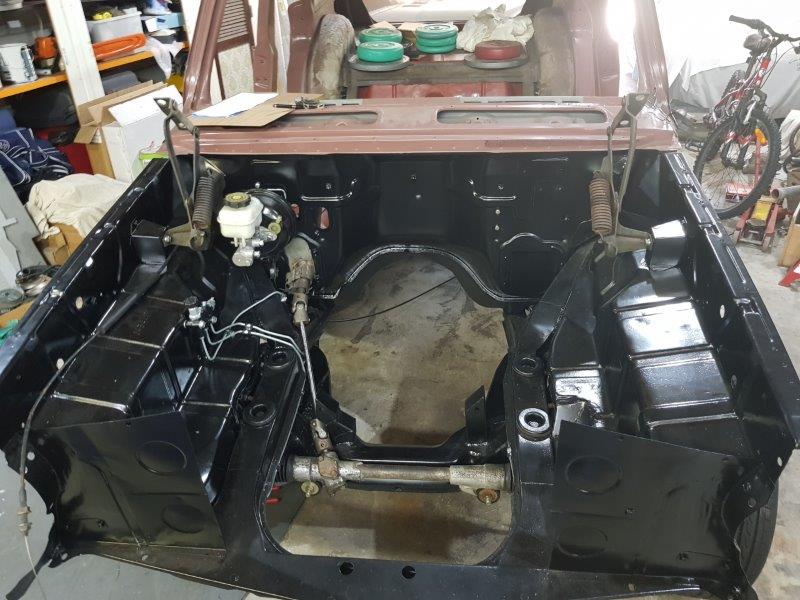
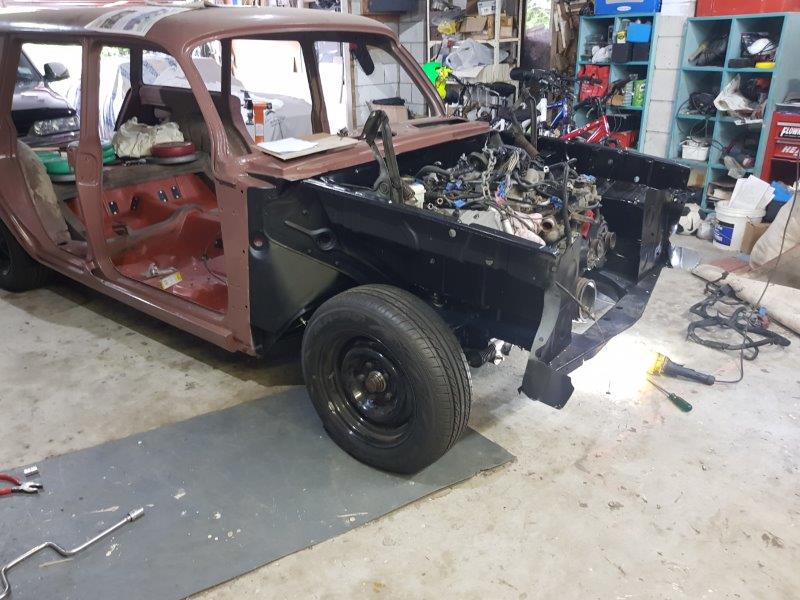
Here are the photos Engine ready to go in Hole for engine Engine in Hole Stance of car, should be about right. And another one just to be sure.
-
Kiwibirdmans 1962 EJ Holden Wagon
Kiwibirdman replied to Kiwibirdman's topic in Projects and Build Ups
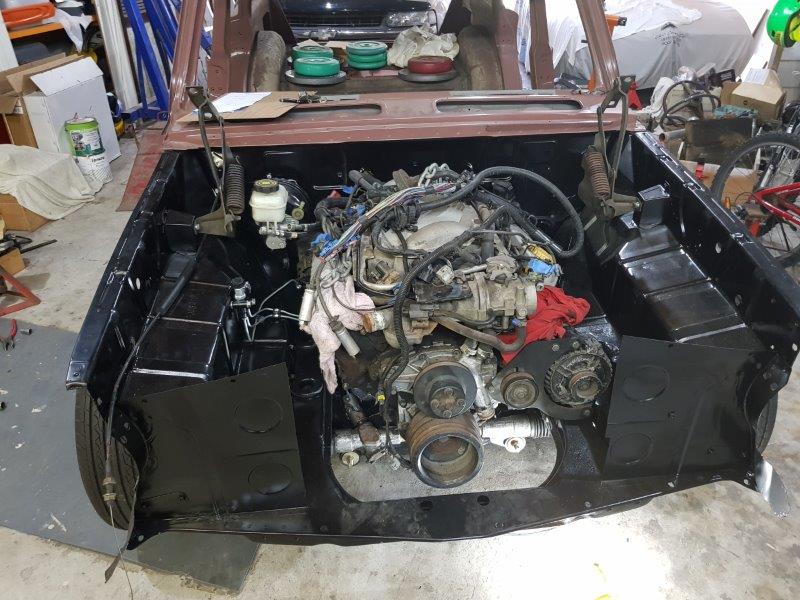
Engine went in on Saturday. I attached the wiring loom to the trans and draped the rest of it over the motor. The engine went in ok. I was using an engine crane and really needed an extra set of hands. Rang a few people but no one wad around. Decided to go for it and all went well. After fitting the engine i decided that the drivers side exhaust should go on. Used a block of wood on the jack to lift the engine. The jack decided to move which kicked the block of wood out. That jammed my ring finger against the chassis and mage a nice mess of my finger. Many bad words yelled and blood on the floor. I have photos that i will put up once my pc has finished updating. -
Kiwibirdmans 1962 EJ Holden Wagon
Kiwibirdman replied to Kiwibirdman's topic in Projects and Build Ups
Monthly meet was 2 weeks ago and engine is still on the stand. I started the brake lines in the engine bay. It was a good move as it took all the space I had to get them routed around all thr obstacles. I only stopped tonight beacause I ran out of P clamps. I'll buy some more tomorrow and finish it off Friday. As long as the wife lets me get on with it engine in this weekend. -
You are on the slippery slope. Next is carby then extractors. Followed by some head work, then................
-
Is it getting a standard grind or something a little better. Also do you need longer pushrods with a reground cam?
-
Kiwibirdmans 1962 EJ Holden Wagon
Kiwibirdman replied to Kiwibirdman's topic in Projects and Build Ups
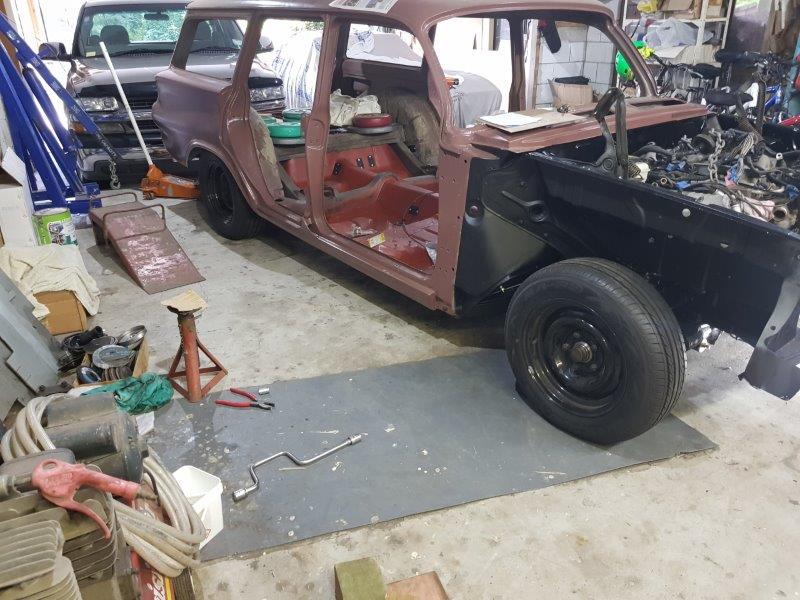
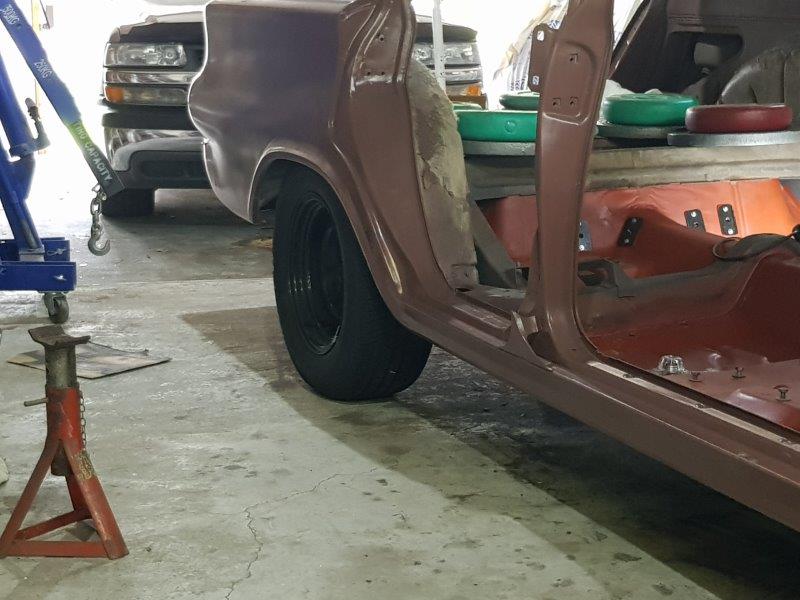
Last weekend I got some decent time in the garage. The rear suspension got put together completely. I had bought a new set of shocks and finished painting the floor over the diff before they went in. The shocks are KYB so they should be OK. I didn't take any photos along the way, her is the car on the floor, there is 135kg sitting above the diff to simulate the weight of the interior, windows, fuel tank etc. I added the weight and had the wheels sitting on ramps before I did all the bolts up tight. I did jump up and down on the tail gate opening to help it settle. Once it was back on the floor after everything was done up I tried sitting in the tailgate opening. the back of the car drops 10mm with my 100kgs sitting in the back. I'm pretty happy with how stiff it is. Spent some time tonight sorting out the brake lines and making sure that the front hoses didn't hit the tires on full lock. The brake line to the back of the car is in and distribution block with proportioning valve mounted. Monthly meet tomorrow so engine will go back in Thursday. I cant wait to see how low the front sits. The springs are a pair that I have had sitting round in the garage for a long time and don't know where they came from. They are fairly short and didn't drop far when 2 of us, about 190 kg stood on the front of the car. Time will tell.
- 131 replies
-
- 12
-