kws
-
Posts
4,181 -
Joined
-
Last visited
-
Days Won
5
Content Type
Forums
Downloads
Events
Gallery
Everything posted by kws
-

Going a full circle into a Marina again. KwS's 1973 Morris Marina Coupe.
kws replied to kws's topic in Projects and Build Ups
Just quickly, before moving on, a quick update on the rear quarter panel I left in filler last time. After much sanding, this is where it is. It needs some touching up, but I'm much happier with it. Finally, something other than bodywork. You're sick of reading about it, I'm sick of doing and writing about it. In a change of scenery, I moved to the front suspension to sort out an issue this Marina had. Say what you will about the Marina suspension, well no not that; it's not been pulled from the Minor, but anyway, it's very simple. This simplicity works both ways. It's easy to work on and adjust, but it's also simple in how it operates which can cause some compromises in ride comfort and handling. One way it's delightfully simple is that it uses a pair of torsion bars in the front suspension instead of traditional springs. These operate as a spring by twisting a spring steel rod along its length. As it always wants to try to unwind, it causes a springing effect. These have one simple benefit for car weirdos like me; they can be adjusted without special tools, on the car (for the most part), and without any legal headaches. This makes the ride height adjustable. At the back of the torsion bar, which is about half way down the length of the car, is a trim adjuster. This is used to adjust the fine height of the car. These are usually set about half way in their travel, so the ride can be altered higher or lower by a certain amount (usually an inch or two either way). Coarse adjustment is done by moving the arm by one or more splines on the shaft, one spline is one inch in adjustment. Mine is pretty ugly because it's 50 years old, and covered in thick underseal, but the basics can be seen. The orange arrow is the torsion bar, this is heading off towards the front of the car to meet the lower front suspension arm. The blue arrow is a locking bolt, this will need to be loosened (not removed) to adjust the arm, and the green arrow is the actual adjuster (which presses against a thick steel "bucket" so it doesn't dig into the floor pan). The adjuster works but moving the lever up and down, causing more or less twist in the torsion bar. So, the issue the Marina had. Well, just look at it It was very nose-up. As it turns out, according to the workshop manual, it should be 14.6-15" (37-38cm) when measured from the center of the front wheel dust cap to the arch lip. This is how mine was sitting, up to a full inch too high. I noticed this when I reassembled the front suspension after its rebuild. I was careful not to move the lower arm on the splines, so it wasn't me that threw it out of whack, but the suspension was so high that the top arm was pressed firmly against the droop stop when at rest. This is not good for ride quality. It's quite a large gap It's visible in the delivery photos too, even if the tire is a bit flat on the top. To correct this was quite simple really. Well, mostly. To actually fix the issue I would ideally need to disassemble the suspension and turn the lower arm one spline on the torsion bar to set the adjuster in the middle again, but because I don't want to do that all over again, I wire brushed off the adjuster, loosened the locking bolt and wound the adjuster bolt out. Loosening the bolt lowers the car as it takes tension off the torsion bar. I started with the RH side due to easier access and lowered it until the bucket on the top of the adjuster bolt was no longer captive, and wound it back in until it was. It got it about spot on for what I had in mind, about an inch lower than the lowest stock spec. It looked pretty good, so I moved to the other side. Unfortunately this adjuster wasn't in the middle of its travel, so it bottomed out about here. A smidge more than half an inch lower than stock. To be fair, this actually looked really good too, even though it wasn't quite as low. I wound the RH side up to level it out and ended up with this Compared to what it was, it's a decent difference. Should improve handling too, both by being lower, but also not having the top arm resting on the droop stop anymore. Pretty good result on the front. I do have a set of one-inch lowering blocks for the rear, but I want to see what it looks like on the ground again before I decide to lower the rear or not. I think I will, but we'll see. I'm hoping to get through a lot more work over the coming holiday period and have the car ready for a WOF early next year. It's way behind schedule, but it's slowly getting there.- 80 replies
-
- 23
-

-
Thanks @locost_bryan that's exactly what I needed. That's different to the weird two-piece seals the donor car had (which in hindsight I should've grabbed for a sample) but look to be exactly what I was thinking of fitting, definitely gives me something to work off.
-
Thanks for the advice. I'm just pissed off i was reassured before bidding that it would be fine with a sandblast and underseal, and then once i won it they started coming back saying its $$$$$++++ instead, without anyone actually looking at it and me having to take their word for it. Regardless, from what I'm hearing it sounds like NZTA is being a nightmare with rust, especially if its been flagged (which it has), so have rejected the car and sending it back to auction in japan. Absolutely gutted, but it is what it is.
-
Since ive been digging around the hell hole that is entry certification, here's the acid wash deets https://www.repaircert.nz/media/2022/10/Technical-Bulletin_02-2022_Acid-Wash.pdf
-
.
-
Agreed. Almost sounds like he was of the opinion that it was an old car that no one would care about, so rather than put his name to it, it should be scrapped. I hate that attitude, my wife got it a lot with her Alto years ago and I'll no doubt encounter it with the Marina at some point.
-
Going a full circle into a Marina again. KwS's 1973 Morris Marina Coupe.
kws replied to kws's topic in Projects and Build Ups
Winter sucks. Not only is it cold and dark, but it also makes working in the garage a somewhat unappealing prospect. That, and having other projects on the go, caused a bit of a slowdown with the Marina. But finally, Lucas is gone, so no more time needed to be spent there, and we're in spring now, so it's getting warmer and lighter. With that in mind, I took some time off work to finally dedicate some time to the Marina, as it's been so good just sitting there waiting, while everything else gets the attention. First though, let's step back in time to June, which was the last time I worked on the Marina. To finish off the door opening area of the sill I used a thin skim of filler just to even out the low spots where the plug welds are, and to tidy up the front edge of the sill where it meets the guard The window opening also got a skim of filler to smooth out the work I had done there. That rear curve was a real pain to do. You may have also spotted in that first photo that the floor pans were also seam-sealed. I did this to both the top, and under the car. It's not the tidiest; it's brush on and the goal was to get a good coating and not worry too much about how it looks since it will be covered by carpet anyway. Once that was done, since I had managed to acquire a new bottle of gas for my welder, I got stuck into the rear valance again. As some context, I started this valance way back in January. To get to the valance I first had to remove the tow bar. I don't really want this car to be towing anything, so it's unlikely this will go back on again. I'd previously removed the wiring and holes for that, too. It looks like Old Mate took a few tries drilling the holes before getting it right... But it came off after a bit of a fight This gave me clear access to the valance. A quick whip over with the strippy wheel, and this is what I had. Damn. It's pretty well contained to the LH side though Amongst the rust there are also some old holes for what I presume were a different screw pattern number plate. They will get filled too. I started cutting And found a couple of spots where the inner panel was rusted through too, so out that came To be replaced with a couple of bits of nice fresh new metal, all folded up to suit With the inner ground back, The first section of the outer went in. This little filler section was mainly to keep the upper section and lower lip in place so I didn't lose the profile. The real patching started with this random little hole off to the side Which extended into filling the rest of the gaping hole with new metal It's not the prettiest, and to be honest the primer makes it look worse than it is, but its nothing a skim of bog won't tidy up later And that's about where I ran out of welding gas. So, six months later, more gas in hand, I got back into it. With a fresh new perspective, I cut the rest of the lower lip off (it wasn't going to survive) and a new lower section was welded in place. This was also plug welded to the inner section I had previously replaced. A couple of smaller holes on the RH side got the filling treatment I folded this section up, stuck it in place with some magnets And metal glued in I cut out and welded up the other smaller patches, and once it was ground back a coat of epoxy primer protected it I would've loved to have a new valance panel like the Brits have, but the shipping cost would be prohibitive, and they just aren't available here. Instead, we'll make do with what we have. And that brings us up to date. Three months later, here we are. The first job of the day for yesterday was to cut the rear quarter panel up again, as I just wasn't happy with it. When I originally welded the new section in, I didn't leave enough of a gap, and when I welded it it resulted in a pointed high spot where the two panels met. I tried to hammer it out, and made it better, but just moved that metal to somewhere else in the panel. I also wasn't happy with the gap between one small section of the quarter, and where it met the sill. The gap was larger than the rest of the panel. I tried to fix this with filler, but I wasn't happy. So I cut it. I cut the bottom section out to fix the gap, and the big vertical cut released a lot of tension in the panel, allowing me to hammer it back into alignment. Opening this up also allowed me to tweak the arch section of the panel, which always sat slightly recessed from the sill. Once it was all welded back in, it was much better. Theres still a lot of finishing work to be done, but I wont be contending with a massive high peak in the middle and a deep low at the end I also completely finished the sill. There were some plug welds missing from the end, and I had to make and weld in a plate on the back of the sill to join it to the inner sill. I seam sealed the gap, which in hindsight I shouldn't have done until after using filler, but oh well With that done, the next goal was to finally refit the passengers door. It has been off the car since December last year. It's almost a car again The panel gap between the door and the new sill isn't perfect, It's a little tight at the front of the door, but it's not touching, so it's good enough. The door does need to come back a bit, but it's maxed out on its adjustment. Looking at photos, it's always been like that, so I'll need to shim the hinges, or slot the mounting holes a bit. That's a job for another time. It does open and close lovely though, even with a test door seal in place. The final task for the day was to give all the areas I had welded and seam-sealed a top coat of enamel paint. The floors were coated top and bottom Yes, I would have rather had satin or matte, but they only had gloss. The carpet will cover it, and the underside will be undersealed anyway. I also did the little strengthening ribs in the rear too, since this is where any water is likely to pool if it did get in. The rear inner boot pocket I fixed got coated too. This will likely get over-coated in yellow at some point With one full day's work under my belt, I went into day two with a list of things I wanted to try to get done. The first was to cut out and fix the seal lip on the boot opening. Most of this came off with the seal when I removed it. I had been putting this job off as it looked complex, but it ended up being a lot easier than expected, just really time consuming. I started by cutting out a small section and welding a patch in, just as a proof of concept, but it worked well, so off we went I worked my way along, using scraps from the work bench. Measure the scrap against the body, cut the rust out, clean up and weld in. And keep moving, patch by patch I left the scrap bigger than I needed, so I could trim it size afterwards There was one small spot where the actual vertical panel had a pinhole in it, so that was carefully cut out and a patch welded in there too This corner section was interesting. I hand-shaped the replacement section until it perfectly matched the profile of the original, and then cut and welded it in. The final section was welded in. Many hours later. Yeah, there are still a couple of frilly areas, but it's all under the seal and they were pretty solid otherwise, so I'm not worried. After some touching up with the grinder, it all got a coat of epoxy primer After spending so much time fixing that, I moved on to one of the other jobs I hate, filler. The valance didn't need too much, but the quarter is a bit wobbly and might need a couple of goes. I'll sand it back tomorrow and see how good I can get it. It's not something I look forward to. This has been a huge boost towards having the car on the road again. Other than some cosmetic work, like fixing the dent/rust in the boot lid, and fixing the heater box, this signals a huge milestone; all the welding is done.- 80 replies
-
- 30
-

-
-
if the pin is hollow, I have heard of people threading them internally and using a screw screwed into the pin to reassemble (not on gauges, but something else I can't recall). I agree with Bryan that it looks like a pin that has the end flared out holding it together
-
Yeah the door settings are nothing more than a ballpark for you to set the machine to and then alter the settings to suit yourself. Dont take them as gospel, sometimes they will be perfect, but often not. When i find a really good setting for what I'm doing, i print it on a Dymo label and stick it to the top of my machine. I only have, and need, a couple of settings since all I'm doing is panel work (but my memory is shocking) IMO, you are doing yourself a disservice by trying to learn all these different thicknesses and settings all at once. Just practice on what you're actually going to be using, and get the settings really well dialled in for that.
-
that sounds good, its the reason i didn't put mine on an oil pressure switch or the likes, as I want to prime the fuel system before starting as my car sits for a bit between starts.
-
Locost Bryan's 1972 Morris Marina TC Coupe
kws replied to locost_bryan's topic in Project Discussion
I was under the impression that SuperFlex in the Uk sources some bushes from SuperPro Aus, hence the P/N crossovers -
Yeah my pump is wired to run all the time with key on, but is quiet enough I'm not bothered by it on my car. The inertia switch is my safety in case I put the car on its roof or something.
-
Locost Bryan's 1972 Morris Marina TC Coupe
kws replied to locost_bryan's topic in Project Discussion
Id appreciate that, and a measurement of the height of the "bulb" the glass squishes would help too. Mk3 onwards Mini could be a good option too, as you say -
Locost Bryan's 1972 Morris Marina TC Coupe
kws replied to locost_bryan's topic in Project Discussion
Ive used Superpro bushes a few times, usually ordered via Sparesbox in Aus, by getting the part numbers from the Superpro site. No complaints here. Depending on the style they can take a bit of work to fit, but I haven't had any that couldn't be fitted or were damaged on install. -
Locost Bryan's 1972 Morris Marina TC Coupe
kws replied to locost_bryan's topic in Project Discussion
Currently fixed, but I have a pair of opening to fit. Im thinking of using a similar pinch weld seal to the door seals -
Locost Bryan's 1972 Morris Marina TC Coupe
kws replied to locost_bryan's topic in Project Discussion
And again, good too see progress @locost_bryan are you replacing the rear QTR window seals? If so, what have you purchased for them? The seals from the donor car for my windows were stuffed, but were a weird rubber seal with an insert in it (which i didn't keep due to them being stuffed). -
Give these guys a bell, https://www.mpautoparts.co.nz/
-
KwS is back in an SD1 again, because of course.
kws replied to kws's topic in Projects and Build Ups
The time has come, Lucas has been moved onto a new owner. No, I know it's not the outcome most people wanted, but it's the best outcome for both Lucas and myself. He goes on to a new owner who can take the next steps and look after him, and I get to move on to a new and exciting project and get to stop stressing about having two British projects. It's a shame I didn't get to do another Speeduino install, but that takes a lot of time investment, and I just don't have the motivation to spend that time on Lucas when I really need to be working on the Marina. I'll find something to install the Speeduino on, one day; maybe even the Marina. The new owner is an ex Vitesse owner, who regrets selling his car a few years ago and wanted another SD1; so he knows what he's getting into, knows the cars well, and is committed to spending the time and money to look after Lucas. As part of the sale I agreed to include the original 31A engine that came in bits with the car, but I also wanted to include the crank from the old carb 3.5 I removed from the car, as the 31A crank was rusty from being badly stored. This meant I had to rapidly strip the engine. I didn't take too many photos because I was working quickly, and it was messy. The heads come off easy enough. I question if the head bolts were torqued properly though as I could crack the head bolts with a 1/2" ratchet without much effort. The heads have had work before as they are very clean inside, and the engine had composite head gaskets. They're good heads, so I'll try to find a new owner for them before they go to scrap. The block threads were a bit sad though. This one straight up pulled out of the block and this one had previously had a stud inserted into it, and a wheel nut used to secure it I stripped the whole engine down, and if I'm honest, there was no real smoking gun like I was hoping to see, to tell me what was causing the horrible clacking from the engine. Even the cam had all its lobes, and none of the lifters were dished. My only real suspicion is that the timing chain was so loose it was slapping around and making noise. There was some ugly wear on the main bearings (likely from contaminants in the oil), but they weren't spun Thankfully the crank was spotless, so that was removed and put into a box and loaded into the car And the rest piled up under the bench, waiting for me to hurry up and do a scrap metal run So with that, it was all loaded into the back of the Rover, and after a week and a bit of waiting for transporters to get their A into G, Lucas was loaded up onto the truck today and off into the sunset he went Good bye Lucas, it's been an adventure. Now to spend some much-needed time on the Marina, and begin the process of obtaining the next toy.- 30 replies
-
- 29
-
-

-
-
IIRC, from my experience NZ Warehouse means it ships from overseas to their NZ warehouse, and then delivered to you from there (hence the cheap freight cost). It also takes a while to get to the NZ warehouse from overseas
-
It says in the "Applicability" line that its "type A", which is the top diagram that matches the light in the photo As we say on an almost daily basis at work; diagrams are indicative only.
-
Probably too late, but i tend to use white lithium grease on my regulators. Seems to stick well and not dry out. I've also heard of lubricating the spring too so it doesn't get rusty and increase friction.
-
My fuelflow pump actually recommends having a filter before the pump
-
Thanks for the offer but I have a rather sizable collection of manuals
-
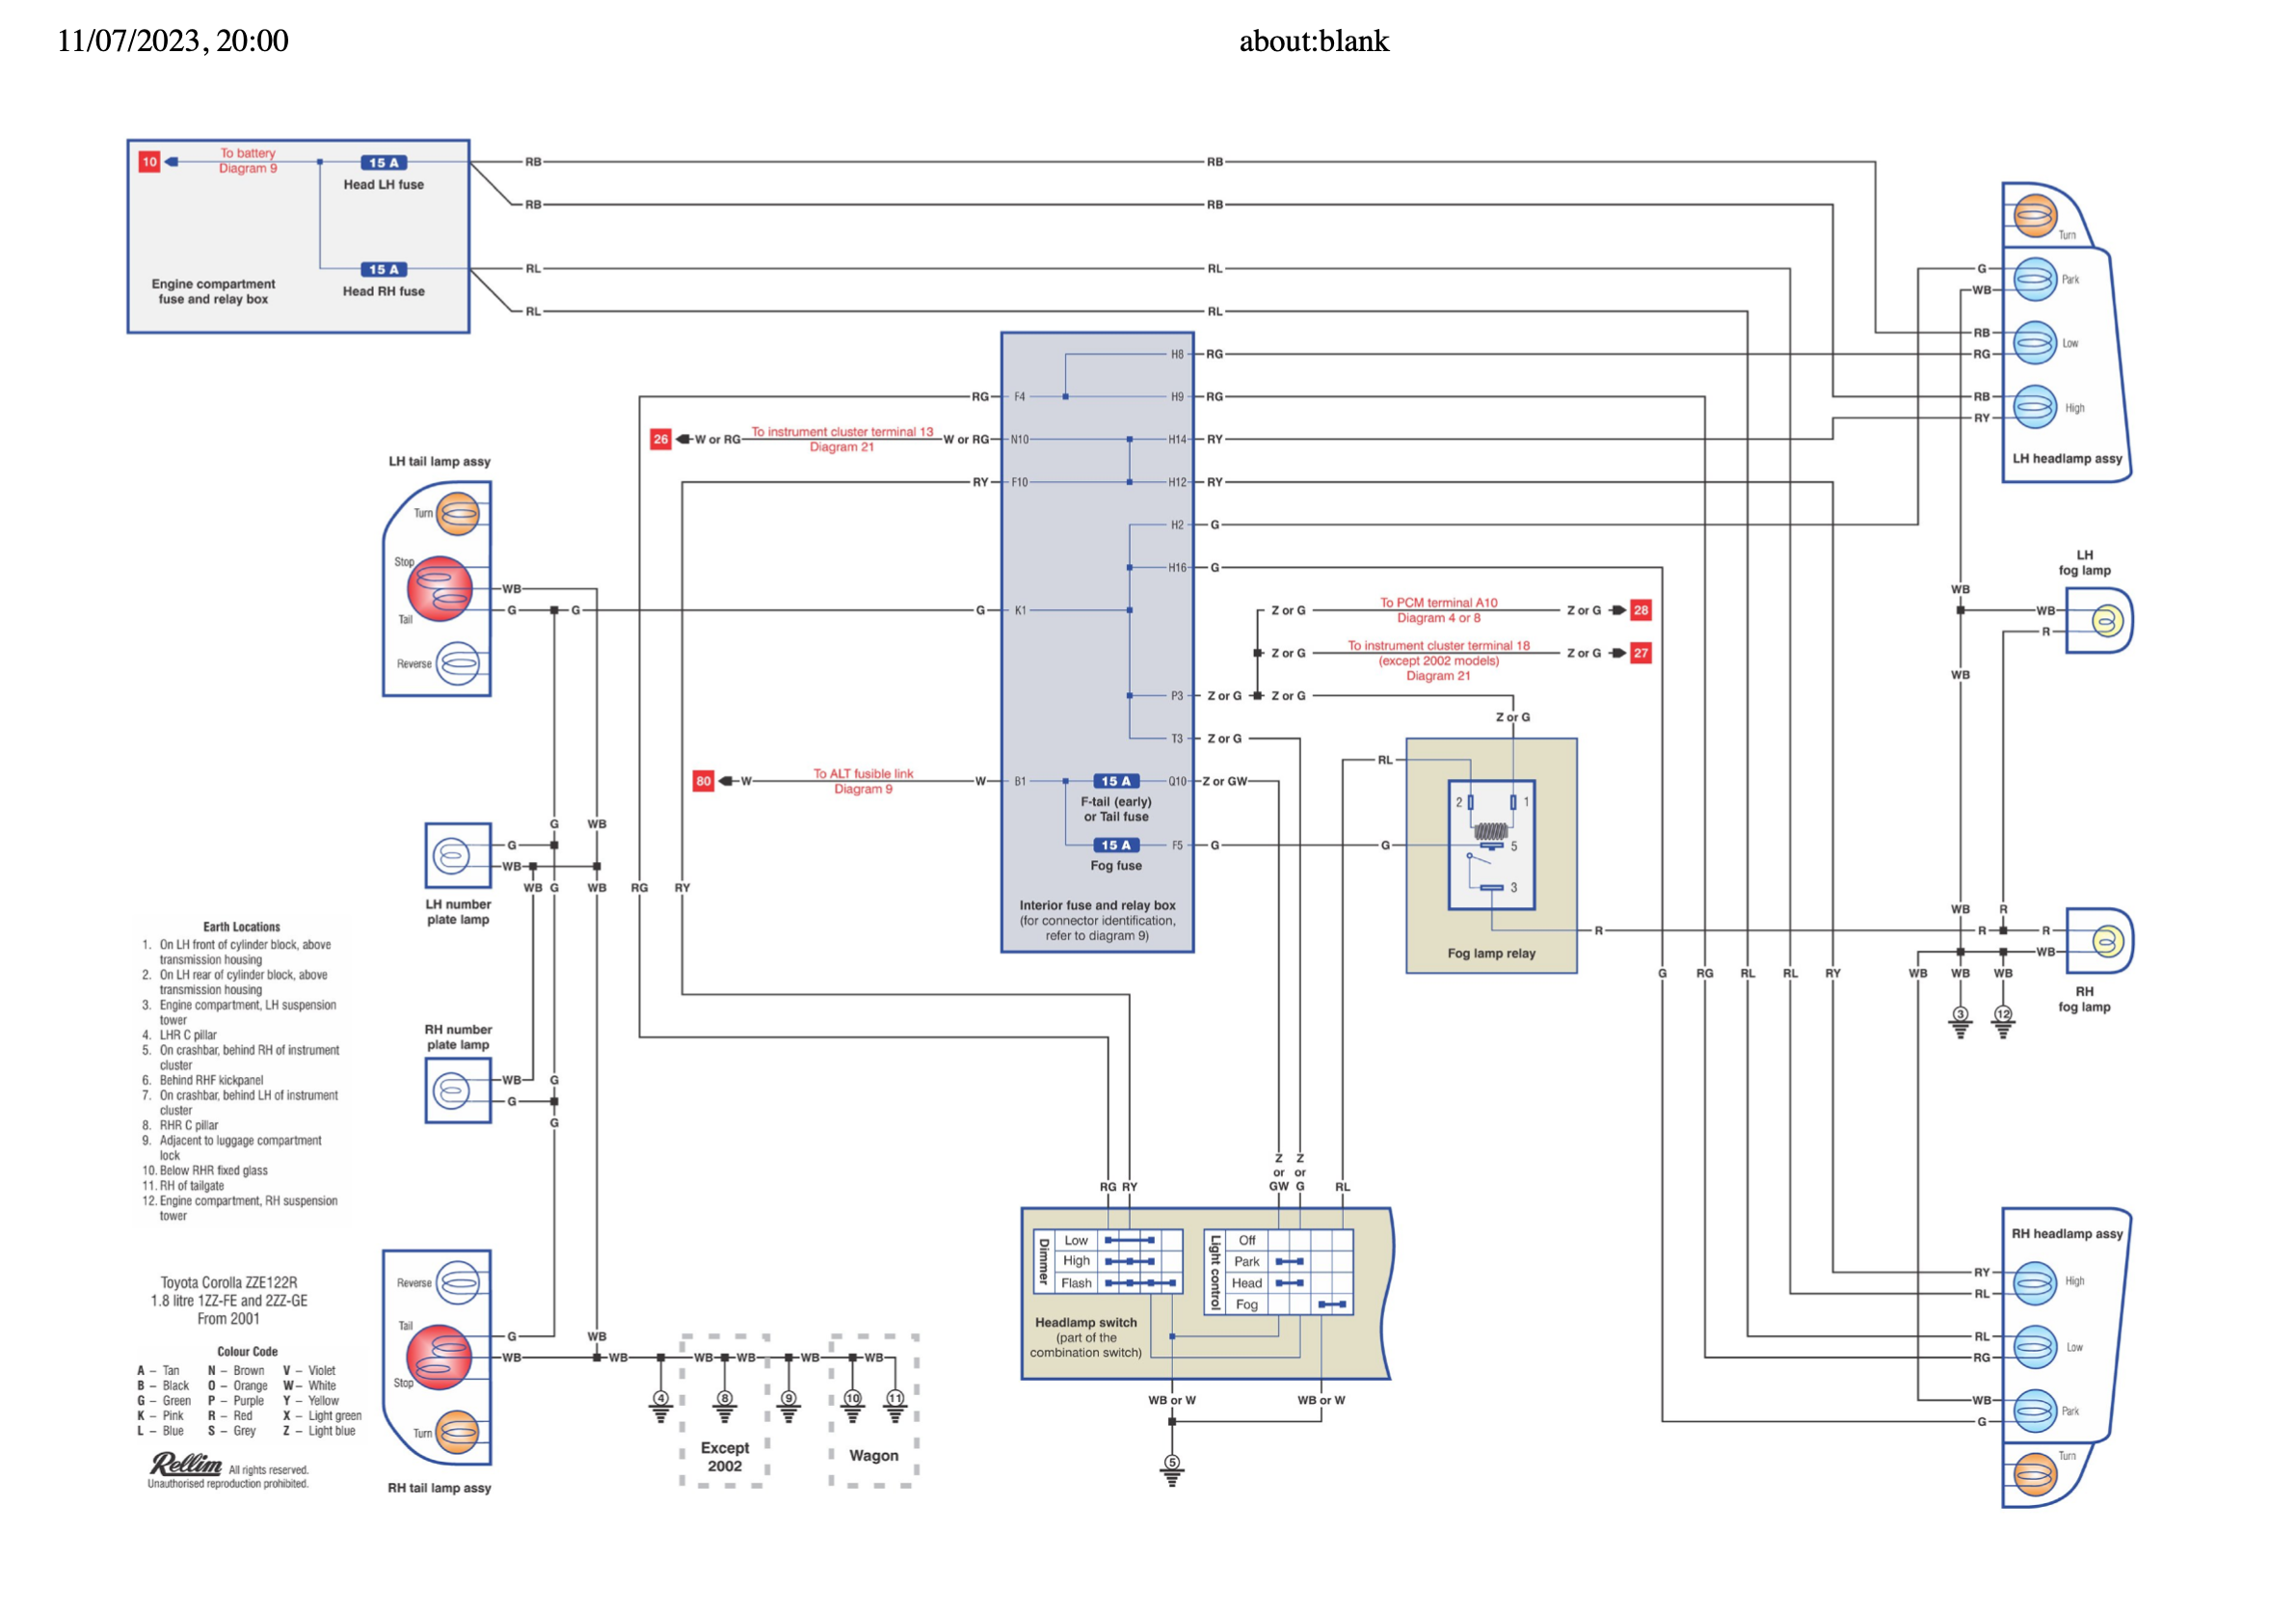
Im not 100% sure how accurate this is for a fielder, but i think they're just a long body Corolla of the time. I harvested this from Haynes.

-
It might depend on the pump. Certainly, with my Fuelflow 015 it doesn't care, and I have the inlet on the bottom and outlet on the top. Seems happy. Some pumps prefer to be gravity fed though.