

63Ragtop
-
Posts
17061 -
Joined
-
Last visited
-
Days Won
91
Everything posted by 63Ragtop
-
getting there bro.
-
bit more progress.body on wooden stand.doors bogged and primed.fenders bogged and primedtook a lot of work, many late nights, all day Sunday and half of Monday.A little tip, don't try welding 6 fenders together to make two, so much work to make them look good Still heaps to go!life looks like this now.time to finish up the shell and get those valance's done!
- 254 replies
-
- 15
-

-
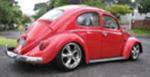
this is the target. thanks photoshop.
-
That's the stuff rusty, so far so good, will see how it goes once back on the road. update just of you 86, bodywork sucks!
-
This is my life nowsanding sanding and more sanding.had to buy some more Autothane primer filler, 4lts used up already, all the small removable parts are primed, working on the doors, then the front fenders, going to take the shell off the spit this weekend so I can finish up the front and back ends, aiming to have it all done by the end of the month, BUT, my work is relocating at the end of the month and have just started paying us Monthly(broke ass) the Mrs is filling in for her charge nurse who has just resigned and is working full time for the next month and a half not to mention the boys Rugby is starting soon, we're going away in the school holidays and all the other normal day to day shit like mowing the lawns and other diy crap still needs to be done!Fuuuuuuk.YeaHaw!!!
- 254 replies
-
- 14
-
-
do it! do it! mount go pro and post video please! haha. nice work man, sweet kart.
-
had a busy week and weekend, got the first couple coats of red on the car.did the bottom and the inside and dash area,pretty pleased with it, did one coat on saturday, missed a couple spots, worst thing that happened was sweat running out of my glove on the wet paint, bugger it! gave it a wipe with thinners and it came really nice on the second coat today. Got a few small runs but stoked with it. not bad for a rookie!
- 254 replies
-
- 30
-
-
that looks super sweet indeed! does this mean you'll lose the mirror tints, cause I hate them. Also that shit all over the fire is fucking with my OCD something wicked, what you need is a polished stainless louvered firewall, that would make lidless cruzing sparkle like the star you are. hehe.
-

azzurros 1966 FIAT Duemilatrecento Familiare Discussione
63Ragtop replied to azzurro's topic in Project Discussion
Awesome work man! such a mean looking wagon, well done getting it back on the road. Gives me hope for mine! -
Got some more thinners and got the front under bonnet/boot painted next.tried to get a good coverage on everything.over the years many stone chips had done a number on the paint under the arches.one more wire wheel dead.had a crack at heat shrinking some of the mess I'd made of the front quarter, worked a wee bit, stopped it popping in and out so easy.bog time!I spent Monday, Tuesday and Wendnesday night last week from about 9pm once the kids were sorted and the next day organized, sanding, sanding and sanding till about 1 or 2 am.And finally on Thursday night.a bit of etch.followed by...just the engine bay and the front valance to prime.but that will have to wait till it's off the spit as I still need to spot weld the bonnet seal strip on both valances as the frame it's bolted to is in the way.still needs heaps of work, found a few dips and bumps after the paint went on, needs lots of sandpaper marks filled in/sanded out, but I should be able to do the seam sealing and smash some red on the bum soon!
- 254 replies
-
- 18
-
-
So Summer has officially ended and still no red paint on this thing! But never fear, I'm on it!! I've been spending what feels like every waking moment and many when I should be sleeping working on this thing, I'm beginning to understand why car paint jobs are so flippin expensive!Time, lots and lots of time.So after giving the shed a mighty clean up and tidy, thinning out the heard of pushbikes down to a manageable number and shoving anything unneeded under the house, I began with dressing down the old welds on the sunroof graft.and then the bog.So much sanding.then decided to bare metal the dash and tidy up the rest of the inside.check out the factory spot welds.the reason for this was to remove all the shitty old glue that I had spread about holding the carpets in place, as I wanted to get a nice coat of paint every where.looking much better after some etch.I even managed to get a couple days off work as I was on a roll!moved onto the underside, which apart from the bottom corners on the front firewall, needed no bog at least!also heaps and heaps of tiny small things like bogging up the spot welds under the engine air vents, smoothing out the welds where I grafted said vent panel into the roof and the front scuttle graft aswell, the A pillars, the front wheel wells...... At this point my fingers are numb and my skin feels like 180T sandpaper, are we having fun yet?!But seeing it all coming together in one colour.that is pretty cool.fantastic motivation.You gotta keep on pushin, you gotta keep on pushin!time to crank up the beast!this side was tricky, the hood release tube is right smack in the way.got it stick in place evenchually.and then the one on the scuttle.spot welder was making a bit of a mess out of this one(it may have been the operator) so I had to MIG up a few wee holes here and there.and bog and sand and etch.....another chunk done.need to start seam sealing but it would appear that the tube I used on the chassis has seam sealed its self inside the tube, fuck it, I'd only used a quarter of the fucking thing!I cut the tube open and did the under side bits here.not very pretty, but it will keep out the weather.seams about right, I went to paint the gray primer on the inside of the trunk, got half way and ran out of air, went to finish it tonight and I'd run out of thinners, and now the seam sealer. Ah well, I've been meaning to update you guys so there you are.
- 254 replies
-
- 19
-
-
amazing work there mate. Those spot welders are worth their considerable weight in gold in saving so much grinding down plug welds, keep the tips nice and clean and make sure the two parts are well stuck.
-
thanks man, floorpan took about two months of hard work. Paint on body next!
-
Thanks guys, I'll unhook the top bolt and compress it right down, pretty sure it won't hit. Just thought there might be a minimum distance thing like fuel lines etc. I've already given it a little bend.
-
Just wanted to check if i need to redo my rear brake lines or not? they are about 1cm away from the shock.
-
Tomica93 1987 Mitsubishi Galant 2.0Turbo DOHC RalliArt version
63Ragtop replied to Tomica93's topic in Project Discussion
super clean work mate, well done. -
Nah, I don't want to be looking at that ugly thing every time I open the hood, this is a custom(empi) res that plug straight into the master, so no more leaky hoses and mess, hopefully. cheers though!
-
Yep, pretty frigging happy with it, paint could be nicer, more stainless/polish/chrome etc would be cool, but at the end of it, no one is really going to see it are they!?Bonus shots.bolted in the shocks, painted the white front ones matt black like the rears.thought I may have a problem here. actually about 1cm away from the shock, should be okay? would be much eaier to change it now than when it's full of fluid.other random pics.this thing was super handy for bending up the brake lines.
- 254 replies
-
- 12
-
-
So christmas came a little late this year.who am I kidding, this was better!Mark at the Metric Nut sent me up pretty much everything I'd need to get this thing on the road.I wasn't going to bother with the shift rod seal but after cleaning up the gearbox, I'd found one small tear in one of the axle boots, so while it's apart we might as well stick one in, never had one before, fancy!got the front brakes back together.had to get the rear oil seals pressed in by the local shop (cheers frank and co) I tried doing my self but just mangled it. nearly didn't do that either as I read the seals don't work without the drums torqued up, again, glad I did as this was inside the leaking one.took the pedals apart, cleaned, painted, greased and reassembled.pretty much every part of the throttle linkage was all bent to hell.new bumpstopstwin circuit master with fluid res on top, started running new stainless brake lines that I brought ages ago.pedals installed.ran clutch and throttle cables, forgot how much of a ass hooking up the clutch cable was who designed that fucking thing!got the rear brakes back in along with the bearing seals, handbrake cables run and hooked up.cleaned up the tie rods and installed new inner ends, the outer one have been replaced in the last decade or so.I was going to polish up those stainless brake lines but I had run out of autosol and wanted to get it done, I've also realized how little things like a tube of this, a can of that, soon adds up, I needed rubber grommets for the brake line, some else this car has never had, and bugger me if stupercheap wanted over eight bucks for two.this shit adds up man!ah, forgot the lube!never forget the lube.then I came up with this genius way of getting it inside the steering box.and paint bla bla.front drums on, with new locking tabs for the bearings.rears all jammed on.and holy shit balls! it's on it's wheels!
- 254 replies
-
- 19
-
-
fuck yes. so much work, so much slam, so much brap, all the wins!
-
Shit, just remembered a sharn, was at a party about 10 years ago, had the red ragtop there. got talking to this cunt, talked about car/vw's with this guy, said how various engine's are stuck in the back of bugs, subys etc, then I said rotas, and he's starts telling me nah nah mate, not rotas, these gearboxs can't spin fast enough for rotas, I said well I've seen it done and I don't think the gearbox cares how fast its going?( to a point) wouldn't believe anything I said so I agreed to disagree with that dickhead. is it finished yet?
-
Great progress man, putting me to shame! Axles got longer about 67, I put a 1500 gearbox in my car years back and swapped the axles so everything would fit back together the same. found this on the samba I think there may even be another size for different models/years etc.
-
Is this thing done yet??
-
Spent most of the last week of holidays in the shed, cleaning and painting the beam, brakes and gearbox, so i could get it back on its wheels and get back to the shell.Everything was covered in grease,rust,dirt and paint, so the process was dowse in turps, scrape and wipe as much grease and muck off, wire wheel, degrease, brake cleaner, sand, acid etch and or paint. Filthy work.I ended up getting two cans of POR15 in rattlecans, which saved a bit of time painting.trying to keep track of all the partswhen I first got the car the front was sitting pretty high, and the front bump stops were under the rear seat with the battery, when I installed them I found out why. One side went on fine, the other fowled the shock.Whoever build this beam, had cut and turned the bump stop horns and had welded on crooked, so all I had to do was cut and reweld, matching it to the good side, easy! except when I removed the rubber off the good one, the horn came off in my hand, that's some good welding!you can see the gap were the weld missed.also found this tiny blob of weld on the edge of the beam bearing, has not made friends with the trailing arm over the years, I'm sure someone will be posting up all my mistakes on this car one day.like the shitty huge welds that now hold the horns on. acid is a hell of a drug!but it sure does make POR stick well.cleaned up my oddball drums.smashed on some matt blackFirst part installed on the pan.Filled the tunnel up with Rustroy, that shit stinks!Darrell helped me bolt up the gearbag and beam.matty b on the box.Now I bought these grease seals for the beam about 15 years ago and never got around to installing them.until now.gearbox is matt black, axle tubes are Gloss Black POR, backing plates are grey.I've started cleaning up the brake parts, shoes etc, just need new cylinders (wheel and master) reinstall cables and paint pedals and steering stuff, feels like a major milestone!
- 254 replies
-
- 17
-
