Bling
-
Posts
22845 -
Joined
-
Last visited
-
Days Won
3
Everything posted by Bling
-
Smaller the roll the worse the value (probably double the price by weight), that's the only problem. If you plan to weld a lot, 5kg will be decent value. Just remember to swap the roller around to 0.6mm as well as the torch tip. Also, you have the 3rd knob wrong in that photo, the chart you took a photo of shows it in the green zone. The manual also states it adjusts the induction. So it will be a pretty important setting to be using correctly. I had to check the manual as it didn't make sense to me that a fancy looking machine like that seemed to have limited adjustment. So that may not solve a huge amount, but it will certainly play a part in getting good results. If I adjust my inductance on my welder it changes the weld result. Read the manual tonight with a cold beer and see what all the bells and whistles are for, then look to set the machine a bit closer to the settings recommended. With settings not set right, you'll be fighting a losing battle for sure.
-
0.8mm doesn't make it impossible, as it can be done. But if you're learning, you want things to be as easy as possible, 0.6mm is the best wire for thin material. A new roll of wire isn't the end of the world, sell the 0.8mm to cover a lot of the cost. Worthwhile i'd say, the extra heat needed is just going to be annoying to work with. The only reason (IMO) to run 0.8mm would be if you weld mostly thicker stuff, with the odd bit of panel steel. If you're mostly welding panel steel, then get the 0.6mm which is best suited to that. You can still use the 0.6mm for bigger jobs, if necessary. If no big jobs in the pipeline, sell the 0.8mm to help fun the 0.6mm. Sell it to that mate who said 0.8mm for panel steel
-
A lot of this looks too cold to me, was there a back photo for that one or did I just miss it? Appears to be a big weld pool on the top, but it hasn't melted into the panel itself in areas, as if it had, it wouldn't have the steep sides on the finished weld, would be more flat like some of the other welds. I've only used 0.6mm on my repairs, so a little out of depth with how to set that up to work better TBH. I would perhaps start by dialing back the wire speed slowly and see how that changes the weld. Is that 3rd knob used for MIG or only the first two? Rough maths says 0.8mm wire is 40% more wire than 0.6mm wire. That's quite a difference when we are working on thin welds.
-
I'd say middle of road for my welds, plenty of people on here could put them to shame haha. I did take my time with those since they were inspected though. But that all comes down to practice. I've been using my machine for years, haven't done a huge amount of welding compared to some. But I always practice, practice, practice things, before trying it on the real job. So I spent a bit of time with scraps like you have cut, and just played with settings till I could reproduce welds with the right penetration. Plenty of youtube videos showing what to look for. The person recommended above would be worth looking into and taking in all the information.
-
Post up your planned knob settings, could be some pointers there before you start. That welder makes mine look like a dinosaur lol.
-
Cheers, working well so far. Only the most stubborn of tiny (sub 0.5mm) epoxy primer dots staying put. So they'll get the blade. The rest is silky smooth.
-
Wirespeed also affects amperage I think. So it's a fine tune between turning that up and having the voltage about right to match it. I used to have settings written on my workbench. Then I sold it... I just wing it now, most of my knobs are middle of the road and I often use torch distance to work to fine tune things as I go. I feel like low settings on a welder would only be useful if trying to weld a whole length on a join. Which you can't really do on car panels. So higher settings work better for "spot welds". I've never really used the bottom half of the range on my machine much for that reason. Welder is currently setup: Voltage: 22ish Current: 110a Inductance: 5, which is middle on mine. Wirespeed: high That plug welded my ~1mm panel. I was using the torch to hold the panel in place, so distance to work piece was like 2-3mm. Each welder seems to have different knobs and whistles which probably all do the same thing.
-
Idiot proof methods to bring car window glass back to new? Lots of grime and some wind-blown dots from painting. Have used razorblade in our of the way places as a test and it comes up good. But could damage glass so wondering what others do? Does a clay bar take all that stuff off?
-
Yeah mix will be nicer to use, but honestly i've not been limited by pure CO2. You adapt to each gas. I've measured 0.5mm sheet and tack welded that with pure CO2, it had no use, I just wanted to see if it was possible. Old escort panel should be a breeze with it, with practice. I certainly wouldn't change gas and expect it to solve the problem here. Not that there is a problem as such, just need more practice and to know what to look for.
-
Will try this week. In the meantime, get a few bits of scrap panel and just try welding tacks on them. Literally just try weld in the middle of a bit of scrap. Then turn it over and see how obvious the weld is. Too cold and the surface will look like normal. Penetration which you want, will start to form a molten pool on the underside. The idea behind having a few bits of scrap is so you don't build up the heat too much, which will throw the results out. Maybe post up the settings you are using too. I always do a test weld before working on the actual job too. That photo I posted earlier I had some sheet, same sheet, on the bench and did some test tacks to make sure the settings were ok. Biggest hurdle with your patches were the gaps IMO. They are weldable, but only with practice as they are a bit harder to do. Easier to weld when the panels are butted together. With gaps, you have to get creative. Once you have one tack that bridges the gap, I tend to weld to the tacks which will then melt both panels together at the edges. Trying to weld into the gap by starting on one panel or the other will be blow through city.
-
So, not a pro welder etc, just showing how i'd do it. On a small patch i'd potentially even have a little break between each set of 4 tacks, to avoid heat build up in the panel. Heat build up will change how it welds, too much heat and apart from the panel potentially warping, the chance of blowing through will increase. So maybe 1,2,3,4, break, 5,6,7,8, break. The smaller you can make the gap between the car and the panel the better too, less chance of blowing through, having the wire go through the gap or even melting the edge away from the panel. If you can have them a tight fit, that will make it easier to weld.

-
Flap discs for me, and it's only if it's going to be seen really. A lot of my repairs aren't seen so I leave them as they were when welded. Checked your project fred, yeah looking a bit cold. What I do for patches like that, is do a few decent tacks to hold it in place. Then I weld right next to the tack, aiming the torch at the gap right against the tack already there if that makes sense. What it means is the wire won't go through the gap accidently as it hits the tack that's already there. I'll try get the welder out this week and do some photos of what I mean as it might not make sense.
-
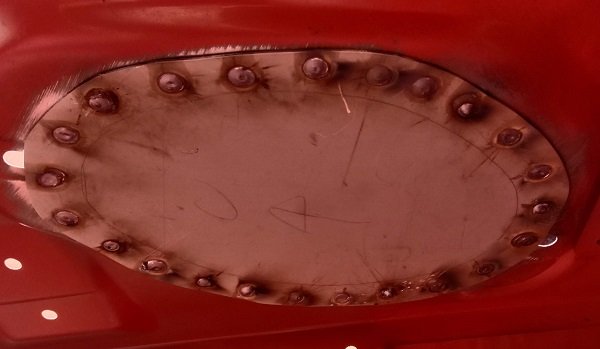
Post some photos up of practice welds done on bench, or even the patches you have done. Here is some I did in my boot, laying upside down. Welder settings are relatively high, for the material thickness, but I do short welds just long enough to fill the 5mm holes I had punch in the bottom sheet. Gave good penetration which showed on the topside with a bit of metal protruding top side too on the plugs. Example included in spoiler.
-
100mm or so squares of panel steel for practise. The panel will heat up, so have a few you can cycle through to get the most accurate results. Then i'd just set the welder and hit the panel. So a few "spot welds" and see what the result is. Post them if you like, i'm sure plenty on here with more experience than me. But you can tell a lot from a weld as to what you may need to fine tune. I have a BOC welder which has a few settings on it, so I can't give you the settings for yours. But I find it pretty forgiving. For example, I was welding some 4mm plate to a 10mm section the other day for an exhaust bracket. Then this last week I plug welded some just shy of 1mm body panels without even changing the welder settings. A lot comes down to how long you pull the trigger for, distance from work etc. This is with CO2, it's all i've ever used at home, no problems.
-
Will swap for cosplay photos. /didn't take any sorry
-
Cracker day for it, some sweet whips too. 10/10 for Wayne's balls.
-
VIRM should have pretty decent diagrams showing where it's required. I was looking the other day (but too lazy to google it right now) and it showed all sorts of angles and where they were required. Cletus may have actually posted it on a previous page, I have a vague memory of that so could be worth a look. look up virm mudguard, should have all the info
-
It's because no one uses CD's anymore* and people want laptops that weigh nothing. I haven't had a CD drive in my PC since forever. On the plus side, USB drives are cheap and you don't have to carry around CD drive components in your laptop for that one time you need it. *Certifiers are made to
-
Worst case you could make up a battery pack that plugs into the charging socket? edit: yeah very true on CGA, sounds like a decent case.
-
Do your best bog the rest. You can only do what you can do, anything is better than rust left in place. If you can enclose it inside something that stops moisture getting to it I'm sure you'll be sweet. Plenty of repairs don't get a full treatment due to no access.
-
Can you not get access? I used to just glove up and brush paint over the epoxy repairs usually. Often blindly then i'd just take a photo and see where I missed. Depends where the repair is too, can get that goop that covers everything in sills etc. Chuck up example situation.
-
Just reposting Bookface for those not on it. SUNDAY 11th Oldschool.co.nz Christmas Meet Ouruhia Domain from 11am we will have a BBQ. please byo drinks and meats. we will provide sauces and bread See you all there! If you haven't been before, rock along, we are pretty friendly.
-
Yeah should be able to pop some back out.
-
In my experience, the amount of fuel you go through covers enough tax. My auto one would use 15L/100km no matter how you drove. I took it to Nelson once from CHCH, had to fill up halfway...reliable as fuck though. As for the dented up car, unless it's a WOF fail, why even fix it, sounds like it may happen again so save the money / time.
-
Pretty hard to beat CD's price wise, i'd say they are more reliable too for long term storage. I grabbed one out to put photos on for this reason this week and each time I plugged the USB stick in, it wanted to be formatted lol. Gave photos on a SD card in the end as have no means to burn a CD easily. Check out Amazon.com.au for CD's Clint, half that price there (unless you buy them with cases) with free delivery if you spend over $xx