Bling
-
Posts
24,231 -
Joined
-
Last visited
-
Days Won
3
Everything posted by Bling
-
Yeah I found that out when I built the one for the corolla. I cut and shut one then got it copied. Problem that time though was that there was no possible way to bend the impossible angles I needed. Lesson learned, cost was the same, just more of my time needed to fine tune, every, bend.
-
It's only the last 1m or so of pipe, I certain'y ain't got the motivation to build a whole exhaust for a work vehicle lol.
-
Sweet, will get it booked in then, just didn't want to find it was restrictive for the engine. You could be right about the 3" bender, would make sense. If I had the space i'd do it from bends like you mention. I don't think the dmax would even fit in the garage space I have to use. Thanks.
-
Work truck needs the last section of exhaust replaced, approx 1m of pipe that goes over diff and that's about it. It's 2.75" from rough OD measuring of 70mm. Shop said 2.5" will be sweet for the last section (crush bent I assume, if that's the norm). Is that correct? I suggested 3" but they said 2.5" is fine as it's not doing much (pointing out the muffler has already done the restricting work). Sounds like 2.75" isn't really a common thing, it's factory system that looks to be mandrel bent. Any thoughts on that? 2012 3L turb diesel d-max. Cheers Not that I doubt them, just getting a 2nd opinion due to reducing size.
-
I'd just rattle the repairs if he just wants to drive and enjoy the thing. There's my shit advice for the day. /good enough for my fridge This thread is super handy for backyard butchers like me though, so much info.
-
Shit yeah, nice car
-
Dicksmith one is probably the same as ones from aliexpress? Which was the same ones resold on trademe, which could be cheaper, worth a look. I got one from Ali like this: https://www.trademe.co.nz/motors/car-parts-accessories/tools-repair-kits/other/listing-2613493571.htm?rsqid=954ab67877364b37be4e457500fcd1d6-001 (requires air compressor) Haven't used it on brakes yet but it worked really well for draining my power steering! I very rarely find someone willing to pump the pedal so just run some pipe into a bottle and open the bleed screw a little bit. Seems to work, once there is some fluid in the bottle, air can't get back up the hose if it's submerged.
-
If you like the car and can do the work, then go nuts. Pricing is always a hard one as they don't come up often so price ranges aren't too specific.
-
And find one that is manual if you want a manual car. Less headaches and likely cheaper in the end, unless you can get all the parts cheap and do everything yourself.
-
Yeah probably a year. Will keep on looking into it while lockdown is a thing as they have a store in town, so may go visit when things open up. Currently radiator doesn't leak too much, a lot more than it should for one I paid to be fixed a while ago though. Thanks for all the replies, gives me something to ponder.
-
Yeah a recore is an option for sure. But it will likely cost twice what a brand new aluminium radiator will. Which i'd be open to if I had oodles of money (I don't) and didn't need to buy a new heater core too. Just doing research to see what is my best bang for buck really. Haven't seen an aftermarket one yet in anything other than full aluminium. No one sells the heater core either, so i'll have to modify one to suit. Recore on that won't work as the end is fucked lol. Just old car life, just wanting something that will do the trick.
-
Oh for sure, but if the bottom basically falls off, the design of that particular one can't be great. I think all my modern junk has the plastic stuff.
-
The Fenix option i'm looking at is a completely alloy unit. That sounds like a fabrication fail for sure with the plastic one though.
-
Yeah lets blame the coolant for the oil leaks eh. I'll looking in to that thanks.
-
Yeah a lot of talk on the web about coolants. Green and red both seem to state they are compatible with everything. Just not each other, in any volume lol. You're right though, red does contain more "stuff" to protect aluminium. If I go aluminium rad i'll go red. It seems they come from the factory (AE70) with only three of four holes lining up (two of which are rubber mounted). Thought one may have had a prang so didn't line up. Checked other car and sure enough, mounting hole seems to be in the wrong spot from the factory. It does sit in a rubber padded craddle too though, so not going far. I wonder if the one random bolt that actually contacts the radiator itself is an earth?
-
A search on here did bring up rumours of quality change @ Fenix at some point in the past. They all look to be much of a muchness. Will check them out, will do more homework on Fenix / copper ones. Cheers team. edit - Redline do one for my car, that should require slightly less modification. Promising.
-
Radiator question time. If I want to spend $500+ I can get mine rebuilt with copper / brass core. I don't really want to spend that much though. Just so many things left to buy to finish the car. So what is the deal with using aluminium radiators? I keep seeing things about electrolysis this and that. I can get an uprated Fenix aluminum radiator for much less. Cooling level isn't going to be a problem, i'm only making 14HP. Is it a case of flush the system 99 times, then fill with demineralised water / coolant mix and good to go? Or are there reasons I shouldn't be looking at aluminium? Engine in question is typical 80's toyota lump. Has a bunch of cast aluminium parts already attached. When replacing waterpump / thermostat housing I didn't notice any corrosion on them.
-
I sourced garnet for mine back in the day, just got it from one of the local sandblasting places. Just wanted to avoid using glass and the nasty dust that creates. Not that you should breathe any of them. Long time since i've done any though, but from memory garnet was better. It also can be reused more than some other products. Alistair isn't active on here nowadays, but he knows all about the blasting media game.
-
SCA have options too, as do other shops here, toolshed etc. Some priced in the same ballpark, but at least if it breaks you get easy returns. I haven't used either, so do own research etc. https://www.supercheapauto.co.nz/p/toolpro-toolpro-dual-action-polisher-240v-720w-150mm/581559.html?cgid=SCN01011101#start=8 https://www.thetoolshed.co.nz/product/7083-toolshed-sander-polisher-random-orbital-150mm?categoryId=1278
-
Location might be handy, unless you haven't picked one yet anyway.
-
I'd wire wheel the floor for you for $1400, bargain. Unless you want to eat off it I reckon it could be done in 1-2 days of slog. Most of it looks light so would take minimal effort. Might need a second grinder and run them in shifts. Those twisted cup brushes work fast. Seem to last ok too.
-
Decent wire wheel on the grinder will get rid of all that. Then 2k epoxy primer / underseal I imagine. Mine looks similar to that, but i'm not that motivated to actually sort it due to nowhere to make that much mess.
-
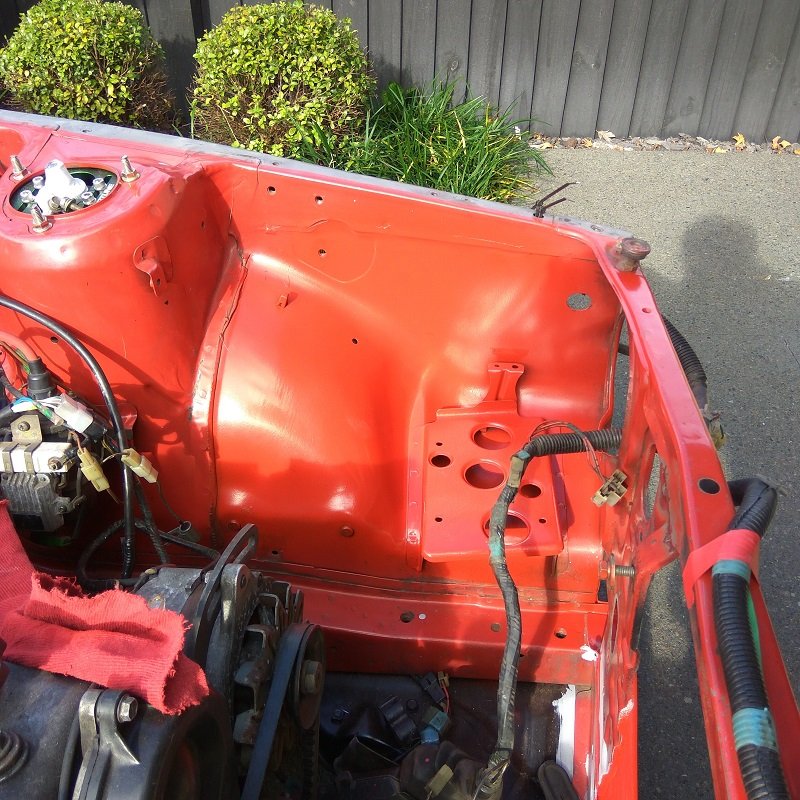
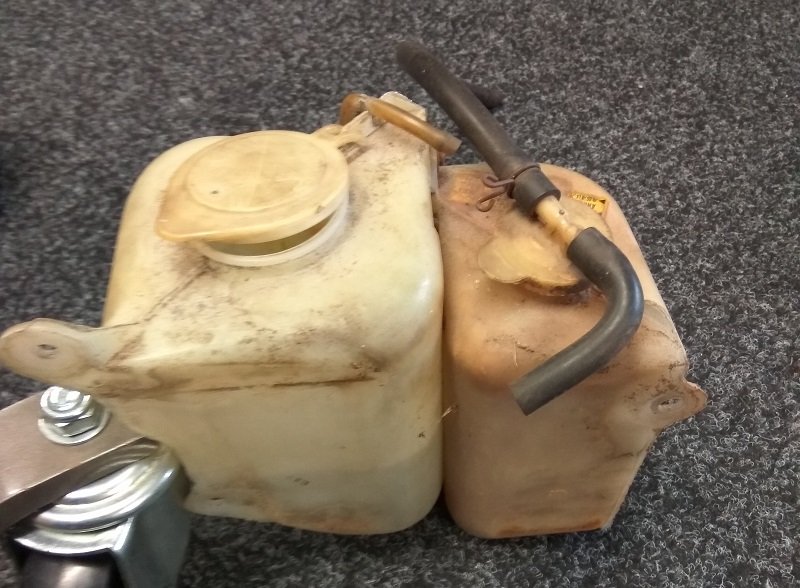
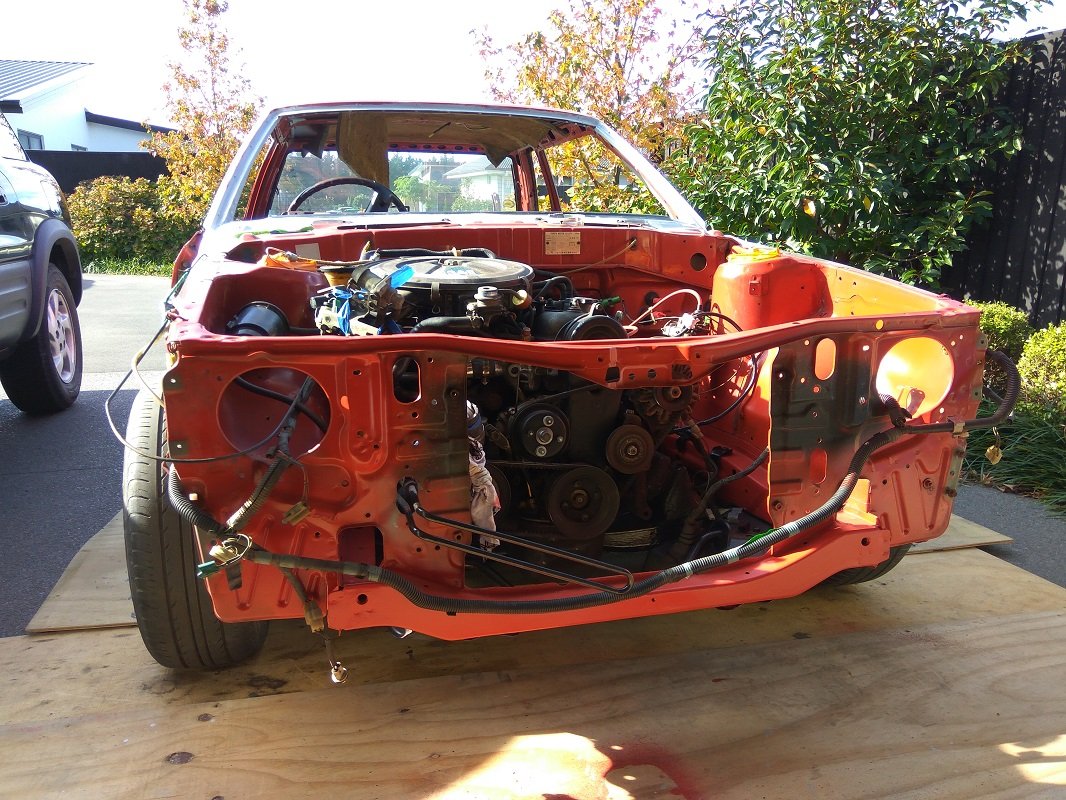
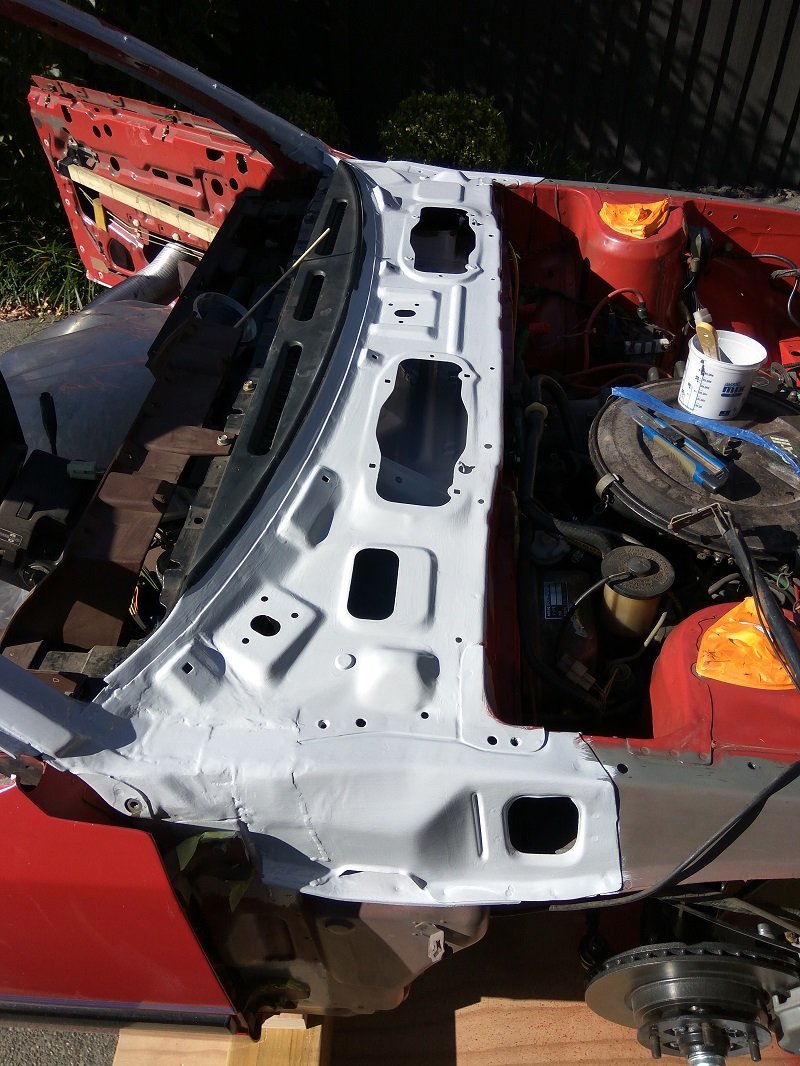
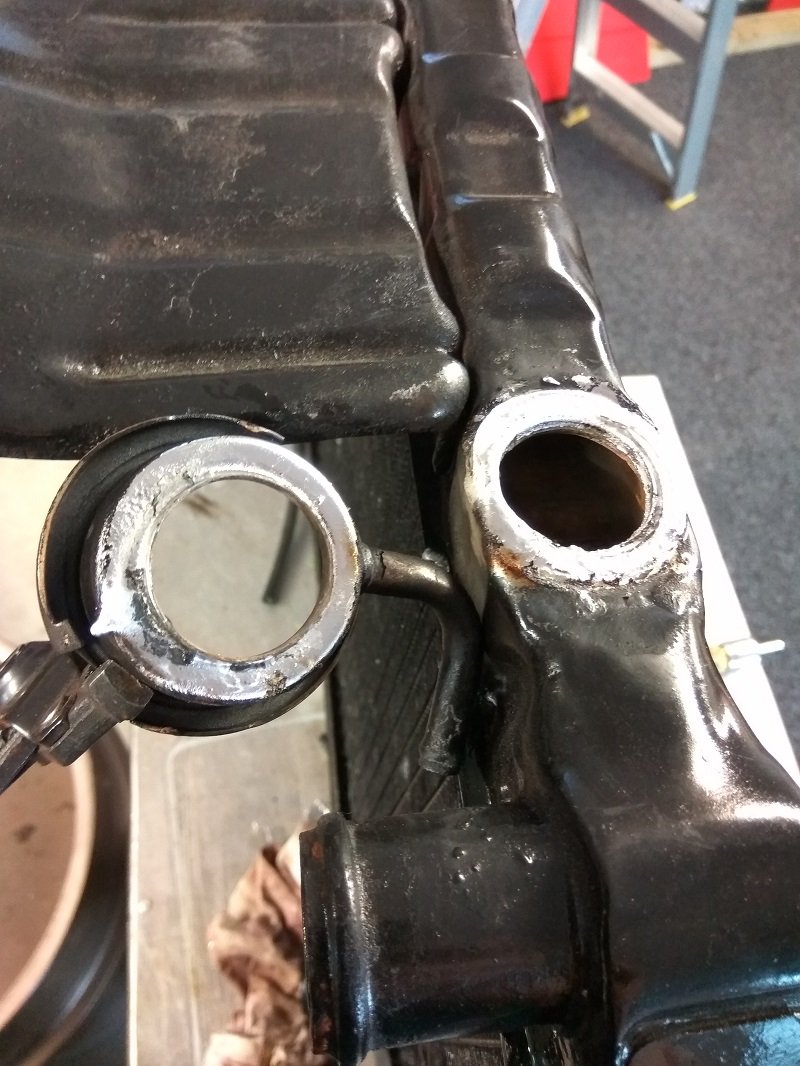
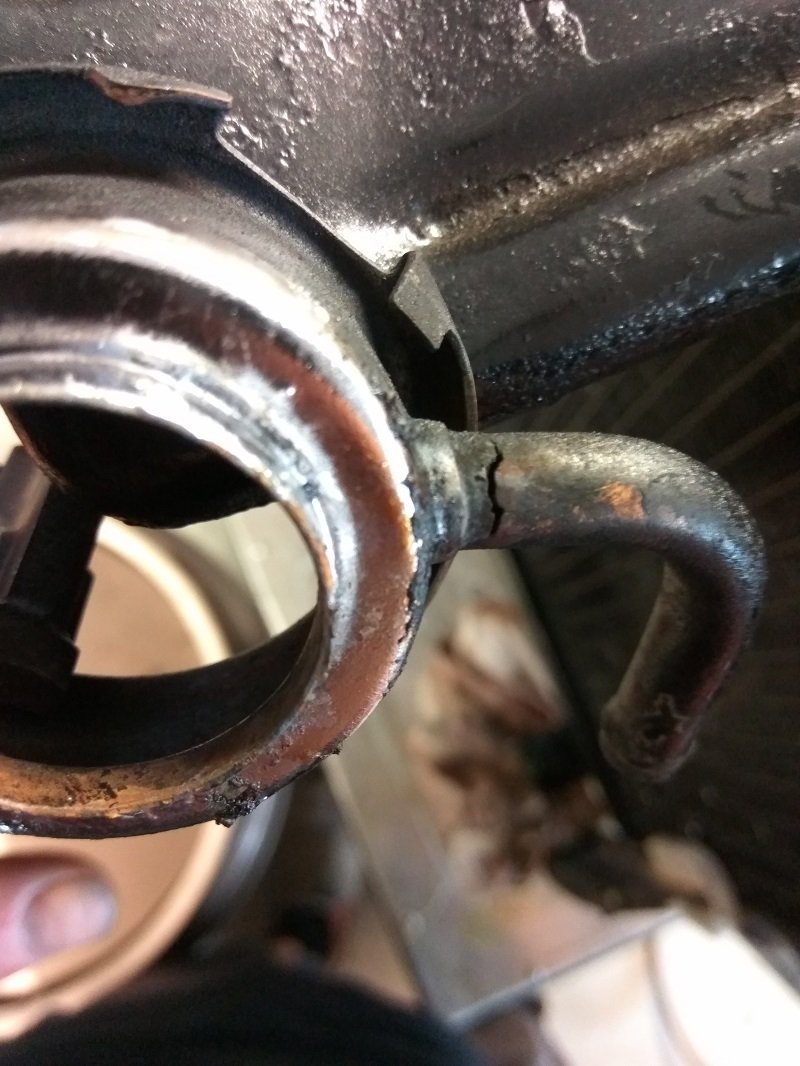
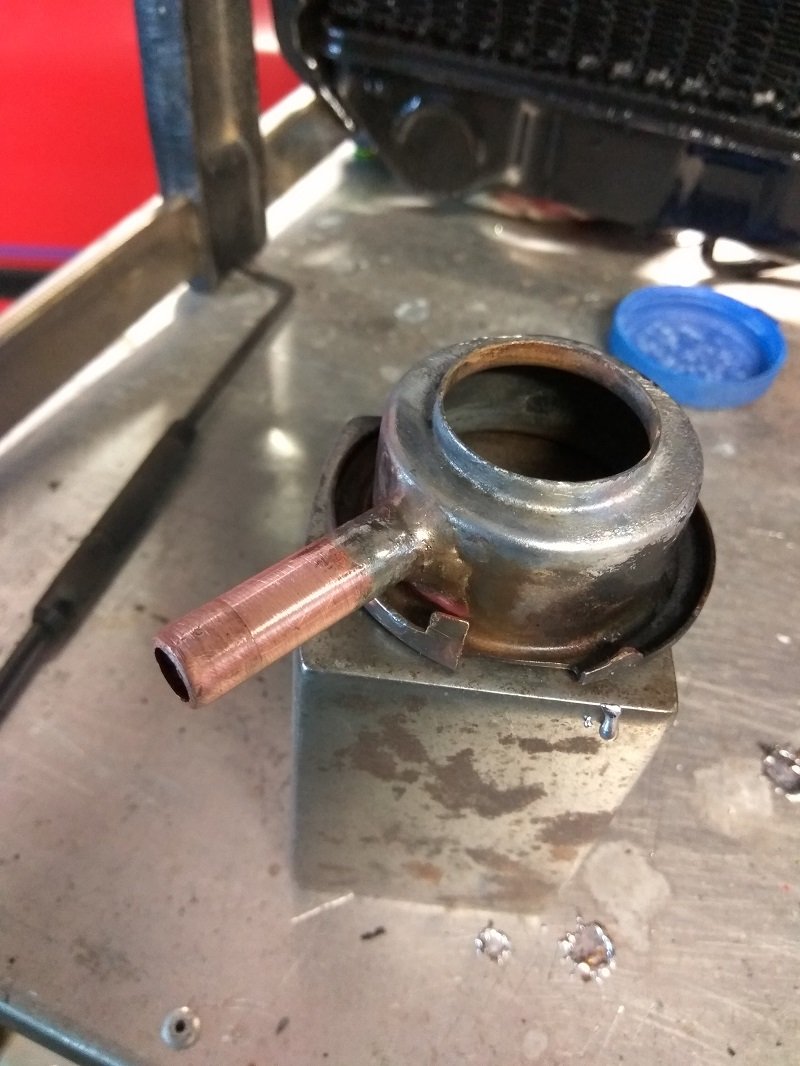
Two updates in one month, lockdown eh... Have been epoxy priming lots of things, under wiper area, gave it a good scrub out, clean, and epoxy. Some areas that I couldn't reach to remove every tiny bit of surface rust I sprayed 3-4 times with Brunox, then epoxied over the top. It wasn't that bad to begin with, but figured i'd stop it now. Any water that gets into that area now has a clean run along the epoxy (to be top coated I guess) and out the side of the car. Have some seam sealer so will do along the front edge to stop any water ever getting to the firewall metal panel sandwich. Also finished painting the radiator area, so the brackets on the underside got another coat of paint. The radiator support area got two coats of epoxy after a lot of wire wheeling and surface rust treatment. Then a couple of coats of red. Now I just have to be careful to not scratch it. The brackets on the underside are currently not bolted up as I want the paint all 1000% dry before bolting the surfaces together. So with all that paint work done (photos aren't 100% current as I don't always remember to take them), I installed the radiator. I had a slow leak on it fixed before lock down. So was expecting a nice and simple job. I should have known... turns out there was a relatively large (to the pipe size) crack on the overflow pipe on the radiator. So after a lot of pissing around trying to fix it in place, I removed the whole neck. I then removed the existing pipe as solder would not stick, even with flux and a super good clean. Got some 3/8" copper out of the van and dremeled it down in diameter to fit in the hole. Braised it up and called it good. At some point i'd like to throw a Fenix radiator at it, as this one is past it's used by. But it will do for now as the whole system will still have a bit of shit in it. So once that is nice and clean i'll look at new rad. Some before and after pics of the overflow / washer bottles, as they were rather grot. Lots of scrubbing later after splitting them apart, they came up much nicer. Also removed the brake master cylinder and will replace / rebuild that at some point. So yeah, some pics. Battery tray which was super rust pitted, spent a long time on the wire wheel. Epoxy, epoxy, paint, paint. Front on, have since fit the loom back in place and painted black the areas seen through the grill. Epoxy finished in this area now. Red top coat to go on, and whatever top coat colour I have lying around for in the gutter. Washer / radiator bottles before And after, enough time spent on these that I had priced up universal ones. Wouldn't look right though, so I soldiered on. All fixed back in place with new bolts from "Car Clips" based in Dunedin I think. Didn't take much heat to pop this off. My gas torch is not suited to this job at all, so you'll notice solder here and there. Even on low it's enough to send the solder running. Such a small crack, such a massive pain to fix. Copper pipe installed, took longer to sand it down to size than braise it in place. And job done, find out tomorrow how porous the cooling system is. This part at least should be sound.

- 23 replies
-
- 30
-

-
Forgot to answer this bit. I don't recall what they were off now, I got the whole lot as a kit from MRP, they are redrilled and came with shims to suit my application.
-
Oh yeah cheers, will wait for this lockdown thing to sort itself and give them a call, see what they got / what they can do with mine potentially. Not in a hurry to get it sorted, so may as well try all local options.