kws
-
Posts
4,175 -
Joined
-
Last visited
-
Days Won
5
Everything posted by kws
-
Good lord I remember that from the GP forums
-
Actually, there it goes. It is the one from the museum
-
There was a story on taped on the window of where it came from, but i didn't take a photo. I think it was a private import, one owner. I thought it was the one from the Museum too, but it didn't mention it.
-
Thankfully they moved the car next to mine forward, not mine back. It still had the effect of putting my car in the shadows. I've been a member of a couple of different clubs and parked with them at shows, and usually there would be someone from the club that at the very least gives you a wave and comes for a quick hello, or even tries to direct parking a bit (particularly as we were fairly early), but here there was nothing but a group of people sitting in a group drinking tea and ignoring the rest of the world.
-
It's not that they were rude as such (other than moving that car, maybe), It's that they just didn't seem to care. It'd be interesting to know how I would've been treated had I been in a Minor, or if the Marina was painted and actually presentable. Just as we were leaving though, we had a good chat with a member, Chris, who liked the car and had a good story about his own Marina from back in the day.
-

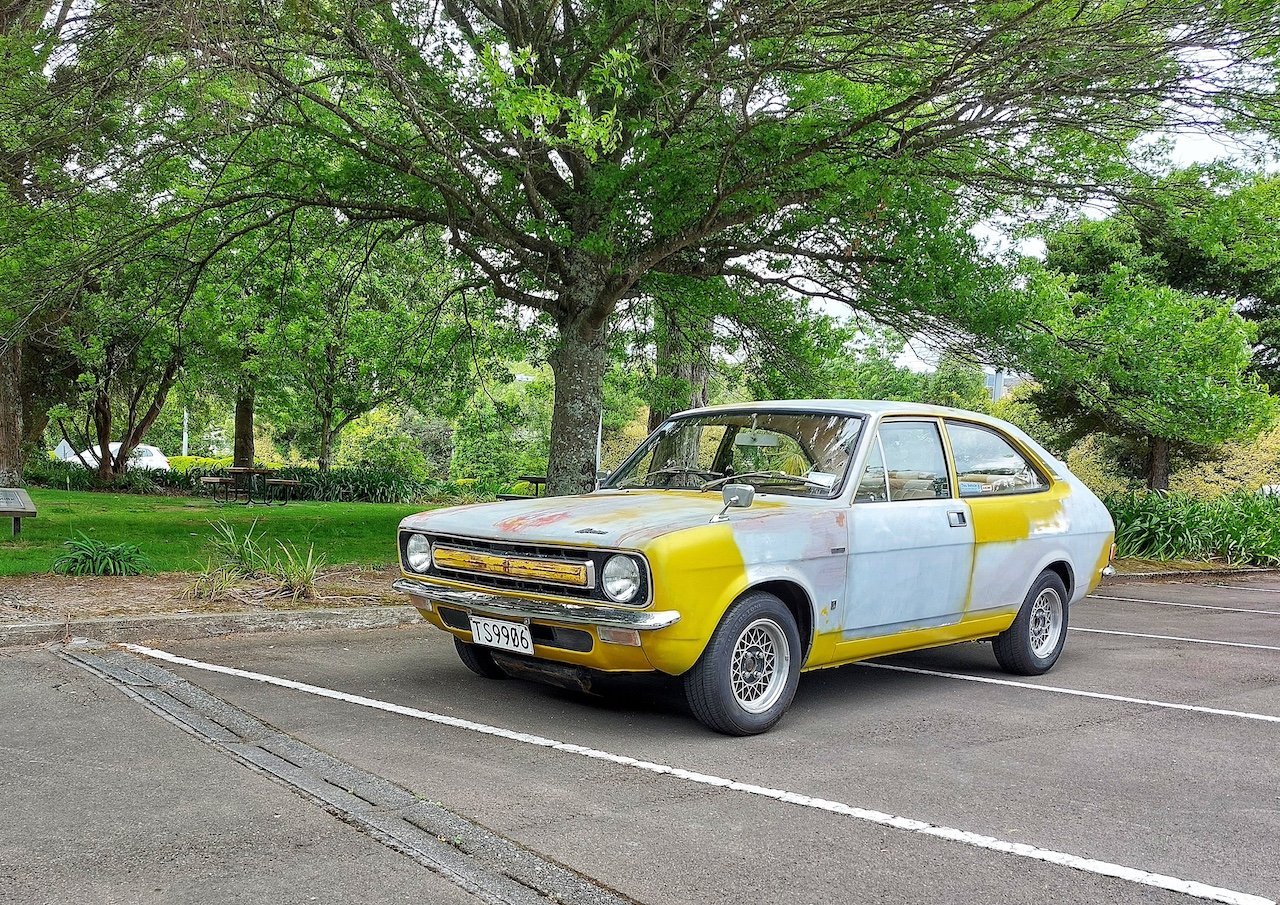
Going a full circle into a Marina again. KwS's 1973 Morris Marina Coupe.
kws replied to kws's topic in Projects and Build Ups
Finally, after four years of work, the Marina was off to its first car show. But not before a few changes and bumps in the road. The first change was that my black personalised plates finally arrived. In New Zealand, "black plates" used to signify a classic car, as all plates before 1987 were matte black with silver machined text. After 1987 they all changed to gloss white with black text So to me, white plates on a classic car look wrong. Unfortunately, back in 1995 when the Marina was re-registered, they didn't retain the old plates and it was issued with white plates of the time. I have had MEH for a few years now, and it's been on a couple of cars, including my Vitesse 050 - Rover SD1 Vitesse But it was white with black text, as personalised plates previously never came in anything else. A few years ago they made it so any car could get black plates, with either silver or (gross) white text. This was a re-design though, giving it a reflective gloss background so "cameras can see it better", and with the modern font. I had wanted to convert my white plates to this for a while, and when I heard they were discontinuing black/silver plates due to some... technical... issues, I jumped on the chance to finally do it. After a couple of months waiting, they were finally in my hand and quickly on the Marina exclamation: meh expressing a lack of interest or enthusiasm."meh, I'm not impressed so far They aren't perfect; I don't like the gloss black, and the font isn't right, but it's the only legal way to have black personalised plates (without the gross white text). Normally I'm strongly against removing original plates from old cars, but since the Marina wasn't on its original plates, I wasn't too cut up about it. Shame to lose the 2 letter combo though. Why did they pull the sale of black/silver? This. In certain lights the black goes silver and makes the plate almost impossible to read. Many people were clambering to get these before they were stopped, as there is a rumour that speed cameras can't see them... but I'd bet that's a myth (and a dumb reason to buy them. Kiwiplates themselves probably started the rumour to drive sales...) My "new" black plate on the right, with an original black plate next to it Before I could head off to British Car Day though, a couple of things bothered me. First, was the fuel filter. I had noticed it had changed colour to a dark brown since I topped the tank up with more fuel a while back. I was wondered it was full of rust, so I removed it to inspect. It had a noticeable heft to it Eww. I cut the filter open to see what was inside A huge amount of sludge in the bottom of the canister, and the filter material was completely plugged The good news is that it's completely nonferrous, so it's not rust. I believe it's "varnish", or dried/dehydrated fuel remnants, that must be coating the bottom of the tank. It dries to a powdery light brown substance, and fresh fuel rehydrates it. I have no idea how the car was even running, let alone as good as it did. I popped a new filter in, dropped a spare in the boot, and I'll keep an eye on it. With the carb possibly seeing more fuel, I wanted to check the mixture as it was a prick to tune last time (maybe due to the filter). Last time, I tuned the carb by ear as the piston listing method wasn't working (it would just stall despite it being tuned to best idle). Before tuning it I removed the fuel bowl cover and drained the fuel and removed the small amount of sediment in the bottom (now I know where that sediment was coming from, the plugged filter) I tried again to tune it with the lifting pin, and had the same results. Tuning it to the point where the lifting pin resulted in a slight bump in idle which settles back down again, resulted in the car idling rough and uneven. Not very nice, and I didn't trust it. Going back to an old tried and true method of tuning, I pulled the Colortune out The initial setting, was a nice orange flame. Far too rich Tweaking the idle to the best by ear, got me pretty much bang on a nice blue flame, which is ideal I don't know what's wrong with the lift pin method here, but the old tuning by ear trick doesn't let me down. With the car seemingly running happier, I took it for a quick test drive around the block. Sure enough, the engine was pulling nice and strong and sounds good. I pull out of an intersection, clutch in to change to second, and clunk, the clutch pedal goes to the floor. I rev match into second, but now I'm stuck in second as the pedal has gone from nothing, to everything, and I can't push it down. Luckily, I'm just around the corner from home, so being stuck in second is fine. I pull into my driveway, and have to stall it as the clutch won't press down and the loading on the gears mean I can't pull it out of gear. I give the clutch pedal a hard shove, and with a crunch it goes to the floor. I manage to pull it out of gear and roll down the drive into the garage. As soon as I get out of the car, I can see the trail of fluid. A quick sniff test tells me it's brake fluid, so I'm guessing it's clutch hydraulic fluid. At least it's not gearbox oil, I guess. Now, this is the day before British Car Day, so I'm a bit low on time if it's anything serious. I pop the bonnet and sure enough the clutch res is empty. I have a look at the slave cylinder and I can see all its guts have been ejected into the boot. Yay. It was easy enough to remove, since it had fallen to bits. Thankfully, all the bits are there and I don't need to go see what I can find on the road. This appears to be the culprit. This is the circlip that retains the piston inside the cylinder. It appears the piston forced it to deform and pop out, with everything following it. A quick rush around a couple of shops and I had a pack of 1" internal circlips in my hand. You can see how deformed the old one is Reassembled, with the new clip in place After refitting, refilling and bleeding the fluid, thankfully it all seemed to be working fine again. I'm not 100% sure on what actually caused the failure. I have a couple of theories, but I'm not sure. One theory is that the clutch pedal stop was out of adjustment and allowed the slave to over extended, bash the clip out, and explode everywhere. Unfortunately it appears the stop is present, isn't adjustable, and the pedal does seem to contact it. Stop here, with the orange arrow Pedal appears to touch it fine, without too much force I'm going to look into a small pad to put on the end of the stop, to extend it slightly and see how it feels then. At the moment though, I'm just going easy on it. So, with that crisis averted, the show the next morning, I should be all sorted. No. It was pointed out to me that the patch of black rust convertor at the back of the bonnet looked a bit gross... so I had to fix that A sanded it back and gave it some epoxy primer Wait, what about the RH sill though, It's bugged me that It's patchy in primer. I gave it a quick sand, masked it up, primed a couple of extra spots and then shot some yellow at it What to do while that dries though? Fix this mess on the front guard, which I hate. I stripped the mountain of bog off it when I got the car, and other than hammering it out a bit, haven't touched it since. I need to replace the guard, or at the very least the front half of it, but in the meantime, bog. Damn, what do I do while that dries? Cover the ugly stripes I made on the door when I sanded the primer off. ADHD is hard work. After sanding the first layer of filler back, I applied a second coat to fill the lows After that cured, I sanded it back, and gave it a coat of epoxy primer. It's far from good, or done, but it's better than it was, and only temporary. The RH side looks a bit less shite. Once again, far from good, but a bit less offensive. I then gave the car a waterless wash, cleaned all the glass inside and out, and half dead of exhaustion made my way upstairs and called it a day. The next morning, we clambered aboard and departed for the show. The old girl fired straight into life, choke disengaged correctly (I wonder if it was sticking from the gummy fuel varnish) and off we went. It did me proud, like usual, and got there with no drama. I love driving it, it's such a nice sensory experience, and it runs and drives so good. We arrive nice and early, and I head to the Morris club stand. Unfortunately, I felt a bit shunned by them, as no one acknowledged us, welcomed us, directed us to park or anything. A pretty average attitude, considering I'm a paid member. I decided to park at the end of the row next to another older Morris, away from their main stand. No, it's not the prettiest car there, but it is honest, and rare. For anyone curious, this is what is in the passengers window. I guess a story appeals to people, as I saw a lot reading it. We noticed almost immediately that the Marina drew a crowd. People made a bee-line for it, and throughout the day it always had plenty of people checking it out. So we were very surprised when shortly after we parked, from the other side of the field, we suddenly couldn't see the Marina anymore. It turns out, someone had moved the car I was parked next to forward, tucking the Marina back Now, I'm sure it wasn't deliberate, trying to distance themselves from the ugly car, but it sure felt a bit intentional... Jokes on them though, as the Marina gained a friend shortly after, and it appeared to be the two most popular cars on the stand. I guess there are only so many times you can see the same Morris Minor in a different colour, yet when was the last time anyone saw a Marina Coupe, or an Ital Estate?! The Ital was for sale, said it was 1 of 1 in NZ and I'd believe that. I wasn't aware we even got Itals in NZ. It's a tidy, honest car, with some bits needing some love, but over all a good, road legal, classic wagon. As cool as the Ital is, the Marina front appeals to be far more. The blocky headlights just take away from the friendly face. I'll tell you what, it was hard to get photos of these two without people in them... I'm proud that after 4 years of work, the Marina finally made it there. It was always a goal, but the criteria was that the car had to get there under it'd own power, and road legal. Interestingly, today was 4 years and 1 day since I contacted a random guy on Facebook, minutes after a ratty looking Marina Coupe appeared on Marketplace, with one photo and a vague description. 7 days later, it was in my garage, ready to start a massive journey involving a huge amount of work, far too much time, and many new skills. No regrets. I love this car and it's been well worth the work put into it. Back to the show. It was a great turnout, and some really cool cars were there. I didn't take many photos, I prefer to just enjoy what I'm looking at these days, but here are a couple of outstanding ones As a note, I call it "British Car Day" as thats what it started as, but these days they also allow Euros in too. Casual, road legal, military vehicle I like these old Mercs. Just big, solid old 80s tanks The paint on this classic Porsche was amazing. Love the colour I also loved this little Fiat. It seems today was the day for great paint jobs/colours (excluding the Marina, obviously) You just dont get colours like this anymore. Such a shame A nice classic old Brick and finally, this gorgeous old Multipla (yes, that Multipla) It was a great show, and I'm looking forward to taking the Marina back again next year. This time I won't bother parking with the "club", and as my plan is to improve the car each time it goes there, it'll be better, faster and nicer.- 80 replies
-
- 25
-

-

-
Well hell, it might almost work... Thanks to @locost_bryan for the lower arm for mocking up

-
Tomble's adorable go cart / distraction / Alto Works
kws replied to tomble's topic in Other Projects
I haven't done that in 12 months in all 4 of my cars combined 🤣 Good work for getting out and using it! -
Going a full circle into a Marina again. KwS's 1973 Morris Marina Coupe.
kws replied to kws's topic in Projects and Build Ups
Well, that's another year done. Happy New Year and welcome to 2025. May everyone's year be excellent and filled with car stuff. To celebrate the New Year, and the weather not being the usual NZ "Summer" trash of wind and rain, I took the Marina out for a quick spin, the first of the year. The main goal here was to do some testing. I hadn't really driven the Marina since freshening the carb up, and upgrading the ignition system, and wanted to see that the issues I was having were resolved. The biggest test was that I wanted to try heading up some hills and see how the engine responded. I've not been up any hills yet, so haven't really had a chance to put the engine under sustained load, and see how it likes it. Before redoing the ignition, I suspect it would've just cut out and not made it. I planned a route, a 22km round trip. Enough time to get the engine warmed up before I hit the hill, and a wide enough road that if I have to bail, I can pull over and do a U-Turn. My wife and I jumped in the Marina, and after a quick tweak of the idle (too low) and unsticking the choke jet again, we were off. After a quick drive, we get to the bottom of the hill. Now, by normal standards, it's not that steep, but for a 52 year old car that's not seen a hill in at least 15+ odd years, it's Mt Everest. Much to my surprise, the Marina just cruised up it with no fuss. My concern was for nothing. Being twisty, most of it was done in second gear, but third was also given a work out too. The engine pulled great, and the temps were stable the whole time. The suspension was struggling a bit, the front really needs the telescopic conversion to control it, and the rear should get the new shocks fitted soon. Corners are best taken slowly. I had my wife checking my speed against the indicated speed on GPS, and it seems my Speedo is reading about 10% low, so I've been speeding everywhere, oops! Being out on the back roads gave me a chance, for the first time, to open it up a bit and see what the car was like at higher speeds. The pancake filter really unleashes the carb intake sounds. At 80kph, the car feels perfectly stable and cruises really well. At 100kph, It's not so good, everything starts to get a bit floaty, a "feature" I suspect is related to the front suspension being too soft. Basically, it's an old car, drive it slowly (at least until I sort the front suspension). We pulled over for a quick check and to grab some photos. Everything was happy, no leaks, temps were good and the fan was working well to keep it under control. It's a cool looking car, even in its current "ratrod" look. I quite enjoy the reactions of people as I drive by. It seems yesterday the cyclists got the biggest kick out of seeing the Marina out and about, many stares, lots of smiles and one audible "Marina?!". Over all, a very successful drive. We're getting closer to being brave enough to drive the car the 60km round trip to work...- 80 replies
-
- 25
-
-
-
Thanks, I do actually have one on the shelf, just haven't got around to using it. I too used it on my Mini when I had it. I just changed to the Penrite dashpot oil, but was previously running 20w oil. Probably changed too much in one go... This carb is only a short term solution anyway, so its not worth me spending time or money on. The goal is to get the twin carbs on sooner rather than later.
-
Going a full circle into a Marina again. KwS's 1973 Morris Marina Coupe.
kws replied to kws's topic in Projects and Build Ups
I've not driven the Marina since the last update, and it's been a month now. The reason? My usual "it's on the road now, let's pull it to bits" thing. To be fair, it's not without reason though. In my last outings in the car, I found the engine would cut out under higher RPM, so I wanted to investigate this. Since I got the car, despite having run and driven it a bit, other than cleaning out the fuel bowl and tweaking the mixture, I haven't actually touched the carb. To kick everything off, I thought I would pull out the old carb that came in a box with the car, and strip it down to see what state that was in. The fact it had a big X marked on the top of it didn't bode well. I love SU carbs, they're just so easy to strip and service. Nothing fancy, but does the job. Sadly, there is almost nothing in this carb that was reusable. I pulled the throttle spindle out and it had massive wear The bushing in the body was worn too, as even the "good" bit of the shaft would wobble about when tested With the right tools, some new bushes and some time, I could fix that, but I really don't care for it. Even the needle was stuffed. The holder is cracked and the needle itself is actually bent The jet seems to be welded into the jet bearing, as when trying to remove it the complete plastic end of the jet decided it would rather come off instead So moving on from that development, I popped the bonnet on the Marina. This is what I started with I removed the air filter saucepan and its intake pipe which gave me access to the mighty SU HS6 carb Three tight and one loose nut later, the carb itself was off. The gasket and under the carb were all quite wet with oily fuelly muck The heat shield and spacer came off next With the carb on the bench I removed the fuel bowl lid and was annoyed at the muddy sediment on the bottom of the bowl It didn't really act like rust and wasn't ferrous, it was more like dirt. I have a filter in the system before the fuel pump, and that not shown any signs of rust or dirt (yet), so I'm not sure where this came from. I cleaned the bowl out when I first got the car running. The float looked fine. It moved freely and had no signs of liquid inside it Next I removed the damper, suction chamber and piston. This allowed me to remove the needle, which I confirmed is the correct "BAN" needle for single carb 1750. One of the biggest reasons for servicing the carb was due to this, a sticking jet when the choke was applied. The jet doesn't return and causes the car to run super rich and drop a cylinder Usually it takes just a gentle tap with your finger on the bottom of the jet to pop it back up again, but this requires popping the bonnet when starting cold, which is unacceptable when you have an image to withhold. It should sit all the way up against the adjustment nut The fuel feed hose had been weeping too I removed the jet and feed hose I thought it was weird there appeared to be no seal on the end of the hose in the bowl... turns out it was still in the bowl Careful use of a couple of picks and I managed to chip the "rubber" seal out. It was harder than plastic. The new seal is to the left of the remains I ran some brake cleaner through the jet and found more gunk I cleaned the outside of the jet and inside of the jet bearing up as well as I could, and when testing on the bench it all worked nicely with no sticking I fit the new seal to the fuel feed hose. A new washer came in the gasket kit, but I found the outside diameter too big and I couldn't thread in the fitting, so I ended up refitting the old washer and it works fine. And refitted to the fuel bowl. It turns out this also wasnt tight when I removed it, as the fitting screws much further in than it was The choke linkage was also refitted I refit the needle to the piston and after a thorough cleaning of the inside of the carb body, refitted the piston. As its turns out, the spare carb had a different piston spring. Neither have any obvious paint markings to show which one is "RED" as indicated in the manual. The one from the spare carb is slightly longer and has thicker wire in the coils 0.99mm wire and the one that was in the carb on the car 0.82mm wire I don't know which one is right for the car, and just for curiosity I fit the thicker coil spring from the spare carb to the car to see what it was like. I might need to swap back though as I'm having some weird tuning issues. Next was the fuel needle and seat, and float. The needle and seat are what stops the fuel flow into the bowl, so it doesnt overfill and overflow. As the level in the bowl rises, the float will rise up with it and at a certain height it presses on the back of the needle and pushes it into the seat, blocking the inlet. My needle and seat appears to be original, and replacements these days come with viton rubber tips, to help seal. Mine was a plastic body with brass tip. With these carbs, to remove the needle and seat you need to remove the float. This is held in place with a small hinge pin. I used a smal punch to carefully tap it out enough to grab with some pliers The seat just unscrews from the cap. The spare carb had one washer under the seat whilst the in car one had two. These set the height of the float The new needle and seat. The new needle is all brass with a viton rubber tip After a lot of faffing about with float levels, which I'm still not 100% sure is right, the new needle, seat and float were refitted. It's annoying these floats don't have a metal tab that allows for adjustment. With a new float bowl gasket, the carb was reassembled. I didn't remove the throttle plate or shaft as I didn't have new ones or new screws. There is some play in the shaft, which pretty much dooms this carb, but it'll do for now. Before refitting I decided to bite the bullet and remove the inlet/exhaust manifold. I knew there had been a leak, it wasnt bad, but it was a good time to address it anyway. Plus, this gives me a chance to prep the fittings for easy removal when I go to fit the twin carb manifold. By some miracle, all the nuts and bolts came off without issue. The only little hangup was that the front stud was rusted into the manfold, and needed some persuading to give it up. The inlet port sizing on the manifold is... slightly mismatched. I may check the match on the twin carb manifold and massage it if needed I cleaned the face of the head up with the wire wheel on the drill Add went through with taps and dies cleaning all the threads DIY short spinning tap handle After cleaning up the manifold I found a rather decent crack in the casting between the two center exhaust runners That necessitated some copper exhaust spooge on the gasket, for maximum sealing And with that, I banged it all back together, with new gaskets on everything Because I'm sick of the saucepan handle rattling on my hood prop, I replaced it with a cheap foam "pancake" filter. So much room for activities now. In hindsight it's a bit close to the heater hoses, so I should've got the offset mounting to raise the filter up. Oh well. I've set the carb up, and tuned it as well as it wants to be tuned. It runs well, but I cant help but think the float height or piston spring arent quite right as when lifting the piston the engine revs up slightly and then dies, indicating its lean, but if I add more fuel it starts to run a bit rubbish. At the moment its running at the "audiable sweet spot" where it sounds happiest running. Unfortunately the damn jet is still sticking when the choke is applied, so this carb isnt long for this world. I have a kit to rebuild the twin HIF4s, so they will be going on the car some time soon. It's no real surprise I guess; only a month or so ago the jet was completely jammed solid and didnt move, so I'm lucky I can use it at all. In the mean time, I wanted to investigate the ignition system a bit further to see if it has any affect on the cutting out at high RPM. I have nothing against points, they have their charm, but I wanted to convert to electronic ignition to do away with any risk of the points or condensor being an issue. I bought an Accuspark Stealth "Kit 4" for a Lucas 25D distributor, which I can now confirm works fine on the Lucas 29D4 in the Marina. The old points and condensor accepting their fate I pulled the rotor off and removed the points and condensor I wouldnt be surprised if this had something to do with the issue... The main power feed to the points had been "fixed" at some point, with the worst crimp they could find. I don't even know if any copper was still connected, or if the only thing holding the terminal on the wire was the insulation. I could spin the terminal right around with no issues. This also wouldnt help With some careful poking and prodding I pushed the grommet through the housing and removed the old wire The terminal fell off once out of the car The new Accuspark pickup fits right in, after smearing some of the supplied thermal grease on the underside. The pickup ring slips over the shaft easily. The kit comes with new grommets, only one of which will fit and annoyingly it's not quite right, it should really have a 90 degree outlet to avoid the clip for the cap, but it is pliable enough that you can bend it out of the way without issue. I wanted to also replace the coil, as I suspect it was probably original. I got a nice Powerspark high output coil. Its very understated, with not even so much as a label on it. Perfect. UK spec Marinas mounted the coil on the inner wing, away from all the heat and vibration of the engine Aus cars didnt have that luxury, the coil is mounted on the engine. It'd be quite an easy thing to change, I believe the holes are even already in place. Unless you're me, and have mounted an aux fuse box to that location. Nuts. Oh well, I cleaned the inside of the bracket up And mounted the new coil. Its a little bigger than the old coil, so its a tight squeeze. The Accuspark gets wired straight to the positive and negative terminals. The rotor, cap and sports car racing leads were all refitted again. You'd not even notice the fancy newfangled technology hiding in the distributor The car fired into life straight away, with no issues, which was a relief. Once it was warm I checked the timing, which was a little more advanced than it should be, so I knocked that back a little, tweaked the carb tune and took it for a run around the block. I'll tell you what, it has no trouble revving to the 5500rpm redline on the tacho now! The sound it makes from the little pancake filter too, its excellent. I'm not 100% happy with the carb, so will do a couple more tweaks on that, but otherwise its running and driving very well. I think the biggest surprise for me is that the gearbox syncros can keep up even at over 5000RPM on a 1st to 2nd change. Heaps on the list of things to do, but I'm really trying not to get too stuck into much else that will take it off the road, as if we can get some sunny days for once, I want to be able to drive the car.- 80 replies
-
- 25
-
-
-
Bloody enshittification ruining everything these days. So hard to find good quality stuff now. Congrats on the wof regardless of it's efforts to foil your plans.
-
We've seen jobs come up at work where they have done a body swap and then it fails a wof for missing things like body mount rubbers... Just crank the bolts up right, she'll be right. Out of curiosity, i have wondered, if we supply a brand new genuine chassis for a ute to repair crash damage, i know the chassis number needs to be stamped on it, but does it technically need a cert for that?
-
From what my friend said, who was running the same rails in his Corolla, you're pretty well limited to anything around the age of Fishnets or SR2/3 from something like a Civic/ DC2 Integra Type R. Anything newer, like Evo 5 onwards, DC5R, Accord Euro R etc will be the 4 bolt pattern. He was going to change to floor mounted buckles and use modern rails, but sold the car before that.
-
Going a full circle into a Marina again. KwS's 1973 Morris Marina Coupe.
kws replied to kws's topic in Projects and Build Ups
With a successful WOF under my belt, I could finally drive the Marina out on the roads and see what it is actually like. Before driving it the couple of KM to the last WOF inspection, the most I had driven it was around the block a couple of times. I had never really strayed far from home. Now though, I could take it out for drives "for the fun of it". I could even get some photos that weren't taken in my garage or driveway! The interior in particular looks a lot better out in natural light than in my garage The feeling of finally being able to get out and actually drive the car properly was awesome. For 51 years old, it drives really well. Going down the road, it just feels like "a car" (that you have to dodge all the potholes in lest you bottom out the suspension). It can be driven just like any other car; get in, turn the key, it fires up and off you go. The difference is that you are driving it, it's not an appliance. About as far from the Leaf as you can get. Touch wood, but it doesn't smoke, it's not overheating, the gearbox shifts well, and although a bit soft, the suspension seems to be doing what I ask of it. I'm very impressed. Those first couple of drives did show up a few niggles. One of them, which concerned me a little as it was the first time I'd heard it, was a clattering from the gearbox. It only happens sometimes, and only when warm, which is why I hadn't heard it before I guess and usually only on over-run or when taking off from a stop. Surprisingly the shifts are good and the syncros are doing the things they should, unlike my first Marina which would punish you if you didn't go from first, across the gate left to right and then go into second gear, to give the syncro time to catch up. There is a squeal from either the clutch release or spigot bearing though, so a new clutch will be on the cards in the future. Something that has been bugging me for a bit, was that my tacho was intermittent at best and dead at worst. It happened randomly a while ago and sometimes works until the cars been running a few minutes and then just drops to zero. I checked the wiring from the coil to no avail, so knew it had to be something in the cluster. Having spent a not insignificant amount on the Spiyda tacho conversion, I was hoping it wasn't an issue with that. With the column shrouds off already for other work, removing the cluster was a matter of taking out two screws (since I haven't got around to sorting the top two yet), reaching in through the "speaker" grille in the dash and undoing the speedo cable, and then pulling it forward enough to disconnect the harness. Once on the bench, I had my suspicions about what the cause was This little guy. I didn't do this, and it's on the power feed to the tacho. Lifting the end nearest the screw showed it was barely attached to the copper trace, if at all. I carefully peeled it off, snipped it back to the solder and soldered in a new jump wire, this time joining straight to the bare copper where the ring terminal contacts the trace To give it some support and stop any risk of shorts I covered it in some hot glue Refitted to the car, lo and behold on the next drive I had a rock-solid tacho for the whole drive. Excellent. I love a simple fix. A not so simple fix, was the next thing that was bugging me. The ignition key. Ever since I've had the car the ignition key has been a bit of a pain, but it did work, you just had to jiggle it a bit and sometimes it'd only work if you pulled the key out and turned it over. I could live with that though. What I needed, was spare keys, just in case I locked my only set in the boot, which has no release except with a key and cant easily be accessed from inside the car. The door key was easy enough, the locksmith decoded it and cut me a nice new one. It turns out his decoding of it perfectly matched a photo I took of the back of the outside door handle ages ago, showing the back of the lock barrel where the number is stamped into it. The ignition key though, was a different story. The first thing the locksmith said to me was "this is on the wrong blank" just by looking at it, followed by "its been hand cut with a file". Oh goody. "custom" key bottom, new blank on top Long story short, the original key had been hand cut by/for the previous owner and had an asymmetrical cut. It took me a little to work out why, and was only when I remembered something the guy at the workshop that failed the Marina said when he went to open the boot with the ignition key and I told him to use the door key, "it opened it before"... Sure enough, when flipped up one way, the ignition key will open the boot But it won't open the boot if the key is inserted the other way, and it won't open the doors. Some wizardry had been done. Why he specifically needed this cut, I don't know, but it's kinda cool. The locksmith didn't want a bar of it, he said he could replicate it but it may or may not work, and in the end it would probably still have the same issue the key currently has, where it's hard to use in the ignition. The reason for this is because it's not a symmetrical cut, with the same cut on each side of the key, so of course the wafers in the barrel will be different on each side. My plan was to copy one side of the key to both sides of a blank, by hand, and make it a symmetrical key. I bought a blank from the locksmith and dug out my needle files. Before I could do that though, I wanted to strip my spare barrel so I could use that to test the key, so I didn't upset the current barrel (and make the car immobile). The problem was that I didn't have a key for this barrel, and you need to use a key to remove the core. That left me with one option, see if I could pick it. First I had to drill out the retaining pin. This goes into a hole in the barrel, locking it in place. I actually filed this down first to see if I could expose the pin and pull it out, it didn't go well, so I ended up drilling it. Next you would insert the key, turn it to ACC position and due to the mechanism in it, it would eject the barrel from the housing. With out a key, or lock pick set, I had to get creative. Using a bunch of stuff from my rollcab that really shouldn't be abused like this, I picked the core wafer by wafer and out it popped. I went between using this spanner and the screwdriver on my multitool as a turning tool, and the remains of some cheap long-nose tweezers to pick the wafers Now the fun part. I removed the column shrouds Took some photos of the wiring so I knew where to plug it in later And using the handy previously slotted shear bolts holding the ignition on, removed it. The signs that someone had been here before were obvious... Such as the random screw holding the switch into the housing and the modification to the retaining pin It turns out the modification is a little ball that was pressed into a hole that had been drilled down next to the pin Removing that allowed me to use a pick under the pin to lift it up Inserting the key into the barrel, and turning it ejected it The bare barrel A bunch of wafers were missing from either side, to match the cut of the key. No wonder it was a pain to use The square metal rod on the end is what turns the electrical switch in the end of the barrel. The white plastic section has a groove that runs around it, and this is what engages and disengages the steering lock (and also what ejects the barrel from the housing). I used a small punch and screwdriver to drift out the roll pin holding the plastic part on With that removed, the core will come straight out of the barrel Make sure you have a key in the core when you remove it or the wafers and springs will go everywhere. The core does not require a key in it to be removed. The effects of the iffy key can be seen in the barrel, where the wafers have worn into the housing from not being disengaged properly This is what the uncut blank looks like in the core, showing the wafers that would stop the barrel turning. It does highlight how few wafers were actually being used too. Apparently this "wrong" blank is designed for 10 cuts (5 on each side). The proper blank is for 8 cuts. This key had maybe 4 total based on the wafers left. I stripped the spare core completely After cleaning all the wafers and springs up, I went through and using the original key, on the side I wanted to copy, matched the spare core to that key It's worth remembering that the key works on the opposite side of the core, pulling the wafers down. In the above photo, the cut on the bottom of the key will be acting on the wafers fitted from the top of the core, pulling them down against the springs. I didn't fit any wafers to the other side, just so I could perfect the one side of the key first I carefully clamped the two keys together, and using vivid (permanent marker) on the blank, traced the cut from the key to the blank Using a series of small files, I carefully filed down the cuts until it was close to the traced marks, testing along the way. I got one side of it really good, almost a perfect match. I started on the other side, got it pretty close and then this happened I messed up. What I hadn't accounted for was that the other key, having the shorter cut on one side, couldn't be symmetrical using that cut, or the key goes too far into the core By reducing this area here to line the cuts up, allows the key to go further into the core than it should, misaligning the the end wafers. You can see the reason for it here, on the original key. With that one, the key goes further into the barrel on one side than the other. Its madness. Back to the drawing board I went. In a stroke of luck, whilst googling what sort of key the Marina should have, I came across a number for a blank which rang a bell. Hold on, don't I have one of those keys? It's pretty worn, but yes, that's the blank a Marina should have. I don't know where it came from, if it even came with the Marina or another car, but its quite fortuitous. You can see the cut is quite different and the tip of the key is longer and stepped I already knew this key didn't match either of the barrels I had, as I had tested it, but this gave me the chance to rekey a barrel to match this key now. The locksmith was also more than happy to duplicate this key as it wasn't some weirdo custom thing. I built the core up in my spare barrel for testing, and once good, I gutted the original core and swapped it all over The reason I couldn't use this barrel in my car is that someone has removed the outer ring which has all the markings on it, so it looks pretty haggard One tip for reinserting the barrel into the housing, is to make sure the plastic at the end of the housing matches the pin on the end of the barrel. Its not actually a perfect square, but a slight rectangle and it will only go in one way. You can spend a lot of time being frustrated by it not going in, if this piece is the wrong way around... I gave the barrel, core, and housing all a good clean and then lightly lubricated it with graphite before reassembling and refitting to the car The steering lock is still a little sticky to activate, it always has been, but the key now works each and every time without having to jiggle it or turn it over. Its made the car 100% easier to operate now. I really wanted to keep the weirdo asymmetrical key in the car as it's a cool bit of history, but that just made the job far too difficult, when just redoing the whole lot to a different cut made so much more sense. I'll keep the original keys in storage with the rest of the bits, including the wafers I kept in order, just in case. Now, I have two complete sets of keys (plus another spare that will open the boot) and an ignition barrel that works properly. Success. Finally, the last niggle the car has developed since I've been able to drive it properly is an issue at higher RPM where it seems to cut out. I had a rather interesting moment shooting a gap in traffic where I started off rapidly with a chirp of a tyre, and just as I got out in front of the oncoming car, the engine cut flat out but came back to life when I basically crash started it and kept going like nothing happened. Testing it again later, the same thing could be replicated by giving it beans in a straight line. It didn't seem to be load dependant as you can go WOT at low RPM and other than some light pinging (hopefully to be fixed by running higher octane now) it pulls fine, but once the revs climb above about 3500rpm it started to misfire and then cut out. It could be fuelling, as I've been topping the fuel tank up with jerry cans and I don't know how much is actually in there, and although the fuel gauge is coming back to life, I don't know how accurate it is. Theres no obvious rust in the fuel filter, and the pump should easily be able to keep up with the demands of this engine. I've topped up with another 20L of 98 octane to be sure it isn't just low fuel, and the gauge reads about 3/4 of a tank now. It's a 54L tank, so that makes sense. My suspicion is the ignition system, as the tacho drops to zero when the engine cuts out. Other than cleaning the points, checking the gaps when I got the car, changing the plugs, leads, cap and rotor, I have done nothing else. My plan here is to replace the coil, relocate it from the engine to the engine bay (like later Marinas, presumably to reduce vibration), convert to electronic ignition, and I'm also going to give the carb a quick going over as I've only barely cleaned and adjusted it to get it running. Hopefully that fixes it. if not, more troubleshooting will follow, including maybe checking inside the fuel tank for condition. In the mean time, its more than happy tootling around town, as long as I don't try to drive too aggressively.- 80 replies
-
- 23
-
-
I'm running the black 015 in the Marina and it seems to go hard, appears to have no issues keeping up with the mighty 1750 and single SU.
-
If it still has a standard steel sump pan, check the flange on it is flat before refitting. People always nip the bolts up too tight to try to fix a leak, and end up warping the flange around the bolts and it'll never stop leaking until thats fixed
-
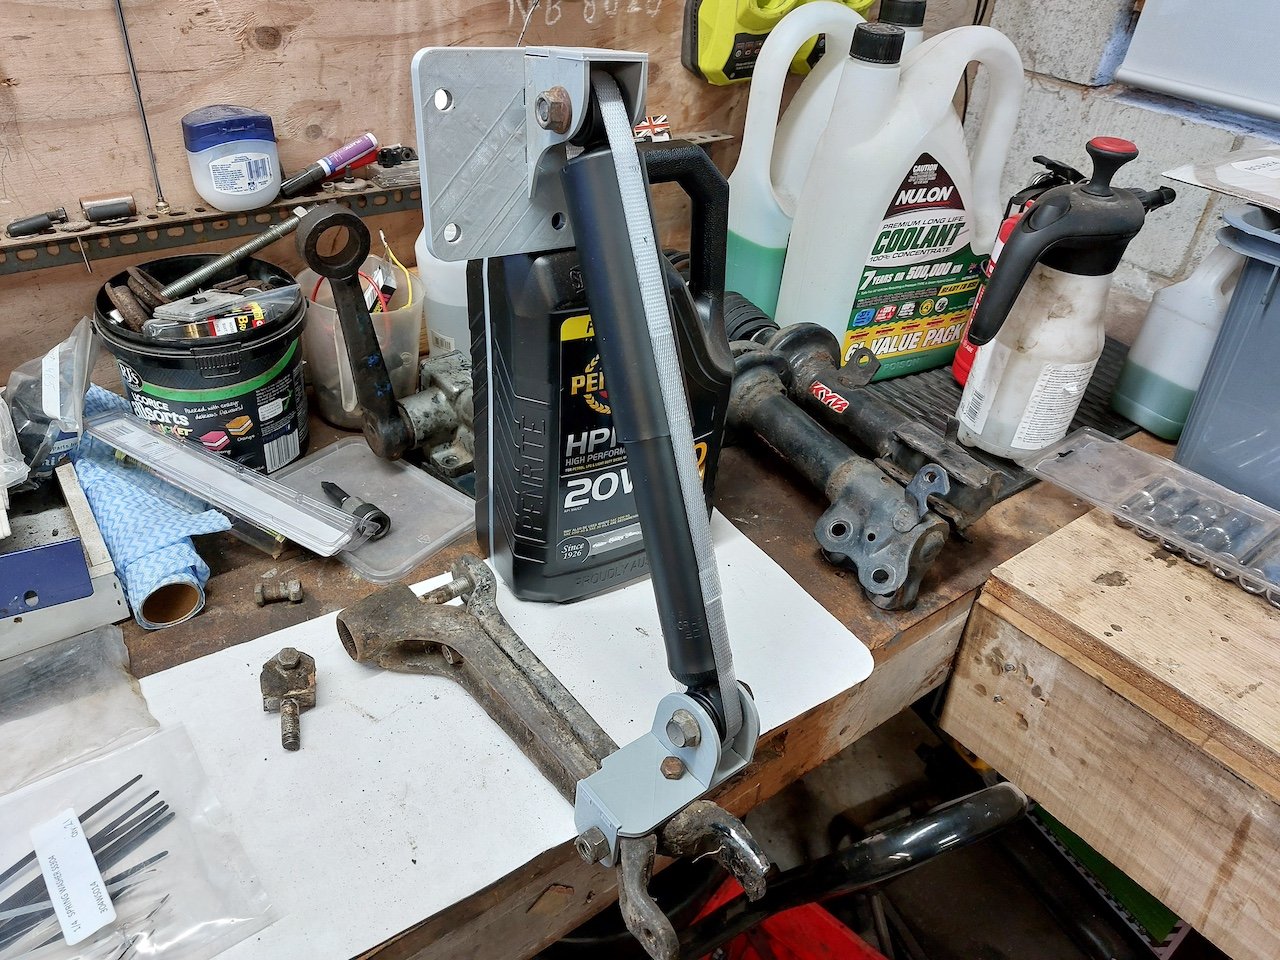
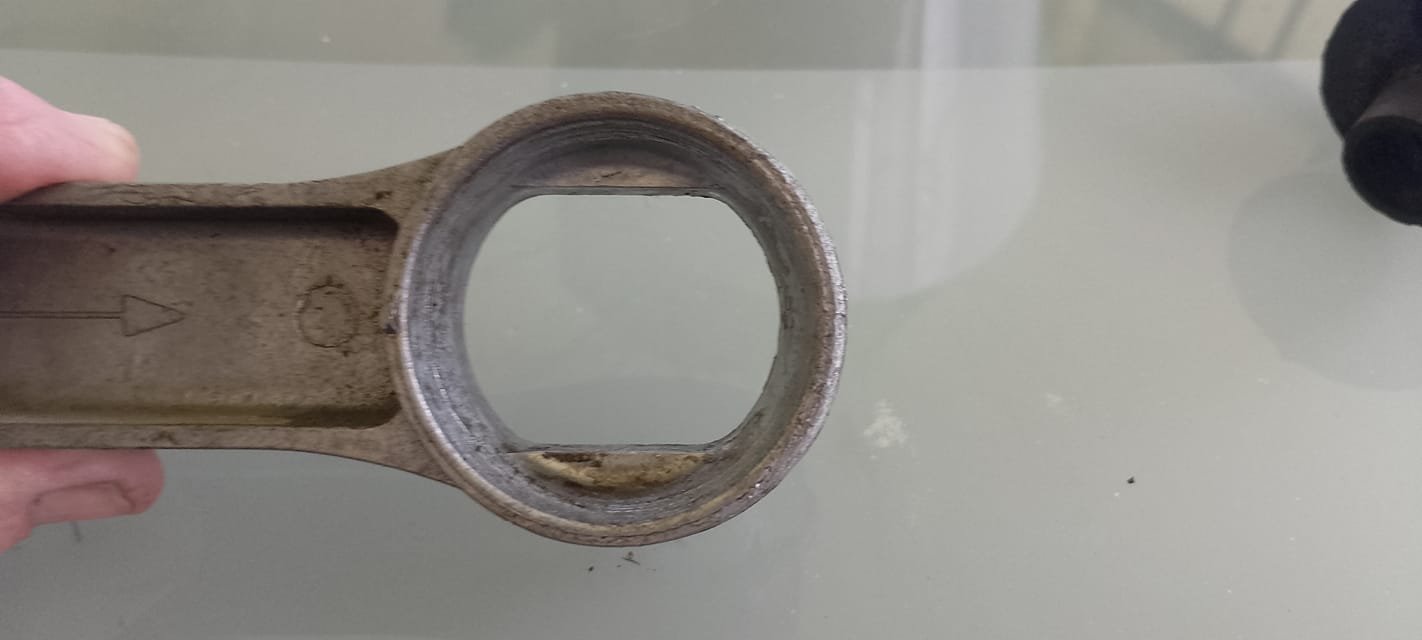
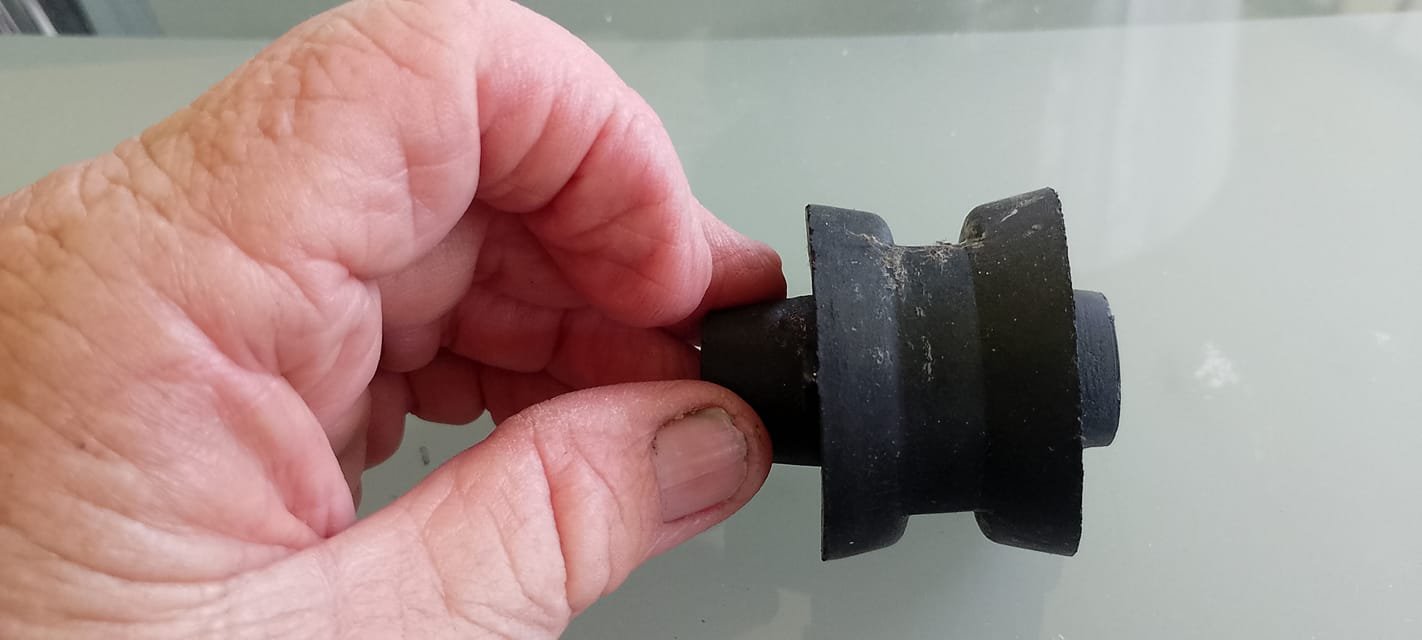
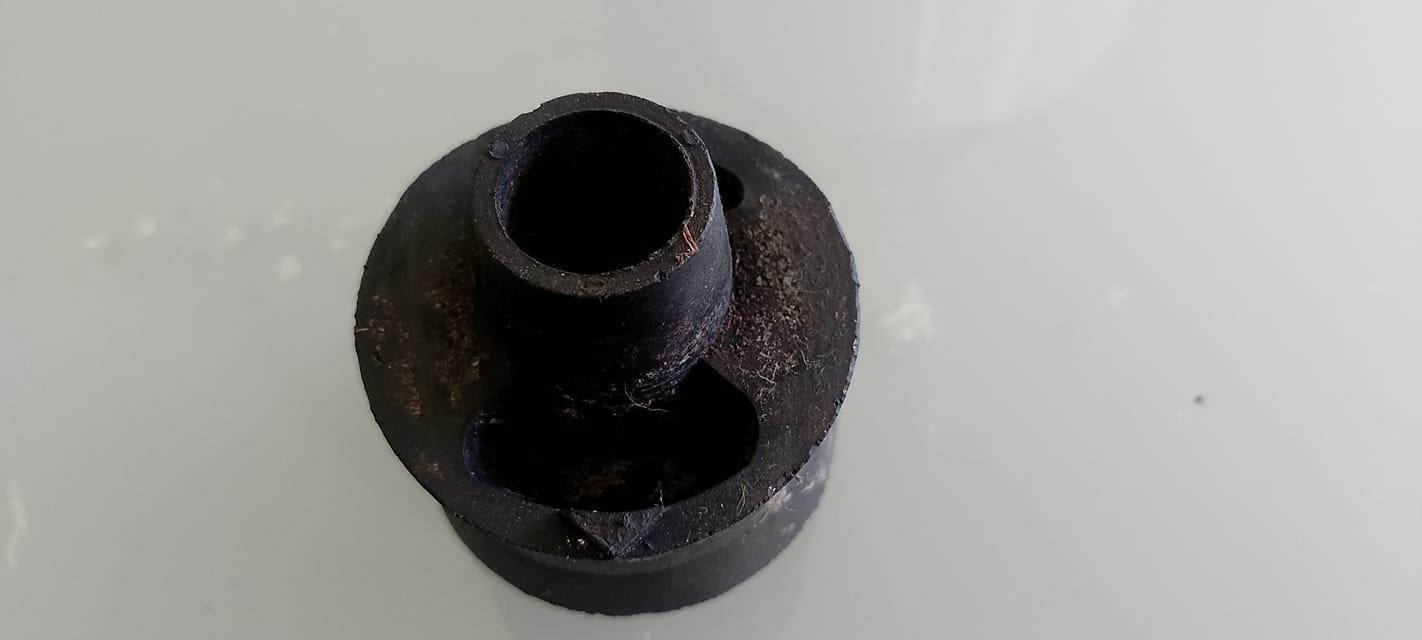
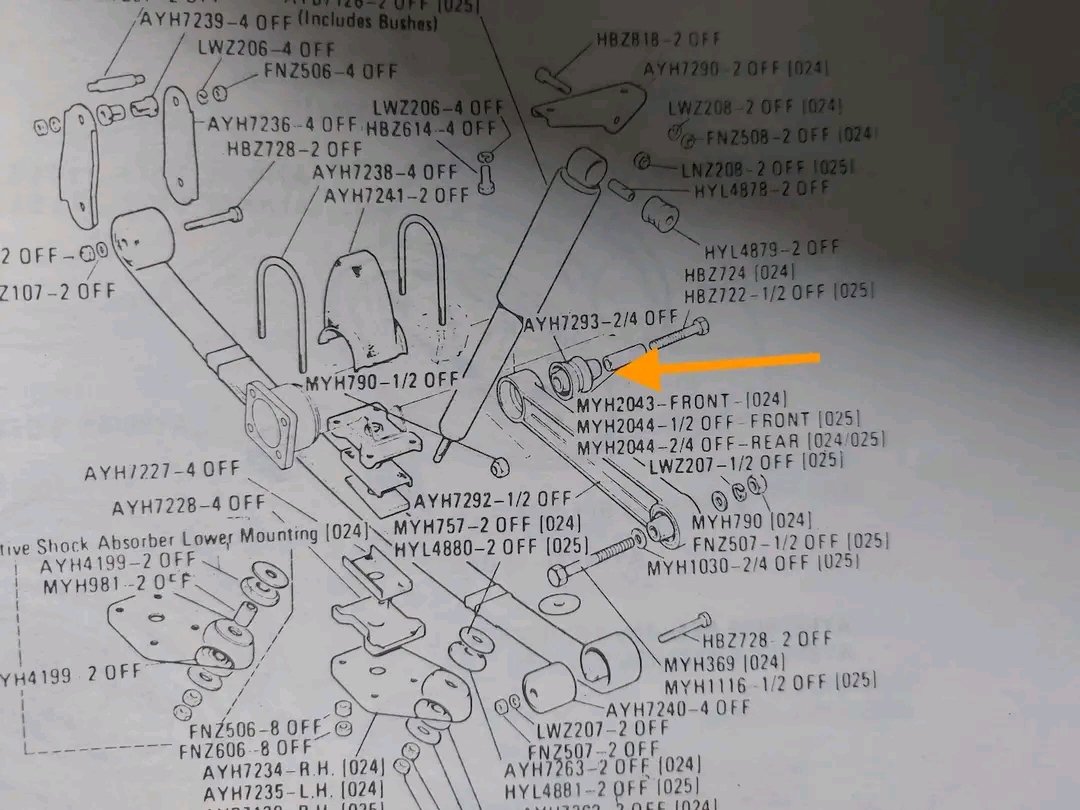
The bushes are super weird, so even pouring poly bushes probably wouldn't be the go as you need the flex or the alloy arm will break (which I need to avoid at all costs since the arm is also unobtainium) I had a guy in Aus snap some photos of the arm and new bush for me to see what I was working with. My idea was to just buy or made something like this, to the exact same length as the stock arm, but with bushes with voids in the same places as the stock bushes
-
I can't be 100% sure on the 4.6 because I haven't had one, but the crank snout differences on 3.5 and late 3.9 is all inside the timing cover due to the oil pump differences. The actual length was the same. There is a spacer to use the old pulley on a newer engine and keep belt alignment. The blocks are all the same dimensions, just with different bore and stroke.
-
So the Marina had a wof advisory that the rear axle radius arm bushes are perished and I need to replace them. Problem is they were only on Aus cars, and are straight up unobtainable. They're a weird moulded rubber bush, and the hole in the arm isn't circular (to stop the bush rotating) so I can't really press some other sort of bush in without modifying the arm. What's the go with me just replacing the arm with a custom arm (basically a rod with a standard bush on each end)? Direct replacement, not adjustable etc. either standard bushes with voids like standard, or rose joints.
-
I have a 2L one and it's fairly small, so depends what you want to use it for I guess. Mine just fits a small motorbike carb body in it
-
Sadly not. I asked the seller/son about it and he wasnt sure and with his dad gone the story was lost to time. I have the original re-rego paperwork for it, but no reason why it was dereg in the first place. The son has the original black plates, and im trying to get hold of them from him for histories sake but he's older and a bit hard to get hold of.
-
Coming back to this, I can mostly confirm this was correct. After a little driving the new bearing is significantly quieter now. Given a bit more use I think it'll go silent.
-
Thanks everyone, it does feel good to finally have gotten over that massive hurdle that's been so daunting for years. The closer I got to it being ready for a WOF check, the more scary it got. I think you might be giving me a little too much credit there @Flash. The order i've phased the work really comes down to the fact that I enjoy mechanical work and utterly loathe bodywork There is definitely something to be said for having an ugly, but drivable "rolling project" as you say. I'd be even further behind schedule had I decided to tackle more of the bodywork; the work I had to do set me back way more than expected as it was but was necessary to move forward. I've only driven it for one "for the fun of it" drive so far, since insurance isn't sorted yet, but I wanted to take my wife for a quick spin (she won't go in any of my cars until they're road legal). Starting to hear and feel things I haven't noticed before, but I'm sure there'll be plenty of small things that pop up. As we parked up for photos a mum and her kids walked by, and I heard the little boy exclaim "look at that it's so cool!" and that made me real proud. Looking forward to bolstering/being the Morris Marina showing at British Car Day, and hopefully the MGCC runs their grasskhana at Threntham again next year as I'm real keen to throw this around it
- 248 replies
-
- 14
-
-
-
Going a full circle into a Marina again. KwS's 1973 Morris Marina Coupe.
kws replied to kws's topic in Projects and Build Ups
Well, here we are, It's time to try this WOF thing again. After the string alignment, when the rain finally stopped, I took the Marina out for a quick run around the block to see how the alignment was. The steering was dead center, and it was a lot less wayward than it had been, likely due to the new bush in the steering rack. I'll call that a success. All that was left was to wait a couple of weeks for the next booking. This time I booked it with a different workshop, one that I was recommended by a friend in the local Rover club which he had good experience with, and I booked it as a Pre-WOF inspection off the bat (just in case I did need more than the 28 days to fix anything). I wanted to make a good impression, so the day before, I gave the Marina its first real wash, with suds and all. It was dirtier than it looked but it's hard to tell because of the condition of the paint. The wheels gained a bit of a shine though. The Marina did decide to play a great little prank on me though, the day before the WOF check, where it ran on only three cylinders. haha so funny. I checked spark, all good. It didn't clean up when revved, and barely idled. I was starting to get a bit concerned, and then decided to check the carb and noticed the choke jet was out despite the handle being all the way in; the jet had stuck and the carb was over fuelling. I lightly touched it and it snapped back into place and suddenly the engine smoothed out and ran beautifully, as expected. Phew. It stuck again the next morning, so I'll need to sort that out. Yesterday morning, with my wife in the Leaf in tow (two polar opposites of transportation), I drove the Marina the furthest it's been in my ownership and dropped it off at the workshop. Other than once again passing a police officer on the way there, and my wife alerting me to an iffy connection on one of my brake lights (which a quick jiggle of the bulb holder cured), the drive went well. Straight off the bat I got way better vibes from these guys about the Marina, having had a quick chat with the guy there who expressed his interest and enthusiasm towards the car. It makes a big difference when the people you choose to work on your special project actually care about it. There was no waiting around for it this time, and since they were busy I wasn't going to get the car back until the afternoon, so I jumped in the Leaf and after some breakfast and errands, I spent the rest of the day trying to distract myself whilst anxiously waiting for the call. Late in the afternoon the call comes through "your car is all done and ready for collection". Vague. We jump in the Leaf again and shoot down there. As we roll into the carpark, the Marina is just parked out front, looking awesome. As we turn to park next to it I notice something and just about jump out of my skin. There is a sticker on the windscreen. I go in and sure enough, we've done it. After almost 29 years to the day, the Marina has a fresh new WOF on it. All the hard work finally paid off. Soon to be updated The guy from earlier came over and complimented the car, saying how good it was and how good it looked underneath, and wishing me some good cruising over summer. He also clarified a note on the WOF sheet for me, that the bushes on the rear axle reaction arm are perished and will need to be replaced, but that needs to be done before the next WOF. Other than that, we were all good to go. Some strategic tape to cover the gap in the seal, since it was meant to rain. New seal to be fitted. I jumped in, the old girl fired up first turn of the key and off we went. As it's not insured yet, it went straight back into the garage for now. We quickly popped to VTNZ before they closed and renewed the rego, which has been on hold for as long as it has not had a WOF. I was 7 years old when this car was last on the road. It hasn't been on the road for longer than some of my colleagues have been alive. But here it is, back on the road again and ready to do some summer cruising. It's been saved from an uncertain fate where it could've been stripped for parts, chopped up or scrapped. A lot of people wouldn't have bothered to do the work it needed, but back in 2021 when I bought the car, I promised the seller I would get his dads old car back on the road. For a couple of years now I've been holding on to a little treat for the car (and myself), only allowing it to be fitted once the car is road-legal. That time has come. Off came the stock wheel, which is badly cracking and doesn't feel great to hold The boss kit needed a couple of pins for the indicator cancelling fitted, and then it was fitted to the column And my steering wheel of choice was fitted. It's been so long that I can't recall the size now, it's a nice black leather Mountney wheel. Compared to the original wheel it is slightly smaller, but so much thicker And it feels great in the hand It won't be to everyone's tastes, and I couldn't care less. I like it. I wouldn't be a British car owner without some self-deprecating humour too A huge thank you goes out to everyone who has followed along, all the comments and support, and to the people that have helped out with knowledge/advice and parts when needed. There is still plenty to do to it, and it'll have some money spent on upgrades soon, now that it's proven it can get through a WOF. For now though, once the insurance is sorted, I just want to get some Ks on it, give it a shakedown and see what happens.- 80 replies
-
- 48
-
-