azzurro
-
Posts
2,873 -
Joined
-
Last visited
-
Days Won
4
Everything posted by azzurro
-
It 'chelates' it as adoom says, which in practice means the rust pretty much just falls off with the hose after soaking for a while leaving clean metal. You can then dip it and let it air dry on the thing as a weak antiflash too, but needs rinsing off before paint. Also old containers are on spesh (all gone where i saw it) as crc seems to have bought it out and are now advertising it on telly in a new label
-
Evaporust is legitimately magic and you can reuse it.
-

Dunedin/Otago meet up and cruise Sunday 12 December 2021
azzurro replied to vivaspeed's topic in South Island Region
Keen! I think Peter Johnstone Park is in Mosgiel? @nzstato? -
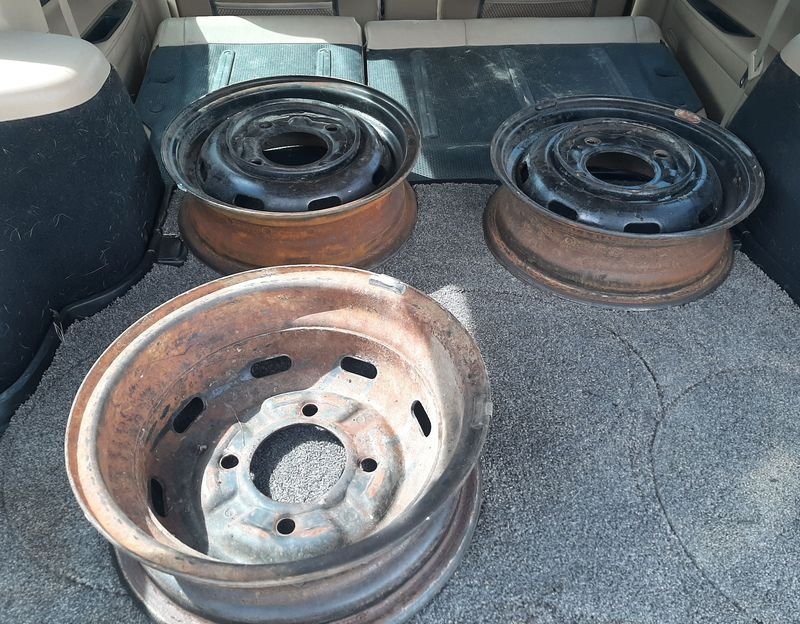
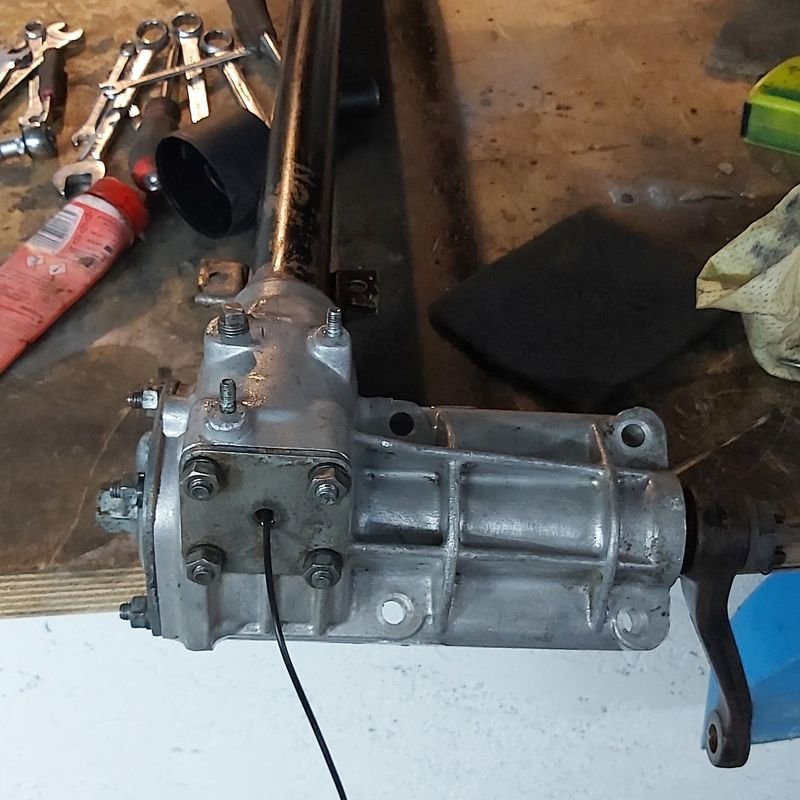
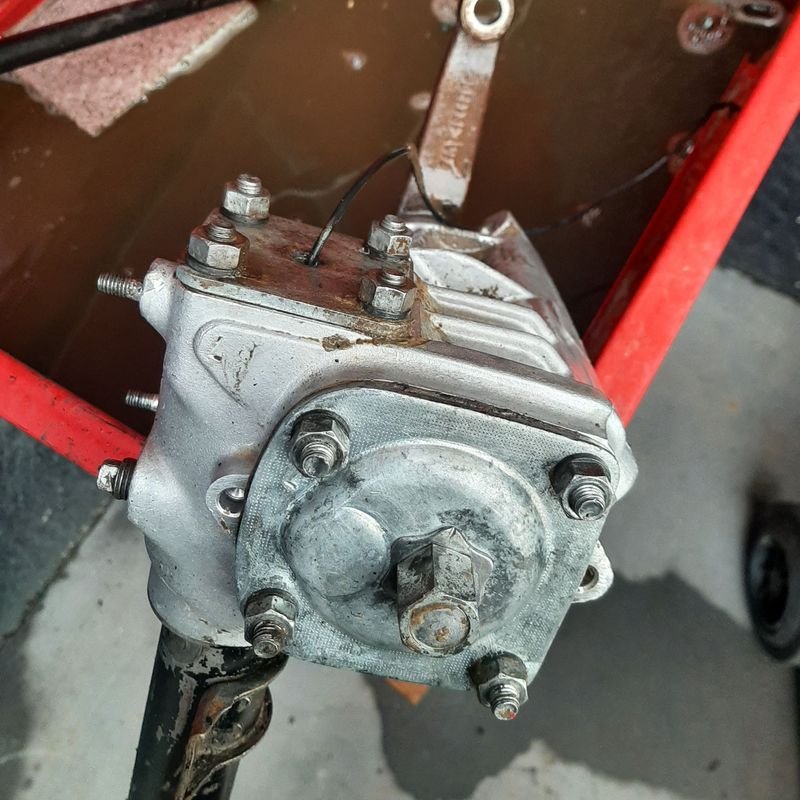
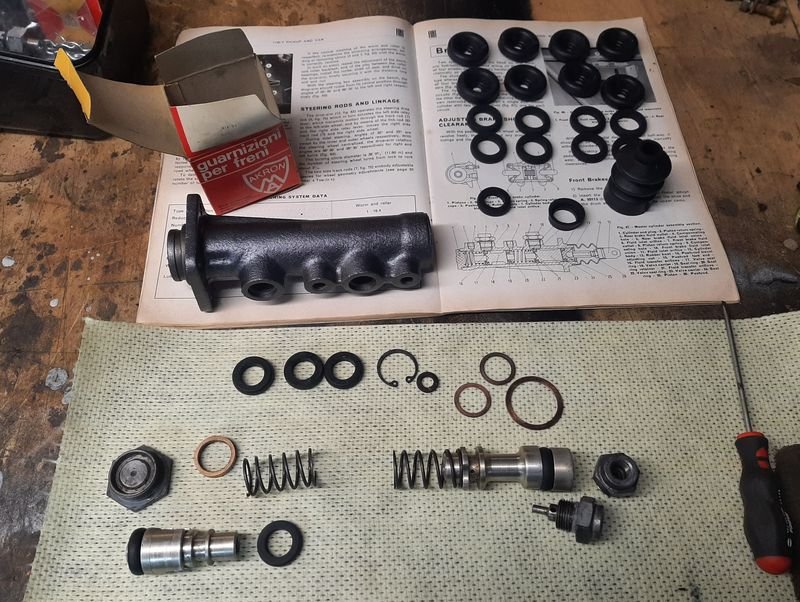
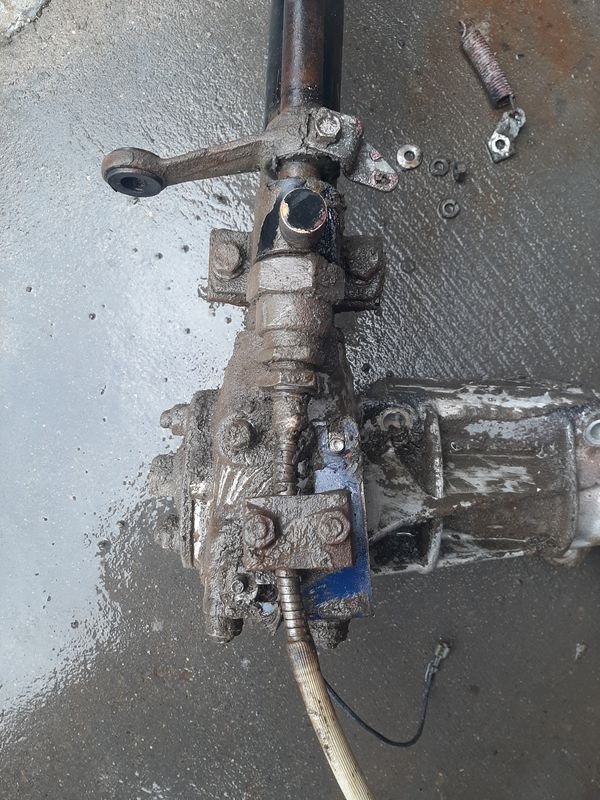
Spent some money on stuff Master cylinder bored and resleeved with a new stainless sleeve Got to unbox my nice NOS rebuild kit - the master is different (later?) from the books one, but lucky i took lots of photos when i disassembled it! Got some paint mixed up from my swatch, chose the closest swatch they had in their book. Looking forward to wafting some around next year sometime. Future reference Nason Ful-Thane 2K Urethane, Spectro #030 Got the rims stripped, and dropped them off to the blasters. Got a set of pretty much new 195 R14C for $100 of FBM to go on them once i get them resprayed. Unsure on black like factory or the new body colour? And pulled the last main component off, the steering shaft/box. it was utterly minging. But came up pretty good! Horn wire runs right though the hollow steering shaft from the wheel and out the bottom of the box. - i thought it may have been leaking though the hole but it turns out the bottom plate has a pipe on it that goes above the level of the cast housing. Genius but total madness at the same time. Pretty sure the source of the grimness is the pitman arm seal leaking, and maybe the adjustment nut too. It smells like its been (re)filled with gear oil which is too thin. I cant get the pitman arm off with any of the pullers i have to change the seal so ill use a mix of grease to fill the shaft up with and and a wee bit of moreys for sticking too and thining the grease around the gears when i refill it like i have on all the other cars steering boxes so it shouldnt leak (as much) Steering shaft carries the column shift as well, this is the housing which was factory painted but i think ill leave it raw Ol' Mate Jay at Daily Coffee has this pic up on the wall. The big vans are Alfa Romeo Romeo's but the little ones im not sure, might be coachbuilt Fiat Multiplas?

- 64 replies
-
- 28
-

-
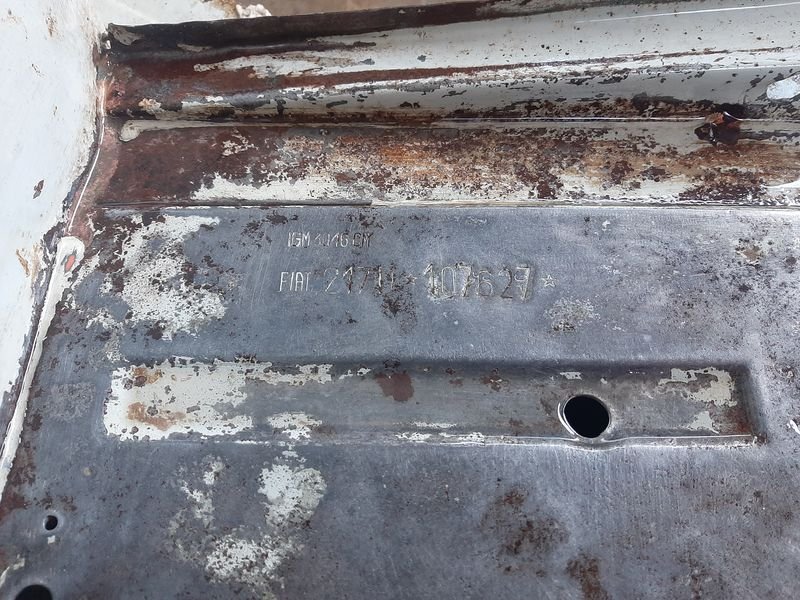
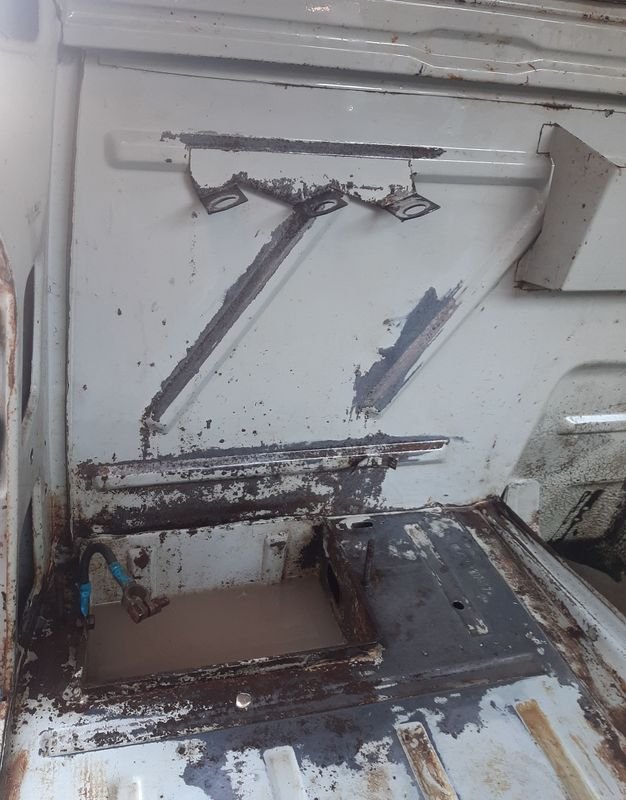
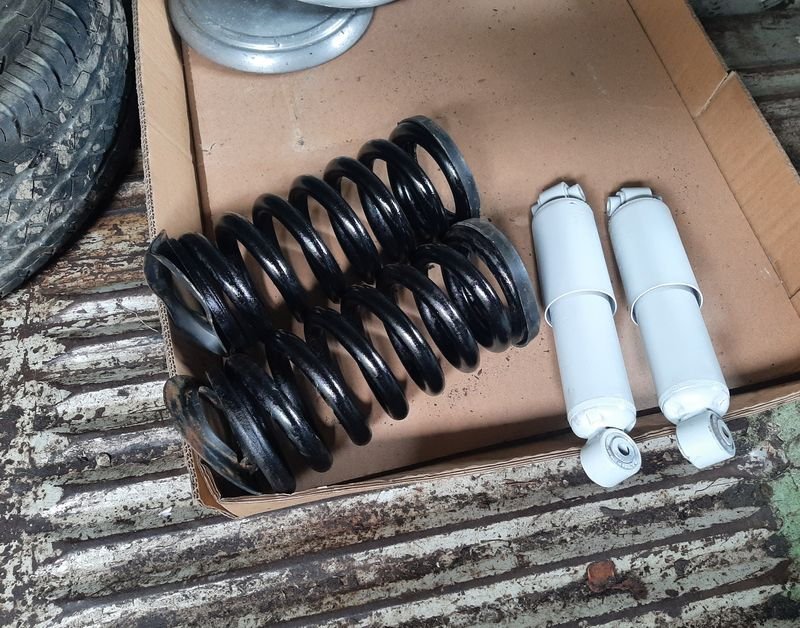
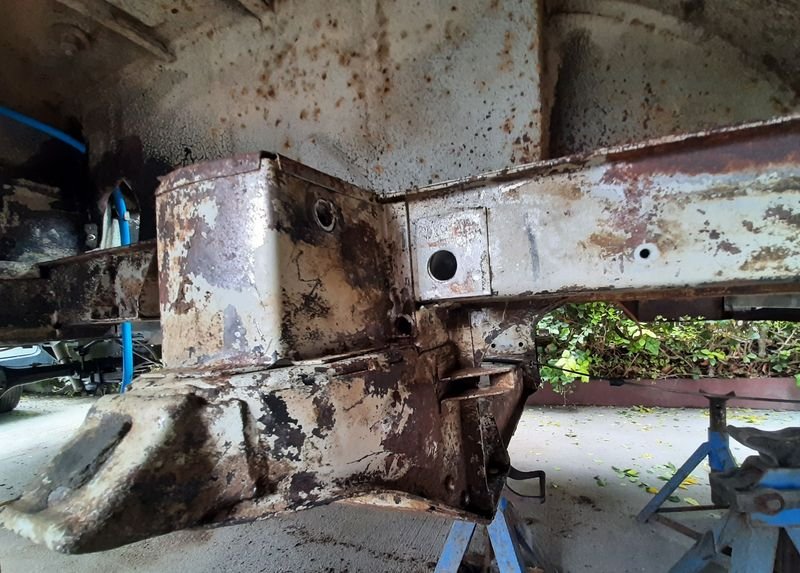
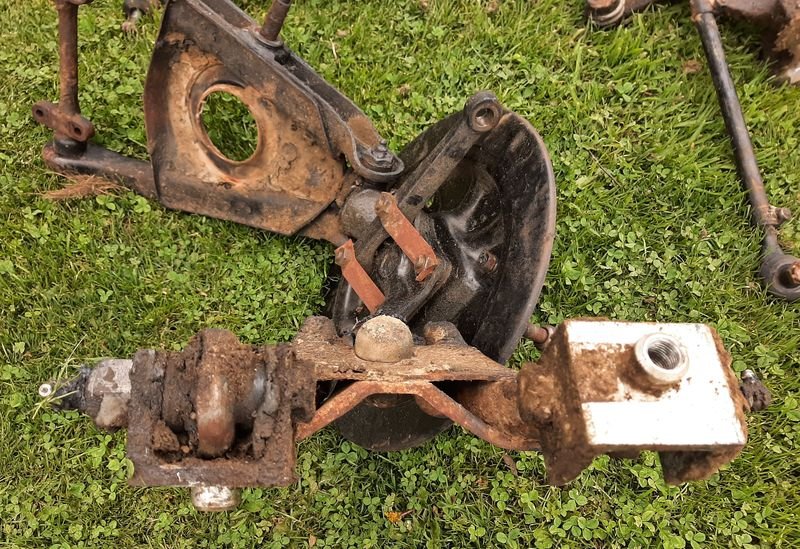
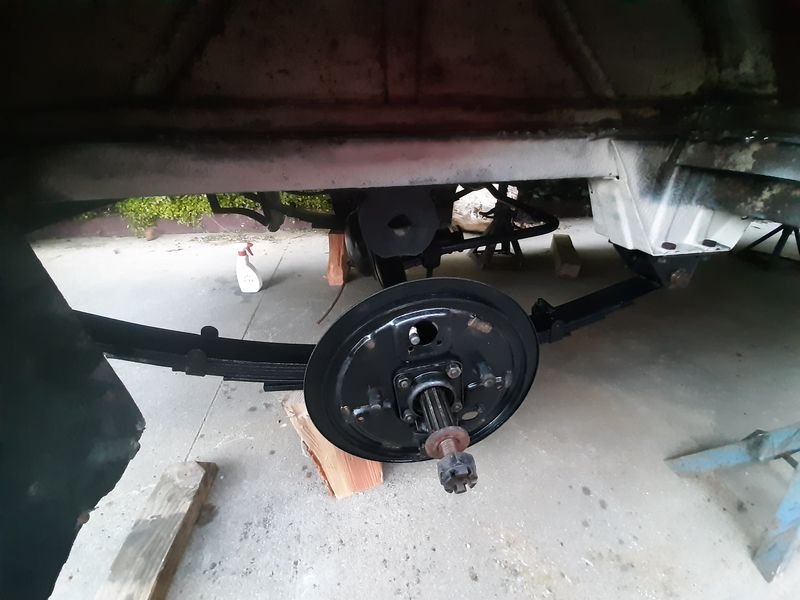
More cleaning and painting of the front suspension which is cleaning up very nice. No real wear or damage. Shocks and springs. Shocks do need replacing but not today satan, not today... They are short stubby bastards too, my stash of Nissan e2x series van front shocks are too long and they are pretty short by modern standards Steering arms all come out lovely, fresh grease and ready to go back on Hubs and kingpins, spiders and tierods. Need some replacement tie rod boots (available from ladapower - the tie rods themselves are also hared with lada/125/2300 too) but otherwise everything is good to go. Engine Cover got a quick rub down and some gloss black May put a coat of satin on it to tone down the obviousness of my lazy prep Ive also been removing all the lines and wires so i can roughly paint and protect where new/restored/cleaned stuff will bolt back on. The 3 reservoirs (front & rear brake and clutch) live on the cargo barrier behind the driver seat above the battery compartment, so this corner was pretty crusty looking. I hit it with the sander after doing the engine lid and sprayed some phosphoric acid on it and it come up great. this is just the first go. VIN number is in this corner too, so I'm very glad all the rust is light and just seems to be from where brake fluid, battery acid mist and rat piss was just sitting and pretty much wipes off after a soaking with the phosphoric. IGM 3046OM FIAT 217D *107627*
- 64 replies
-
- 18
-
-
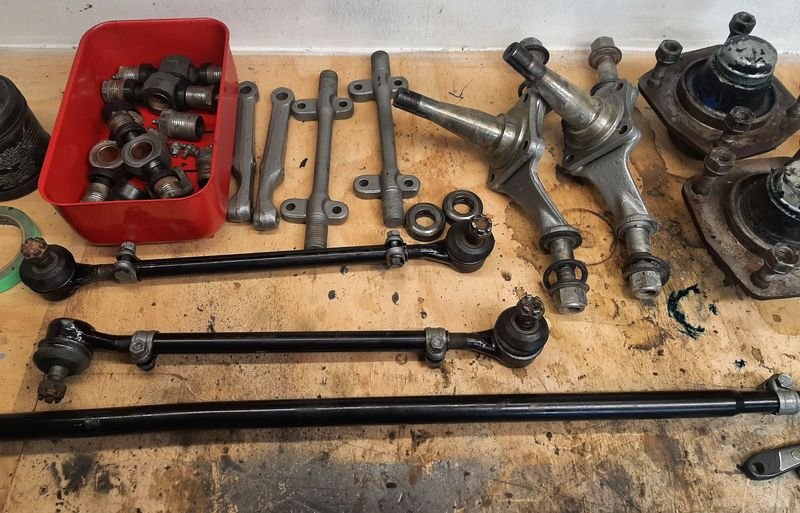
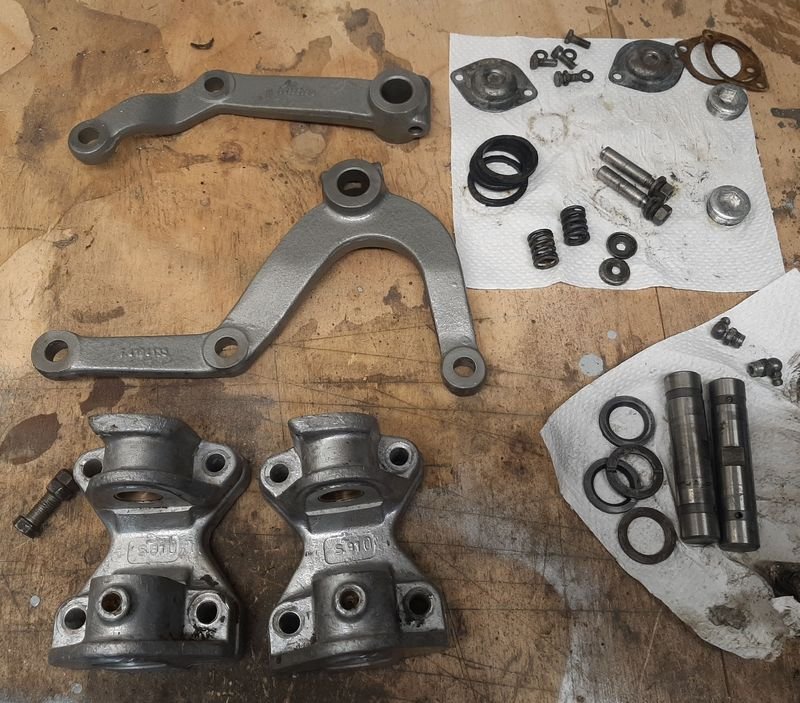
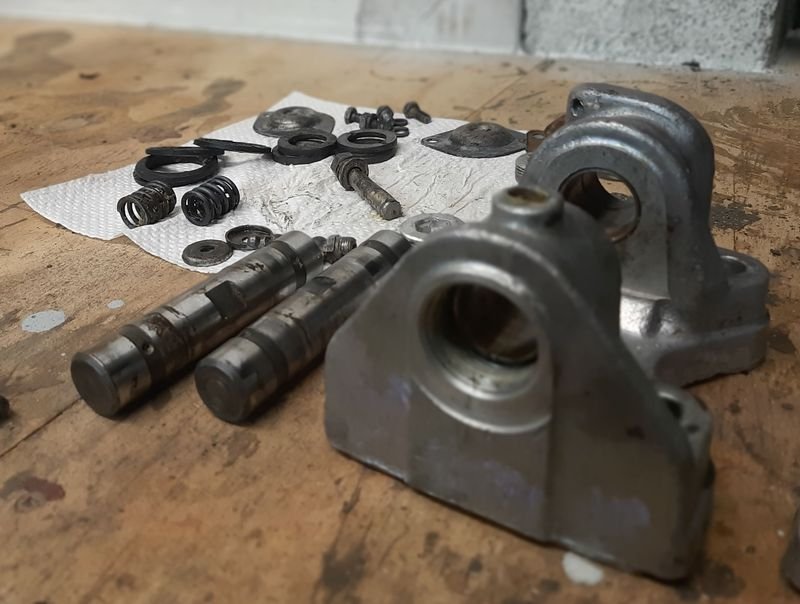
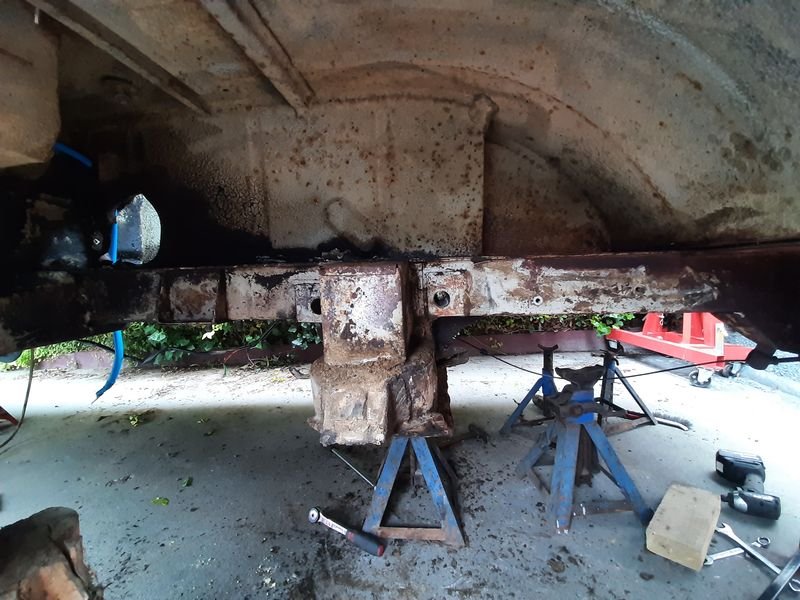
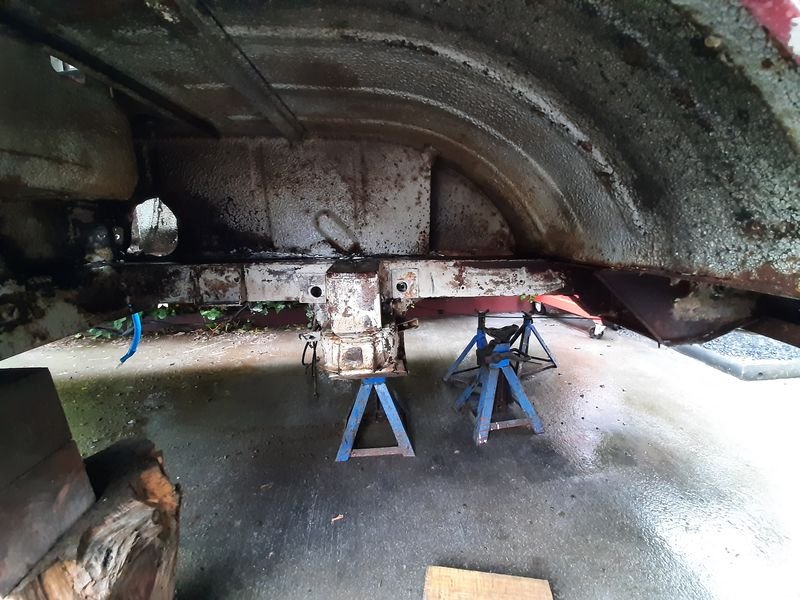
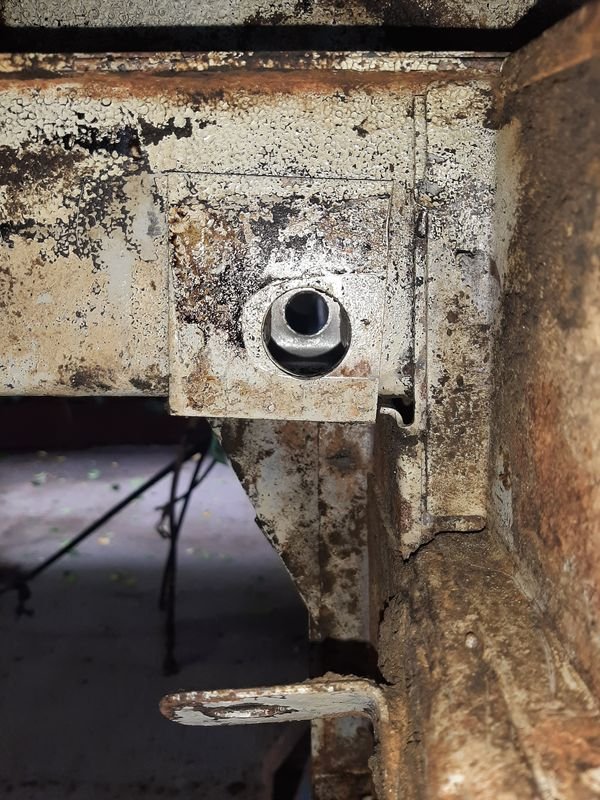
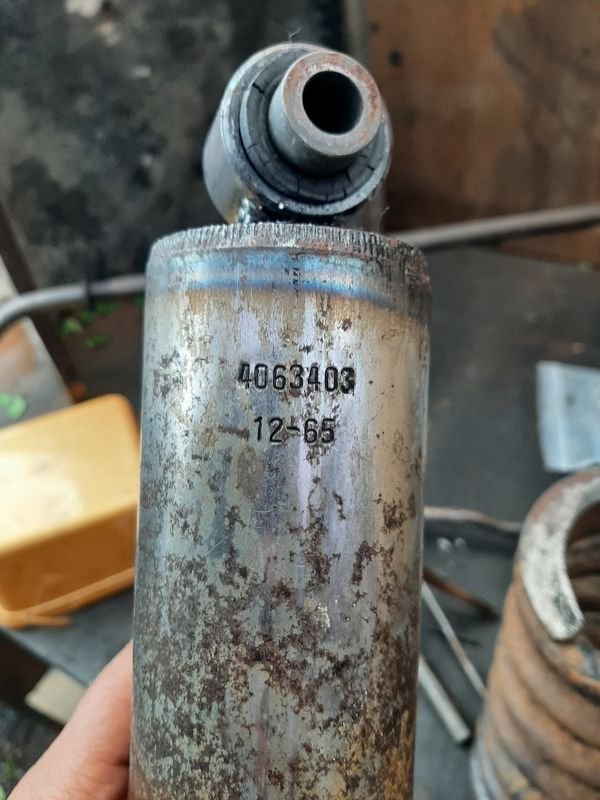
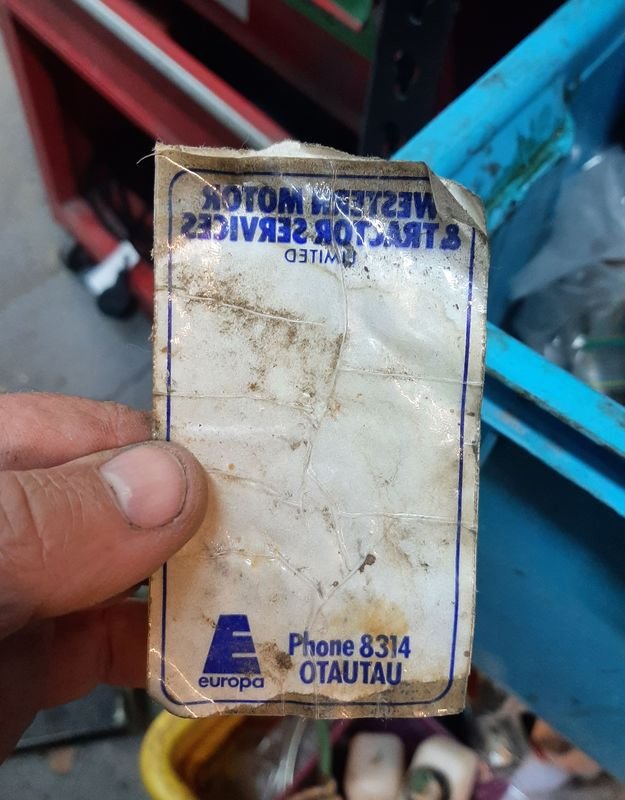
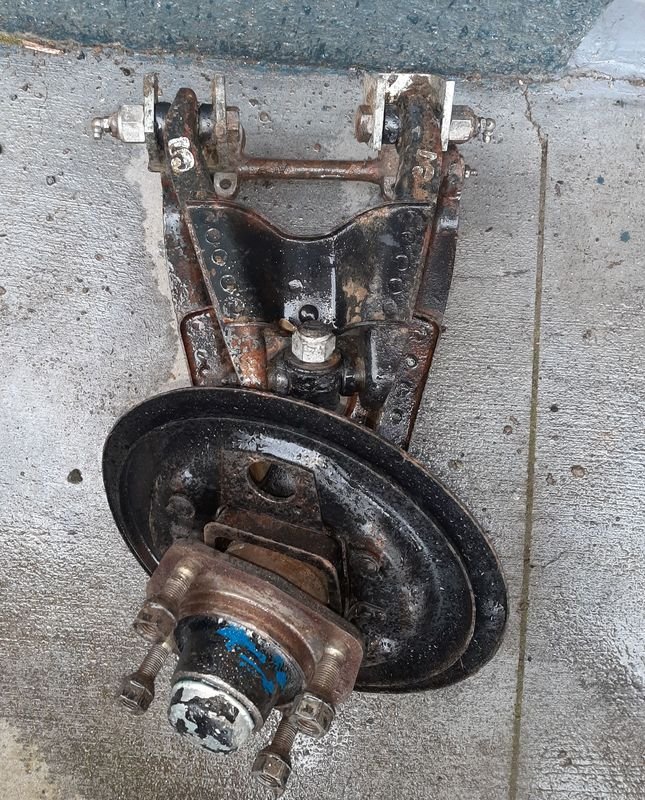
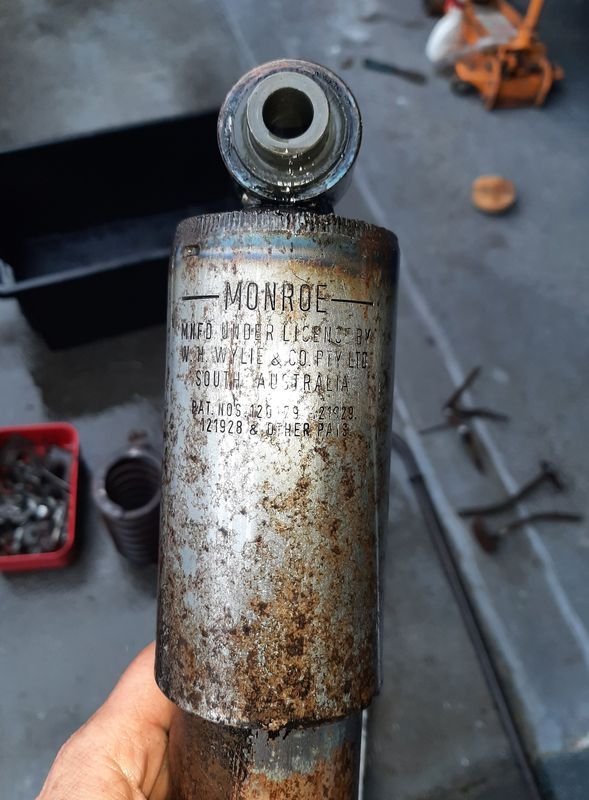
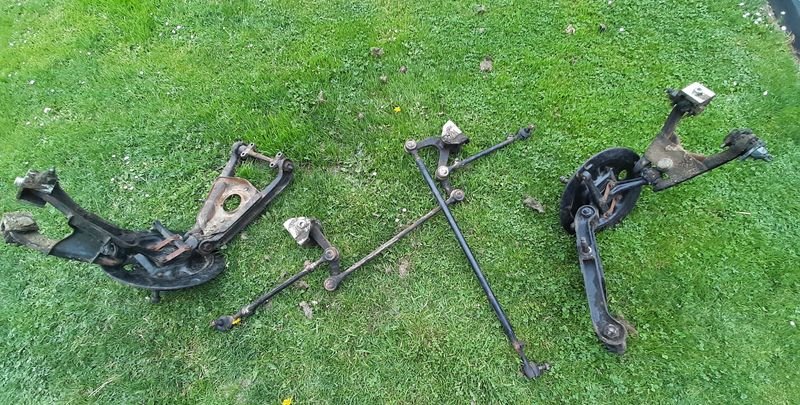
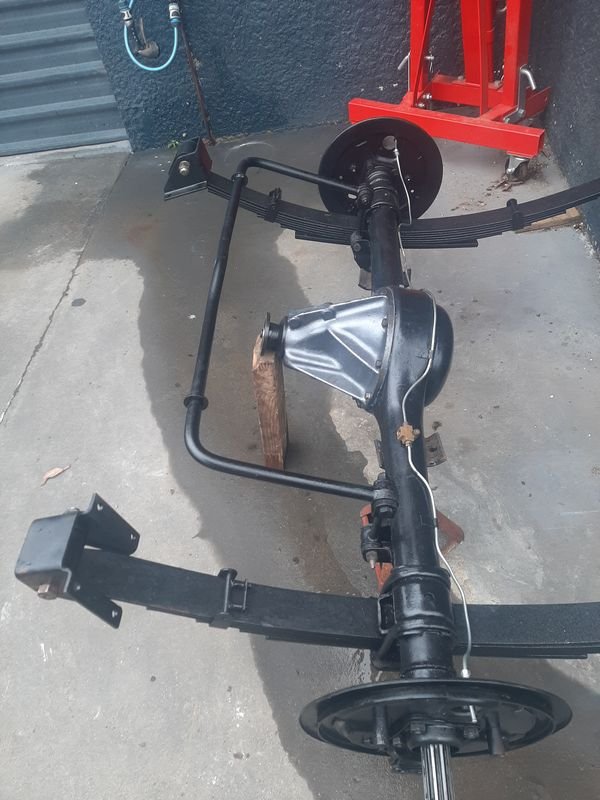
With the rear suspension done, and reinstalled the handbrake cable, i started to unpick the front end. I want to clean all the greasy dirt that is still caked on everything (and has actually done pretty well at preserving stuff) and then i can clean, paint, regrease and reassemble. Im very pleased to say, the rust is all on the 'outside' of the van in the panels, and not the chassis structure. Took all the brakelines off first, including the lines from the reservoirs (they are up behind the drivers seat) to make later, they all unscrewed easy. I didnt have the right spring compressor so just used the jack under the lower control arm but i think ill need one for putting it back together! Some before and afters Drivers side after dropping the wishbones out, and then after a scrape and waterblast Same area immediately after dropping the suspension and after a scrape and a waterblast. The light brown is a mix of oil, grease and road dust that is anything from 1mm to 20mm thick. Usually clean paint or metal under it, so could be worse! Only surface rust really is where the greasy smeg wasnt - a lot of cleany shiny metal where the paint came off with the waterblaster. This pic show where one of the main bolts comes thought, the inside of the rail is minty mint mint The two wishbone assemblies and the steering rack. ALL of the tie rod ends! One of the suspension assemblies, give a good idea of the crust on everything. Ive water blasted under the van about 10 times. After a clean, still has factory (?) shim count stamps . I got some new CRC degreaser for the parts washer, stuff is magic, seems to have a slight derusting action too. The gear change linkages came lovely, and have no discernable wear which is another sign of low milage Pretty sure these would have been factory fitted (CKD built by Torino Motors in Otahuhu), but cant believe how clean they came up! Pretty sure thats a manufacturing date stamp, which also makes me think this van is also a later (66 on) one. I re-found this service sticker that was in the cubby in the van that i thought id lost put somewhere for safekeeping . Along with the Kelso address painted on the Hubcaps, I reckon she is a Southland Van Place is still going Im going to get some paint made up soon (i have lost my paint swatch) so i can make a start respraying the shock mounts and engine bay etc before bolting everything back in. Still a lot of cleaning and stuff to do first. Head is off at the machine shop getting looked at, and i have the rims in the back of the daily to get the tyres stripped and then off to the sandblaster, so progress is continuing.
- 64 replies
-
- 32
-
-
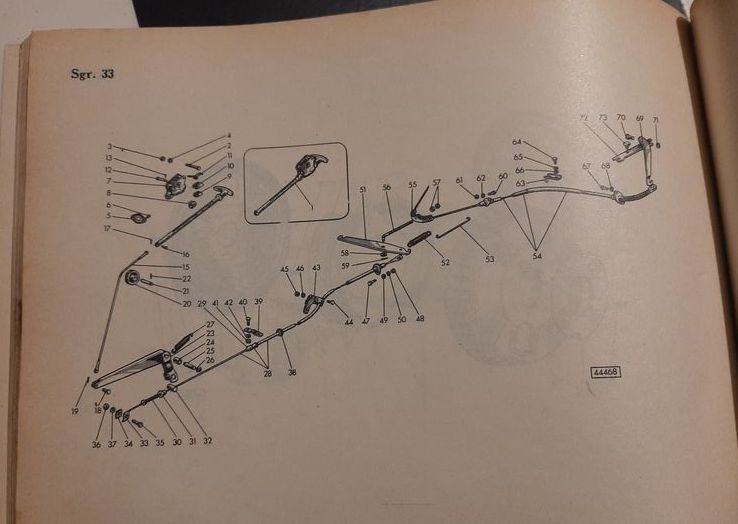
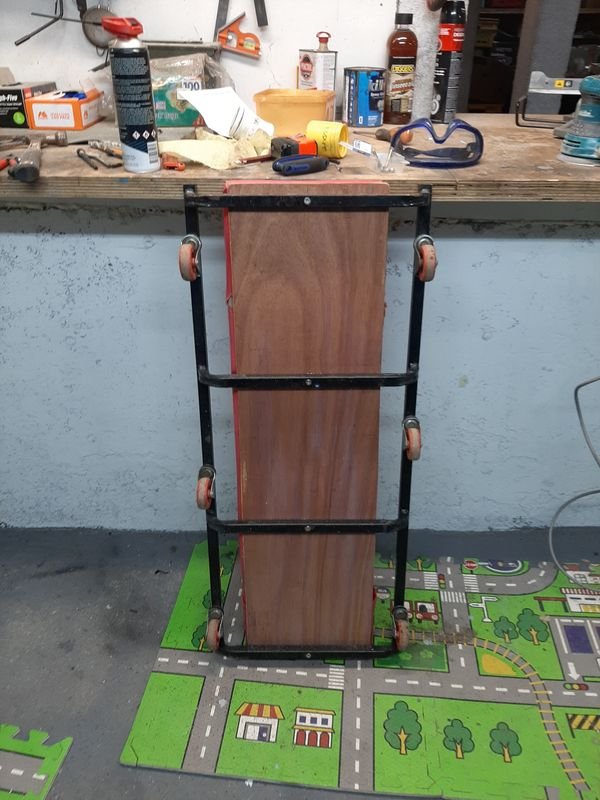
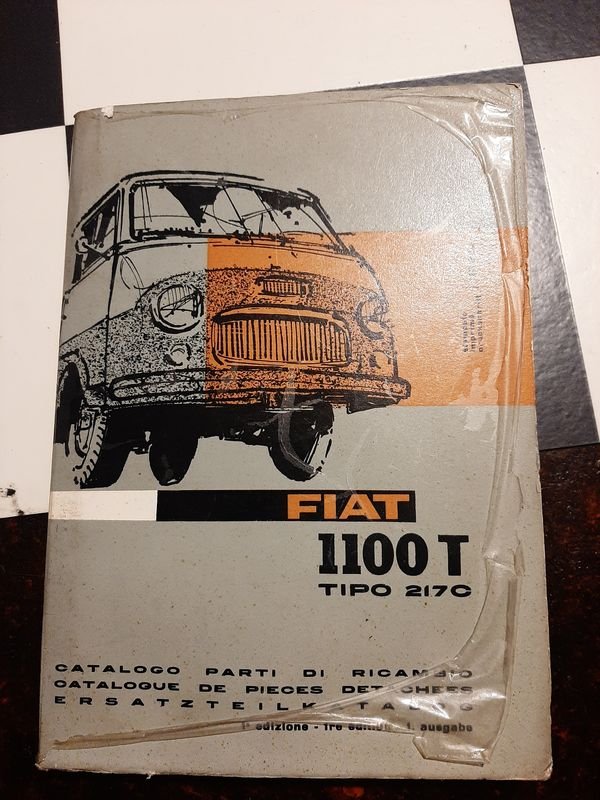
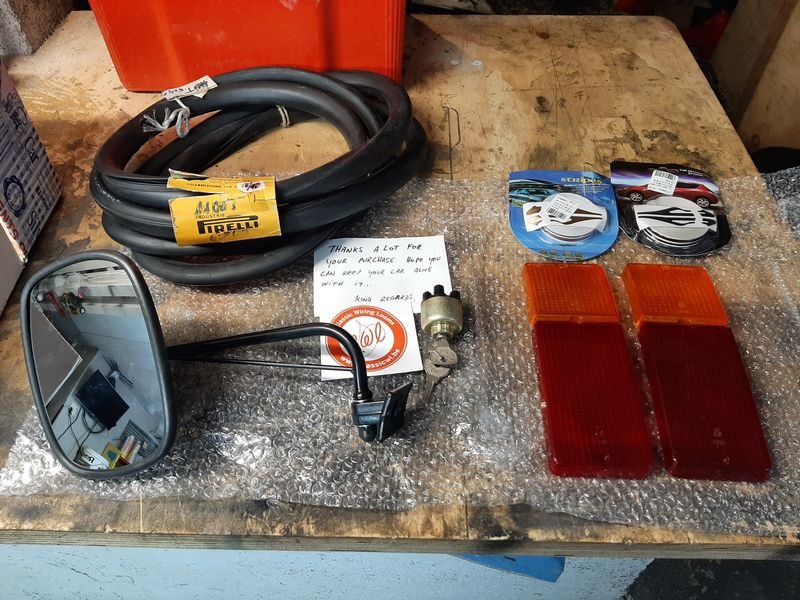
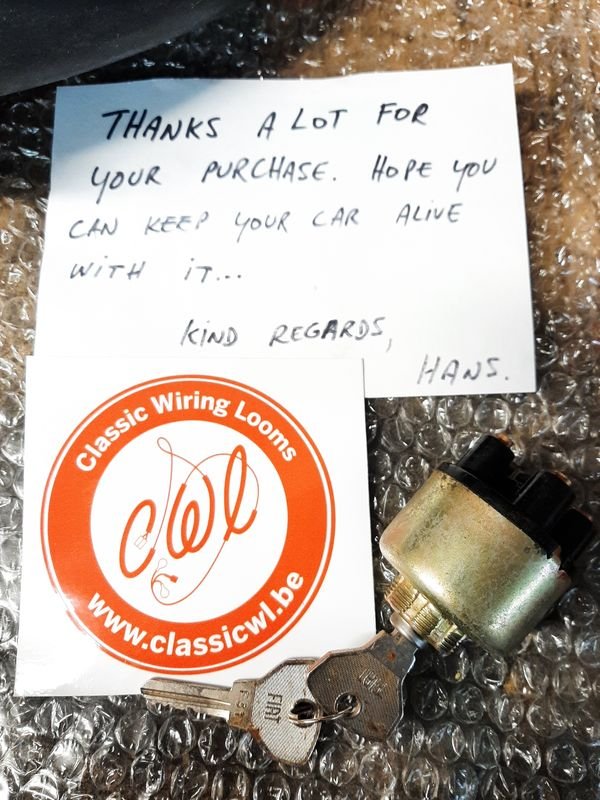
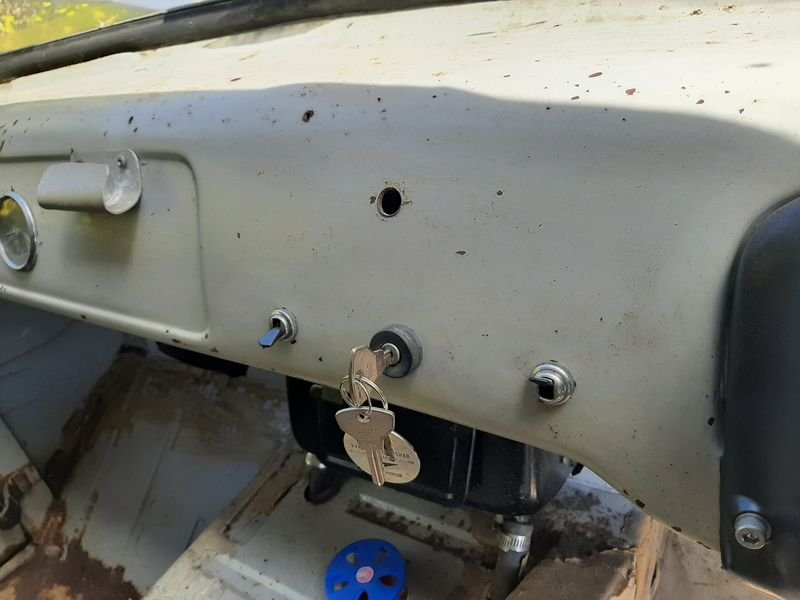
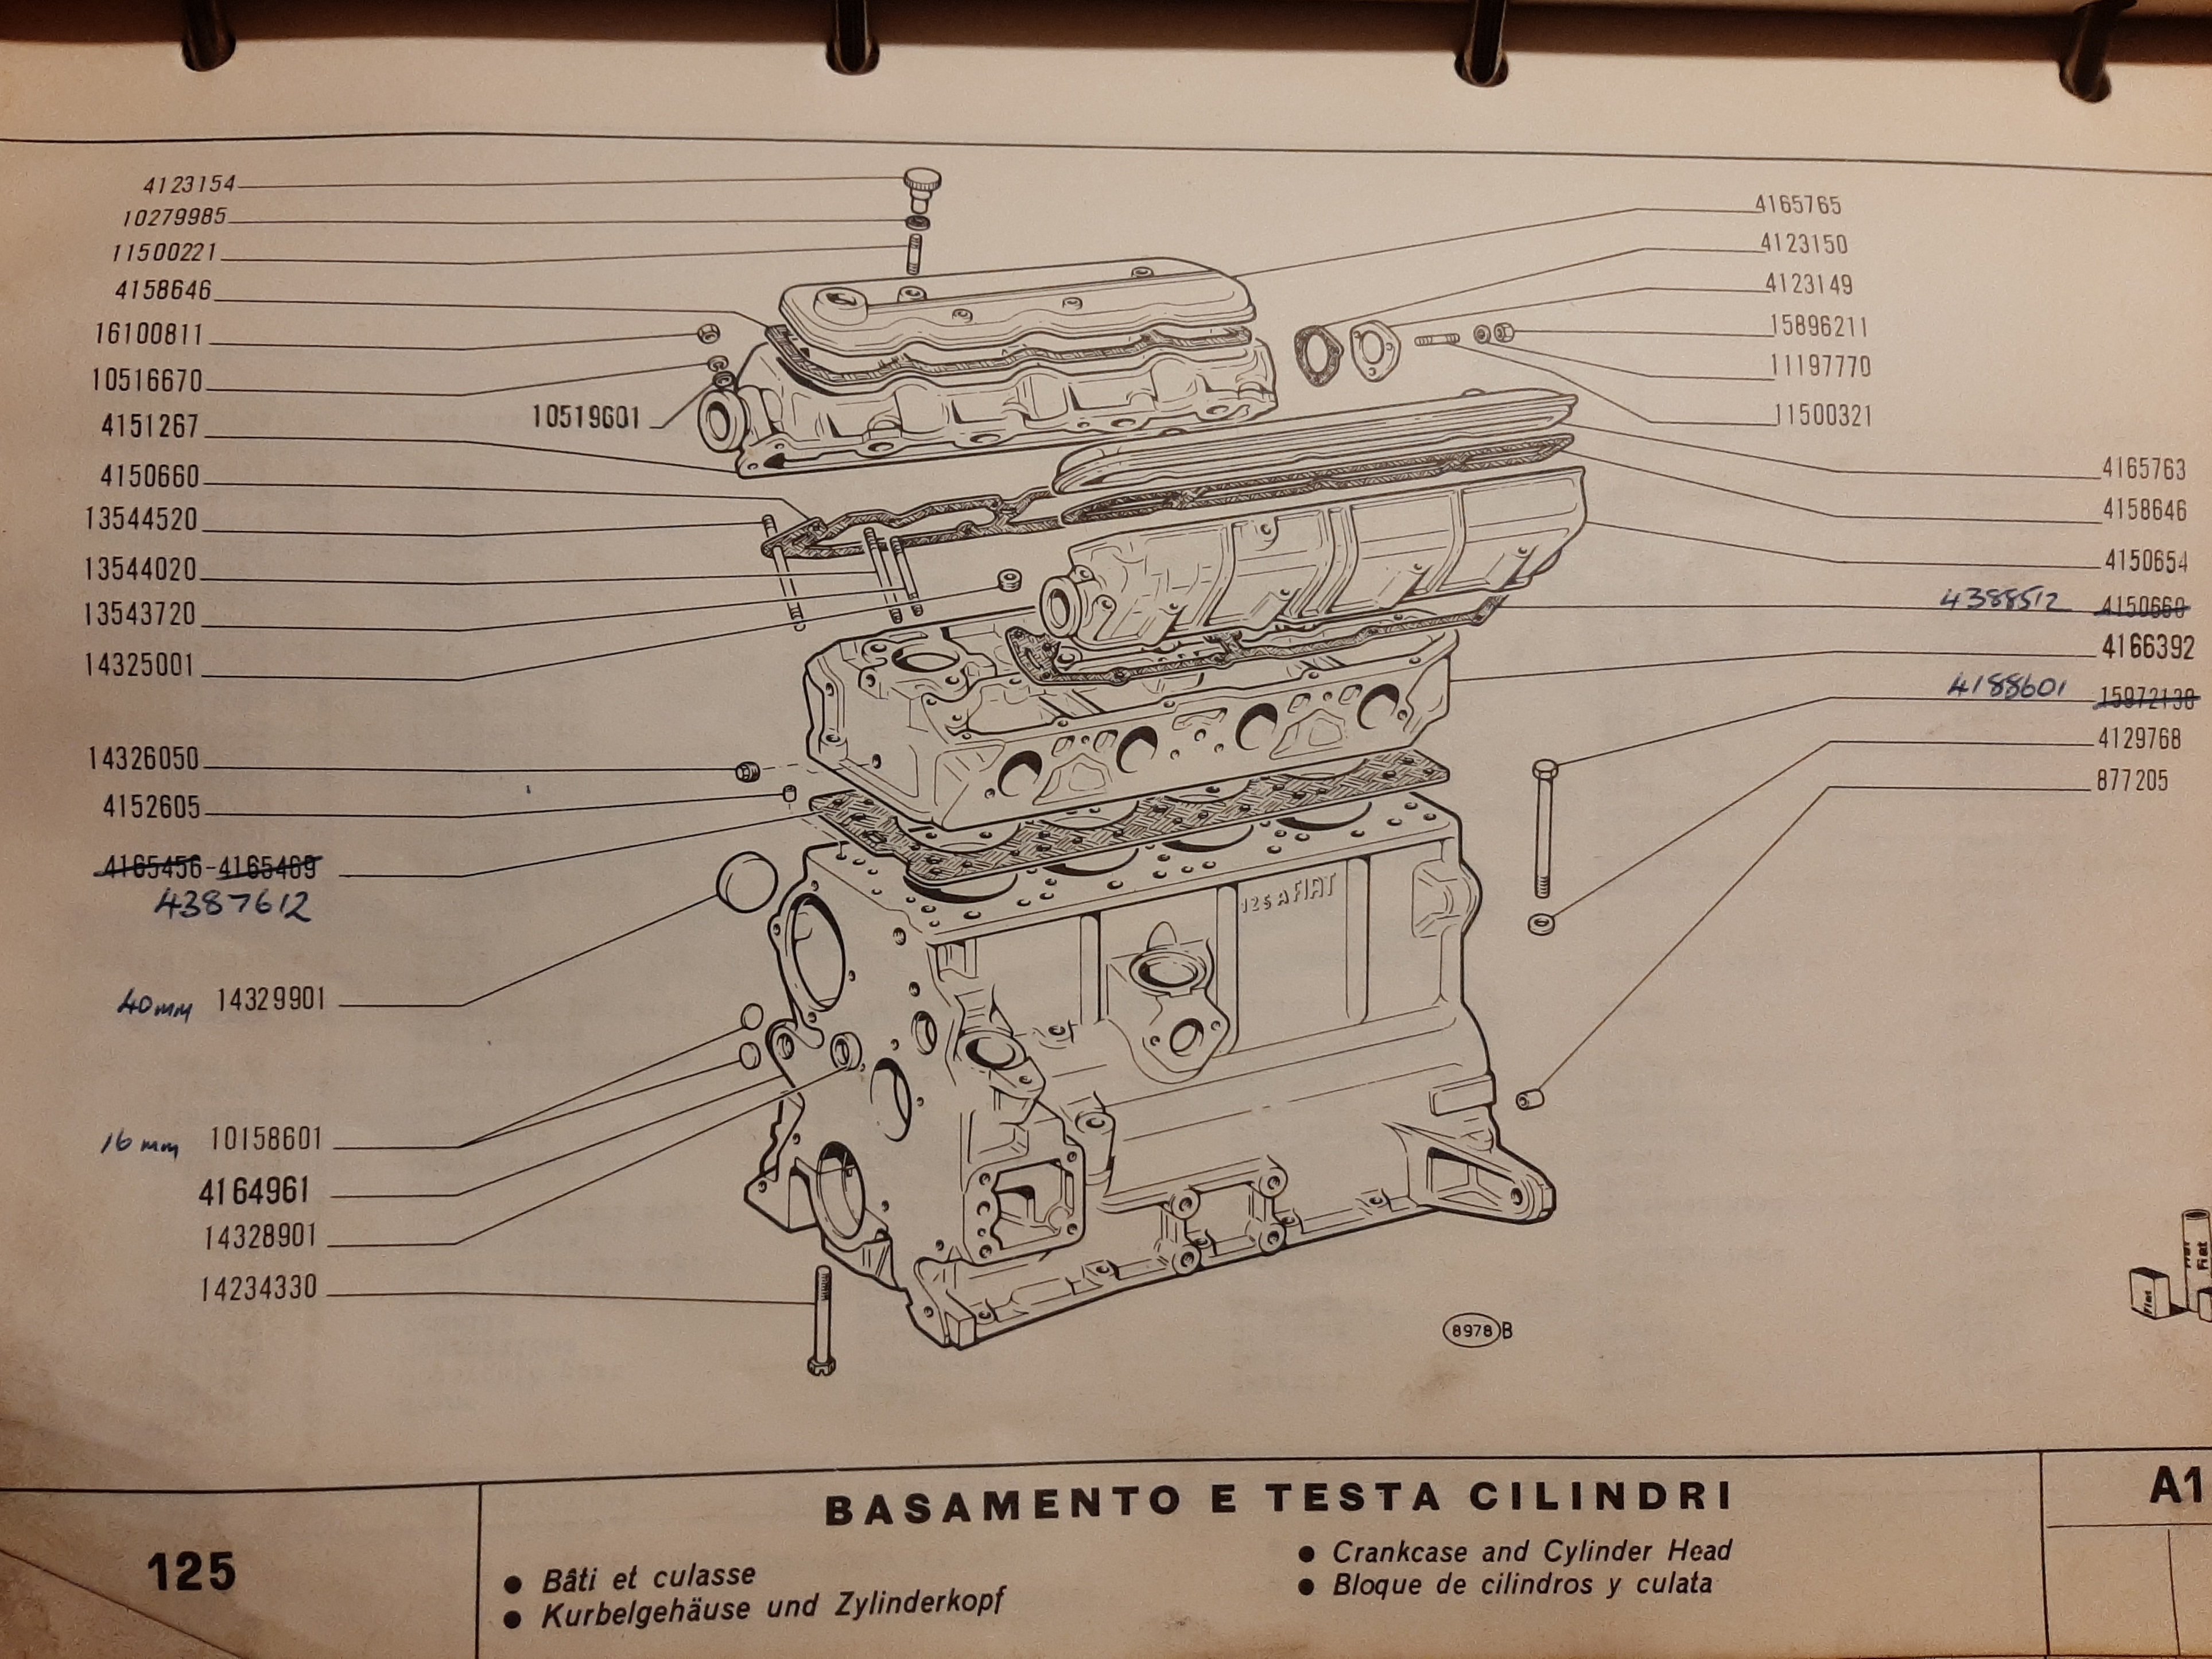
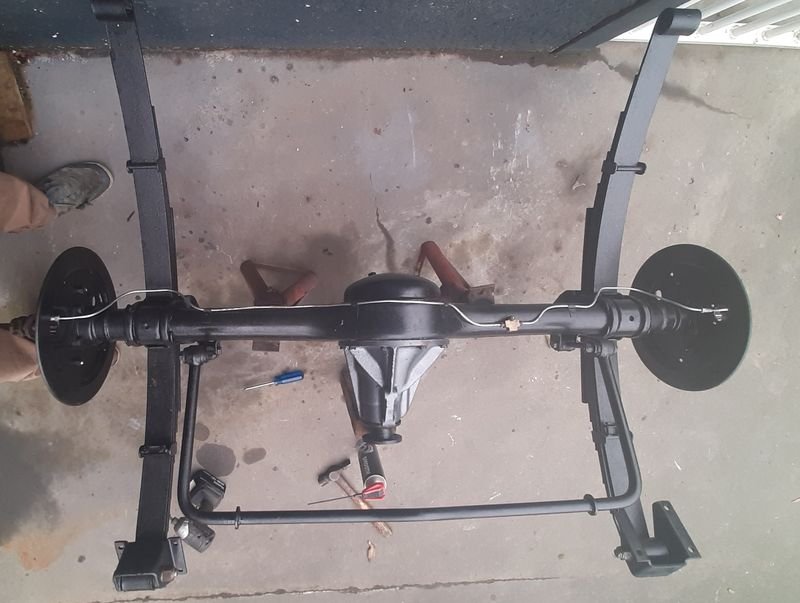
Chucked the diff back in a while back, fresh black makes everything else look worse. Had a bit of a splurge on ebay, got a NOS Pirelli windscreen rubber, which means i can cut the old one off eventually a NOS Sipea ignition switch a replacement (not NOS but made in Italy) passenger side mirror some NOS tail lights lenses for the 125p ute Ignition switch came with a nice note Thanks Hans, Installed, so van finally has some keys Also got this parts catalogue, good for practicing the italian, french and german But full of great diagrams like this, which has already proved invaluable taking a few things apart, and putting them back together. Also broke my crawler with the diff so that got new base wood - used some random ply that would result in the least waste - tuned out fancy!
- 64 replies
-
- 14
-
-
Dunedin/Otago meet up and cruise Sunday 12 December 2021
azzurro replied to vivaspeed's topic in South Island Region
No no no, bring the trailer -
125s had the early twin cams (14xx cc and 1608cc) had thermostat in the head (cortina is the same part no) and a single exit housing and pretty standard hose routing, that 3 way thermostat is for the later twincams (124bc on, 131, 132, and ladas etc) that have a 'T' or two way housing and slightly strange hose routing as a result Either system works fine but you only need the one
-
But seriously, some sort of expansion tool might be needed cause getting those fuckers in without an easy swing with a good hammer is a real trick - dont reckon opening the hole out is a good idea either, future you/owners will be cursing that plug that doesnt for ever.
-
dont worry, wont be flat when you finished pushing it with abolt or making room for the back swing on the persuader Have you considered a crane? Jb weld? 10 propellors? 2ZZ? Newtech and newspaper? fresh underseal with dirt in it? lower it more? Turbo 6 falcon? Turbos with eagers? more jandal? Have we found an edge case scenario where the OS standard answers do not apply, thereby proving they are in fact fundamental laws of the universe by exception?
- 32 replies
-
- 11
-
-

-

-
heh, tell me about obscure nissan commercial radiators Also, this is my family crest (seriously)
- 86 replies
-
- 11
-
-
-
Chur, tis cool for sure but, thats the later '68 on model, 'twins' Type 238 (Fwd)/ Type 241 (Rwd) both with either a 1500 petrol, or 1900 diesel. Some drive line/brake parts cross over to my Type 217, which has helped. Im pretty sure that one is a 238.
-
That tank looks fine to me, but im broken. Id just run it as is with a new inline filter or 2.
-
You have the sickness. Nice Found Itin Another Territory
-
Dunedin/Otago meet up and cruise Sunday 12 December 2021
azzurro replied to vivaspeed's topic in South Island Region
All of those are good - plenty of interesting driving on the peninsular - out to Allans etc. Mrs was keen to take the Wagon up the Pig Root to the big opshop in Ranfurly one time in summer, but that may be a bit far for a convoy, it is a nice driveing road. Also agree we should assemble for a guard of dishonour/bring parts/snags for the shitbox rally -
Dunedin/Otago meet up and cruise Sunday 12 December 2021
azzurro replied to vivaspeed's topic in South Island Region
Keen as! @kiwi808 is in central i think? -
@doullama, @ul9601 is right, you need special shouldered bolts for the Wards. Can measure mine if you want, but you may need to 'make' some from shouldered nuts, and high tensile bolts with the head cut off and a blob of weld or loctite to hold them together as they are very hard to find new (ebay?) let alone second hand. I also have plastic hub rings on mine too and that tidied up a lot of the 'wheel balance' shake i had before.
-
Would add Euro-Italian Car Parts in Albany to your list - Gavin is a top bloke and sometimes puts lollies in the courier packet. Mal has sold Dino Enterprises, have not bought anything from the new guy yet, other than letting him know i had a new project (1100T) and if he had ANY bits that suited it at all, to let me know - he replied asking for a list of what i needed and i said, well at least one of everything, unfortunately no response Take my $$$$, gosh! - not gonna force the man to make a sale or take my money, but that right there is more $ than i care to add up that have gone to ebay and youshop instead of a local speciality business.
-
None of the books are particularly useful with consumable part dimensions, but the notes on this page from the Catalogi di Parti Ricambio say 40mm?
-
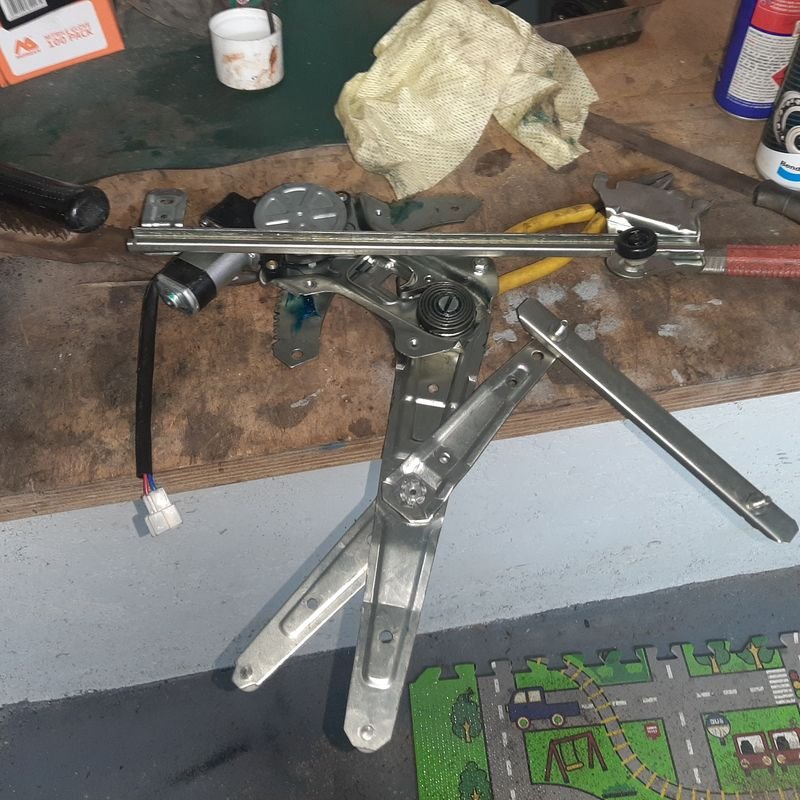
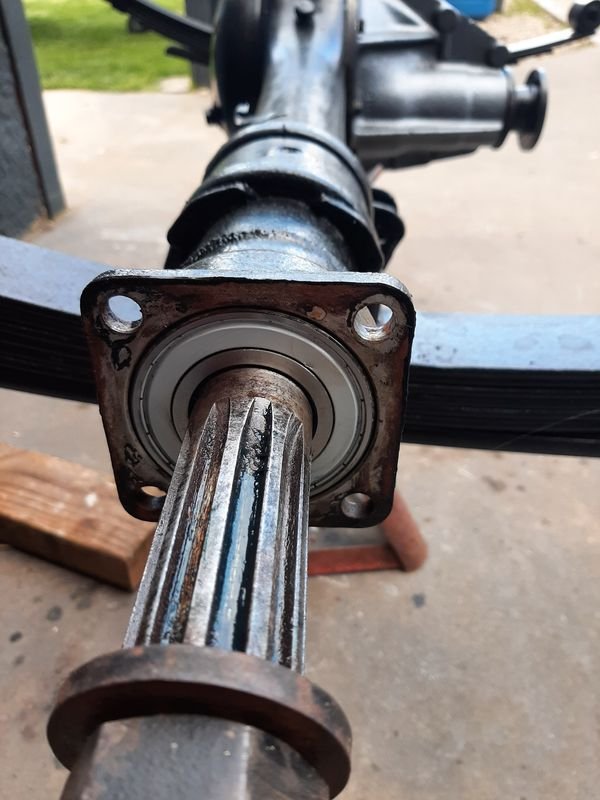
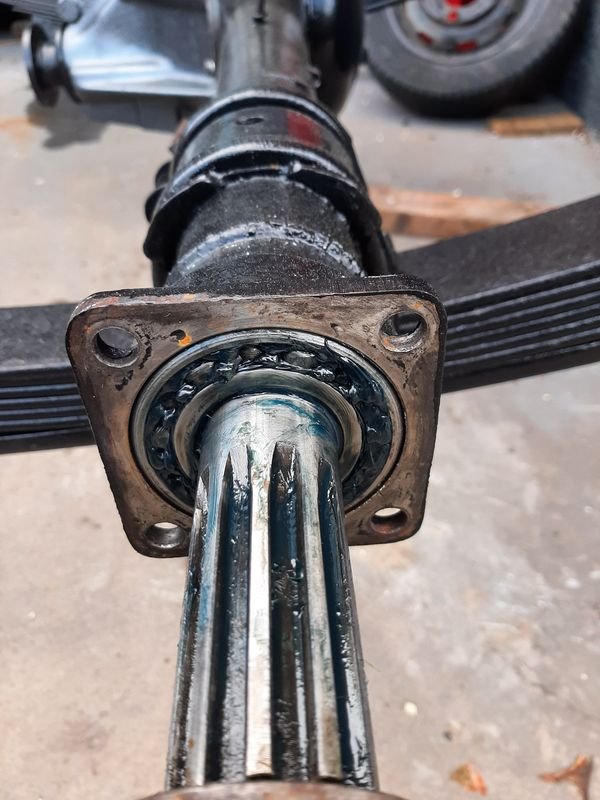
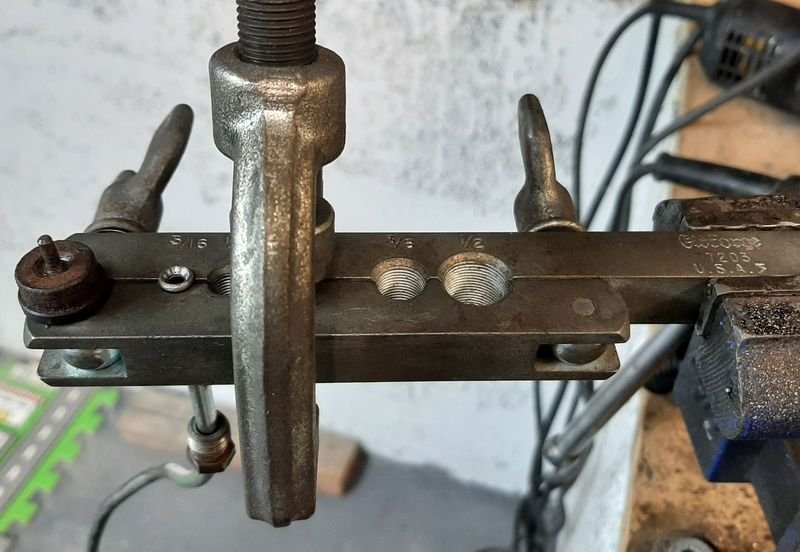
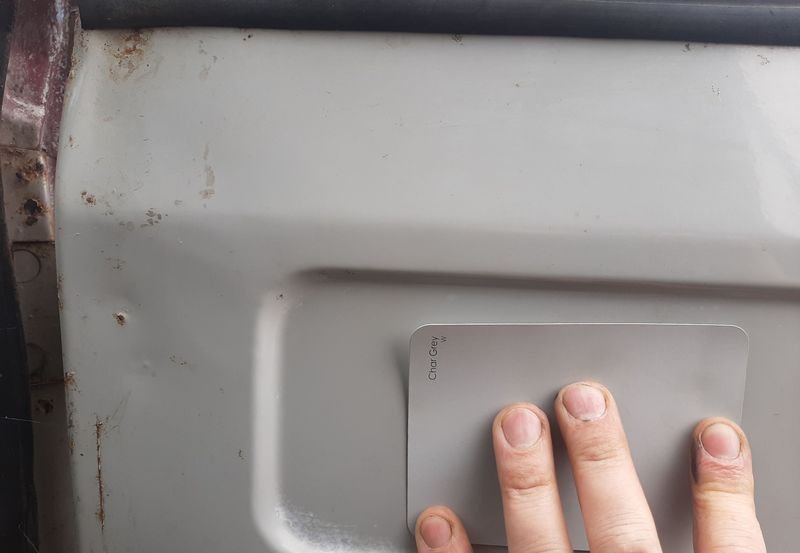
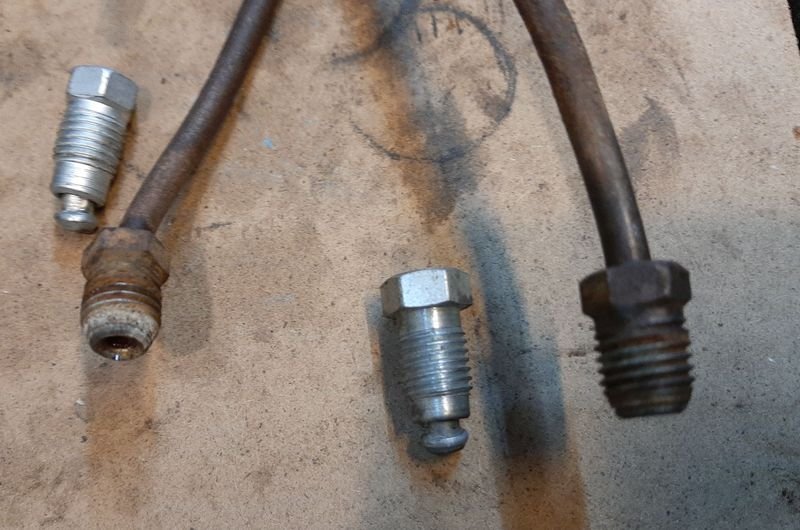
Slower progress this week, My excuses are a nightmare window motor and regulator swap in the daily - complete with incorrect parts supplied, correct parts supplied that dont quite fit (never sort by cheapest!) and need swapping from the old bits, blood and much swearing And a stereo upgrade in a buddys new (to him) Nissan VanPa Beige Anonymity edition. New bearing and oil seals showed up, so regreased the passenger side, and managed to dint the seal on the new one, so thats just great. Still will be 100% better than the old drivers side bearing that had to be destructively removed and fell apart . yep, that would not have sounded good, and pretty sure it had been driven like that for a while - there were other wear on the other bits and the old seal on this side was noticeably ovalled. Dug out the bin of brake lines - 125/124/lada stuff that i have is pretty close to the 1100 stuff but had to swap the ferrules and make double flares for the ends that go into the brass distribution block that mounts on the diff Picked up this bad boy for pretty much nothing ages ago, an Oldforge, 7203, and proper Made in USA , and first time using it and i managed to squeeze out a perfect double flare. USA, A-OK! Diffs ready to go back under, I wire wheeled and degreased the sections where the diffs going to go, no new surprises and will come up mint with a sand blast, but for now Im gonna put some rust converter to just seal and pause it for now (and its mostly see through apart from where it goes black) and just concentrate on tidying the brackets that things get bolted to, so i can bolt cleaned up and painted things to cleaned and painted things. Finally found a sample that's close enough to use for a colour match. PPG Char Grey which is a bronwy/greeny grey.
- 64 replies
-
- 27
-
-
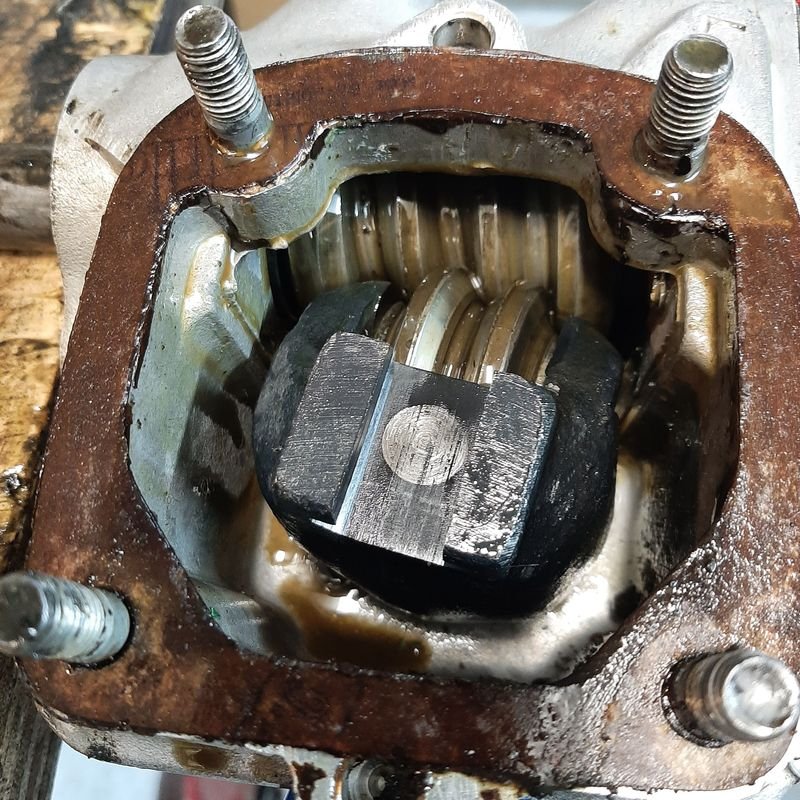
Im no engine guy, but that bottom end and pcv suggests its got lots of blow by to me, and or run (not just sat) without regular oil changes. Maybe lots of short runs and long sitting could do it?. OTOH The outside (clean yellow zinc plating on the inlet studs?) and coolant passages look pretty clean. Hows the cam boxes look - blackened and burned like the sump or clean alloy? These engines are pretty stout, but if you dont want to take off the head, then just clean out the gunk, and slap it back together with some fresh gaskets and paint and keep an eye out for another engine to build. At least it runs-ish? I would probably also whip the head off too, just to inspect and clean those grody valves up, and replace the stem seals - a full gasket set is only ~$100. Then give it a proper italian tune up and the gummy rings will probably bed right back in
-
Exhibit B, 1981 reno of a then 20yo house, added new aluminium windows including the popouts on the front, aluminium porch, and downstairs bar. Aggressively shitty workmanship to pack out the walls behind the bar reno cladding, and absolutely no insulation installed. Added another layer of lino to the original stuff that covers rimu floorboards
-
I had been told there was one in Balclutha that was good too, could be the Gore guy, maybe. Worst case is if i need to get the repairs done by a shop 'approved repairer', thats a hard nope. Hopefully i can show that im not a total numptie (IMO!) and "have the skill and knowledge to competently perform the repairs required" as most of the rust is actually pretty simple stuff like door bottoms and floor sections, no real structural stuff (except for the A pillar maybe) and whcile i dont want to set myself up for 3 more vehicles worth of repair certification, pretty confident ive got the skills and equipment to make a kwalitee fix What is an approved repairer? An approved repairer will have the skills and knowledge required to competently perform the repairs required. The repairer must have the correct equipment to perform the repairs necessary. The certifier will include all the repairer’s details in a file.
-
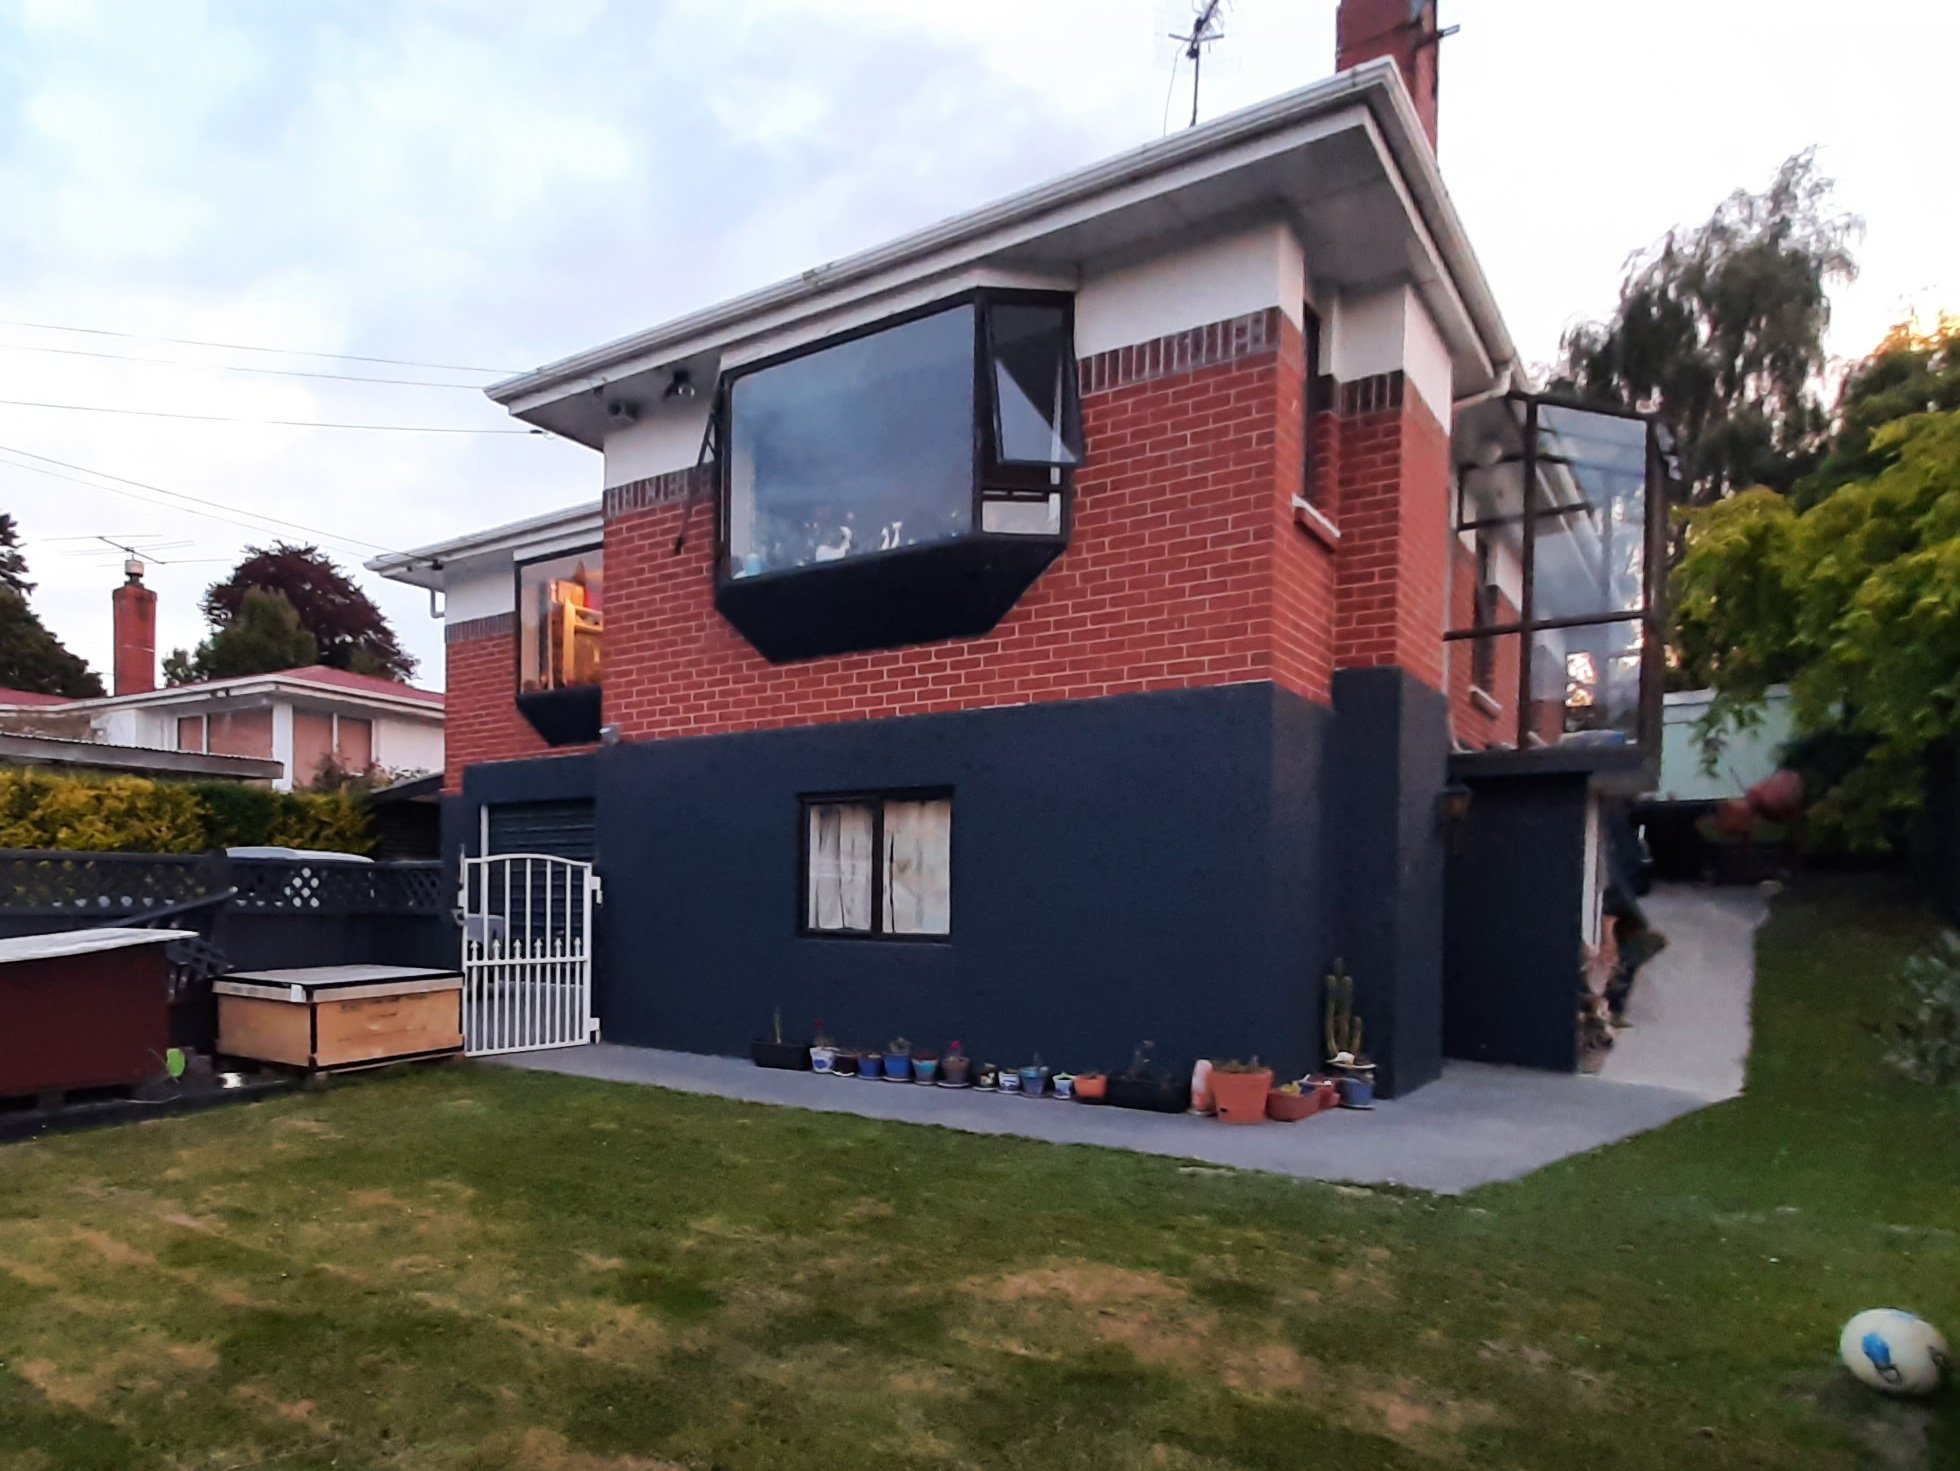
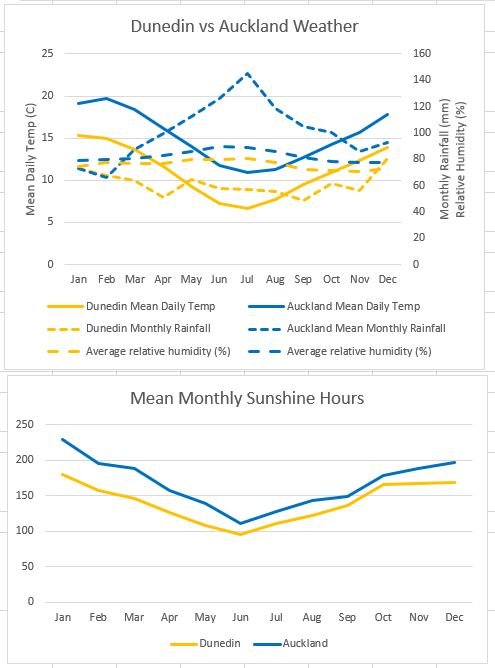
Thanks Chaps, I think i may just leave it for now, and do what the man wants later. Once i have a man. (recommendations for south island repair cert folk?) I should really make a start on the paper work too. RE Weather, since i am a massive dork, i have previously prepared this: Top graph shows Dunedin is consistently ~4deg cooler, but has significantly less rainfall in winter and is less humid. Second graph also shows that its somehow less sunny as well, but I recon its way sunnier (im on the Mosgiel side of the hill tho) , and way less windy than Auckland. Also the sun is way hotter feeling when its out, but the air being less humid doenst hold the heat the same.