nzstato
-
Posts
2008 -
Joined
-
Last visited
-
Days Won
1
Everything posted by nzstato
-
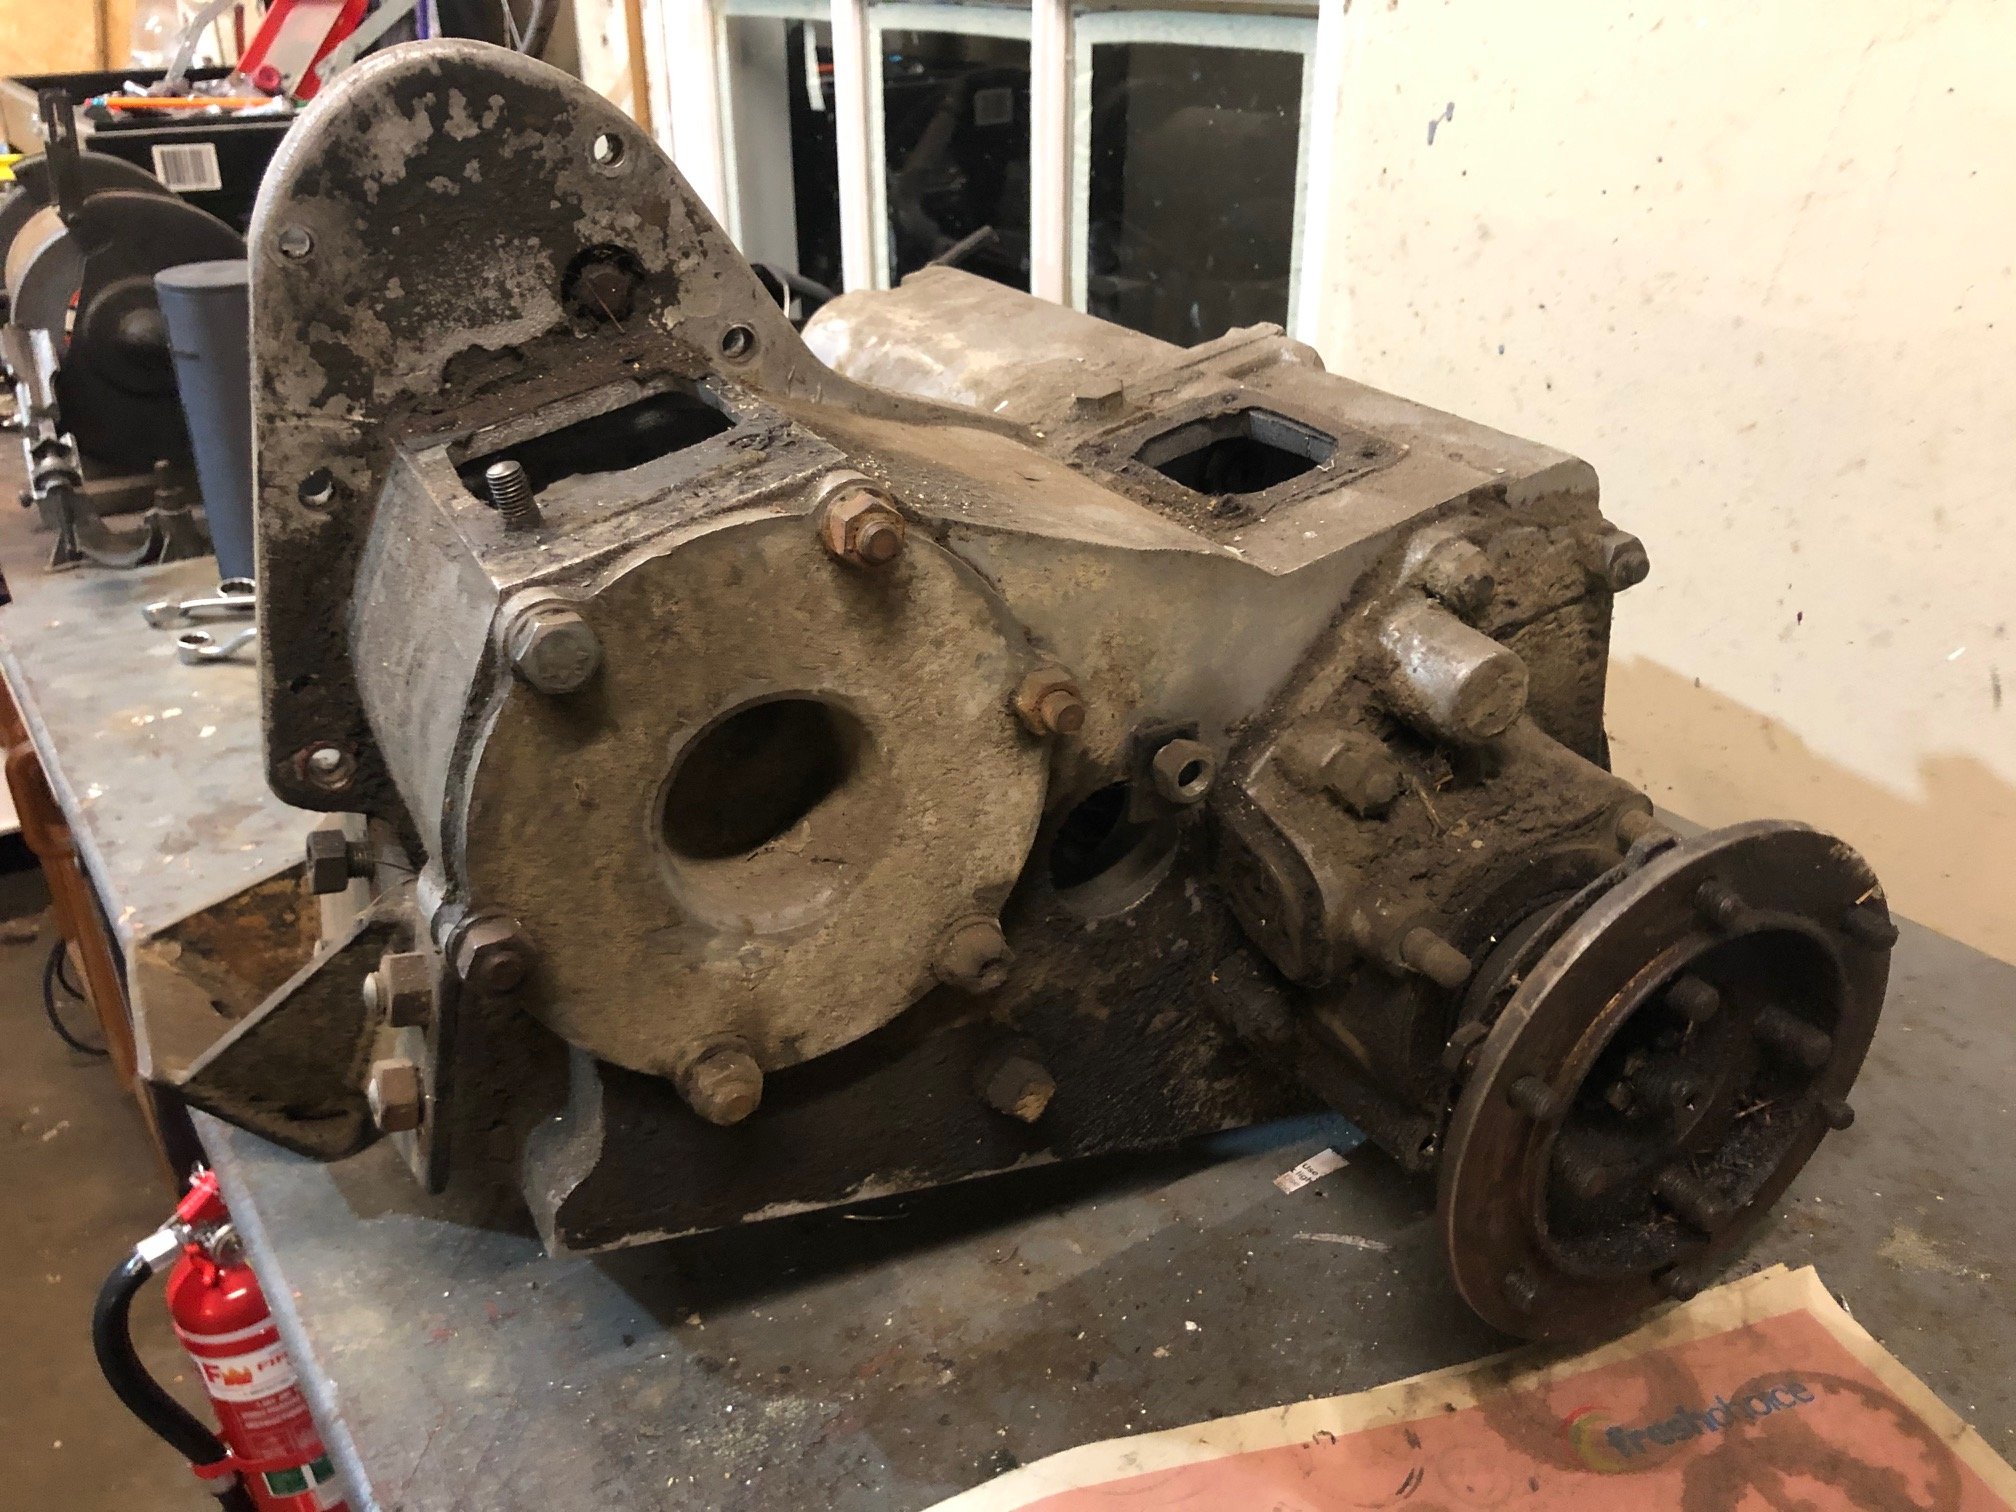
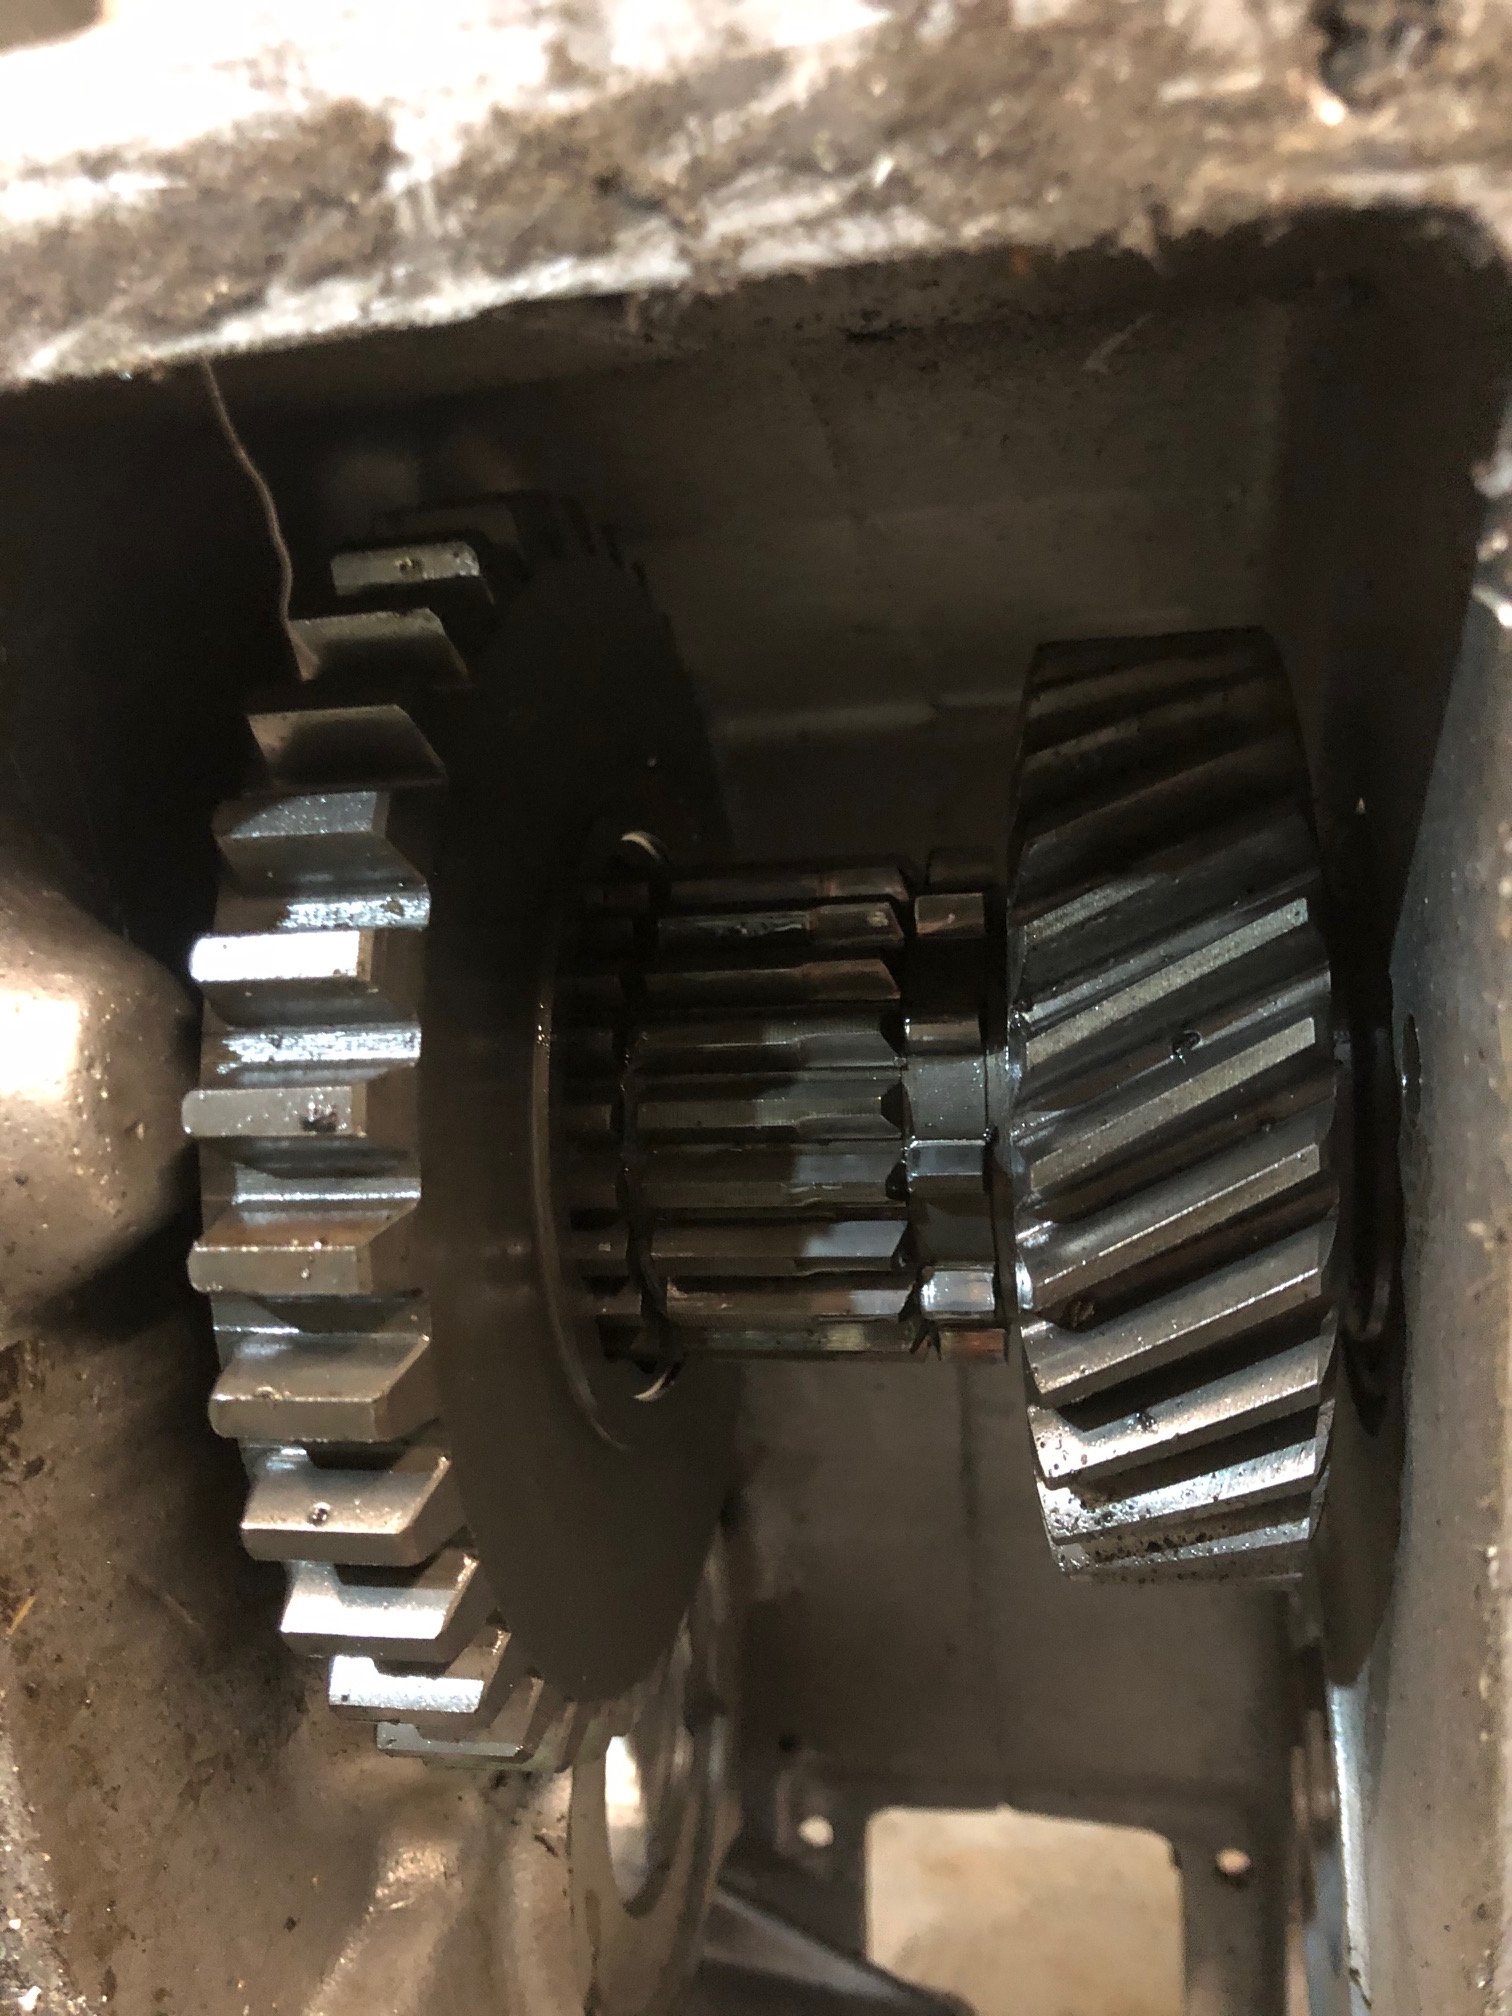
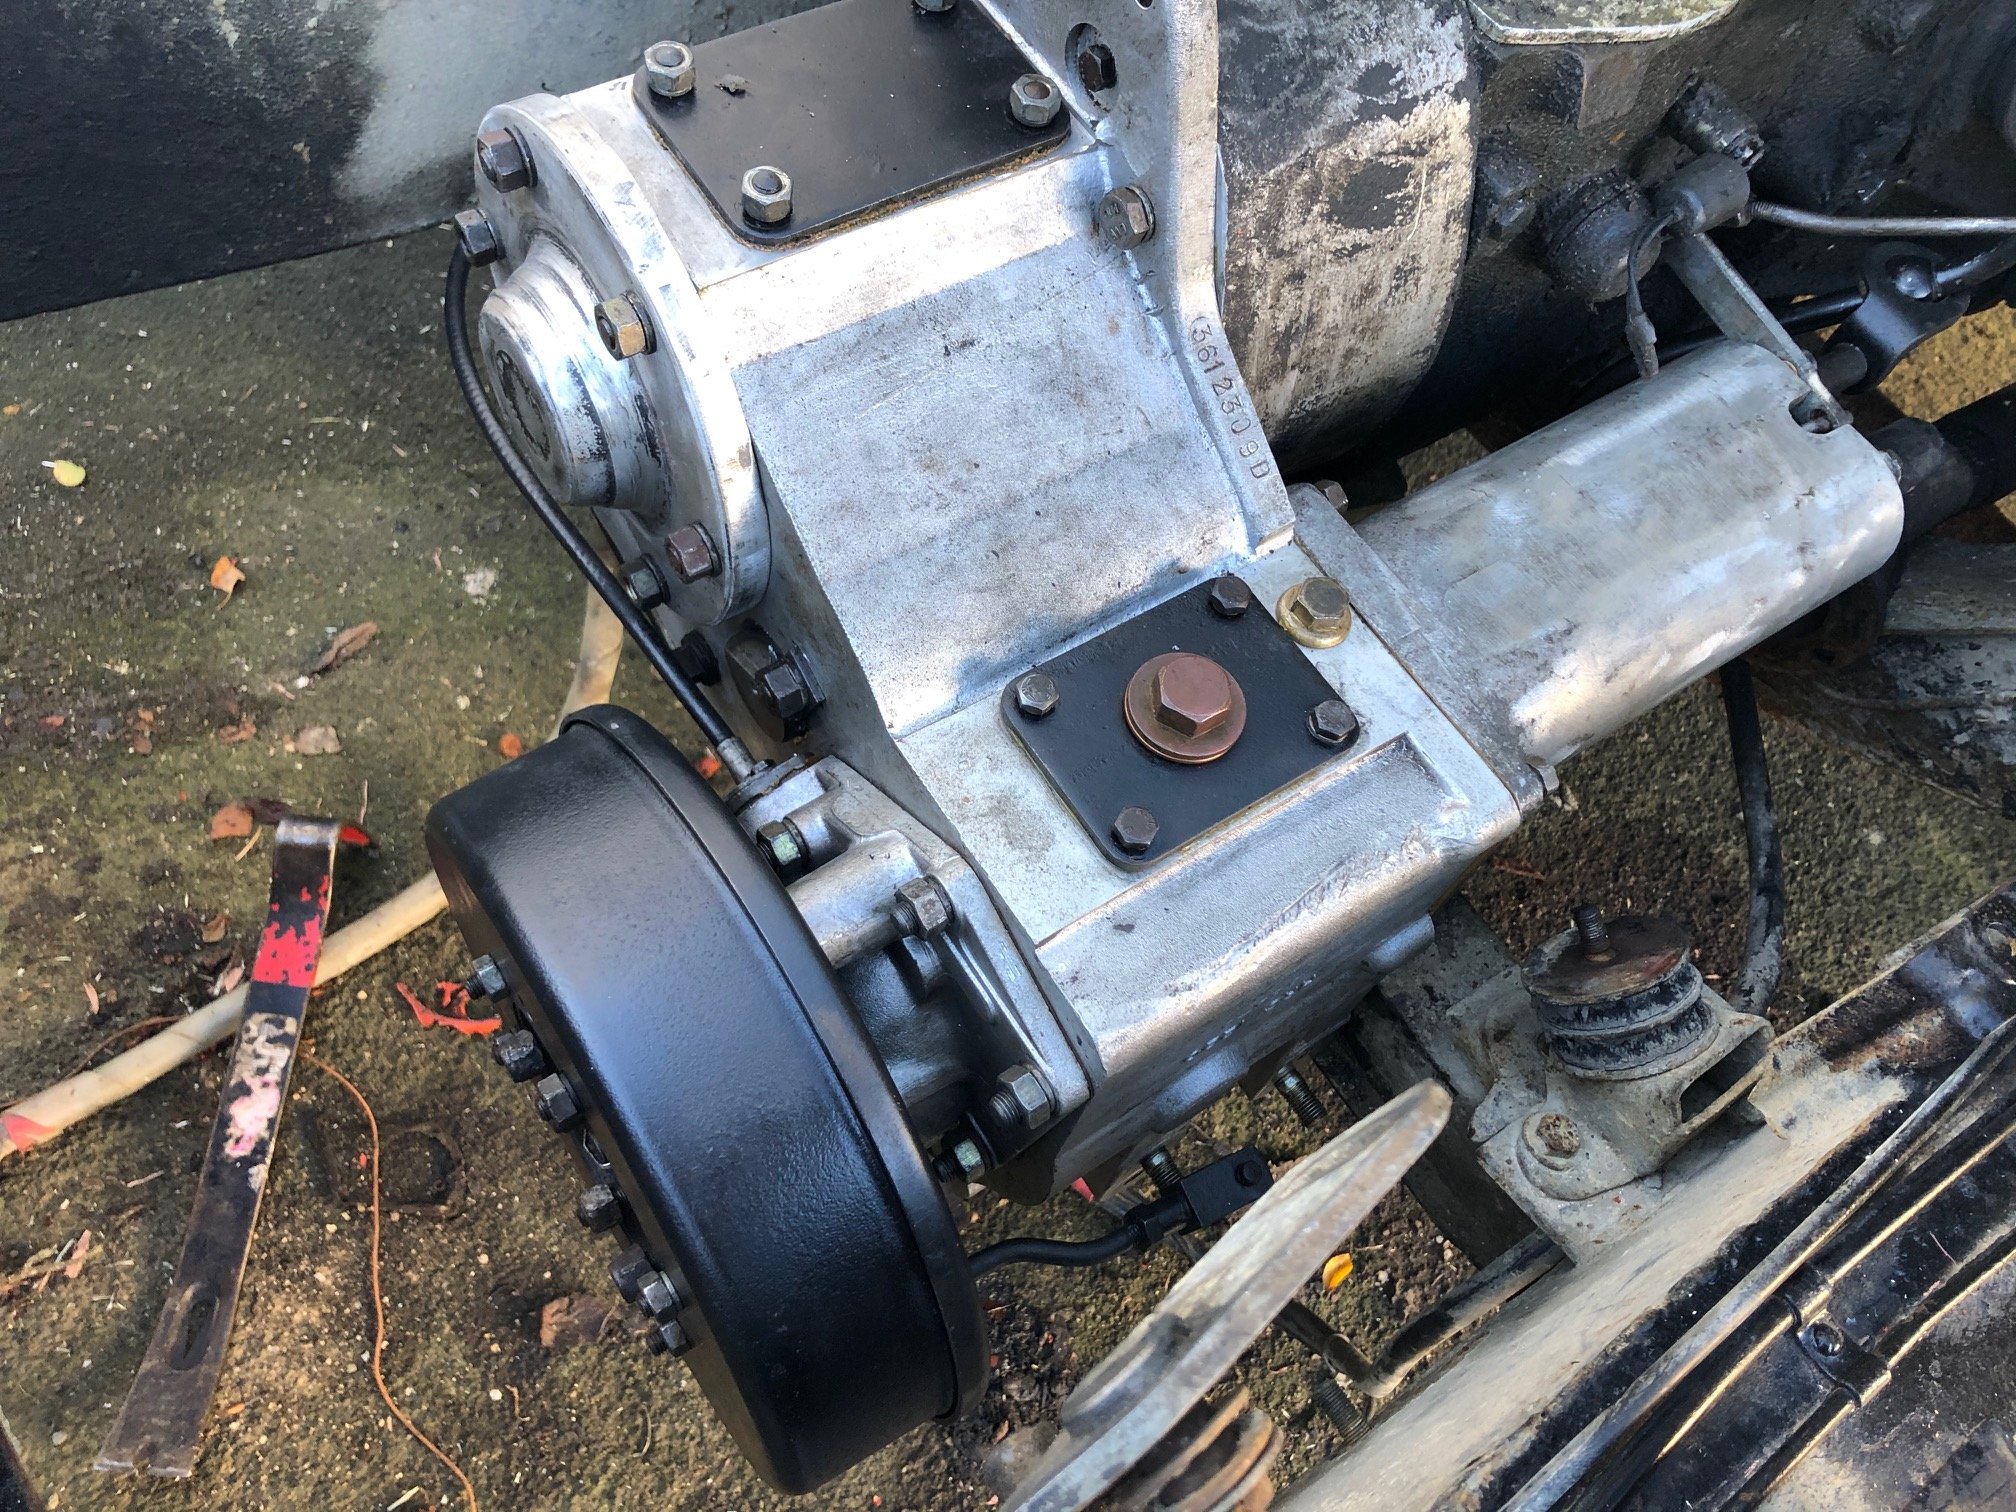
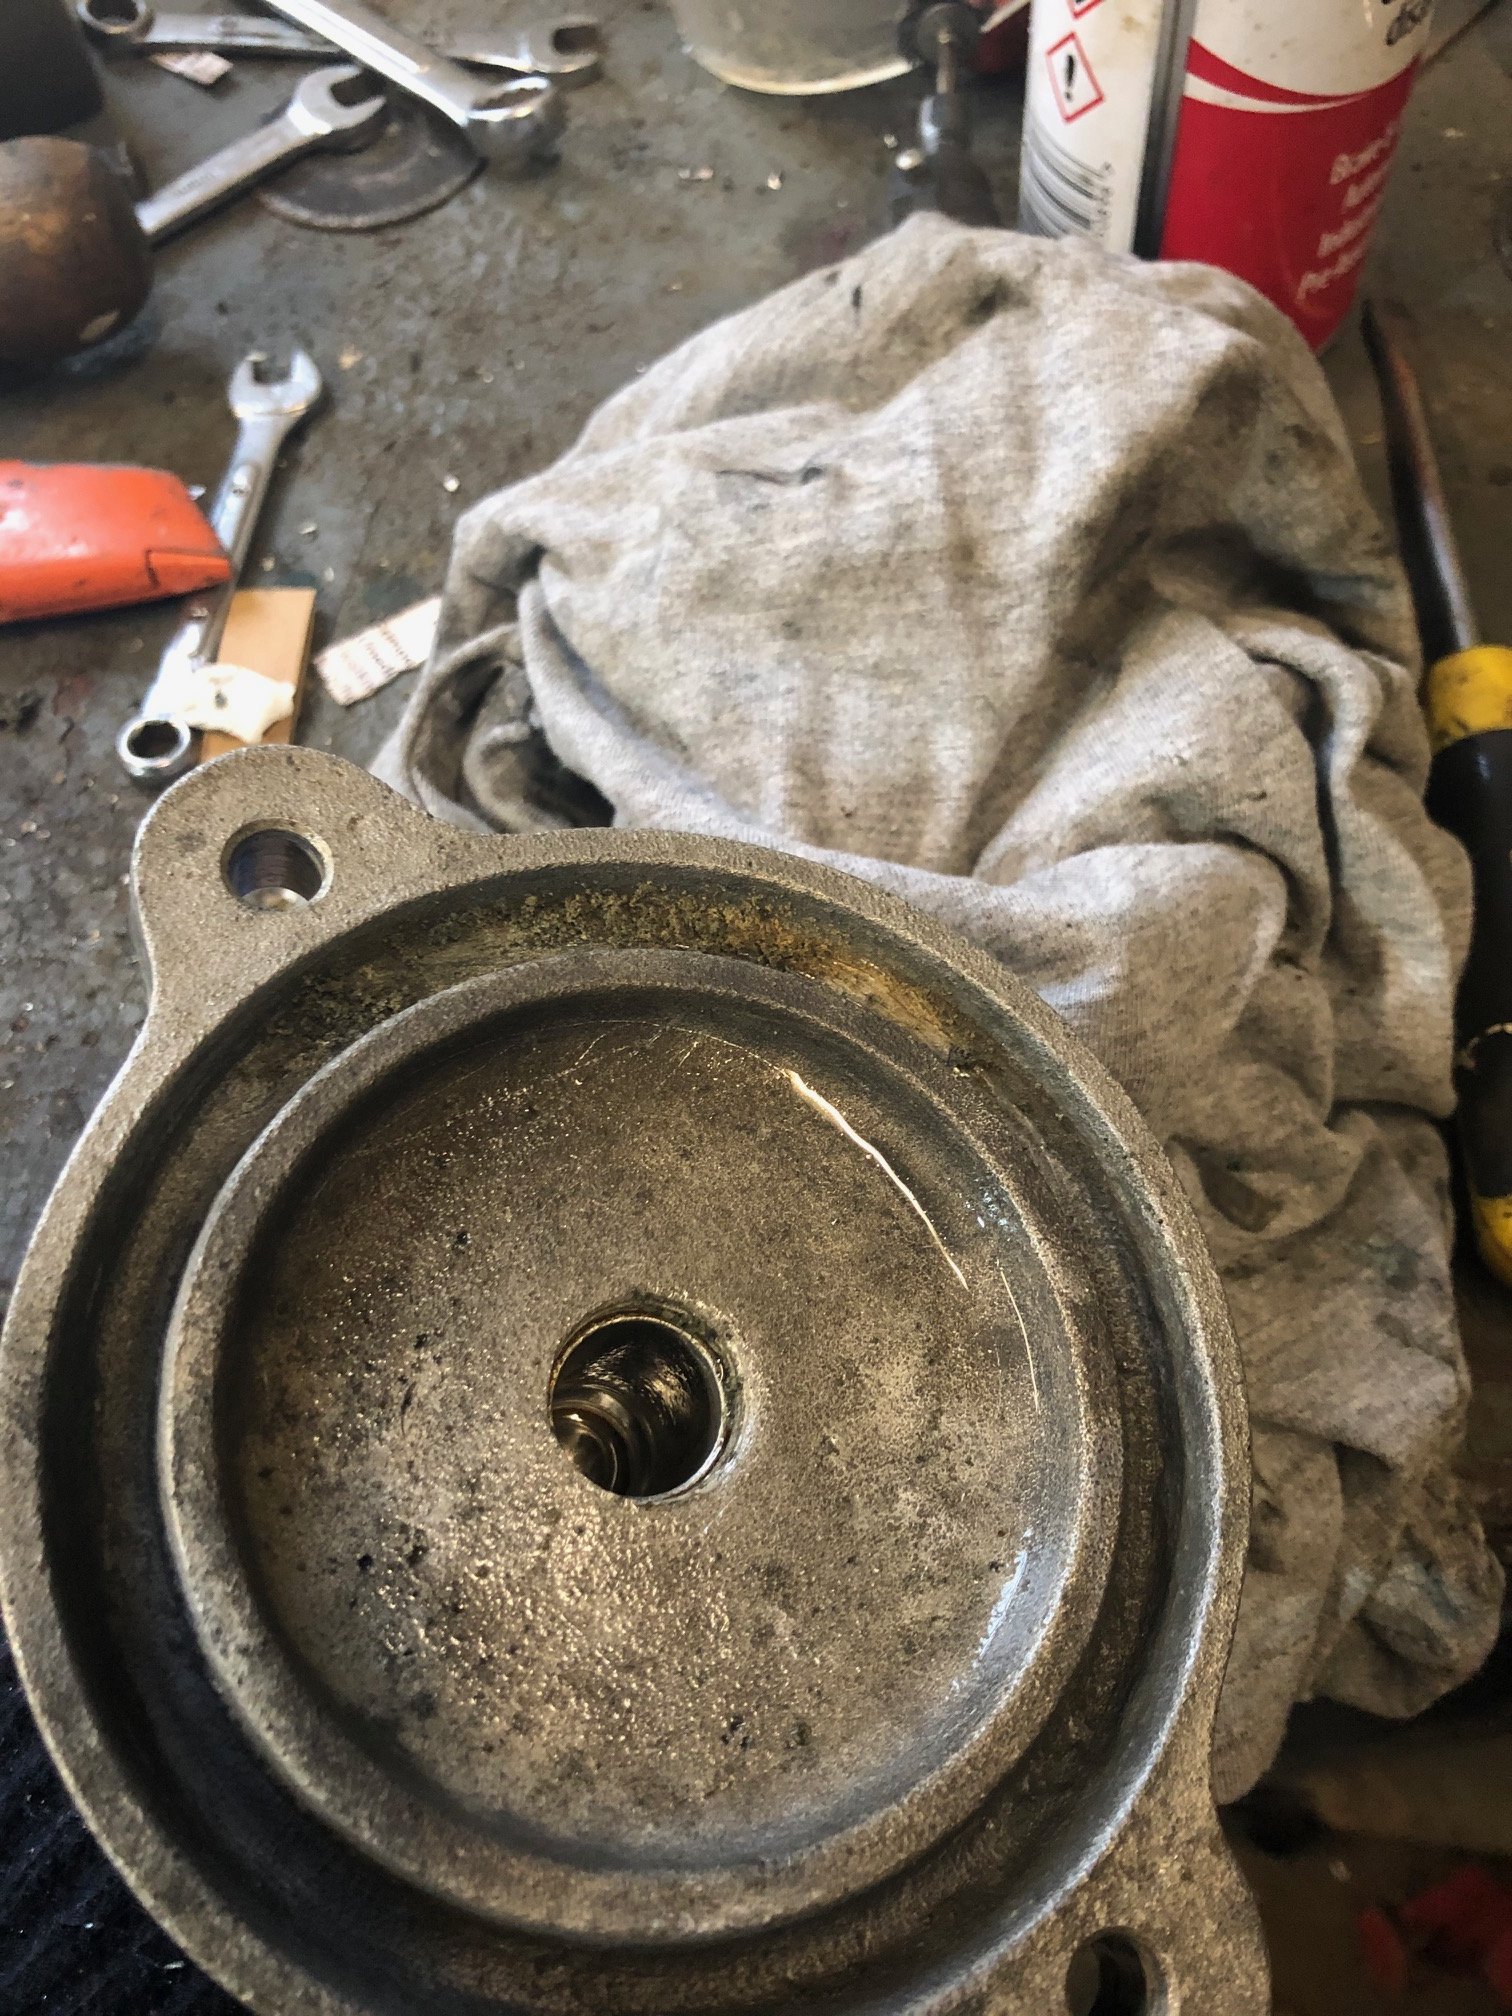
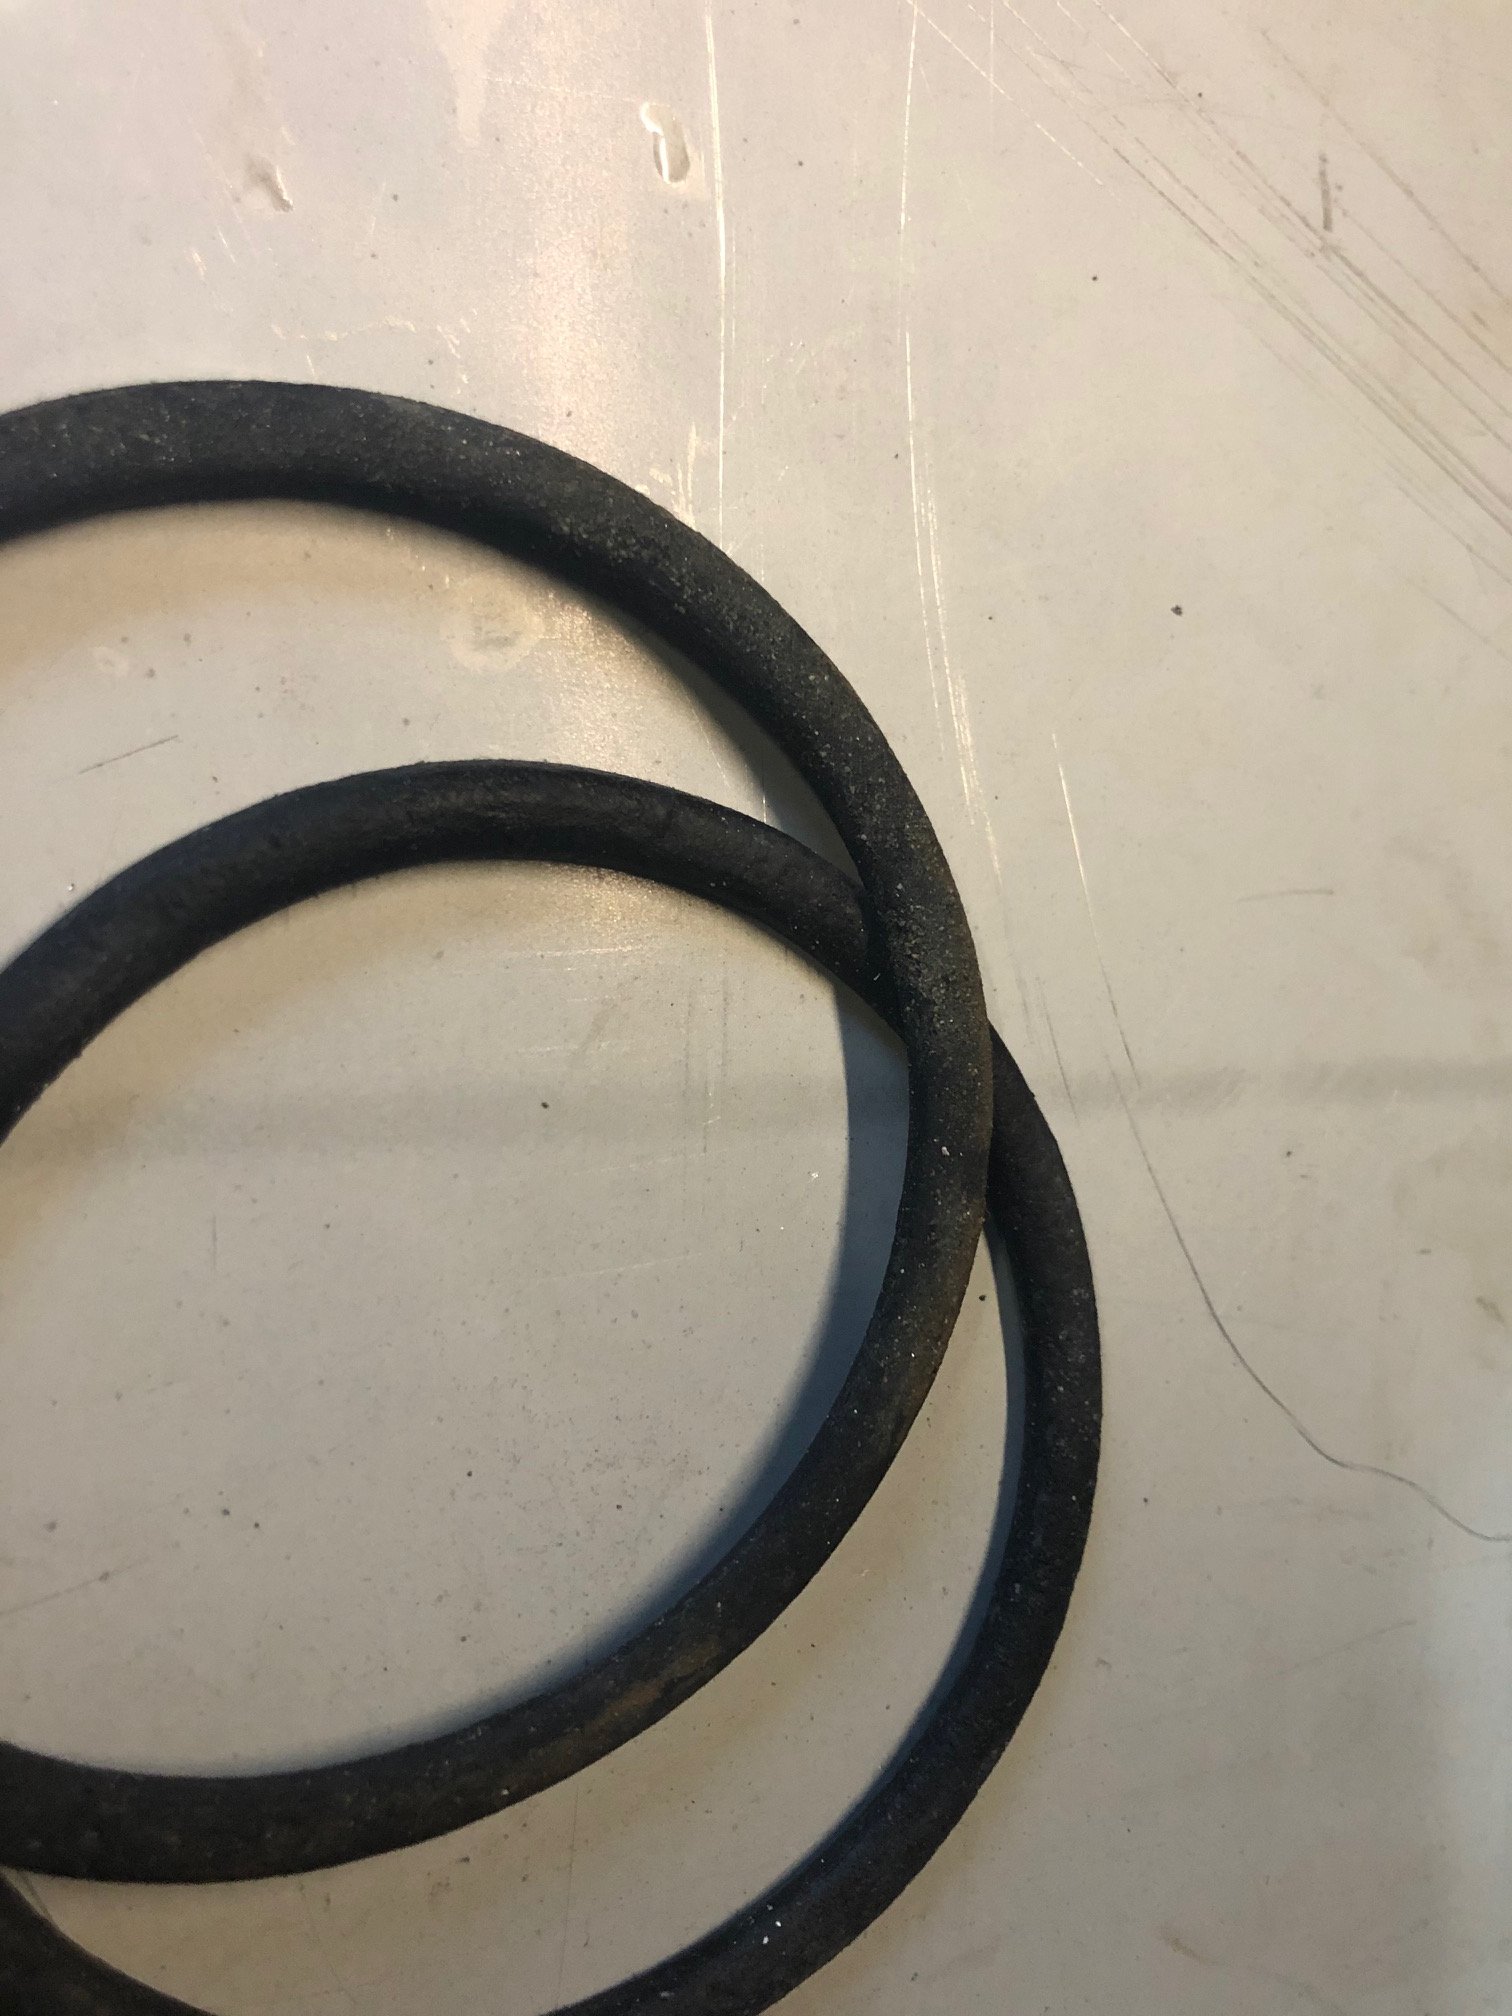
Have transfer box #3 to see if this one is any good. Later suffix D (Barry points there...). After cleaning all the crud off it this one turned into a minter, didnt bother pulling the shaft/bearings as other than a little bit of spline wear (I really cant be choosey at this point..)looked in great nick. Got it all mounted back in, new gaskets/orings etc, all went reasonably well

-
Used to have a racing quad back in the day. Got on a ATC at one point and tried to push it just as hard. Geeze they are tippy.... all for the price of one less wheel....
-
Fair Just keep in mind, first shot if you do go to move it on
- 94 replies
-
- 1
-

-
- eunos
- eunos roadster
- (and 6 more)
-

Discuss here about Yoeddynz's little Imp project...
nzstato replied to yoeddynz's topic in Project Discussion
Well this is a cool idea.... Has there been subaru conversions over the years? -
Dibs on Aw11 if you sell...?
-
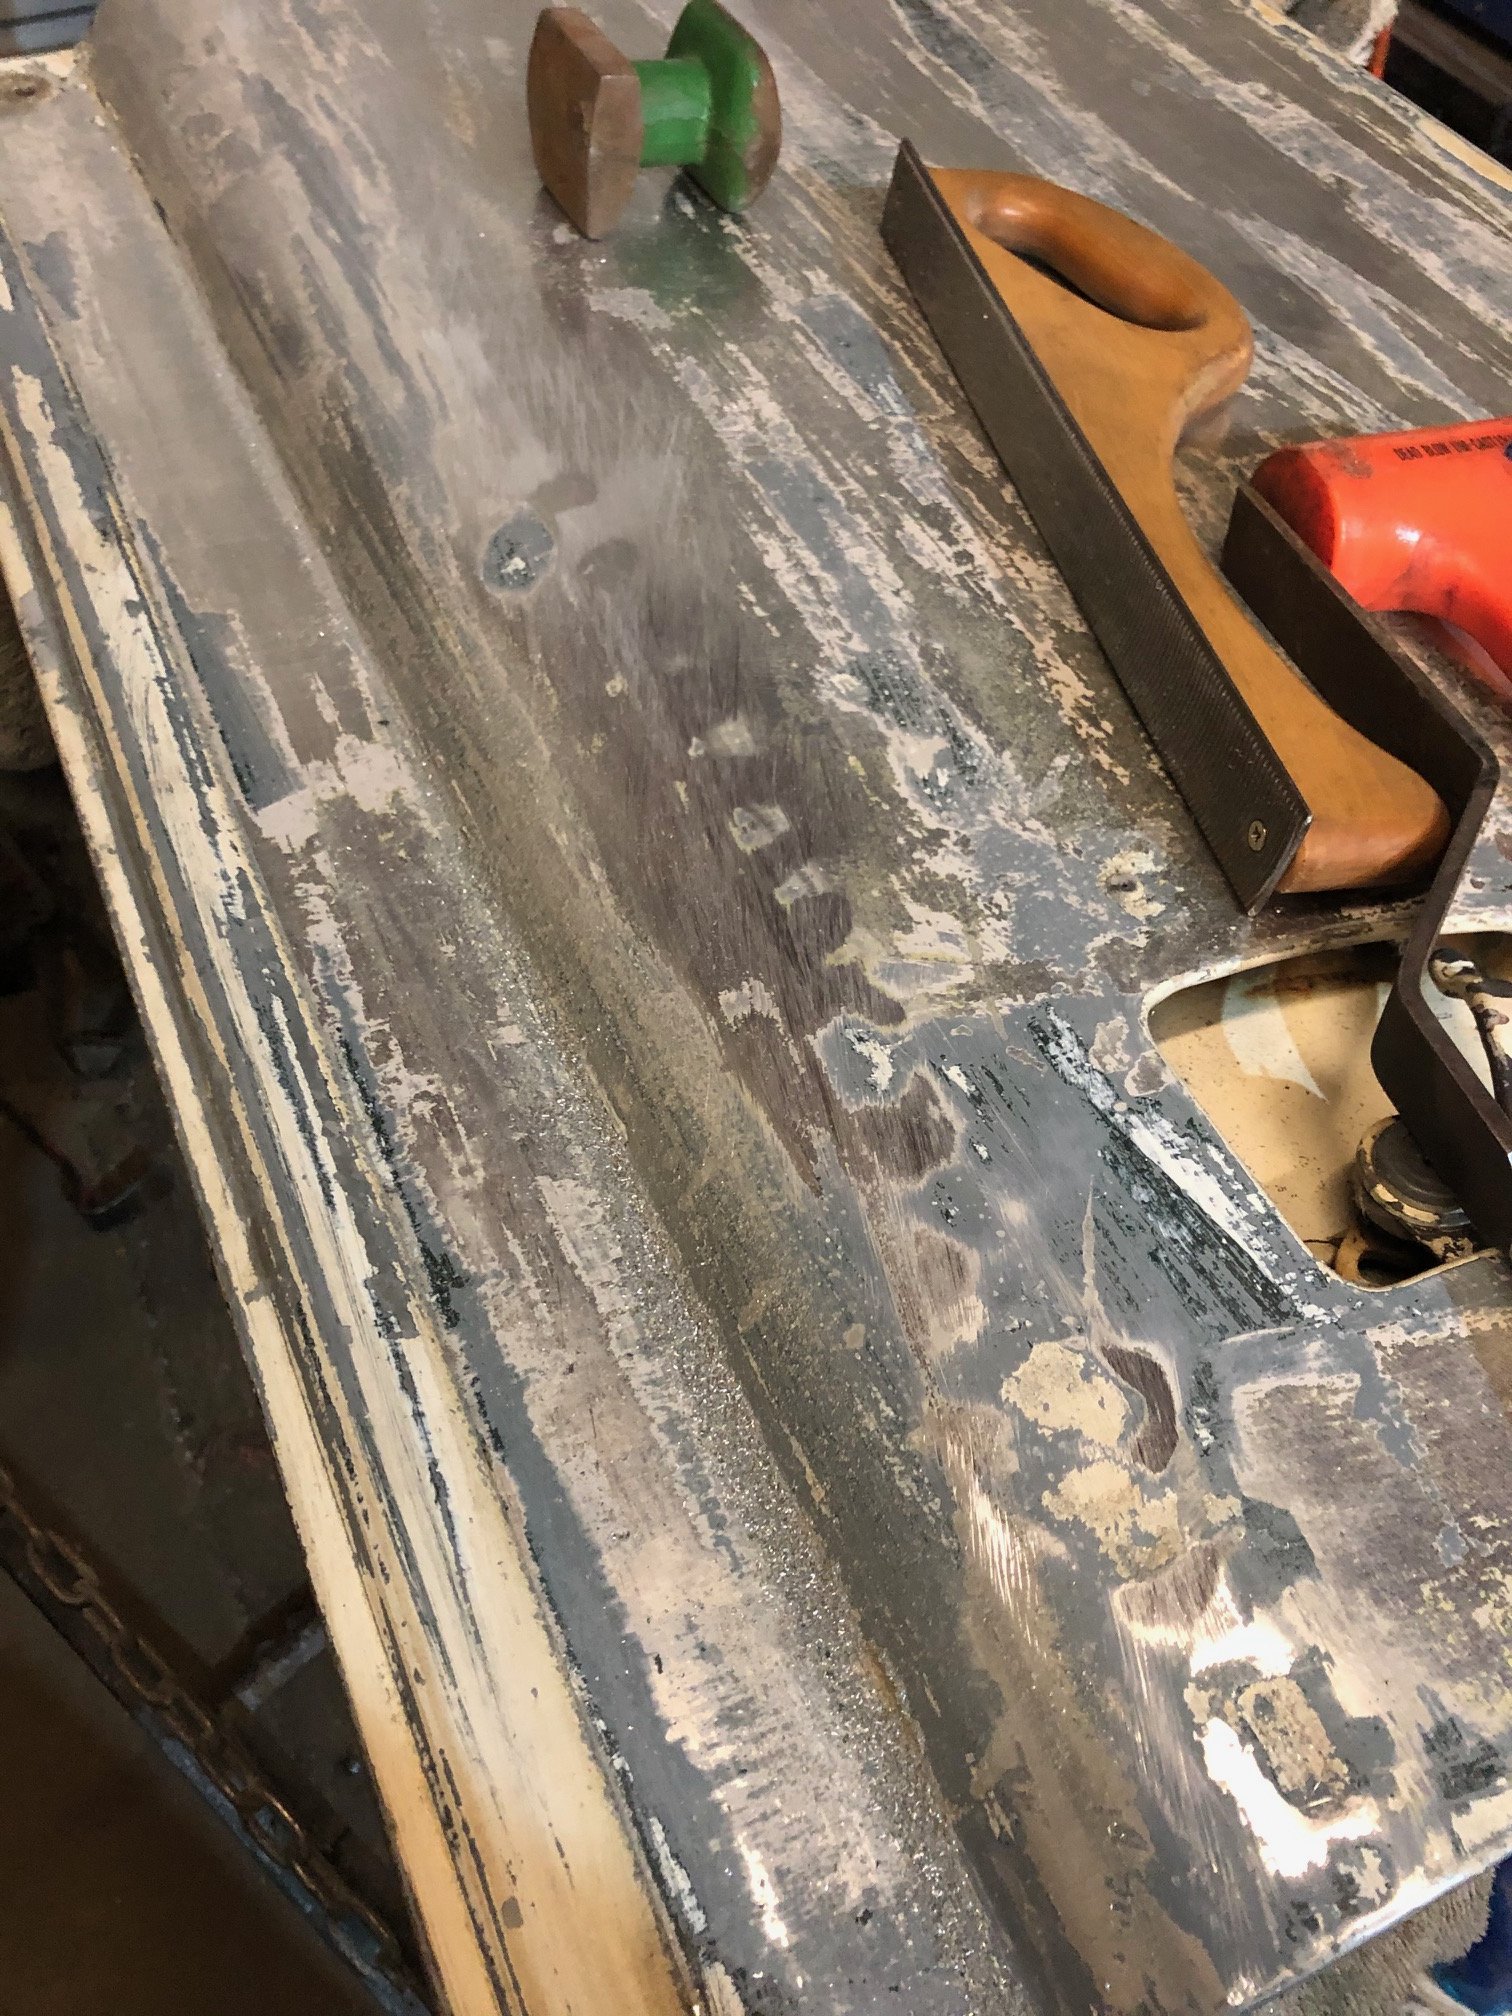
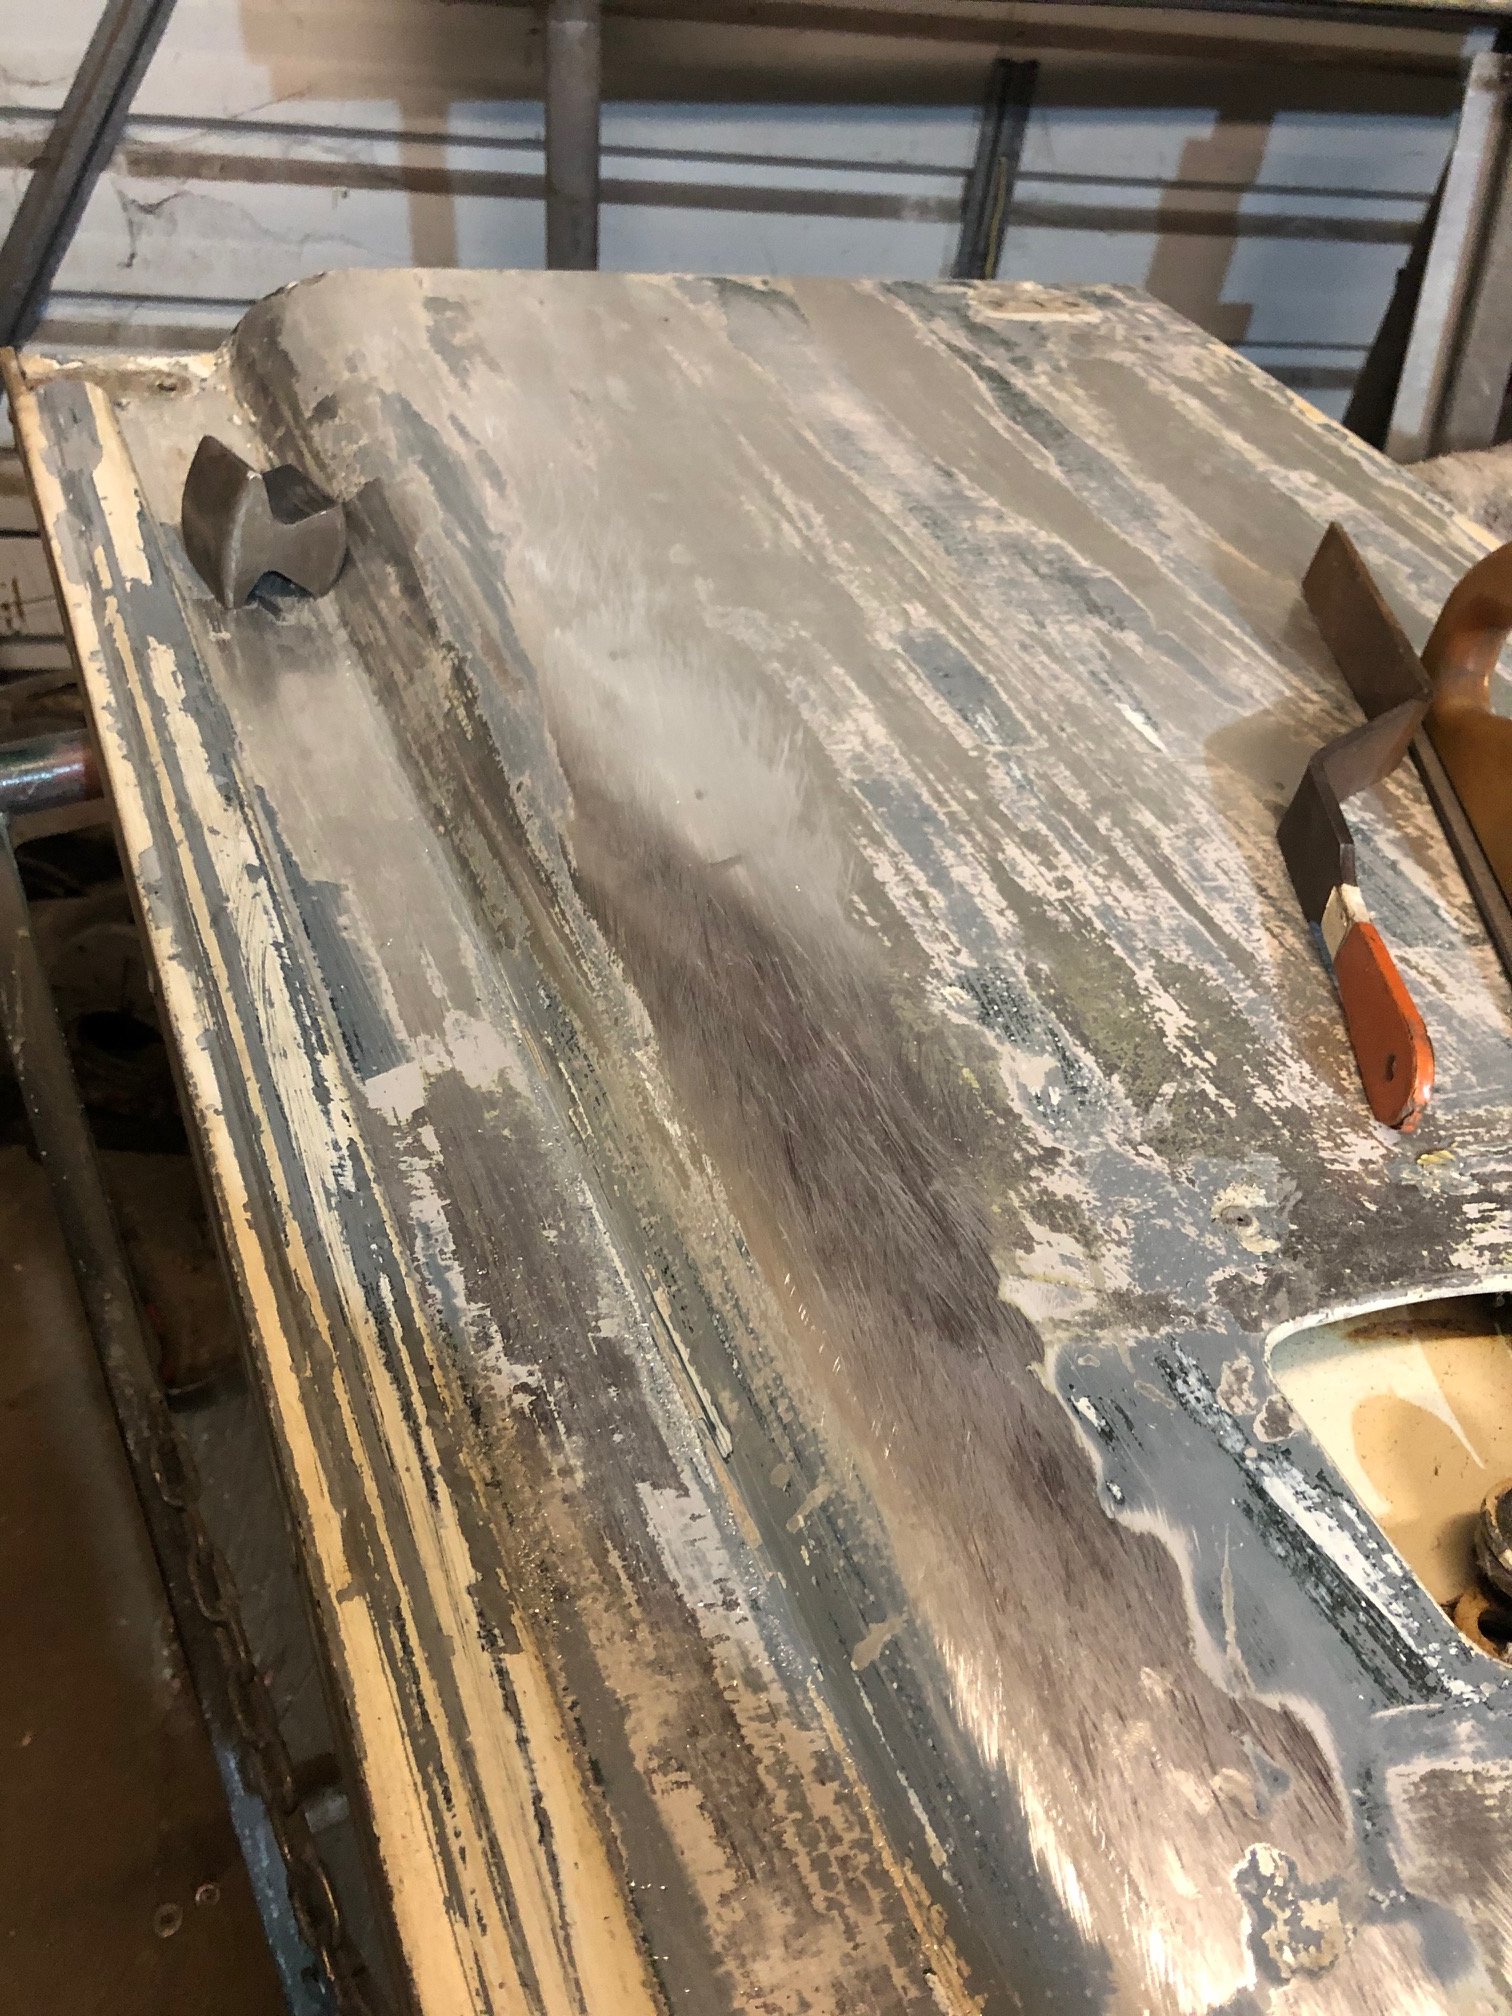
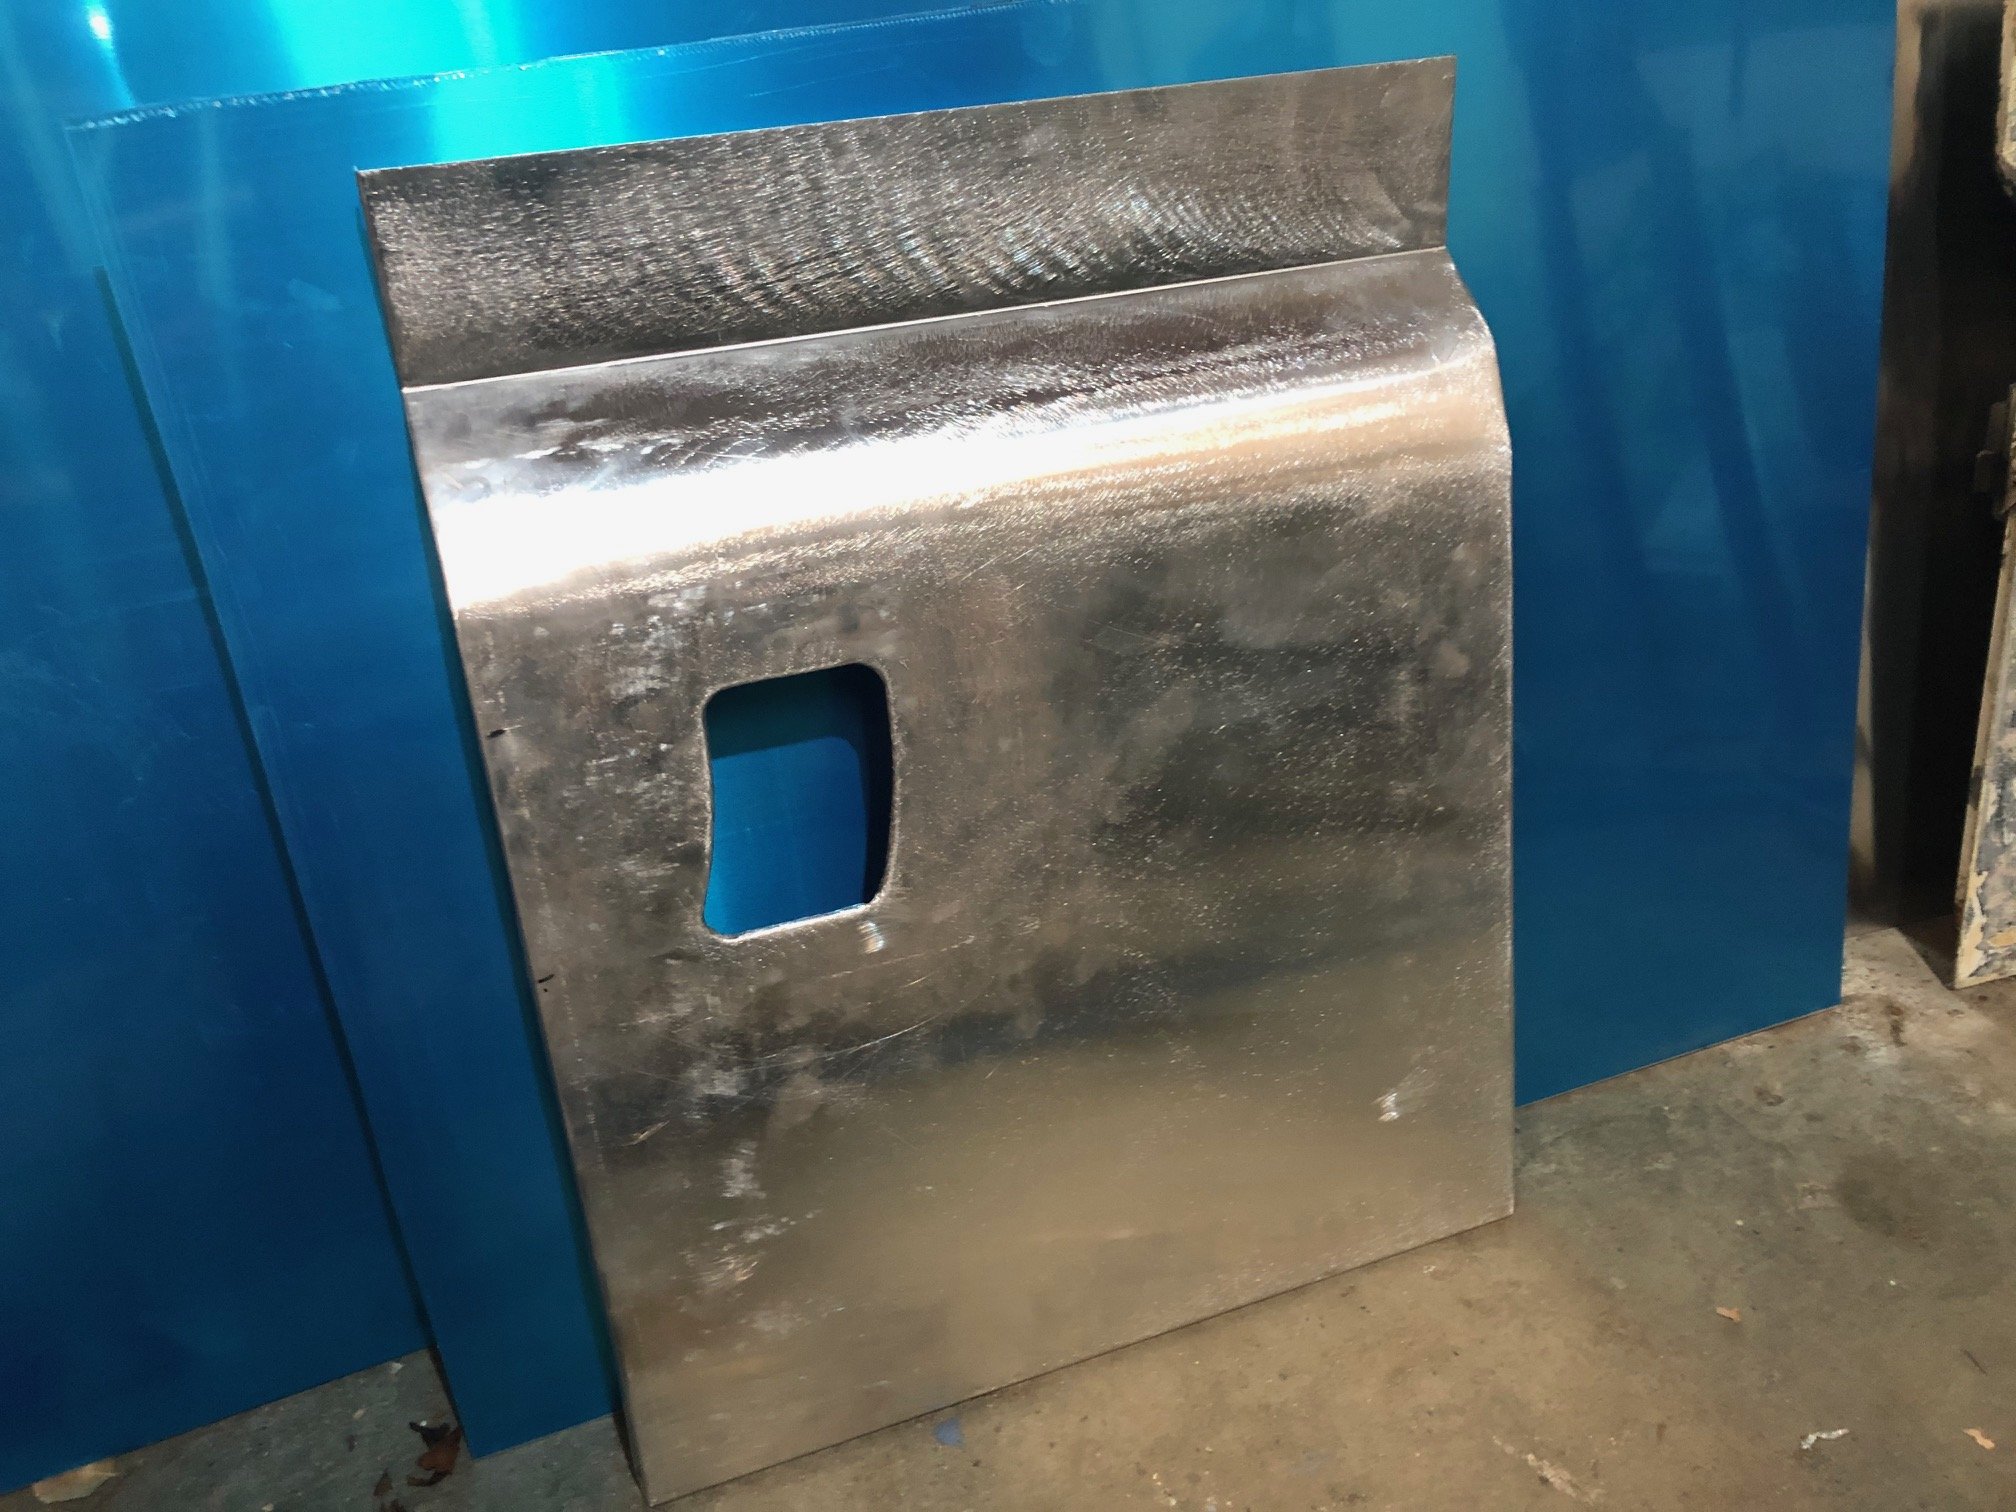
I'm sure most of this is boring as hell but it might help 1/100... The rear doors in these are notorious for rotting out... which means they are extremely difficult to find decent ones second had and the new reproductions are orribly expensive... I've cut that whole section away (all of these frames are going to the blasters). This little section is the cause of all of the problem. There are drain channels here (which look like an engineering afterthought) which get clogged with crud and rust out into nothingness, then you get water in the frame an the whole lot rots out. I will be making new drain channels . I'm not going to reskin these front doors, they are ok enough, I did however spend some time taking the dings out where I can (the ones hidden by the frame can stay there...). Working alluminium is SO nice, it moves so easily and files out well...
- 70 replies
-
- 14
-
-
1UZFE 4 Speed Auto with 5 Speed Gear selector
nzstato replied to DeWetSwanepoel's topic in Tech Talk
Go to the godfather of the 1UZ.... https://www.youtube.com/user/CartuneNZ He has a few vids up on the transwiring, how you can go manualising etc... -
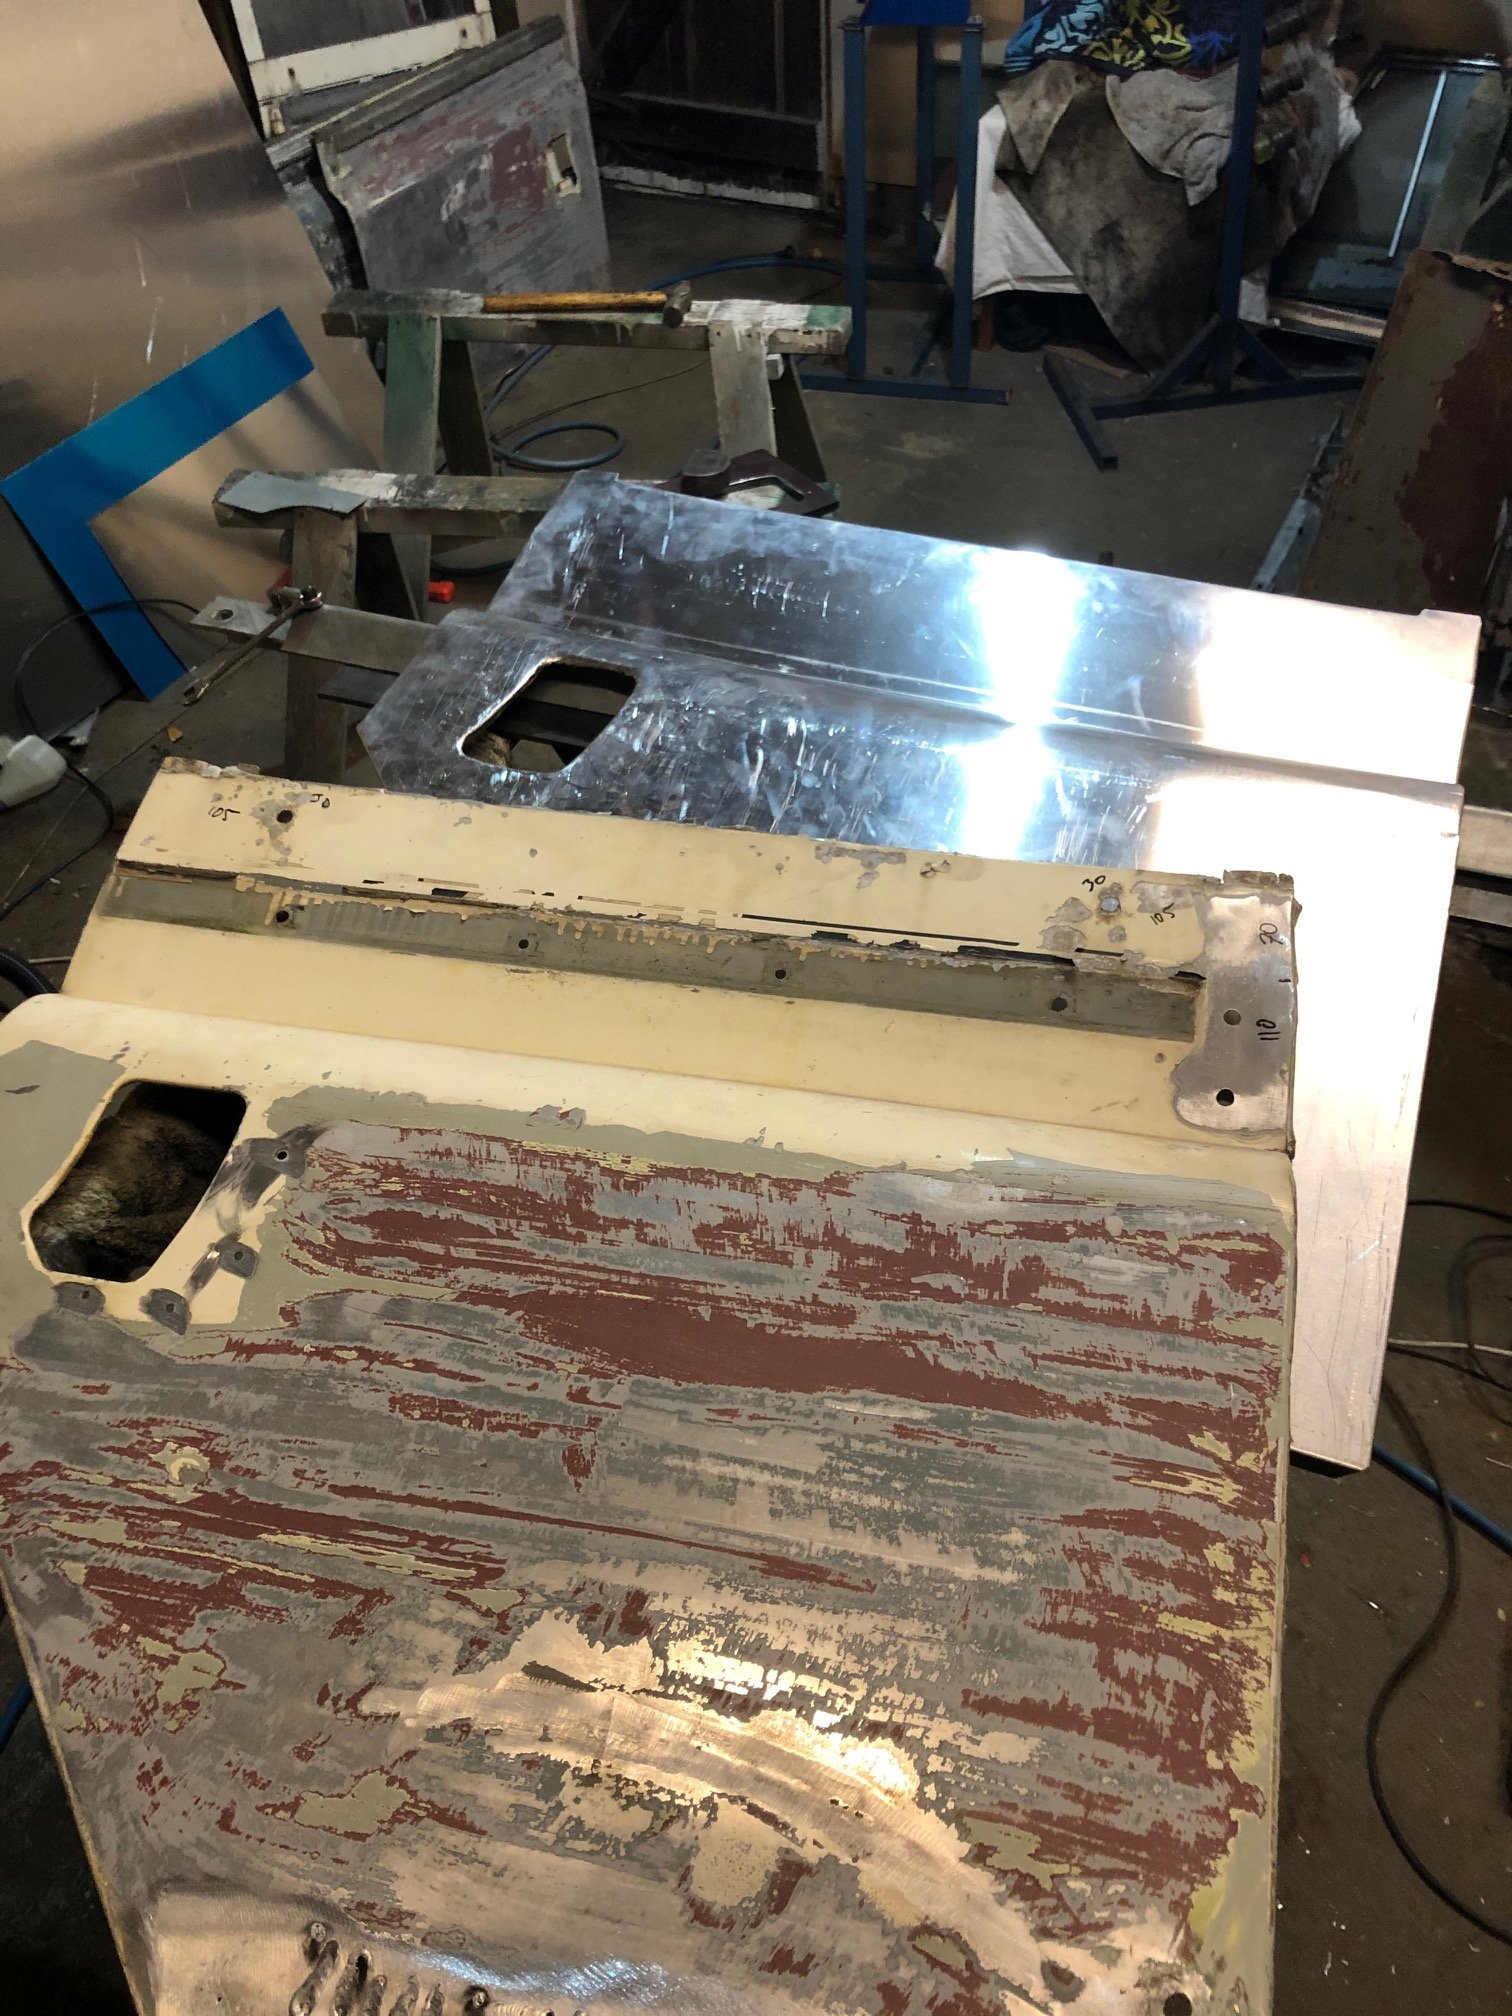
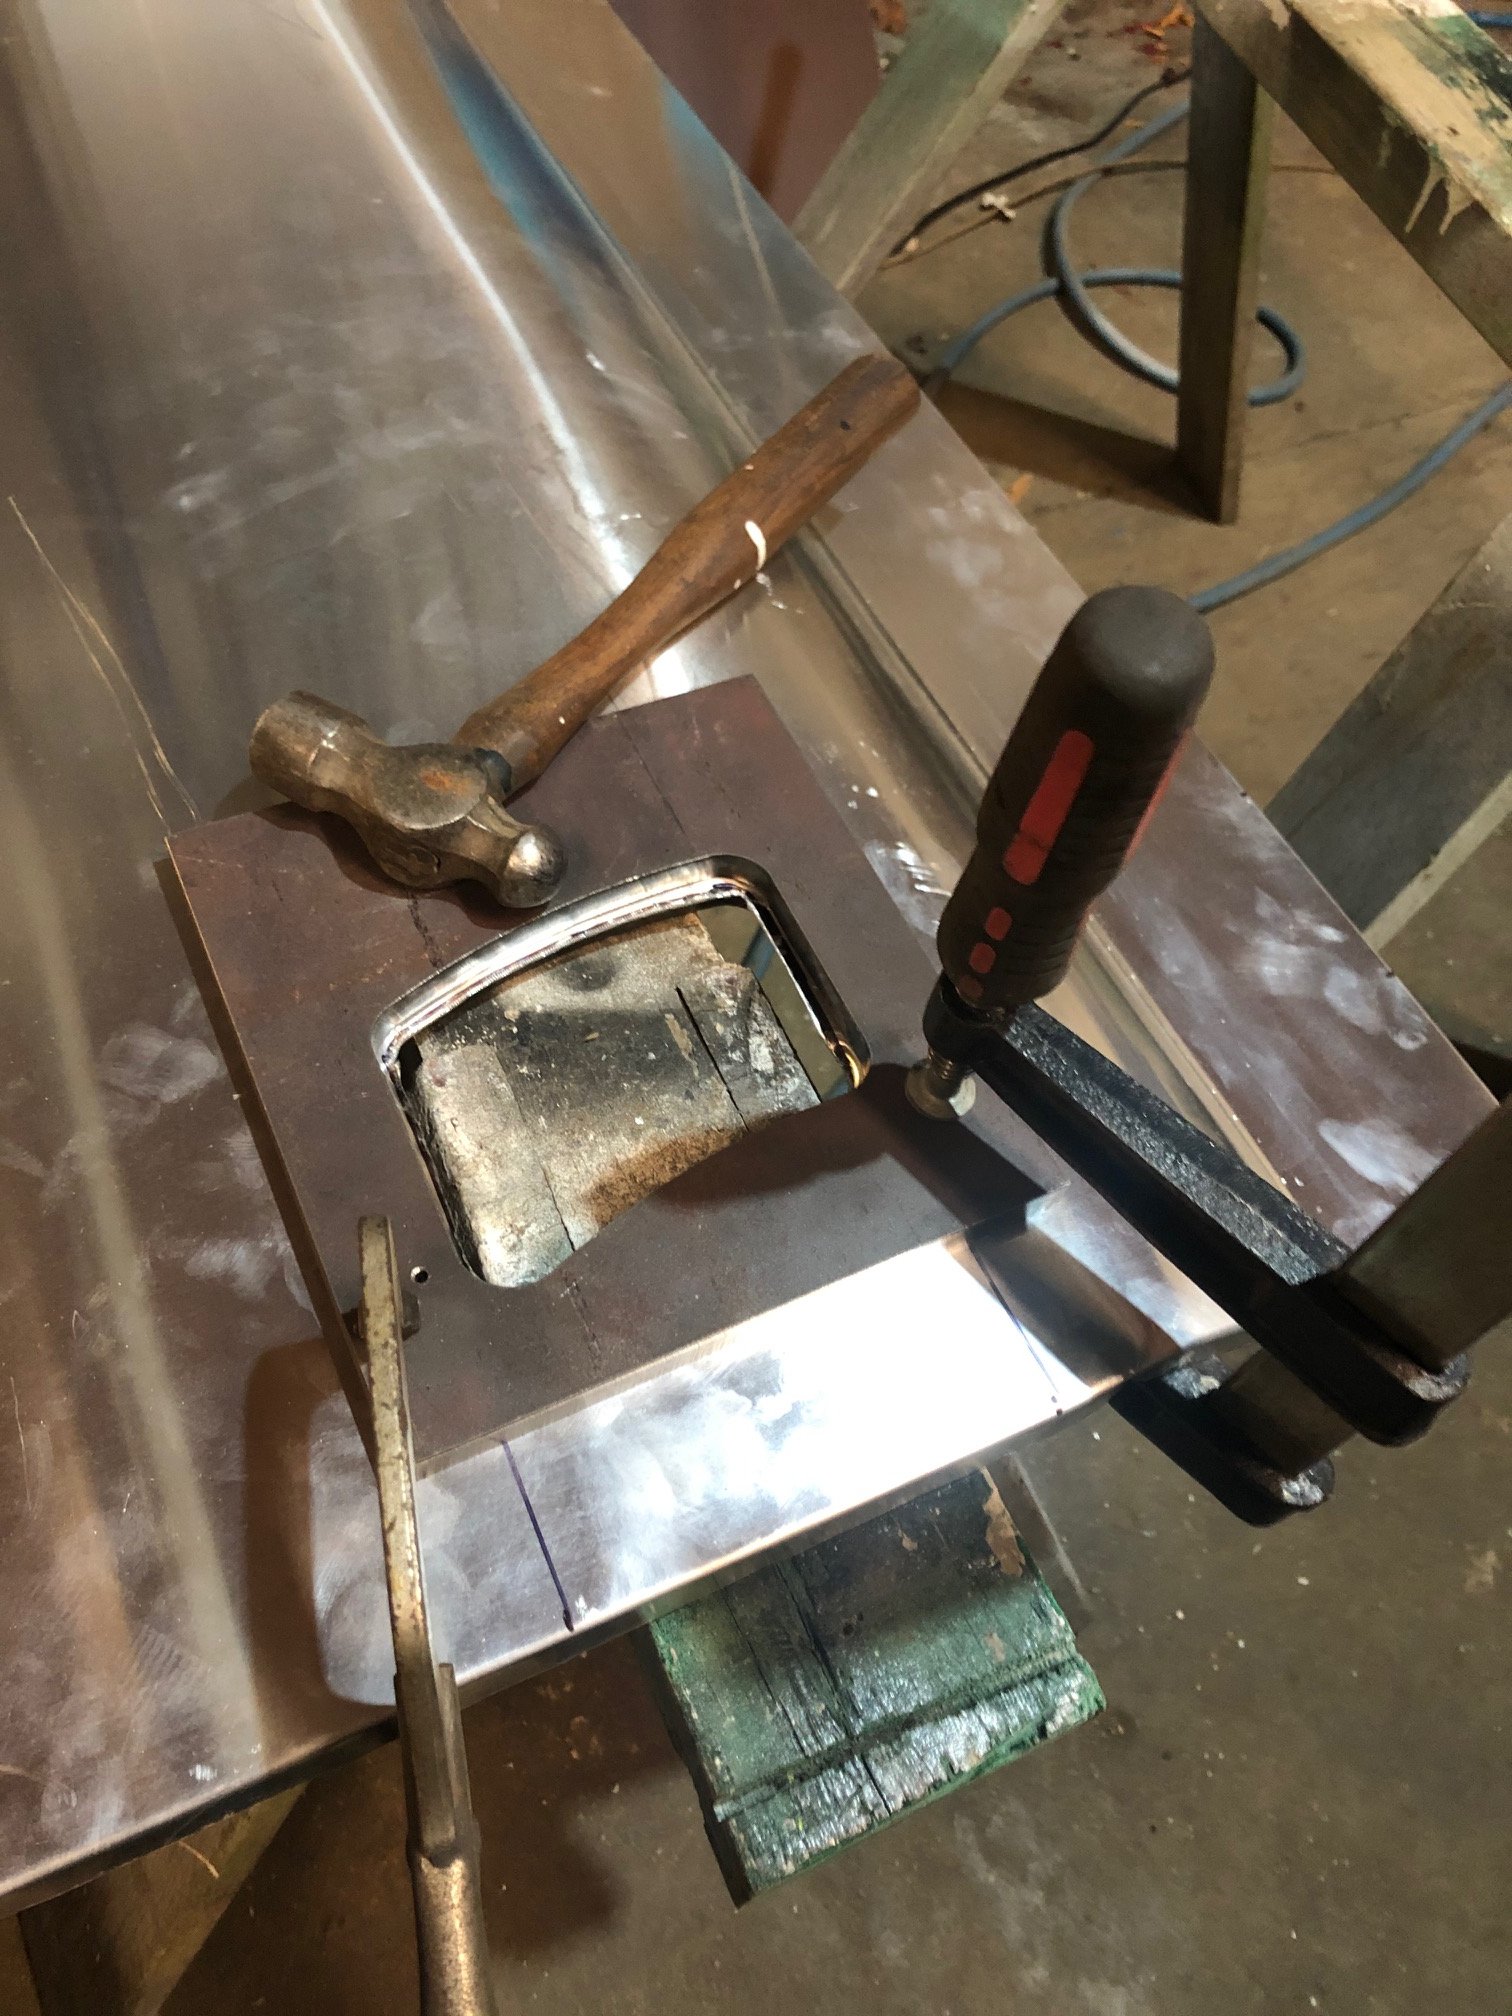
Bit more time in the shed. Got these skins knocked out. Hammerform approach worked really well. Would ideally have access to slip rolls to do the radius a little bit better (and a nicer folder) but got there in the end... Will drop the frames off at the blaster, still alot of work in the back doors
- 70 replies
-
- 31
-
-
^ yup, friend did the same a number of years back... had lockup converter on a seperate speed switch.
-
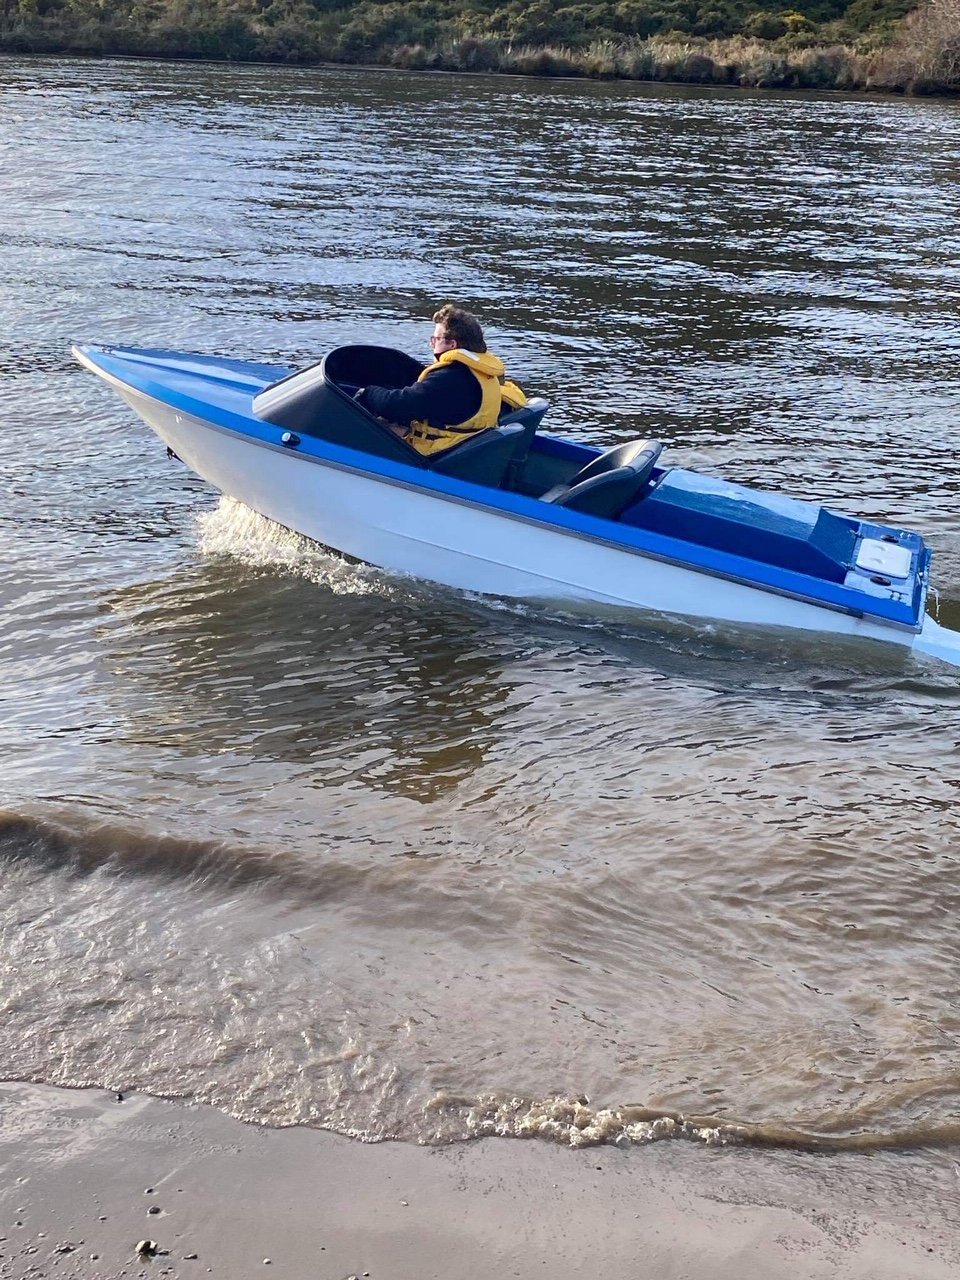
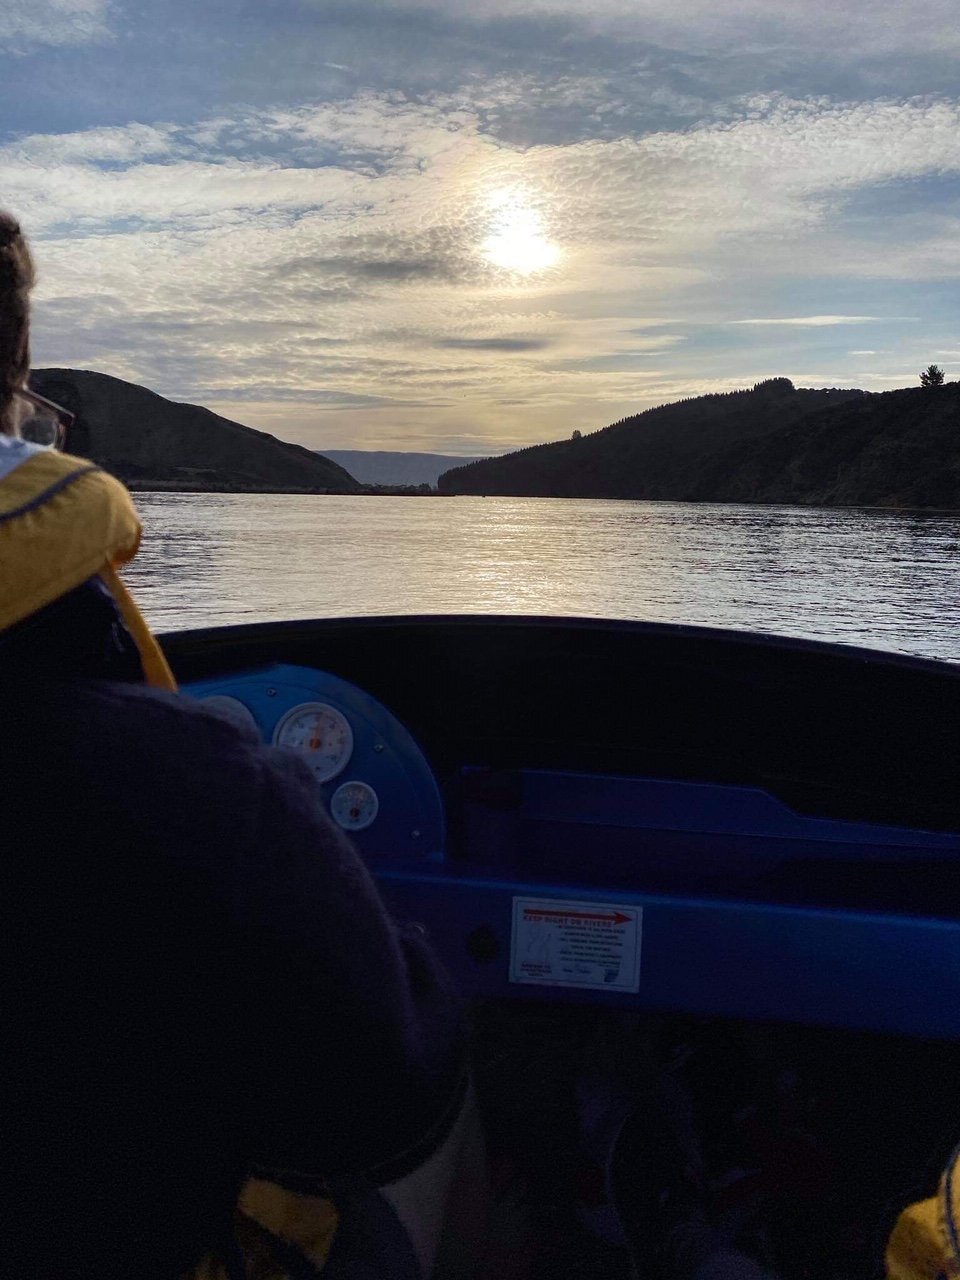
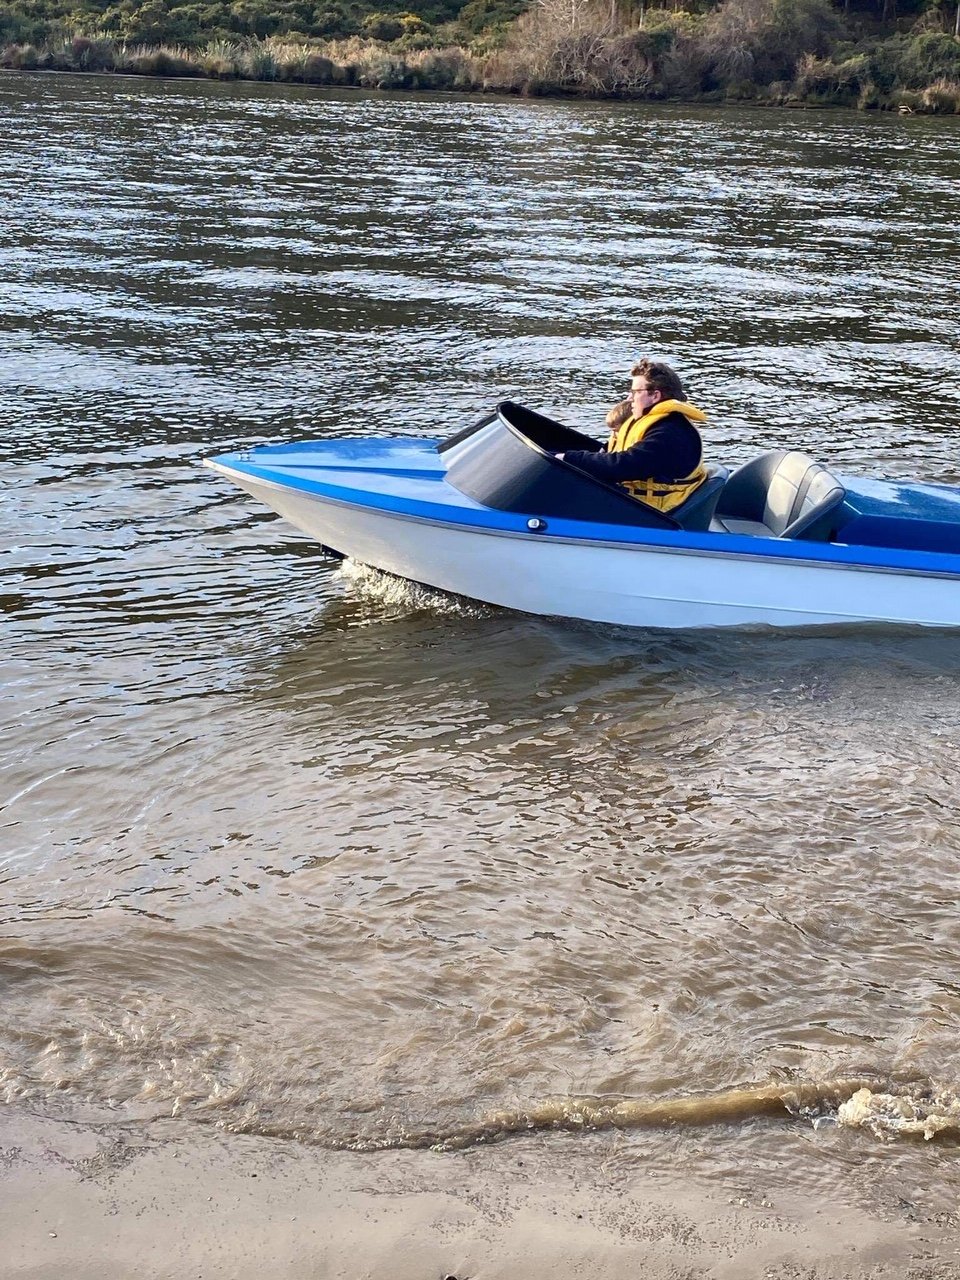
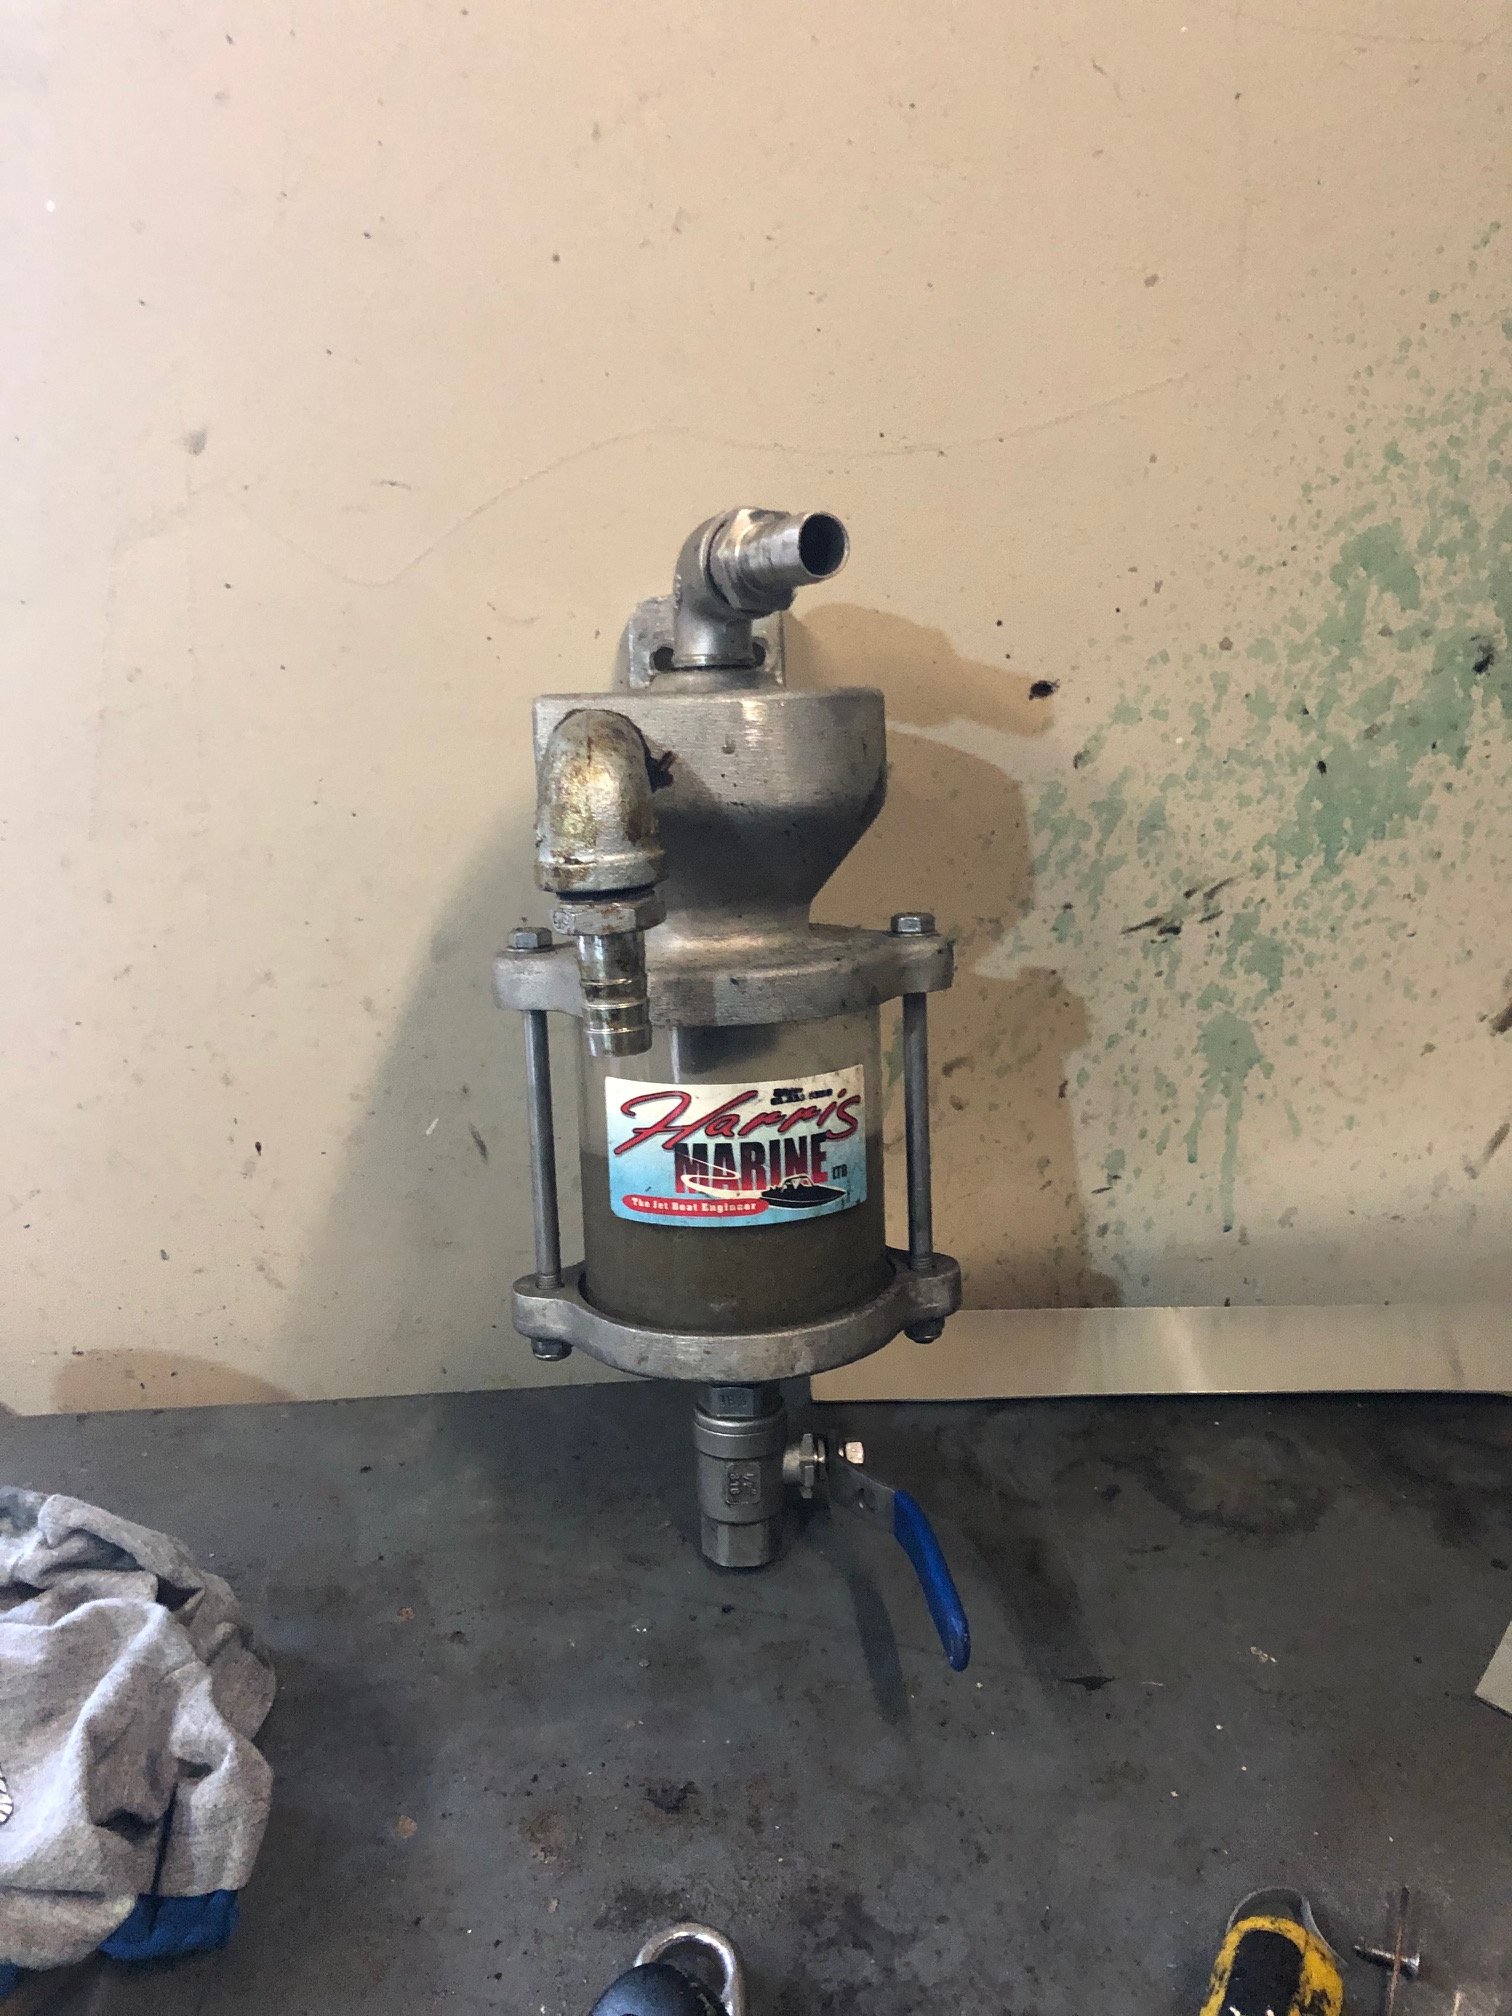
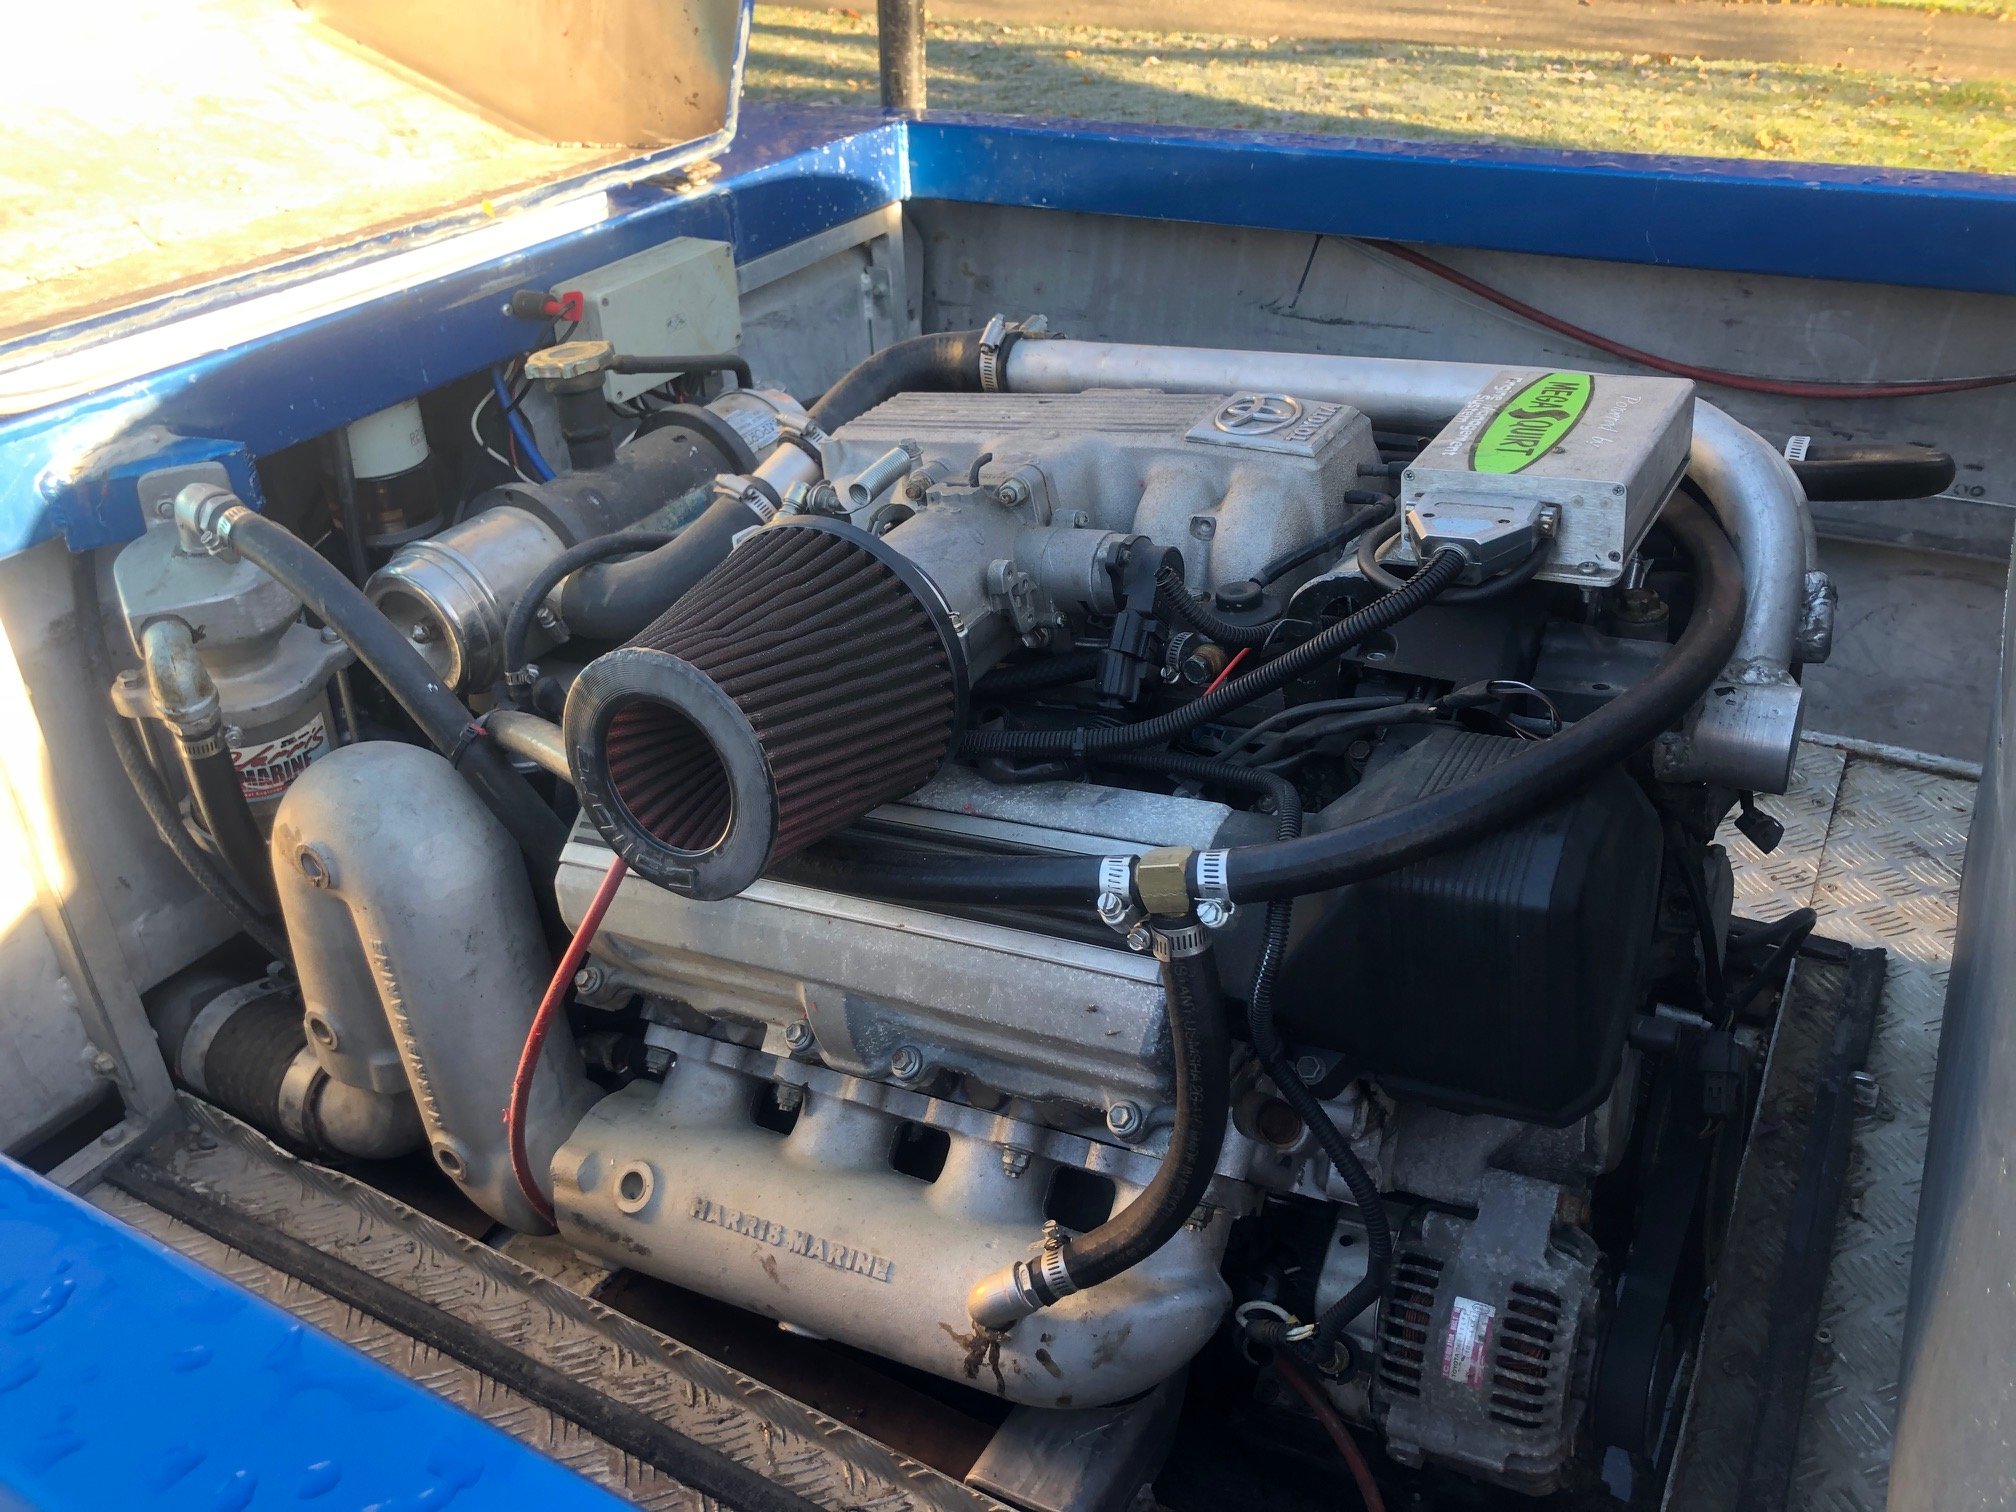
Got it out this weekend.... had reset the tune on it and it starts/idles alot better, still not perfect without ICAV but good enough.... trying to track down a log manifold so I can setup an O2 to do some proper logging/tuning. Also, when I did my sale inspection I noticed a decent amount of water collecting in the bilge. Mr mechanic seller wasnt to phased and was happy to use the pump most of the time to clear the bilge, I used this to negotiate thinking that either the jet unit for the bolts holding the keel plastic on would need resealed. Turns out the solution is way easier... water is fair pissing out of the lower seal on the sandtrap. Where the seal fits to the housing was loaded up with old silt and preventing it from sealing (likely pulled apart in a hurry and never cleaned), likewise the seals are old and caked up with grit. Should be an easy fix....
- 19 replies
-
- 12
-
-
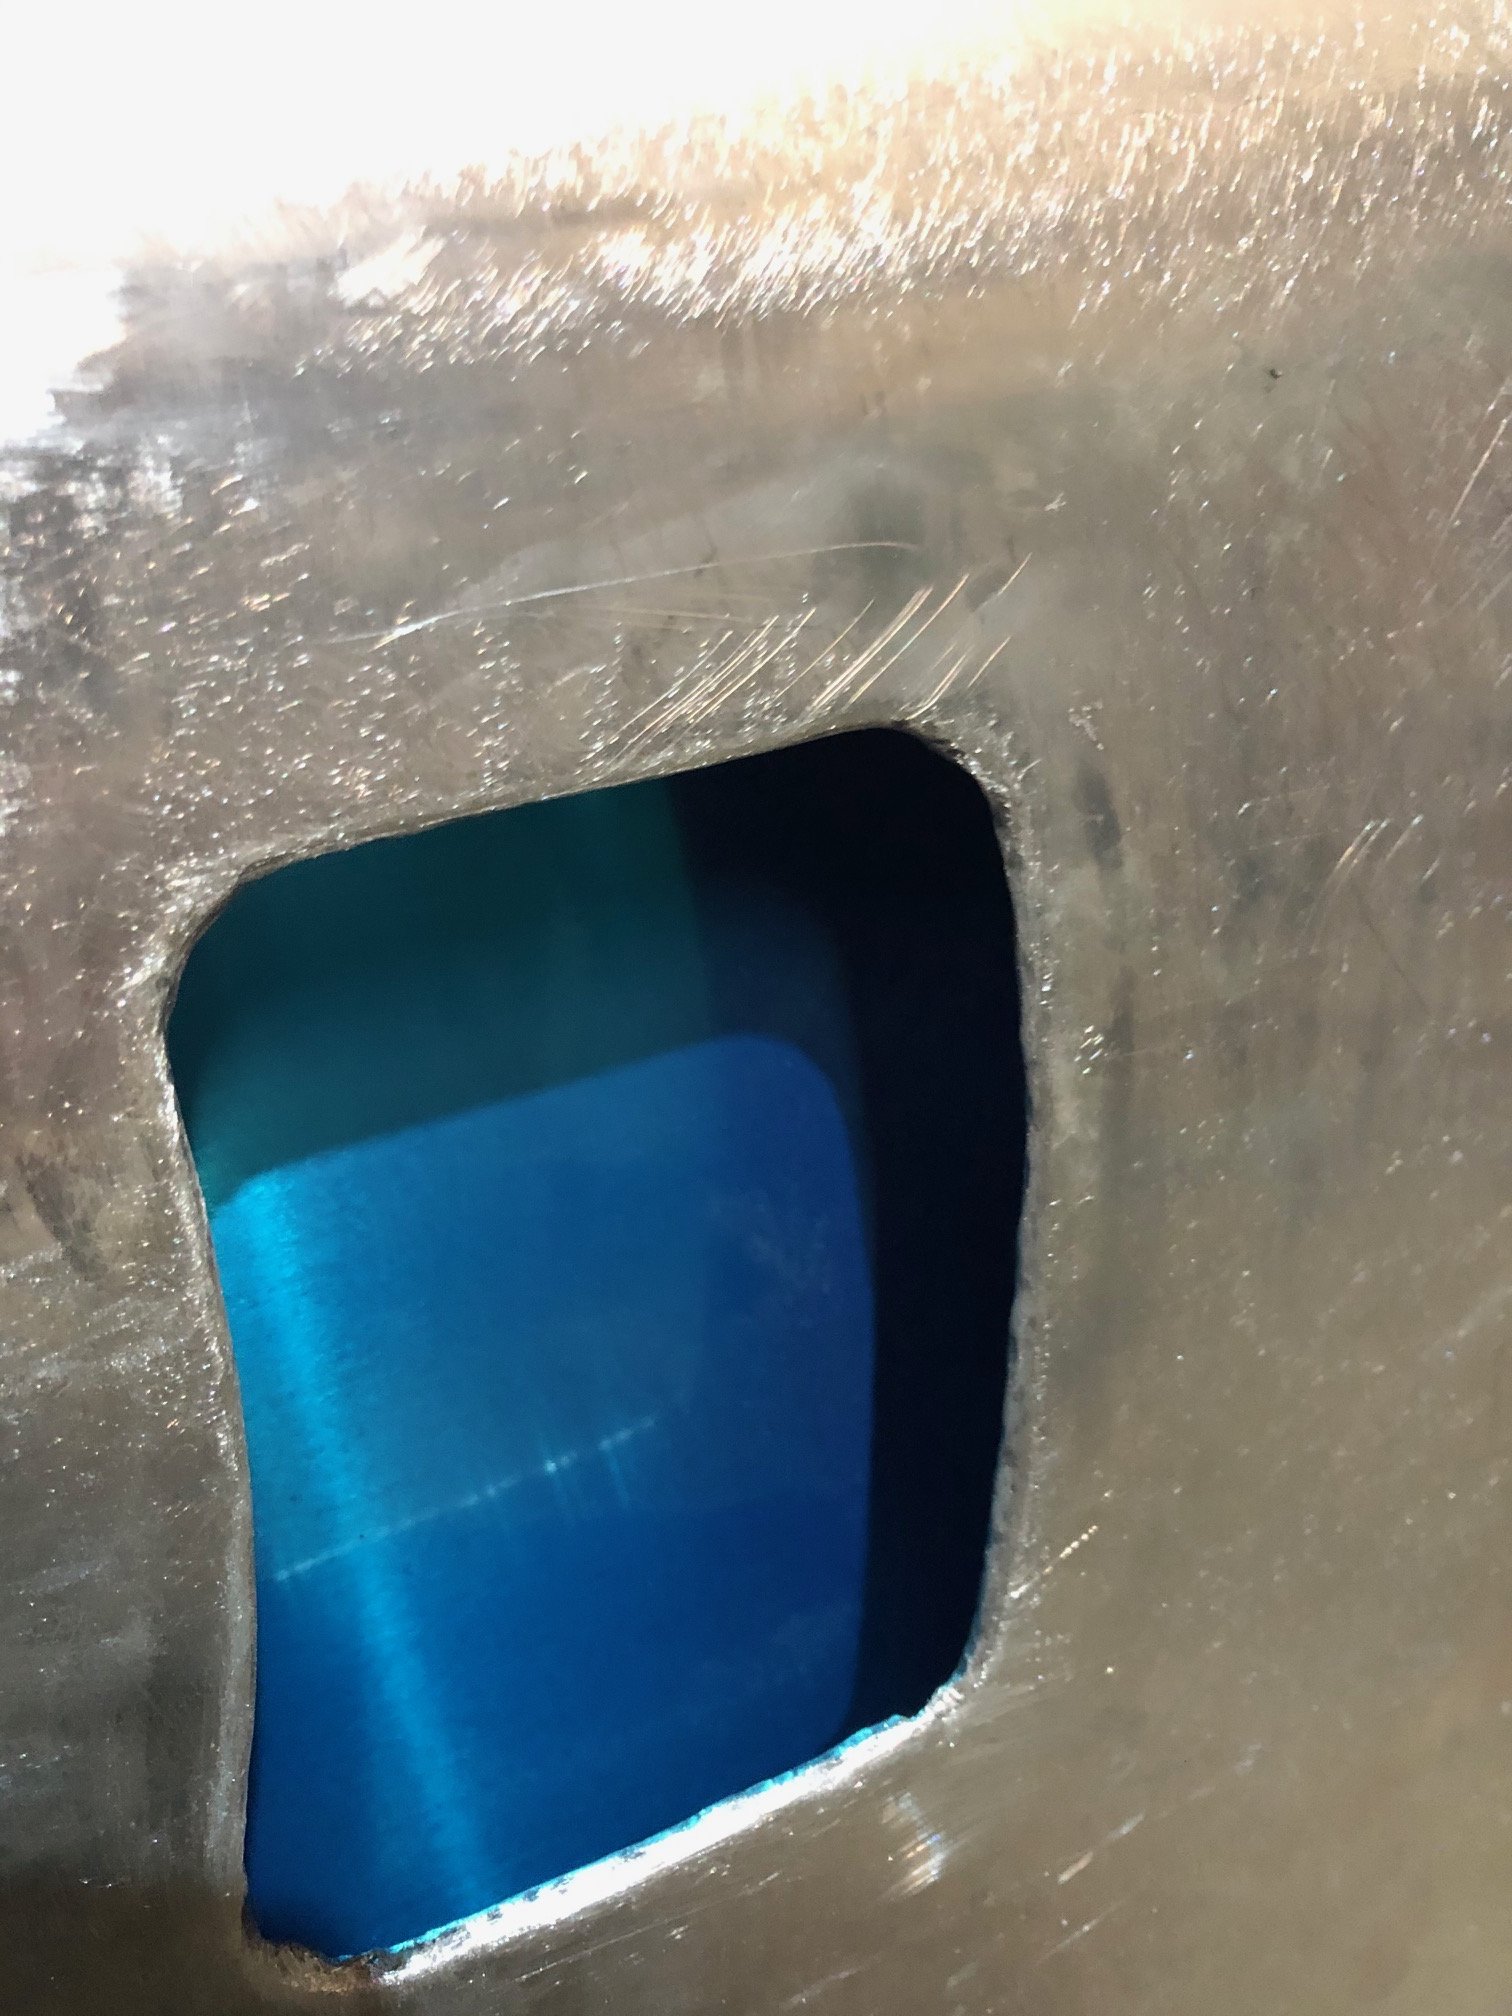
Been a little quiet on the LR front.... Been gearing up with some homebuilt tools to manufacture these door skins, I have a bunch of interest from others who want me to make skins, including someone who has just purchased a Forward Control S2 - they are a unique door to that model which should be interesting. Anywho, made a 'mini' door just to confirm my steps. The door handle opening was done by making a hammerform from a 1/2" plate cut to the correct shape, I radiused the edge on it so it would give me the right kind of 'roll over'. Currently have made these from 1200-H14 but might try and get something stiffer next time which will help with dent resistance.
- 70 replies
-
- 15
-
-
I assembled one of these A engines a few months back, your description of dizzy position sounds correct.... If it hasn't been replaced the chains in these will be getting really slack now, they can jump teeth. Put it on TDC, pull the cover off and see if the crank/cam marks point to each other. I cant recall the exact position but the crank key should sit in a particular reference to this also (it may have stripped the key). In the Haynes manual
-
Got it, makes sense. Found the link base tune by doing a screen shot from a video by 'CarTuneNZ' - great source for anything 1UZ. Looks a pretty good starting point, I also transcribed some accel settings from a decent source. Planning to get on the water this weekend. Will report back...
-
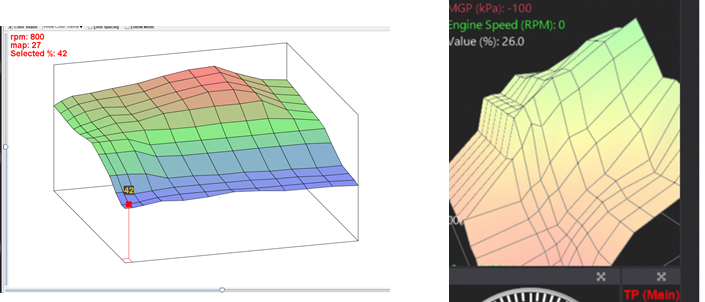
More good ideas.... Some quick googling finds some partial screenshots which looks somewhat similar.... Another question I have... doing some more research, with the 'constant load' aspect of the jet unit, the map area at which you are at 'cruise' has a higher MAP value than in a vehicle. Would it be ok in the AFR map to move the lean values into that area to correctly tune for those situations? Need to do the logging to properly see what I need to do but something I was thinking of. Some quick googling to find a partial screen
-
Cheers, aligns with my strategy on this. Some more googling and found what could be a better starting point that what I have. Need to do some conversions as not all corrections in MS1 are % based. https://www.clublexus.com/forums/build-threads/771816-rob-s-sc400-pnp-megasquirt-project.html From the mods I had to do to the throttle, fully expecting the TPS isnt calibrated correctly and need to check the base timing (I see 4 Deg trim already) Not sure I've I'll get to much testing on it this weekend, started trying to hunt down 1UZ log exhausts to rig up the O2. Aim it to get at least 'running right' prior to spring. I need to pull the engine at some point (probably next year) and will likely go through and re-wire alot of the connectors, built a proper fuse and relay bank, perhaps upgrade to a microsquirt and mount in a different location. Who know what the years of heat/vibration has done on this MS1 and its expected reliability....
-
Don't have the functionality here but this fills in the blanks where I need to go... https://www.msextra.com/forums/viewtopic.php?f=134&t=66937
-
Thats an awesome idea... if my hot timing is ~12deg, knock this back to 8-10 might be enough? Asuming I keep the relevent cells out of this a bit higher shouldnt cause any off idle accel issues? Yes, know REQ_Fuel is just a scaler, just cautious since this early megasquirt version swaps between raw and % tables (compared to later models) that I dont mess certain parts up.
-
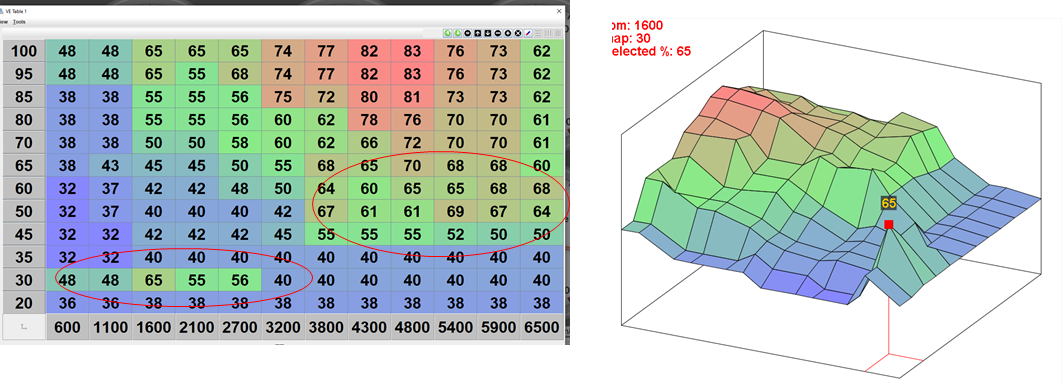
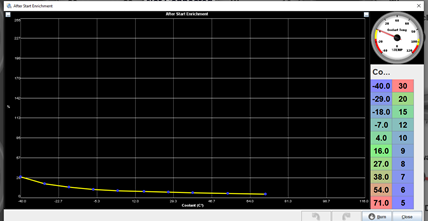
Yet to start logging with the boat but looking at the current tune, and noting some potential problems.... Firstly, REQ_Fuel (base injector pulse width) is set ~11% too low (6.0 vs 6.7ms) for what the calculator shows, they've used some funny parameters in the calc to get 6.0ms so likely whoever was originally doing it found that 6.0 was (close to right) Looking at the fuel table there are two 'ridges', the low MAP/low RPM one was probably set in an attempt to help idling (the idle control valve has been removed) and the higher one probably because thats where the engine is mostly in the table - my reading shows that since the load on the engine is relatively constant (i.e. you're pushing water through a jet pump) you only use a small portion of the map. Also, it starts pretty quick, the cranking table for MS1 is set by pulse width direct rather than % off the VE table, works out to be ~80% fuel so I think that may be roughly on the money. However takes a number of jabs on the throttle to stay going on the early stage of warmup. My feel from this is that the After Start Enrichment is too lean (and compensated by high values in the VE table) but warmup curve is probably ok. Or, is the fact there is no idle valve going to play into this? Being a direct drive boat I ideally dont want >1000rpm at any point during startup/idle and so wonder I can get away with no idle valve. Appreciate startup will never be spot on but perhaps a bit better than this currently if I can sort out these tables. Advice?
-
That might be the better option... going to think about it some more.... I really would prefer not to drill into the alloy and go through the flexi, issue is backflush water entering that area. Cheers Was looking to get a serial/bluetooth/Wifi adapter for logging, but might just be alot easier to run an extra long cable and sit an old laptop on the back seat
-
Think it’s been there for a long time... doubt it likes the heat either. Going to move it....
-
Think it’s been there for a long time... doubt it likes the heat either. Going to move it....
-
She gets pretty wet in there....
-
Think I've only been able to read through 50% of the thread but this is gold.... I'm going to do some logging/tuning on my boat and need to hook up a wideband. Jetties have advised the only way to really do this in marine manifolds is to drill/tap right next to a single exhaust port where it's not water jacketed. Realistically a widebands only going to be there during the period where I need to log/tune, I'll have it running open map 99% of the time. What problems am I going to run into? Will the AFR be bias lean/rich, how will heatsoak affect numbers? I'm sure the sensor wouldn't last too many hours to be left in that position anywho.
-
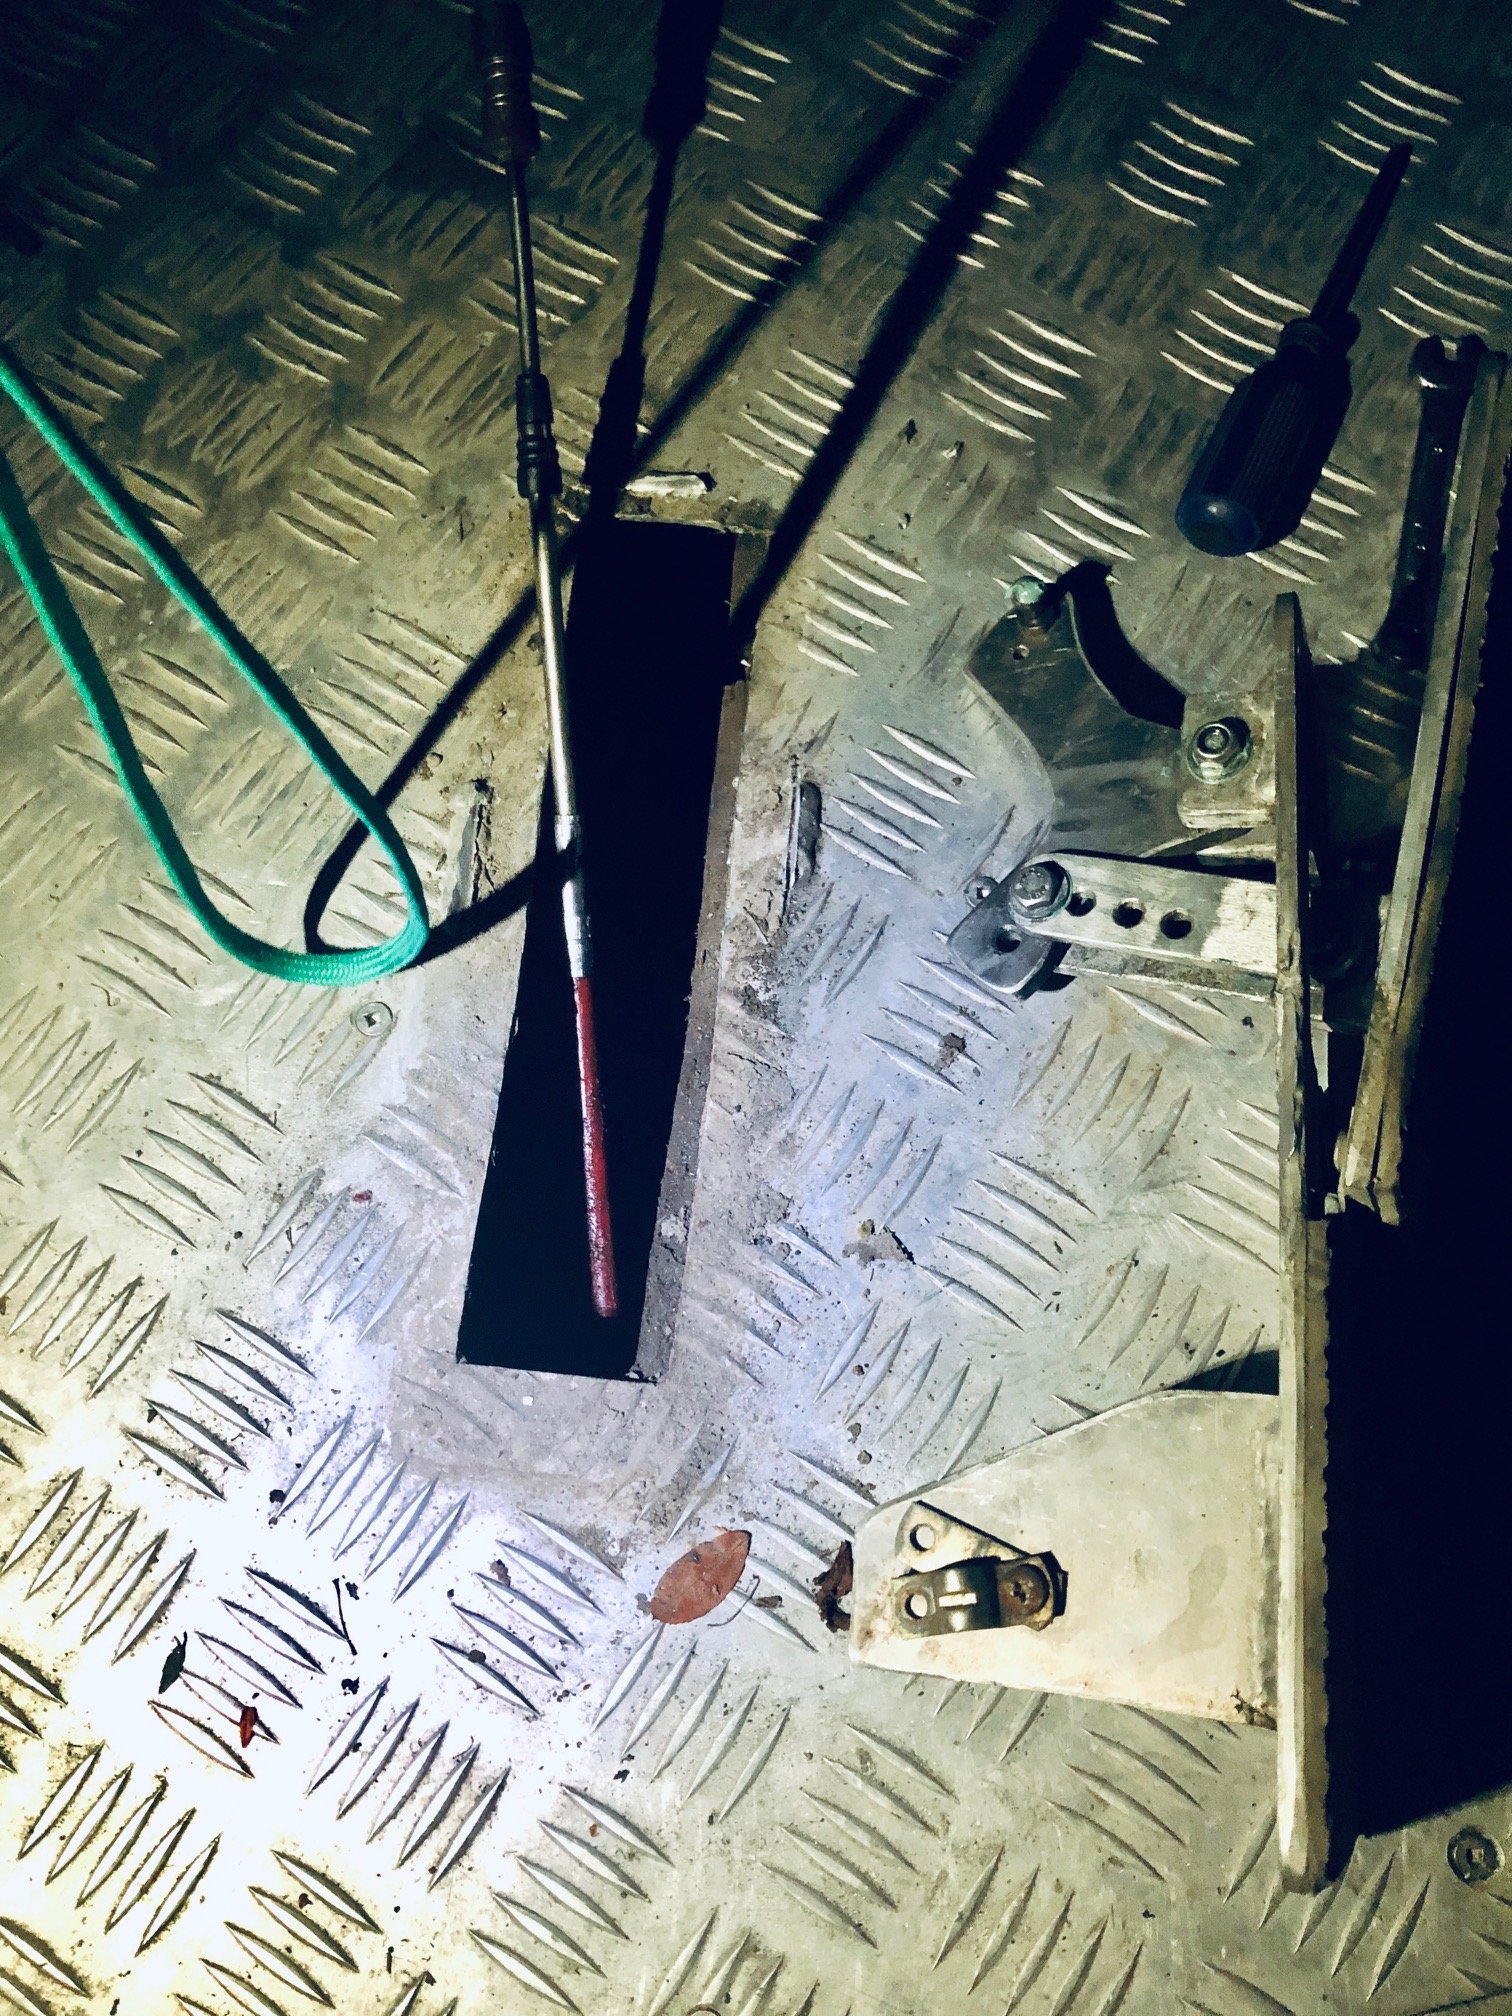
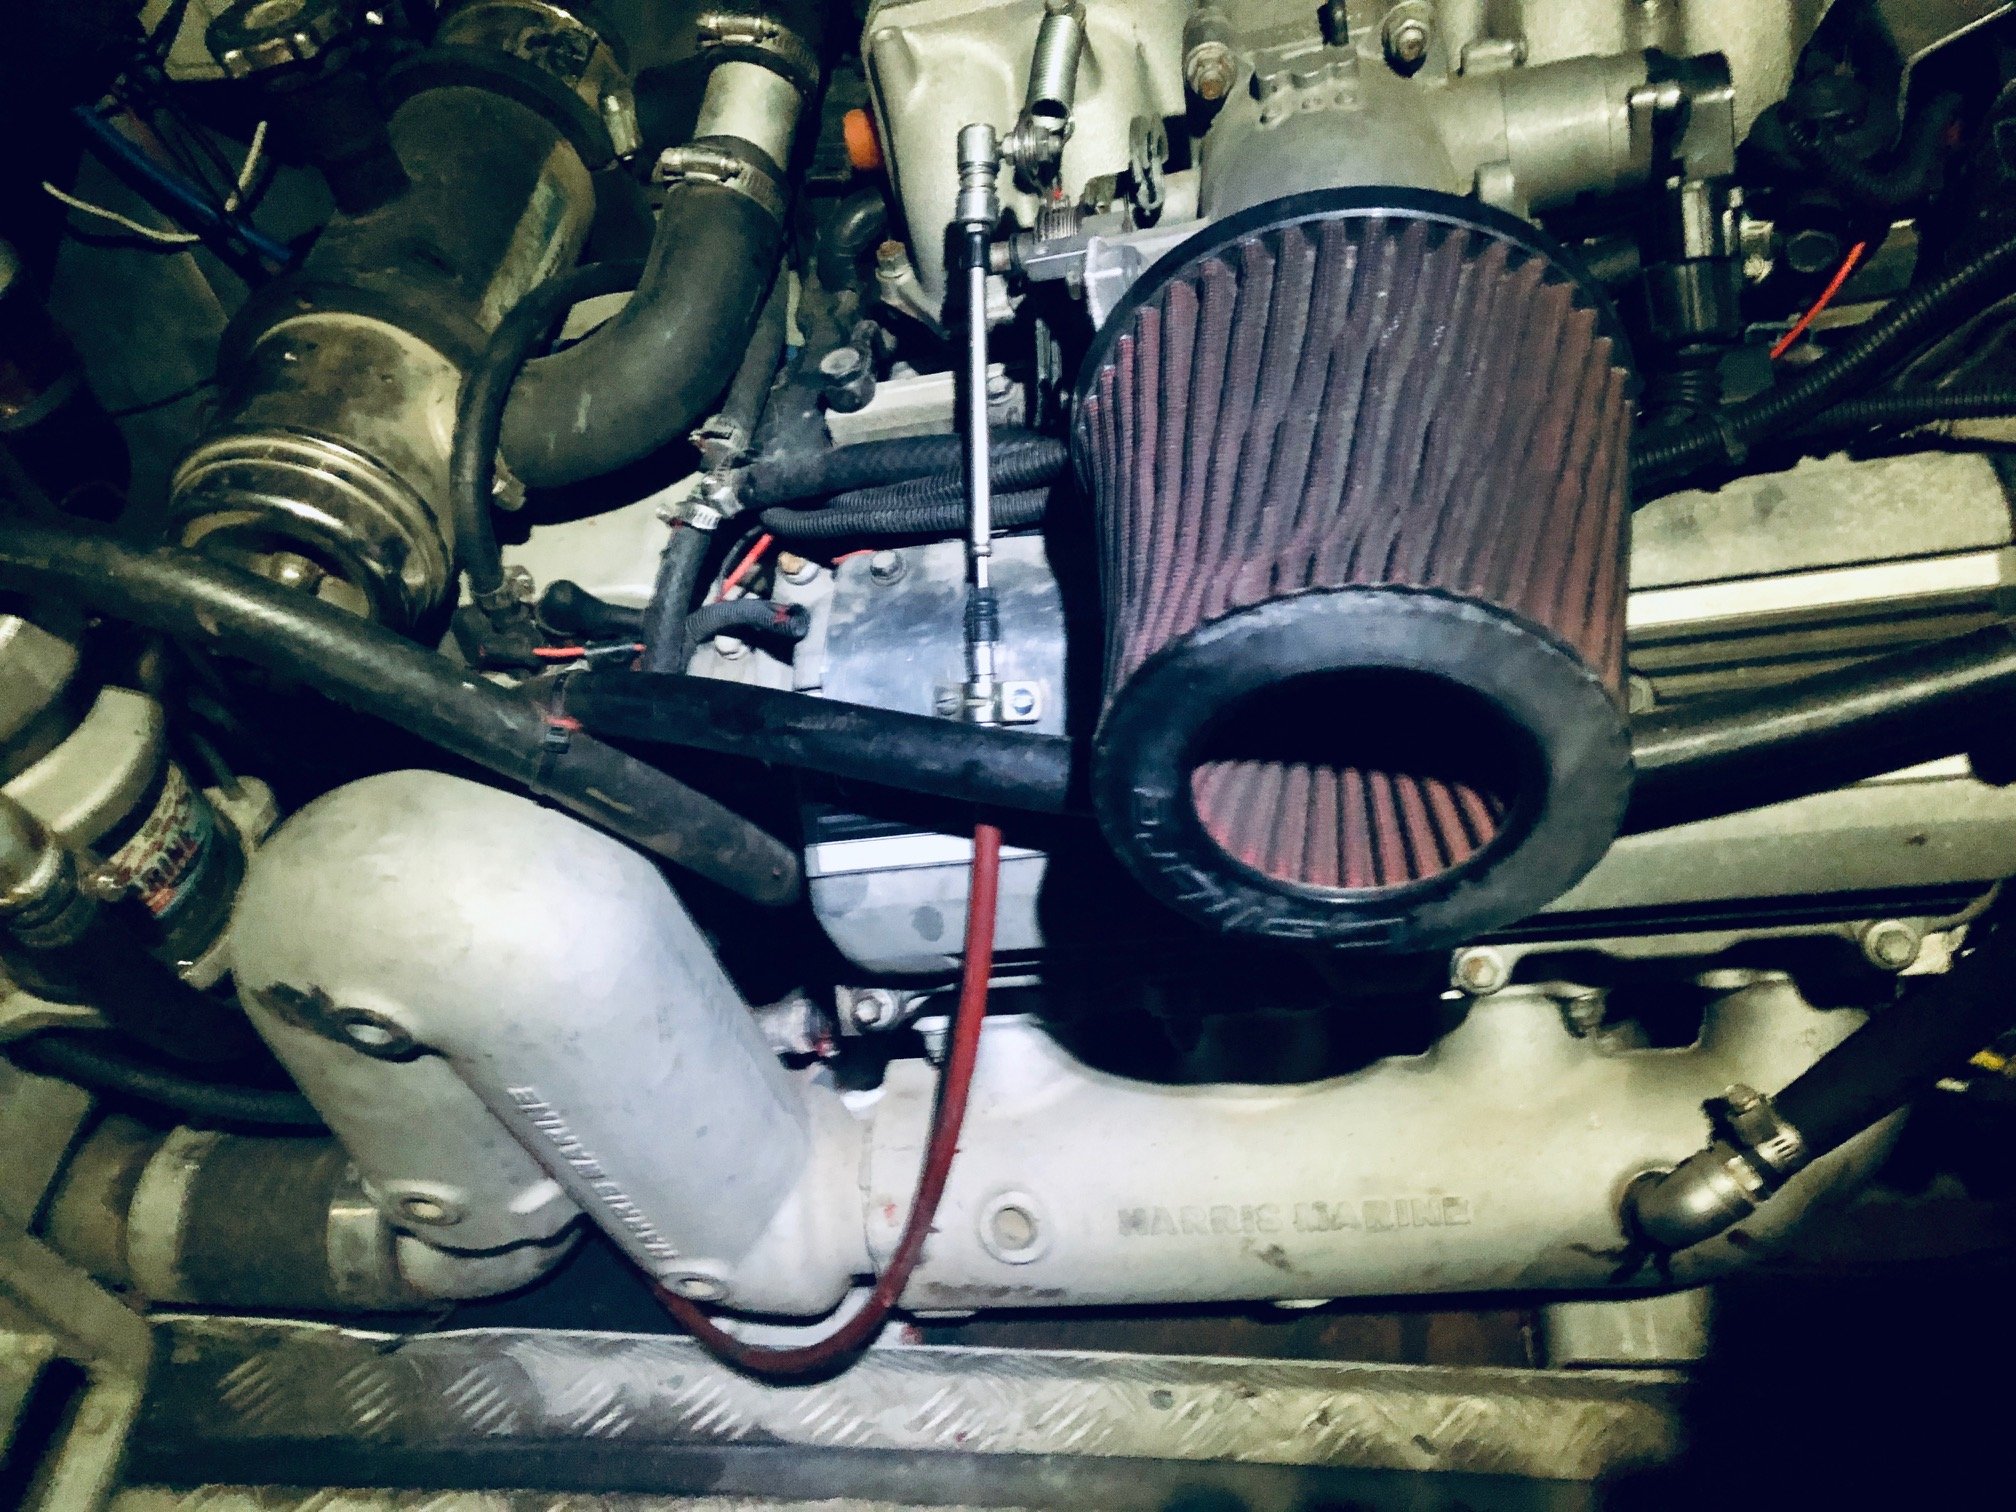
Some more tweaking tonight... apologies crap pics at night with head torch... The more I got into the throttle setup I found 2-3 other things I didnt like. First was the foot pedal... Its a home made affair but functional enough, pivots on m5 bolts with nylock nuts. Doing nothing drastic I just ensured there were washers at every pivot, used a dab of marine grease everywhere and snuged it up so it moved smooth with min drag. Drilled at each corner to hold it down to the checker plate (with ply underneath) The cable was next, ideally you wouldnt use a morse cable here, you'd use a normal cable to reduce friction and have a return spring at both the pedal and throttle body. I think they did this to get away with one (heavy) return spring, and coz Jet Boat. Anywho it in a bit of a coil in the bottom of the bilge so I pulled it out, checked for kink and then re-routed in a gentle curve round the back over the top of the jet unit - its quite a long cable.... Then the throttle assembly itself... lots wrong here, the clamp holding the cable isnt square to the throttle shaft so its tweaked the pivot sideways, the spring is barely holding on. Also since the arm has been pulled its now contacting an alloy boss on the side, both the position of the cable clamp and the protecting sleeve is preventing full travel of the cable. Result being that this thing was only able to run 1/2-3/4 throttle at any point in time... Bunch of small tweaks.... moved the cable clamp, removed the cable sleeve and cut down the offending boss. Now we have full throttle and it returns correctly to idle position when you take the foot off the pedal. This will do for now, ideally I'll run a proper cable at some point in the future. Made me think... previous owner reckoned it wasnt as powerful as it should be.... did I mention he was a mechanic and managed a workshop....
- 19 replies
-
- 13
-
-
Pondering next steps on the ECU/1UZ... with the idle control missing the start ups aren't that great... would look to add one of the aftermarket 2-wire kits and somehow run an O2 sensor (I have some ideas)... Thinking I might just stick with what it is for ~6 months, iron out some of the other things and then do the above, upgrade to a MS3 and run CoP with a fully sequential setup and put a new loom in..... I bought this because it wasn't suppose to be 'a project'....