BlownCorona
-
Posts
6,541 -
Joined
-
Last visited
-
Days Won
4
Content Type
Forums
Downloads
Events
Gallery
Everything posted by BlownCorona
-

BlownCoronas 1988 Lotus Seven (Chevron)
BlownCorona replied to BlownCorona's topic in Projects and Build Ups
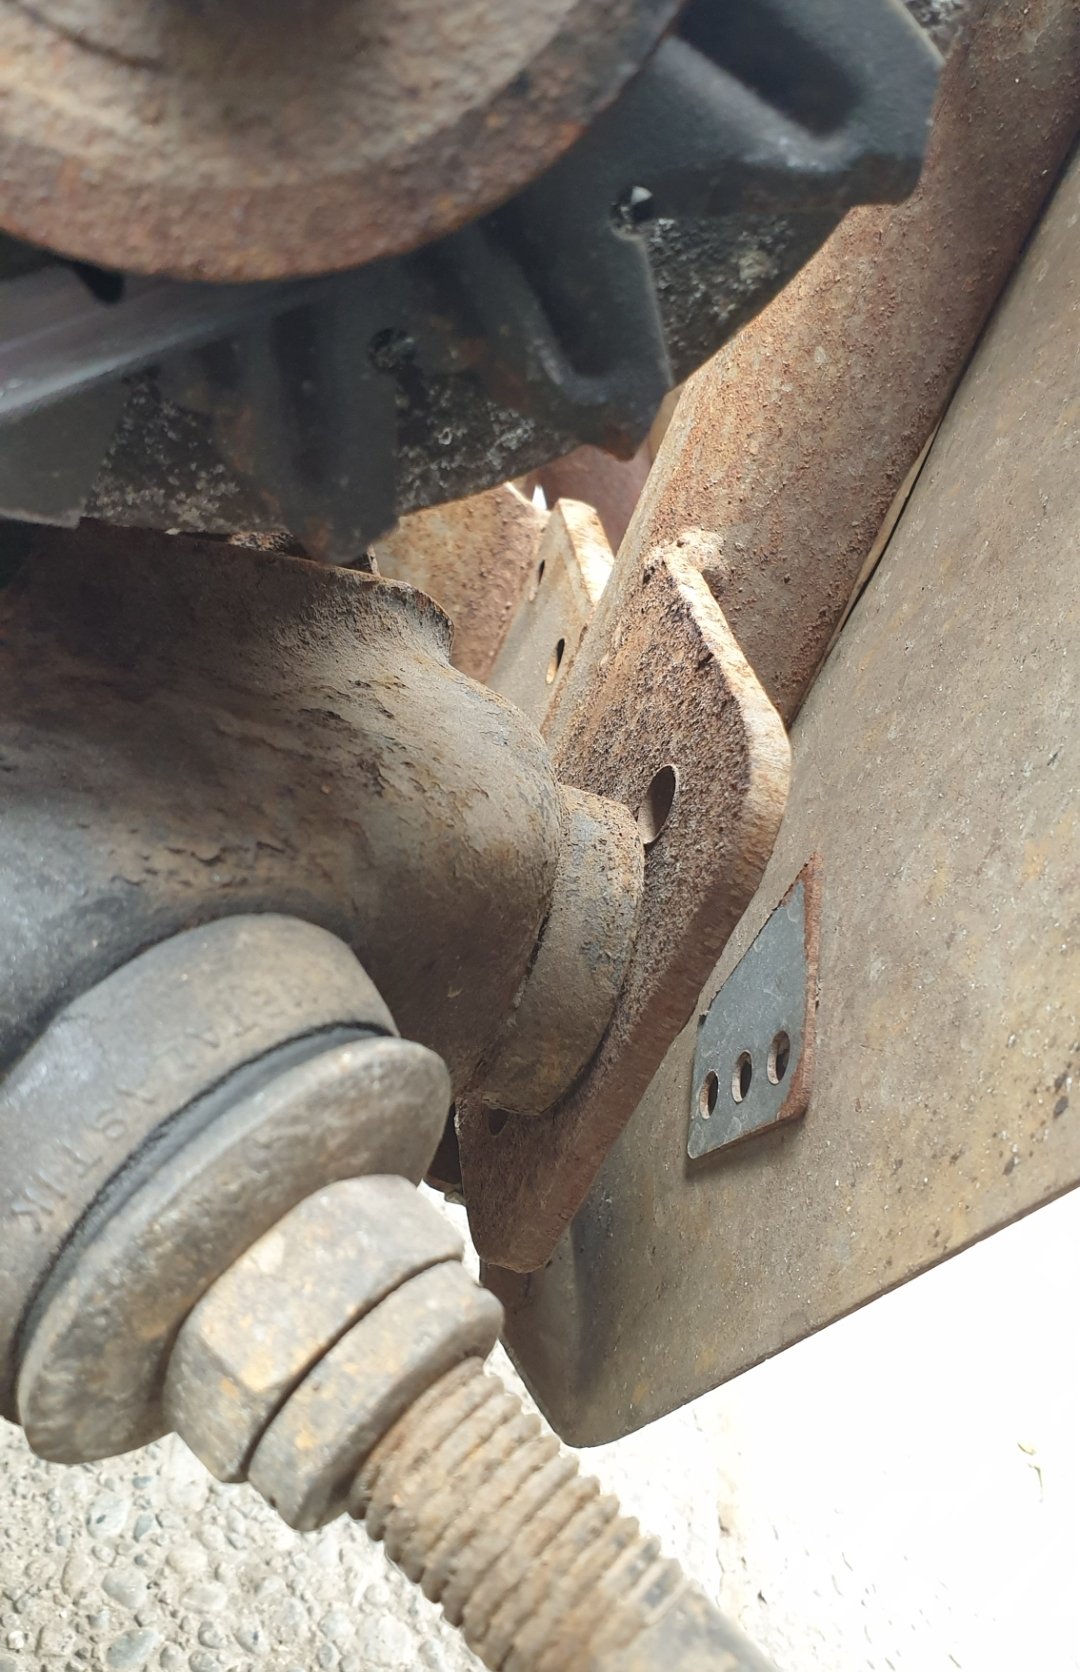
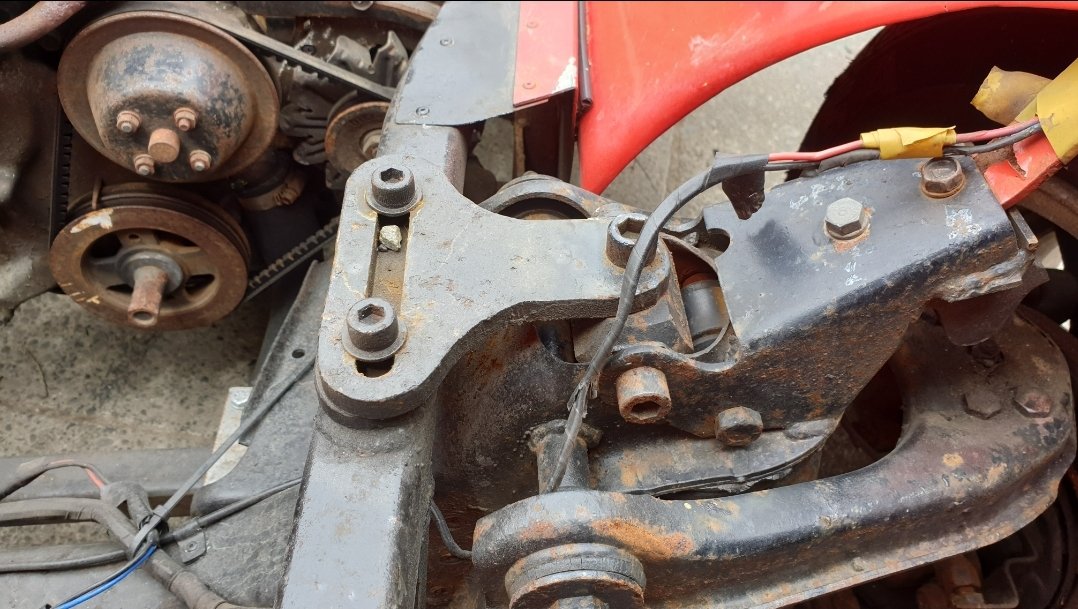
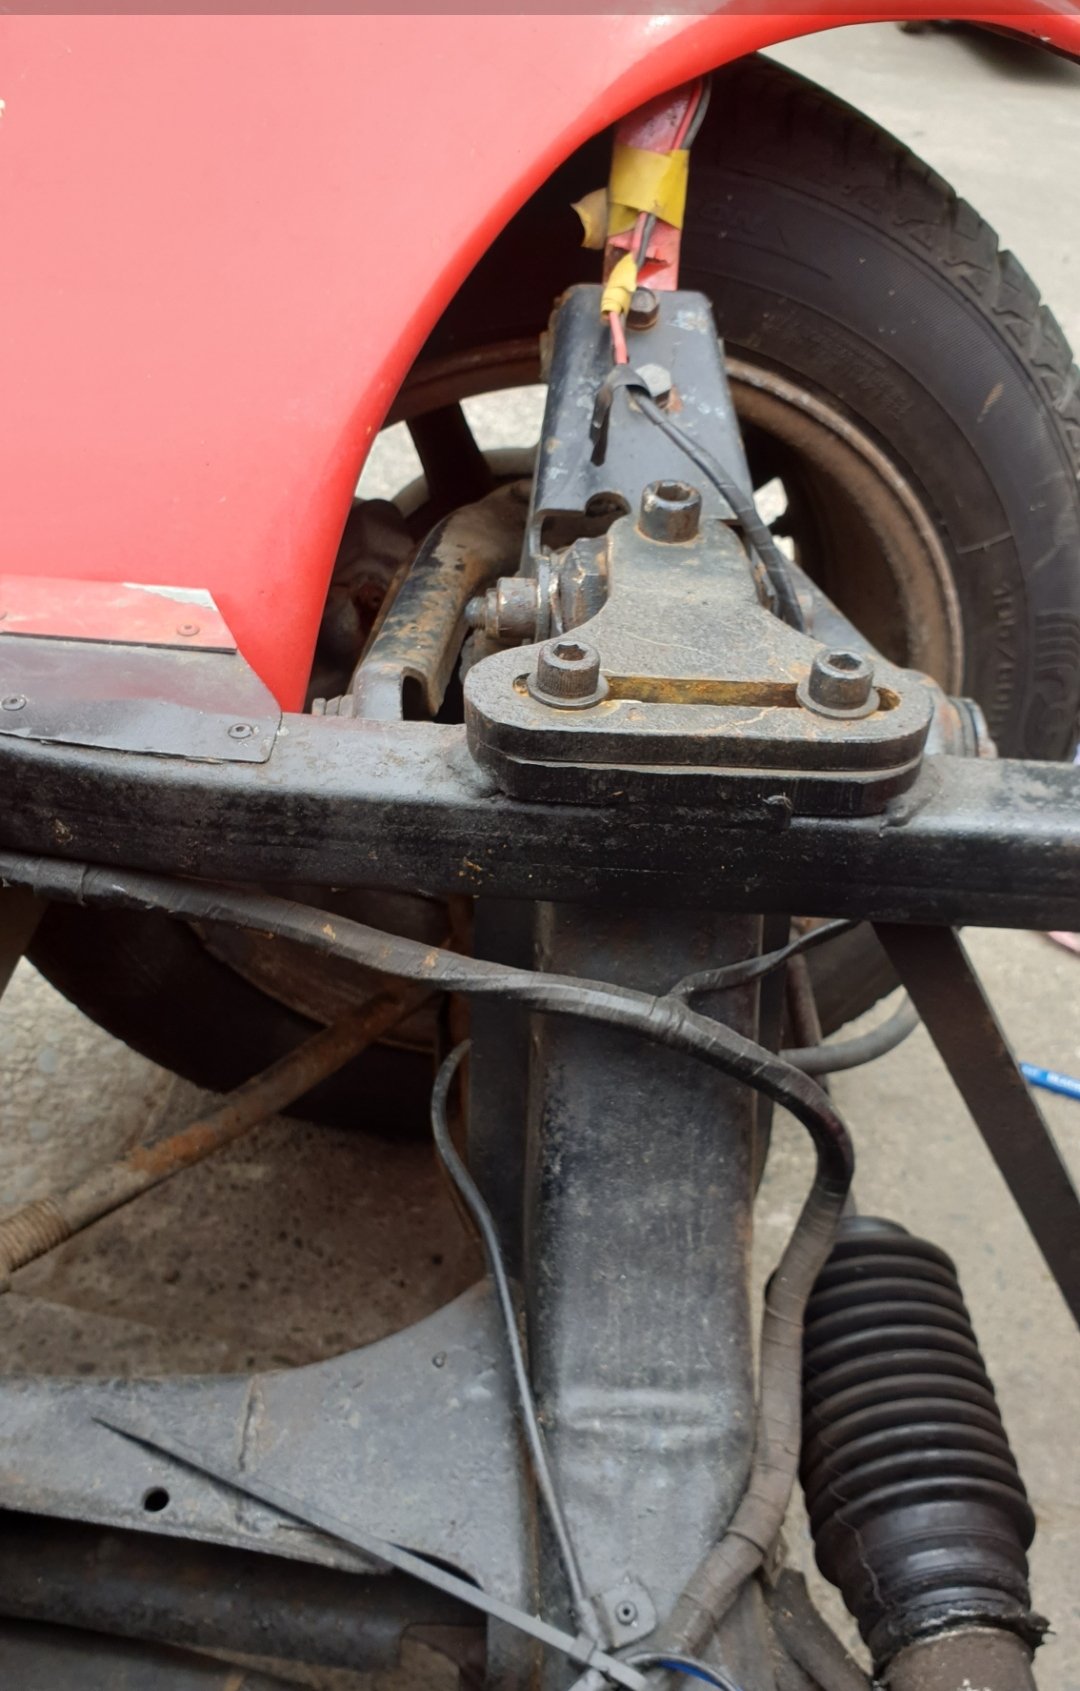
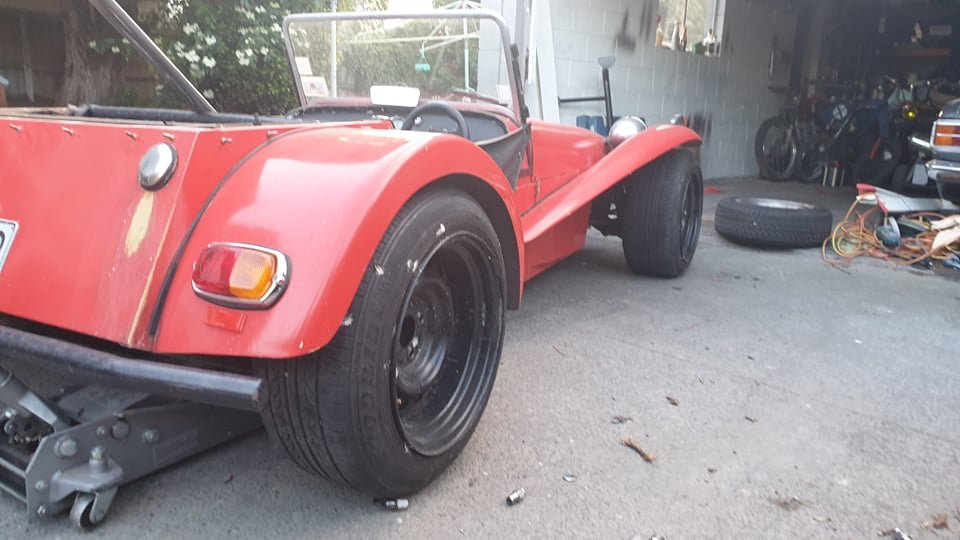
another one for @yoeddynz @vivaspeed and anyone who knows about Vivas or suspension geometry. a query raised at the wof was about the steering not returning to center, they thought it may be cause of the stiff spot in one area of the steering, but ive sorted that and its still no better. not really surprised as it wasn't really that stiff. at any speeds, low or high the steering wheel doesn't really return to center. now my limited knowledge on suspension geometry is that castor angle is what causes this effect. and castor angle looks to be really close to 0 deg on this car. there looks to be some form of caster angle adjustment where the viva subframe connects to the chassis, but it appears the upper mounts wont allow any angle change at all without stressing the whole lot. i could bend or remake the upper mounts but thought id better ask here what would be the way castor angle is adjusted on a viva? it looks like i could push the lower arm forward some with the trailing arms but that doesn't seem correct either.
-
you know youre probably right there, i was only going 16mm cause thats what the guy at saeco measured, but id better buy a battery for my verniers (or get some OG ones) and check for myself. id be much less surprised if it was 5/8ths be a bunch more options at 5/8ths too
-
its appears to be a double row ball bearing type. its not tapered, but it might be like an old pushbike? ive never played with them. unfortunately the play is between the shells and balls. so the inner race has some movement in it that it shouldnt do. its a 16mm shaft, which is weird because i thought it would have been imperial. but 16mm bearings arnt very common. the amount of play left with the grease, id probably be happy to run with (knowing that the bearings not going to collapse or anything) but i dont think the wof man should have to accept a half fixed solution
-
i repacked the bearing with grease and it made it heaps better, but there's still a little play unfortunately enough that i probably do need to source a new bearing to fit in there.
-
went to saeco but nothing off the shelf (though increasingly ive found saeco to be unable to help with things that arnt direct replacements) so have taken that with a grain of salt and having a look online myself. it sure would help if i could find my vernier calipers, or even my streel rule. keep ya garages clean yo, its a pain in the ass,
-
man is that really what they want to charge for something like that? its not even a good bearing. if its gonna be anymore than 20 bucks for an oem bearing ill just make an off the shelf skf fit/never gonna wear out again. edit - i do ofcourse appreciate the help and sourcing of other options!
-
BlownCoronas 1988 Lotus Seven (Chevron)
BlownCorona replied to BlownCorona's topic in Projects and Build Ups
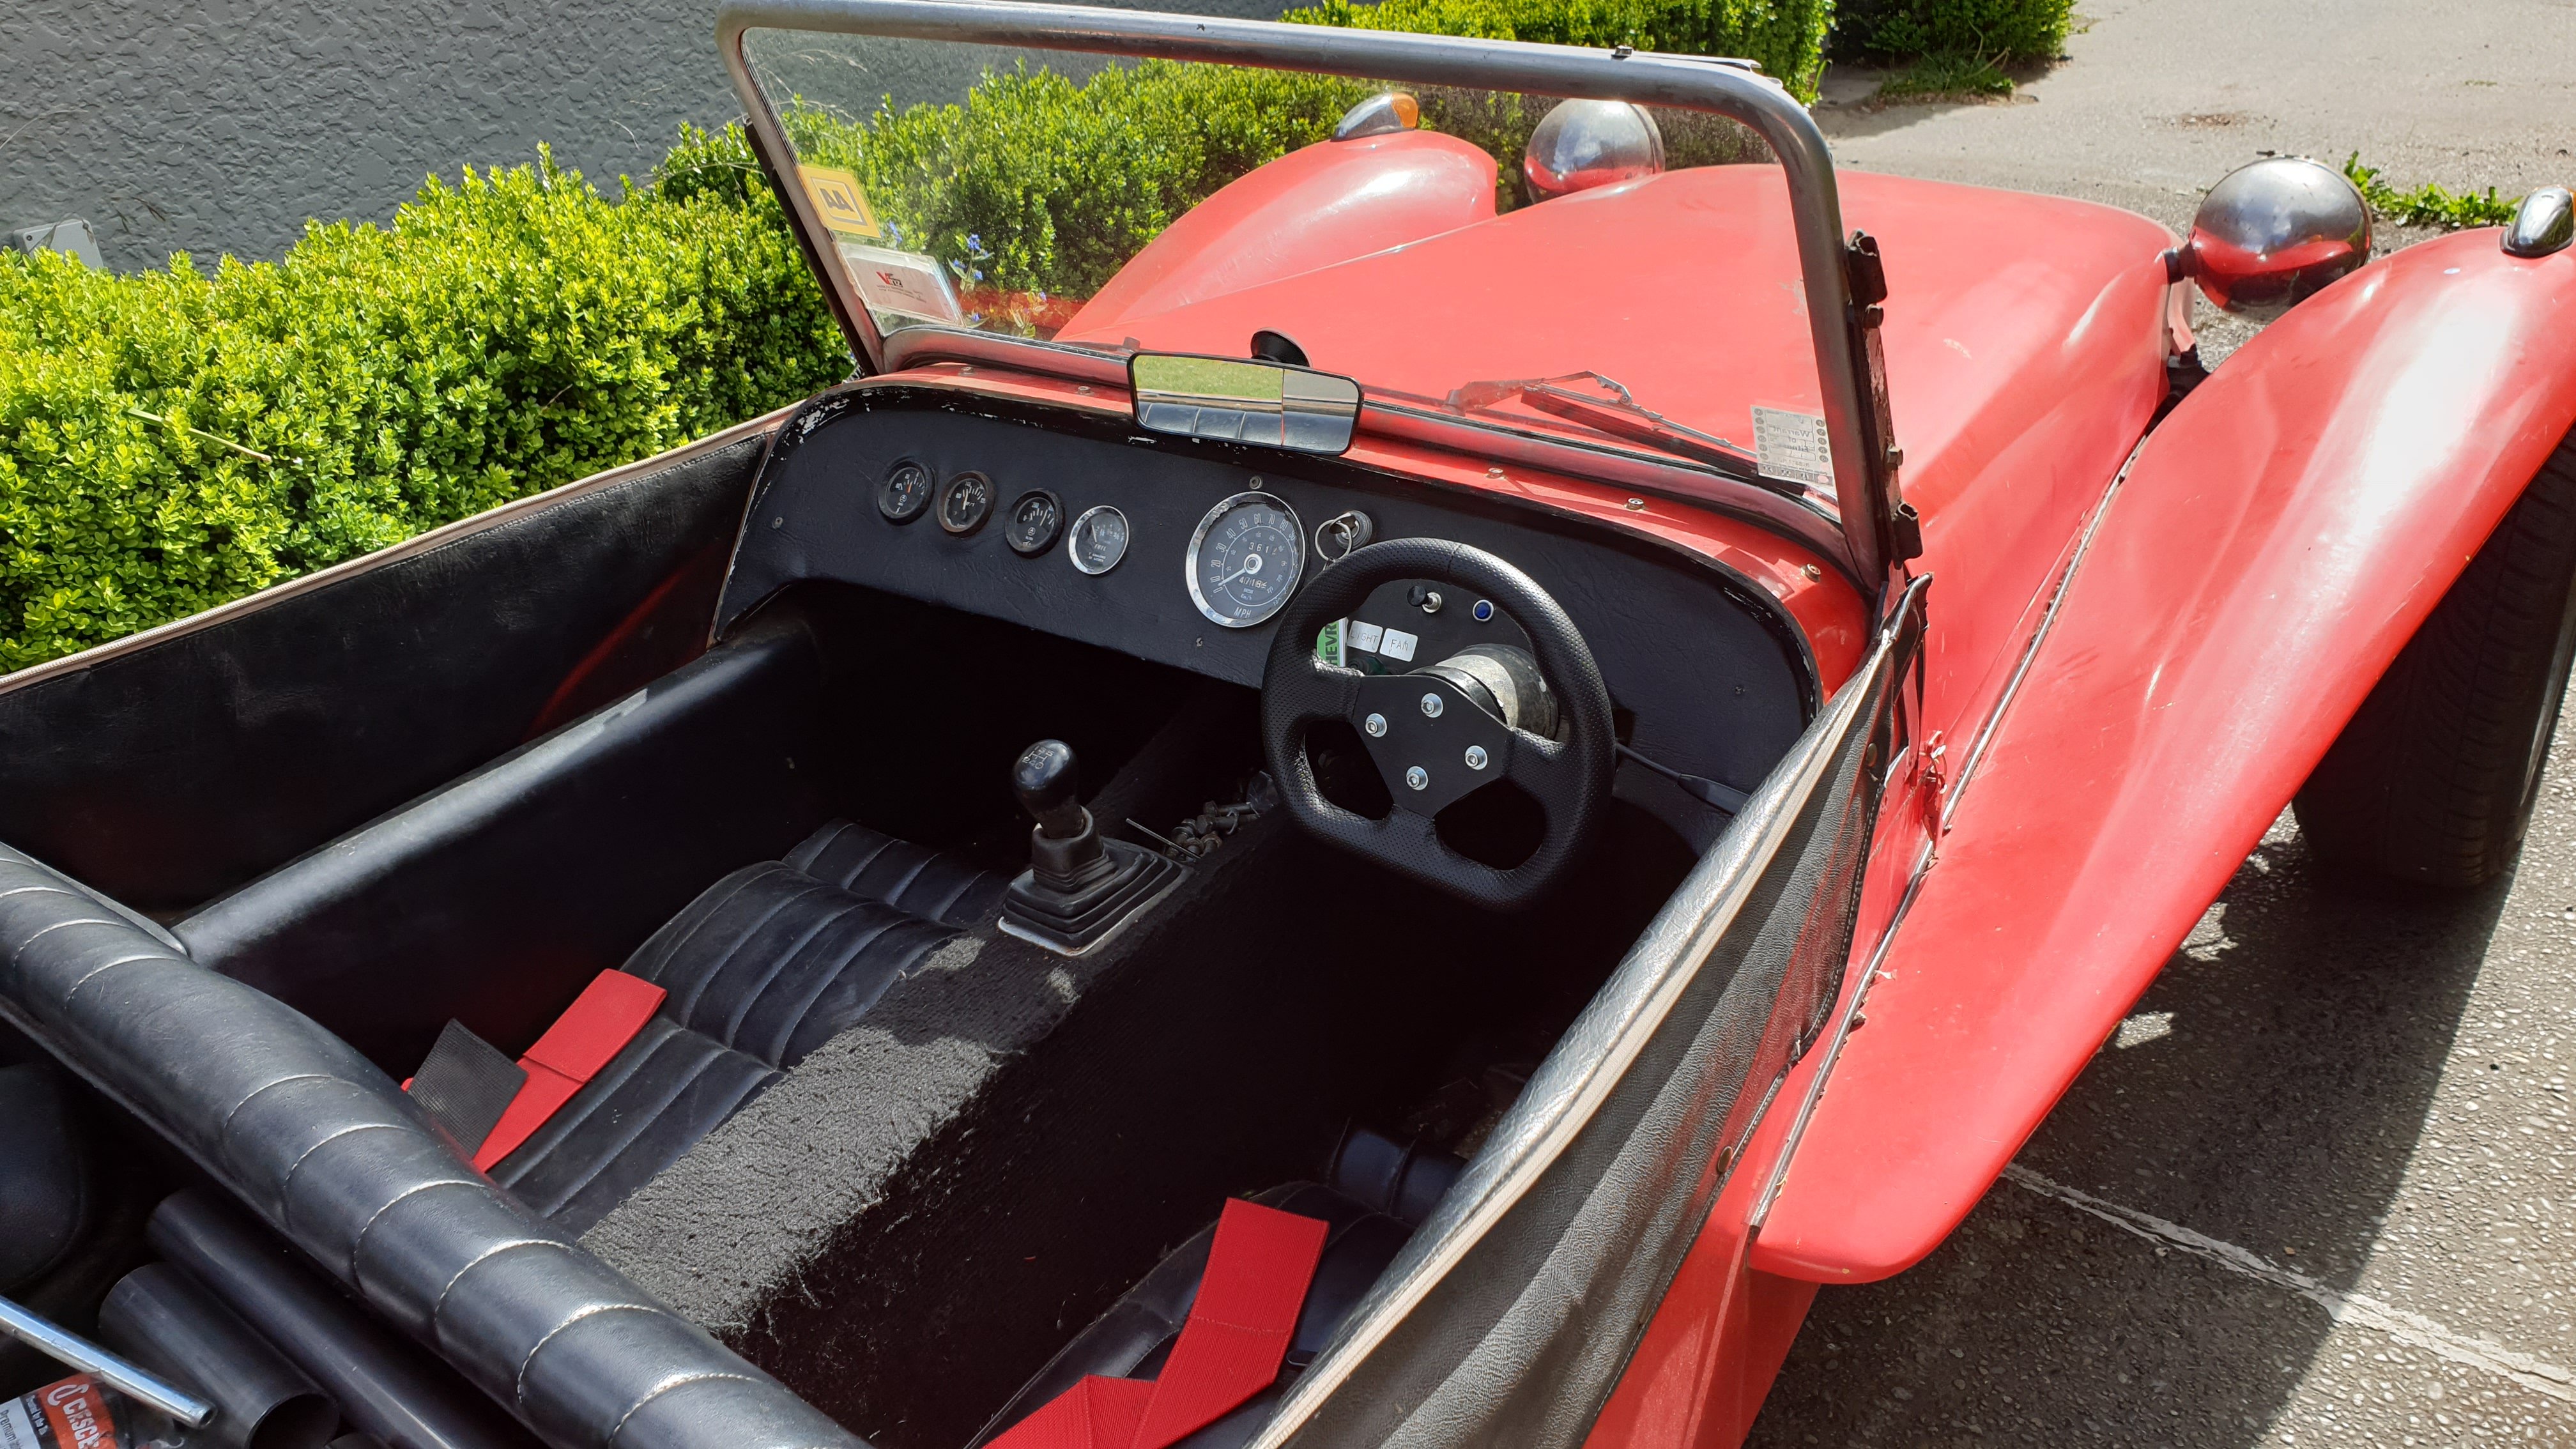
took this to get a wof today in preparation for another sweet summer hooning around, failed on general service items so pretty please. needs; rear diff/axle seals number plate light to go (already fixed was just some corosion) a crack fixed on what they thought was the steering mount, turns out its just an allow cover over a hefty steel mount, will still fix, but likley isnt an issue anyway. steering doesnt return to centre, and has a bit of a stiffer spot when turnin to the right hand side - unsure what this is, hoping no biggie, might be ball joints? wow shop suggest it could be the UJ but it apears to only happen one direction. maybe just good regrease. steering column has play near steering wheel - took the top end appart and looks like the bearing is wearing, looks to be an HB viva column to match the front end - *calling @yoeddynz * do you know where i could source that pressed steel bearing thats not $80+AUD? otherwise ill probably just jamb a normal double row bearing in there. could probably pack this one with grease and have it come right too if i get stuck. who are the rich boomers keeping rarespares in business huh? -
on a similar note, the same DS80 recently at dirt masters had similar carby symptoms, took the carby apart and found that the stand pipe for bowl overflow had cracked and bent and was jamming the float too high. so yeah could totally be that
-
the crank seal on my ds80 once fell out and was wobling around on the crank shaft. for ages i coudnt find the issue, also though carb issues. it was super on / off for for running mint or running like shit. i even back flipped the bike down my drive trying to get it running, holding it wide open in first and suddenly it was back to running mint. turns out the seal was sort of bouncing in and out of the case enough to seal
-
i will have to let you know, seems like you may be keen to aquire them, ill have to have a long hard think about whether i want to store them or not, on one hand i hate them, on the other hand, they were a bespoke, and original alloy produced for the chevron (to my understanding) and it appears most chevrons have lost them. *probably due to how badly they fit and how shit they look*
-
plan is wobble nuts as i assume its 4x4 given the viva front end. the torana 5 stud end had been redrilled to match. as i need to buy new wheels nuts anyway, the allots use tube nuts, and they are al miss matched as it is.
-
either 4x4 or 4x100, i havnt measured them with anything accurate. they are pretty heavy for alloys, but also have some other issues, such as the shank nuts wall thickness to the centre bore is so thin that on several studs its even broken through, its been like that since '88, so i guess its fine, but i still dont like it, i also dont like the style or fitment. the steelies with their bigger tires feel slightly lighter than the alloys on my calibrated arm scales, but ill hopefully chuck them on the scales at work at some point. its probably near even tbh.
-
the tires are a little bit stretch spec, but still wider than what was on it and the treads good so ill revisit that once i need new tires.
-
oh man, you are so right there! i have no idea how they fuck up the styling of what i think is one of the much nicer looking replicas out there. modern wheels, scaffolding spec roll bars and messed up ride heights/rake and its game over.
-
its pretty far off, did consider spacers, but would be an issue come wof time. i assume they were made to suit an mx5, since i cant think of much else thats 4x100 that would have stupidly wide steelies. 9.5 and 10.5 wide! loving the look it gives it, ill eventually paint it in a classic style livery and the wheels probably wont stay black.
-
BlownCoronas 1988 Lotus Seven (Chevron)
BlownCorona replied to BlownCorona's topic in Projects and Build Ups
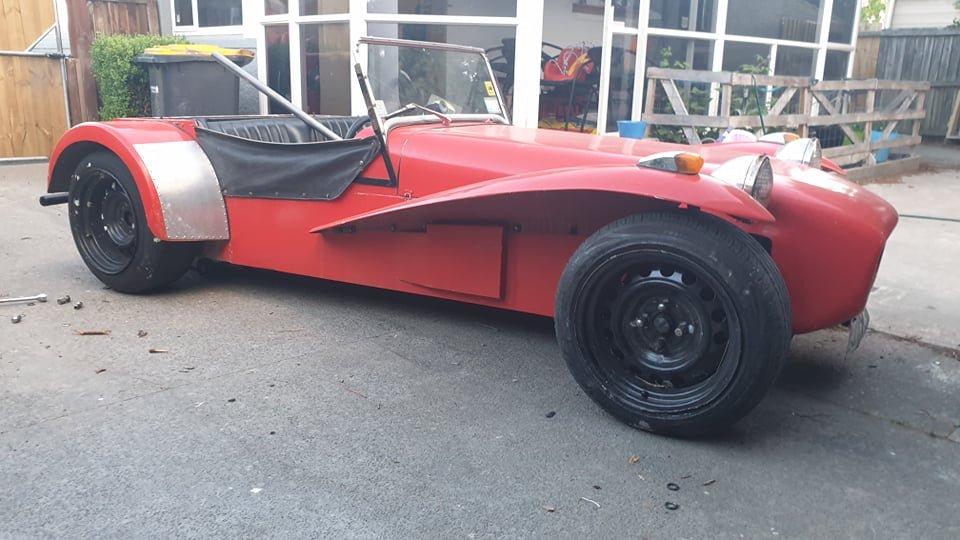
Got some new wheels for it since i dont really like the alloys, they dont fit that well, and they are super heavy. turns out these dont fit either. rears need to shift the barrels out by about 1.5" and the fronts could do with a half inch less offset too. silver lining is that the welds arnt fantastic so id by grinding them out and re welding anyway. rear wheels probably need to come out to about here, probably a touch less, to ensure enough clearance on the inside for full suspension travel. will experiment. plus side is i really like how they look and progress the car towards the late 60s racer that i want it to be. so overall pretty happy.
- 21 replies
-
- 22
-

-
theres not going to be anything left of that toyota on top once you go back to get it out!
-
BlownCoronas 1988 Lotus Seven (Chevron)
BlownCorona replied to BlownCorona's topic in Projects and Build Ups
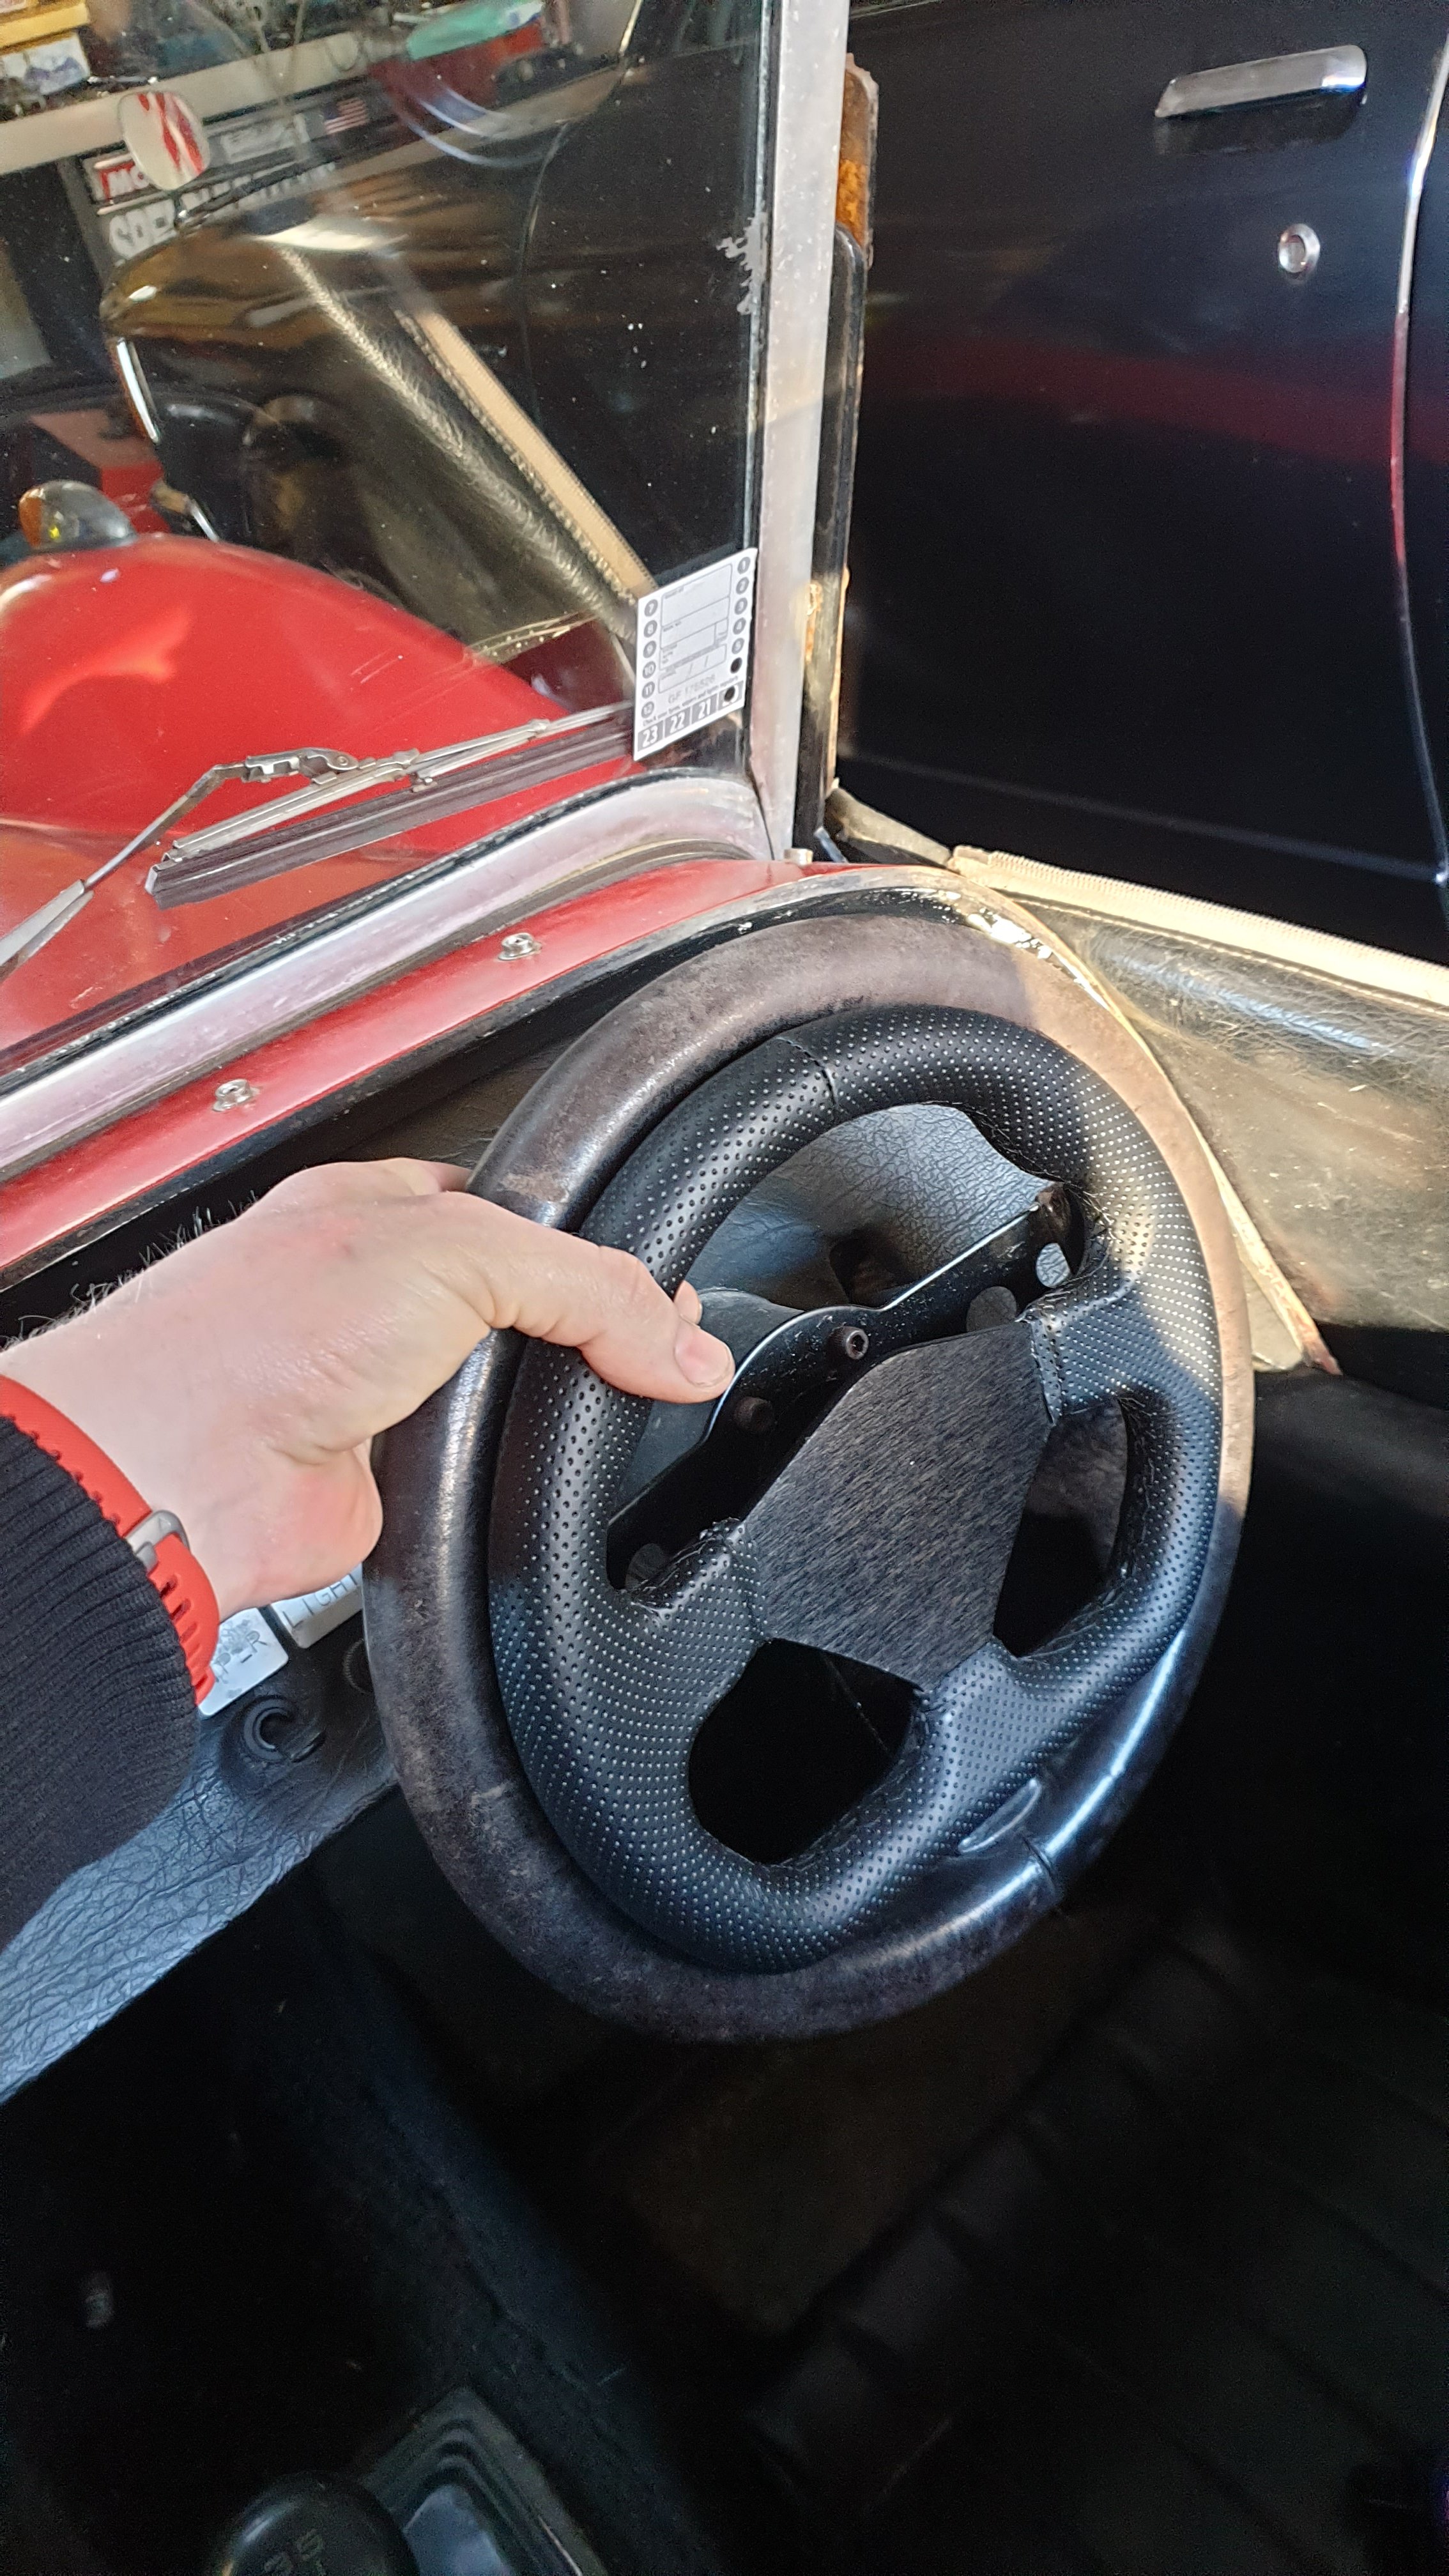
Also made up a hub adapter/spacer to fit the open wheeler steering wheel.
- 21 replies
-
- 11
-
-
BlownCoronas 1988 Lotus Seven (Chevron)
BlownCorona replied to BlownCorona's topic in Projects and Build Ups
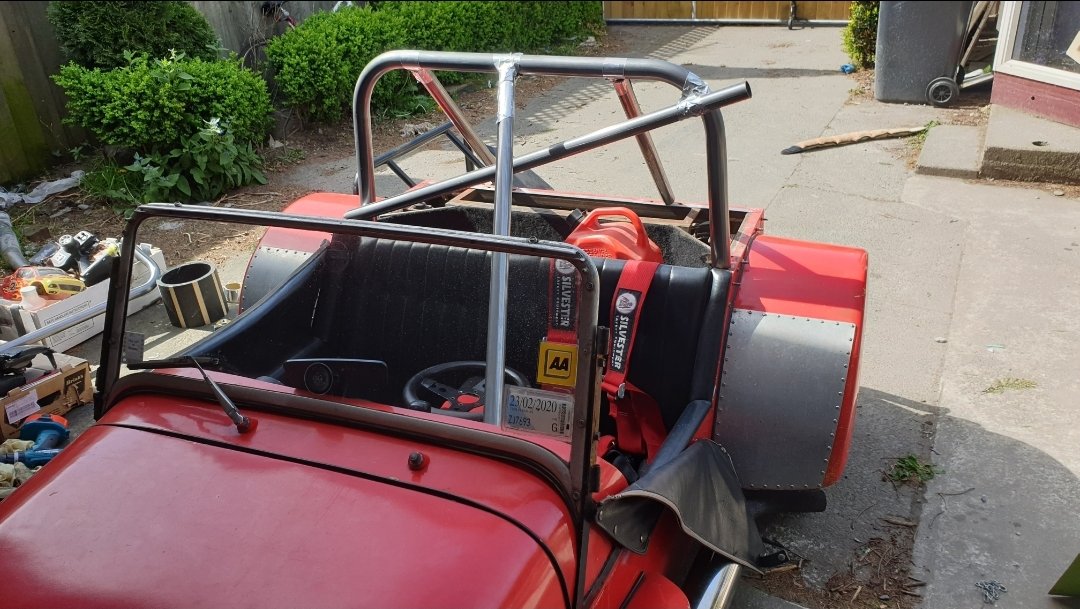
new cage starting to take shape really happy with how it looks given that MSNZ rules make you end up (rightfully so) with a really tall main hoop. but 5 degrees lean back and the uprights on 5 degrees make it look a lot less scaffolding spec- 21 replies
-
- 10
-
-
BlownCoronas 1988 Lotus Seven (Chevron)
BlownCorona replied to BlownCorona's topic in Projects and Build Ups
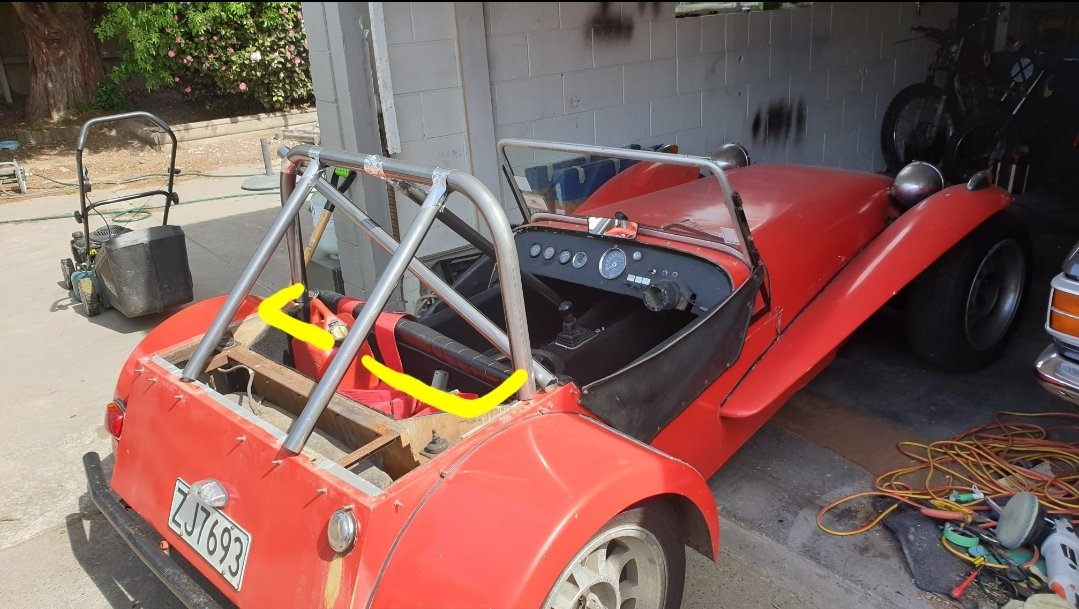
Sadly, was intending on racing this at an even today but some real struggles we with motivation recently saw my prep and mods/additions to make it more track suitable and track legal started too slow and too late. Still, I have a new roll bar kit to install including a 5th removable point that will fit into the passengers foot well, and a super tiny steering wheel, this may prove to be too small for road use, but on track will make it significantly easier to exit in a hurry if required. Needs a spacer/adapter made up as the momo PCD will be too close to the edge of the centre. Cage just taped together for a look, obveously some of the tubes are still too long, so some dimensions may change. I also may move where the diaganol goes but need to look into what the rules say. Harness bar to go in here somewhere, but I think they bent it wrong as it doesn't match up the hoop width at the bottom
- 21 replies
-
- 10
-
-
shit that's going to be a large motor! i had in my head that those parts were the profile of the crankcase and that part housed the crank gear like a standard engine would have a timing gear case on the front of the block
-
one time it bit me in the ass and the master was a cunt to remove, so i always do now
-
you should bench bleed any master cylinder before fitment anyway.
-
the way mx5s are going, this will out value the 110 by 2023 and and he'll pull all the panels off this instead
- 94 replies
-
- 4
-
-

-
- eunos
- eunos roadster
- (and 6 more)
-
it would sit on a pallet nicely if separated. so probably wouldn't be too prohibitive to freight.