Unclejake
-
Posts
7899 -
Joined
-
Last visited
-
Days Won
9
Everything posted by Unclejake
-
I haven't read the thread, but the common way when I was racing was to shim the diff to make it super tight. Google should help
-
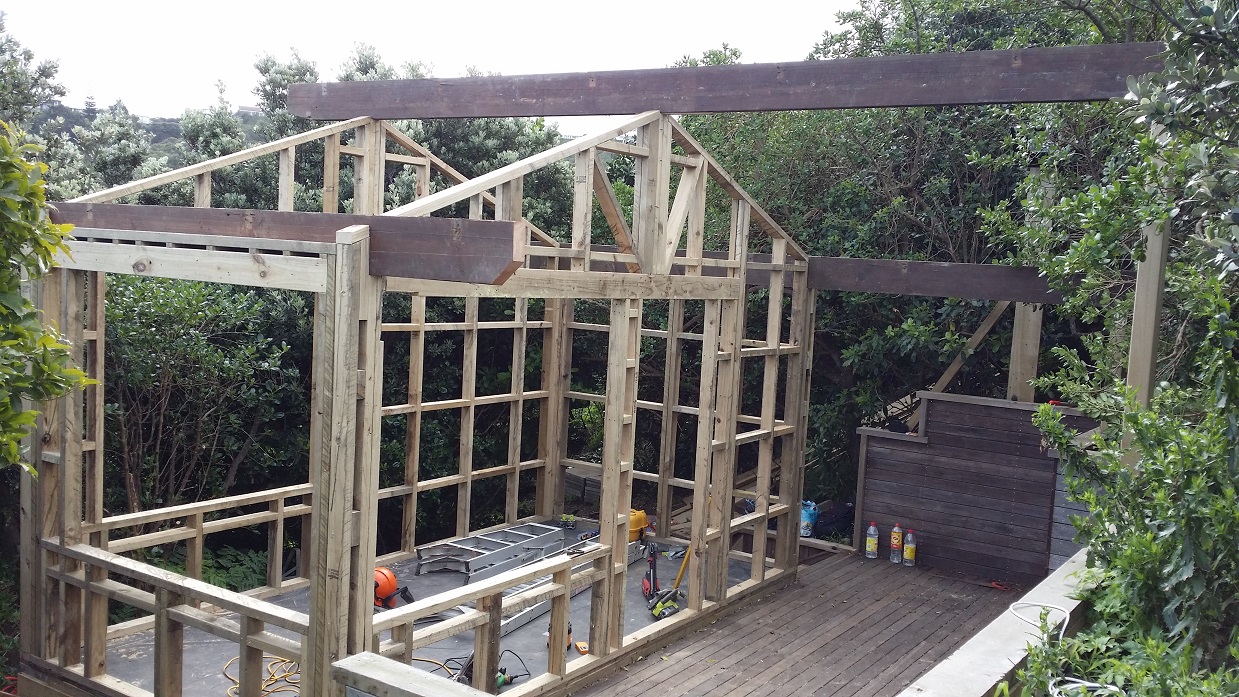
Unsurprisingly the beams were not a great deal of fun to carry. Two are are just over 6.5 metres long The cabin exterior is 4.6 x 2.4m Bathcollector. Its internal dimensions will add up to 9.8sqm... but I have an ancillary building planned for the woodshed, generator shed, toilet and shower
-

Please help - Gearbox identification
Unclejake replied to Little-Macks-Villiers's topic in Tech Talk
It looks like an early Ford box to me too, so Bryan will be spot on. It's unlikely to need a rebuild if the lever is just refusing to move. Remove the top hat and you'll see the selector shafts. The 'magic wand' gearlever has a tapered ball on the end of it and pivots inside a bushing part way up the tophat. It's probably just got itself jammed between two of the selector shafts. If you're brave you could just hit the base of the shaft with a hammer, but the ball tips are fairly brittle so it's probably best to remove the four bolts and have a proper look -
It's best to get wire advice from a proper welder mate. I'm a noob too
-
I'm no welder, but if you can get away with it try 0.6mm. I use 0.8mm as I do more fabrication than panel work. I have all files, hammers, dollies, shears, rotary burrs, long boards etc, and also a wee hand held pneumatic thing that does stuff that helps with patches (but I can't remember what it's called). Happy to make them all available if it helps. EDIT: It's an air panel flange punch tool. Yeah baby. You didn't even know Flange needed an air punch in the tool
-
Tip #1: Heat distorts the shit out of the parent metal as well as the patch you're adding, so use as little heat as possible for the shortest time possible. Thin MIG wire, short welds with a cool down time, and practice will help. Failing that; smash it all down with a huge hammer and bog over the lot Tip #2: UJ has just about all of the tools, but he never works on cars because mint slice. If you wanna borrow anything just arsk.
-

- 199 replies
-
- 57
-

-

-
How did you get on Mighty Joe?
-
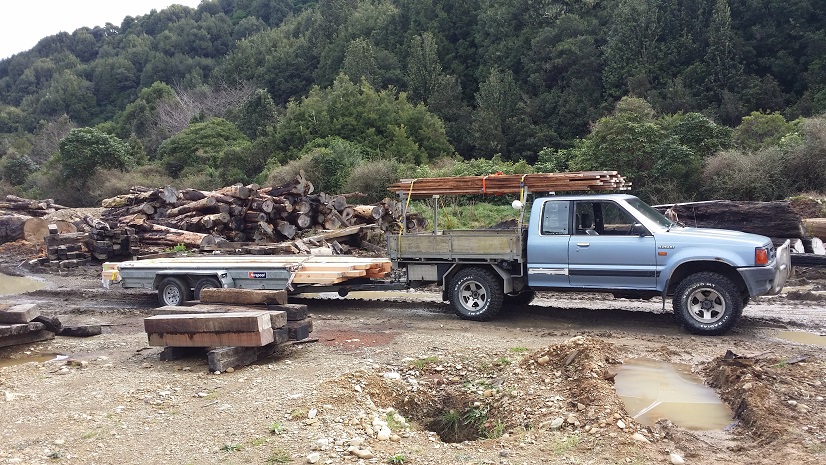
I've been collecting timber from a sawmill 'up north'. Is my ute OS? I reckon it are. It's also bloody awesome. It has self canceling indicators and power steering, but everything else you need to do yourself. The objects in the mirror are precisely their own size and I need to get out of the cab to engage the free-wheeling hubs. I love that ute. Sadly the generator died last weekend (as did a number of other things). It's a real challenge trying to keep tools dry enough to use up there, but after forking out a significant portion of the cabin budget on a replacement generator I managed to finish another frame today. I've gotten a bit better at calculating tangents... but of course there are mistakes aplenty. Sorry about blurry photo. It was almost dark
- 199 replies
-
- 29
-
-
If you've fitted square main caps I assume they're off a crossflow block. Bloody good idea if you're going to pull high revs. You got it line bored? Jesus man. That's awesome. If they sized it all correctly and know what they're doing then the main bearing tolerances should be OK, so it's probably wise to look for an assembly error... and it may not be your error - but theirs. 6015 block: Does it have a 6 bolt crank then? They have a fraction more stroke than the earlier 120E IIRC, but one thing to watch out for is the pilot bearing (to the gearbox) as I think they're a bit different... but that has nothing to do with oil pressure so I'll shut up now. If you haven't put load on the motor (i.e. tried to drive it) then you are unlikely to have done much harm yet. I wish I could remember more but I can't think of anything except a rotated bearing (that's blanking off an oil gallery). I guess it's possible that you fitted grub screws that are too long, but it's probably worth thinking hard about your next move first. If it was me I think I'd pull the motor out and get it onto an engine stand, but perhaps there's another diagnostic step that I haven't thought of yet. Sorry, that's probably little help, but I wish you the best sir. Line bored! OMG. Are you my adopted son? So awesome
-
IIRC the oil pressure light goes OFF when the circuit is earthed. I assume that's what you did to test it from your description, but I thought I'd mention it anyway EDIT: I read your first post properly and now understand what you've replaced. Assuming the BE and main bearings are the correct size, then the most likely problem is that you've put one of them in wrong. I'm getting old and my memory is bad, but I'm almost certain the oil circuit basically starts with the crankshaft on the 120E, so perhaps that's what's happened. If I can think of anything else I'll holla...
-
You're right to not put any load on the engine as someone has made an error and you could be in deep trouble if you get load on it without adequate oil pressure. I assume it's a 120E block Underneath the RHS engine mount will be a tiny grub screw which is directly connected to the oil gallery. I assume you didn't do anything with/to that? If you get desperate you can remove it to see if there's oil pressure there, but that's a shitty job so leave that to a last resort. Additionally, the cam bearings need to be rotated correctly to allow oil delivery, and the front spacer (if there are any) under the rocker shaft post needs a hole in it too. There's very little oil delivery to the rocker gear so unfortunately watching the valve gear isn't hugely indicative of oil delivery. It depends on how much of a rebuild you did, but one guess is that you have a gasket on backwards, or a faulty gasket. Perhaps start with the oil pump gasket... but you also need to consider the head gasket. The worst case is that you installed the main or big end bearings incorrectly, in which case it's sump off (at best). DO NOT PUT LOAD ON THE MOTOR. It may not be too late to save this There's a 120E oil flow diagram somewhere. I may have seen it in a Hanyes manual. Have a look on Google and then you'll have a better idea. Good luck mate
-
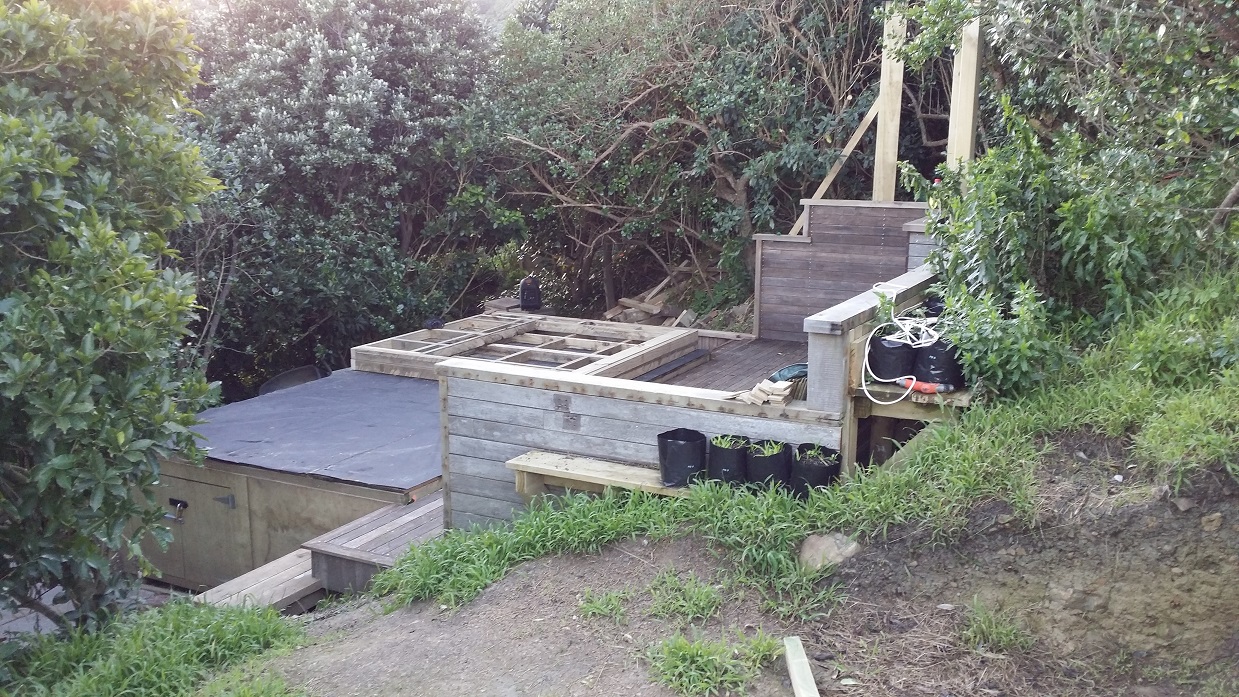
This cabin is taking forever to finish. I try to work on it every weekend, but it's taking a while. In good news there's two lots of paving down, two sets of stairs finished, about 600 baby trees moved into bags, and I've started on the cabin frame. It might be weathertight in December? Dunno. It's fun though!!!
- 199 replies
-
- 25
-
-
Anyone got a couch available this sat night, welles area?
Unclejake replied to RUNAMUCK's topic in Lower North Island Region
Ditto. Can give youse two adjoining rooms if needed (on the south coast in Island Bay), but would need to know by Wednesday to switch on the waterbed for miss 5. You'll prolly have the house to yourselves as I'm hoping to be elsewhere, but that may, or may not suit you. PM me if you want to take up the offer, but otherwise I'll assume you'll hang with the dam chewer -
Brocky41's 1963 Ford Cortina MK1 - Discussion
Unclejake replied to brocky41's topic in Project Discussion
A link to the project thread in the first discussion pot would be great brocky -
I'll try that Nick. Thanks. We dragged it out of the bush this afternoon so at least it's somewhere with tools and lights now
-
Unfortunately it's petrol dripping down the leg (and not just oil). It sprayed out of the exhaust when I went to pull start it.
-
I have a pre-mix Wacker brand trenching compactor. . I left it under a tree in the rain about five months ago, but it fell over and was lying on its side for most of those months. The fuel tap was left on Yesterday I stood it upright, pulled on the starter a few times and it burst into life. I compacted a trench or two and left it standing up overnight. This morning there was liquid all over the leg, which was traced to petrol dripping out of the exhaust pipe. Float valve?
-
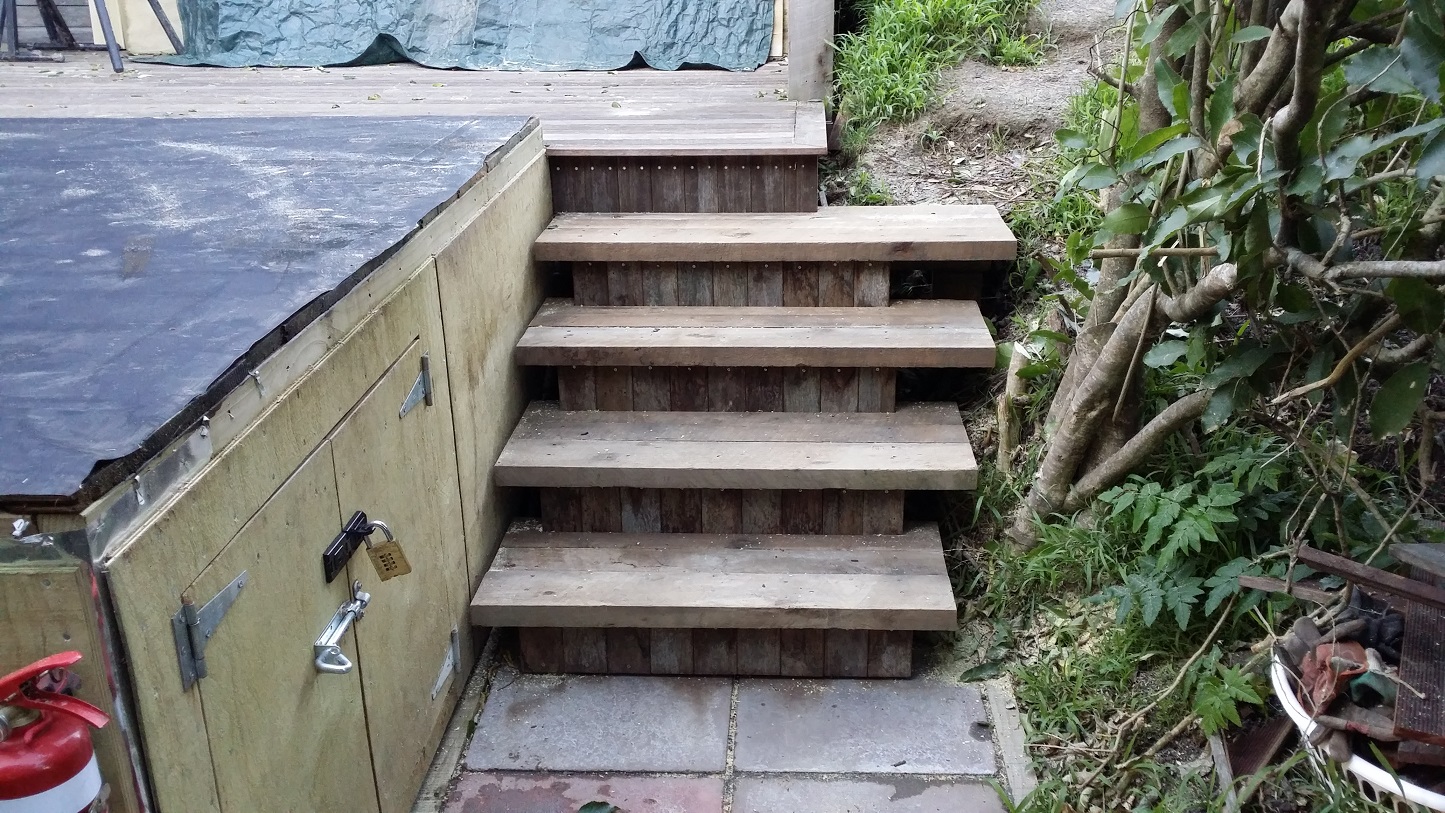
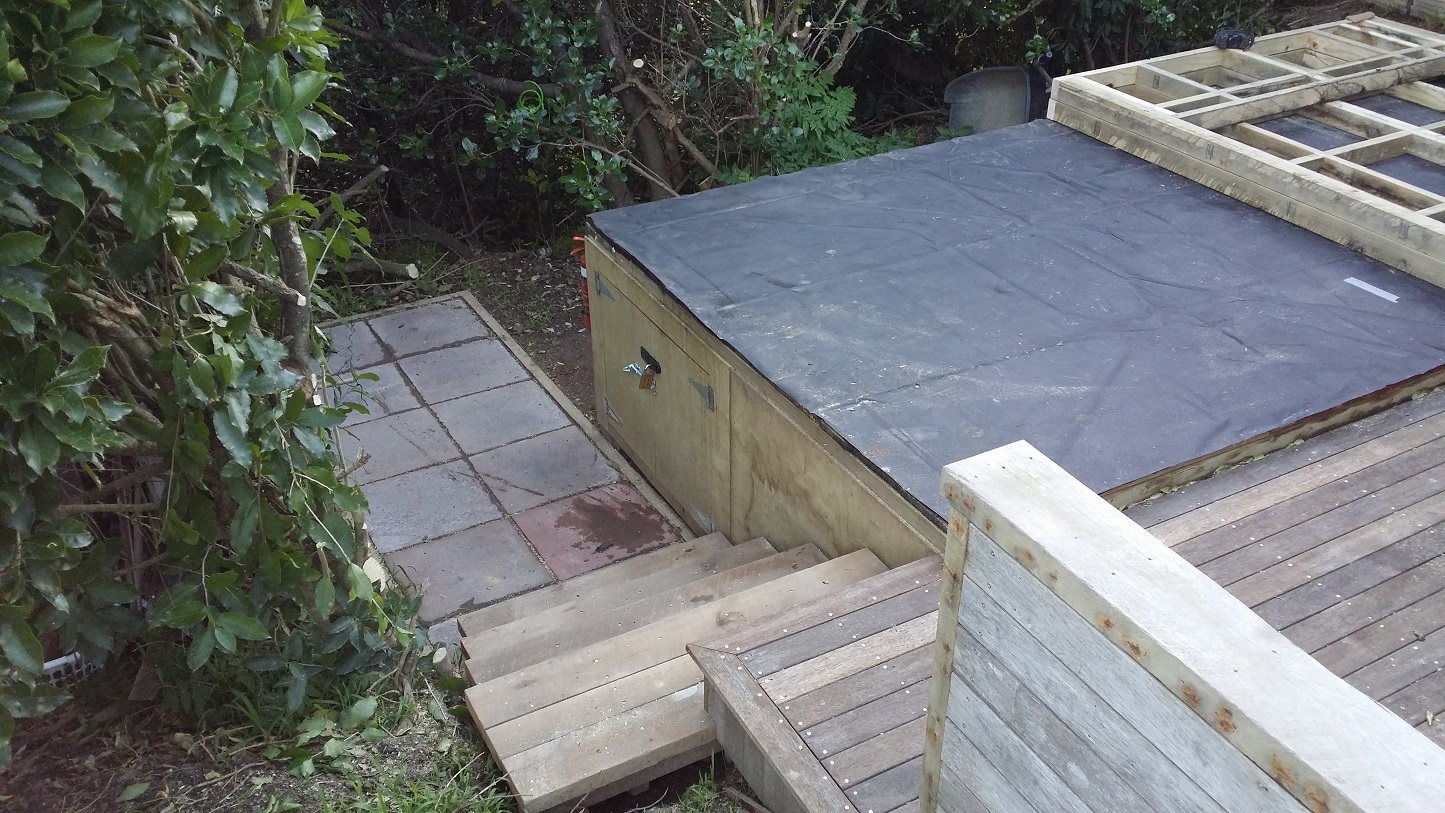
After much deliberation I went with visible stainless steel screws for both this cabin deck and the deck at home... and I am SO GLAD I did as I've needed to pull up boards on both decks over the course of the last year or so. I chose a Simpson Strongtie hardwood to softwood screw, but that was largely to do with the shape of the head which is personal preference. Getting them all in a straight line helped make the visible screws look OK. I'd never do anything but a simple vertically fixed screw for a deck now. They cost more and take longer than nails, but they are much better at staying put and give you the luxury of being able to lift or replace a board with minimal fuss.
-
I don't understand why you're doing things to your driveshaft as you've already borrowed another shaft to no avail. If this problem genuinely wasn't present prior to taking the car off the road then it's most likely a result of something you have changed during the rebuild . Despite the problem being road speed related I'm still thinking the gearbox input shaft to pilot bearing could be worth checking. As you are feeling less vibration under acceleration it's possibly worth putting some weight in the very rear of the boot to simulate the change in suspension geometry under engine load . ... but I've never tried that so it could be a waste of time. What part of Wellington are you in? EDIT: I hadn't read that there was no vibration when towed without a driveshaft . That's awesome news
-
^ Caster adjustment can be done using big washers on these cars. One can cut a slot into a few washers and mess around with caster pretty swiftly as the McPherson struts basically hang down from the inner guard and are kept from spitting aft under braking by only the swaybar.... but having said that I suspect this vibration issue is more related to a rotating thing. WRT the gearbox to driveshaft: There's a soft metal sleeve in the gearbox that the driveshaft nose rotates in. That's the extent of the driveshaft bearing. The gearbox mainshaft itself has roller bearings which can wear and vibrate, but more than likely the gearbox would sometimes pop out of gear too (once those bearings are stuffed). The answer to this dilemma is most likely in the first few posts. I'll try to re-read them soon. Everyone wants this fixed!
-
I measured my rims once and they were something like 4mm out so I dunno that you've found it sorry Phlex. I can't remember if you have borrowed a gearbox of not yet. That's a fairly simple and cheap thing to try if someone's got a good one. Once upon a time I'd have lent you three at a time!
-
Thanks all.
-
I'm keen to play music from my smart phone through my car stereo. There's a few options available, but I really want a reliable unit that will interface with my factory dash and steering wheel controls. In my case it's a 2007 Lexus GS430, but if you know of a brand of Bluetooth adapter that's very reliable it'd be great to hear about it. My car has the 330 watt ten speaker Mark Levinson stereo (a $4.5k option when new) so it'd be good to keep as much sound quality as possible over bluetooth I do not want to use the aftermarket handsfree calling if I can avoid it. The Lexus does that thing perfectly adequately. I'm just after a music source (whilst preserving the factory handsfree function). There's no auxiliary input for the Lexus stereo BTW I'm tending towards the Vais brand SL3b-L bluetooth adapter, but there's heaps of others like Grom, iSimple, GTA and Crux Any recommendations? http://www.vaistech.com/product/sl3b-l/ http://gromaudio.com/store/bt3_adapters/toyota_lexus_scion_98-11_aux-in_mp3_bluetooth_ipod_iphone_adapter.html https://www.sonicelectronix.com/cat_i1903_lexus-bluetooth.html
-
If you want to borrow a dial gauge on a stand (to measure how out of round things are) then holla at me. I've had quite a bit of Cortina experience, but sadly have very little time to offer hands on help this month.
.jpg.27415e420274596778ffef5e9c8290c7.jpg)