Kiwibirdman
-
Posts
1005 -
Joined
-
Last visited
Everything posted by Kiwibirdman
-

Kiwibirdmans 1962 EJ Holden Wagon
Kiwibirdman replied to Kiwibirdman's topic in Projects and Build Ups
Good progress in the last couple of weeks despite having to go away for work Master Cylinder Mounted to booster with (hopefully) the correct clearance for the pushrod. Header plates have arrived, so now need to buy some U bends and start cutting and welding Filler is on the petrol tank, very useful having a second tank to chop up and steal the filler neck from Mounts for the traction bars cut off, shortened up by 15 mm and rewelded. Photos to come -
Kiwibirdmans 1962 EJ Holden Wagon
Kiwibirdman replied to Kiwibirdman's topic in Projects and Build Ups
Not much progress, spent a chunk of Saturday afternoon playing musical wheels with Glyn, the owner of the big blue mig in my garage, and his 1965 396 big block SS Impala. We swapped the 14x7 and 14x8 S/S cragars off my Firebird onto his impala. The 14x8s on the back fill out the guards nicely, so we left them on for a while. Firebird needs some love but not until the Holden is finished. I did get to Zebra parts today for a VZ commodore brake master cylinder. Mr Vapour got the last one I had when he spied it with the booster. I thought that there would be lots of them around, lots of the VT, VX and VY's being wrecked, not many VZ. Hopefully tomorrow will see me in the garage again, a night off from being the kids taxi. -
Kiwibirdmans 1962 EJ Holden Wagon
Kiwibirdman replied to Kiwibirdman's topic in Projects and Build Ups
Clint came round today to have a look at the car. After much looking he said mainly happy. The only thing that I got wrong is the mounts for the traction bars are too low by 10mm. They will hit the ground if a back tire goes flat. Not major, a bit of cut, shut and paint to fix. The other things are a gusset on the rebate in the front chassis where space was made to fit the top A arm and a strong back on the engine mounting plates, all easy stuff. Plugging away with other bits, fuel tank is mounted, still have to figure out the filler, brake pedal support is on the pedal box, some more holes in the floor welded up, UJ fitted to the steering rack. The list of stuff to do has got shorter, must be time for a new list. -
Kiwibirdmans 1962 EJ Holden Wagon
Kiwibirdman replied to Kiwibirdman's topic in Projects and Build Ups
It's been nearly a month since the last update. I had a 2 week holiday in Bali which slowed things up. Got back into it tonight working through the list of stuff to finish off, Universal is mounted to the steering rack, found that it hit the engine mount so that had to be clearanced, put the starter motor on and there is space to shift the knock sensor to the other side of the motor so the dip stick will fit into the HQ sump, clips fitted to the diff for the brake lines. Clint (Cletus as he is known here) is coming round for an inspection for certification next week so lots has to be done. I want his OK before it all get blown apart again and painted. Progress for sure. -
I have had success with a version of beavers idea, use the wheel with the nuts on 3 or 4 turns. The wheel has more weight than the brake drum.
-
Kiwibirdmans 1962 EJ Holden Wagon
Kiwibirdman replied to Kiwibirdman's topic in Projects and Build Ups
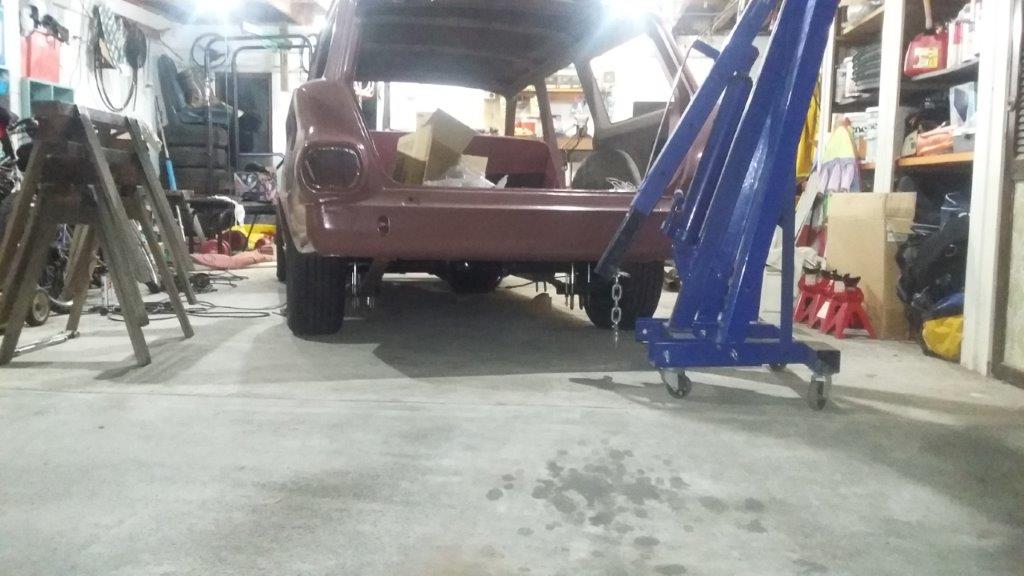
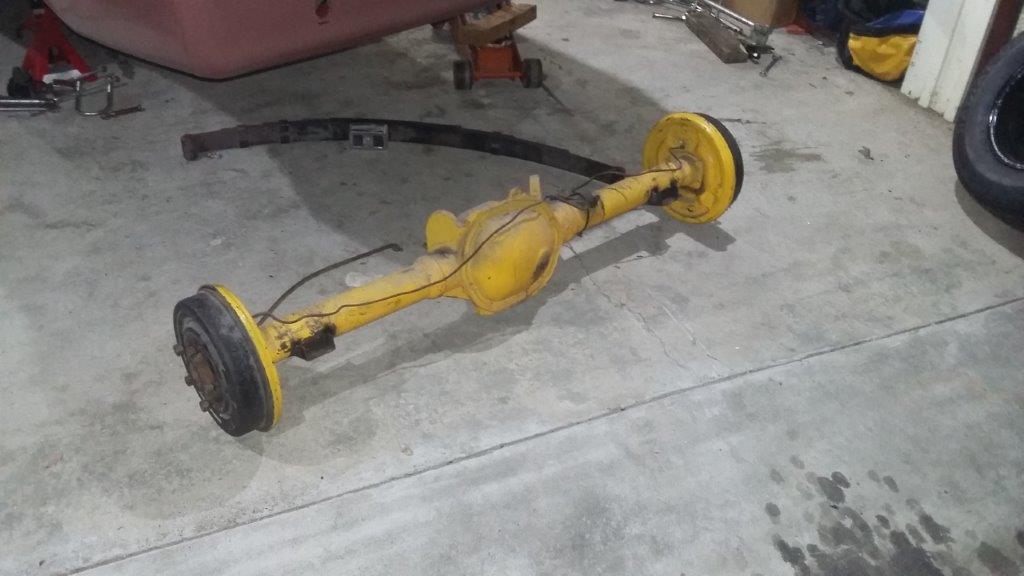
Its amazing how life gets in the way, last Saturday disappeared in being a taxi service for my eldest son for soccer out in Kelston, about 40 mins each way from home. I stopped into Pick a Part to see about another VX commodore master cylinder. Plenty of VT which were different and looked ugly as sin. I'll take a trip out out to Zebra tomorrow, their web site says they have 2. I did make some progress, new cans of paint and the rear axle is racing shiny black, no more 70's yellow. I forgot to take photos (as usual) while it was all on a couple of saw horses. New brake lines got made and a new HQ type flexible hose turned up from Australia. The mount on the body had the spot welds drilled out and will be moved. Car is back on the ground and suspension wound down (I love the threaded rod instead of springs at this stage). I'm pretty happy if I can get the final ride height here. A piece of 4x2 slides under everything with plenty of clearance. I also got a box from Summit racing today.
-
Kiwibirdmans 1962 EJ Holden Wagon
Kiwibirdman replied to Kiwibirdman's topic in Projects and Build Ups
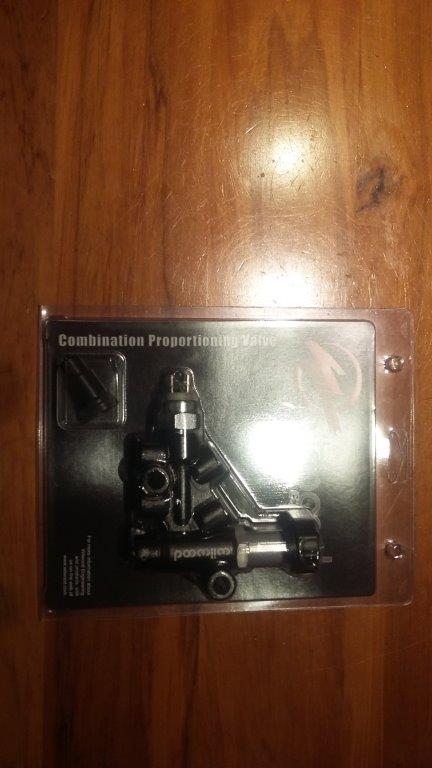
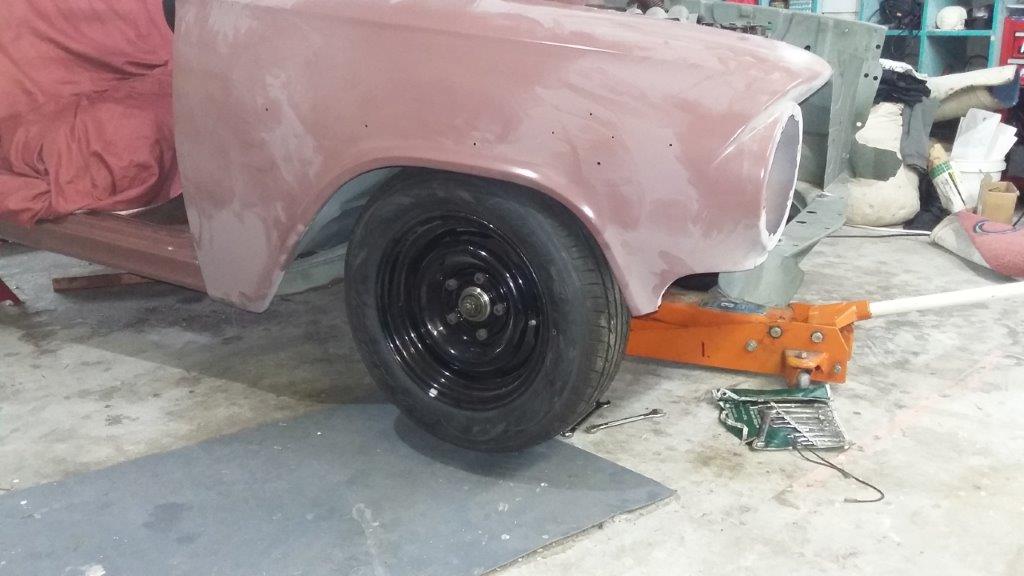
Over the weekend the ears on the diffhead got cut down to create some clearance. On a sedan diff they have a big hole for the suspension arms so no structural. I started cleaning up and painting to get rid of the lovely yellow. I ran out of best quality VHT black so no photos until I get some more and it is one colour. The brake booster got cleaned up as well and is very pretty in copper coat primer. Ordered a new flexible brake line for the diff and will make up new hard lines before it goes under the car. Also ordered a Willwood distribution block/proportioning valve from summit racing. I had grabbed the bonnet and one front guard from the panel beaters. I was playing around with how low I could go and still get full steering lock. Here the tire is about 15mm under the guard and goes lock to lock with no touching.When the car gets a wheel alignment it will be set up with a bit of negative camber so tilting the wheel in a bit will make more space. To quote the great philosopher Aaron Kaufmann of Fast and Loud, lower the altitude, raise the attitude. Once the diff is back under it will play round with the ride height, ground clearance will be the limiting factor I think.
-
Kiwibirdmans 1962 EJ Holden Wagon
Kiwibirdman replied to Kiwibirdman's topic in Projects and Build Ups
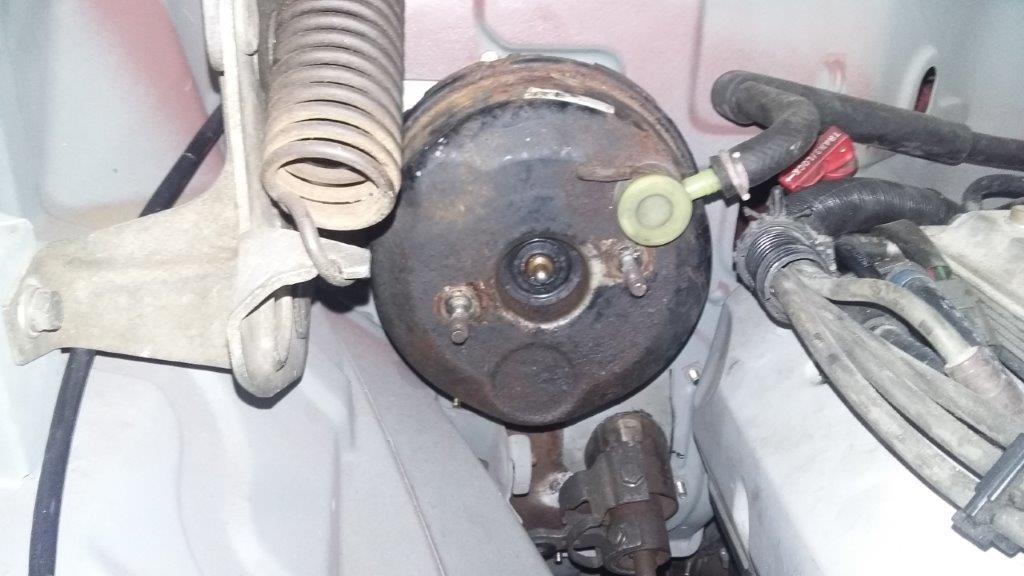
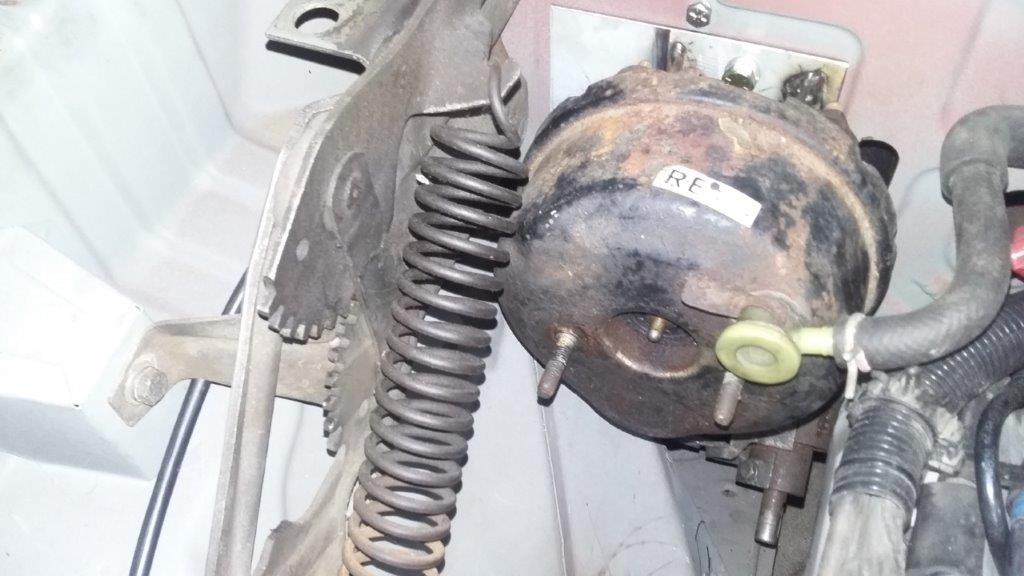
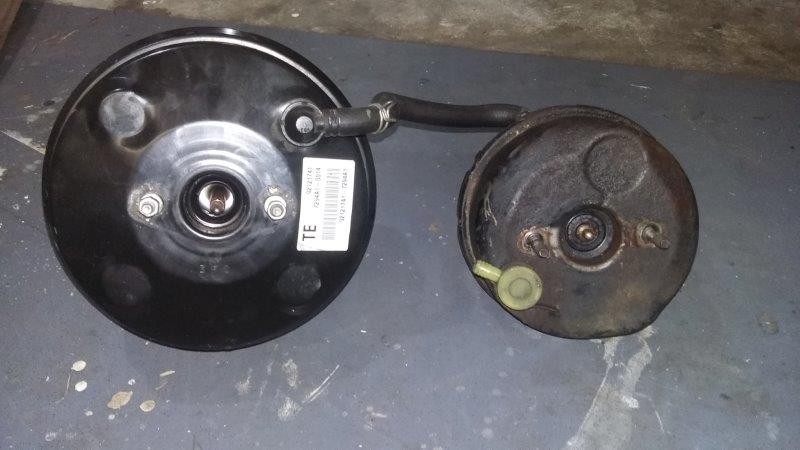
Some more photos Gemini Booster in place, note the not so deliberate mistake The mounting studs are not level. Bloody booster has to be rotated 18 degrees, yet another job that gets done twice. Here it is with the hinge down. During the shed raid Mr Vapour decided that he needed the VX commodore booster and master cylinder that I had got. I had the great plan of using an HQ PBR master. I thought they would be every where for not much money, not so. I'm going to have to go to Zebra parts to get another master cylinder, hopehully ther are still a couple of commodores there. Here is the diff with new mounts attached. Sorry Neal(threeonthetree), the yellow paint will be gone before this goes back under the car.
-
Kiwibirdmans 1962 EJ Holden Wagon
Kiwibirdman replied to Kiwibirdman's topic in Projects and Build Ups
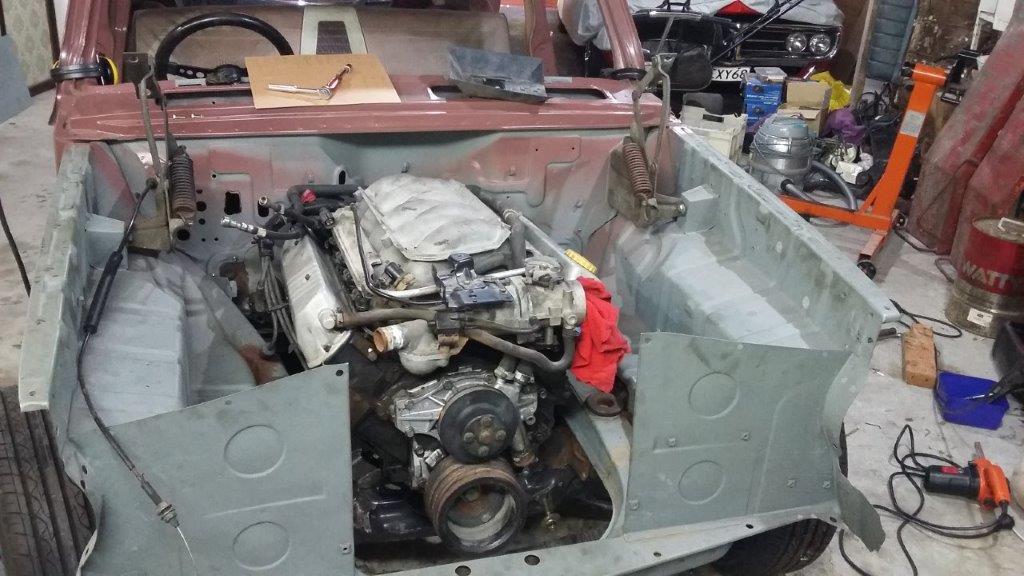
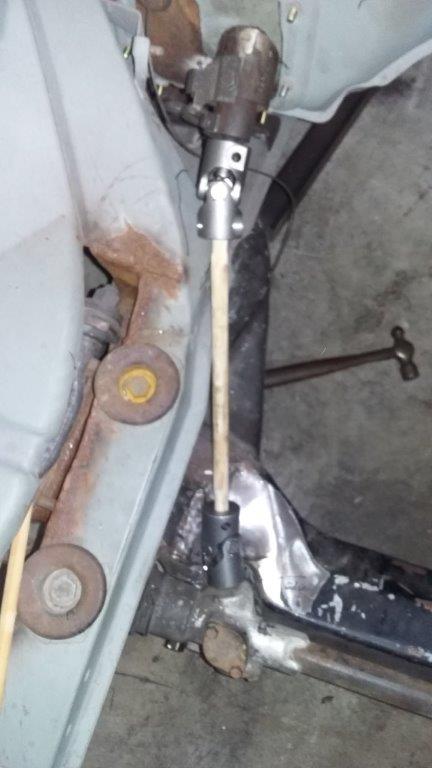
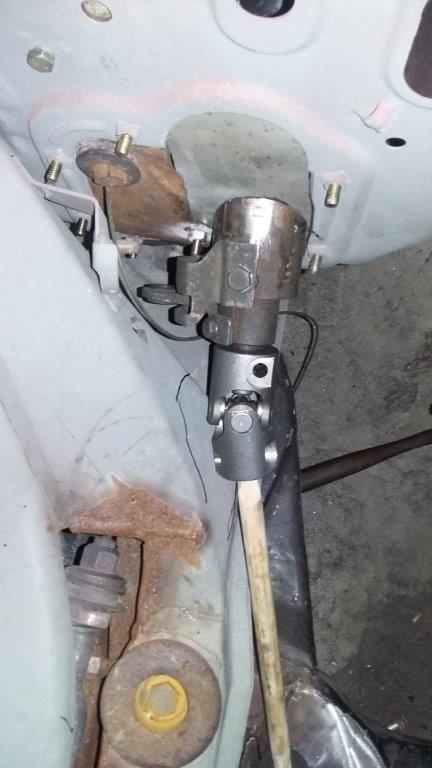
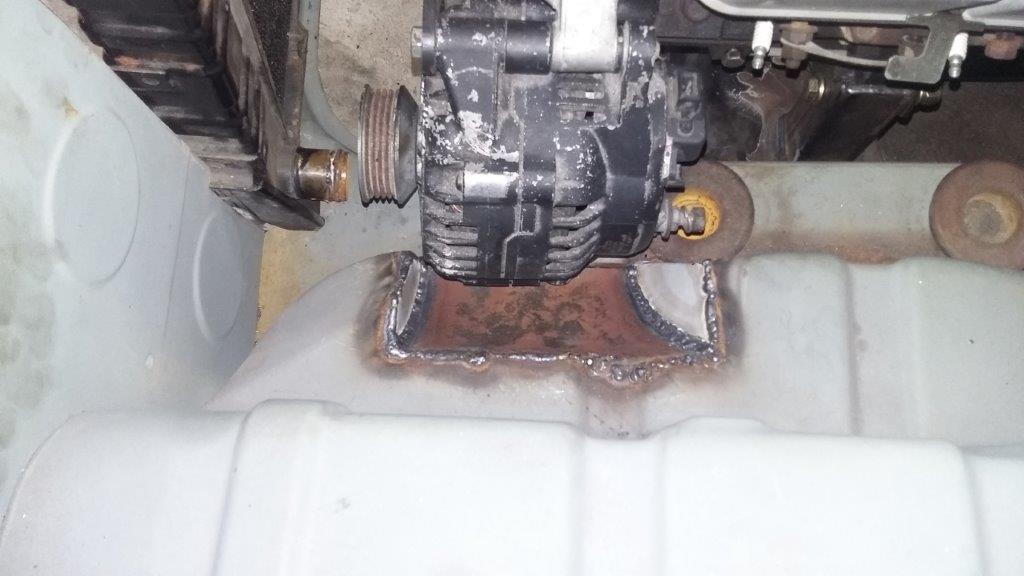
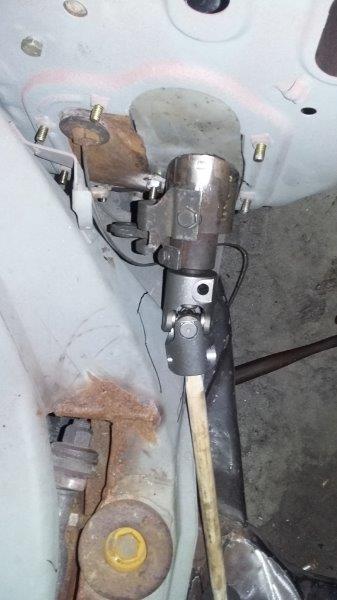
Here are some updates and photos The engine sitting in the engine bay, gives an idea of size of engine and lack of space. This photo gives a better idea, clearance of the inner guard to make space for the alternator A new gearbox mount, designed for a TH350 and just happens to bolt to a 4L60E with the right bolt holes for a HQ cross member. These two are of the steering . My nice piece of dowling intermediate shaft gives a good idea of how tight it all is. The right hand picture shows the bottom of the column and the shift arm. It all fits just. Still some clearance to be created at the time of photo.
-
Kiwibirdmans 1962 EJ Holden Wagon
Kiwibirdman replied to Kiwibirdman's topic in Projects and Build Ups
I had an oh shit moment a while ago when I tried the new HQ type V8 radiator I had bought. Width wise it would fit OK, bur height wise it was 100mm above the the support panel. I did think about some serious cutting to make it fit. Something in the back of my brain said there is a better option that you have seen before. There was a green EH wagon that made NZV8 a few years ago and they had used a HiAce van radiator. I got the dimensions and had a measure, all looked good. This morning I picked up a slightly used one off trademe for $50. This first non Holden part.........I'm on the slippery slope. -
Kiwibirdmans 1962 EJ Holden Wagon
Kiwibirdman replied to Kiwibirdman's topic in Projects and Build Ups
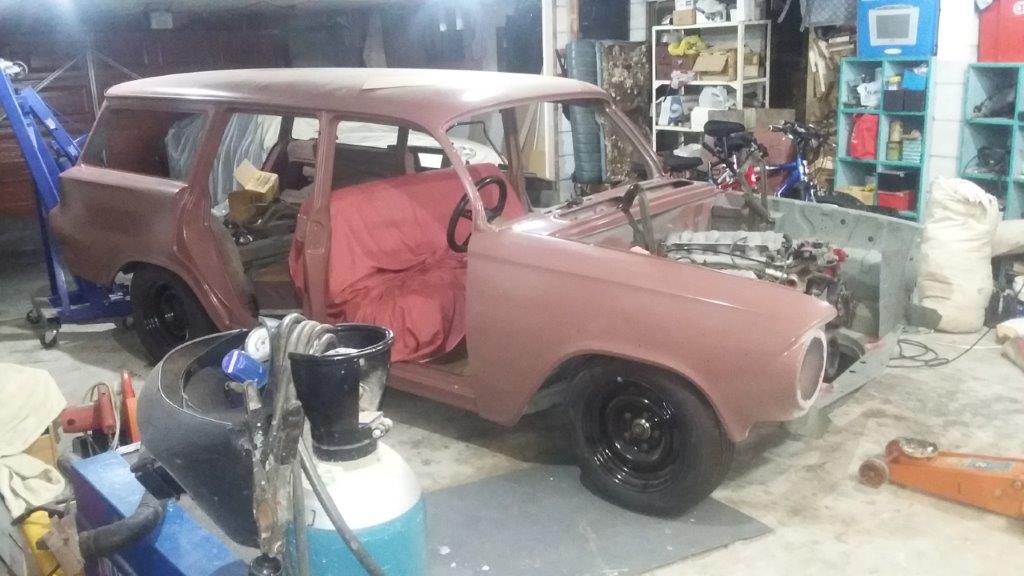
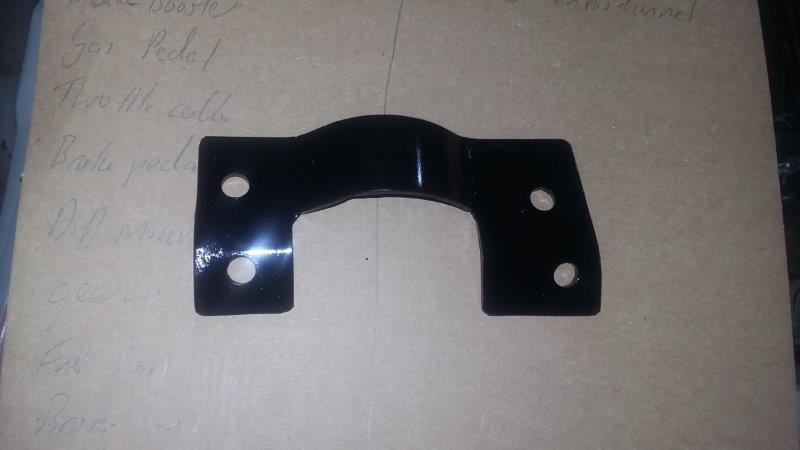
I had been holding off on an update until after the shed raid, I didn't want to give away too much before the team came round and had a look. The engine is in and mounts welded up, still some finishing to do on the drivers side once the engine comes out again. The gearbox cross member is in place. HQ holden narrowed by 300mm. Again some final welding to finish off when the engine is out. Brake booster brackets made, final hole in the firewall to finish off. We didn't do it the other night because my kids had gone to bed and the die grinder was going to make too much noise. I have been stuffing around with the diff angle and finding how much change there is in angle in normal suspension movement. I have decided to have the diff 2 degrees nose down, same as the Firebird. I have traction bars that mount under the spring pad at one end and below and forward of the front spring eye on the chassis. At expected ride height they are almost parallel with ground and the diff angle stays constant. The main thing I want is no axle tramp and I think these will do the trick.Traction is always going to be an issue with 215 tires. Still plenty to do but getting rapidly closer to all cuts cut, shuts shut and then off for final rust work and paint. Photos to come. -
Funnily enough I have been wasting a lot of time around diff angles, drive shafts and the like.A couple of thoughts, your old lowered springs will probably insert the drive shaft further into your gearbox as long as the input of the diff is below the output of the gearbox. Severely lowered vehicles, think 30s chassis car with a Z in the chassis go the other way. The other thing is the diff angle will change as the suspension goes through its travel. My suggestion would be to refit the old springs, go for a drive and confirm that the vibration is still gone, check the distance the drive shaft is in the gear box and the diff angle. Put your new springs in with the lowering blocks, if you are going to use them, then make the diff angle the same. Because you have used the lowering blocks the drive shaft should be OK but check that it is in far enough. Most decent 4 wheel drive places should have the shims to change the diff angle. When I lowered my Silverado the kit came with 3 degree shims and putting them in made a world of difference to the vibration.
-
When is threeonthetree going to become 4speedOD????? Time for a name change Neal now that you have swapped the bogan holdens for the British stiff upper lip.
-
All the positive feed back has gone back to my wife. She will make cake again next year if my shed makes the list.
-
Thank you Mr Vapour for making this happen. A+ will trade again.
-
Getting close now. Have been clearing some crap out of the shed so there is space round the car.
-
Wylde's '84 Holden Statesman DeVille series II
Kiwibirdman replied to KKtrips's topic in Project Discussion
Good work on the warrant. -
Auckland Monthly Meet - Wednesday 22nd March
Kiwibirdman replied to Shakotom's topic in Upper North Island Region
In the diary. -
That is true. It is also dependent on the ratio of total distance from pivot point to pedal v pivot point to connection to the master cylinder/booster. The higher the ratio the easier the pedal is to push(more leverage) but the further the pedal has to travel.
-
Kiwibirdmans 1962 EJ Holden Wagon
Kiwibirdman replied to Kiwibirdman's topic in Projects and Build Ups
Here are the engine mounts. The strait up and down one is the passengers side which I made a couple of months ago. The funky one is to go around the steering universal. This is the second attempt as the first one didn't have a big enough dog leg. As usual second attempt took about a quarter of the time of the first one. A guy who I met recently did the finish welding with the 250 amp mig in his garage. Here is the size comparison of the VZ commodore booster and the gemini booster. I'll let you guess which is which. I'm going to use the original holes in the pedal so shouldn't need a massive amount of boost to get good brakes, the leverage is about 9:1 where the commodore was around 7:1. I am a little worried about how much travel on the pedal, have to wait and see once it's all together.
-
Kiwibirdmans 1962 EJ Holden Wagon
Kiwibirdman replied to Kiwibirdman's topic in Projects and Build Ups
Here are some photos as promised The final mount for the steering column. The steering column in is final place A couple of the steering so far. Still more clearance needed around the universals.
-
Kiwibirdmans 1962 EJ Holden Wagon
Kiwibirdman replied to Kiwibirdman's topic in Projects and Build Ups
Nothing like inviting the Club round for a garage tour to get some motivation. Bottom mount for the column is made, just needs a couple welds and that can be ticked off. I have fitted the steering universals and made a nice piece of pine dowling to connect them. As usual mocking things up finds the other bits that don't work. My funky engine mount with a bend in it isn't going to work so another will have to be made. Once again the second should take about 20% of the time to make of the first one. Once the engine mounts are in , all the clearances for the universals sorted, I will get an intermediate shaft machined up. The other thing that I had wasted a heap of time on was trying to get the VZ Commodore brake booster to fit. After may hours I gave up and chucked it in the corner. Some research on the web told me a Gemini booster was the go. I was talking to a mate about this and his comment was good luck finding one of those. One search on trademe found a crowd called Olds Cool who were wrecking one. A couple of emails, a bank transfer and the courier arrived a work with it 3 days later. Looks like it will be the business, I can cut down the original brackets, the bonnet spring and rocker covers will miss and the VZ master cylinder looks like it can be made to work. I promise photos soon. -
Auckland Monthly Meat - WEDNESDAY 15 FEBRUARY
Kiwibirdman replied to Shakotom's topic in Upper North Island Region
What Ned Said!!!! -
Mr Vapor, you need to move the typing finger a little to the right, its an EJ not an EH.
-
Since the problem started with the change in springs I would be checking the diff angle. Use a proper gauge (I have seen people use the built in angle gauge on an iPhone) and make sure that the gearbox and diff are parallel. It is amazing how 1 or 2 degrees of miss alignment will make things vibrate.