j.e.d.
-
Posts
1,129 -
Joined
-
Last visited
-
Days Won
2
Everything posted by j.e.d.
-
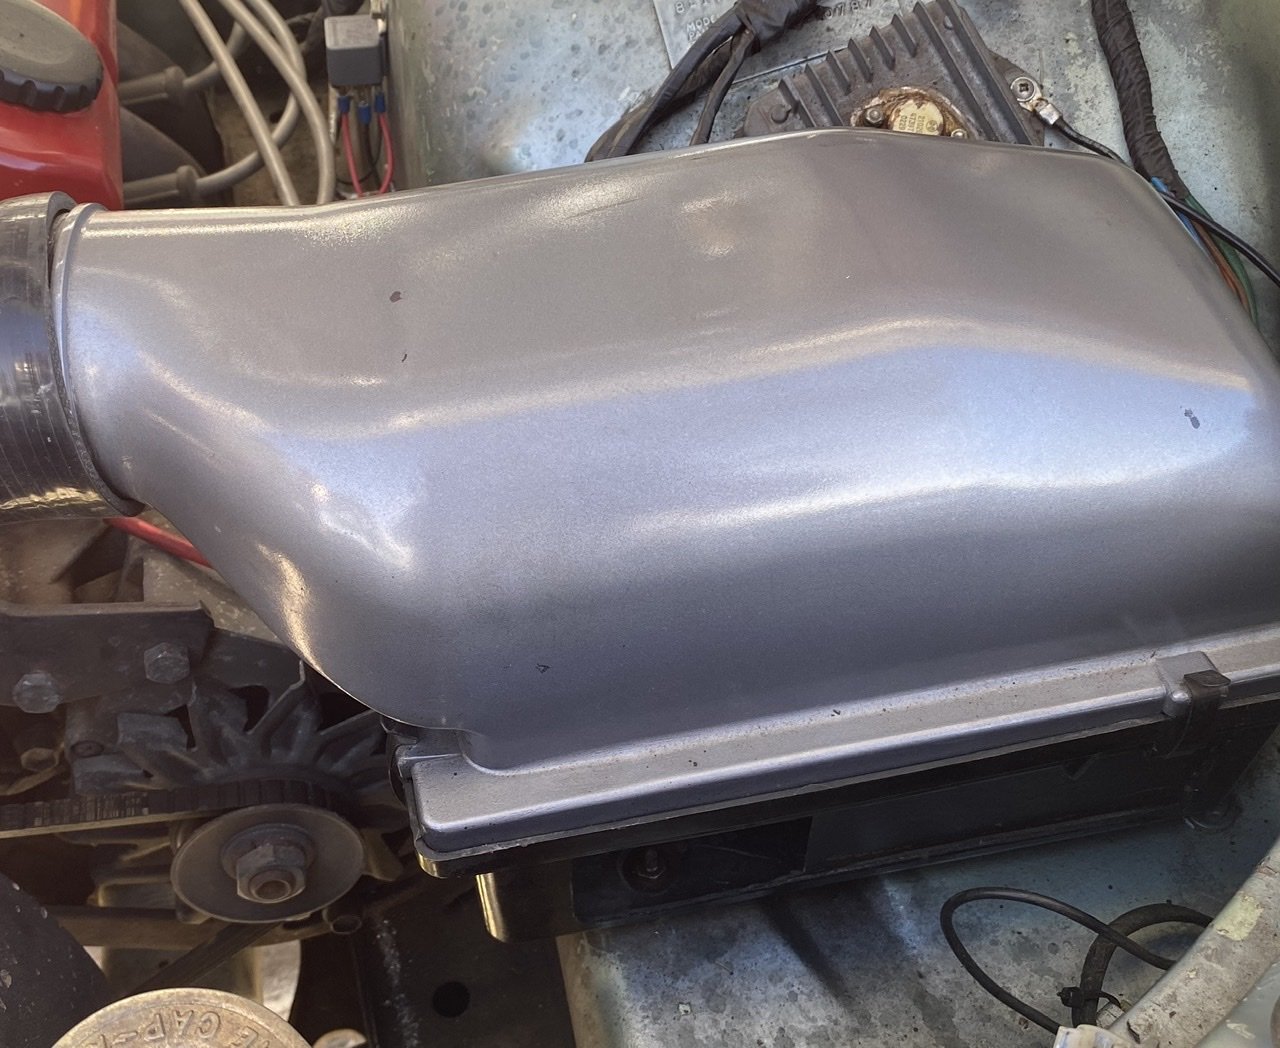
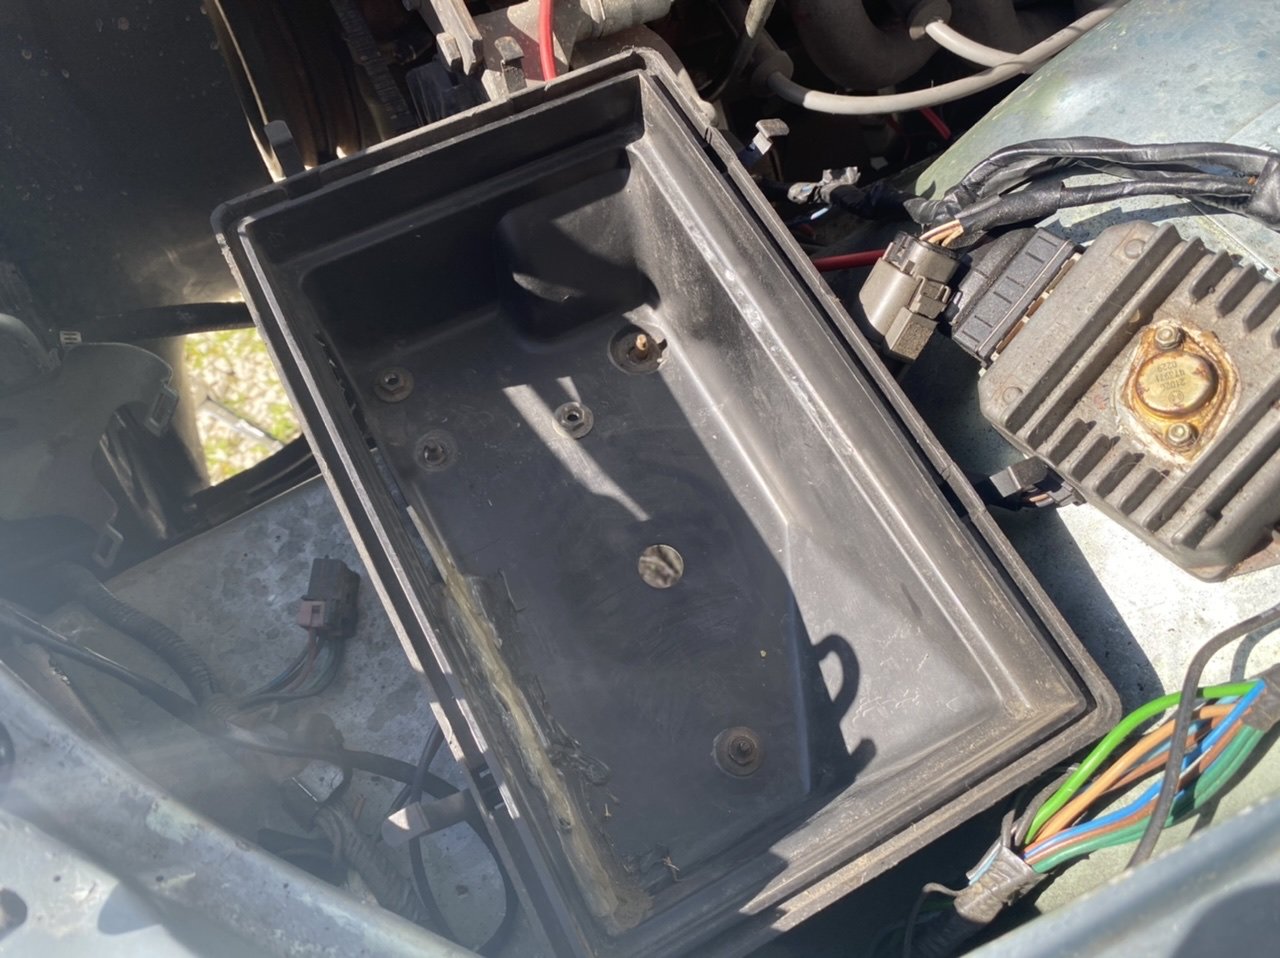
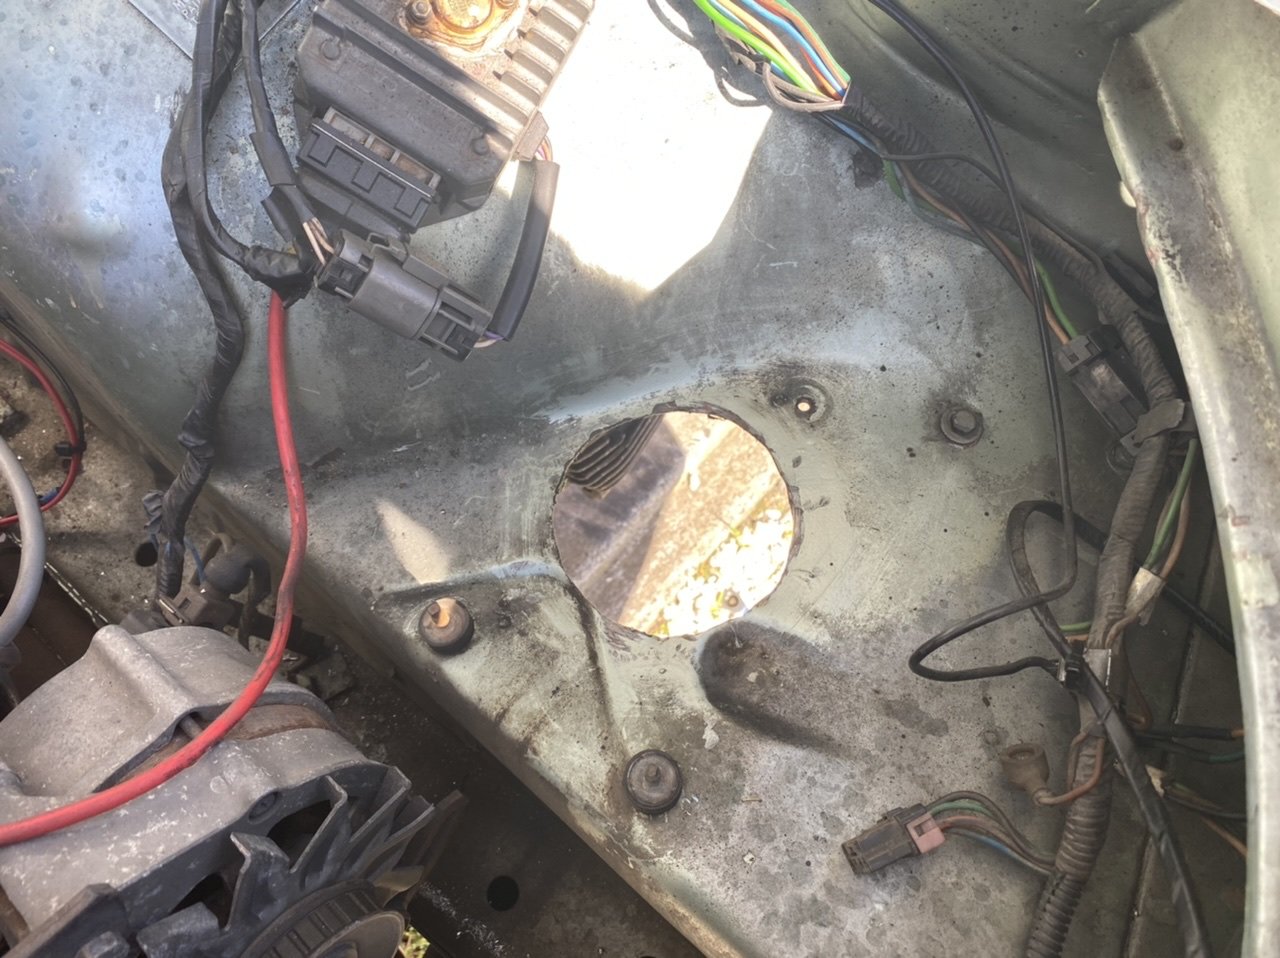
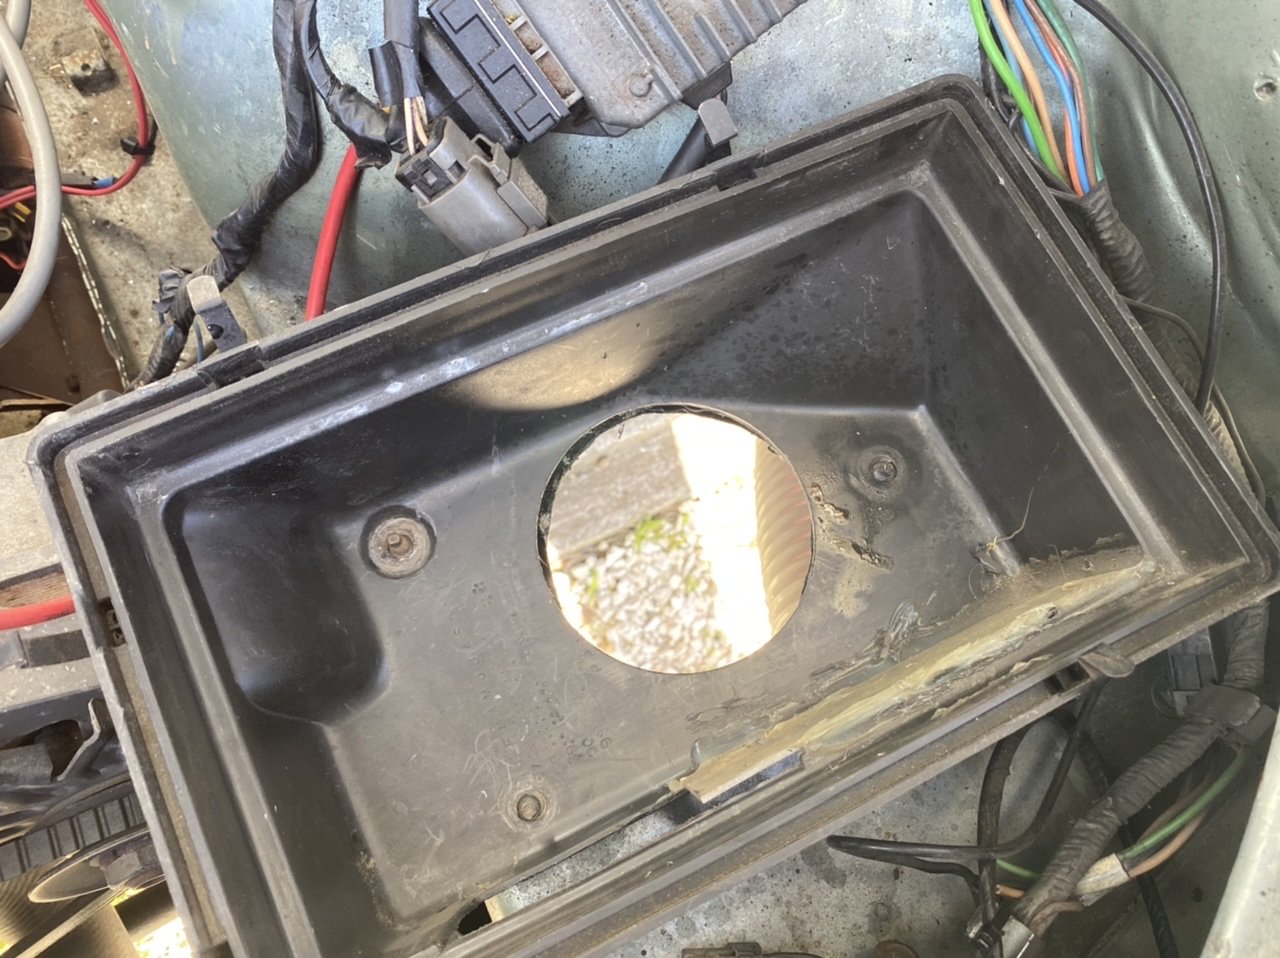
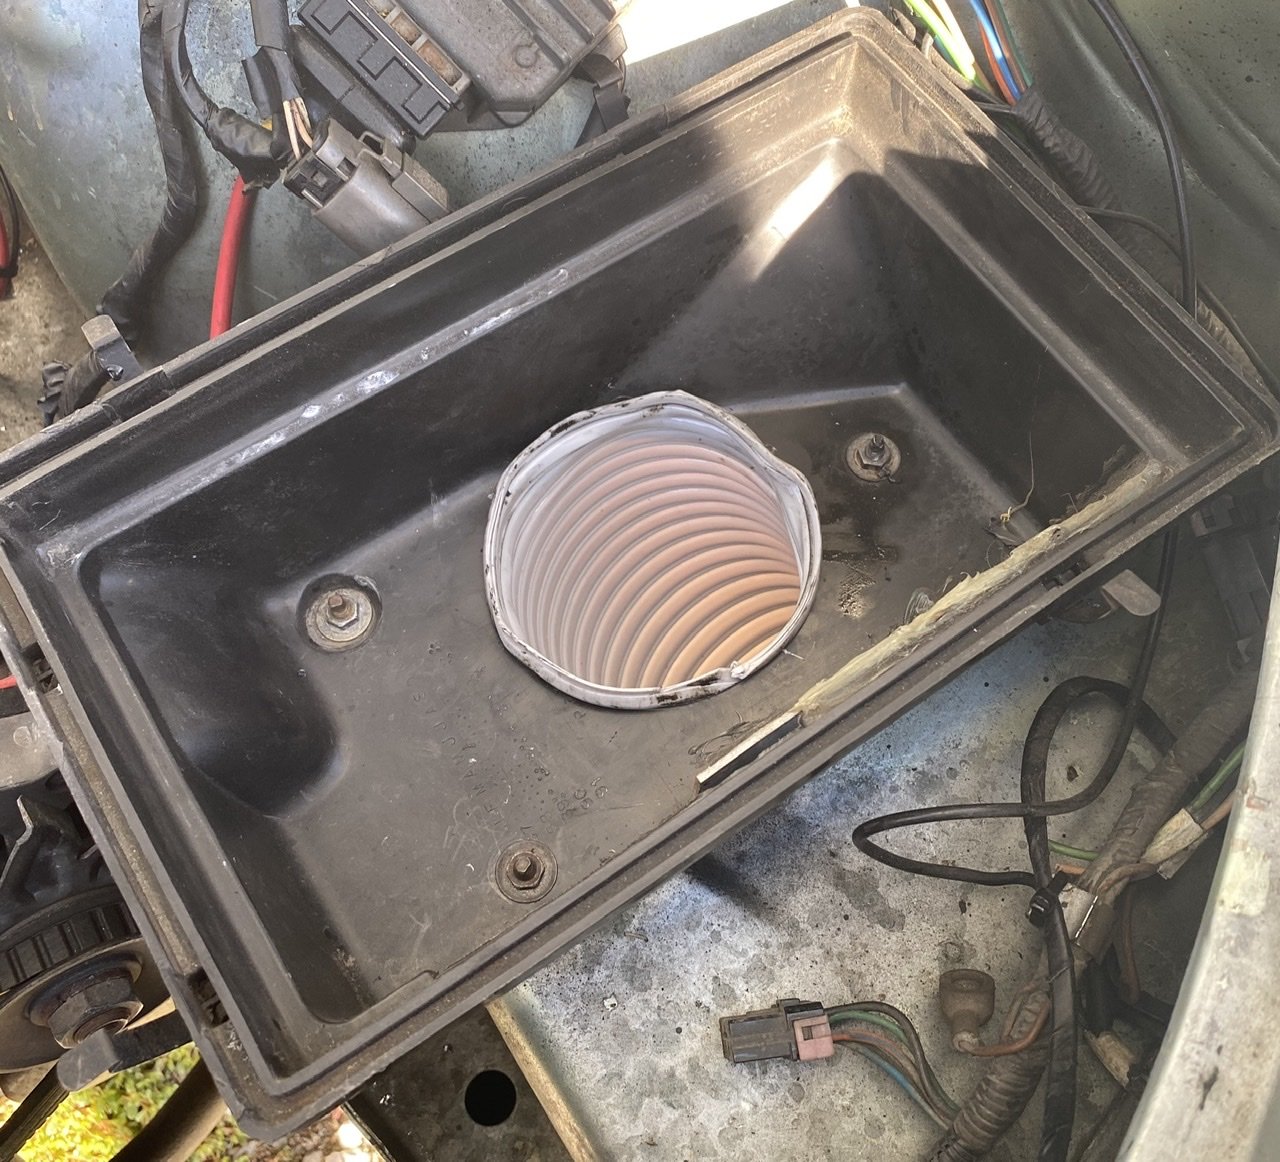
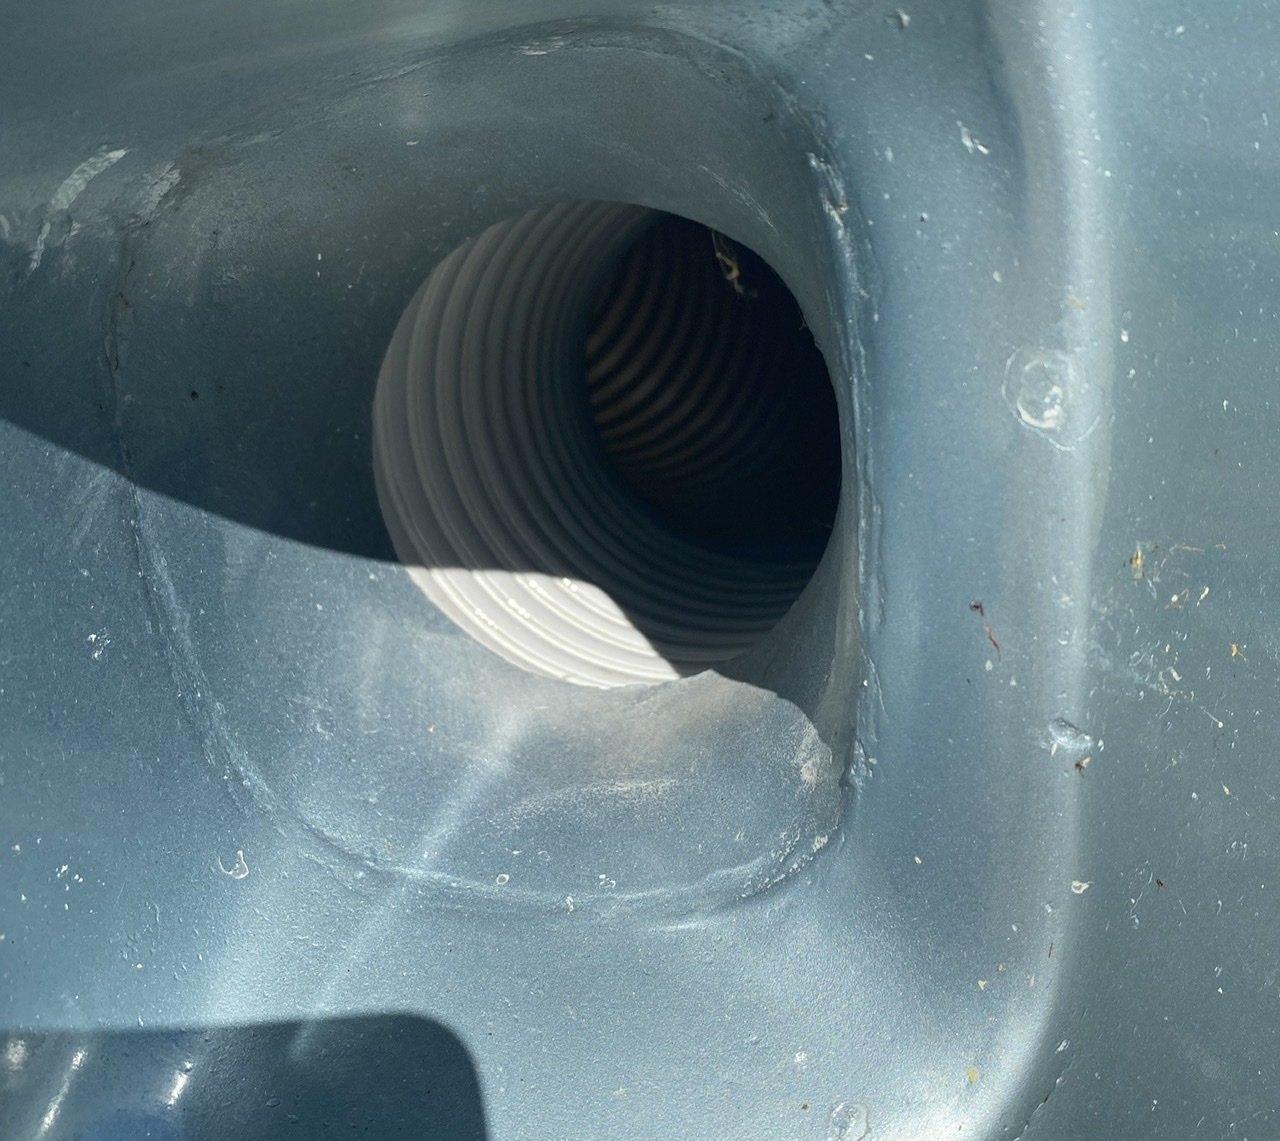
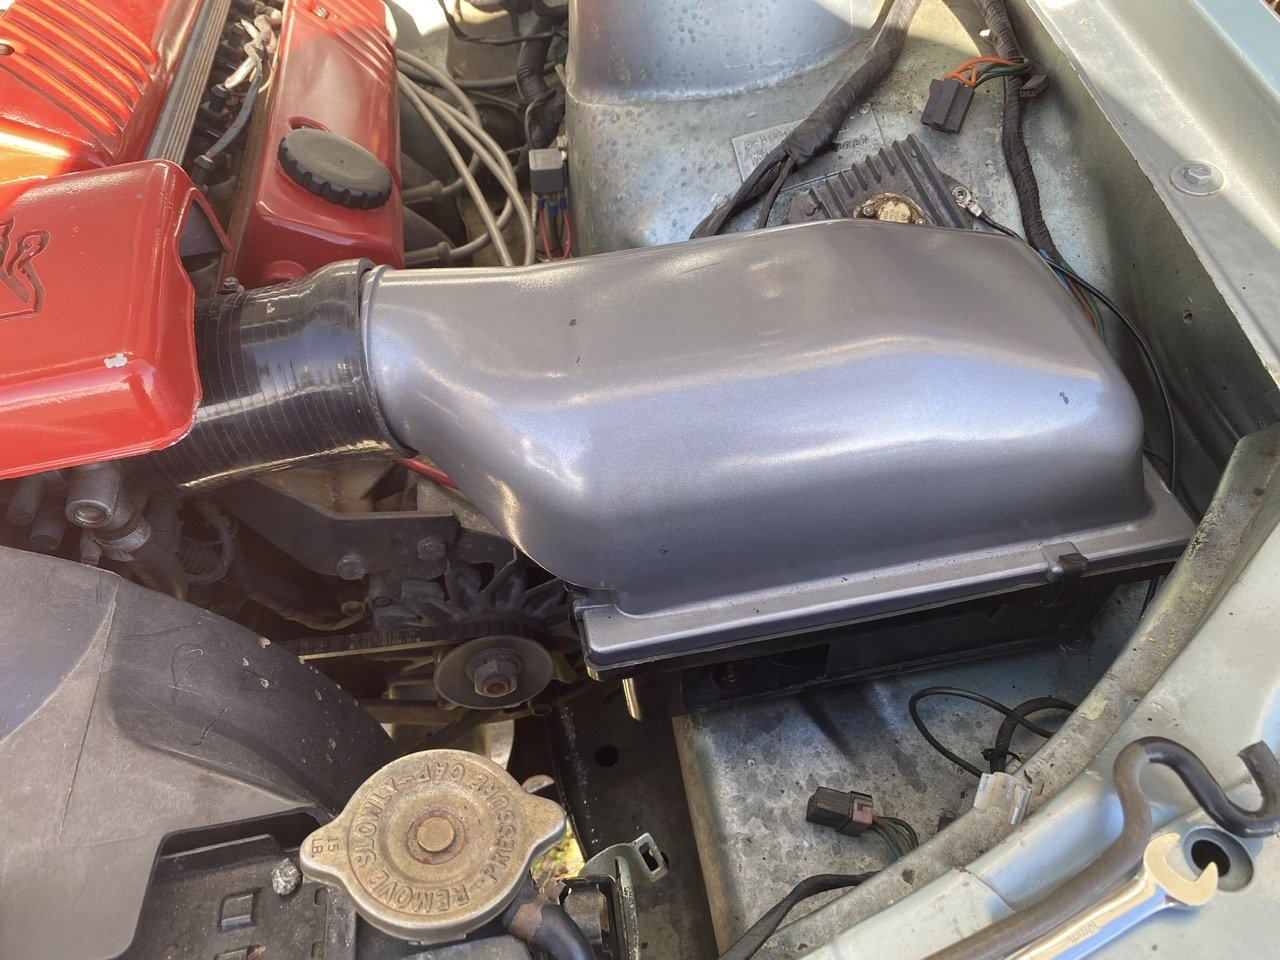
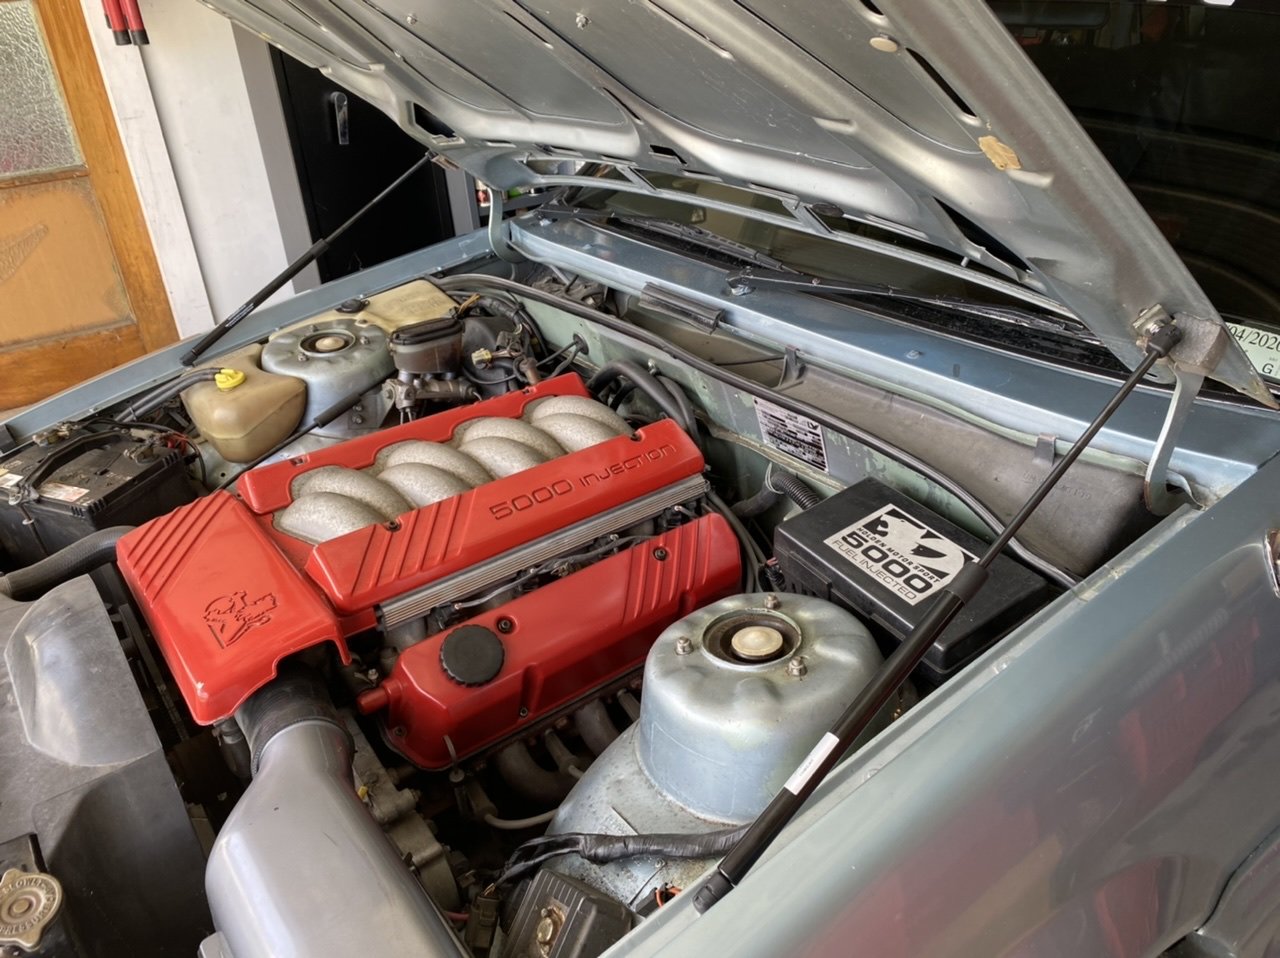
Had a cursory look at oil levels and air filter one day and discovered something not to my liking.. the air box to the throttle body only has this tiny opening to feed air into it. Going along the lines of more air = more go, I started to look at where I could run some ducting to said tiny opening. No clear path was apparent in the engine bay around the radiator so figured the best way was from underneath.. it was at this time I saw @sheepers post on the hole he drilled so thought I must be on the right track. I grabbed a length of ducting from work that they used for sawdust extraction and figured that’ll do the trick. Tiny hole at front of airbox: The airbox had this hole already in the base and below it there was a factory hole about 20mm diameter directly in line with this in the inner guard.. very handy for lining things up: Unfortunately I don't have a metal holesaw so resorted to many tiny holes and a file.. came up pretty good & gave a it a coat of rust kill paint on the edges: My wood holesaw worked well in the plastic though: Poked the ducting through the hole Slipped perfectly over the brake duct hole in the front spoiler (will leave it like this for now): View from under the guard: Then all back together like nothing happened. Silicon pipe between the throttle body & airbox looks dubious but not sure if it needs clamping or not.. its a snug fit:

- 7 replies
-
- 14
-

-

J.e.d.'s Walkinshaw Rep friendly discussion thread
j.e.d. replied to j.e.d.'s topic in Project Discussion
Thanks for all the comments so far.. much appreciated.. Along with suspension upgrades will be a bigger diameter rim as I think a car with all this extra padding requires some balance.. Here is a test fit I did:
-
J.e.d.'s Walkinshaw Rep friendly discussion thread
j.e.d. replied to j.e.d.'s topic in Project Discussion
Yea I don’t get it either man.. but in saying that, my partner is Peruvian and she just doesn’t understand the kiwi culture and love for Aussie cars.. anything with a bowtie symbol on the front though she’s all good. Hmm LSA conversion sounds like an idea. Suspension is the biggie on the list I’ve got lined up in the coming weeks though which I’m looking forward to -
Feel free to cast all your valued opinions right here
-
-
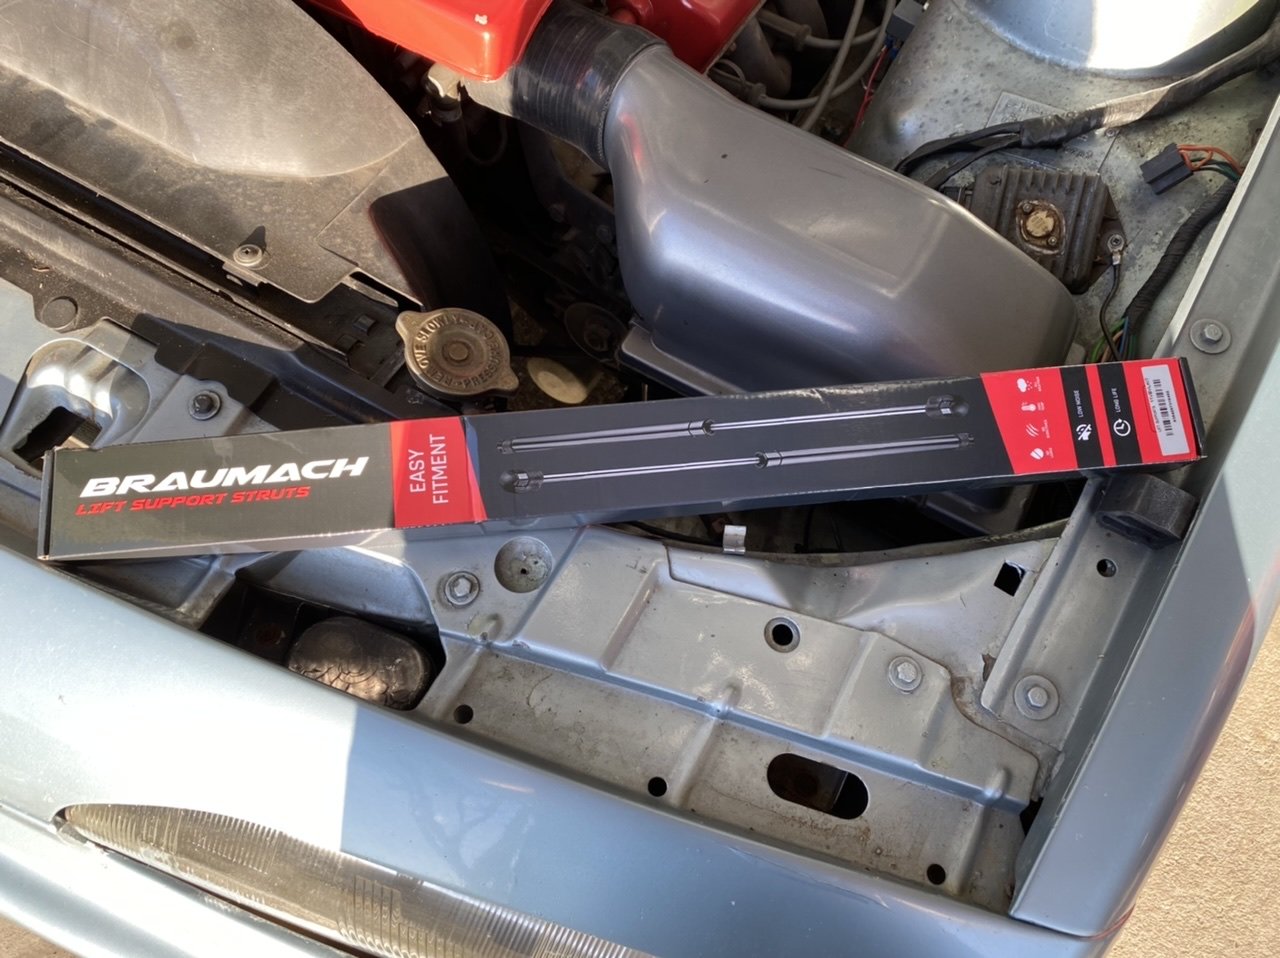
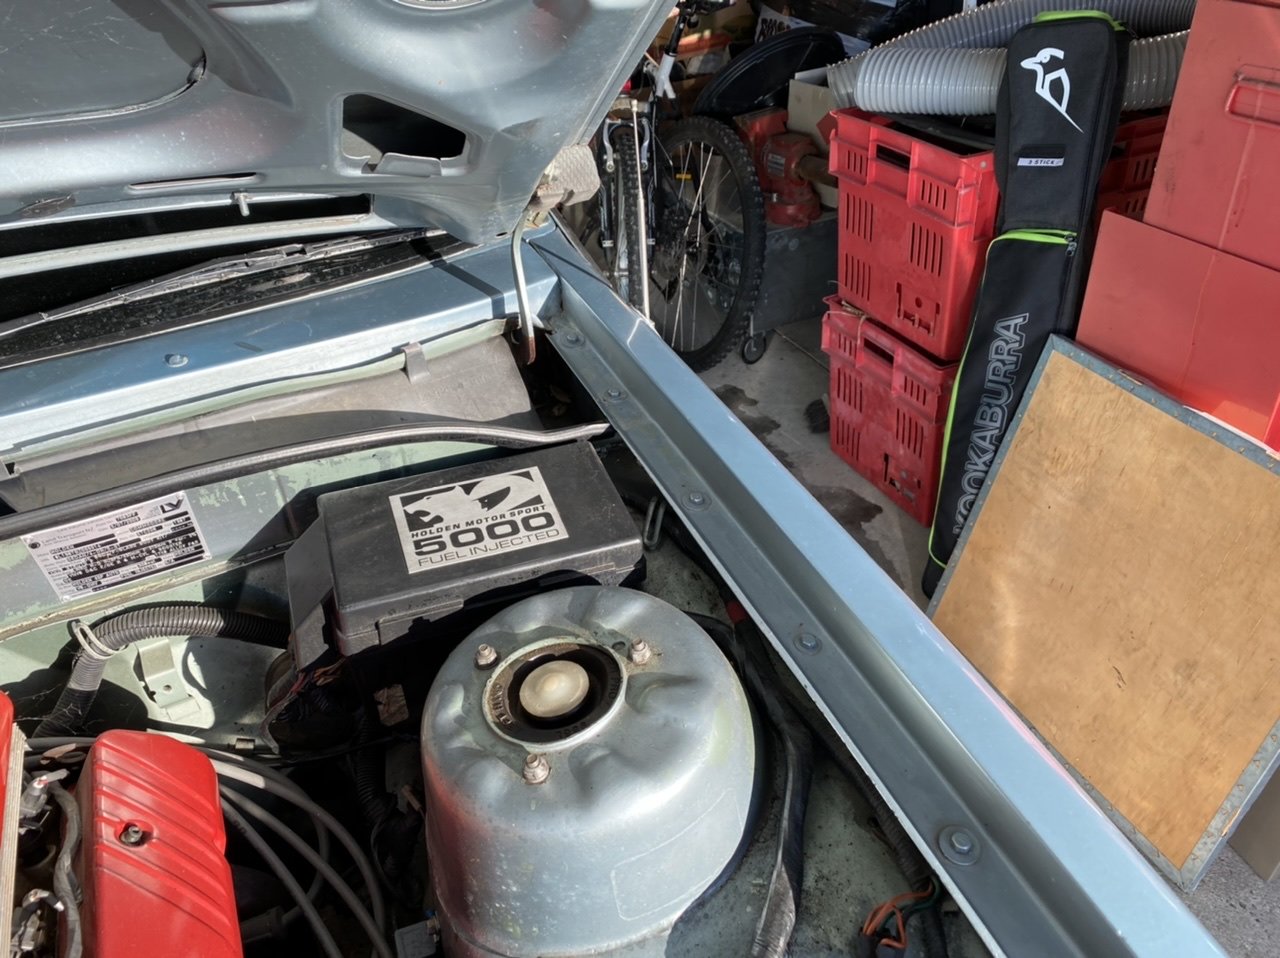
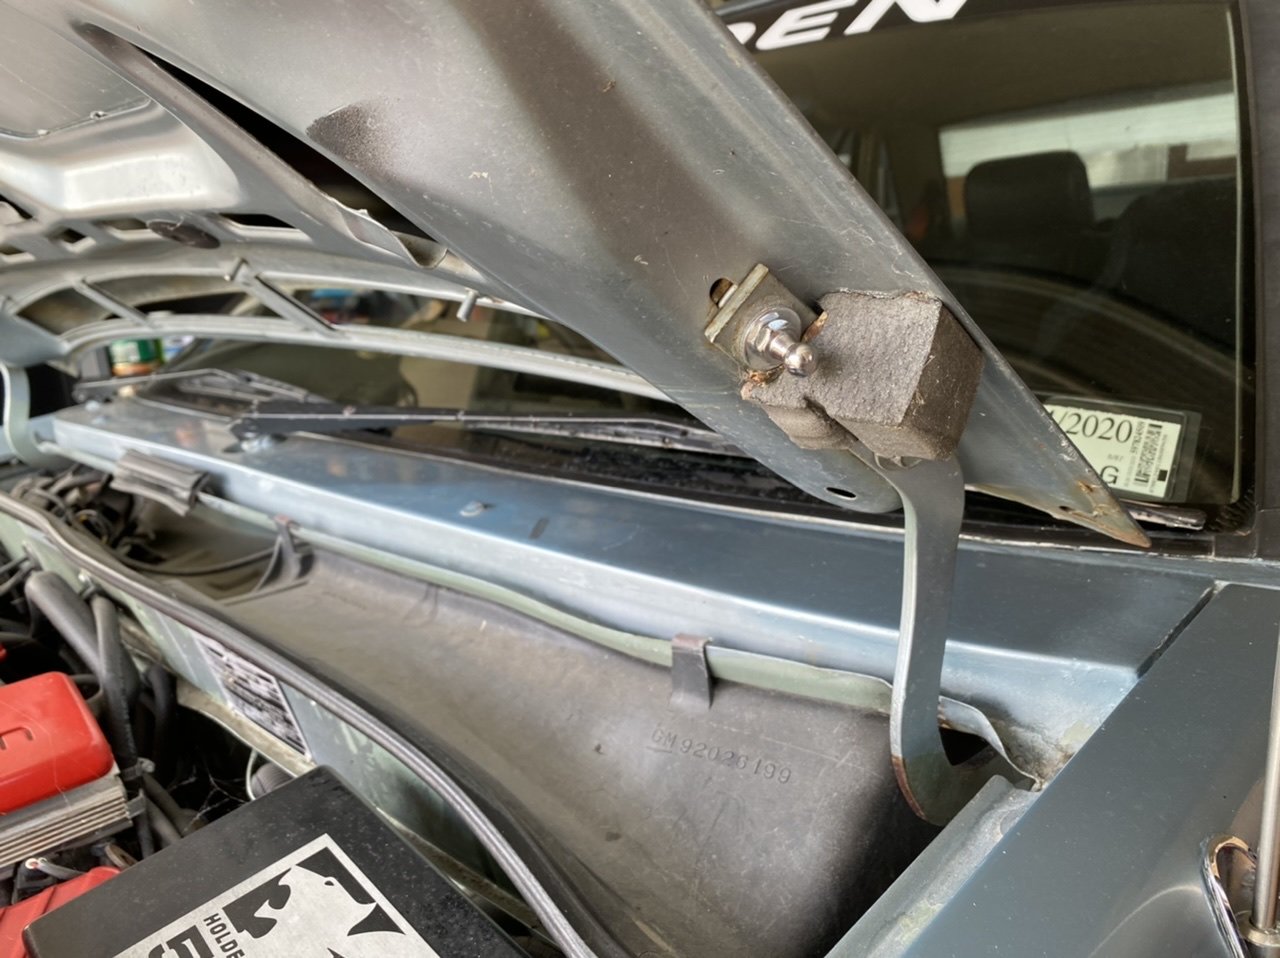
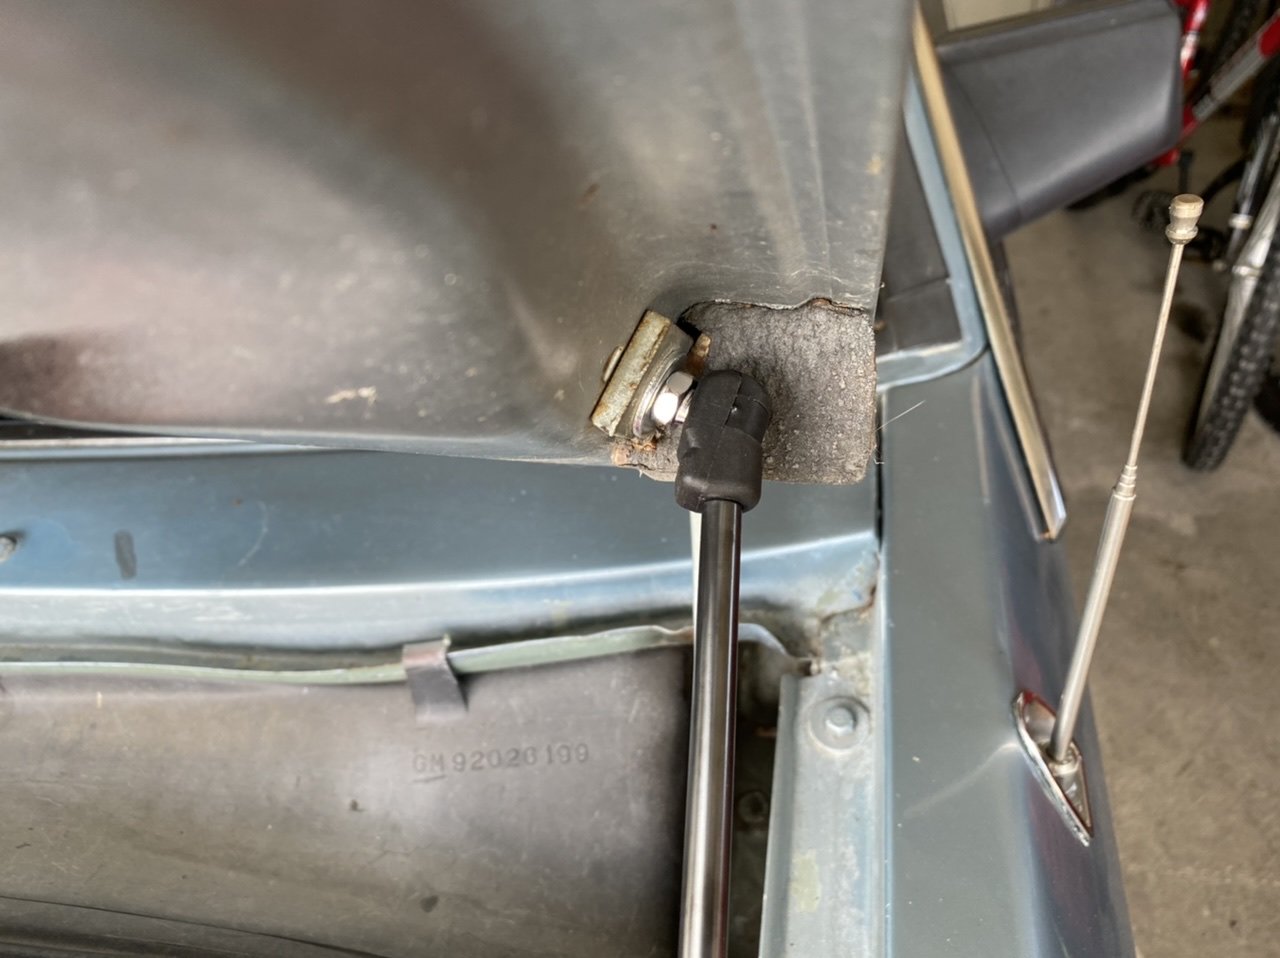
Righto.. first quick easy mod.. when I picked this up and spent a couple of days getting to know her, I soon discovered how damn heavy the bonnet and boot are to open due to the body kit. The boot is still on the agenda to be done (fibreglass rod works well for now), but the bonnet was a straight forward fix. Onto eBay to buy this kit from a supplier in Aus. The only thing I did differently was flip the struts compared to the information I was looking at because of the angle of the head at one end suited it being fixed to the bonnet end rather than the guard end (in my humble opinion) Struts in a box: Starting point: Replacing the hinge bolt on either side with one of these: Then the same along the guard.. third bolt up from the front gets replaced: This is where I chose to have the angled head of the strut. Probably could have been on the guard mount, but visually it looks better this way for me: And the end result. Bonnet latch needed a slight tweak for the bonnet to release a lot easier but I don't think that was related to my install. Well worth doing this mod I reckon!
- 7 replies
-
- 12
-
-
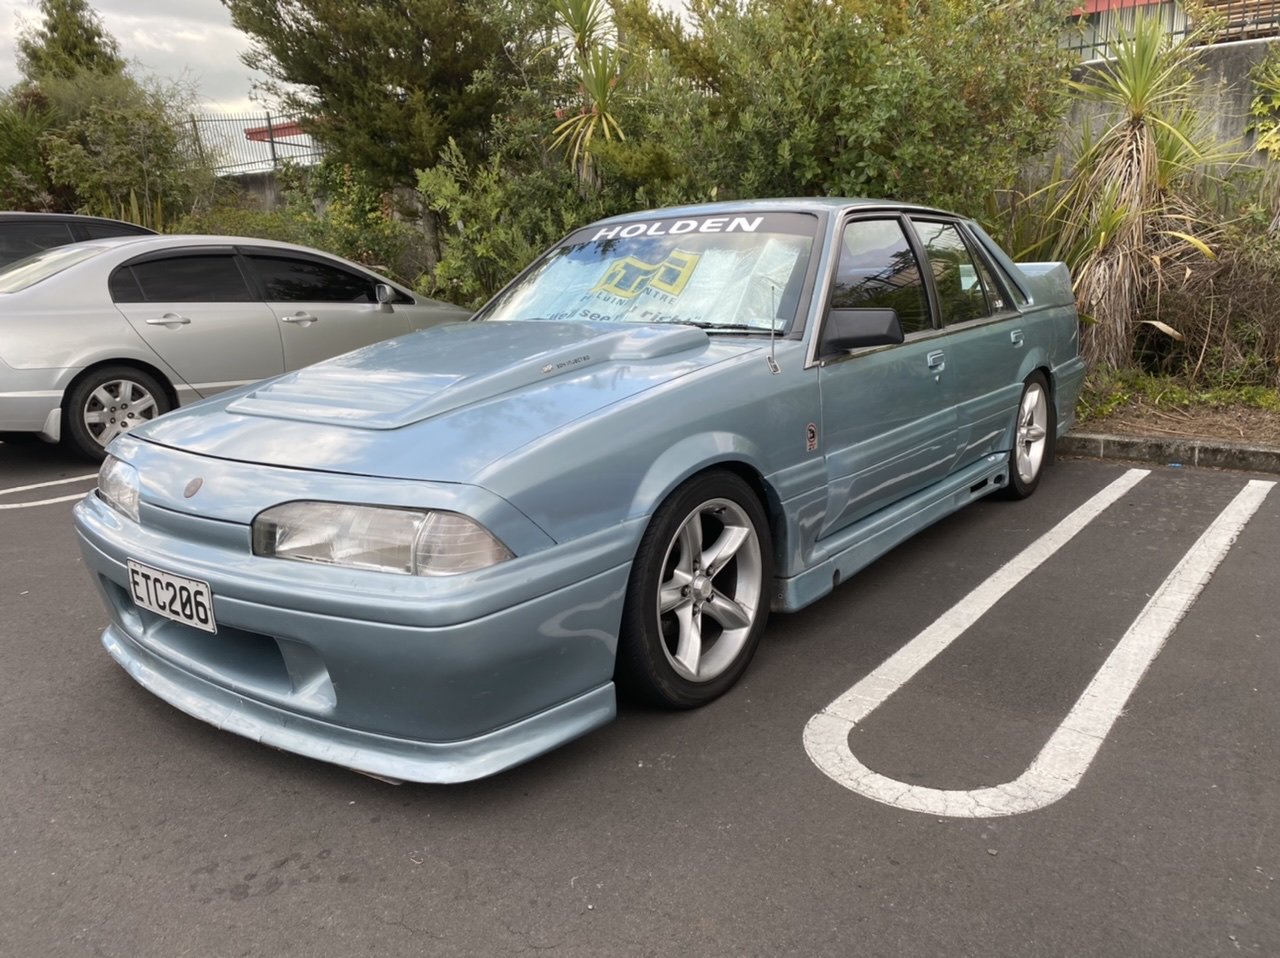
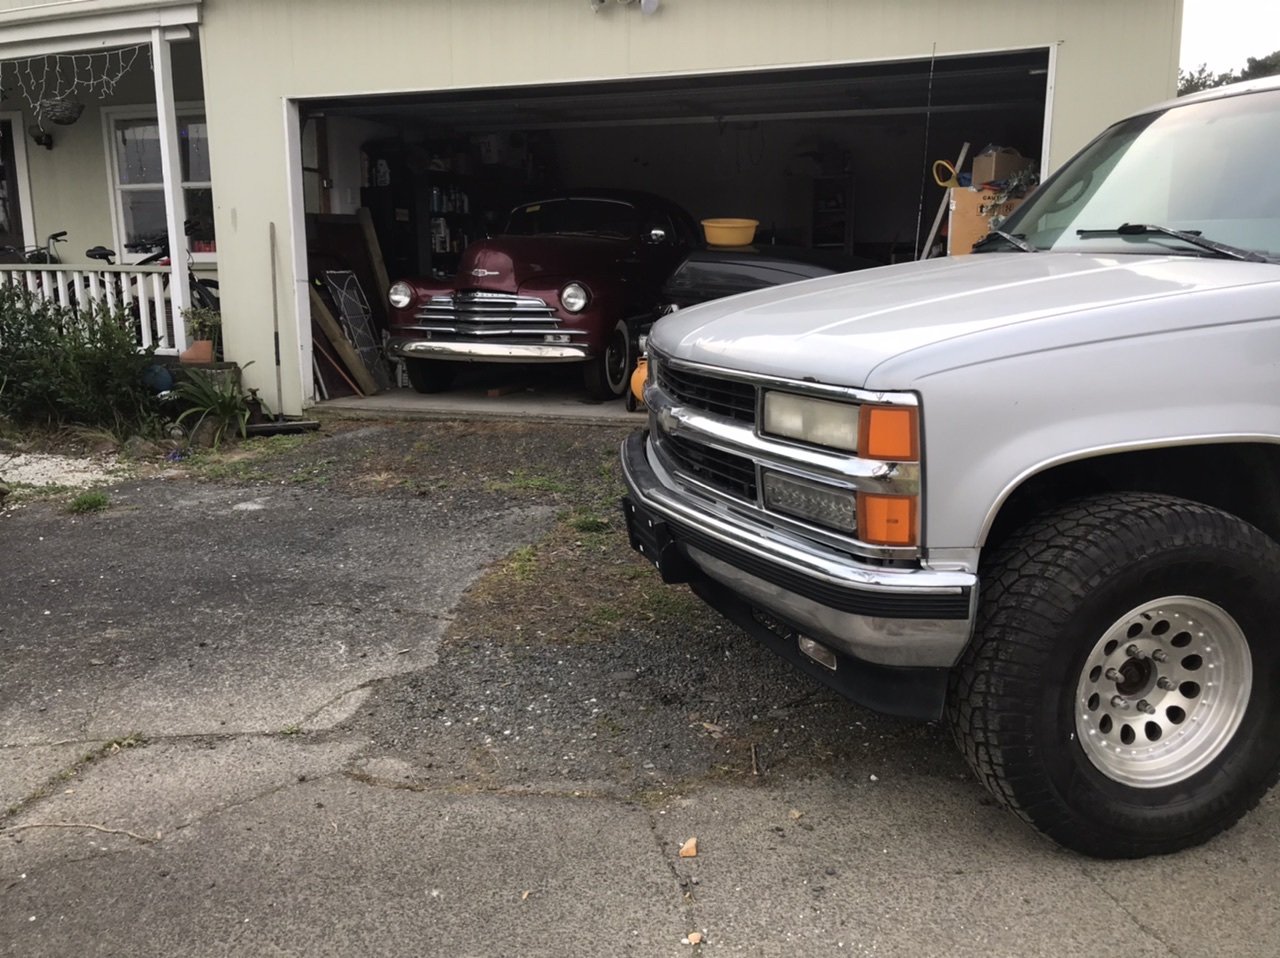
Here is my new borderline oldschool mode of transportation. Admin please feel free to move it if it doesn’t fit the “oldschool” criteria (maybe too much plastic perhaps). But anyway, previous to this (after my 74 Camaro) I had picked up a 47 Chev coupe, but struggled to get into it so did a deal with a guy and swapped it for this (much to my partner’s disgust). I always enjoy having a car that’s actually on the road that I can enjoy and tinker away with. I’ll probably end up getting another project, but in the meantime this thing is kinda fun. I have plans to personalise it a bit more to my needs.. some I’ve done, and some I’ll get round to it when funds allow, but in the mean time this is her:
- 7 replies
-
- 14
-
-
Or convert to chain drive? size of rear sprocket might be smaller that the belt drive one you have on there & may clear more. I'm a fan of chain driven Harleys though.. no concerns of belts breaking in the middle of nowhere, and with doing that on my old bike allowed me to run a 180 rear tyre
-
Good stuff! (I'll be absolutely amazed if all this Harley action doesn't make me go & buy something stupidly inappropriate)
-
I think it'd be more cost effective to do what you've done - buy a complete bike & customise from there. You need to get back into yours.. it'd be great to see it finally sorted man
-
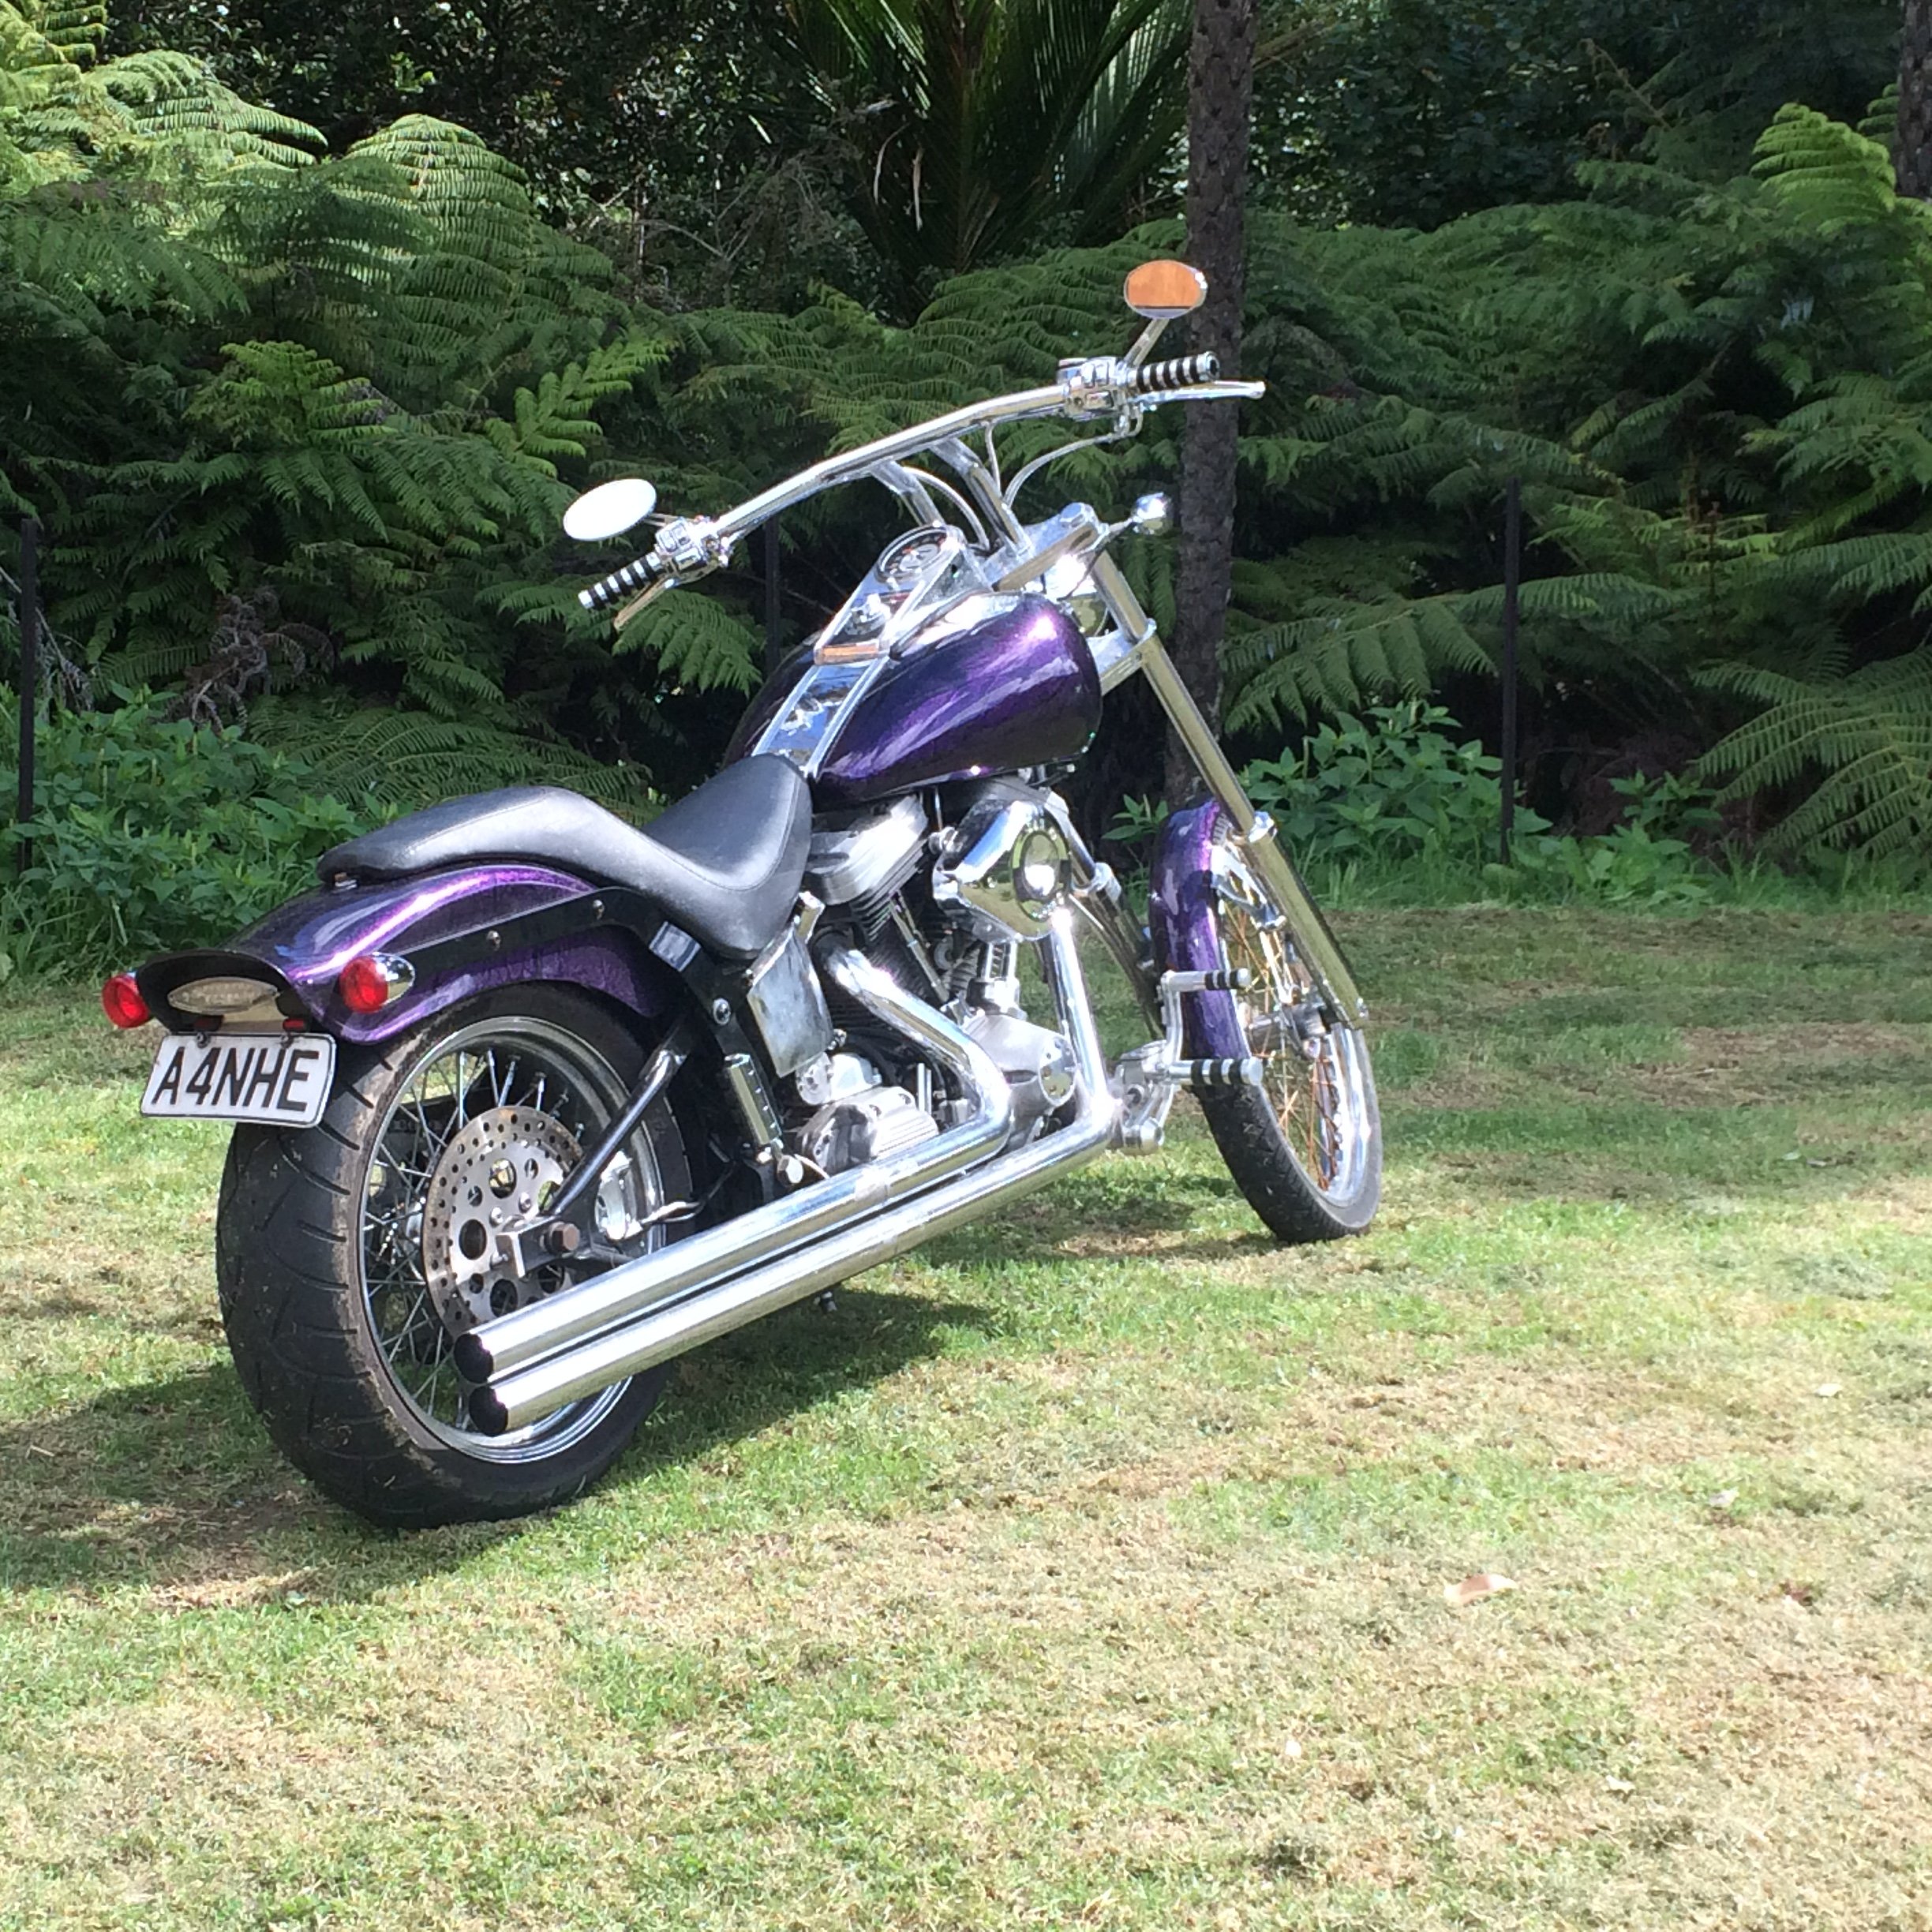
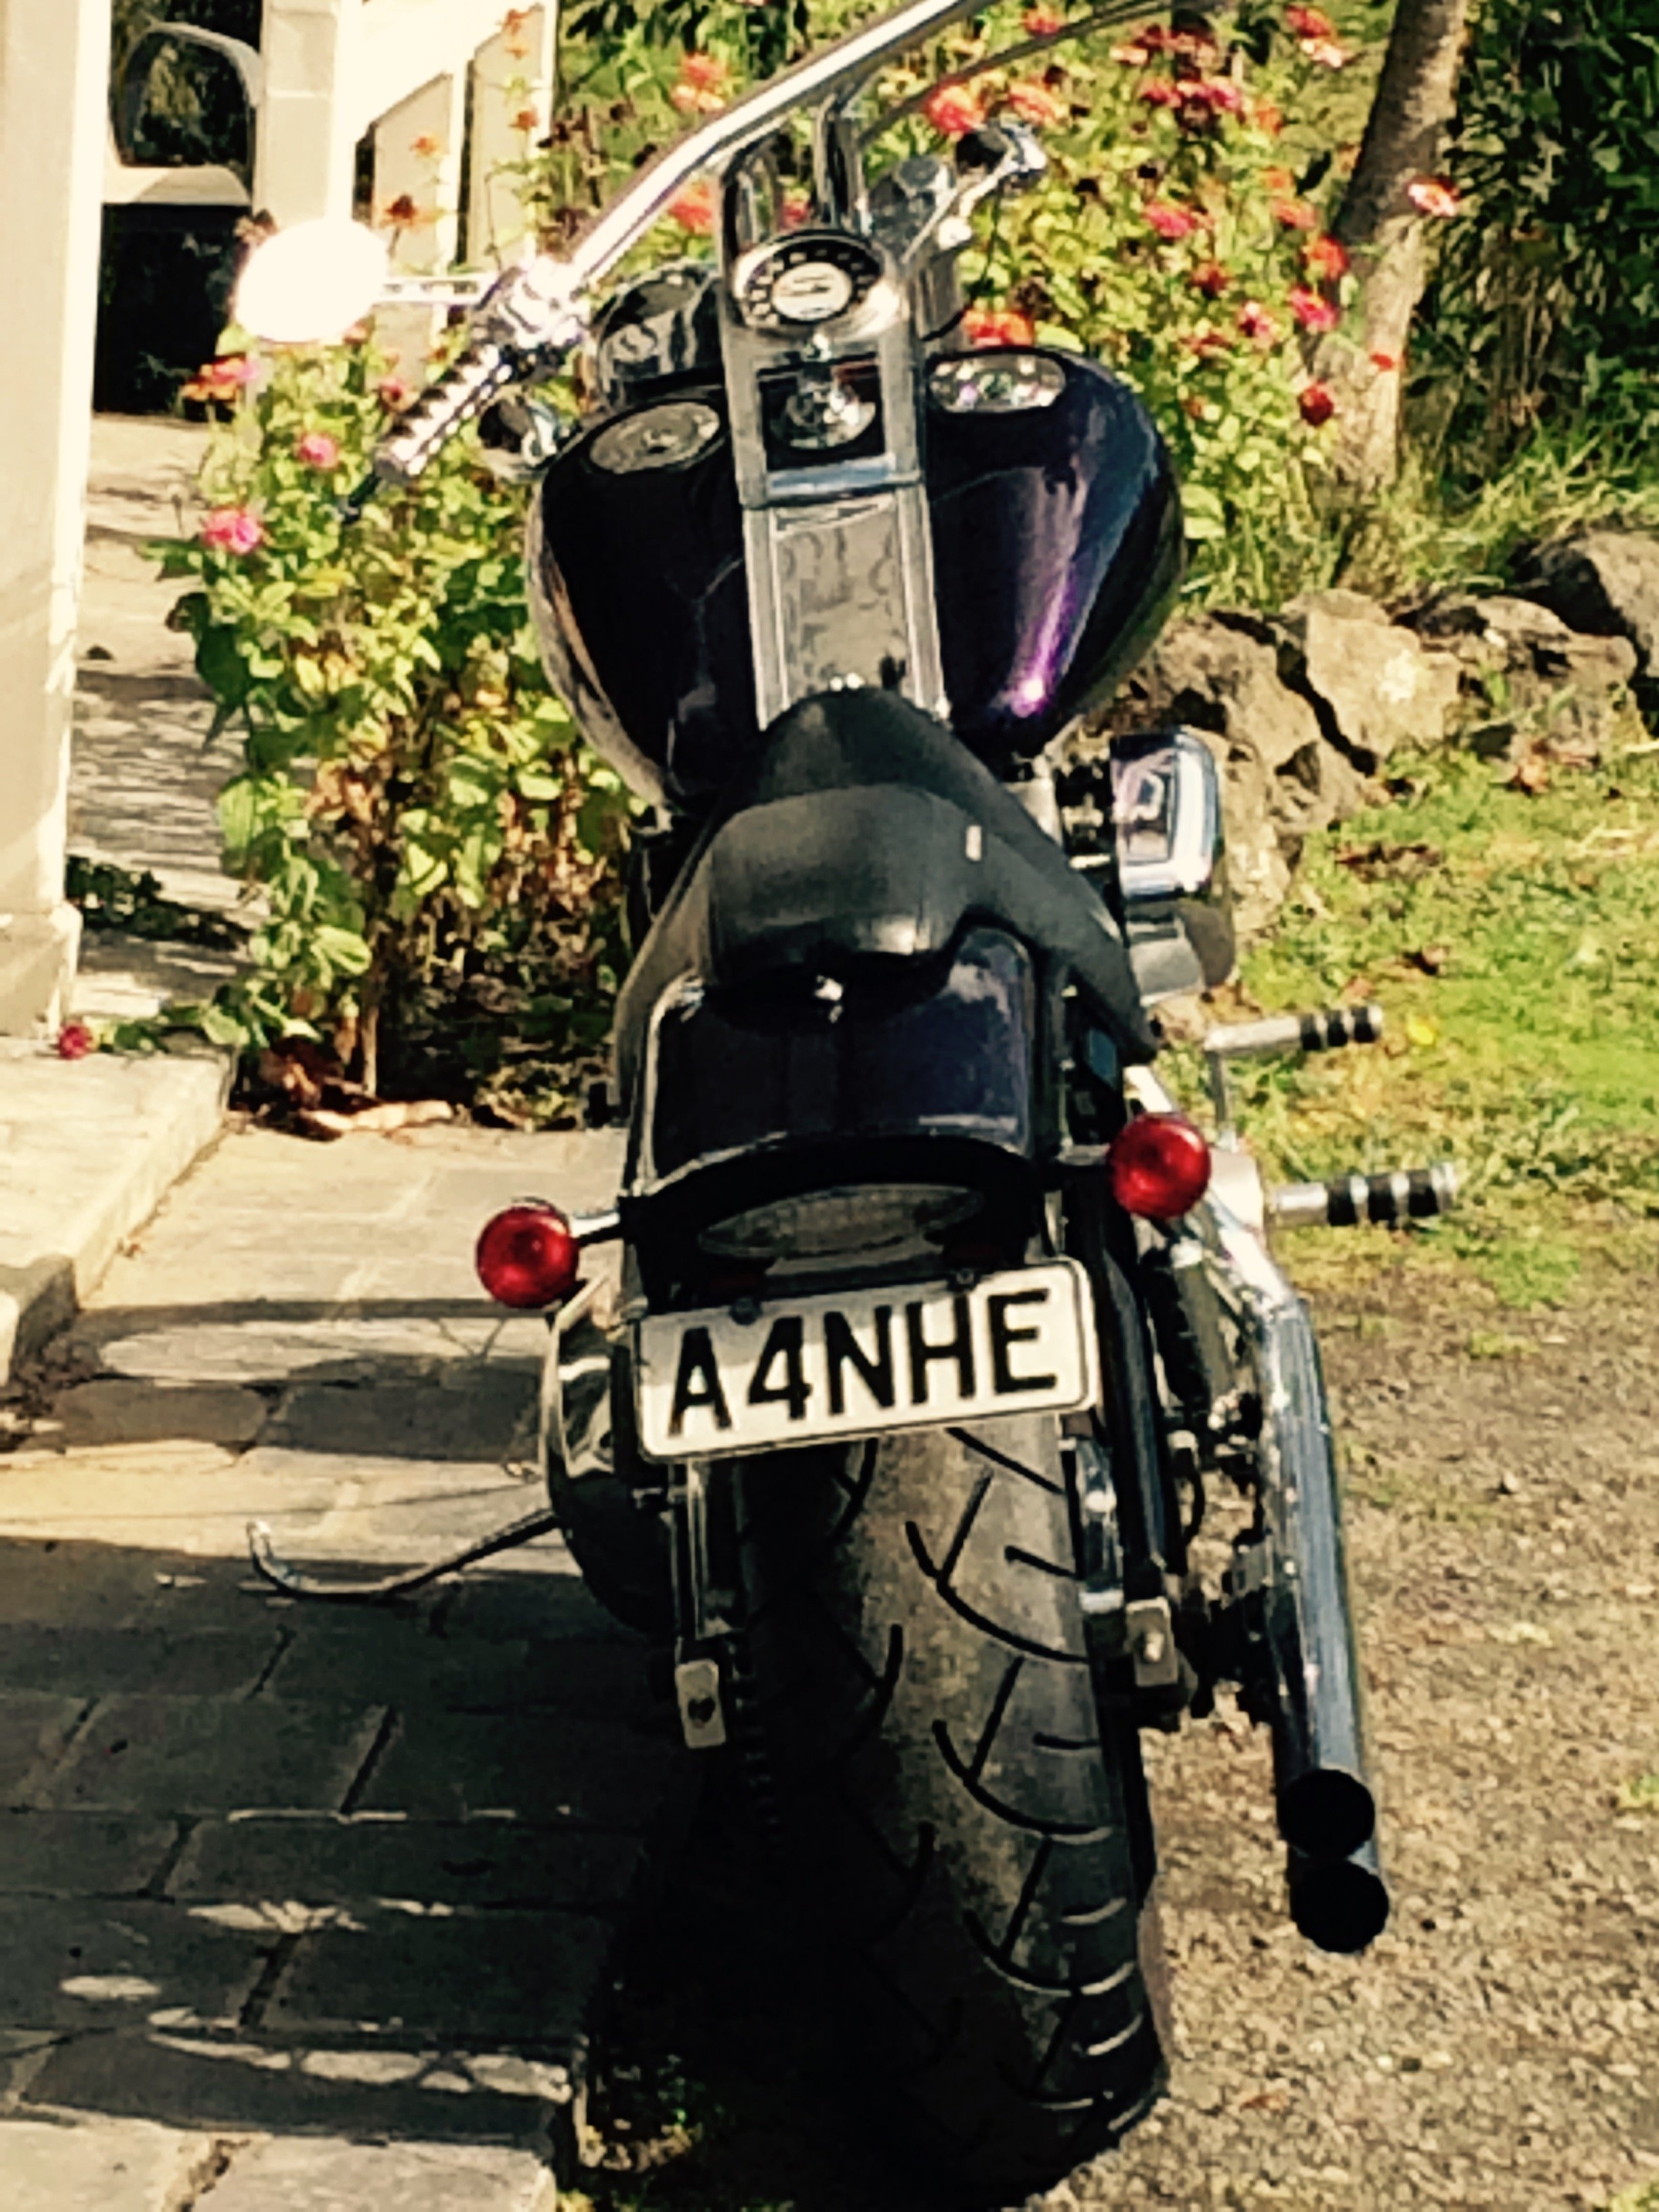
I’d have to agree with you there.. when I built mine from scratch (2004-2011 from memory) I stopped counting the cost, but worked out it got up to around $20-25k In the end. It was a fun journey and I often catch myself reminiscing and wanting to do it again , but I remind myself of that cost then let it go haha
-
Hey mate, this ^^ is exactly what I wanted to do for the CAI for my commodore under the airbox running a flexi hose from the front spoiler. You reckon there should be no hassles come WOF time? not a structural part of the car & all that? cheers
-
I did the black cover sanded fin look on my Camaro.. I liked it a lot
-
Will do.. I’ve looked at the list of Repair Certifiers and the closest is in Papatoetoe (I’m in Drury) are all certifiers much of a muchness? Or can anyone recommend someone who can come to me? Cheers
-
Agreed on both counts. I think I’ve reached my quota of stupid for the year now. Could have driven it home, but no access to another body to get me there to pick it up, and for some stupid reason (as outlined above) I didn’t want to be pulled over... yea yea I know stupid is as stupid does. I just clearly underestimated the shear size of the truck tbh. Not been registered in NZ before so I need to go through all that process. The old fella said it’s “in the system” whatever that means, and that I can go ahead and get the chassis blasted and primed before getting a repair Certifier to check it over. The chassis is surface rusted but should come up good.
-
And a pic of both of my rusty American vehicles
-
(I think I waffled on too much haha)
-
Thanks man.. yea I like them low too, but I swing all sorts of ways with my tastes and this thing does it for me. (Honestly I don’t need much excuse to buy more cars haha). Picking up this truck created some interesting problem solving moments, and more importantly how not to pick up and transport an American truck. (story edited to reduce humility and save space haha) I look at the photos and think it looks photoshopped haha
-
Well, I do already have a rather major project on the go with my ‘47 Fleetmaster. So what else is a guy to do other than to get another project.. right? I convinced myself (and my partner more importantly) that I needed a Chevy truck in my life, but in typical oldschool fashion I had neither the budget or the garage space for another vehicle. And anyway, who doesn’t need a thumping great big American 4WD truck in their lives? Oh well. I made some enquires with @Kiwibirdmanas I knew he was dailying one.. got some good advice and proceeded to probably do the wrong thing and buy a project. Owner said on the ad that it had rust but an easy fix. (Que Tui ad) I’m chucking this up here to get any advice through the process, and what I learn here will help me with my bigger project which is on the back burner temporarily til this is sorted. Here is the best pics the seller put on TM to sell it:
-
And I thought I was crazy with mine. You sir, are an inspiration
-
Thanks man, much appreciated
-
Good call.. I have a spare door which needs repair work to it so he can practice on that
-
Thats true mate.. I do hope that it'll all work out as it'll be his first go at working with panel steel.
-
Yea pretty sure what you're saying is what my flatmate is doing. He works for a steel fab shop in Drury & works on all sorts of industrial jobs. He mentioned the other day he's got his certification now & is real keen to work on my car (he's a young guy who is positive & self motivated so I'm happy to encourage that) He really enjoys his job, so what he lacks in automotive welding I'm sure he will make up for it with better skill than me haha.
-
Nah nothing. It's an old Chev so only tags are on the firewall. Cheers