piazzanoob
-
Posts
1247 -
Joined
-
Last visited
-
Days Won
1
Everything posted by piazzanoob
-
wouldn't wet sanding a car in primer be a bad idea? And yes it will be sanded when the primer is dry haha as from what i understand the primer absorbs moisture but might be different depending on the type of primer. but i see why you are doing it to get a nice smooth surface.
-

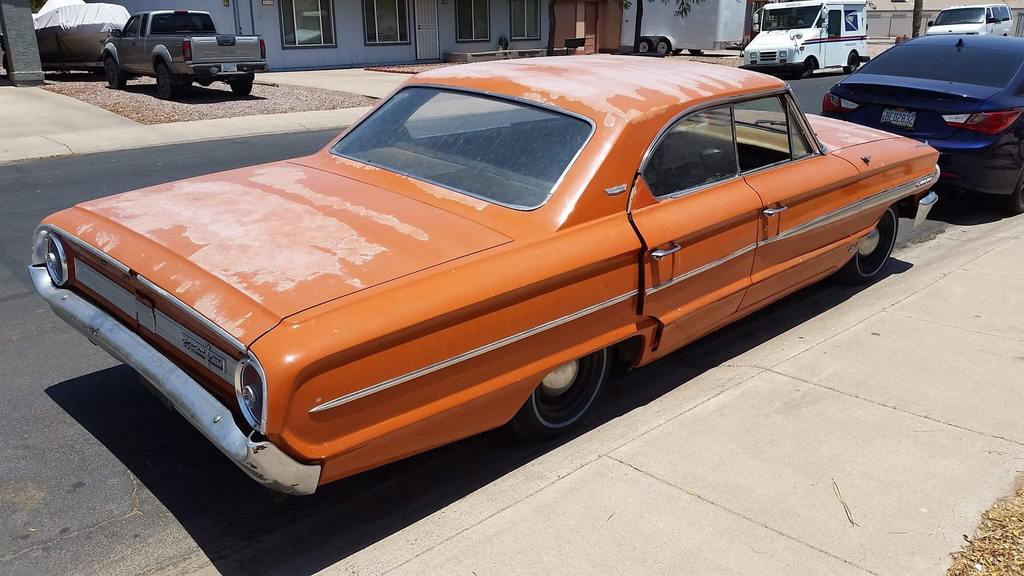
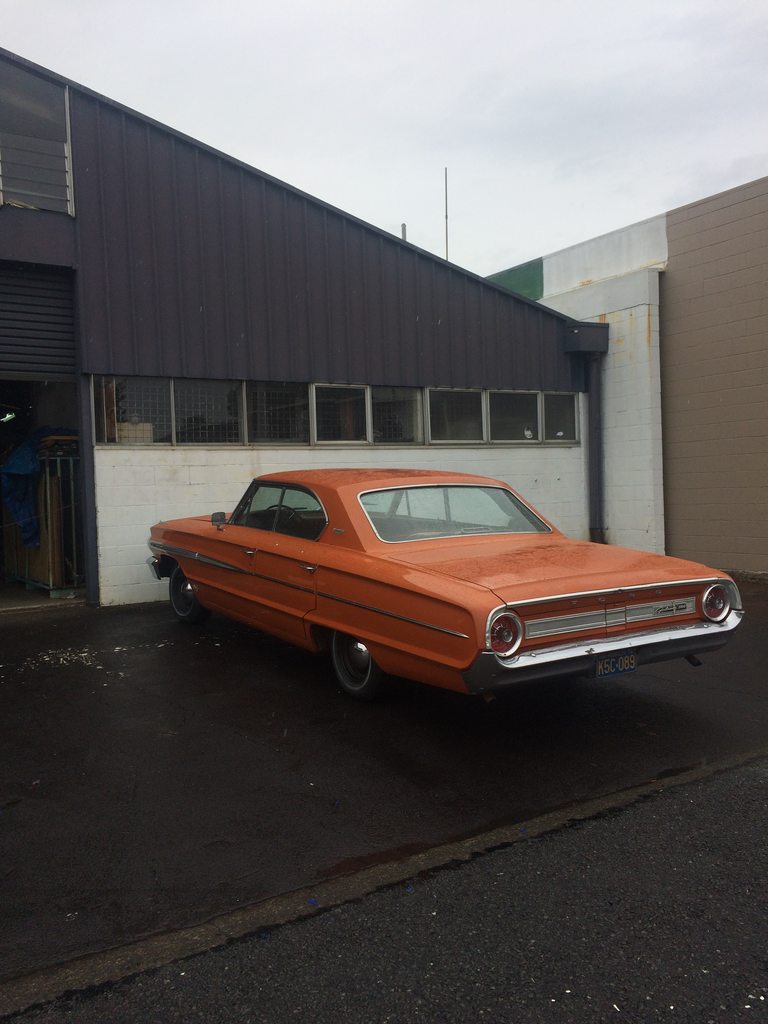
piazzanoob's 1964 ford Galaxie 500 seeedaan
piazzanoob replied to piazzanoob's topic in Project Discussion
cheers still plenty more work to be done before its legal still -
Is this the one that was on TM for 1 dollar reserve? if so good score man even had it sitting in my watchlist to see what it would go for. And yeah agreed on needing a wellside for this good luck and keep us updated!
-
well ^^^ he beat me too it. get your parts from rockauto some parts end up with a big freight bill though like drums and other heavy items. but yeah wont get them any cheaper locally even at trade prices.
-
Auckland Monthly Meat! 23 MAY. Same place as last month.
piazzanoob replied to Shakotom's topic in Upper North Island Region
-
piazzanoob's 1964 ford Galaxie 500 seeedaan
piazzanoob replied to piazzanoob's topic in Project Discussion
Haha yeah that would be good if you could. did think it looked a bit average with them and they don't really protect the speakers from the sun either. -
piazzanoob's 1964 ford Galaxie 500 seeedaan
piazzanoob replied to piazzanoob's topic in Project Discussion
Go check out the build mate would like to say yes but would have no use for them so not much point. -
piazzanoob's 1964 ford Galaxie 500 seeedaan
piazzanoob replied to piazzanoob's topic in Project Discussion
unfortunately don't know enough about sound systems that i would be able to use them to my advantage or knowledge. haha but thanks for the offer -
piazzanoob's 1964 Ford Galaxie 500 seeeedaaan
piazzanoob replied to piazzanoob's topic in Projects and Build Ups
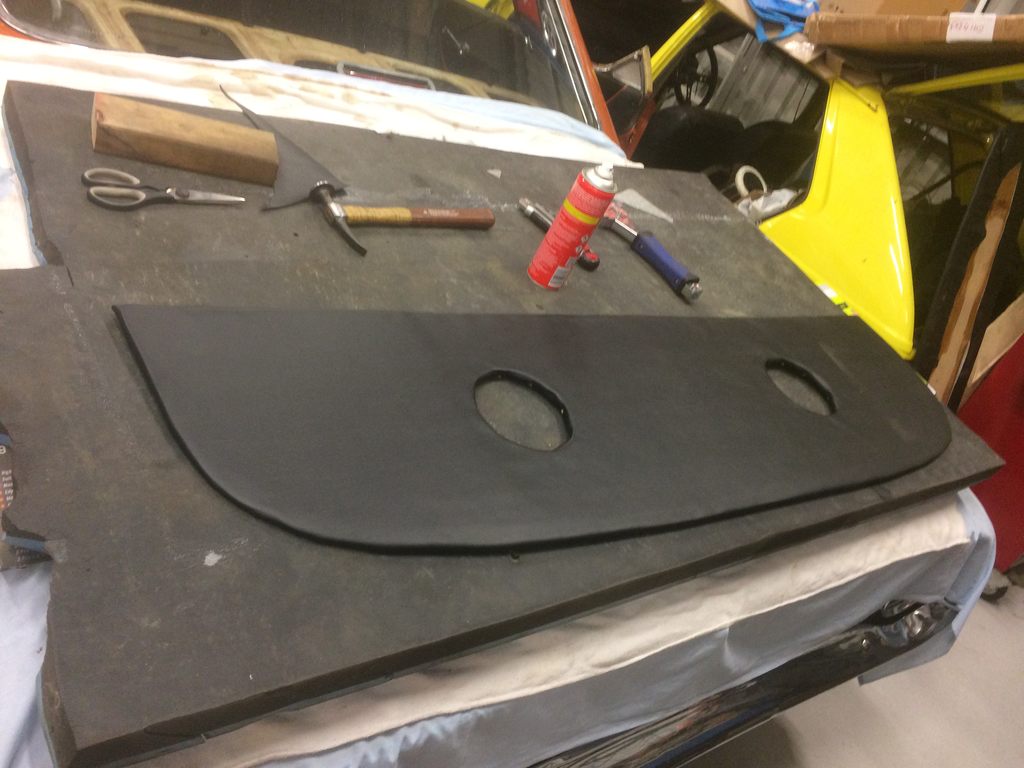
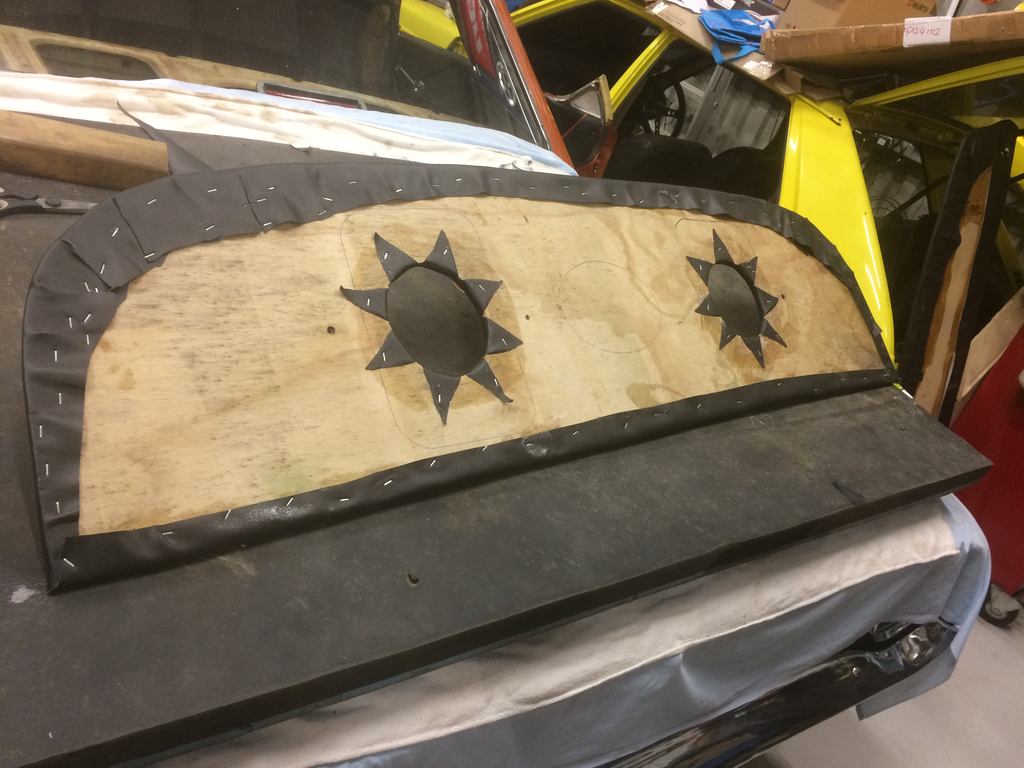
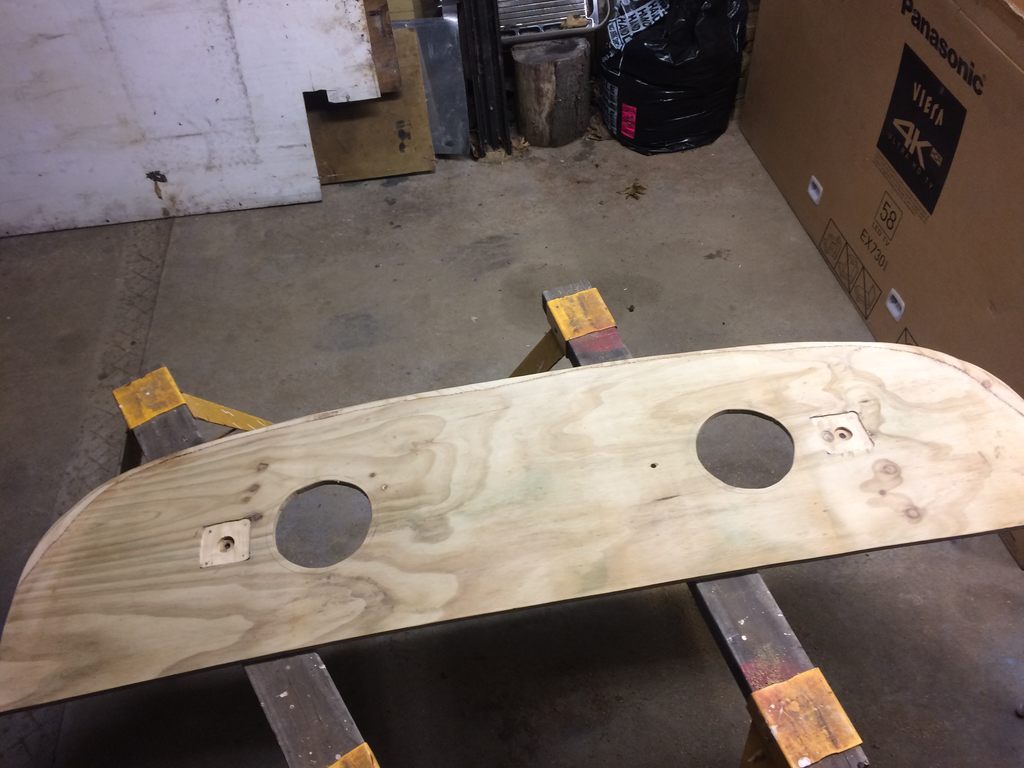
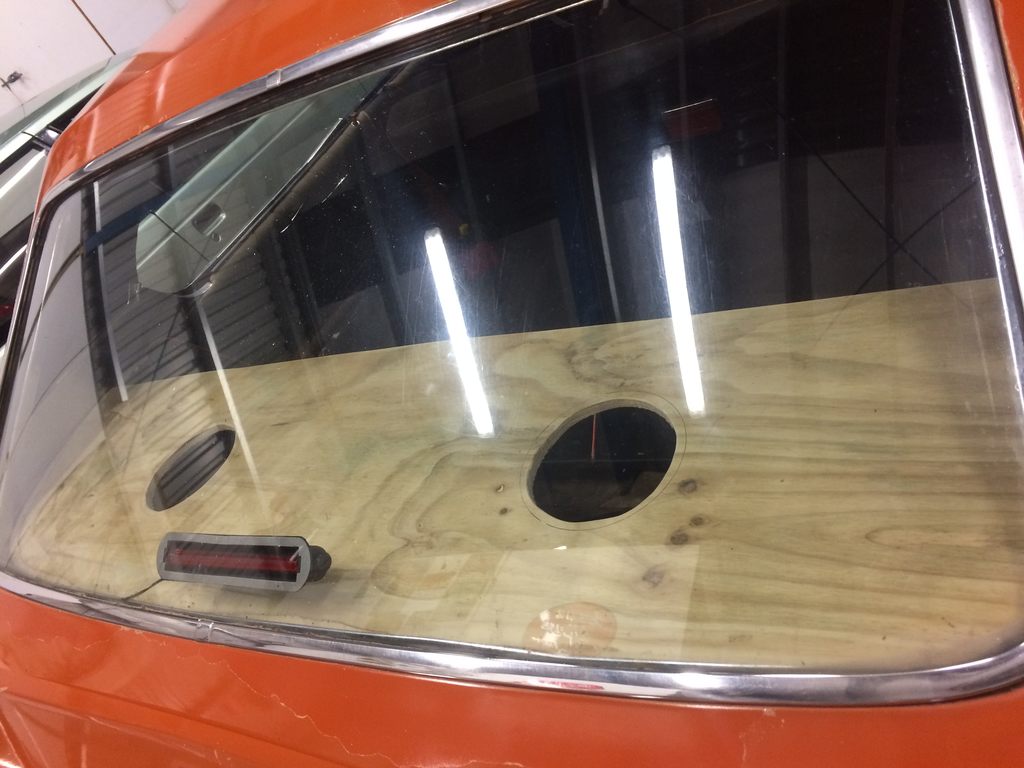
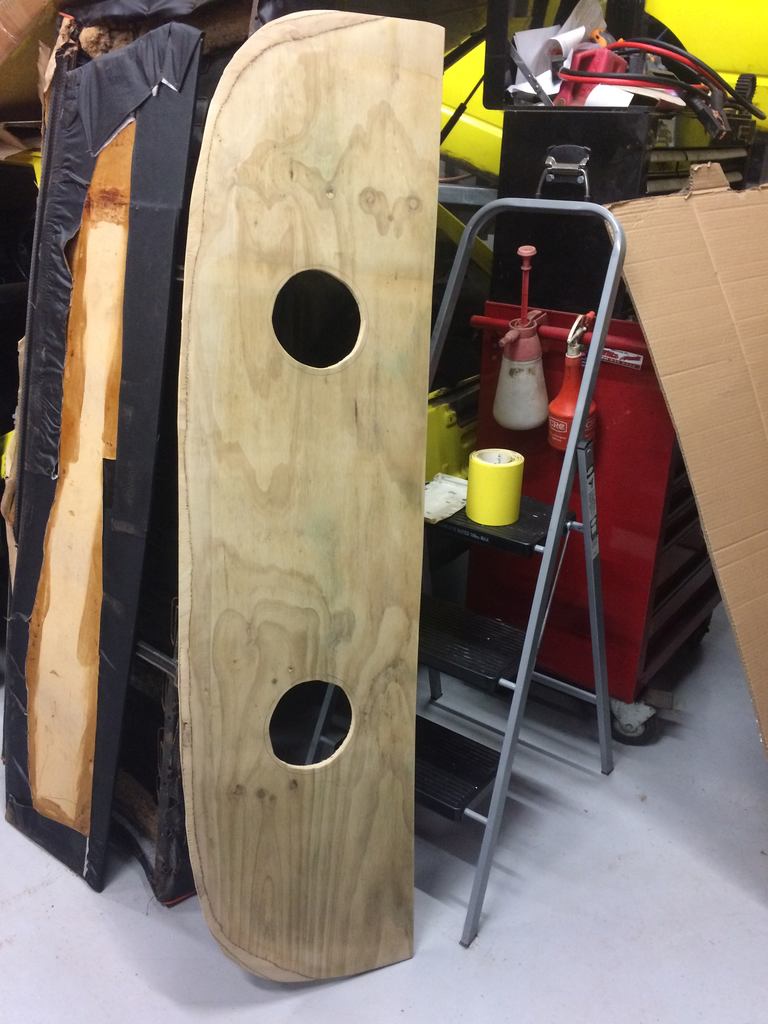
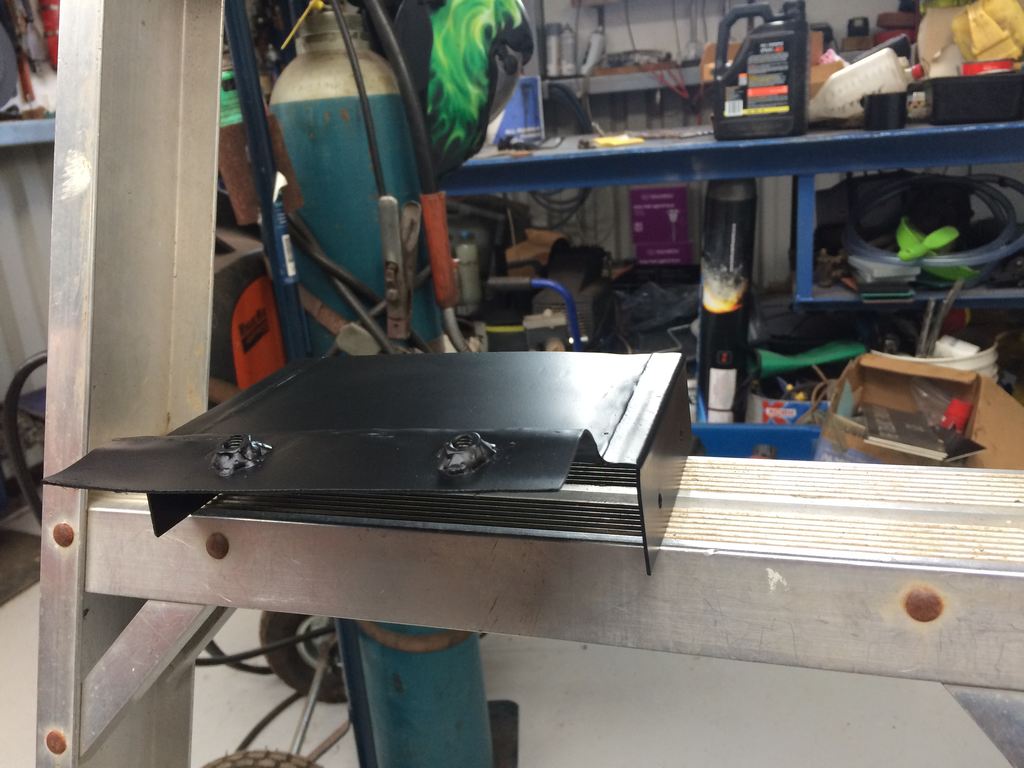
So with having a radio in the hole and no speakers that was the next job on the list. so i figured this system would end up with 2 rear 6x9's and one front 6x9 in the dashtop. so started with the rear by pulling the parcel tray off to mark some holes out to place the speakers and thats when i came to know really how shit the rear parcel tray was the material on it is sun fucked and i knew that but figured it would just need a recover but it had been patched up in the past and done quite poorly plus it was the wrong shape so i got a piece of plywood and started to make a new one this required many hours of cutting and sanding to get the shape right. With also needing to taper the edge due to the chrome trim. and some weight to get the bow out of the ply too And i guess now your wondering why those speaker holes are small. well unfortunately there is not enough space without chopping the metal frame below to make two 6x9's fit and to look right too As im also not keen on cutting this car up too. but there is a spot in the centre for one 6x9 on the parcel tray but figured two speakers would be enough. so i then got to work on how to hold the parcel tray to the metal frame so for when the speakers are working they are not causing rattling issues. so i then routed out these bits in the top of the parcel tray for my mounting plates to be secured in. oh and the holes are offset because that's where the holes in the metal tray below were. used some 1.3mm panelsteel and welded a nut to it. i think these plates were 50 x 50 sprayed them black and screwed them into place. i then got some vinyl material from @64vauxhall and placed it over the ply using staples and ADOS in a can i then bolted it into the car and fitted some soundstream speakers i had. so all in all i think it came out pretty good considering im not a interior guy or a wood butcher. but now after ive finshed it and made it would've i been any better off using mdf?
-
piazzanoob's 1964 Ford Galaxie 500 seeeedaaan
piazzanoob replied to piazzanoob's topic in Projects and Build Ups
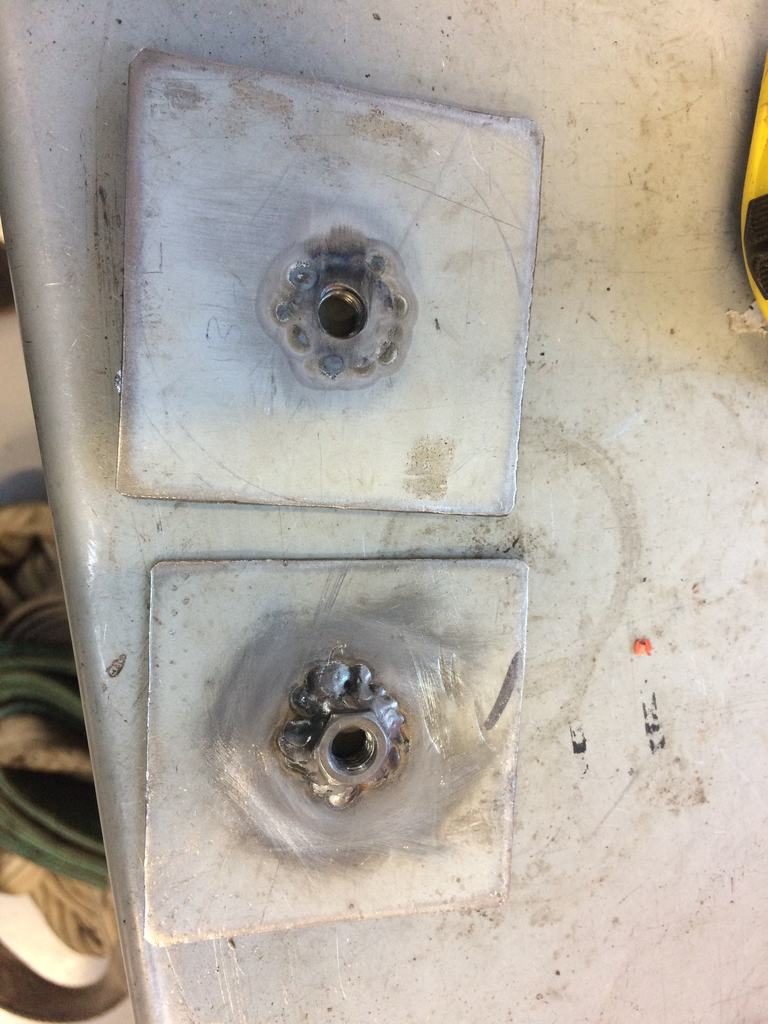
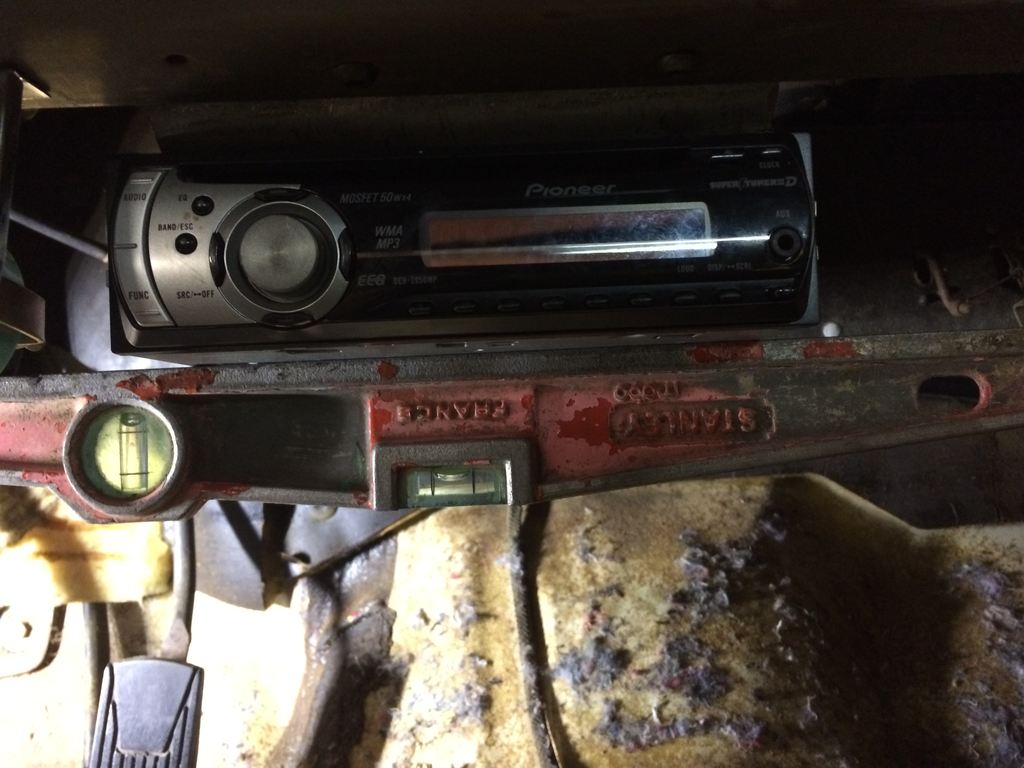
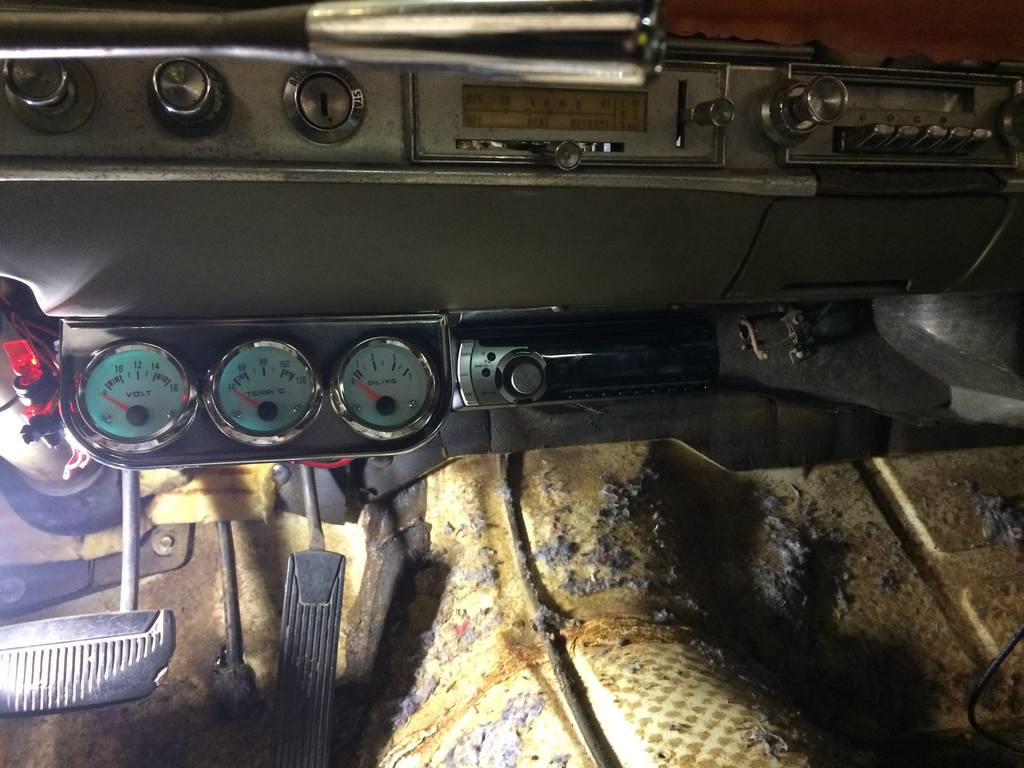
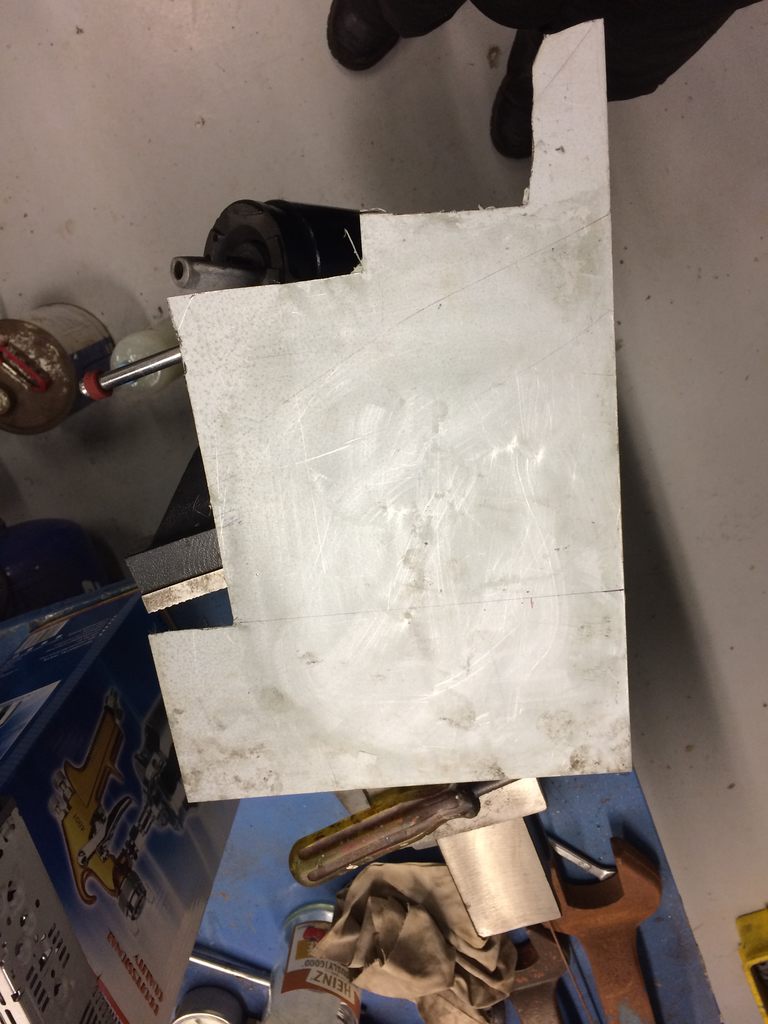
Another no so important job on the list done. pulled out this piece of sheetmetal Spent a whole bunch of time cutting bending and welding some nuts in to make this then applied some rattle can black to it so i guess now your wondering what its for but have some sort of idea in your head. And your right! its a radio mounting bracket decided i was sick of driving it with no radio and had planned on making one so put one in. As the original radio was still in its factory hole but didn't work and i wasn't keen on chopping up the dash to make a modern unit fit. or spending mega bucks having a reproduction one in its place. was also keen on tucking the radio away from being well seen also so this works And you can see the factory one in the top R/H corner. Also just used this radio as had got it years ago from a car that was being wrecked. might chuck a nice modern bluetooth item in if i feel like spending money later on down the track. shes pretty level mate. so yeah now i have a radio but no speakers.
-
kinda disappointing your painting it black. although it will still look good. but choosing a colour is always hard too. glad to see some progress on this!
-
piazzanoob's 1964 Ford Galaxie 500 seeeedaaan
piazzanoob replied to piazzanoob's topic in Projects and Build Ups
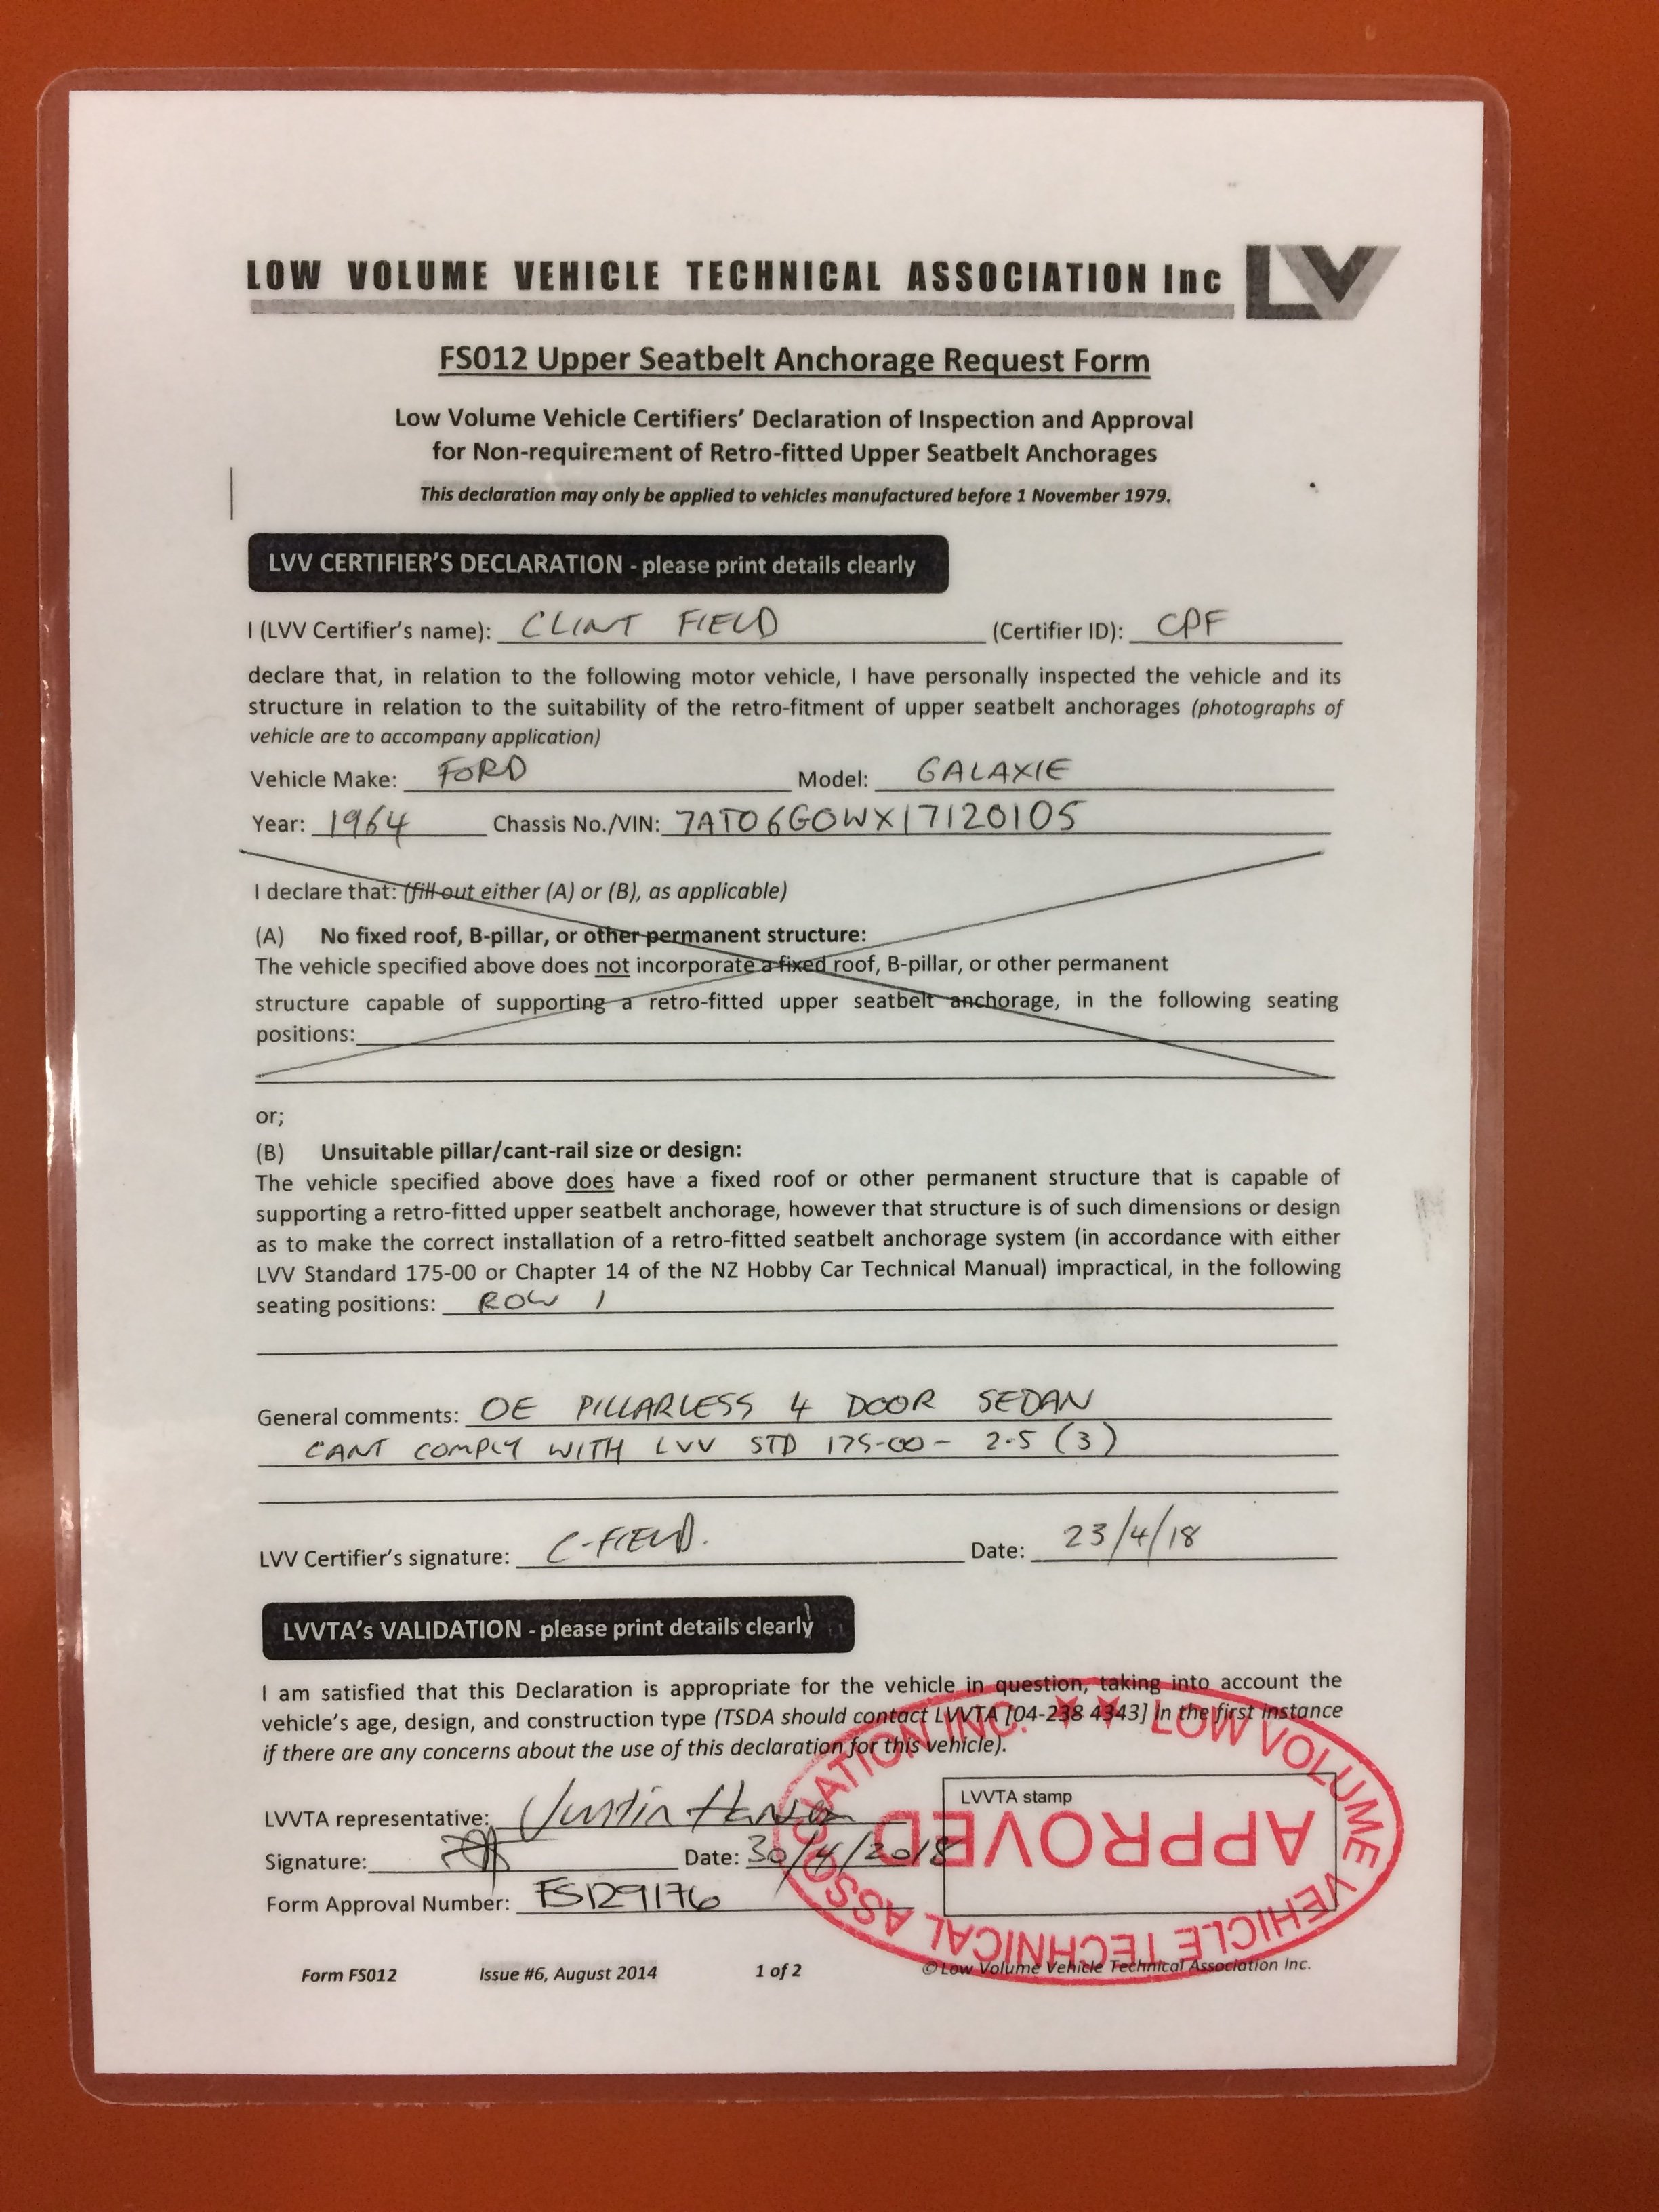
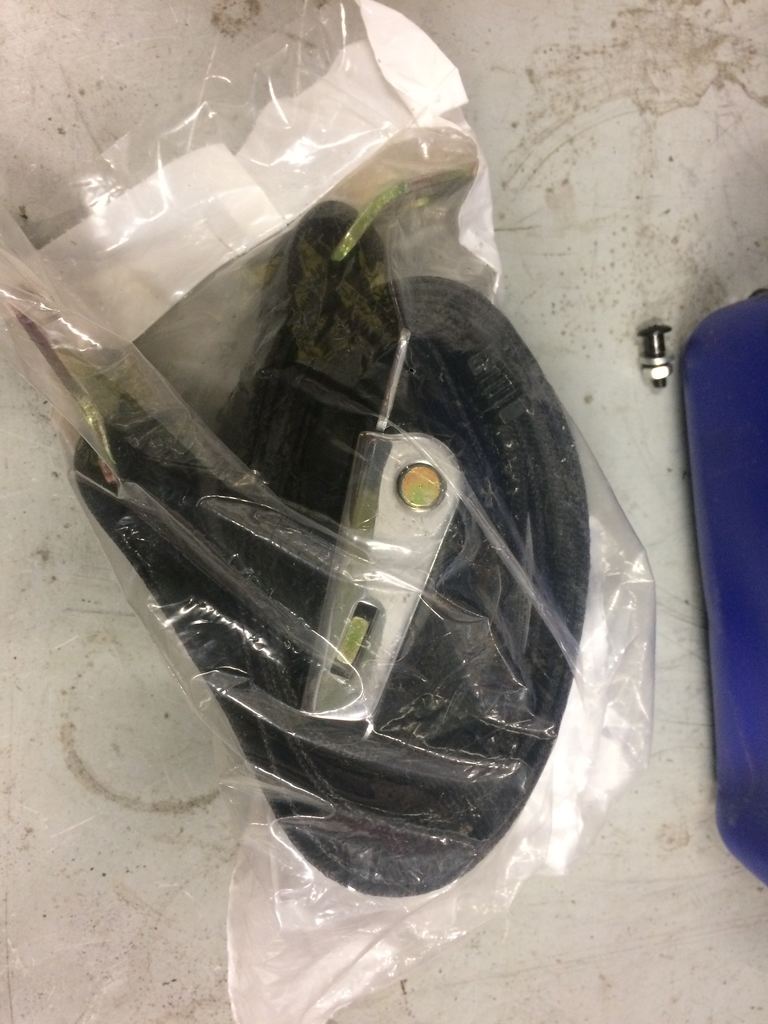
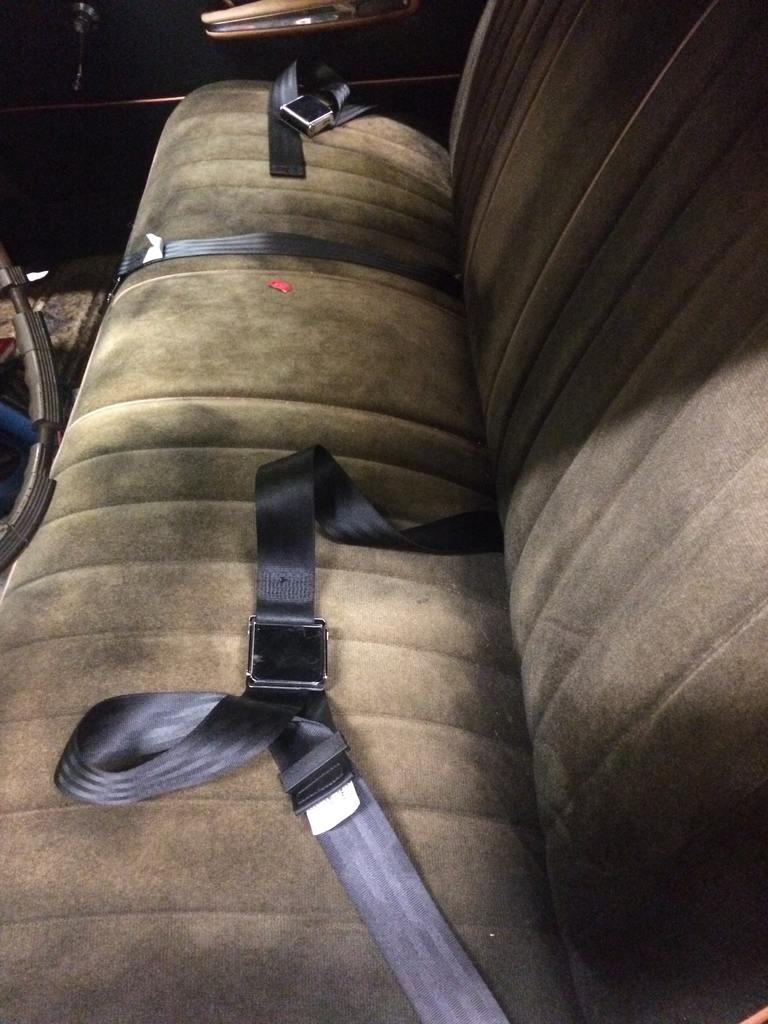
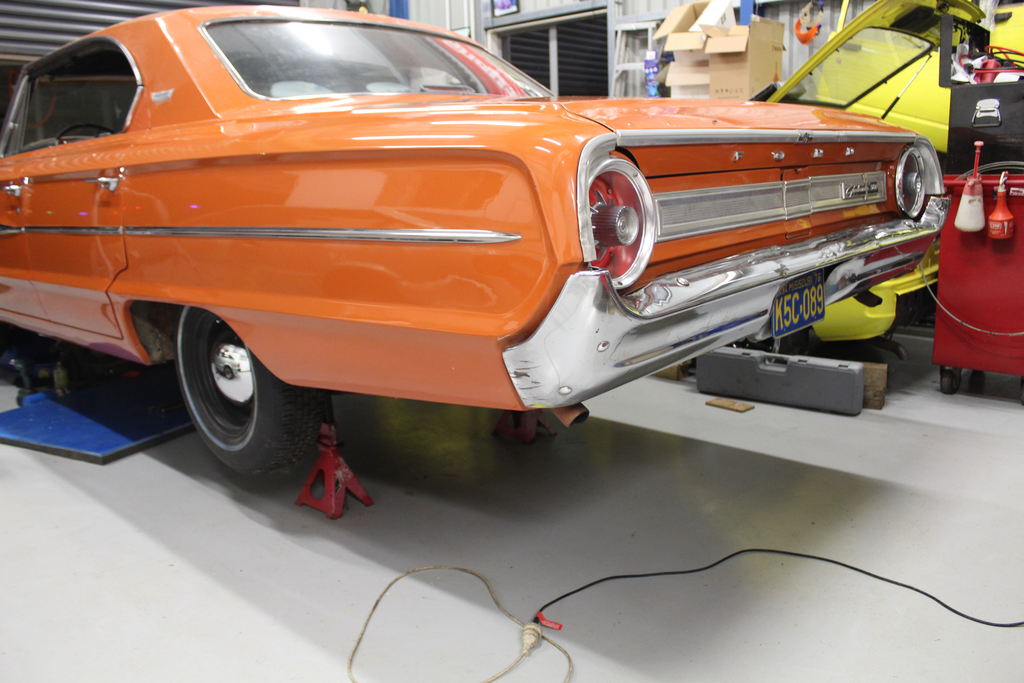
Also one of the jobs that needed to be done was the seatbelts they had failed compliance due to not mounted in the factory mounting points and wrong seatbelt type. so the first inspector got it all wrong and said it required 3 point belts which being a pillarless car there is nothing strong to mount the top piece too which the only other belt i can have is lap belts which is a factory option witch this car was not ordered new with. so called @cletus round to have a look and see what could be done. he looked and found that it had factory mounting points that still had the bungs in them since 1964. so i then ordered some seatbelts from https://www.seatbeltsplus.com/ as they are quarter of the cost than from classic seatbelts here in new zealand. used youshop post service as they don't do overseas shipping and arrived at my door a few weeks later. I then mounted two of them in the front using new seatbelt bolts i had around and using factory mounts. I had then organised while i was doing the wheel alignment for @cletus to check the belts and fill the paperwork out to get a seatbelt declaration to state that after being recommended that i put in 3 point belts i am not and keeping the lap belts in place therefor leaving nzta not to blame if any accident is too occur. then a week and a bit later this turned up And also bought a third one so once shes all legal i can put a middle lap belt in using one of each of the mounts as if i had it fitted it a strength plate would need to be added as two belts on one set of mounts. oh and no belts for the rear seat. As then plates would need to be welded in and a cert would be required and im not that concerned about it. Also thanks to ol mate @cletus for sorting this out
- 77 replies
-
- 19
-

-

-
piazzanoob's 1964 ford Galaxie 500 seeedaan
piazzanoob replied to piazzanoob's topic in Project Discussion
Cheers will keep in mind if I need something Yeah hard thing is finding anyone with spec's or someone who understands suspension and steering geometry. As everyone now just gets taught if it's in the green it's good. also trying to push these tanks also doesn't help haha yeah I'm glad it didn't say on the printout too that it's custom specs as then the engineer will question it as edited it to suit within spec haha. still have to use a measure tape every now and again for when issues are still present after alignments -
piazzanoob's 1964 Ford Galaxie 500 seeeedaaan
piazzanoob replied to piazzanoob's topic in Projects and Build Ups
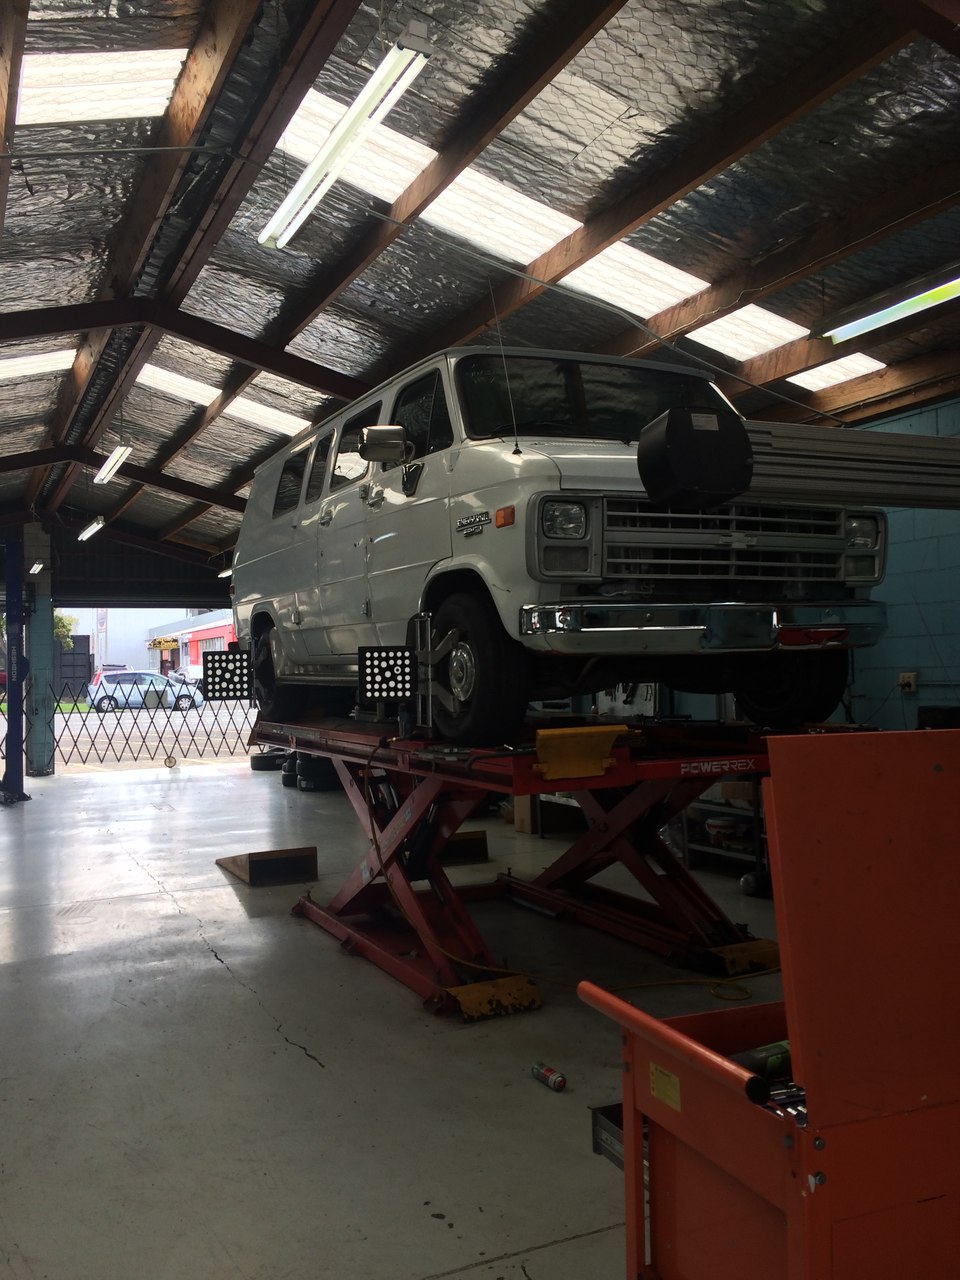
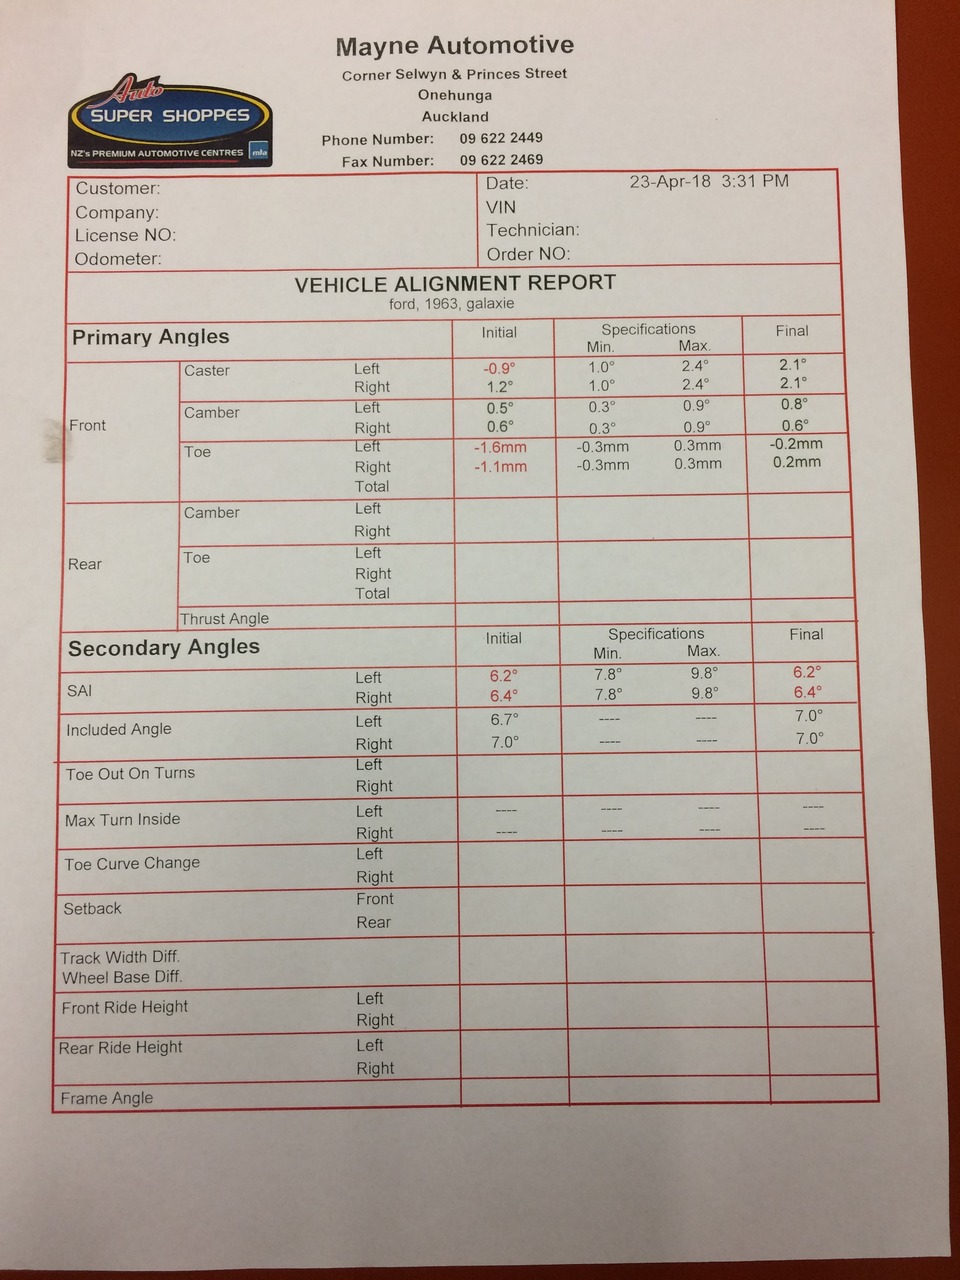
Another job on the to do list done but again took way too long. One of the jobs that needed to be completed for the engineer's sign off was a wheel alignment. Not that is any what related to the chassis repair but i guess is a standard on any repair. seen as i work in a shop and have to do wheel alignments on a daily basis why not do it myself right. well we don't have the spec's for any car of that era. so i gave the guy at northwestern ford a call to see if he had any spec's to which he found some and sent them via email which was choice. so spent way too long trying to convert the measurements over to millimeters from inches then into our alignment computer. only to make 3 different ones with different spec's on each one to making one for better drive ability. then thinking some more and changing it again. so then on one of my days off i took it in to do the alignment. well it started off with not being able to put the rear sensors on the car due to the rear wheel arches. That's cool seen as there is no rear adjustment anyway. then set the computer up for front alignment only... but ive only done one other car that way so had to figure all that out again. then computer had a spaz and wouldn't do the full procedure so try again and again then decides to play ball. so then get to do the alignment only to find its miles out and requires shim's in the front for both camber and caster. so jack it up slightly to release the suspension load then loosen the nuts and remove and insert shims until within spec. so that was about 2 hours work to finish that alignment. woohoo. only to find the computer would not communicate with the printer. so just figured i would sort it the next day as it gets kept on the database. so check on the database only to find that the spec part of the alignment is blank. great. we had then got the IT guy in to check the printing issue only to find that it had a issue with the ip address being a wireless printer but all of this was caused by the Auckland storm causing the power cut. so when the printer was working i figured i would just chuck the car on the alignment hoist run it through the procedure then not have to adjust anything due to doing it the week before. but nah off again and where i would have to shim it again... so off it went and brought it back in to work another day to do it. then edited the spec's again but really made a new lot of spec's altogether then spent a few more hours getting it to the new spec And then printed 2 copies of the new spec's and is still on the database which is good. And now noticeably drives and steers better than the last alignment. but i also tried to correct the steering wheel location as it is far off from straight. but couldn't pull the wheel off even left some puller tension on it overnight with no luck so have put that in the too hard basket for now. oh and one i was doing on @chris r van a few months back for engineer's sign off was also shim's and a long alignment job.
-
piazzanoob's 1964 Ford Galaxie 500 seeeedaaan
piazzanoob replied to piazzanoob's topic in Projects and Build Ups
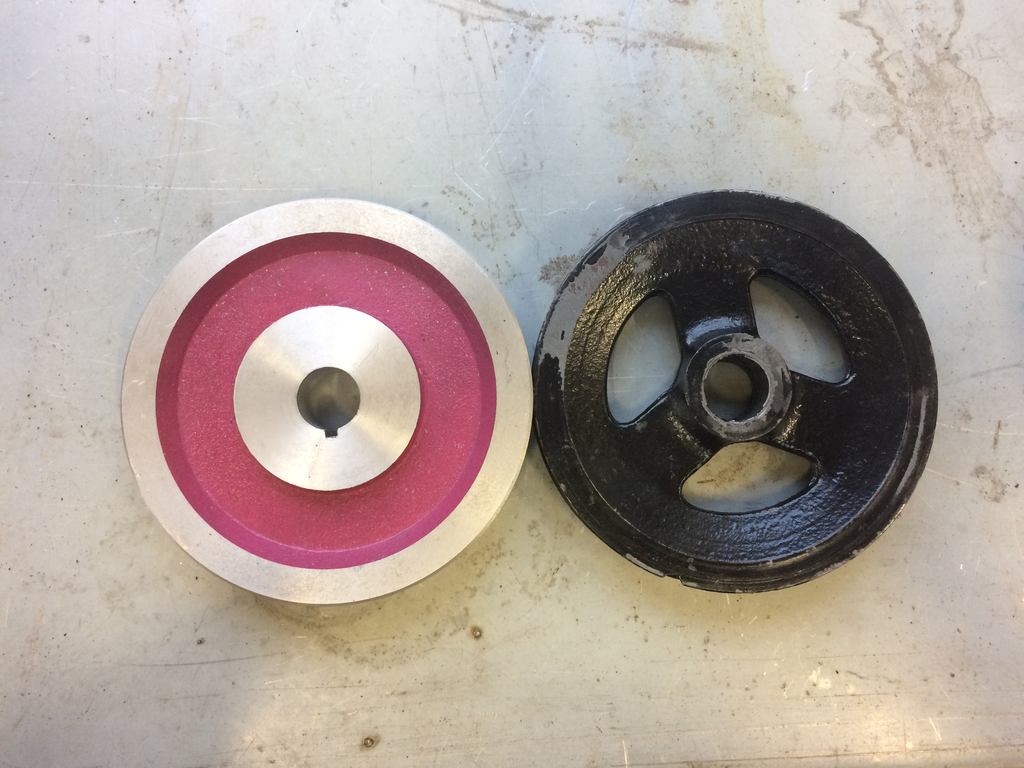
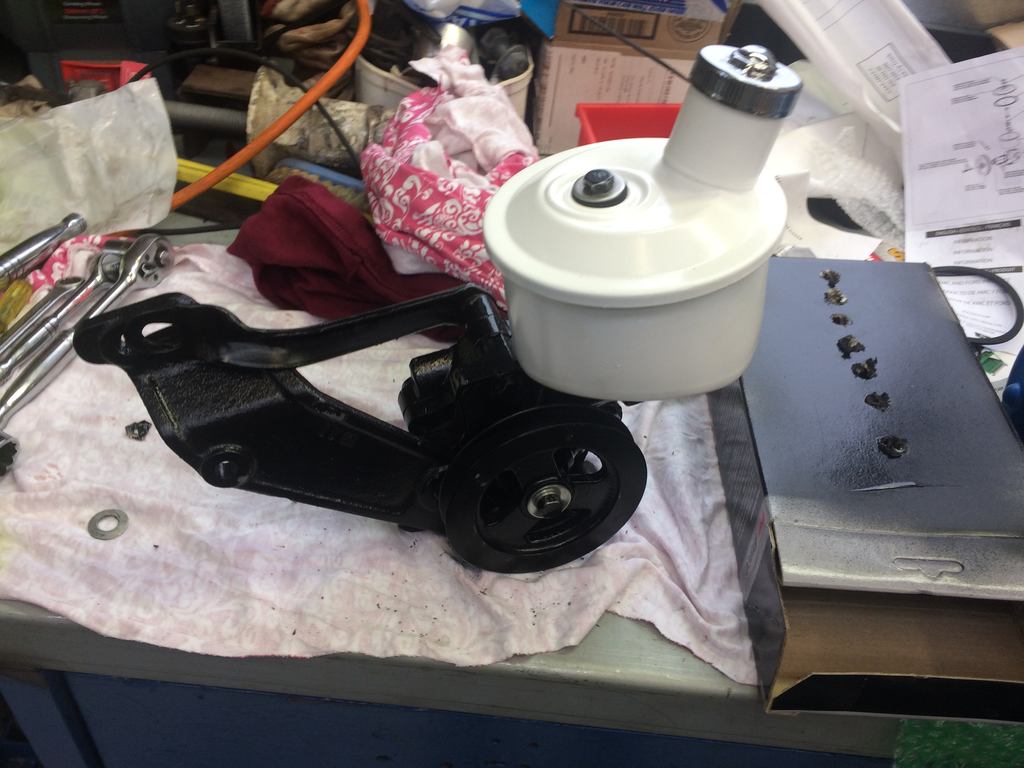
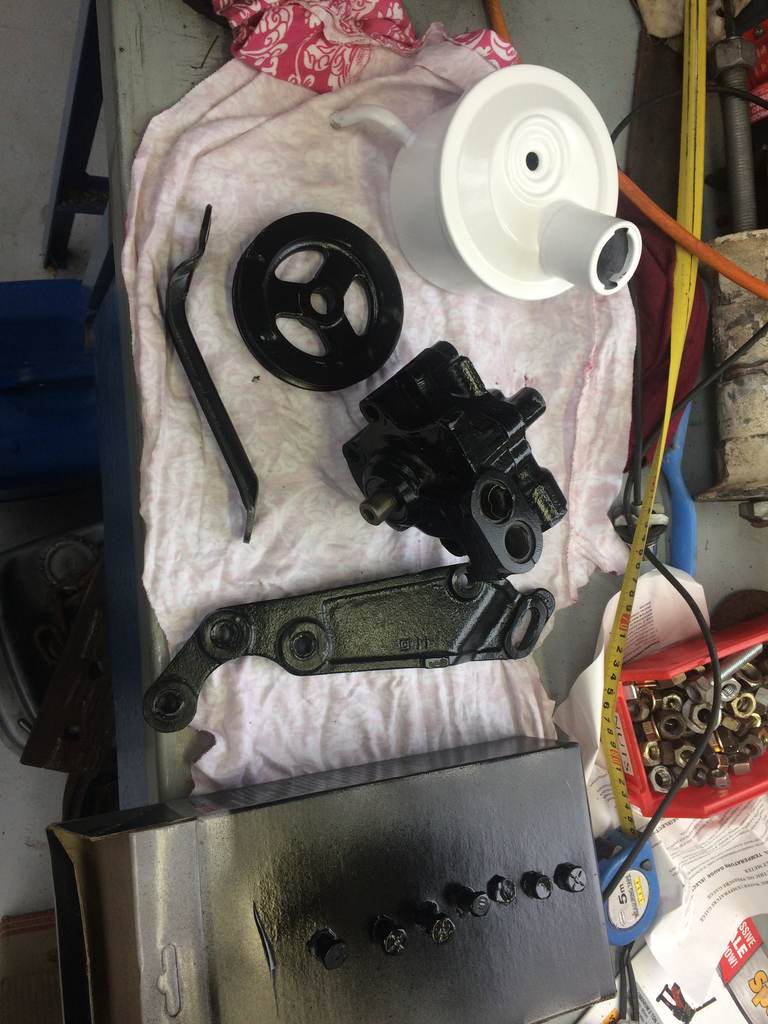
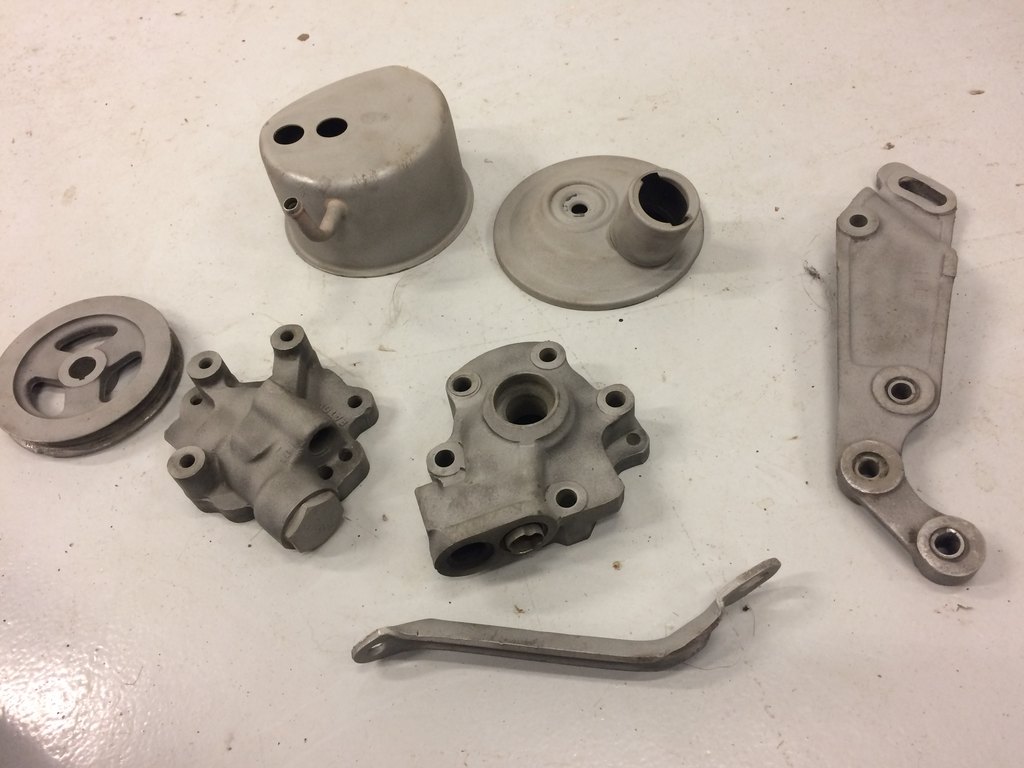
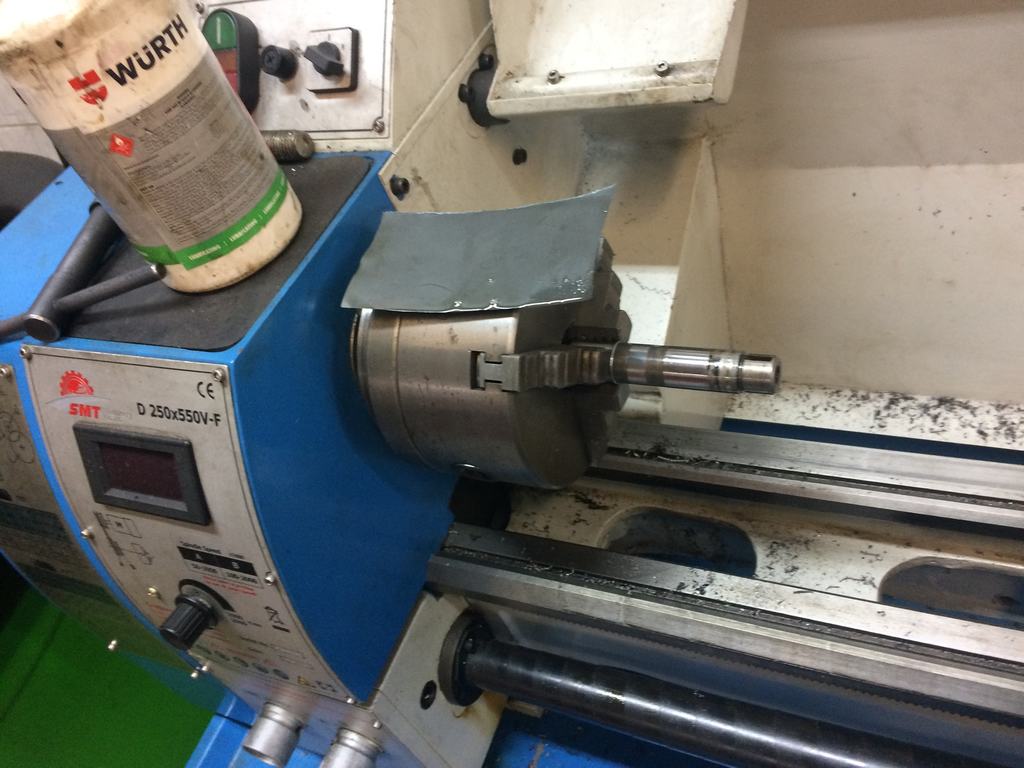
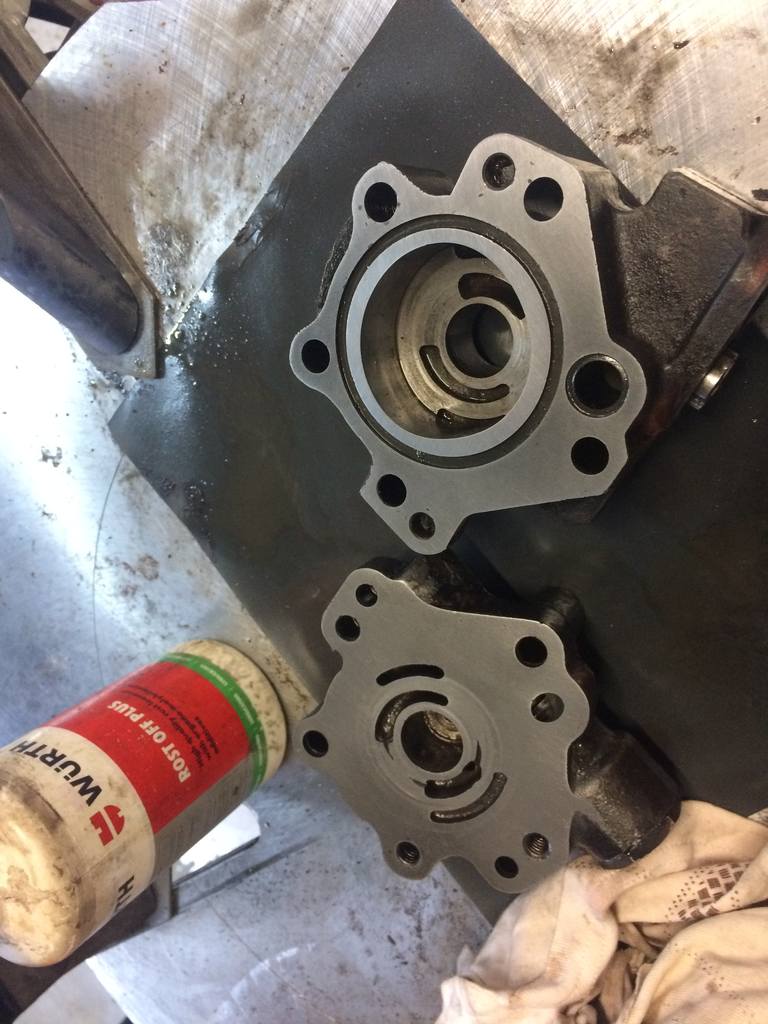
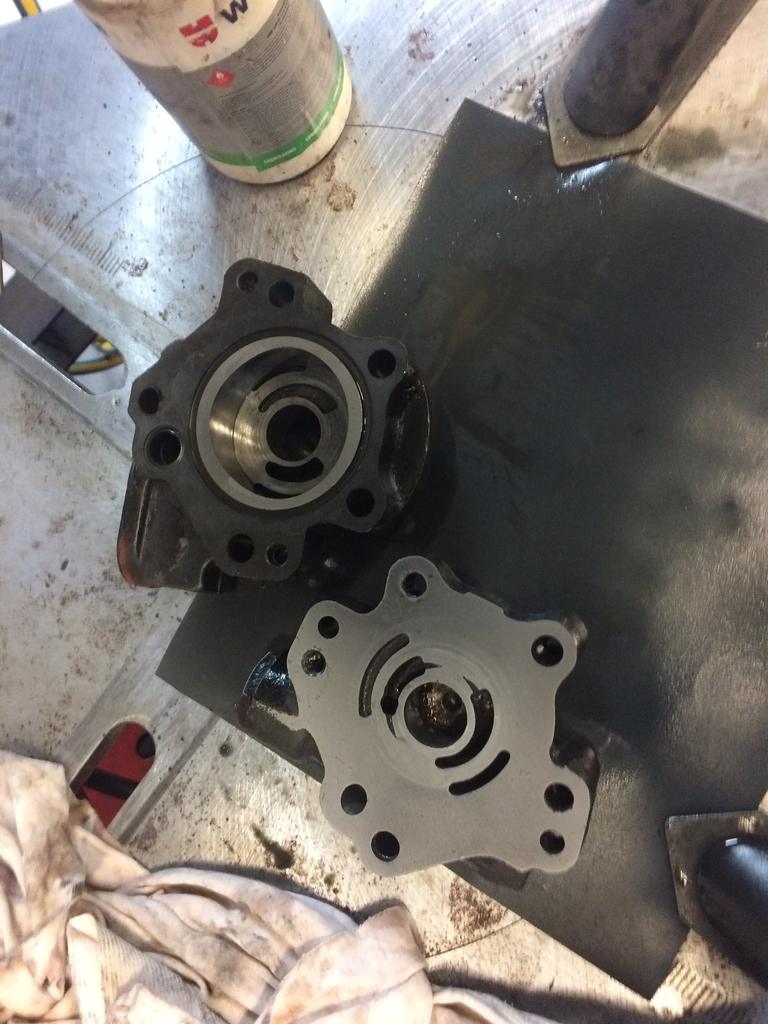
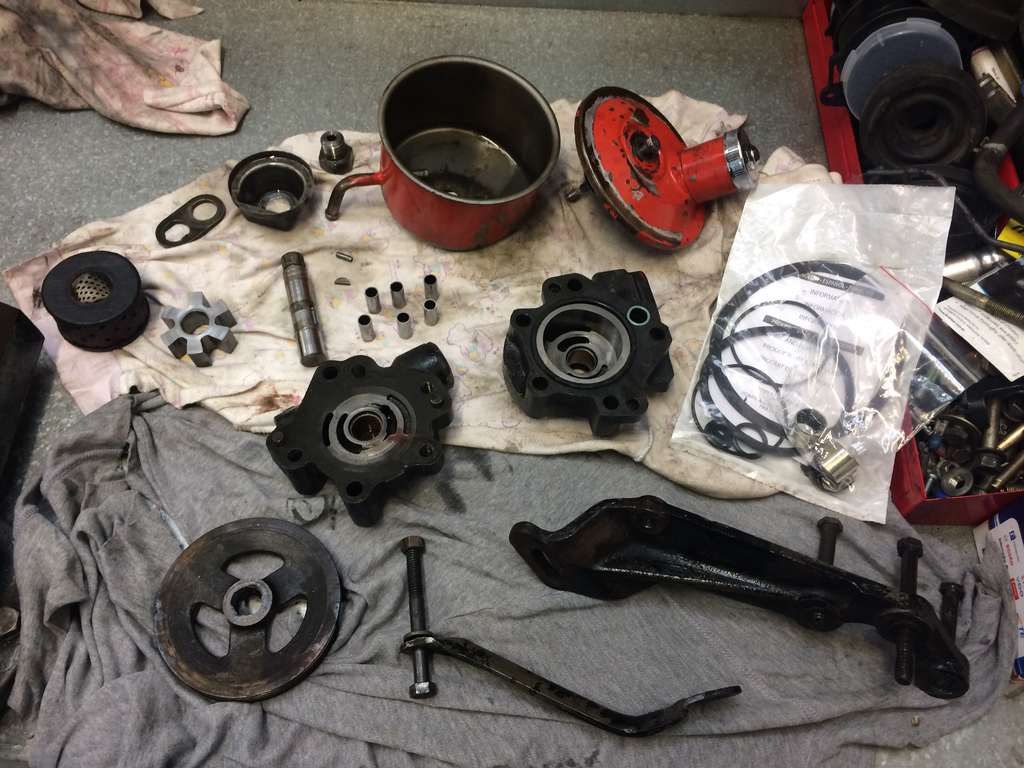
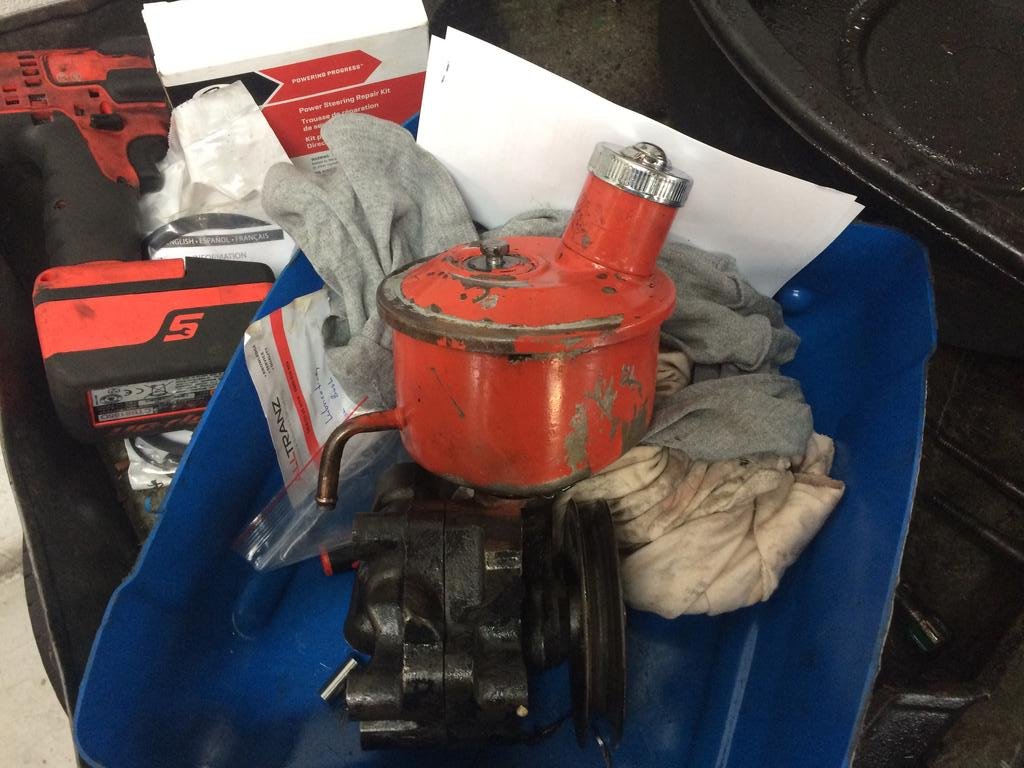
Finshed doing one of the jobs i was going to do then half assed fixed it then decided i will fix it properly as would of most likely bite me in the ass if i didn't power steering pump was leaking out of the front seal so put some morey's in there and no more leaky but the pump pulley ran way out of true and to the point i knew something was worn and fucked so off it came. had got a seal kit out of rockauto for this job seen as they are the cheapest. then stripped the pump into as many pieces as it could be I then found that it had bushes and they were worn out so i stopped in to my local transmission and steering parts supplier (being tranz) to see weather they had any bushes or not but they didn't but spent some time sharning as they got an ex trans and steering mechanic there so he gave me some tips on the pump And told me where to get the bushes. oh and also gave me the bush sizes off the top of his head so went to seal imports with a bit of paper with the size needed and job done. so ended up getting some teflon coated bushes rather than the standard brass bushes as they are easier to fit and much nicer on the pump components when wear occurs. I then removed the old bushes and prepped the pump for fitting new seals and bushes by using some wet and dry sandpaper A flat surface being a tyre machine being the most ideal And some wurth rust off for the lubricant so we do this by moving the item you are sanding in a figure 8 shape so that the item gets sanded EVENLY And then the otherside too so now the both sides are hand machined flat so the seal will seal! I then also polished up the main pump shaft as it had score marks from the worn out bushes and years of use. Ran it up on the lathe and sprayed the wet and dry sandpaper with rust off again and used the sandpaper to polish the marks out. I then threw the parts in the blasting cabinet and gave them a sandblast at home I then fitted the new bushes and new seals and the rest of the stuff back into the pump And gave the components a lick of paint. ended up coming out super average being from a spray can. should've just bought some white and sprayed in my spray gun. then joined the two halfs back together And then at this point when i fitted the pulley realised the internal hole in the pulley had worn out offset. so off so saeco wilson so buy a blank pulley in the same size. then sent the pulley off to a engineering shop to have the pulley offset hole size and keyway done on the pulley. Done to a tight fit mate also notice in the photo how worn that pulley is! the key way had mostly worn away. I then prepped and sprayed the new pulley black. then used the oxy acetylene to heat the pulley to expand the pulley enough so it would nicely fit onto the shaft. being that it was a machined fit. then refitted back onto the car and bleed the system. so i now have a good functioning pump with no more wobbly pulley. I also added some morey's back in too as the steering control valve is leaking also.
- 77 replies
-
- 17
-
-
I personally think the chassis wont look good in black well just standard gloss anyway with all the great work done with the chassis mods and design i think it needs a colour that will show off that. thats a work of art by itself perhaps like a metal flake black or gun metal grey. have you thought of getting it dipped and powdercoated? i would also be inclined to make the exhaust a different colour to the chassis also just to show the workmanship of it keep up the good work!
-
piazzanoob's 1964 Ford Galaxie 500 seeeedaaan
piazzanoob replied to piazzanoob's topic in Projects and Build Ups
Seen as the trans got a rebuild I had to give it a stall test right? well I guess it won't stall cheers m8- 77 replies
-
- 21
-
-
-
piazzanoob's 1964 ford Galaxie 500 seeedaan
piazzanoob replied to piazzanoob's topic in Project Discussion
Haha yeah i didn't know anything about that until after the work was done through the grapevine. just him and another guy Matt is working there. hes has a bit of work on though -
piazzanoob's 1964 ford Galaxie 500 seeedaan
piazzanoob replied to piazzanoob's topic in Project Discussion
cheers glad i got the trans done as don't have to stress about it on any long trips if it does any. And nah still no legal will be trying to keep the build thread updated as is abit behind now -
piazzanoob's 1964 ford Galaxie 500 seeedaan
piazzanoob replied to piazzanoob's topic in Project Discussion
but no colour goes with bloody orange! -
piazzanoob's 1964 ford Galaxie 500 seeedaan
piazzanoob replied to piazzanoob's topic in Project Discussion
this is the plan! -
piazzanoob's 1964 Ford Galaxie 500 seeeedaaan
piazzanoob replied to piazzanoob's topic in Projects and Build Ups
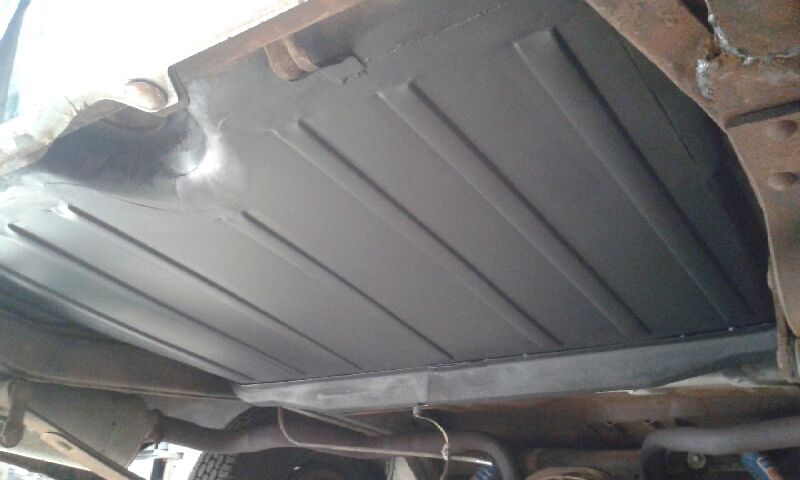
So i was now at the point where i was talking to my panel beater about my rubbish panel And already being past the engineers cut off date for a recheck only for compliance which was the 28th of February and we are now the 10th of march ( As my posts are well overdue) so i took the car in left it with him and uber'd home so this gave him time to put the car in the workshop which was on a monday then went back that evening to drop the fuel tank out for him to keep my bill lower and spin some yarns. I also took the trunk pan i bought to him to see if he could make it work as i stated the amount and hassle it owed me And i think he felt a bit bad about it too as he had recommended me to order a GOOD one from the USA as others had too He then flicked me a texted early Wednesday morning saying it was done following with a photo and invoice. paid 80 percent of the invoice and left the remaining as i couldn't see the numbers properly on the photo invoice he had sent. and planned to come pick it up friday evening. went in friday evening with some burbons to place the tank back in and put the drained gas in and unloaded off the axle stands. done that then explained about the payment i had done when he asked and said i would put the rest through tonight then spun some yarns and drank some beer he supplied and drove the old girl home. And this was the job he did for me. And he didn't end up using my panel as it wasn't going to work. so he made one from some flat 1.3mm zintech steel and used a Trekka swage die to make the swages which is one of these so now my car has Trekka designed floor pan swages in it. but was overall very impressed with the job And the price was fair considering the work involved and is a two man job to weld it in place. And the quick turnaround And also A+ YARNS so thanks to Tony at custom metalshapers LTD In East Tamaki for doing the job.
- 77 replies
-
- 16
-
-
piazzanoob's 1964 Ford Galaxie 500 seeeedaaan
piazzanoob replied to piazzanoob's topic in Projects and Build Ups
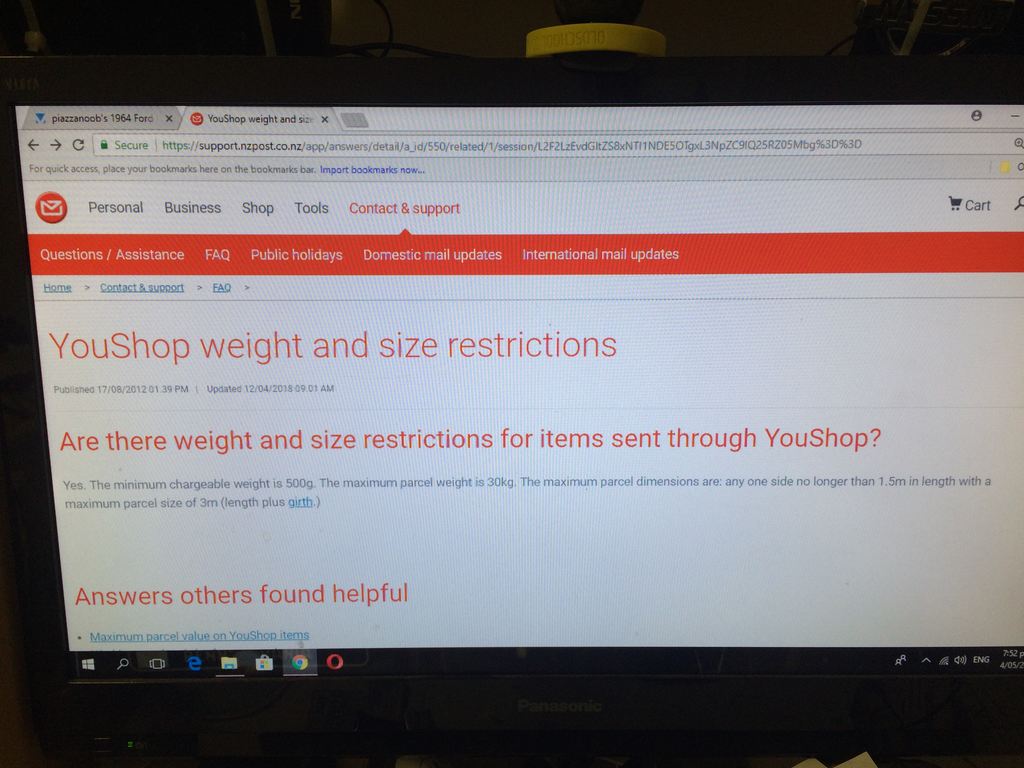
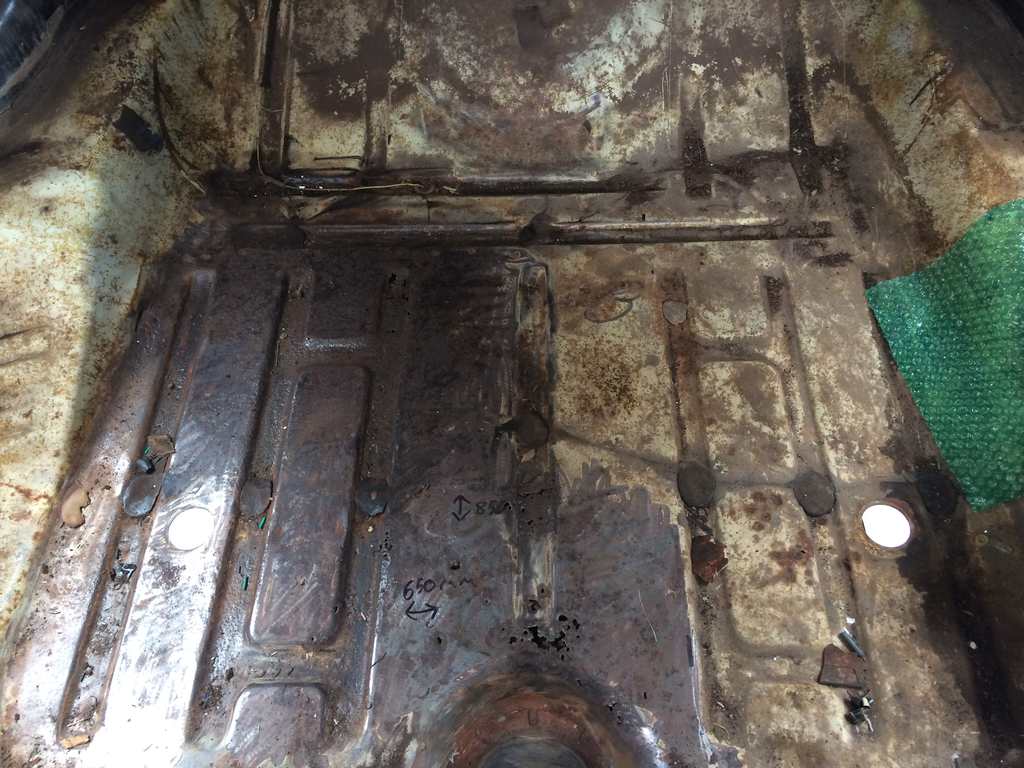
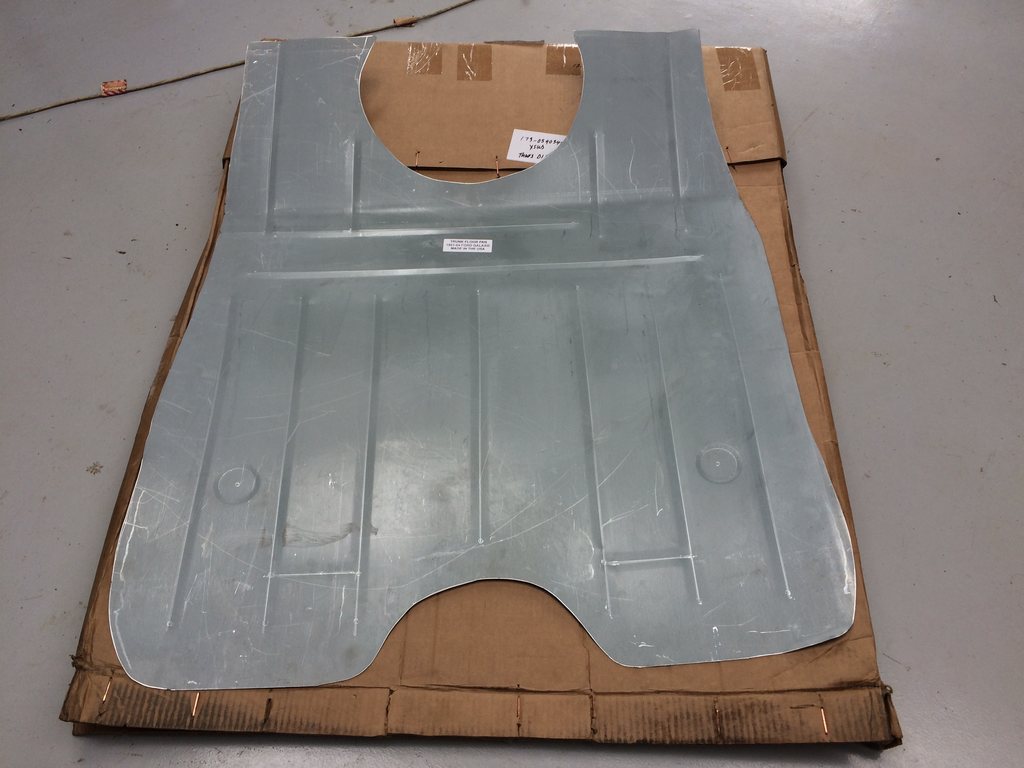
Another compliance job now to be ticked off the list with the car having some previous repair damage and a couple rust areas the job needed to be inspected first by a panel beater engineer before any work was carried out. so i checked with the local panelbeaters who they used and gave that guy a ring so organised a day with him and i put it on the hoist at work for him to inspect and all that was said is make and weld a new patch in nicely in the front R/f floor replace the boot floor (trunk pan) as has many holes and cut out and straighten and reweld chassis in R/R And job done so after talking to a few people and taking the car to a few aswell for the rear trunk floor as that was the last on the list to do with one guy offering to make one for me but me having to cut the floor out and send it to wellington to get made then sent back then spend heaps of time trying to fit the fucking thing. so figured that was an expensive and fuck around way of doing it So the other opinion from who i had seen was to get a good new reproduction trunk floor out of the USA so i found a website who did old ford stuff who i had already bought stuff off so fired away and bought one off them and sent it to the nz post service depot in oregon why they have it there who would know. Then got an email a couple days later stating that the item had arrived but was considered oversize wait what! so gave you shop a call but had to call them here as they don't have a number for the US service 20 minutes on hold and my lunch break is over so called again same thing on hold for 20 minutes so they say they will send an inquiry out for them to check why it is oversize etc so i rang them the next week to get an update as had not heard anything for over 4 days waste more time on hold with the same shitty music then to be told the combined size is too big so my item only being 1350mm or so i figured i was way under so figured it would be fine but no. perhaps they could of worded it abit easier for people to understand the combined size etc? or make people more aware of this? so i was then told i have to email the oversize freight team to get a quote to have it sent here. so did that and had to wait a couple of days for the quote be emailed to me then paid the money as figured it was way less hassle to be Air freighted through them then sending elsewhere and at this point my engineers deadline was coming up. so the item arrived a week later into nz and was waiting customs check for a duty bill etc 3 bloody weeks went by and i had been TRYING to get hold of them but 20 minute holds and by then i just hang up I eventually talk to someone to say an invoice had been sent to me but they sent it to the wrong email address but the thing is i had already been talking to the person who was going to be sending the invoice via email so why didn't he just reply to our current conversation and he did state he would email me the invoice. so i pay the invoice and get told i will get the item on Friday via courier as they don't accept pickups but end up getting the item on MONDAY... so now im a week away from my deadline and there is no chance i can get the trunk pan in because of work. so i open my box to look at nice new trunk floor only too.......... what on earth is this piece of crap where is my swages there is no straight edge on this panel too And they also have the cheek to put a sticker stating its made in the USA m8 could've made a better panel myself with a grinder so this is what the panel should look like. And at this point the panel owes me 835.64 dollars and its scrap so tip one - don't use quality USA replacement panels tip two - don't ring nz post unless you want to waste your life away on hold tip three - nz customs hold times are great also tip four - don't be as gullible as me and assume it would be easier to get one from the states and it would look like the original. like other panel beaters told me.
-
piazzanoob's 1964 Ford Galaxie 500 seeeedaaan
piazzanoob replied to piazzanoob's topic in Projects and Build Ups
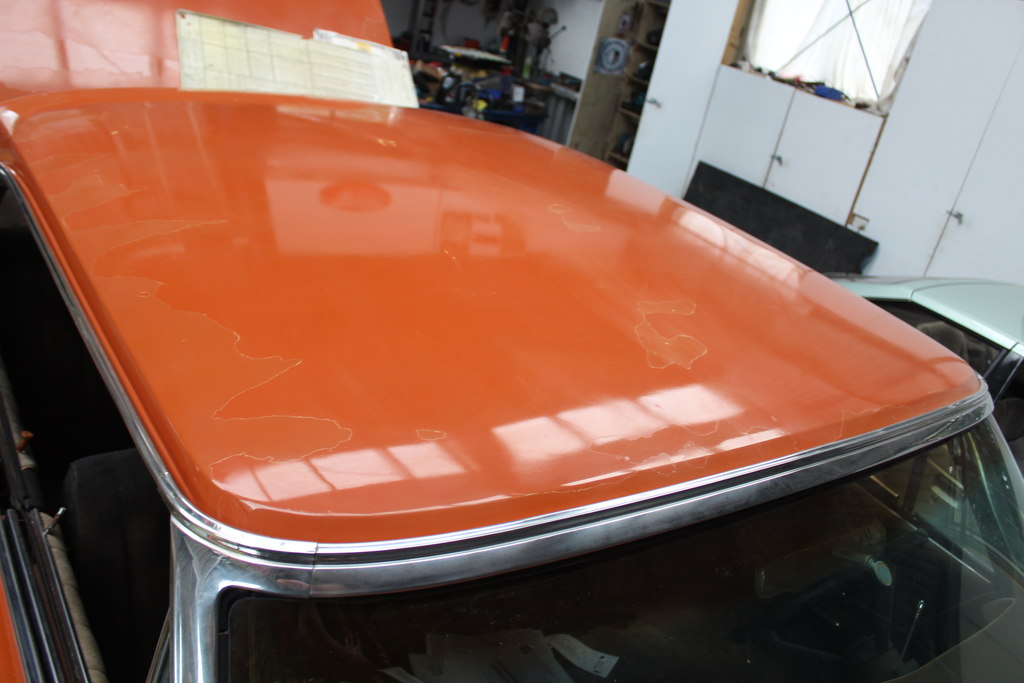
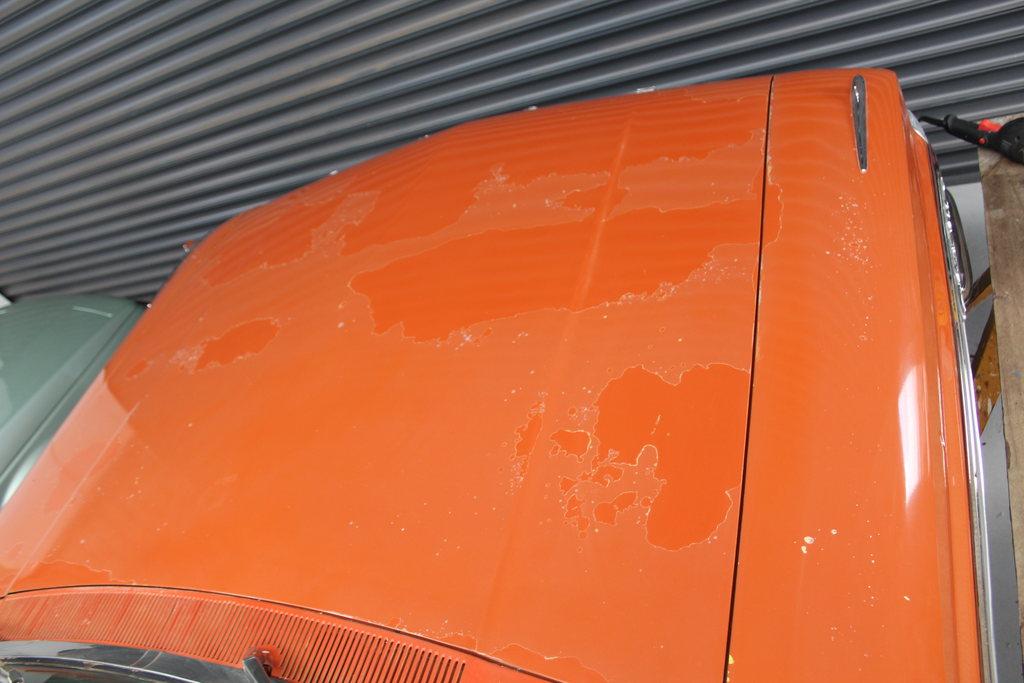
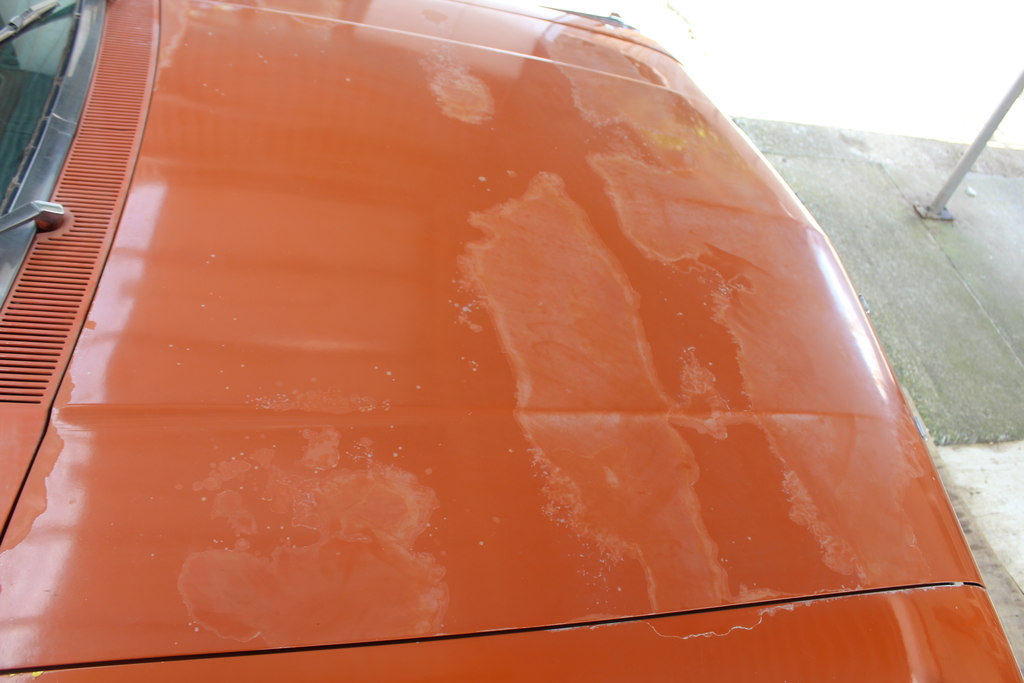
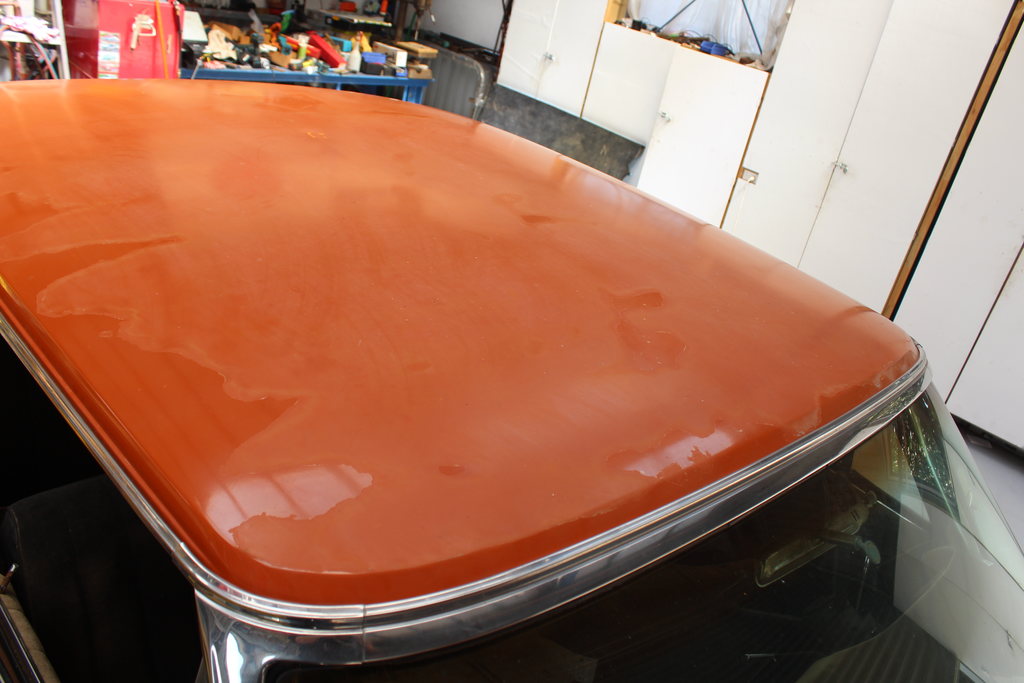
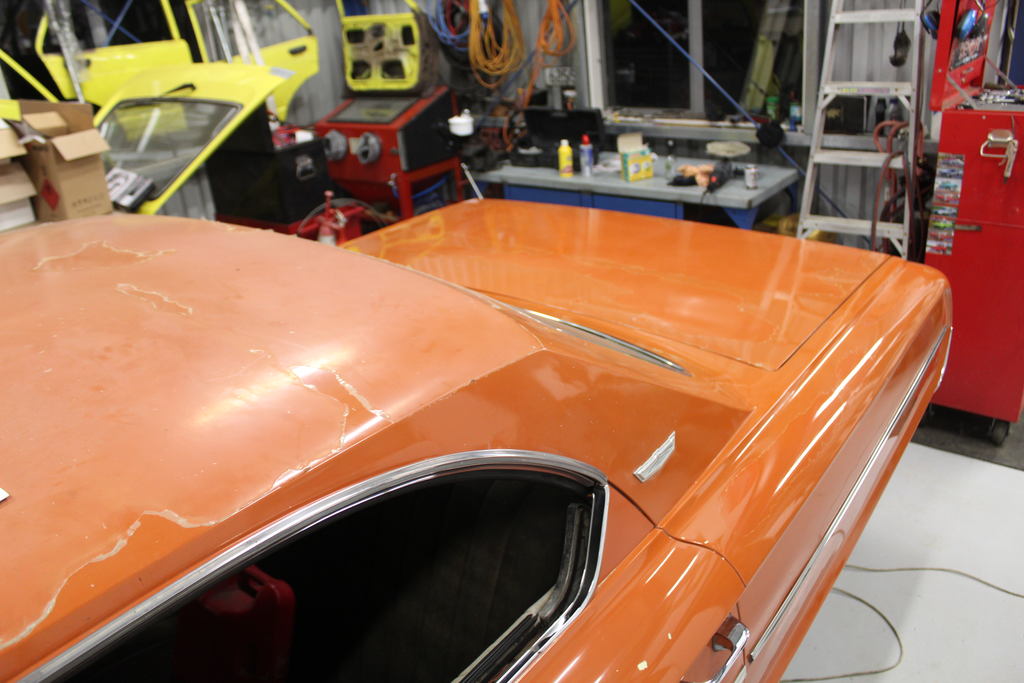
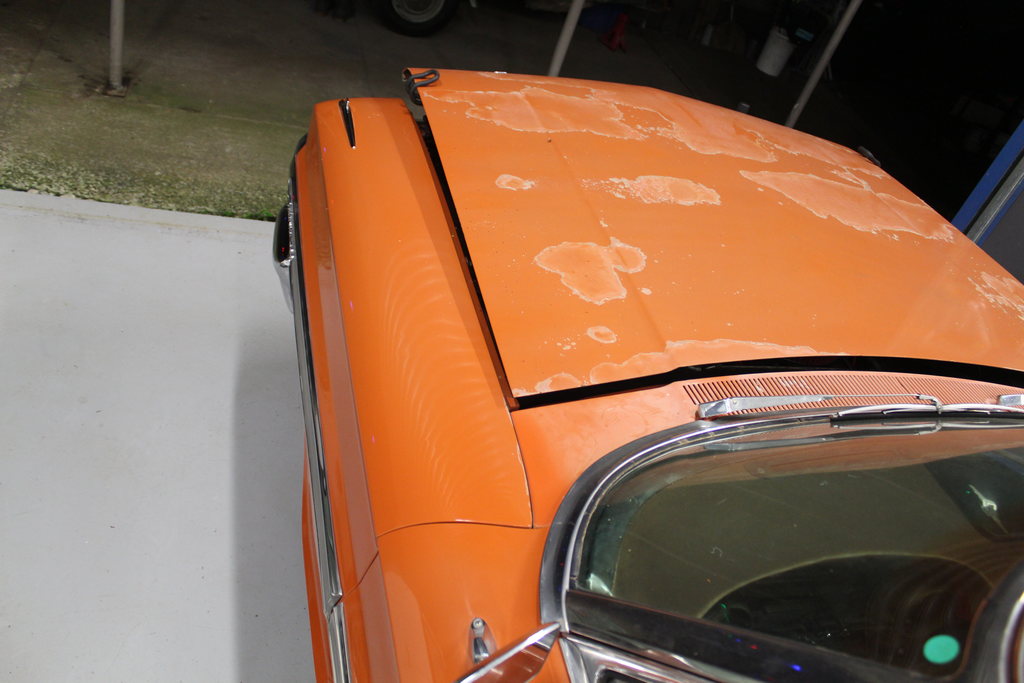
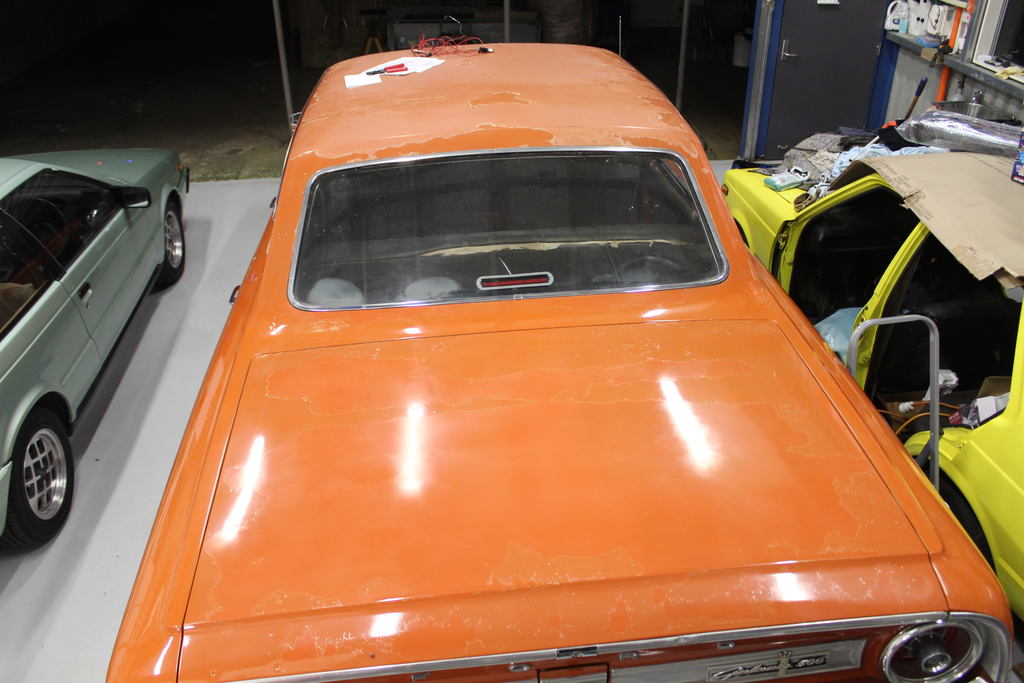
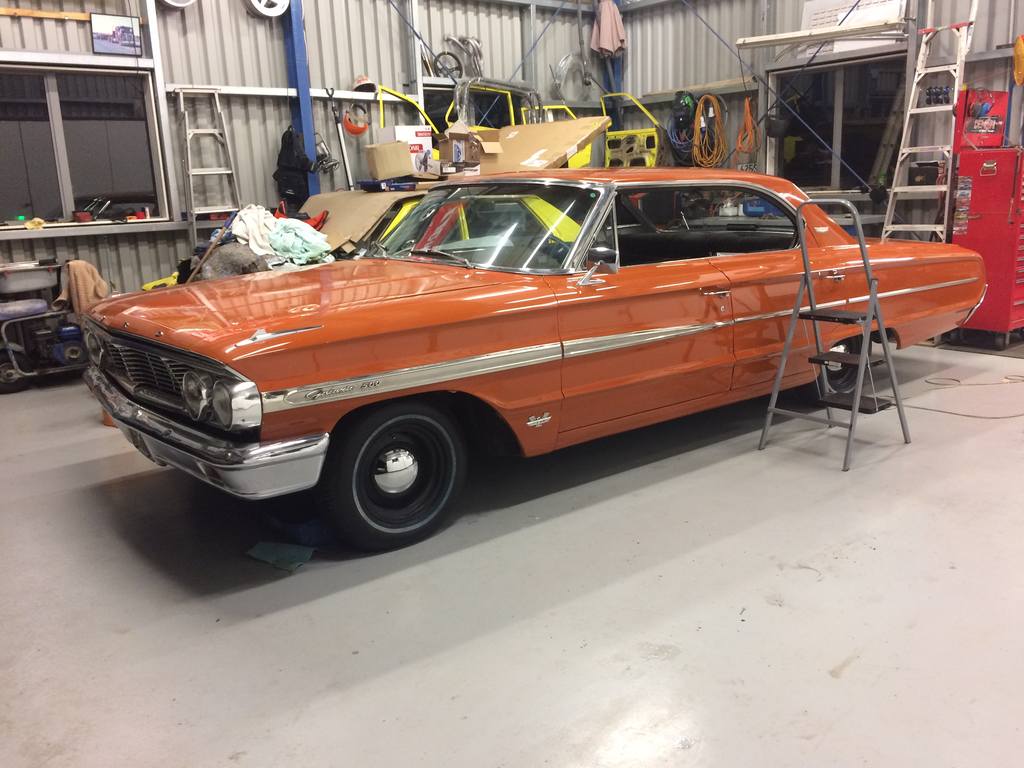
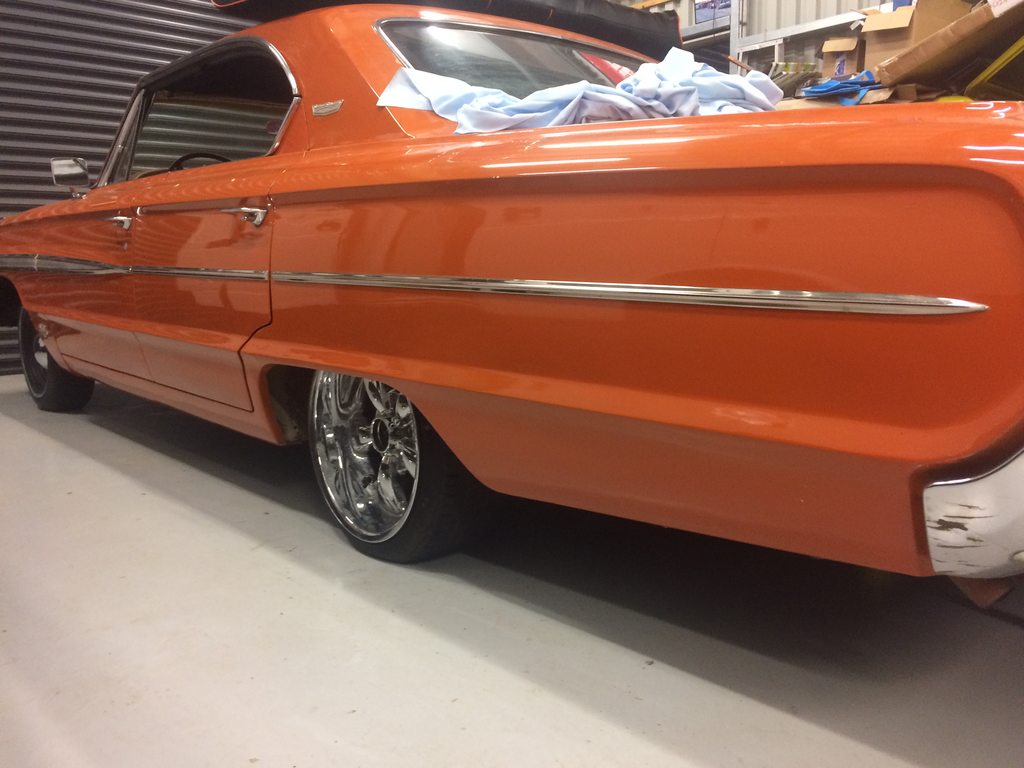
One thing that had always bugged me with this car was the paint. The clear coat on the paint has come off on the bonnet boot and roof and some other smaller areas so it looks like crap. ive decided that the car will not get a respray from me as ive got to many other projects and would rather not know what is below the paint. nor have the time or money to do the job. so to start with i got the compressor with the air duster on it it and blew off the remaining clear coat that was not stuck down as they were the bits that stood out I then used the electric buffer with the sheep wool pad on it and some cutting compound and a mist of water on the surface so the cutting compound would not dry out so now the aim was to restore the current paint as good as i could so this was before any work had been done on it when it was in the USA still which is the best photo comparison for the paint work without looking at it in person so this photo shows the gaurd has been buffed and the bonnet has not i then over a few nights buffed the whole car and having to go over some bits again too And the roof yet to be done in this photo then after buffing the whole car i then buffed on some polishing wax to give it a bit more shine and paint protection And tried on some 17inch cragar's which look crap so now the paint looks a whole lot better than before but is still good from far but far from good. but now to keep it clean as it doesn't get taken in the rain much is just to give it a wipe over with some detail wax and a microfiber cloth and it keeps its shine and helps to stop dust staying on it. now tell me how i should matty B it
- 77 replies
-
- 19
-
-
piazzanoob's 1964 Ford Galaxie 500 seeeedaaan
piazzanoob replied to piazzanoob's topic in Projects and Build Ups
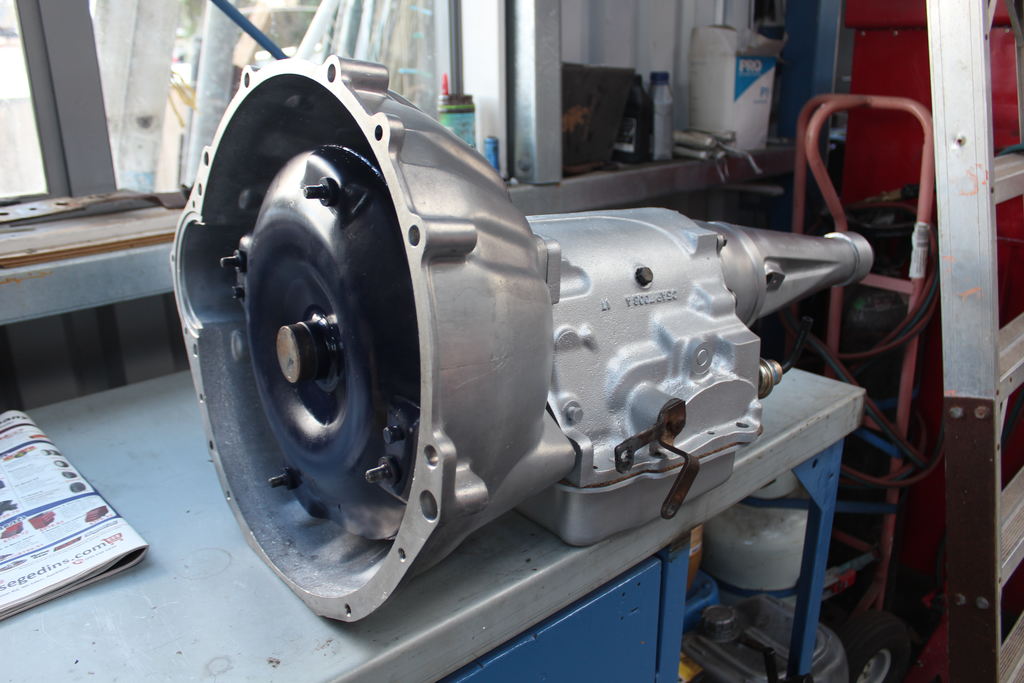
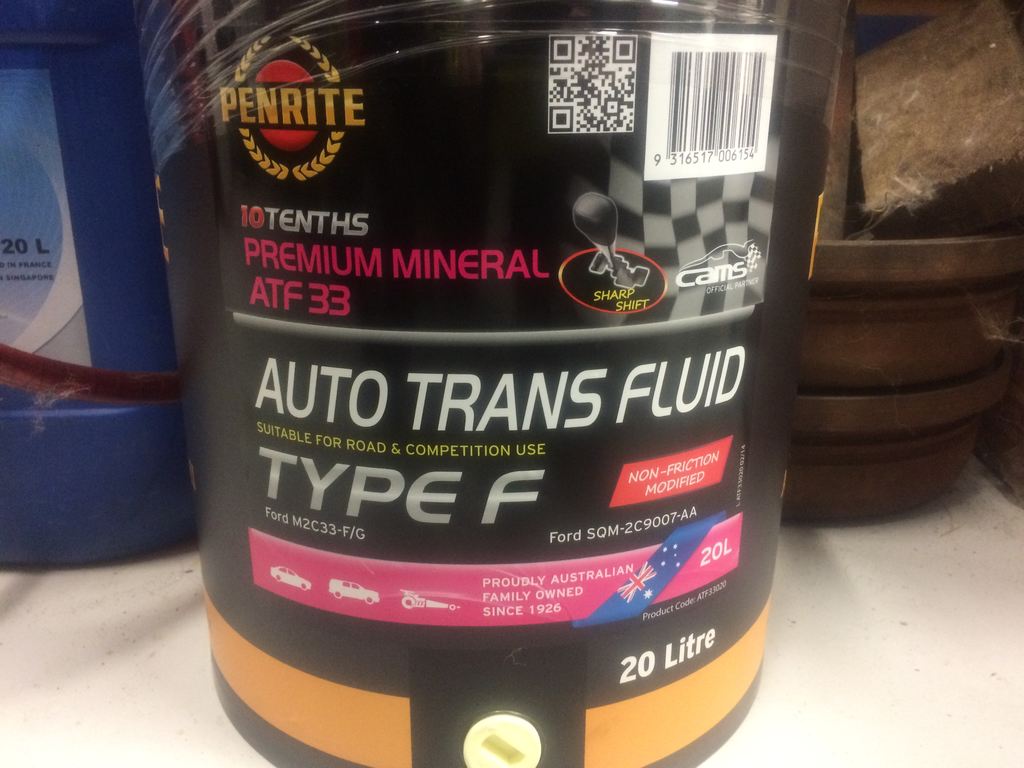
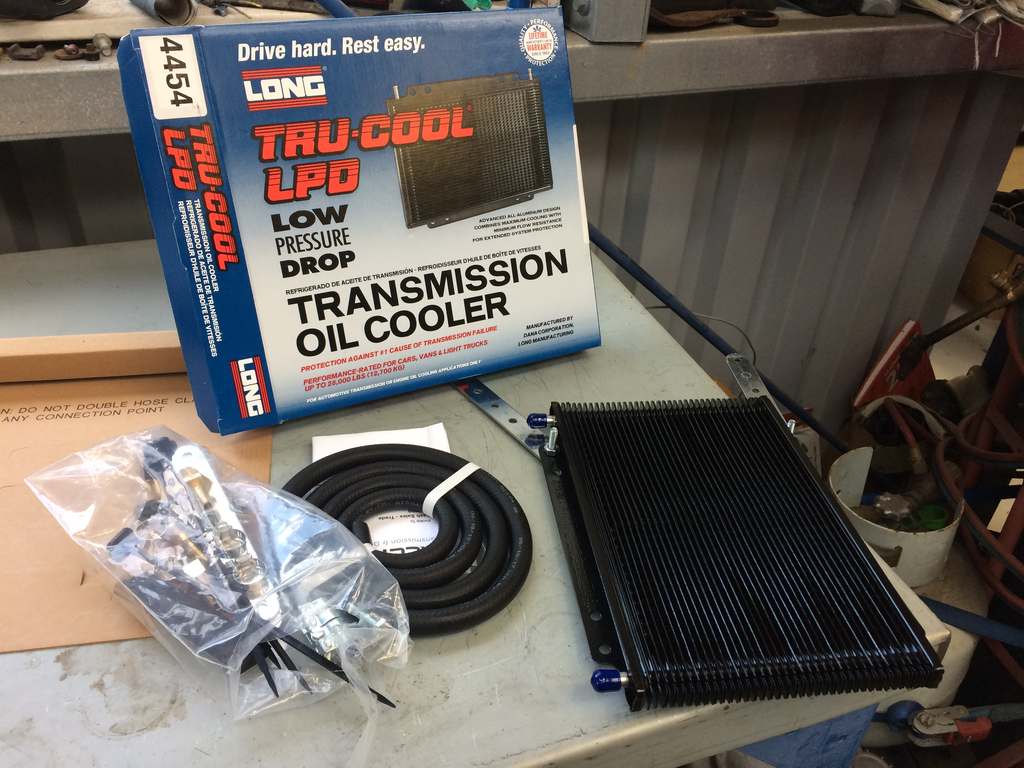
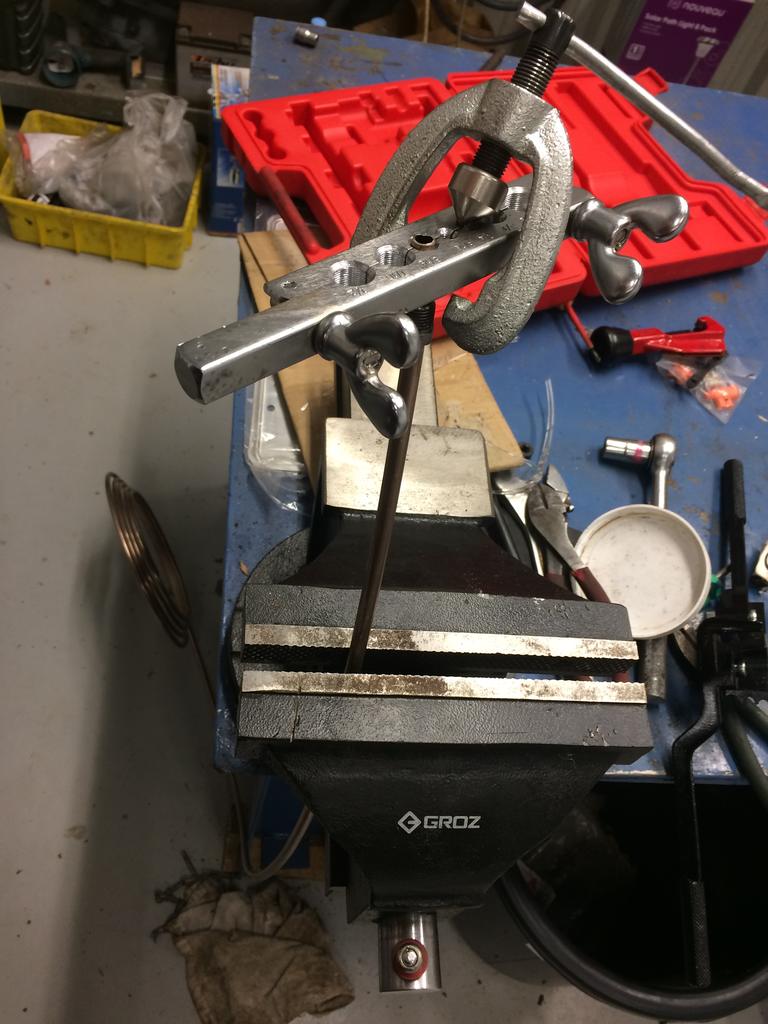
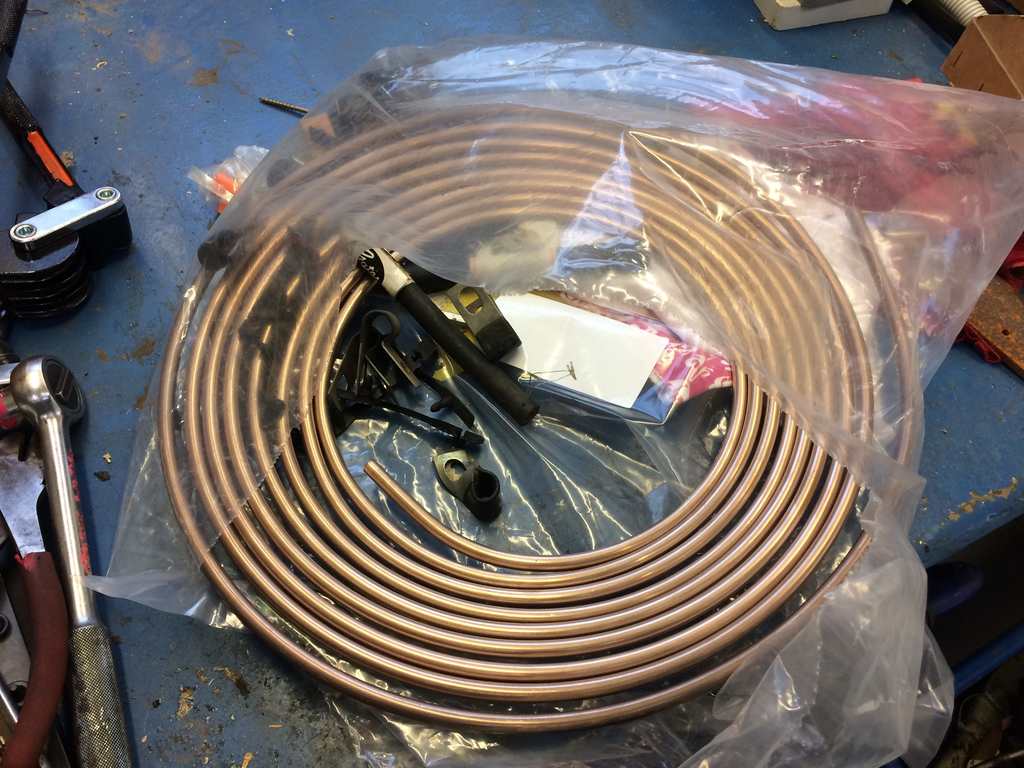
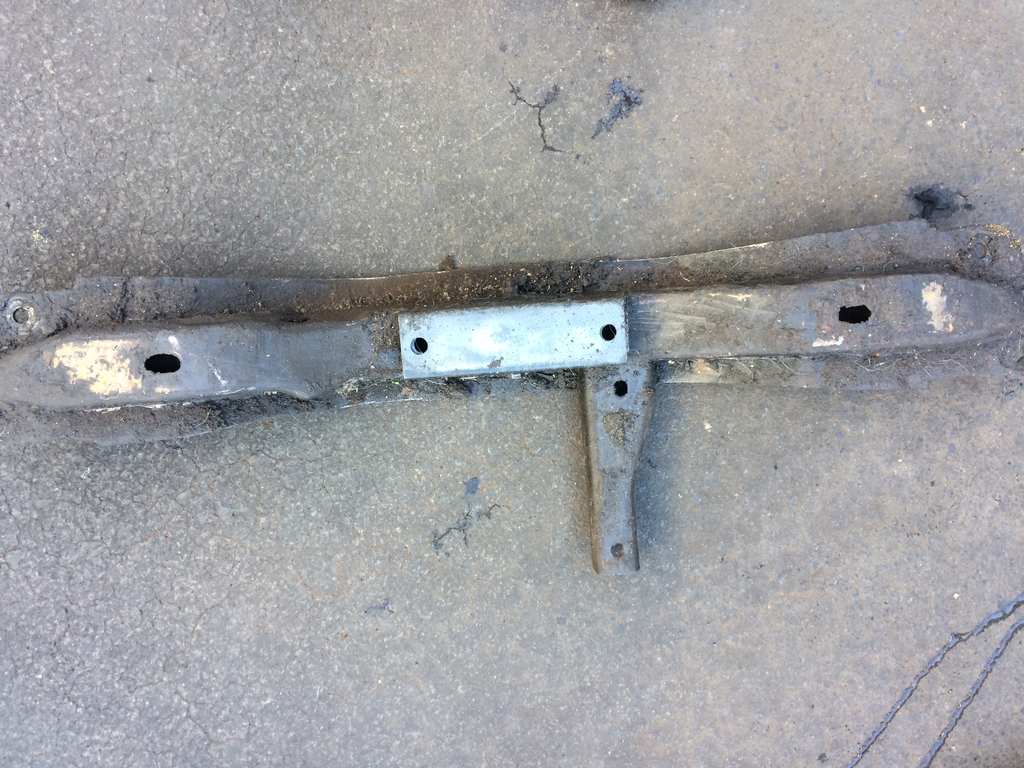
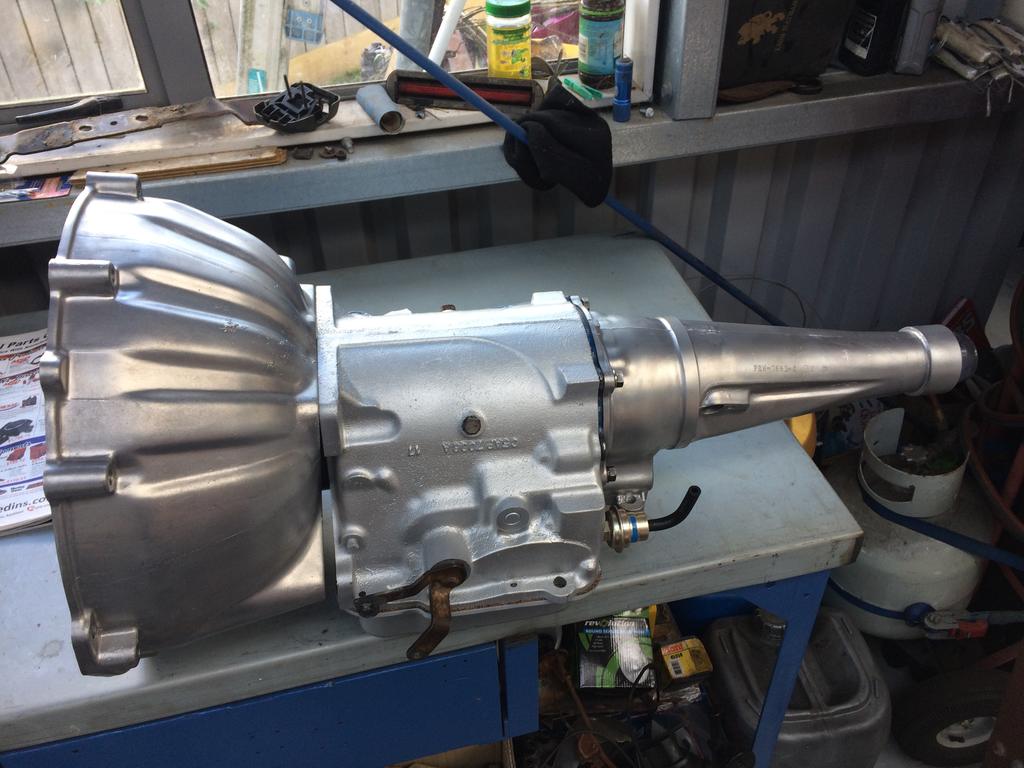
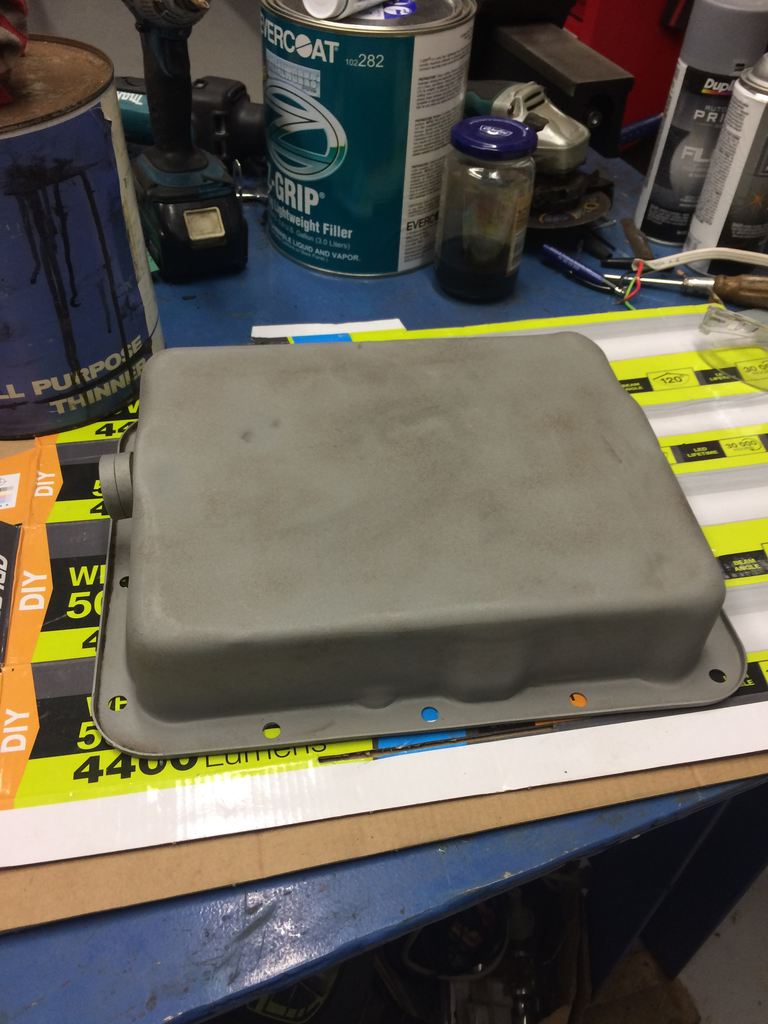
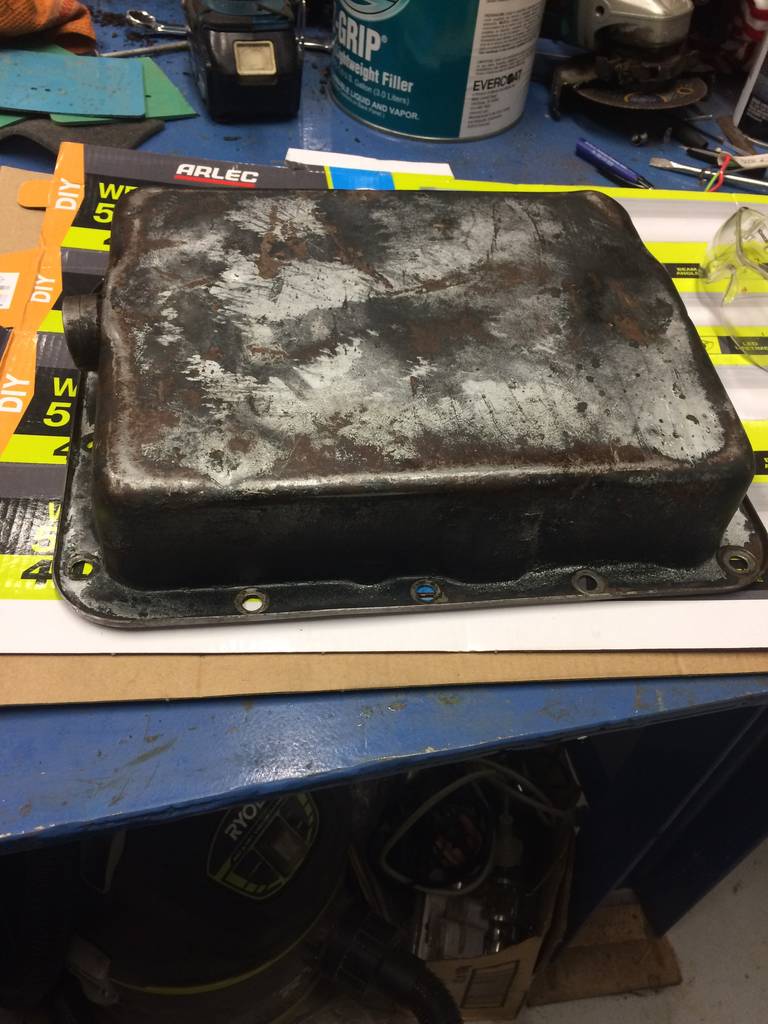
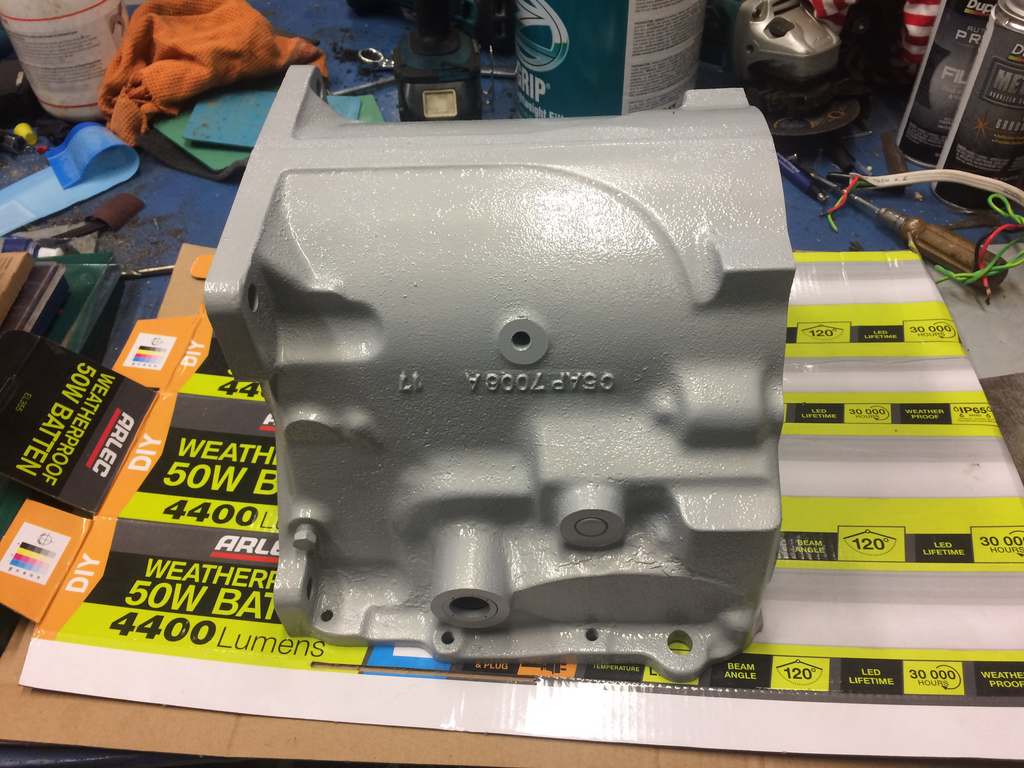
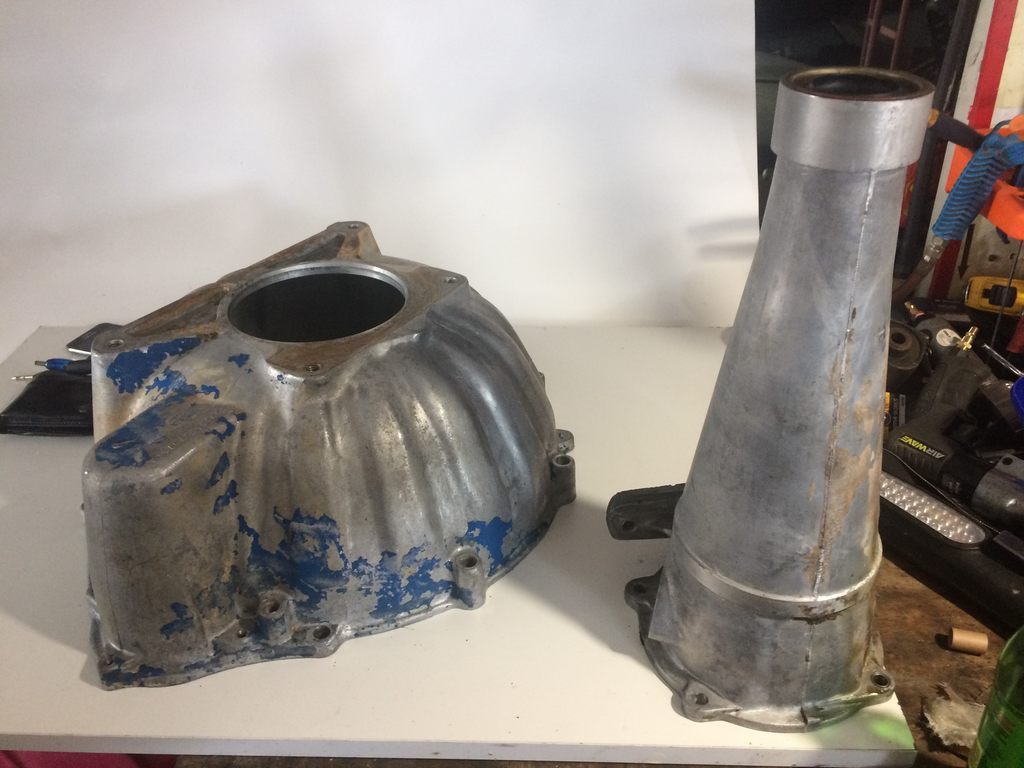
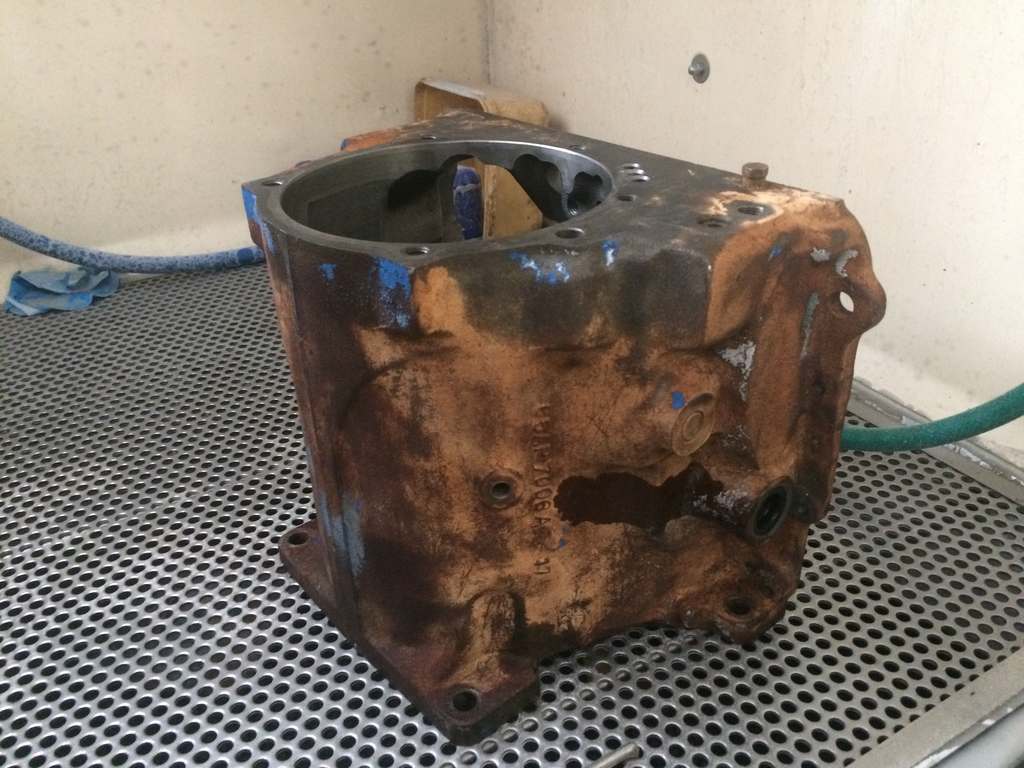
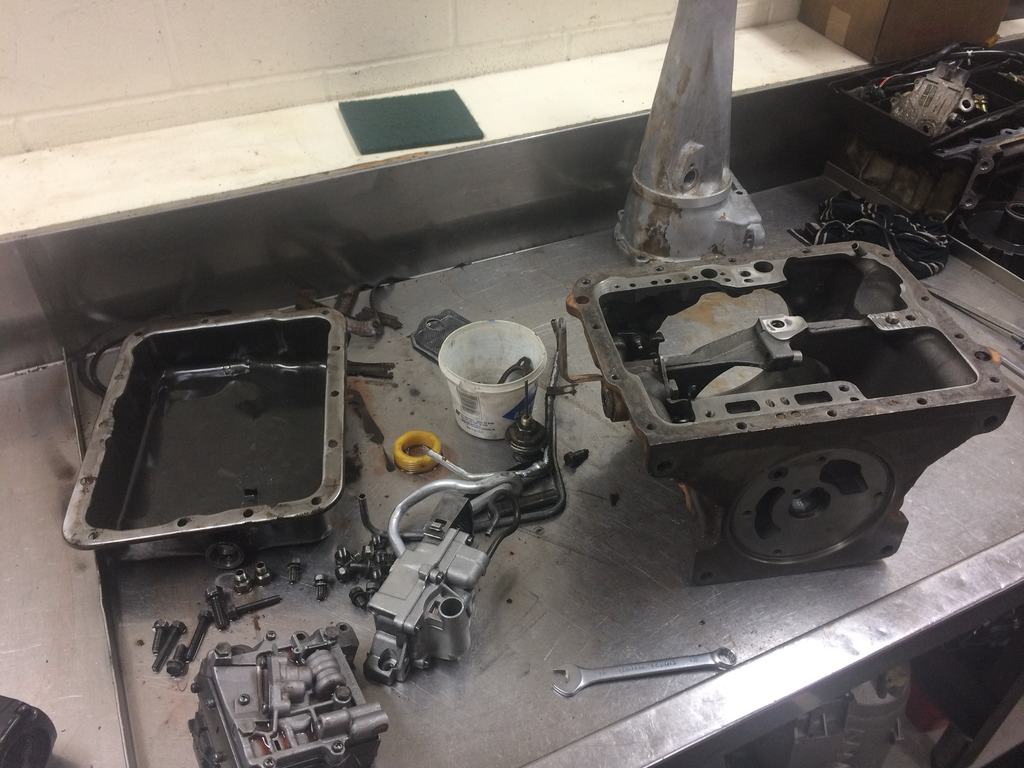
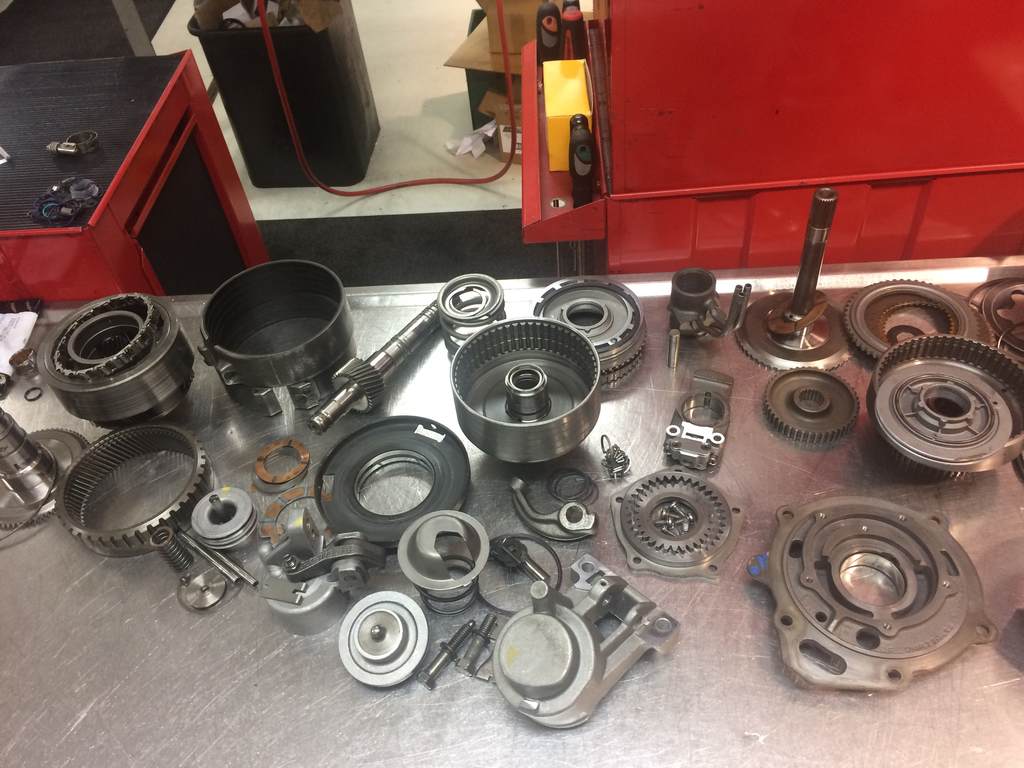
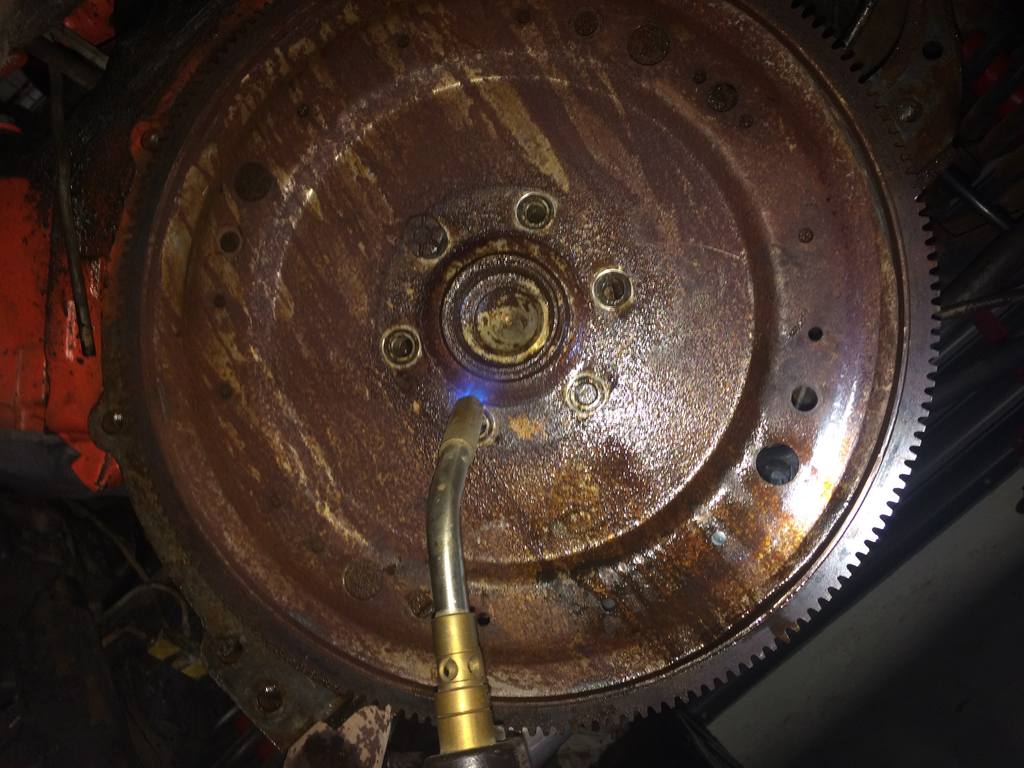
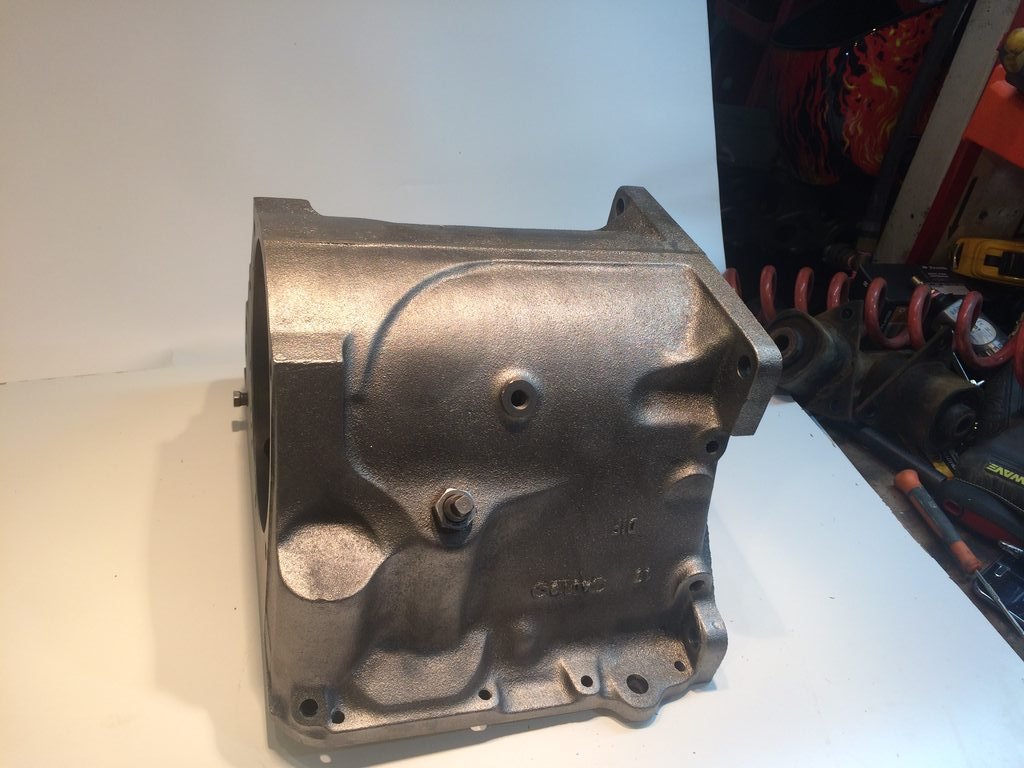
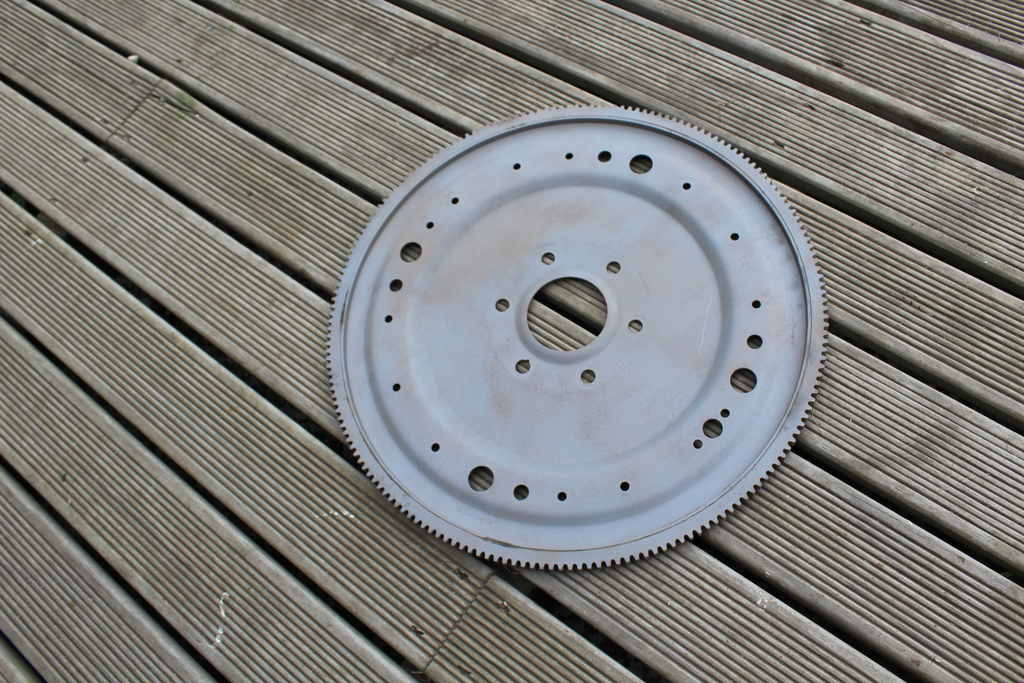
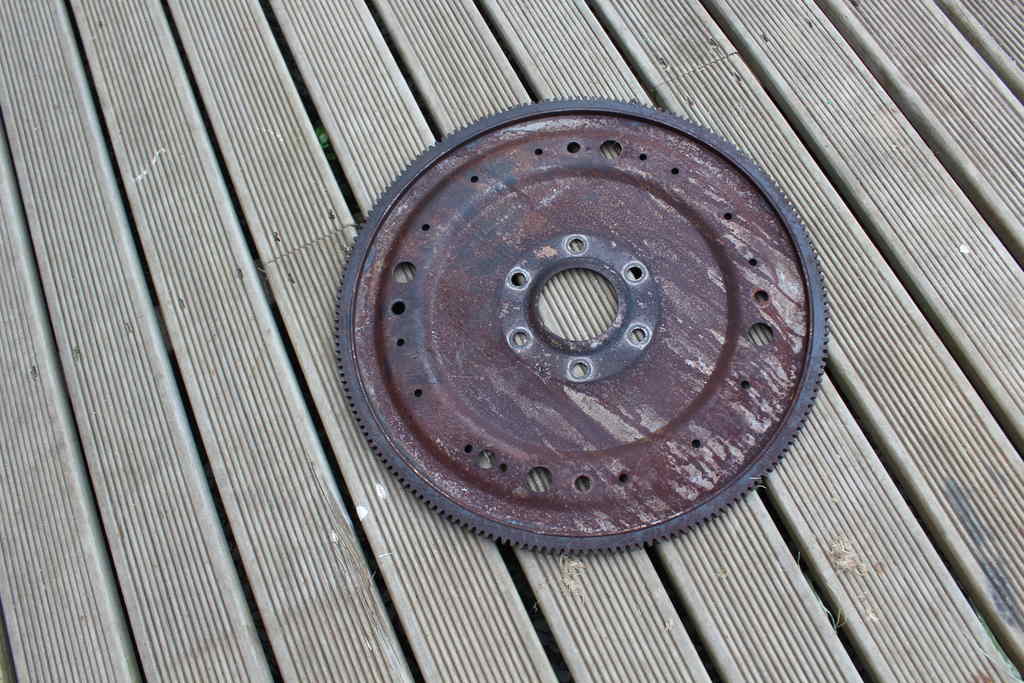
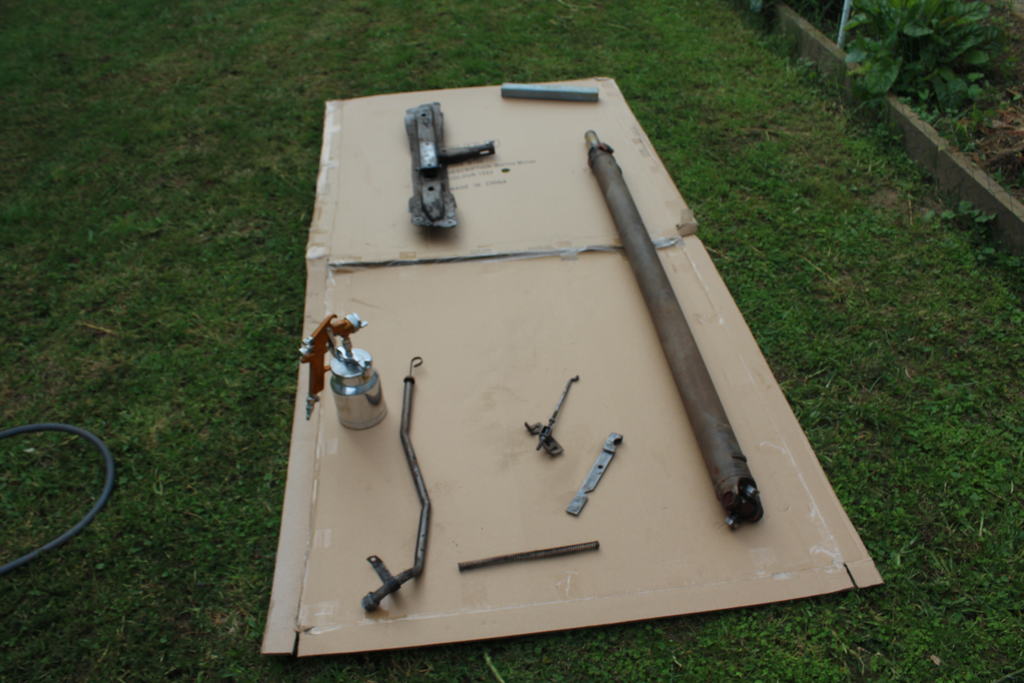
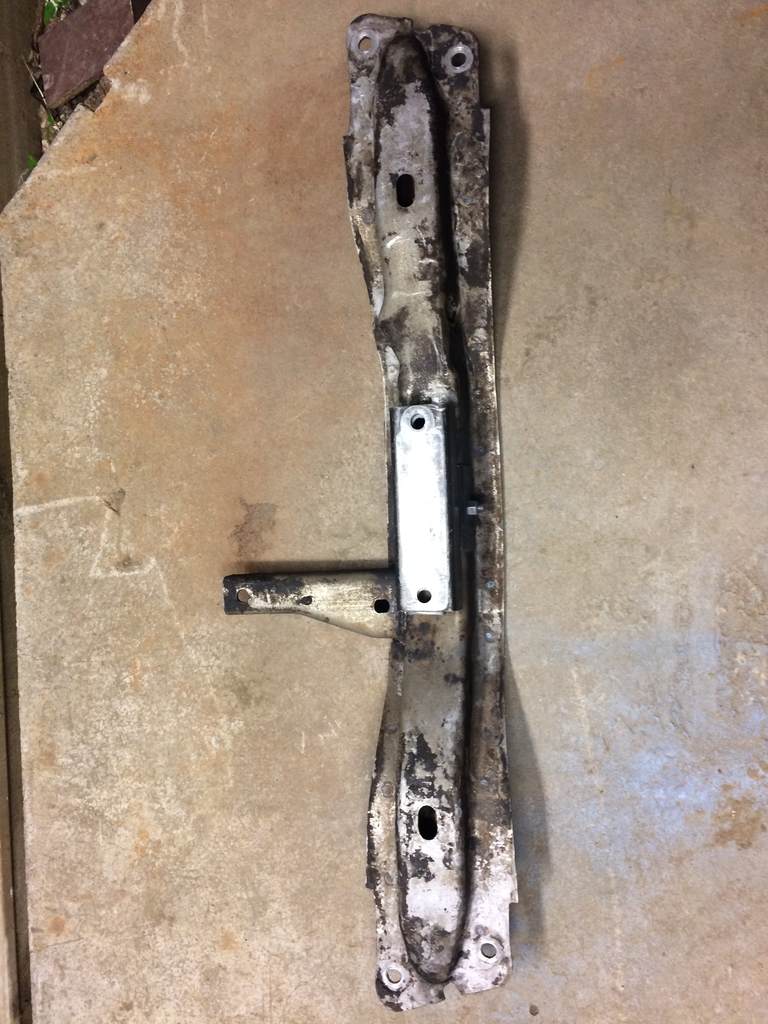
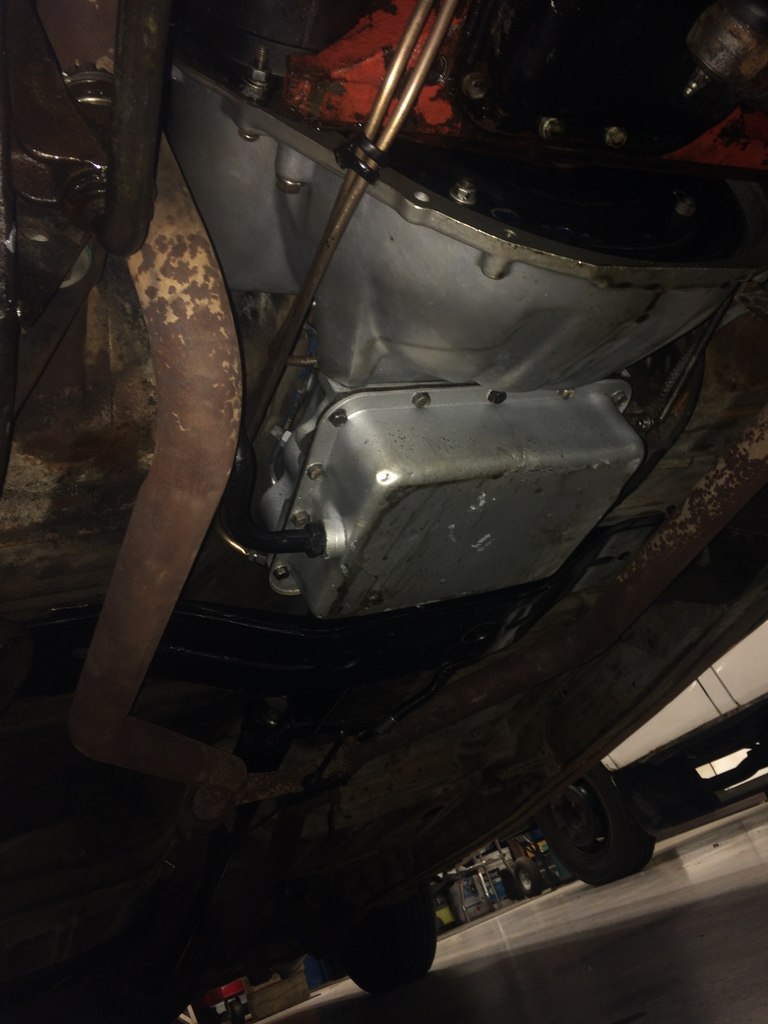
more jobs on the list have been done one that i didn't really want to open my wallet and get done but it needed to be done. The trans had and issue where it would not go into third gear (top gear) all the time and leaked from every hole bar the front seal. And after talking to the trans shop about it it was decided it had to come out to be fixed. so out it came unfortunately never got a photo of it out but the whole trans and crossmember were covered in fluid and grease so pulling it out was not much fun so off to the trans shop it went And god dam these cruise o matics are heavy also note that amount of metal fillings sitting in the trans pan so pretty much under the whole inspection nothing was found to be damaged just everything worn out and metal fillings through the torque converter and valve body which was the cause of the intermittent top gear fault but the trans had clean fluid in it due to it leaking out it required regular top ups so while the trans shop were waiting on parts from the USA i sent the housings off to get blasted even though the trans shop had already done a good job at cleaning them so this job went to @Mr Vapour before vapour blasting And after then applied some paint to the housing Then went to the job of removing the flex plate Left CRC on it for a few days and gave it a few heat cycles with the map torch Then got it hot and spent about 10 mins with 2 prybars and eventually came off then gave some of my other parts a sand blast and water blast before After a steam clean And painted the trans pan the same colour as the trans housing but no photo of that. after a light sandbast treatment then gave the parts a lick of black paint unfortunately turned out average as i thinned out the paint a bit too much then the parts went back to the trans shop and got it back a few days later looking like this too bad you don't get to see it as its under the car then in the car it went also did wreck abit of the pan paint while getting the trans in on the ground after that i made some new cooler hardlines as the old ones were steel and pretty fucked copper pipe m8 gave it a flare job then proceeded to run it from the front to the trans and using a pipe bender where it needed it and placing p clips to retain the hard line. then 2 lines later i was on to fitting this then bought one of these bad boys as the current setup was through the radiator which isn't super efficient and mounted it in front of the radiator which seems to cool it alot better than what it did before then filled the trans with this stuff ended up using about 8 liters could've used dexron 3 but type f runs no additives so is abit better for the trans friction material. so cheers too @Mr Vapour on the great blast work and quick turn around And thanks to Auckland Automatics for doing a great job and emptying my wallet
- 77 replies
-
- 18
-
-