kws
-
Posts
4,176 -
Joined
-
Last visited
-
Days Won
5
Everything posted by kws
-
I've been thinking about these for a while, even before I got an Alto, as they are a common mod in Japan. I finally bit the bullet and lowered the front seats. One of the biggest criticisms of the Alto in reviews is that instead of sitting IN the Alto, you sit ON the Alto. The two front seats, despite being nice fancy Recaros, are not height adjustable (lower spec Altos, including the RS Turbo, are) and you sit very high in the car. For example, I'm not particularly tall and my shoulder in the standard seats, is about halfway up the window The other issue was that on the track I had to slightly slouch in the seat for my helmet to clear the headlining. Not ideal. Knowing I want to track the car more, and that slouching in the seat wasn't safe, I convinced myself it was a safety upgrade to lower the seats and gain more headroom. Yes. Safety. So I went on Yahoo Japan and bought a pair of TakeOff Low-Posi Kun seat spacers. These emulate the standard spacers by being one piece with a crossbar between the two legs There are other brands, some of which offer adjustable spacers so you can change the height or the tilt of the seat to suit you, but the TakeOff ones are the only spacers to have the crossbar. I've seen what can happen to Recaro seats when the two rails aren't braced together, and the seat tries to splay them apart. I'm not a small or light person, certainly not the build of person the Alto was designed for, so strength is important. The TakeOff spacers have also been strength tested in Japan and each set comes with an individually serialised certificate of strength testing. It won't mean much in NZ, but it gives me some confidence that the product is good. The TakeOff spacer lowers the seats by 50mm. It doesn't sound like much, but when you put the two spacers side by side it's huge. The top one is the standard spacer, and the black one is the lowered spacer. When put side by side, it's noticeable, as the example photos from the site show Standard Lowered A wad of money, and a few days later, I had a pair of spacers in my hands They're a nicely made piece of kit. Very solid. The included strength certificate It comes with all the fittings needed, if they aren't the standard fittings (it reuses all standard fittings) The thick brass washers are optional spacers to raise the seat slightly. It also makes the rails smoother to adjust. I'm not bothered either way and wanted to go as low as possible, so I left them out I had seen a few different ways to fit the spacers. The most common is to just remove the seats from the car completely, but I didn't want to remove the seats from the car and get them dirty in the garage, so I opted to tip the seats back up onto the folded-down back seat and work on them there The seats are bolted to the car with 4x T40 bolts. You can see the large fabric covered stock spacer here, between the rail and seat. Don't forget to unplug the connector under the seat. These seats don't have side airbags, so I didn't bother disconnecting the battery. This is just the seatbelt and passenger occupancy connector. I unbolted the seat and carefully tipped it back onto the back seat. I turned it so I could work from the back door opening Disconnect the plug and unhook the wiring from the spacer and rail The spacer is then bolted to the seat with 4 bolts (orange arrows) and 7 studs with nuts from the rails below them (green arrows, one side of the rail has an extra stud; 3 on one side and 4 on the other). All are 12mm. I loosened all nuts and bolts before removing any of them. Don't forget to undo the large 14mm securing the seatbelt buckle on the side too. The rail comes off as one piece Leaving the spacer Remove the four bolts holding that on and you have a bare seat. You will need to unhook the fabric from each end of the spacer, I used a trim tool to lever it towards the middle of the seat and unhook it from the metal lip. I then affixed the TakeOff spacer to the standard rails, using supplied washers and the original nuts. Protip, don't mount the buckle yet, it has to go through the fabric on the seat first, so wait until the rail is mounted. Then it was a case of mounting the rails to the seats. The holes are slotted, so I put two bolts on one side of the seat and slid the rail onto those to support it while I put the other two in. There is enough space to slip the seatbelt wiring between the spacer and the seat base. I tightened all the nuts and bolts down and fit the buckle on the side. Once the wiring was clipped and tied in place, the seat was then lowered back down onto the floor, using the locating studs to place it. The bolts were then tightened down. The visual difference was immediate It's significantly lower than the stock driver's seat. I couldn't help myself so jumped in and sat on the newly lowered passenger seat, which made me even more keen to get the driver's side done next. I followed the same procedure, which went quicker this time now that I knew what I was doing, and had the driver's seat installed in no time. Tons of head space now. No chance of helmet issues next time I take it to the track. The little fabric flap now just hangs aimlessly down covering everything. It's not attached anymore, but I'm sure if it bothered you you could glue or velcro it to the spacer to hold it in place. I've seen people cut the fabric or jam it between the spacer and seat base, but I'm happy with it as it is. I've only taken it for a short drive so far, I'm planning on taking it to work tomorrow anyway, but already the differences are pretty big. Obviously, I've had to adjust all my mirrors and steering wheel down (speaking of, the steering wheel is now at its lowest position, so I can see why column spacers exist), but the biggest thing for me is that now I'm looking through the middle of the windscreen, not the top half, and the interior mirror no longer blocks a chunk of my left-hand vision. In terms of driving, the seats feel more comfortable, maybe due to my leg position now, and the car feels a bit more confident in corners. I guess lowering a significant percentage of the cars weight (me) will help that by lowering the center of gravity. It really does feel like you're IN the car now. The only downsides so far are that it's harder to do the old arm-out-the-window when driving, as my shoulder is now just above the waist line of the door, and I've hit my elbow on the armrest on the door when turning once or twice since I'm not used to there being something there. I'm looking forward to my drive to work tomorrow and seeing how it goes around the twisty roads.
- 81 replies
-
- 10
-

-
I'm waiting on a battery tester to arrive so I can test the battery, but being it's from 2019 and spent some time on the docks/ships before i pressed it into regular service, it's probably not living its best life. Looks like the alt is ECU controlled and it's acting "normal" currently. I am not too worried about it, I'm 99% convinced it was my fault for crawling along in second gear with the revs real low.
-
I guess you could use something like this to drive the tacho if its analogue, https://spiyda.com/smiths-rvi-rvc-conversion-external-1.html You should be able to feed the tach signal from the ECU into the box, but as Goat says, there will be a few different makers of things like these now. Im running this version of it for the Smiths tacho in the Marina, which takes the signal from the negative of the coil, does some electronic wizardry and then the needle moves, https://tasteslikepetrol.net/2021/06/project-marina-tacho-conversion/
-
Going from my drive this morning, even at almost-stalling rpm the alt is still pushing a min of 13.5v. Normally it didn't drop below 13.8v when driving.
-
Oh yeah, i didnt mention it but i tested the battery and alt and both had good voltages. It is a Japanese battery, so no idea how old it is, but it has no issue starting the car. I do wonder since I was creeping along in traffic if the revs, and voltage, dipped a bit low and caused the CANBUS to throw a wobbly. The Alt has a normal solid pulley, so fancy clutched pulley here, so no idea if the ECU can control it.
-
It's been an interesting few weeks. I had a scare in the Alto, and more parts arrived. The weirdness started when I was taking the Alto to work the other week. I jumped in, started it up, and all was normal. I'm cruising along, jamming to some tunes, and hit the usual start stop traffic. I'm just crawling along... And BAM, ALL the dash warning lights suddenly light up and start flashing. They flash a few times and then the majority turn off, leaving only the Check Engine and Stability Control warning lights lit. I'm worried, will the car suddenly die stuck in traffic? Is the car about to asplode? I've never seen all the dash lights flash like that. I quickly jump off the highway at the next exit and crawl the car home. It was running fine, no misfire, no smoke, no leaks, nothing. Just the lights. I made it home fine, swapped cars and left it to think about what it had done. After work, I plugged in the tablet and fired up SZ Viewer to scan the codes. Ah yes, I think I have a couple of codes. None were current, but nearly all modules at at least one code. Reading into the codes, they all centered around one thing, the loss of CAN communication with the ABS unit. I checked all the modules and they were all the related codes, so I saved screenshots of the codes for later and cleared all the codes in the modules. Nothing came back. I've driven a few hundred KM since, and haven't had any issues, so hopefully it was a once-off and not an intermittent CANBUS issue. I did have a quick look at the ABS module and it looked normal, so I gave the plug a wiggle and left it While in the engine bay, I forgot that I hadn't shown my awesome duct tape duct. For whatever reason, either the intake rubber intake or the fibreglass duct are too short and they don't really meet up, leaving a large gap between and around the two. I made the duct tape duct before trackday to try and encourage more air into the airbox rather than slip out around the smaller rubber intake. Its fully enclosed and seals the two parts together. It withstood the trackday heat and is still there. I might look for a proper solution one day, or maybe not. The other day I finally had some bits arrive that I have been trying to get for months. Before Christmas, when I first got the car, I tried to order these bits through the local dealer. They asked Suzuki NZ, who asked Japan, and were advised they could be ordered, so we placed the order. Japan then proceeded to ignore the order and not process it. After a couple of months of chasing it, I cancelled the order. I enquired with Amayama, who I have been getting the majority of my genuine Suzuki parts through, and sure enough, they could supply and at a lower cost. Finally, those parts arrived. What are they? Well, the main one was the massive polystyrene insert that sits in the boot and gives me a proper boot floor. Without it, the floor of the boot is much deeper but tapers and makes it kinda useless for carrying anything in. The insert just slips into place All the shaped spaces in it are meant for things like the jack, tyre iron and flat tyre goo kit. I have none of these, so all it is used for is my tow hook I would like to find a water bottle for the intercooler spray that fits into one of the spaces too... Having the block in place means I could reinstall the coreflute "floor" and carpet. These are retained with two special clips with little pull tabs on them, so you can access the tools under the floor It's a kinda dumb thing to be excited about, but I can finally use my boot. The other thing to arrive was the LH and RH front A-pillar trims. The LH side had a big crack in it, and the RH side had a bunch of holes from when the Japanese owner had a gauge pod fitted there. To remove these trims, all you do is pull down the door seal And pull the trim free, starting at the top. It's hooked into the dash at the bottom, but easy to pull free. Refitting is the reverse, hook it in at the bottom and then push the clips into place. Refit the seal, and you're done. I've got a couple of other small things on the way and then that should be most things sorted. It's crazy how well priced genuine parts are for these wee things. I'm paying the sort of prices I would normally pay for secondhand junk on Facebook, for brand new parts from Japan. Future thoughts are an oil cooler for the engine, an SWK intercooler and water sprayer, and maybe some half-down lowering springs. All in good time, and depending on cost.
-
I had no issues with my 14point7 spartan. Easy to use, compact and reliable. A+ still have it to use again later. Also bought a Glowshift gauge unit to use as a portable wideband setup. Also works well, but was pretty spenny new.
-
I mentioned in my last post that I had new shocks on the way, well, they arrived, so let's get them fitted. I began by jacking the rear of the car up, putting it on stands and removing the rear wheels. This gave me access to the shocks and springs. Both the yellow stripe and the part number on the shock indicate that it was a poverty spec shock from a low spec (not Works) Alto. Note the missing lower rear spring pads, the spring shouldn't be sitting on the metal like that. The spring also had the incorrect colour code, yellow and white, not blue and white like the Works spring has. Other than the paint mark they look visually the same, I don't know if the Works has a higher spring rate or anything. Removal is really easy. On my car the side boot trims have been cut, I believe for the damper adjusters for the adjustable rear shocks the car used to have. This gives me perfect access to the nut that holds the top of the shock in place. Because I didn't care about the old shocks, I used a rattle gun to zip the nuts off. Before completely removing the nut I supported the rear beam with a jack under the spring, so the force of the spring wouldn't ping the arm downwards With the top nut removed, I removed the lower bolt on the shock and removed it. This one was very dead. Because they have gas in them, once compressed by hand they should extend to their full length again. This one had no resistance to compressing it and made no efforts to extend. The other side was only marginally better, where if you left it for about 5 minutes it would have extended in full (it should extend to full in a matter of seconds). The new shock has the correct KYB sticker and P/N on it, but it appears the new replacements don't get paint codes like factory-fitted ones do; the factory paint code for a Works is purple and green. I ordered these from the parts book to Works part numbers, so I know they're correct. With the shock removed, I could push down on the hub by hand and pull the spring out. I then fitted the new lower spring pad, in the correct orientation based on the service manual I then replaced the old upper spring pad and fit the spring The new shock slips into place next The top mount on the shocks is interesting to me. The top of the shock has a captive rubber mount and steel sleeve. There is then a top bush and metal washer that sandwiches the shock tower into place. On the underside of the shock tower there is a metal cup that locates the captive bush Even the top bush is weird, the shoulder goes face-up The washer sits on top of it and the nut is placed on top As the nut is tightened, the bush squishes and flattens out under the washer I guess compressing the bush like that creates a fair bit of tension, so the shock won't be rattling around in a hurry. Other than jacking the hub up to ride height and torquing the lower shock bolt, that was one side done. I copy pasta'd the other side. and then onto the ground it went. With the combo of fresh new zero km un-saggy springs and the lower spring pads being fitted, the rear ride height has increased a touch. It's only a couple of mm higher and should settle a little as the springs bed in. I know why they put the KYB sticker where they did now The Suzuki lineup at work the other day Looking clean sans tow hook now too So, how does it drive now? Well, the blown shocks explain a lot! I thought it was just lame povo spec shocks, but even that wouldn't have been as bad. On the road at low speeds the rear feels firmer, but there is a huge difference in how the car feels on the open road, the rear is much more planted and doesn't pitch and dive so much. In the corners, it's a lot more controllable and the rear doesn't feel like wobbly jelly. I still think it needs the extra stiffening of the rear swaybar to balance it, but cornering speeds can be higher than they were beforehand and the rear follows the front wheels like it should. I reckon it'll be good for a second or two off my laps at Manfield next time, particularly if I can get it to rotate as the Jazz did (no hope for trying to do that when I was lacking any confidence in the rear end). Some more (boring) bits should be with me soon to tidy the interior up further, and other than that I'll just keep driving the pants off it. Should hit a milestone soon too...
- 81 replies
-
- 18
-
-

VGs Little FJ40/Off Brand Power Wheels & Trailer
kws replied to Vintage Grumble's topic in Other Projects
Stick the three diamond badge on it, scrap the batteries, fit a 2 stroke powerplant and forever bask in the glory of it being followed by a haze of blue smoke. -
I had to dig this up because kinda relevant. Spotted in a Donut video about cheap anti-theft measures and they cut a knock-off Nardi wheel to get one of the locks off. This is what is inside the rim of it, "more than 90% foam" This video seems to show its a common thing on cheap wheels, including the spokes being attached to the rim via small indents on the rim, not welds.

-
Going a full circle into a Marina again. KwS's 1973 Morris Marina Coupe.
kws replied to kws's topic in Projects and Build Ups
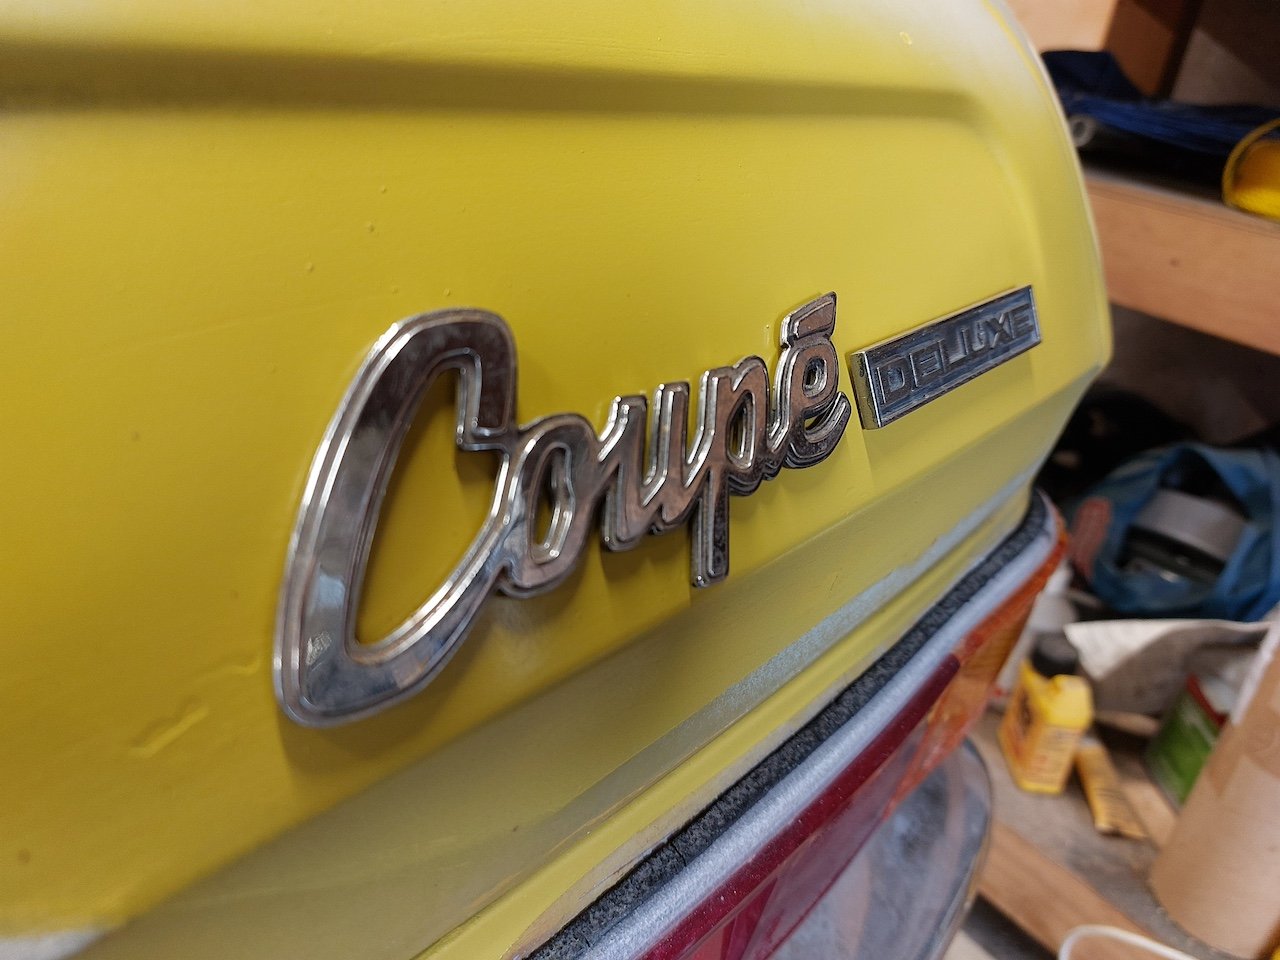
*Slaps boot lid and says in a very Aussie voice* Yeah Luv, it's a DE-LUXE (this car has never had its badges on it since I've owned it)
- 80 replies
-
- 19
-
-

-
They'll still be better than brand new supercats.
-
Going a full circle into a Marina again. KwS's 1973 Morris Marina Coupe.
kws replied to kws's topic in Projects and Build Ups
Progress on the Marina has been slow. I had hoped it would be on the road by now, but that's not happened. The good news is that any progress, is still good progress, and some headway has been made. I have really battled with the heater box and dreaded trying to fix it. In reality, getting it into a usable state wasn't that hard. Negative mindsets can be a real pain like that. According to my records, I removed the intake plenum box way back in October 2021... that's how long it's taken me to get around to sorting it. The heater/blower system is completely bespoke to the Aus/Nz spec cars and differs greatly from how the UK ones are set up. This was obviously due to the local content requirements of the time, which meant a percentage of the car had to be made locally and not imported. This car came with the heater box in the boot, so I've never seen it fitted to the car. The plenum box, which is mounted up under the cowl panel behind the dash, was in place but full of dirt and old leaves. Not a good sign. I removed the grille and then set about removing the screws that hold the plenum box in place. Once removed, the whole box just drops down. It was pretty well full. Took a lot of vacuuming to clean it out But the main reason it needed to come out, was to fix this The metal has ceased being solid and became a crunchy powder. Here it sat for a couple of years, until almost 2 years to the day later, and I pulled it out to have a better look. This involved lots of cutting and drilling, to remove the spot welds and remove the rusty remnants. The gaping hole in the side is obvious, but there were also a lot of other areas that needed attention too, in harder-to-reach places After cutting all this out and cleaning it up as much as I could, I absolutely saturated it in Brunox to treat the rust and seal it off. Because my car is a poverty spec Deluxe and doesn't have the face-level fresh air vents in the dash, I opted to just completely remove the tube for that function on this side as it was completely rusted out and the idea of refitting the tube was doing my head in. I started with some good old CAD Converted it into metal, and tacked it in place I didn't fully seam weld it, I just didn't see the point when it was not structural I seam-sealed the area to seal it and used Newtech body filler to smooth over the welds and fill the holes in the top that I couldn't get to with a welder. Newtech is a fibreglass-infused filler and pretty strong, so should do well enough at keeping the air and water inside the box. Everything got a coating of black zinc on the outside, and the inside was flooded with epoxy primer and then black zinc. I remembered to refit the heater resistor Someone had cut the wires for the heater resistor when removing it, so I crimped on a pair of nice new terminals, so now I can unplug the resistor if I need to With the plenum box done, it was time to test-fit it with the heater box. Before that though, let's travel back to 2021 when I tested and refurbished the heater box The heater box was already out of the car, so the first thing to do was see if the fan actually worked. I connected 12v and turned it on. Sure enough, it fired into life with no signs of any issues. I then set about splitting the box by removing all the nuts and bolts around the perimeter. The whole box is moulded fibreglass. This gave me access to the fan and heater core. I cleaned out years of detritus and pulled it apart further The heater core looked ok with no obvious signs of leaking The direction flap is a little less good The flap is actually made of two layers of metal that sandwich some sort of felt material that creates the edge seal. After cleaning it wasn't too bad, just missing a bit on one edge. Not the end of the world. I didn't want to just refit the heater core and cross my fingers, so I bodged up some hose and fittings so I could pressure test it. I filled it with water and pumped it up to 15psi (just above the rad cap pressure) I can't remember how long I tested it for now, but I think it was a couple of hours and it didn't drop pressure at all. It could spring a leak once it gets hot, but I hope not. I rust treated and then black zinc painted everything inside the box I reassembled it, with some new foam on the diverter flap (to seal it when it's closed), and it's been gathering dust since. Well, today I pulled it all out and put it together. This is the Aus/NZ spec heater assembly The air enters the top of the plenum via the vent in the cowl ahead of the windscreen. It then enters the plenum box and gets sent to the heater box via the C shape duct on the side (the other hole is the face-level vent outlet for the higher spec cars. This is blocked off on my car. The air then passes through the heater core (all air does, the heater valve controls if the core is hot or not), through the fan and down to the ducts at the bottom of the box. The circular outlet would be ducted to the windscreen vents while the large cutouts are the "feet" vents. The heater selector only has three settings, Feet/Windscreen, Windscreen or Off. There should be a heater valve attached to the box too, but mine was missing and the only spare I have I don't trust. They're very expensive heater valves shared with some classic Aussie Fords (hence the cost), so I will likely just have a manual heater tap in the engine bay to turn the heater on and off. For now, I just have the heater bypassed. The test assembly was a success, so I contorted myself into the car and started refitting it. The plenum went in easy enough, once I turned it around so it faced the correct direction. I used a ratchet strap to hook into the plenum box just to give me something to lift it up from the floor inside the car while standing outside, as the screws to secure it go through from the outside. The vent grille could then be refitted, with some nice new screws Next, it was a case of fitting the heater box to the underside of the plenum. This turned out to be a bigger pain in the bum than expected. I fitted it all up, nice and easy, no issues, and then realised I couldn't fit the C-shaped duct in afterwards. So out the heater box came. I fitted the duct to the plenum first and then squeezed the heater box into place. This took an awful lot of wiggling and jiggling to get into place, from both sides of the car. That was the easy bit though, the hard bit was getting the cable for the diverter flap into place. This is in the drivers foot well, so I squeezed myself into there and hooked it up. Next, I connected the blower fan wires, connected the battery and hit the switch. Nothing. Hmmm. I tried again, flicking the switch a few times and suddenly it sprung to life. I guess sitting around unused for a couple of decades does that to a switch. But both speeds work correctly now, so I'm very happy I still need to buy some ducting to duct it up to the windscreen vents, but for now, it'll do. Following that success, I felt it was time to fit something else the car hadn't seen for many years. For the first time in my ownership, the car has steering column shrouds I did have to relocate the ignition switch though. Turns out it's not meant to point down; the previous owner just didn't clock it to the column properly (and disabled the steering lock in the process) when the switch was replaced. It fits perfectly now, and the steering lock even works too. Makes way more sense having the key where it is, it was always hard to see and use when it was facing down. We're getting much closer to being able to take it for a WOF check. I need to refit the quarter window, which I'm procrastinating because I haven't done it before and I'm sure it'll suck to do, and then fit some door cards, seatbelts and the other seat. In the meantime, I scuffed up the new sill and gave it a quick shot of paint Theres a low spot on the rear quarter that I want to address before I put any more paint on that. Might do that this weekend.- 80 replies
-
- 26
-
-
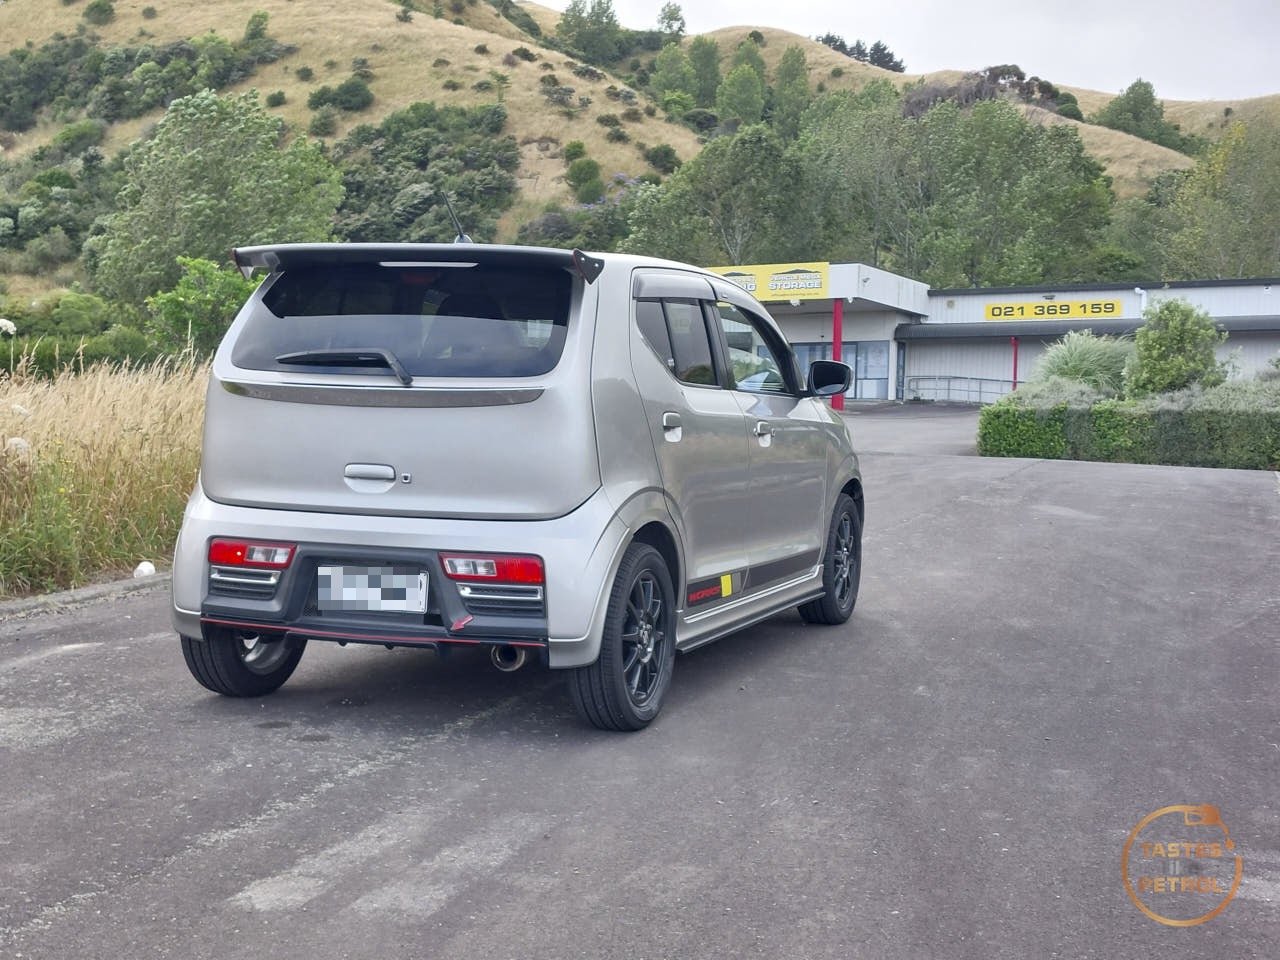
Removed the tow hook the other day and fitted the blanking panel. The towhook will remain in the boot once I have the insert to store it. It tidies the front up a bit, but i do kinda miss how it looked. On a side note, now that the auction results have dropped off the system, the rusty 4WD Alto I bought in Japan has resurfaced at a dealer in Japan for a shade over a million Yen (more than I paid). Looks like they gave the underside another coating of underseal, and fitted the white "summer" wheels, which were missing from the car when it was inspected after I bought it...
-
Tomble's adorable go cart / distraction / Alto Works
kws replied to tomble's topic in Other Projects
If it is, it's not in the parts book -
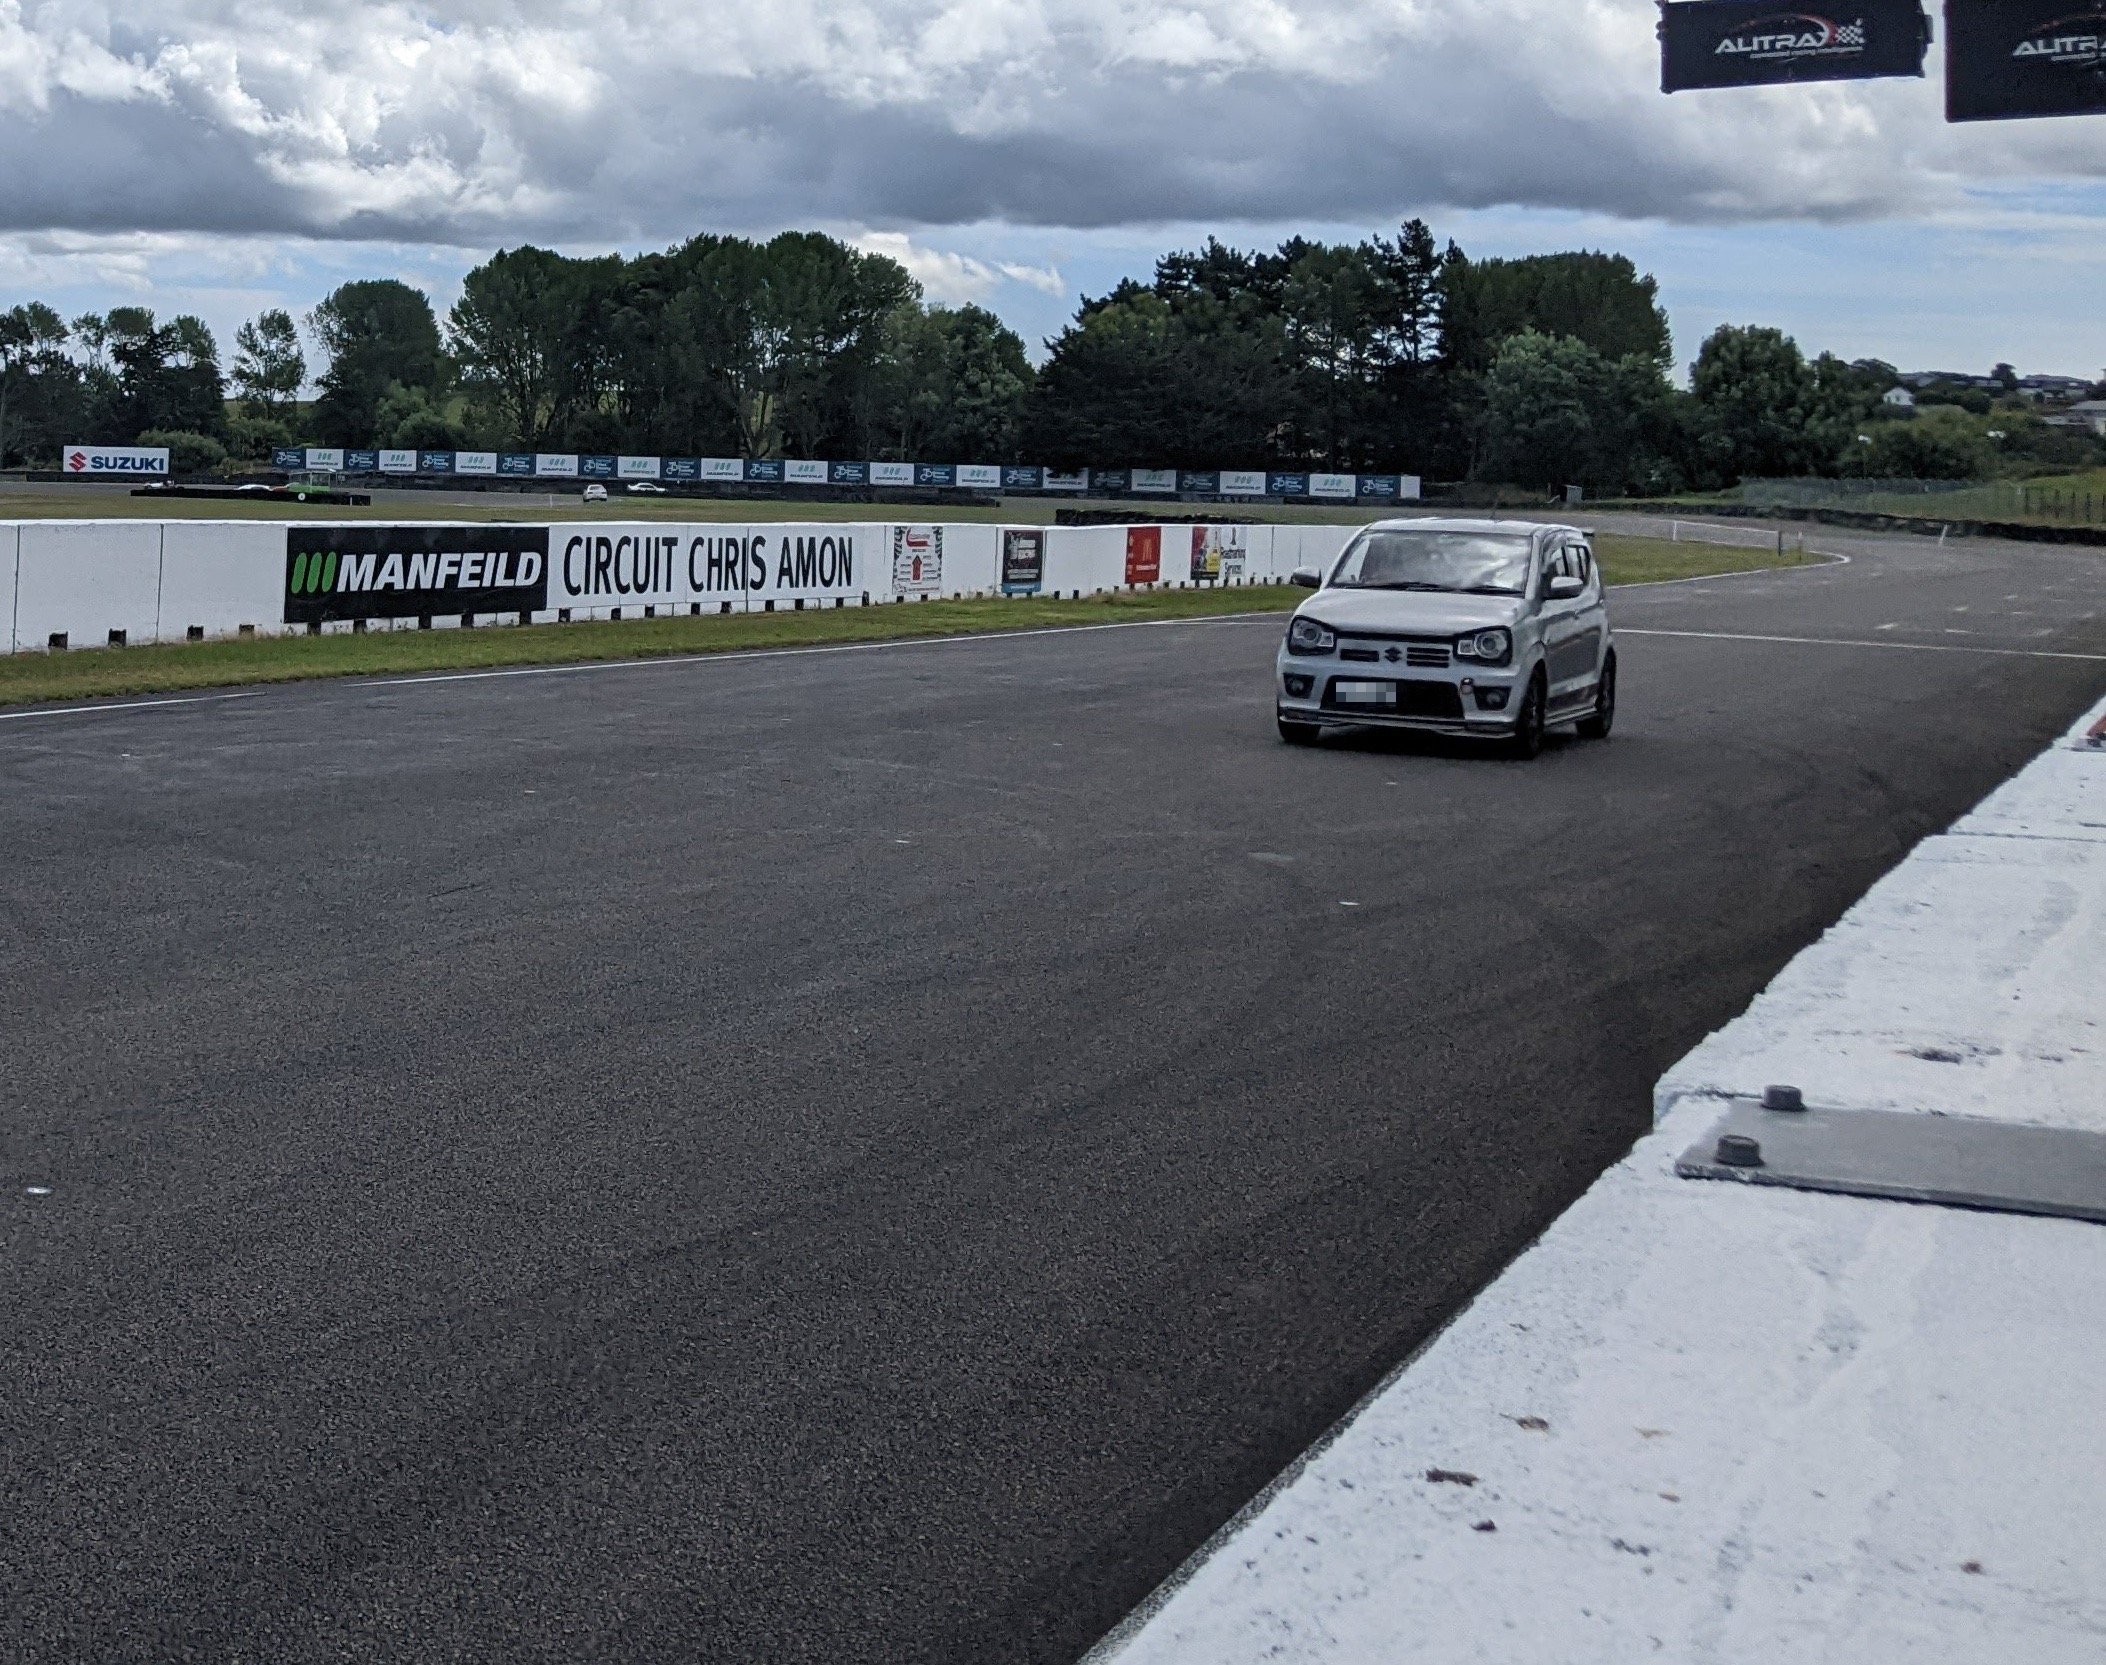
Well, here we go again, another track day. This time, I brought something a bit more interesting than a Jazz. But first, before doing fun things in slow cars, I had to attend to a couple of things. I started by giving the headlining a clean, as it was filthy. I don't know why, but both sides had a lot of black on them. This was after I had already given the area above the pillar a quick clean, there were big areas of dark black It did seem to come off quite easily with just a rag and some APC There is still some darkening, which another clean will probably get off, but it's a lot better for now. The passengers side was bad too, but not as bad While in the area I fit the three grab handles that were missing Big improvement there, so I moved on to checking all the fluids and making sure we were ready to go. I couldn't help myself though, and removed the Take-Off vent and gave it a quick hit with some black paint on the mesh. It was a kind of faded pink/silver The last thing that needed to be done was a last-minute wheel alignment. When negotiating the car with the previous owner, swapping in the standard suspension was part of the deal, and there was talk of a wheel alignment to go with it. It never occurred to me until now that there wasn't time to get one done before the truck arrived.... I noticed at work the other day when I parked up that I was sure the front RH wheel was pointing slightly inwards when the steering wheel was straight, and the LH wheel was straight. As a friend said, it must be pretty bad if you can see it by eye! Sure enough, I dropped it down for an alignment and the results were... interesting. The front wheels were / - \ with a total of almost 10mm toe in, no wonder I could see it by eye! There is still too much toe on the RH rear, but as it's a beam rear end I can't adjust that out without shimming the hub. I'll keep an eye on tire wear there and decide later what I want to do. The alignment made a world of difference to how it drives though. I'm no longer fighting the diff as much, it's a bit less murder-y in corners, and it feels more stable. A+ should've done it sooner. So that was it, we were off on a 2 hour drive to Feilding for the weekend. The carpet has made a huge difference in NVH at open road speeds; the noise and drone were easily bearable, and it was quite a nice drive. The 30c ambient temps weren't so nice, but with working AC it wasn't an issue inside the car. The next day it was track day. I got geared up, and drove to the circuit nice and early so we could get some good pits. And suddenly an excellent car friend arrived; Tom in his lovely blue Alto Compared to mine, his is mostly stock, but running KYB "Lowfer" lowering shocks and springs, aftermarket wheels and an axle back exhaust. The blue is a very stunning colour. We started the day with the usual driver training; cornering line, braking/obstacle avoidance (new this year) and the slalom. Speaking of the braking/obstacle avoidance, this was new. Last time it was just brake as hard as you could when the flag dropped, this time there were cones in the middle of the track to split it into two lanes, and a light on either side that would light up when you triggered a beam across the track. I think the idea was that either the left or right light would come on and you would brake and turn to the opposite side of the track to the light. That didn't really happen though, the braking was kinda dropped and you just changed to the other side of the track to the light and kept going. I think I preferred the emergency stop test. The Alto did quite well in the slalom, whipping around the cones and only once in three goes did I clip a cone when I got a bit cocky. The Alto was nothing compared to the S660 there though, that thing just darted around the cones like it was on rails Once the driver training was done, we lined up for the actual group runs on the track And off we went I chased the other Alto for a bit And eventually managed to zip on by it Because I was running standard/low boost (8psi) and pushing maybe 70hp I wasn't the fastest thing on the track, but easily kept up with the slower cars and didn't hold many people up Sadly Tom had to withdraw the other Alto from our little battle due to technical difficulties. I would've liked to have some more Alto vs Alto fun, but hopefully that'll happen another time. As the day went on I got more confident with the car. One of the things that I was struggling with was trusting the LSD. I had the grip to get out of corners now, unlike in the Jazz, but I found it hard to trust that all I needed to do was put my foot down and keep it there and rely on the diff to pull me through. I had a couple of good battles throughout the day. One of them was against a pretty heavily modified classic Mini. I'm not sure what was under the hood but it was caged and it was quick for what it was. I could catch up and sit on his tail in the corners, but he'd just pull slightly on the straights. I would've walked passed him on high boost though... Unfortunately at one point while chasing him I noticed what I thought was a mist on my windscreen. Thinking nothing of it, I flicked the mist function on the wipers.... and it smeared, bad. I pulled into the pits and found the front end of my car covered in oil spray, which was thankfully not mine (I was worried it had come out of the cowl vents). While I was cleaning my windscreen with brake cleaner my wife popped over and let the Mini owner, who had just pulled into the pits, know he might have an oiling issues and sure enough his breather had failed. He came over and apologised to me, but it is what it is, things happen on the track. No harm, no foul. Speaking of high boost, I did find that the more power I have, the better the LSD works... I found that out in one of the shorter sessions I joined, where I decided to see what the Alto was like on high (14PSI) boost for a couple of laps. With the car putting out about 85hp or so the car was suddenly a lot more lively on the track which meant the LSD was working a lot harder and just acted like a slingshot out of corners, if you were brave enough to pedal down and hold on. Looking at Racechrono we were pulling more speed in the corners, but I was really hustling down the straights (all speeds in KPH) Alto on high boost (14psi) Compared to the fastest lap on low boost Alto on standard/low boost (8psi) Sadly with high ambient temps (25+c) I was concerned the Intake Air Temp was getting a bit high on the high boost. Standard boost saw about 50-60c, but on high boost was seeing over 70c, which I now know is normal but in the interests of longevity I didn't want to push it too hard. So, how did we go then? Well, compared to the fastest lap in the Jazz last year Jazz 1.3 I was similar in speed through the corners, but whipped the Jazz pretty much everywhere except the front straight, where somehow the Jazz pipped me in top speed. I think part of that is down to just going full send in the Jazz and beating it like it owed me money, not so much the Alto being slow. In saying that, the lap times don't lie; The fastest in the Jazz was a 1:50 The fastest in the Alto on standard boost was a whopping 1:45, shaving a whole 5 seconds a lap off Better yet, the fastest in the Alto on high boost... 1:42! Even the difference between high and low boost is whopping, but shaving 8 seconds off the fastest time I could squeeze out of the Jazz is immense. I swear next time I can go faster too. One of the biggest things holding me back was the rear suspension. I have a thick 20mm Cusco front swaybar, but no rear swaybar and on top of that the wrong shocks and springs. It appears the seller of the car fitted poverty pack rear shocks and springs to the car, not the correct Works KYB ones. This results in a really soft rear end, which caused me some grief on the track by wobbling about and generally slowing me down in the corners and it just didn't want to rotate like the Jazz did. It also hated having tools in the boot on the drive up and hit the bump stops more than a few times. I have new genuine Works shocks and springs on the way to fix this. I may also consider getting a Cusco rear swaybar like the car had fitted in Japan, to balance the front out, but the correct shocks and springs should help a lot. Lower ambient temps should help too, as the lower the IATs the more power I'll make. In saying that, I have plans to move the big Greddy intercooler on and change to an SWK intercooler which although fits the same footprint as the tiny standard one is about 1.5x as thick, though more importantly, allows me to reuse the original shroud and reinstate the waterspray the previous owner was running. Obviously the little turbo is making a fair bit of heat at higher boost. Can't even complain about the economy; 5.2L/100KM on the run up there, 11L/100KM on the track. The Android headunit was outstanding, exactly what I wanted it for and it did it perfectly, giving me IAT, Coolant temp and AFRs at a glance all day, and freeing my phone up to focus on Racechrono. On the way there and back, wireless Android Auto kept the tunes going and gave me ETA and road updates. Overall, after almost 40 laps, the Alto did really well. Plenty of room for improvement before the next trackday in September, where hopefully I'll be able to play with another Alto again and better my laptimes.
- 81 replies
-
- 21
-
-
Tomble's adorable go cart / distraction / Alto Works
kws replied to tomble's topic in Other Projects
I was (and still am) so gutted for you guys. I couldn't believe it when I came back into the pits and was told your Alto had failed to proceed. I was really looking forward to a good Alto battle out on the track. Next time. -
I'll post up more details at some point, but for now, enjoy the glorious sight of an Alto Works on a track
-
- 81 replies
-
- 13
-
-
Ive used these guys to send me sheets of panel steel before https://www.dunedinsheetmetals.co.nz/ I had real trouble finding anyone locally that would sell half sheets, or deliver small quantities to residential addresses.
-
I didn't hate the old wheels, but wow the BBS completely change how the car looks. Looks excellent
-
Good point, it was about 10pm and outside lol
-
The final lot of parts from Yahoo Japan arrived the other day, so it was time to do some more work. But first, it was time to clean the little nugget up and take it for its first outing to Cars and Coffee up the coast. I stopped on the way to catch up with a friend who was also going to C&C, and my wife suggested we grab a couple of photos while we waited. It's such a cool wee car I didn't take many photos at C&C, but the Alto drew quite a bit of attention. Had a chat with a fellow Kei (AZ1) owner, and even a GR Yaris owner who was interested in importing a Works himself as a daily. Back home again, it was time to do a couple of quick upgrades The first was to finally fit a set of carpet mats to protect the expensive new carpet I had previously fitted. These aren't genuine mats, but the seller makes a strong point that they are "made in Japan" and of very high quality. I tend to agree, they are made very well and are a good fit, and at about half the price of genuine ones, it's a win in my books. They came with fitting hooks for both front mats to stop them from sliding. I don't know if it's just because my carpet is new, or if an Alto had never had mats fitted if the mounting holes for the hooks will be punched out or not, but in my case they weren't. I initially thought the mats would mount using the clips the carpet also uses to secure it on the drivers side under the seat, but it uses two other holes in the cross-member which are hidden under the carpet. In order to access the holes the factory has perforated a couple of little squares in the carpet where the holes are I carefully used a sharp knife to cut the bottom tab so I could lift the squares up and access the holes I'm really happy with the mats. They're very plush, and fit well. We're well on our way to luxury car now The drivers one fits nicely under the Monster Sport footrest The rear mats don't hook in place, but all the mats have a non-slip backing on them, and they're shaped well to stay in place Looks a lot nicer than the brown paper I had been using, and a lot more secure for track use next week The next upgrade I did was to replace the bulb in the high stop lamp in the tailgate with an LED board. I wanted to do this because I wanted a brighter light to catch attention better. The brake lights on the Alto are way down the bottom of the bumper and these days well below the level of visibility of cars on the road. If the high stop light is brighter, hopefully I'll have more chance of someone seeing it instead of rear-ending me. I bought this off Yahoo Japan, and looking at it, I believe it must be handmade. It's very nicely assembled and looks good. Through-hole components are also unseen these days, it's nice to see. To fit, first, you remove the cover over the lamp. This just sides away from the glass. This is how you would normally change the bulb. The bulb just untwists from the housing. Next, you remove the lamp housing from the tailgate, by removing the two bolts. Once removed, I used a thin flat blade screwdriver to carefully pry out the two tabs holding the lens into place. It was easiest to carefully pry between the black housing and the lens The board just slips into place It's a tight fit against the reflector and I believe it should be retained in place by the lens clips. If not, I'll need to remove the light and secure the board with some glue. You can just make out the grid of LEDs through the lens The wiring is in two parts. The first is the base of a bulb with two wires sticking out of it. This plugs into where the bulb would normally be. This then needs to plug into the two wires that are coming out of the back of the board. Because LEDs are polarised and can only flow electricity one way, it's best to plug it in and test it before fully assembling it, as like me, you might need to swap the two wires over for it to work Once I knew it worked, I carefully tucked the wiring in the housing and reinstalled the bulb holder I then reinstalled the lamp onto the tailgate It seems quite effective. It was very sunny outside, but hopefully it's more visible now. The last thing that arrived in this shipment was something I had been trying to buy for ages, but was loath to spend the price for a new one; a Genuine Suzuki workshop manual for the Alto. I had a saved search on Yahoo Auctions, so as soon as a NOS older version of the manual came up, and confirmed it still supported the turbo models (Works and RS) and was about half the price of a new one, I jumped on it. One of the main reasons I wanted this was to troubleshoot an issue I was having with my keyless entry buttons, which didn't work (Keyless start works, remote locking worked, but the buttons on the doors were all dead). I knew the basics, but need to know the system layout, trouble codes and wiring diagrams. Unfortunately as this disk is old, its support in modern systems is very limited. In the end, I had to build a virtual machine running Windows XP, so I could run OG Internet Explorer (doesn't run in Edge, Chrome, Firefox etc). I did get it running though Yes, it's all in Japanese, so Google Translate gets a real workout, but the information is all there. For my particular issue, I navigated to the correct location in the manual and ran through the troubleshooting guide. Most steps refer to Diagnostic Trouble Codes from the Body Control Manual, something I didn't have. I knew it would have a DTC though as the security light in the cluster was flashing on startup. I tried my OBD scanner, but that wouldn't talk to the BCM. I started looking into all manner of diagnostic tools to run the Suzuki diagnostic software, but in the end, I remembered that for my Swift I had previously had success with a piece of free software called SZ Viewer, which I even still had installed on my tablet. I fired it up, plugged my ELM327 v1.5 cable in and hit connect It connected to all modules and even alerted me to two DTCs in the BCM. Success! I'll look into B150A later, I think that is related to the AC system and isn't causing an issue currently (and isn't lighting a malfunction indicator lamp). B1106 was what I needed to see; there was an issue with the Passengers side antenna circuit. Before now, I didn't even know there was an antenna on the passengers side! Reading the workshop manual, suggested to locate and inspect the antenna. The system overview shows it on the B pillar behind the upper trim (22) Digging deeper, it gave specific details If what I found there didn't fix it, there were a few more steps to follow I pulled back the B pillar trim and found the wires running up the B pillar I gave them a wiggle and heard the distinctive sound of the plastic head of a plug rattling freely in the pillar That'll do it then, it's not even plugged in! A quick peek behind the upper trim shows the antenna in place, but the connector wasn't looking to flash Some jiggery pokery with a set of needlenose pliers allowed me to remove the antenna from the two clips holding it in place. This confirmed the part of the connector that should latch to the plug was completely missing. There is some "damage/modification" to the B pillar trim in the area, so suspect it got damaged during cage install and never fixed. That ain't nothing a ziptie can't fix though Once clipped back into place, I shut all the doors and pressed the button on the drivers door. "beep" *clunk* - All the doors locked and the mirrors folded in. I tested all the buttons and all worked perfectly. Very happy with that fix. I might have stumbled on that wire by accident at some point, but the manual and SZ Viewer were the real heroes here. Now that all the nice clean hands stuff was done, there were two jobs left for the day. I jacked the car up and put it on four stands. The first job under the car was to drain a small amount of gearbox oil, and add some Redline friction modifier to hopefully help the Cusco LSD be a bit more civilized when it's cold. At the moment it clunks, bangs, binds and sounds like the axles are in bits. I know this is normal to a degree, but it'd be nice if it was slightly lessened. I drained off some fluid, and using a syringe added a minimum recommended amount of additive, 30mls (or 1oz). I don't want to over dose the oil and risk the LSD slipping too much and not working. A quick drive (including some tight circles in a carpark) shows it might be a little better already, but I need to get the additive cycled around the box a bit, so tomorrow's drive to work will be interesting. Finally, I wanted to give all the brakes a quick flush. I know for compliance the pads were replaced with RDA Phantom Ceramic pads (the same I'm running in the Jazz), and the fluid looks clean, but I wasn't sure if they had also bled the rear brakes. A quick vac with the bleeder, and now I can have a bit more confidence knowing it's done. The old fluid wasn't worrying, so maybe it had been done. So for now, until a couple of other specific parts arrive from Japan through the local dealer, that's all I have for it. Next Monday will be the little nuggets first outing on the track, so I'm both excited and nervous about that. Hopefully, it all goes well, and I can beat some of the times I put down in the Jazz last year. We'll see.
-
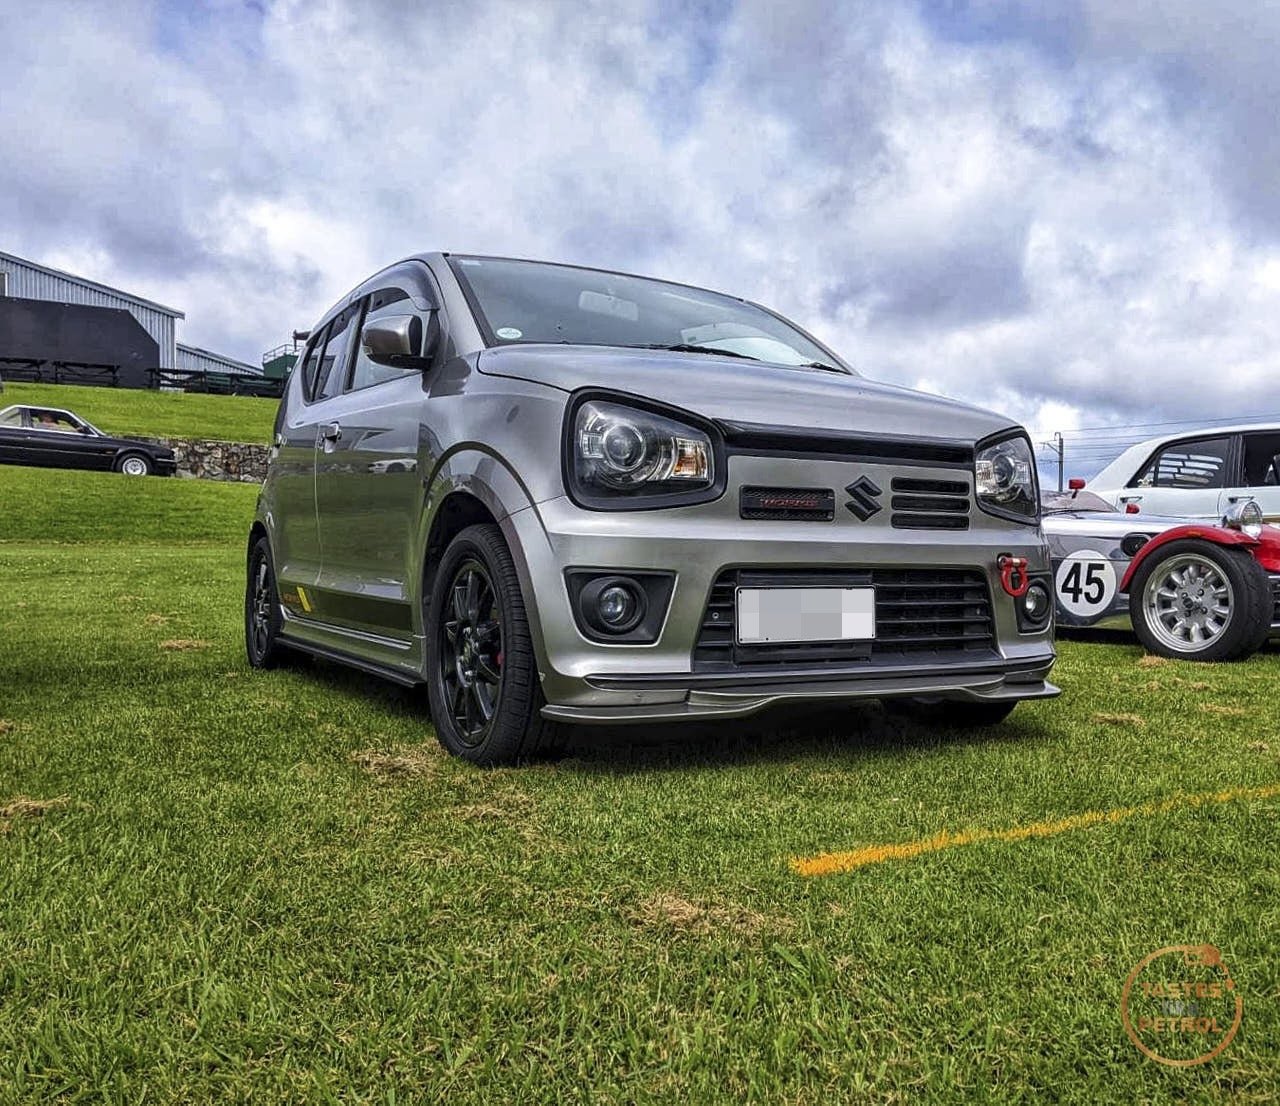
Took the angry little nugget to Cars and Coffee today. Got heaps of attention. Love it when people pass me trying to work out what it is, since it's devoid of badges on the back.
- 81 replies
-
- 14
-
-
Good luck, mine nearly bankrupted me by the end. Great cars but let down by years of bad owners when they were "cheap" and now most are suffering. Was it the black one you bought?