kws
-
Posts
3710 -
Joined
-
Last visited
-
Days Won
3
Everything posted by kws
-
Touching up rust repairs. Currently it's being protected by weld through zinc primer. I need to use some filler and then epoxy primer and some 1k paint. Do I do it like this, Zinc - epoxy - filler - epoxy - paint Or Zinc - filler - epoxy - paint Cheers
-
I tried some finessing with a hammer and dolly, and got it around 10x better than it was
- 158 replies
-
- 12
-

-

Going a full circle into a Marina again. KwS's 1973 Morris Marina Coupe.
kws replied to kws's topic in Projects and Build Ups
Did more cutting, hitting, welding and grinding today to fill the holes. Not 100% happy, there is a high point here, where the patch is joined to the original guard. Not sure if i had the guard out of alignment or something warped when welding (likely the former). Not sure how to fix it, but im thinking cut the join, hammer it all back into alignment, weld up again?- 62 replies
-
- 19
-
-
God damn that thing sounds glorious on the track. Shame about the water pump ending things early. Its probably been brought up before, but could you change to something like a Davies Craig EWP instead of the Toyota one?
-
Oh man a RWD M16A from a Swift Sport would be awesome. Plenty of power, enough torque, and love to be revved. ZC31S are being scrapped pretty often now, even at PAP. The only problem with modern engines like that is the ECU and immobilisers and stuff. The Swift immobiliser is linked to the ECU, so cant operate without all those gubbins. Not like wiring a 4AGE or MX5 engine.
-
Everyone thinks the company/dealer in NZ is the bad guy, but knowing the margins in NZ on things like keys, the "problem" is the overseas overlord. Yes, locksmiths can sell for much less, but having also had both a genuine and a locksmith "knockoff" keys in my hands, there is a reason they are cheaper. If you dont care and its to get you from A to B, then that is a fine option.
-
What a load of bullshit. So anything i dont like the price of, I can just take them to court and get it cheaper because "the sum of the components is less than the complete part"? He should be thankful he has a Toyota and not a Euro.
-
Thanks, I didnt think it'd be a problem but I sometimes overlook the obvious, so a sanity check is good. The very early UK Marinas ran a hardline under the radiator in the same place, but changed the pipe from the tank to the other side of the car later down the track.
-
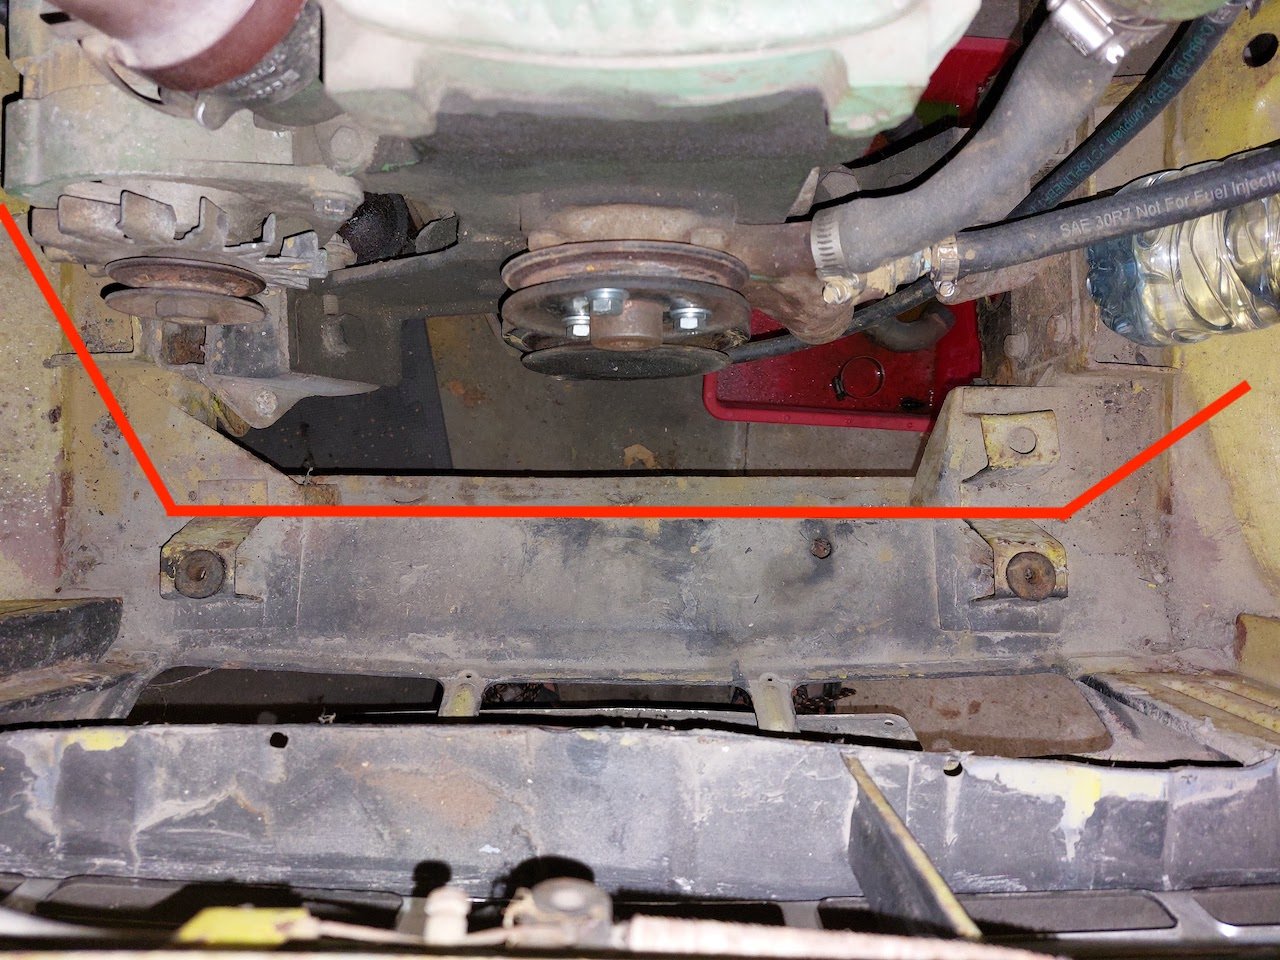
is there any reason why i couldn't/shouldn't run a 1/4" fuel hose where the red line is (secured with P clips), under the radiator, across to the other side (RH side of photo) where an electric fuel pump will be mounted? Currently there is a mechanical fuel pump under the alternator and the fuel hose crosses the front of the sump under the crank pulley to get to the carb.

-
Going a full circle into a Marina again. KwS's 1973 Morris Marina Coupe.
kws replied to kws's topic in Projects and Build Ups
Got the new outer sill welded in today. Looks good.- 62 replies
-
- 29
-
-
Going a full circle into a Marina again. KwS's 1973 Morris Marina Coupe.
kws replied to kws's topic in Projects and Build Ups
Wow, it's almost been a year since Part 1, this project really has been on the back burner. To be fair, a lot of other projects have come and gone in the meantime, and one in particular (not naming names, Lucas) has taken up months of my time, space and money. That has sucked, when all I want is to drive the Marina. Well, its a new year, so Happy New Year and all that, and 2023 is the year the Marina will be back on the road for the first time since about 1996. Anyway, it appears I missed an update. Months ago, back in May 2022 or so, I did actually move onto the Drivers side floor, starting with chopping the whole damn thing out. I decided on this side that instead of doing smaller patches, I would just replace the biggest sections I could. This was the right choice, it's so much easier. Just as a note, this side has the fuel and brake pipes running under it, so I used a block of wood to space these off the floor so I wouldn't cut or heat them. I started making up some patches Everything got a good going over with the flappy wheel of death, and the first patch was started. There were dozens of holes to plug weld to the underfloor supports. After much plug welding, the first patch was welded in The sill patch followed. More plug welds, and welding to the inner sill. This had a couple of different angles I needed to match, as the floor slopes upwards at the rear. I was obviously happy about having some progress after a couple of months of nothing A month or so later, the final patch was welded into place A grinder and paint made me the welder I ain't And with that, the RH side was seam sealed. I still had some touch-ups to do on the LH side, so that hasn't been sealed yet. I did this months ago, so it's pretty dirty now, like the rest of the car. There we have it, the floors are more or less done. Due to all the other projects needing work, this was left untouched for a couple more months, until finally, I had nothing else in the garage and dug deep to find some motivation. It was finally time to address the rather perforated LH sill, as it was never going to pass a WOF in that state. I had been putting this job off because it's a big lump of pretty serious work. It needs to be strong, and it needs to look tidy. It was daunting. I purchased a sill panel months ago from a seller down south that custom makes them on professional rollers, so at least I don't need to try and make my own panel. My workplace is on a shutdown over the Christmas period, so what better time to get off my butt and get chopping? And that's just what I did. First, the LH door has to come off. This is easy, six nuts on the hinges and the whole lot comes off. Not even a single cable to remove from the door. Thankfully the A-pillar area is in PERFECT condition. I have seen some shockers in the UK for rust here. I got out the air saw and started the cut. I used some spare box section to brace the door aperture, just in case. I needed to keep that first top step so I could weld the new sill to it. Opening the sill up showed just how crusty it was. It was packed with rust flakes I vacuumed the chunks out so I could see what I was working with The air saw once again made short work of the bottom of the sill I then used a combo of a sharp dill bit, a flap disk, a grinding disk and a flatblade screwdriver to break all the spot welds for the lip that was still attached. I used a flap disc to take that paint off and expose the spot weld locations, which I then drilled until there was a definite indent. I then finished it off with the grinding disk, until I could lever the strip with the screwdriver and break the spot weld. Some of the factory spot welds were... a bit askew, and barely on the inner sill at all. I do have one of those fancy spot weld cutters, but it's shite. No matter how much I punch or drill first, the damn thing just wanders all over the place instead of cutting around the spot weld. The inner sill looks worse than it is. There was a hole at the very end, and I found another weak spot that failed the poky-poky-screwdriver test. The rest of the sill faired well and is just covered in surface rust and some pitting. I started with the small hole near the seatbelt anchor bolt. I cut the area out And then decided the pitting to the right of the hole was looking at me funny, so cut that out too An appropriate size patch was made up and welded in (excuse the shiny photo, this was after I had covered everything in Brunox) As you can see above, the rear of the sill was also cut out. I chose to overlap this on the jacking point, for some extra strength. Before wrapping up for the night I wire brushed everything and gave it a couple coats of Brunox, which is an epoxy rust killer. I'll tell you what, once set it's like brown stuff on a blanket, really hard to get off. A couple of days later, I set off to the garage with a plan; Cut the bottom of the rear quarter panel off so I could access the inner sill step, which I would need access to when I weld the new outer sill on. For once I was smart, I thought "hey normally I just cut and away I go, but today, I will grind back all the paint so I have a nice clean surface to work with around the cut". It didn't go to plan. I started grinding away and immediately struck bog. Lots of bog. Damn. As it turns out, the whole lower area ahead of the arch was made of bog Even the arch "lip" was bog This wasn't your usual repair, using something to back the bog where there is a hole. Oh no, this was "stuff the hole with bog until it's solid". In the middle of the circle, someone had torn a hole, folded the edges back and filled it with handfuls of bog (you could see it looking down inside the inner guard, I missed it the first time though). Something had hit the arch, bent it in, and left a nice dent. Instead of fixing it properly, that's what they had done. Initially, my brain just fell to bits, my whole plan was derailed and my toys weren't in the cot anymore. Eventually, there was nothing else for it; get cutting. I dug the rest of the bog out, cleaned a bigger area of the panel back, marked a couple of lines and got cutting. Inside, it wasn't bad. The arch lip was bent and twisted But the rest of the area was fine. The damage is mostly contained to the small section of guard that I removed The piece I removed was pretty ugly I don't know how yet, but somehow I have to remake that, including the arch section missing from that piece. It might look basic, but it's got a couple of different angles and a body line in the middle of it. Guess it's time to watch some more YouTube. Otherwise, removing the small section at the bottom of the guard did give the access I was hoping for The plan now was to keep moving, and doing what I had intended to do; fix the inner sill and fit the new outer sill. Once that's fitted I can work on the missing section of guard. As a quick morale booster, I offered up the new outer sill to see how it fits It looks like it should fit quite nicely with some trimming. I welded in a new section for the rear of the inner sill, and make a little piece to replace the upper stepped section I had to remove due to rust And that's where I have ended for today. I gave everything a coat of weld-through zinc primer, and the next step is to make the outer sill fit properly, and weld it in place. It would be exciting if it weren't for the rest of the work that still needs to be done. As they say, it's got to get worse before it can get better. I hope it gets better. God I hate bodywork.- 62 replies
-
- 27
-
-
Just when you think this thread couldn't get better
-
Going a full circle into a Marina again. KwS's 1973 Morris Marina Coupe.
kws replied to kws's topic in Projects and Build Ups
Right, with Lucas finally out of the dog house/garage, it was time to give the Marina some love. More to follow, but its finally happening. Its sill replacement time.- 62 replies
-
- 19
-
-

-
Great threads, I have really enjoyed reading both of them. Im really feeling some similarities between how you and I work, much ADHD scope creep
-
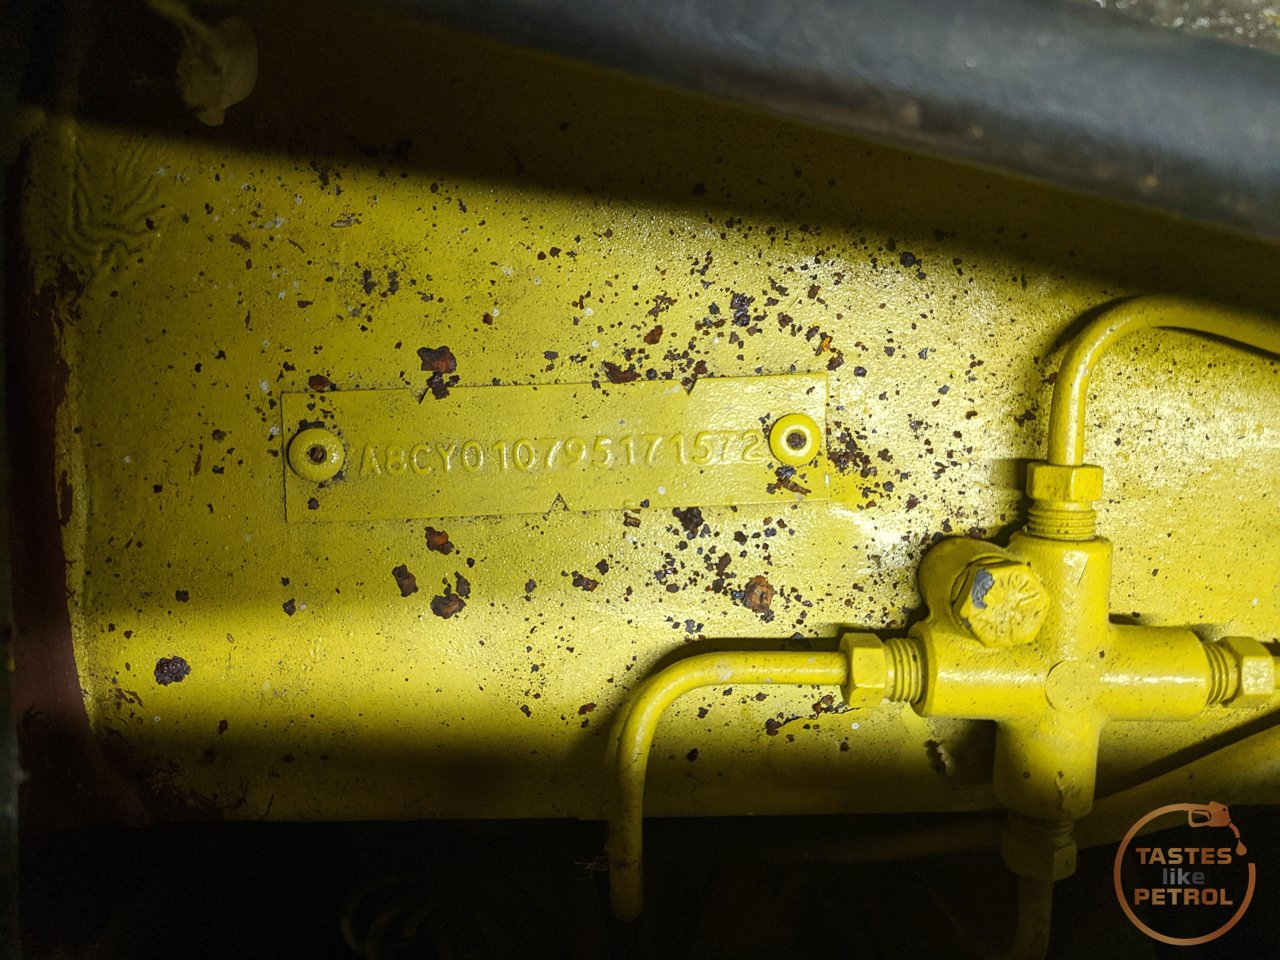
The whole car will visually be dodgy thanks to the previous owners attempt at painting it, but mechanically and structurally it'll be sound. I guess i'll give a WOF a punt and see what happens. Its easy to read, but i guess if they fail it for being painted I need to drop into VTNZ and get a new tag made?
-
Does it matter if a previous owner has painted over my VIN plate? Doesnt look tampered with, and has been there since about 1995, but was painted at some point along with various other bits under the bonnet. Plates are on hold, so it's just for a WOF.
-
Congrats the wof, must be a great feeling after being off the road!
-
Discuss here about Yoeddynz's little Imp project...
kws replied to yoeddynz's topic in Project Discussion
"functional" welds or not, those headers are a work of art. Well done -
Drove the car to work again today. Dont even care about economy, its great to drive. Smiles per mile and all that.
- 173 replies
-
- 12
-
-
I'd be far happier with those sort of figures. The advantage the disco has is that it's running the hotwire injection, while the old analogue flapper injection I'm running is obviously like throwing a fuel can on a bonfire for fuelling.
-
They're all weekend cars, so get used fairly spiritedly. This one does appear to be running rich though and im not sure why. Checked a plug on each bank and both look the same; white/pale brown strap but jet black ring. Unfortunately i set the goal of the Marina being on the road before Speeduino gets installed, so thats a while off yet, so may have to actually work out whats going wrong with the Flapper EFI.
-
Its pretty bad, but not that much different in economy from all my other SD1s, so one must presume its my driving thats causing most of it. Speeduino should help, as the Lucas/Bosch system is quite primitive and has zero learning ability. It doesnt smell particularly rich, but ill pull a plug out and see what it says.
-
KwS is back in an SD1 again, because of course.
kws replied to kws's topic in Projects and Build Ups
The time had come to take Lucas on his longest voyage in years (and the longest drive in my ownership, basically doubling the mileage I had done on the old engine), it was time to go to work. As I have previously said, the goal was to drive the 60 odd KM round trip to and from work today, as it was our work Christmas party and there was a "bring your weird car to work" sort of small car show planned. After all the work that had been done, I wasn't 100% confident in the car, as I haven't had any real time to shake it down, but it was doing it anyway. I always have this imposter syndrome that makes it hard to trust any work I have done, even if I know I've done it properly. The day before, I gave the car a good wash, and finally got around to replacing the old faded center caps on the wheels. I'm not sure how or why, but in the space of a couple of years (I have photos of the car from various years) the center caps had gone from being nice right red, to this horrible faded yellow The plastic domes on the caps had badly yellowed, but the red decal behind the dome had also faded to silver. I pulled all the plastic domes off a while ago, as the silver centers looked slightly better But it was always missing that pop of red. I bought some replacement caps from Rimmers a while ago, at great cost, and finally sorted it last night. The old caps were in good condition other than that... To remove them, without taking the wheel off, I first tapped them in the downward direction with a soft face hammer, and then gently tapped a small thin flatblade into the junction between the cap and wheel. This popped them off easily and without damage. The new caps press into the center of the wheel. Of course, I aligned the cap with the tyre valve, for that extra fanciness. Much better So, that takes us today, and the drive to work. I left slightly early to try and beat the worst of the traffic (failed). Lucas fired up nicely and we were off. I'll tell you what, I shouldn't have been worried. Lucas performed flawlessly. Temperatures were rock solid, and I could hear the viscous fan cut in and out as needed. Oil pressure was solid, 30psi at cruise and 15psi idling in traffic, I can live with that. Even the wipers, which are best described as lethargic at best, worked perfectly on the wet screen and did a good job of clearing without too much juddering. Interestingly the "intermittent" setting was just a constant wipe in the morning, but intermittent on the drive home. Typical Lucas. There was a slight whiff of coolant each time I would take a sharp corner. Not 100% sure about the cause of that, but as it was in the interior I suspect there might be a weep from the heater core. Otherwise, the drive to work was great. The car was planted, cornered well and the suspension felt good. The trans shifted smoothly, albeit a little eager to get into top gear. So, the engine. It's a beast. From a stop, the car isn't what you would call fast. It accelerates well enough, but it feels like the auto trans is sapping some of the power; where it really shines is in gear acceleration and pulling up hills. In gear, even top (3rd), if you give it a poke of the throttle the speedo goes up, without changing gear, or having to rev high. It gains speed without much fuss. If you drop it into second, it gives you a good increase in velocity. Climbing hills was a surprise. There is one fairly long and steep hill on the way to work, which it more or less idled up and would happily accelerate if I wanted it to. I recall the same hill requiring quite a few more RPM in Effie, which had the high comp 3.5 EFI engine. This engine loves to work at lower RPM, but isn't afraid of some revs if needed. It works quite nicely with the auto for that lazy, effortless, wafting-along feeling; Exactly what an SD1 should be to me. I had some positive reactions to the car on my drive, which is always fun. Kids seem to get a kick out of seeing it, which I guess isn't a surprise when all they are used to seeing on the road are wheeled whiteware in various shades of boring. Lucas got me to work in perfect 80s comfort, window down, blasting some Kiss from the cassette player (albeit via adaptor to my phone). It was a good way to commute. The car show was a bit of a bust, some people wussed out because it was raining that morning, and others just didn't bother. That left three of us bringing in our unusual cars. There was Lucas; a 1992 Mercedes E320, which made Lucas look quite small in comparison And one of my team brought his 1986 Mitsubishi Mirage Geneva. Great little car this one and a real time capsule. This one even has a sweet digital dash. So that was that. I had some good feedback from others at work (and the usual "geez I'm surprised you made it" and "do you get tired of crossing your fingers as you drive?" jokes). I would've liked to see a proper little display, with more cars, but it is what it is. Not only did Lucas get me to work, but he even got me home again. Once again, perfect drive, even in crawling traffic. The only real surprise was at the gas station on the way home. I wanted to fill up straight away so I could gauge how (un)economical the trip to work was. 22.9L/100KM. 10.3MPG It's not great Maybe I should stop gunning it everywhere just to hear the exhaust. Nah.- 30 replies
-
- 34
-
-
-
KwS is back in an SD1 again, because of course.
kws replied to kws's topic in Projects and Build Ups
Woah what a week it's been! I have spent almost every night (Thursday was rest day) in the garage until well past my bedtime working on Lucas, trying to make sure I was on track. Right, so we left off with the basic 3.9 in the car, but nothing attached to it. My first goal this week was to get the crank pulley on, but before I could do that I needed to strip it down and fit the trigger wheel for the Speeduino crank sensor (just some "futureproofing"). This is the original SD1/EFI pulley. Since I converted to the original V-Belt front end I couldn't use the 3.9 Serpentine pulley. This is what a bad crank seal can do to the pulley. The hardened, almost plastic, seal can wear into the metal. I will keep an eye on the seal and if it leaks I will either need to source another pulley, or fit a Speedi-Sleeve, which is a thin tube of steel that goes over the damaged surface to give the seal something to seal against. A quick zip with the rattlegun removed the three bolts Because it worked, I am replicating the same install that Effie had, with the trigger wheel (the same 6 bolt 36-1 2.5mm thick trigger wheel from Lloyd Specialist Developments) mounted between the balancer and the PS pulley, so I slipped the rear section of the pulley off This allows the trigger wheel to slip on. I have marked the same spot I aligned Effies pulley to A+ reference material Before it can be fitted, you need to hammer down the roll pin that locates the pulley The trigger wheel should now fit flush And the rear pulley can now be bolted back on Compared to the Serp pulley, it's quite different. They're the same basic length in terms of pulley alignment, but the snout on the Serp one is much shorter to account for the crank driven oil pump. The crank pulley bolt is 15/16", if anyone was wondering Now, this is where it's interesting. I had done a lot of research and asked around, and as best I could tell I needed a crank spacer, so I paid a hefty amount to get one from Rimmers. The spacer goes on after the pulley, and allows the crank bolt to secure the pulley if the crank end is too long (otherwise if you did the bolt up without it, it would only touch the end of the crank and not the pulley). This example image shows the spacer. It's just a thick ring of steel. Long story short, I didn't need it. My pulley fit perfectly, and the bolt secured the pulley against the end of the crank. Oh well, I love paying lots for surplus parts. So, yes, the pulley was then slipped into place Where it promptly fouled on the timing pointer. I remember this from Effie, and the fix is to file the mounting area down to about where the orange line is, to clear the now slightly offset rear pulley. I refit the modified pointer and did the main crank bolt up to about 6 ugga duggas. Next I thought, "oh, let's install the power steering pump bracket". Nope. Should've done that BEFORE fitting the pulley. So I undid the pulley bolt again, slid the pulley forward enough to get the bolt in and secured the bracket. The lower bolt on the front needs to be spaced away as it's used to having the TDC sensor bracket mounted on it. I tried to do this with washers, but in the end just smashed out the old sensor and mounted the bracket. I think this time I might end up modifying this bracket to work with the Speeduino crank sensor as it's quite a neat little mount, instead of making. my own bracket again With that little segue done, it was time to get messy, swap out the valley gasket and install the intake manifold. First I had to split the manifold from the trumpet base, so I could clean it all up. This proved to be harder than expected, and I had to use a chisel to carefully separate them. With the trumpet base off my plan was to just replace the main feed and return hoses, and the injector seals I removed the rail and injectors The old hoses weren't looking too hot. They weren't leaking though. The return to the regulator had a somewhat clever attachment, as in it almost wasn't attached It had deformed the hose too Regulator with new hoses. I tested the regulator and it held vacuum, so that's a win. I removed the injector clamps, taking care to only poke my finger with a pick once. Use said finger poker to carefully lever the big rubber upper seals out of the housing as it'll be corroded in there. I replaced the two hoses that link the pair of rails The old seals look pretty gross I used a sharp knife to carefully cut them off. The lower seals were stuck in the manifold, and hard as plastic. A few of them were quite deformed too. I hadn't originally planned to replace the hoses on the injectors as they weren't leaking and didn't appear cracked (not like the ones on Effie), but upon closer inspection, there were fine cracks in the rubber As it turns out, the inner layer of the hose had basically turned to plastic and crumbled when cut. Don't presume the hoses are OK just from a quick glance. Thankfully I bought a kit from Mr Injector in the UK that came with new seals, hoses and the retaining ferrules (the metal cup at the base of the hose). I set about cutting off the old hoses and ferrule. The instructions are very strict that you must not use a knife to cut the hose off, so in the end I used a combo of "aviation" snips and side cutters. I got it down to a fine art, and took only a matter of seconds to strip the hoses off. I would use the snips held upright to cut vertically through the ferrule, which would usually take two snips do, then use the side cutters to twist the cut ferrule out. I would then use the side cutters to munch horizontally at the bottom 1/4 of the hose, until it was damaged enough that I could push sideways on the top of the hose where it would rip through the cut section and come off. The new hose and ferrule are straightforward to fit. Slip the ferrule on, dip the end of the new hose in fresh engine oil, and push it onto the injector, using a hard surface to push against and force the hose into the cup of the ferrule. That locks the hose into place. Injectors with fresh new hoses Now the new upper seals can be fitted. Don't be like me, and for the second time, forget to put the upper retaining plate over the injectors first. Thankfully I remembered before the first seal dropped into its groove. You cannot fit this plate with the seal in place. Lube the seals with some rubber grease and slip them into the groove I cleaned the corrosion off the bases with a wire brush in the drill, and loosely fitted them, along with new lower injector seals. Next, it was time to clean the manifold up. I removed all the old sealant and wire-brushed the under intake coolant pipe. Speaking of, I had bought a nice new, remade, stainless pipe in anticipation of this job, only to find it's not needed. I think someone has been here before as the pipe fitted is in good shape, and made of a thick-walled steel pipe. With the intake cleaned up, I moved to the valley gasket. There aren't many photos of this because when refitting I was against the clock to get the manifold back on before the sealant went off. I removed the old one and promptly directed it to the nearest bin. Like the heads, the valley is coated in a layer of burnt-on oil. No sludge though, and the cam appeared visually ok (some wear but had lobes and the discolouration wasn't abnormal, it'll do for now). The new gasket and inlet manifold went on easily enough Starting to look like an engine again, with the injector rail fitted too The intake was promptly covered in a rag to stop anything falling down the holes, and then I used my engine brace to lift the engine for the sump gasket replacement. I recall commenting when I did the sump gasket on the Tess, how much easier it would be with an engine brace, and I can confirm, it's much easier. Yes, I had replaced the sump gasket when the engine was out. I purchased a new nice cork gasket from Rimmers, and when fitted, it split in one corner almost straight away (with the bolts gently nipped up by hand), and overnight had split in a further 3 or 4 places. I ordered a replacement gasket locally, which was supplied as a Permaseal gasket. This was slightly thicker than the unbranded Rimmers one, and had a better shape. With the sump off you could see how the seal was spat out. Most of the seal was destroyed removing it from the sealant though, and by golly that was not a fun job, scraping sealant off the bottom of the engine, under the car. I did check the bolt holes in the sump when it was off last time, but didn't really check the flange for straightness, which I should have. Whether this contributed to the seal failure, or it was just a rubbish seal, we will never know. Using a straightedge, you can see how the flange dips down. It was like this the whole way around. Using the tried and true rag and grips method (rag to protect flange surface, grips to pull flange up), I gradually tweaked the flange as straight as I could. There is still a dip in places, but it's only about a mm. I then used Hylomar to stick the new gasket on Which then made its way to the underside of the engine. The bolts were all nipped up by hand, with no splits in the gasket. While under there, I reinstalled the torque converter bolts, and cover plate. I also removed, cleaned and installed the oil lever sensor with a new washer and some thread sealer. With the sump on again, I could put oil in it, which meant only one thing; priming the oil pump. I reinstalled the SD1 distributor (the 3.9 one doesn't have the oil pump drive; I might look into if I can fit an oil pump drive to it as the ignition curve might be more suited to the engine) and connected the ground temporarily. I turned the key, and nothing happened. Ah, I forgot to plug in the main loom. I tried again, and had the sweet sounds of the engine turning over on the starter. After a few turns the oil light went out, and I could see fresh oil coming from the rocker gear Great success! I did have a fail though... even after doing the same thing with Effie, I forgot how much transmission fluid the trans can pump out of disconnected cooling hoses. Knowing the oil pump worked was great. All it took was packing the pump with Vaseline so it wouldn't suck up air. Before I could drop the car down to the ground again I needed to sort the exhaust. I dug the original EFI exhaust manifolds out of storage, only to find they were the same as the ones already on the car. Regardless, the studs were in better shape, so after running a die down the threads on the studs and cleaning the flanges, they are the ones I used. The downpipes weren't looking as good. One of them had a leak that I knew about. It was in a crack in a weld, and since I have a welder, I quickly ground it back and hit it with the welder. That area to the left wasn't looking happy either, so I quickly made up a plate, and hid it from sight. It's not pretty, but it'll work. These downpipes are a bit of a mess really, and would benefit from being replaced with some nice long tube headers. There is also a hole in the bottom of the Y joint in the main mid section, which sounded like a tractor last time the car was running, but with it installed in the car I would only blow a bunch of holes in it with the welder, so that will be fixed when the exhaust comes out to fit the wideband O2 sensor bung. In the meantime, I wrapped it in exhaust tape and put a clamp around it. The manifolds were installed with new gaskets and sealant The downpipes could then be wiggled into place. For the first time in a few days, the car was lowered back onto its wheels. Sweet positive camber yo. This brings us to today. Now it was a case of putting the top of the engine back together. First was to install the new valve covers, since everything goes on top of them. These are the original EFI covers, painted in black wrinkle. New stainless hardware to fit them Much better than the gross old ones The power steering pump went on next. As I had been advised, it was a lot easier to install without the pulley on the front. Just like Effie, I spaced the pump back from the bracket with one washer on each bolt; this brings the pulley into alignment with the crank again (which was pushed back due to the trigger wheel) On the other side, the alternator bracket was next to be fitted. This was almost straight forward, except one of the bolt holes in the head was bigger than the old heads. I had a spare bolt that fit (new on the top, old under it) As the new bolt had a larger diameter it no longer fit through the hole in the bracket. A 10mm drill made short work of that problem. And bracket in place, with new coolant hose beneath it Getting there. The power steering pump was finished off, with the pulley and belt fitted. It was refilled with ATF. Moving up top again, the trumpet base was cleaned thoroughly, and refitted with a smear of Hylomar on the flange. This allowed me to run the wiring that lives under the intake, and tidy everything up under there. The plenum top could be fitted I don't know why, but it really triggers me when people run the wiring harness under the throttle mech, instead of over it, on the platform designed for it. I think all my SD1s except my first one, have had the wiring run like that. I fixed it on Lucas, so now its how it should be Finally, the rest of the engine bay could be assembled. I removed the transmission oil cooler, and re-routed the cooling lines into the radiator as they should be. So, what does that mean? IT'S STARTING TIME. I checked everything was connected, made sure the oil level was good, and that the power steering had oil. Then I connected the battery and turned the key. It didn't start. I noticed it backfired into the intake a couple of times, so suspected the distributor was 180 degrees out. I removed it, spun it around and refitted it. And turned the key. It's alive! I only ran it for a short time as there was no coolant in the system, but it ran well and ran quietly. I filled the cooling system up, and then ran the car to bleed the system. When the engine was at operating temp, I checked and topped the transmission up, set the idle speed, and set the timing to approx 10 degrees on the timing light. The engine runs really well, it idles nicely, and really shows how loud the old engine was at idle, this one is just so quiet. The oil pressure isn't amazing, I didn't expect it to be, but it's within the "good" range when warm, of 15psi at idle and 30psi driving. It was slow to come up when cold, but I'll see how it is tomorrow, since maybe it was only due to the first start. As long as it has pressure, and is quiet, that's enough for me. After it burnt off a bunch of stuff and filled the garage with smoke (from the engine bay, not the exhaust; the exhaust is perfectly clear, with no signs of smoke) I took it out in the rain for a quick test. It's hard to judge because of the rain, but acceleration seemed quite rapid, when it wasn't fighting for traction. The engine is turbine smooth, and revs well. I'm looking forward to the weather clearing and seeing what Lucas can do now. Job done. One week from engine out, to driving. Now to shake it down and see if it makes it to work on Wednesday (60km round trip in traffic) for the Christmas party.- 30 replies
-
- 43
-
-
-
Ditto, except with a label maker. I still haven't quite worked out how to make a weld "hotter",if it's speed or voltage.