

Brennan
-
Posts
659 -
Joined
-
Last visited
-
Days Won
1
Everything posted by Brennan
-
Take it to the garage behind Z on pioneer. He's pretty relaxed compared to vtnz.
-

Palmerston North Monthly Meet - Tuesday 21st Jan 7:00pm
Brennan replied to Sparkle's topic in Lower North Island Region
Was. Until he asked about who did the crack test on the struts. And apparently they need a certificate in crack testing to do it. Hopefully fieldair can sort it Monday. -
Palmerston North Monthly Meet - Tuesday 21st Jan 7:00pm
Brennan replied to Sparkle's topic in Lower North Island Region
So this happened. Cert still isn't finished. Getting worried. Untitled by Beamse70, on Flickr -
Looking good! Doesn't look like it would need to be lowered much. If it was me I would carefully cut the springs. You should be able to get it a little lower, without making the springs uncaptive. And lowering blocks for the back? Allowed up to 2inch ones legally. Did you find out where the nuts came from?
-
Thought I would do a small "how to" for Ae86/Ke70 Coilovers, to share some knowledge. Since this style of Strut is becoming pretty common in projects on here. This should also work for others, Cressida etc. Dont hold me to anything i type on here, this is my experience to the best of my memory. Double check all measurements etc 1. First of all you will need to pick which companies coilover “kit” you want to use. I decided to go with Powered by MAX in the end as I had some pretty good first hand feedback from people using them on there Corolla. I was also seriously considering these XYZ coilovers, before i decided on MAX. 2. Because I was buying them for a later model ke70 that has the same chassis as a AE86 but smaller non-vented brakes. I thought I would start with Gx71 Cressida struts. These are the same if not bigger than Ae86 Struts and have vented brakes like the Ae86 but are much easier to find and cheaper. 1983 Ke70 VS 1986 Gx71?? 3. Once I had these and the Max Coilovers. Using Clints handy diagram that i checked with my certifier. I then marked 60mm on the strut I then cut them off with a drop saw. I’m sure an angle grinder would work if your careful. After this you can remove all the paint of the strut ready for welding. 5. For this step you will want to pay somebody who is decent with a welder, to TIG them together. (Apparently it does not have to be done by somebody who is certified.) The certified engineer I used, welded right around the base of the Coilover tube, and then did 4 plug welds towards the top. 6. Once this has been completed you will want to get them crack tested. After I had already had them tested and painted. I found out that this MUST now be done by a certified Crack tester. Somebody who has the Certificate ANSI level 2 CBIP or equivalent. The only place in Palmerston North that has this is FieldAir, the aeroplane engineers at the airport. There must be others around the country. 7. Once painted you will have a fully adjustable Coilover, hopefully something like this? or better? Note: If you want to used the larger gx71 Cressida Struts on your Ae86/Ke70, you will need to also purchase some of Techno Toy Tuning’s hybrid Steering Knuckles and Roll Centre Adjusters. As the bolt spacing is a little larger on the cressida.
- 1 reply
-
- 5
-

-
Palmerston North Monthly Meet - Tuesday 21st Jan 7:00pm
Brennan replied to Sparkle's topic in Lower North Island Region
No Mitchy haha Passed Certification today!! One step closer to making it to the meet. just need to wait for the cert plate to arrive after the paper work is finished. -
Palmerston North Monthly Meet - Tuesday 21st Jan 7:00pm
Brennan replied to Sparkle's topic in Lower North Island Region
yes! corolla should be well drivable by then! if not, i shall cry. -
Wow so cool. Didn't even know they existed. Bolt on fender flares and super low?? Definitely advan a3a or impul g5 hoshino?! For that ultimate 80s vibe? I like the hood vents too haha
-
My flat mate drove his ss ute back from Auckland to palmy not realising it had a 6th gear. Nice mark 2! A 3sge/3sgte would slot in there quite nicely I think
-
Brennan's Toyota Corolla Beams 3sge Ke70
Brennan replied to Brennan's topic in Projects and Build Ups
These only arrived in the country on Saturday. Flew through Customs this morning. And were at my house by 2pm in Palmy. Top service from DHL Had them fitted by 3pm Fitted rear seat back in. Ready for cert Recheck, hopefully early next week. -
Brennan's, ke70 Corolla, 3sge Beams powered.
Brennan replied to Brennan's topic in Project Discussion
Must be speakers, i think. -
Brennan's, ke70 Corolla, 3sge Beams powered.
Brennan replied to Brennan's topic in Project Discussion
there is 4 wires all up. will have to test them but i have a feeling it is a left and right indicator, just not sure why they are there. -
Brennan's Toyota Corolla Beams 3sge Ke70
Brennan replied to Brennan's topic in Projects and Build Ups
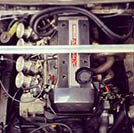
Sadly it dosnt look like she will be certed and cruising before the end of her 30th BirthYear. Been cleaning small things up recently. Painting bits and pieces. While waiting for the replacement brake calipers to show up from summit. Finally got the email today. A whole month after i ordered them. They have left Summit! Pulled the old purple window Tint off today. Also dyed the back seat, the vomit with corn and carrot colour it was before, didnt quite work. Was this Now this Looks soo good. I see the container from Stacked inc in Japan is ready to ship, hopefully containing 4x of my goodies. And a package coming from England containing a pair of goodies. Also does anybody know what these two plugs in the boot would be? Till next time, Merry Xmas and a happy new year xx -
5km faster than the speedo or slower? You would probably want to pick a tyre size similar to that then. The smaller the diameter of the tyre, the quicker the acceleration will be. But you will be sitting at a higher RPM when at 100km/h. The larger the outer diameter it will take longer to get to 100kmh but when you get there it will be much more comfortable cruising at 100kmh. in saying that, these have lower profile/smaller diameter tyres, so cant be to bad. Diff ratios also play a large role too though haha
-
What tyres were on it before? Was the speedo fairly accurate with those tyres?
-
The bottom ones would be a bit more functional? Haha
-
Sweet. How/where did you track down the nuts?
-
Is that the cylinder wall damaged? I brought mine from T parts too. And ran like shit / only made 96kw on its first dyno. Have adjusted the throttle bodies to get it running a bit better since then though. Flares are looking sweet though!
-
External visor? I wouldn't. Should only be on pre 58 Chevys in my opinion haha, your car though. Concentrate on getting those wheels fitted
-
Brennan's Toyota Corolla Beams 3sge Ke70
Brennan replied to Brennan's topic in Projects and Build Ups
Painted the tank guard satin black today and fitted it properly. Pretty happy with the result. -
Brennan's Toyota Corolla Beams 3sge Ke70
Brennan replied to Brennan's topic in Projects and Build Ups
Got the petrol tank bash guard back. Fits nice and snug. has two metal straps at the other end to help hold it up. Will paint it satin black tomorrow as i feel the alloy drop tank look doesn't work with the rest of the car. That was the last thing left for certification. Now just need to wait for the new callipers to show up -
The Thread O.D is 51.75mm Thread height 1.6-1.7ish Total height of the body is about 250mm, not including the shaft.
-
Intake looks sweet! Can't wait to see this out on a track.
-
Brennan's, ke70 Corolla, 3sge Beams powered.
Brennan replied to Brennan's topic in Project Discussion
Was aware of them, seem to be semi difficult to get a hold of. That modification would turn them into a 2way clutch type lsd? or similar? They seem to not make aftermarket lsd's for my ratio, just the higher ratio's. did find this though, http://www.ringpinion.com/b2c/ProductDetails.aspx?ProdID=2959&Product=AG_545016&Brand=Auburn_Gear_&ShowAA=True&Year=1986&Model=240&DriveType=Rear%20Diff%20-%20RWD&DiffId=119&Source=DiffWizard Is a clutch type when open and locked when you flick the switch. Will wait till winter or beyond before i look into them further. -
Brennan's Toyota Corolla Beams 3sge Ke70
Brennan replied to Brennan's topic in Projects and Build Ups
Long time no update. Sad times. Picture less update. Volvo calipers were a bit rooted pitted pistons etc. so have brought new calipers from the USA. Factory replacements, Cressida for the front and Volvo for the back. Was going to be 12days before they could even post them. So counting down. Not long now hopefully. Petrol tank bash guard is halfway there. Just needs some welds and figure out how to mount it. Hopefully it doesn't look too homo, as it's pretty visible. Other than that everything else is ticked off the certification to do list. Doesn't look like there will be any New Years road trip in the corolla though
