

slacker.cam
-
Posts
558 -
Joined
-
Last visited
Content Type
Forums
Downloads
Events
Gallery
Everything posted by slacker.cam
-

Cam's Toyota AE86 Trueno Racecar
slacker.cam replied to slacker.cam's topic in Projects and Build Ups
Need a break from this for a bit. More to come later. -
Cam's Toyota AE86 Trueno Racecar
slacker.cam replied to slacker.cam's topic in Projects and Build Ups
Set the ignition timing. Managed to ground each plug with some jumper leads and some wire. This way we could crank the motor with no plugs and have them sparking so we could set the timing. I want to make up a plate with some old plugs screwed into it to make this job easier for next time. Here's me gazing over it thinking about what I had forgotten before we kicked it in the guts After deciding we were good go James gave it a crank and we got a whole series of pops and bangs. Some out the exhaust, some out the intake. None where they were supposed to be. FUCK. Turns out the the timing was 360deg out to start with. Whoever set up the CAS when the Link was installed didn't RTFM apparently. Pulled the CAS out and turned it 180deg and jammed it back in the hole. Gave it another crank and this happened! Cheers to Ned for the Vide. Jeah. I was a happy man. Idled quite nicely when it came up to temp. The carbs were well out of balance from being off the motor though. Called it a night and went home happy as. -
Cam's Toyota AE86 Trueno Racecar
slacker.cam replied to slacker.cam's topic in Projects and Build Ups
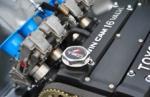
The next night I made this sweet little coolant pipe to fit with my modified water lines from the back of the head. It's a million times better than the previous setup. I really like Supercheaps selection of random radiator and heater hoses, they pretty much always have something that you can make work. And installed: I slipped the cam belt on to the cam pulleys and gave it a few turns by hand before tightening up the tensioner for the last time. Things just didn't look right at all and after scratching my head for a few minutes I realised what had gone wrong. Tony had accidentally timed the cams the wrong way around! So the inlet was opening before the exhaust. This is due to him being used to working on his Louts motor that has the cams on opposite sides of the head. Legitimate mistake. Luckily I realised before going to start it. So out came the dial gauge to sort things out: Finished painting the exhaust. I got the extractors sand blasted as it's impossible to get into the gaps with a wire wheel. I only have a few photos of this part. Before: After. Excuse the white balance in this shot. The lights at work make my camera shit itself. Extractors painted in high temp 'aluminium' paint by 3M. This is really good paint for something that comes out of a rattle can. The rear section was painted with the same stuff. Installed. I really like this shot. -
Cam's Toyota AE86 Trueno Racecar
slacker.cam replied to slacker.cam's topic in Projects and Build Ups
Finally it was time to bolt it down proper! Dad came and gave me a hand to put the head on and tidy things up. By this stage the pre-trackday panic was starting to set in. 'Water pump' housing on and block/pistons cleaned and ready to go: Head on and cams in. Finally! The old man bolting the carbs up: Modified FPR with gauge to check that it's working correctly: Not far away from running now: -
Cam's Toyota AE86 Trueno Racecar
slacker.cam replied to slacker.cam's topic in Projects and Build Ups
Aight so back to getting the damn engine running. The last post about the engine was me measuring the valve clearances and figuring out what shims I was going to need. Turns out I'm a moron and that by doing it with the head sitting on a towel the valves had picked up random strands of cotton and thrown all of my measurements off So I removed all of the towel bits and did it the right way: Finally started getting positive clearances on all valves by juggling around the shims I had. As the valves have been ground quite a lot the shims I need are pretty thin. Managed to get 6 shims from Toyota which cost something stupid like $115 and that was at cost price (the guy at Toyota on Lincoln road is a GC btw). Two shims I needed were unavailable from Toyota so Tony gave them a grind for me. While I was there I picked up the modified Holley fuel pressure regulator. One shim was still not right so I got that ground locally by Glendene Engine Reconditioners. They were nice enough guys but I disapprove of charging $40 to grind one shim when half the time was him scratching his head about how to do it. Took the car up to Tonys and bolted the head down with the old head gasket to time the cams. I hadn't done this before so having Tony to give me a hand was a huge help! We machined nicks into the bottom pulley to mark the centreline of each cam. By aligning these marks up with TDC and using the dial gauge it is easy to set/check the cam timing without a degree wheel. Head on: Timing it up: Checked the piston-valve clearance while we were at it too and it's heaps. -
Cam's Toyota AE86 Trueno Racecar
slacker.cam replied to slacker.cam's topic in Projects and Build Ups
Here's a few more random bits and peices that I did. Modified radiator support bar back from powdercoating. Got a plastic clip for the bonnet bar thingy from Tama Autos. Removed unused bracketry. Spotweld drills are awesome. Drilled speedholes in the radiator fan mounts and gave them a tidy up. There's plenty more speedholes to come -
Cam's Toyota AE86 Trueno Racecar
slacker.cam replied to slacker.cam's topic in Projects and Build Ups
Installed the rack with new urathane bushes from Stocks. The D-shaped one is not correct in these kits so I had to cut a section out of it. It still works fine, but it's not ideal. I think AJPS in Aussie has had a new kit made that only he stocks with the correct parts if anyone is keen to do this. I reckon it came up pretty good All bolted in. It was a mission to get this in place with all of the suspension still hanging there. If I was to do it again I'd probably remove the struts or maybe just the sway bar to make life easier. I left the UJ disconnected until I set up the alignment. -
Cam's Toyota AE86 Trueno Racecar
slacker.cam replied to slacker.cam's topic in Projects and Build Ups
Finishing off the manual steer conversion: So I've already posted pics of the crossmember after it came back from powdercoating and the old and rusty steering rack. The next step was to remove the old crossmember and steering rack (all of the PS lines and pump had already been removed. I supported the engine in a less than ideal manner and dropped the crossmember. Followed by the steering column. This must be changed too as the PS racks are taller so the lower segment of the steering column doesn't reach the UJ on the manual steer rack. Luckily I have spares of all this stuff. Column gone: Sayonara. Stripped the spare rack. Degreased everything. New Rack ends. Bead blasted the UJ and the housing. Painted the steel segement of the housing and the UJ with high temp paint then reassembled it all: Did the same with the replacement steering column. Stripped and everything cleaned. Bead blasted the housing and painted it in the silver exhaust paint that I had (I really like that paint). All bearings regreased. And then jammed it all back together. -
Cam's Toyota AE86 Trueno Racecar
slacker.cam replied to slacker.cam's topic in Projects and Build Ups
Ok it's been way too long since I've updated this thread. Got too busy before trackday... So I wanted to do a bit've a write up on the zinc plating process because it's pretty sweet. Tony Lynch has a really nice little electroplating setup at his workshop that's perfect for doing nuts and bolts and other small items. The process you see here is exactly the same in a fully commercial setup, just on a smaller scale. As you all know when you leave steel uncoated it corrodes like a bitch and soon you're part has turned into a pile of rust if it's not protected in some way. There's a heap of different ways to protect the metal like painting, powder coaring and galvanising. Galvanising is the process of coating a metal (generally steel) in zinc which is less prone to corrosion. The zinc acts as a sacrifical anode and protects the steel underneath. The zinc is normally applied via an electroplating process however it can also be applied by dipping the part in a bath of molten zinc (hot dip galvanising) but this is generally used for larger parts such as trailers. In this writeup I'm just talking about zinc plating steel via electroplating. Even though zinc corrodes more slowly than steel it will eventually wear through and after 25 years a lot of the nuts and bolts in the engine bay of my racecar were looking pretty rough. They were still useable but re plating them it gives the car a much more professional look to it. I took the oppourtunity to plate as many fasteners as possible while I had the head off but beware, it's not a quick process. Cleaning and wiring up all of the fasteners takes quite a lot of time and like anything, the better the prep, the better the end result. The process starts with dipping your nuts/bolts/whatever into a heated caustic soda bath which acts as a grease/oil remover. You need to string the fasteners to thin copper wire so you can retrieve them from the bath. Then rinse in water and dip into the muratic acid (hydrochloric acid) bath to remove any zinc plating which is still on the steel. You leave them in here until the fizzing stops which signals the chemical reaction has stopped. This generally only takes about 10 minutes. After these two steps you end up with something like this. You can see how I have wired them up in short strings. There is still some zinc remaining - this will be stripped in the next step. Your parts then need to be bead blasted to remove any remaining zinc or corrosion. This will also remove any remaining grease or oil but it's not ideal for that job. Then it's a quick rinse in water to remove any bead blasting media and then back into the caustic to remove any grease from handling them. Another rinse and then into the galvanic cell. This is where the zinc plating takes place. I'm going to do a shit job of explaining this but basically the solution that the fasteners are submerged in allows zinc ions to travel from the zinc electrodes to the steel parts when an electrical voltage is applied to the system. In the photo you can see the zinc elecrodes attached to the outside of the bath and the steel parts hanging from the bar in the middle. This process takes about half an hour to build up enough zinc on the parts. Then another rinse and a VERY quick dip (only a second or so) in the brightener solution which is just nitruc acid. This removes the 'fluff' from the surface of the parts and makes the final product more shiny. Then a rinse and the final step is to dip them in the gold passivate. This is a very important step as it provides another level of protection and it also makes the final product look good. Brightener on the right, passivate on the left: A final rinse and then the parts must be left to set overnight. The final result looks awesome and while the process is time consuming it's not very difficult. For the batch I photographed above it took about 3 hours from start to finish. Hopefully someone finds this at least midly interesting. Ask questions here if you want! -
Yeah that's a good point. If the terminals are corroded then that could be your issue. Unlikely to be an earthing problem if it jumps all good.
-
It's going to be the battery. They like to die around this time of the year due to cold. Don't bother charging it and/or testing it. Once they're gone, they're gone. Just buy a new one and be happy
-
I agree with this man. First track day i went to in my Silvia was the new short track at Taupo. There was a dude there with a nana as looking p10 with a sr20ve and golly it was quick. Sweet jacking the inside rear wheel about a foot in the air on the first turn. It had mediocre tyres and I think just low springs and he was lapping faster than me.
-
Where are you measuring the voltage? Straight on the battery posts? What voltage do you measure on the battery posts when the car is running? It's one of only 3 things. Battery, alternator, or wiring. We can isolate the problem pretty easily.
-
I may have a clutch fork. I'll have a quick look before work tomorrow. It's a big maybe though but I seem to recall one floating about the place.
-
Right, well I managed to find the box with my crossmembers in it and assuming the internet is telling the truth today then one of them is a proper AE86 T50 one. If I'm free tomorrow night I'll drop you a txt and see if you're around.
-
I'm gunna vote 4A too. Although I've never driven a 7A car before it just seems kinda wrong. Those small flywheel bolts freak me out. If you need a hand with anything let me know man. I'm keen to come and check out your cars at some point.
-
1VAKND trackday & Bike Gang Summit - NI Travel Plans
slacker.cam replied to Snoozin's topic in Upper North Island Region
45 minutes and we're out've here. Today has been the first day that's gone to plan all week. Ready to go! -
Nice work! That's a frikin solid effort. Good luck with getting it started. See you at the track SON.
-
That was a pretty decent skid my friend.
-
Cam's Toyota AE86 Trueno Racecar
slacker.cam replied to slacker.cam's topic in Projects and Build Ups
Today was a very, very good day.... Pv30DV7SV_M I have a trillion photos to go through so when I get some time I'll do a mega update. Stay tuned kiddies. -
I've never sprayed laquer myself - only 2Ks and a bit of base coat clear coat. I personally wouldn't waste my time with laquer. You have to put on like a million thin coats to build up the layer as you have to allow the air to get to it so it can dry. With a 2 pack the reaction that cures it does not require the presence of air so you can put it on a lot thicker. IMO it comes off the gun better and often won't need to be polished afterwards. With laquer you need to polish it a lot to bring the gloss out. The health risks with spraying 2 pot paints are not to be sneezed at however. Ideally you want to have a face shield with a constant supply of fresh air fed to it but this is far too expensive for most DIY guys. I feel that a reasonable compromise is to use a decent 3M respirator with the correct filters, a full suit and gloves. Some manner of glasses/goggles to keep it out of your eyes is a big bonus as they suck up the nasty shit more than any other part of your body. Also note that you must keep your respirator filters in an airtight container and replace them regulary (I think they reccomend 6 months or something). They will suck up the hydrocarbons that are floating around naturally and become useless if they arent kept in an airtight container.
-
The Infamous Auckland Monthly Meet - 17 August
slacker.cam replied to EURON8's topic in Upper North Island Region
I used to have a van with blacked out windows. Was great fun. Spent a great New Years at Maketu in it. It was dubbed the VCU. One high five for the first who guesses what that stands for. Tara - you don't count. Edit to reduce spam content: I'll be there as usual. Probably panicking that my car's not ready for trackday. -
Hey Allan! What do you reckon your chances of making it to trackday with this are? Your trumpets look far superior to mine. Did you do them by hand with Autosol?
-
AUckland meets and rendezvous discussion.
slacker.cam replied to EURON8's topic in Upper North Island Region
I've done a cruise out to Kaiaua before with the Silvia club. Although it's close to a million miles away from where I live, count me in. The fish n chips are pretty darn good from what I remember. Also, +1 for a pub meet at some stage. We'll have to smuggle Chees in somehow -
Auckland Monthly Meet - 20 July - 730pm
slacker.cam replied to EURON8's topic in Upper North Island Region
I'm keen for a pub meet at some stage. I know it's been said that some people find that intimidating but I think it'd be good for a change. I think a weekend, daytime winter meet would be good. Would give people a chance to properly see the cars.

