Roman
-
Posts
7,233 -
Joined
-
Last visited
-
Days Won
39
Everything posted by Roman
-
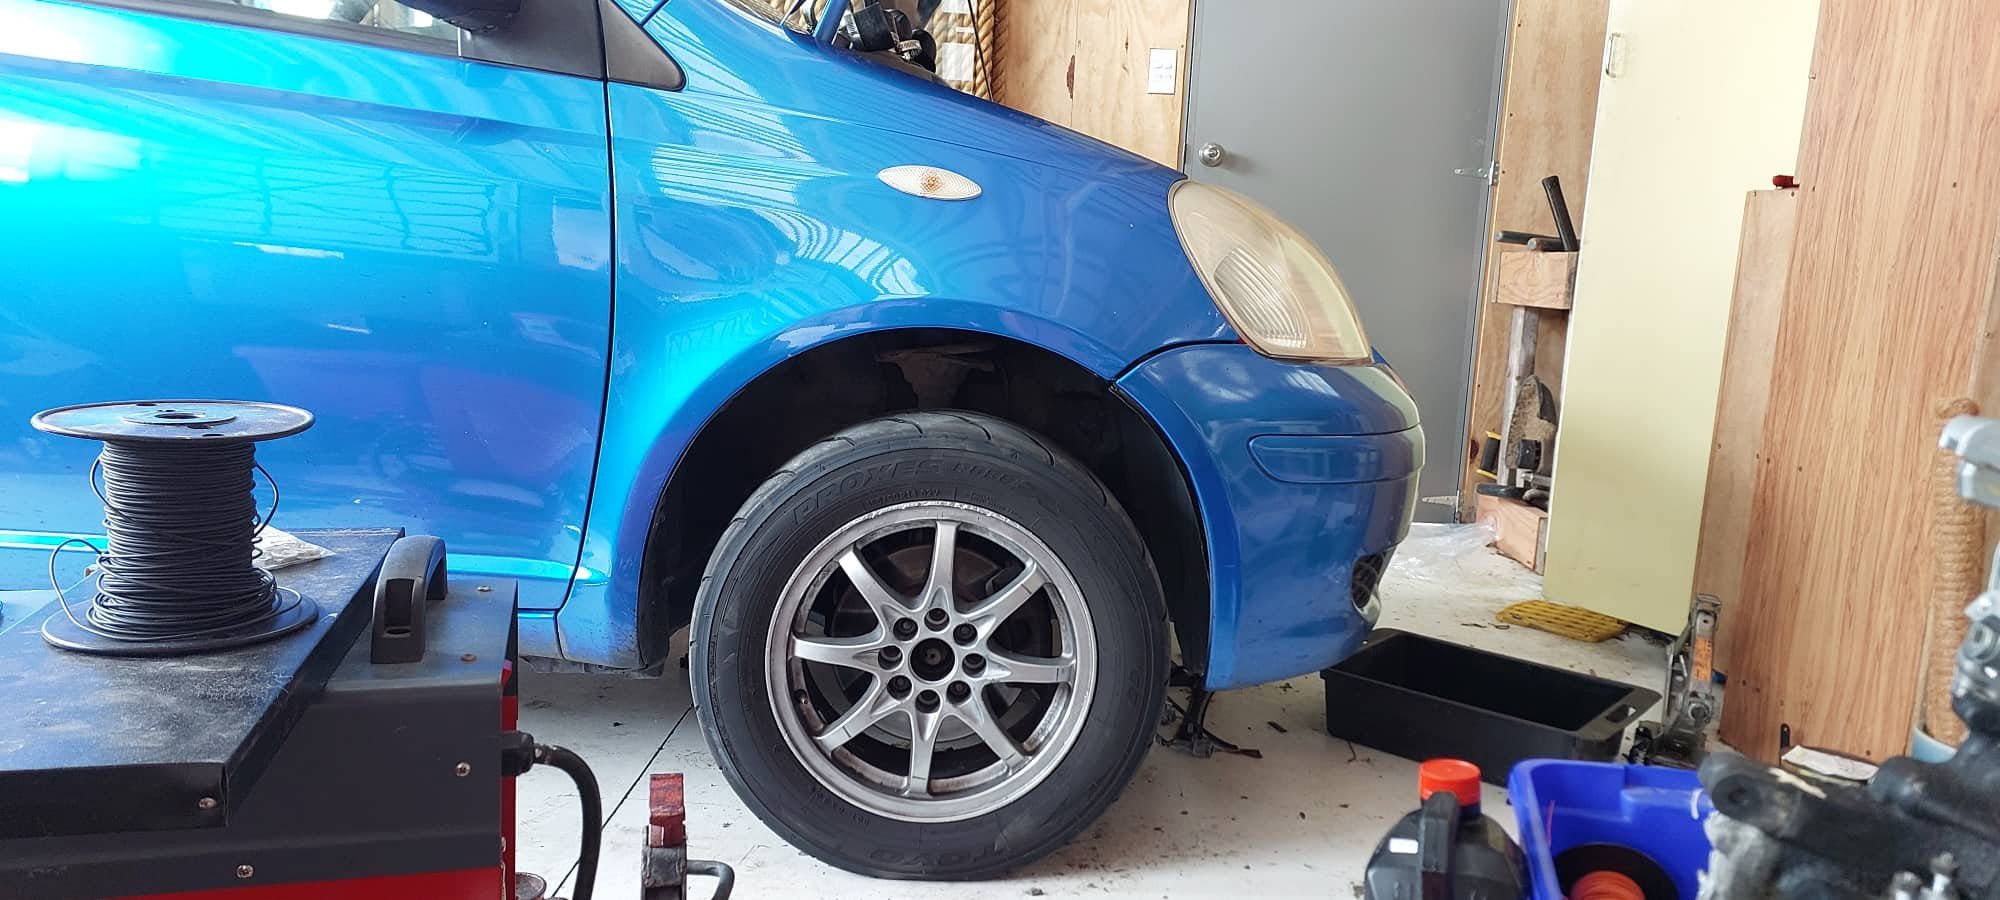
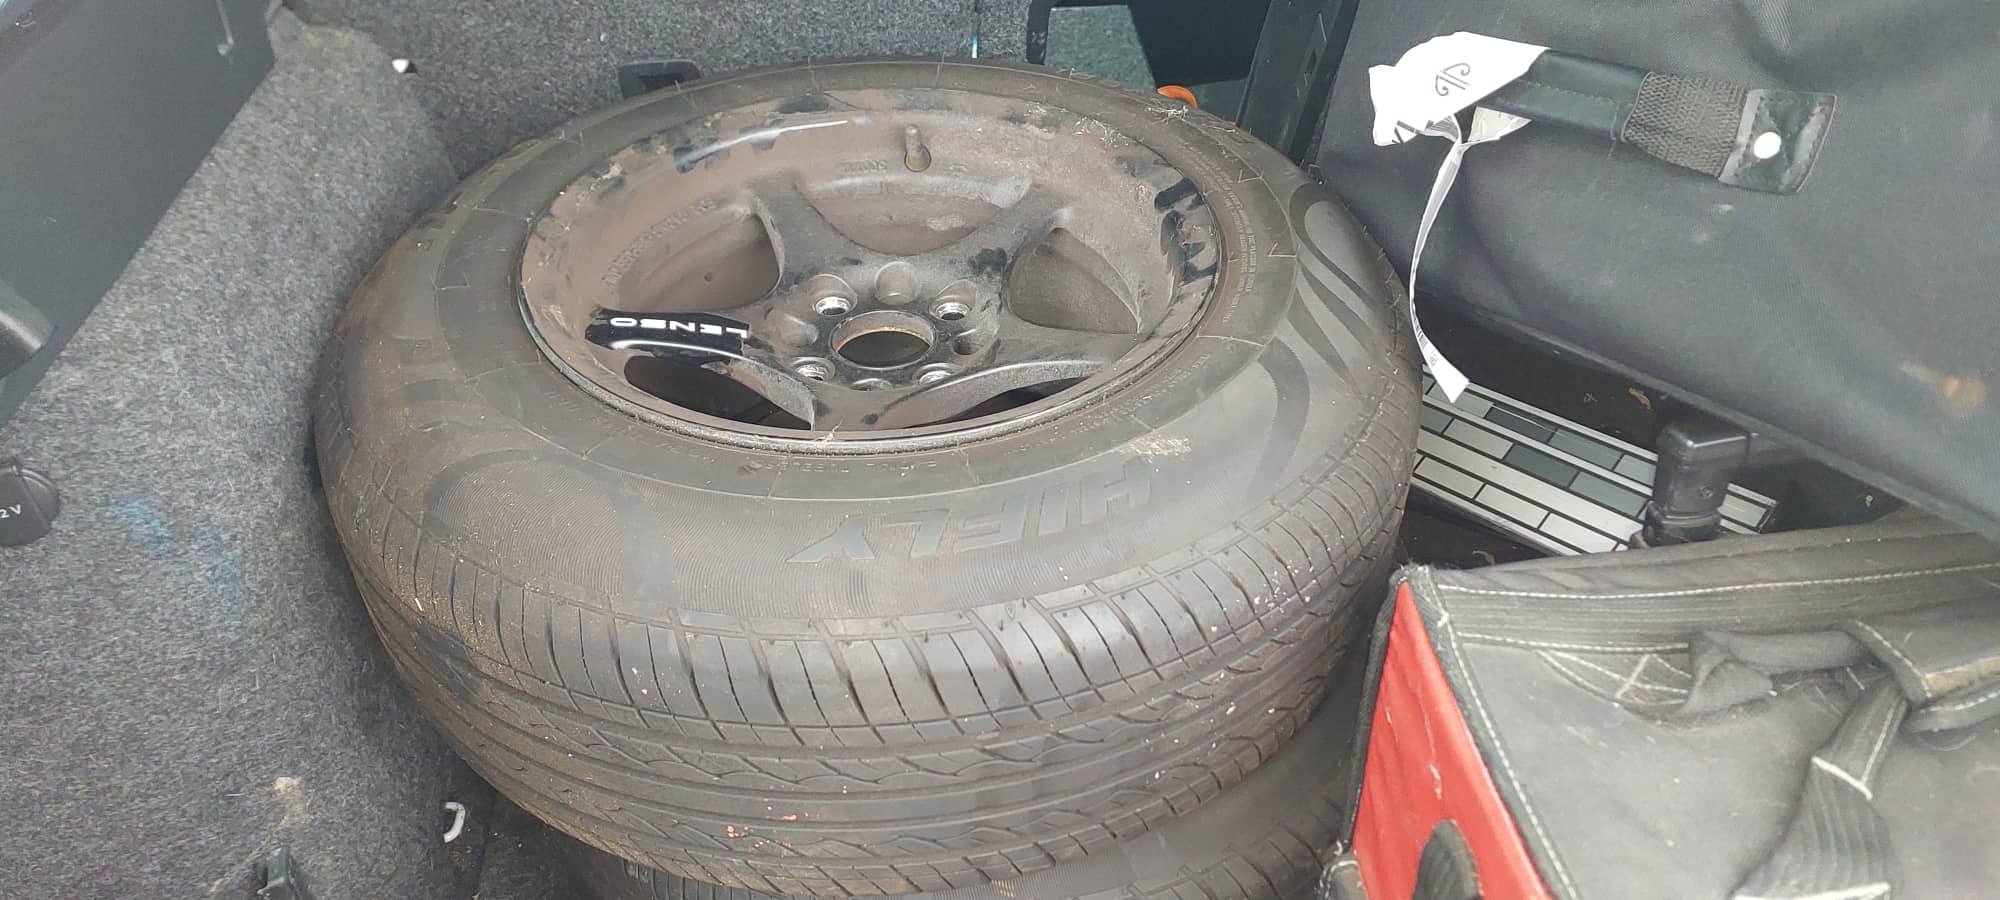
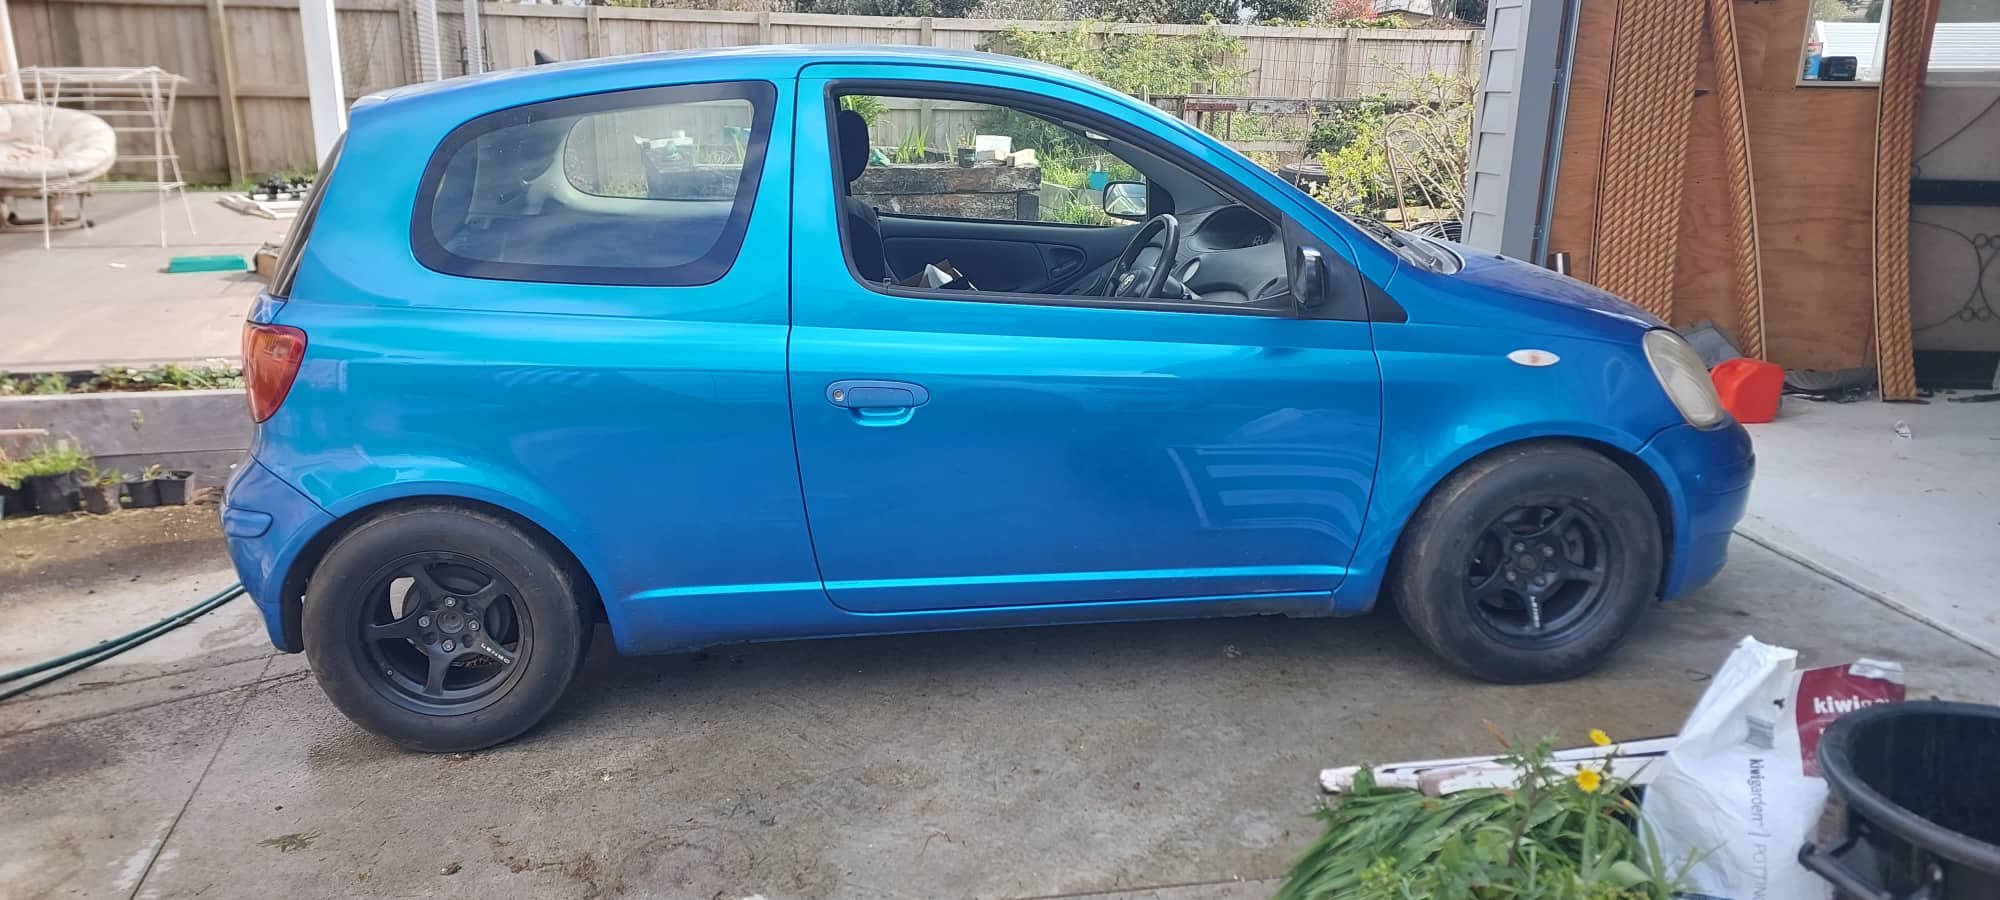
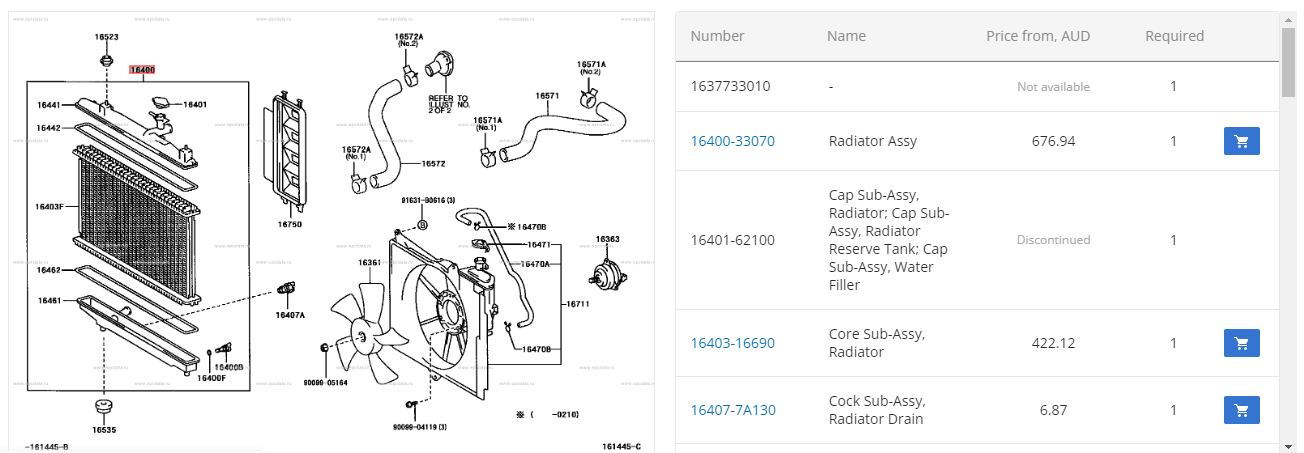
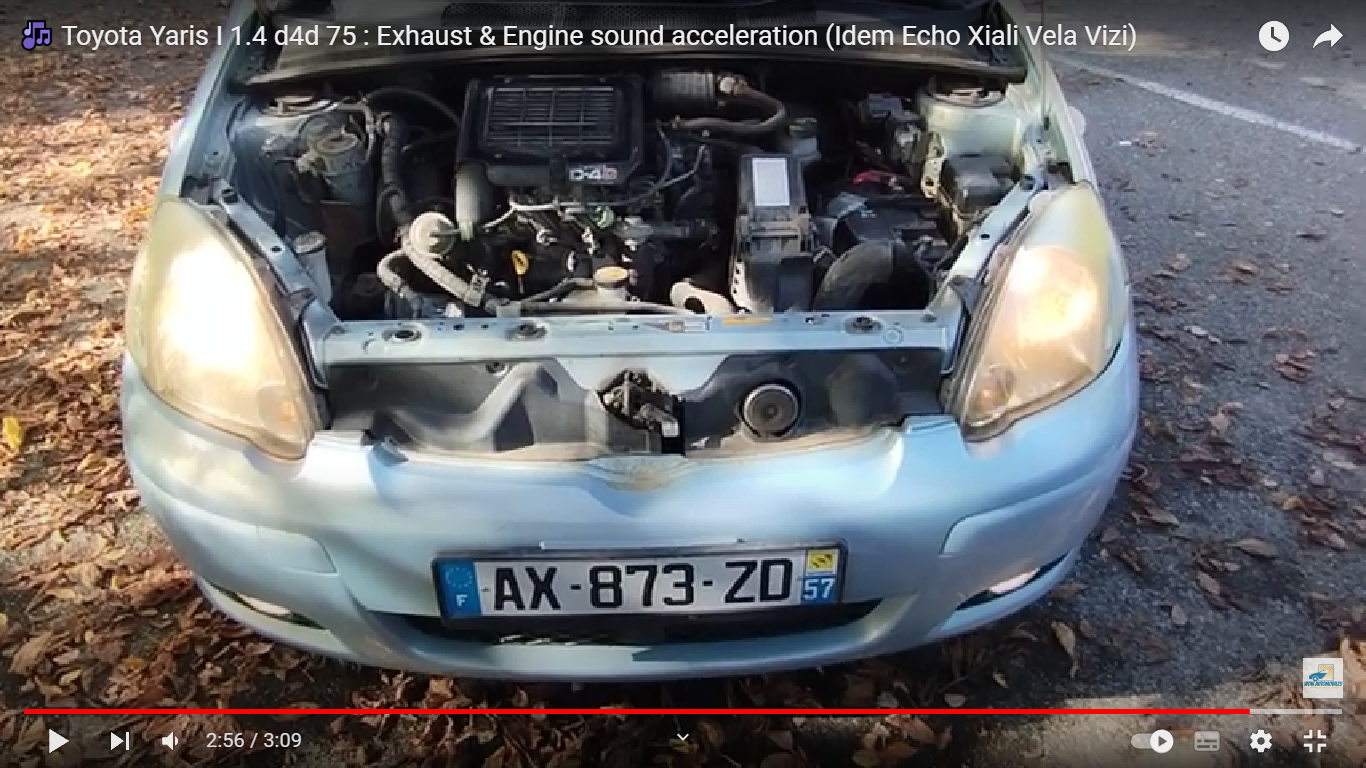
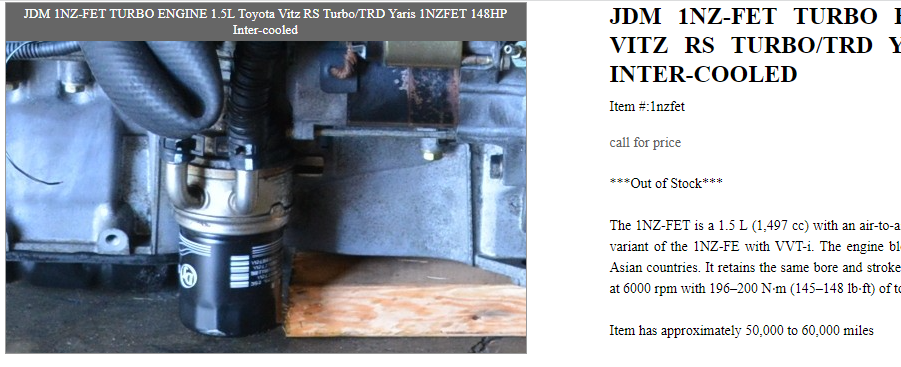
I love that car so much! Mainly because it's simple - Just a near standard 1300 motor, better exhaust, stiff low suspension and just fucking sending it hahaha. Then racing the K11 that is about the same spec. Honestly just looks like incredible fun. I took my car for a VTNZ WOF. With a few amendments that hopefully improved my odds: When you think the jack is still under the car, but it isnt There were a few minor things to fix up. Rear brake imbalance was out, so the drums probably need a dust out. Then replace a windscreen wiper, replace a steering rack boot, fit the front bumper properly, secure a headlight properly. They didnt have any issue with exhaust noise, which is pretty epic considering it's 3" pipe with only a single muffler in it. A real testament to the Adrenalin R muffler design. But it's genuinely not that loud when driving normally. They didnt care about the exhaust valve thingy in it either, probably because it doesnt close currently. Although, I should try connect it up while I've got the plenum on, see if there's enough vacuum to meaningfully pull it closed. Hopefully early next week I'll have time to get these things knocked off, and get have a WOF! I've booked in for the oldschool drags and I cant friggen wait. Best day of the year. (sorry/not sorry for bringing non OS car along) Then also still try get back to the dyno and have a look if any Hampton or Taupo events are coming up. Maybe get back to Pukekohe for another event there too. Also, in some other other news. My second hand 185/60/14 R888R, that I've been driving around on for nearly this entire project. It just blew me away how grippy they were on the track! Ive seen people be super precious about semi slicks, like storing them in black plastic bags, not driving them on the road, etc etc. These tyres have been treated about as poorly as you could in that respect, and were just incredible with some heat in them. I can confirm that I absolutely cannot be fucked trying to wring 3% more grip out of tyres by storing them in bags etc. Anyway! Although my 14x6 Rays Engineering wheels are quite light, and a 185 wide R888R isnt the heaviest thing in the world. Longer term I've wanted to try find a lighter wheel and tyre combo. The plan was to eventually buy a set of 15x7 +35 Advanti Storm S1. These are a cheap-ish wheel that is insanely light because they use some rotational forging or some crap like that. To make the barrel quite thin but really strong. So they are only around 5kg each without tyre which is nuts. However, I've also really liked how the car looks on 13" wheels too, when I've taken it to the drags. This is oldschool forum after all. A problem I've got is that once my drag tyres wear out. I cant get any 13" drag tyres that will fit anymore. Then there's nothing good to do with just a pair of 13" 4x100 wheels... I wonder if anyone else has the same problem? Yes! Another pair turned up for cheap on FB Marketplace, with some balloony looking 185s on. gross. Before committing to purchasing them I figured I'd better test fit on one side with the drag tyres on, and see if I'm going to be able to fit any sort of decent tyre on there with a +25 offset. It's looking surprisingly realistic I think. The rears run a narrower track, so hopefully folding up the inner lip a little bit and it'll not have any issues with tyre rub. The front, not too sure how well it will work yet. I am 100% against any sort of visual modifications to the guards, so hopefully it'll work okay. The 13" Lenso wheel with the drag tyre is only about 11kg combined per corner. Absolutely mental! It'll be heavier with trackday type tyres though, but still crazy light. Initially I was looking to longer term get something like Nankang AR1 which still comes in 13". However I somewhat stumbled into the idea of raiding the used parts bins of the TRS series cars. These cars run a 13" wheel with a Michelen front tyre which is about the equivalent of a 200/52/13 size. I am amid some negotiations to get a set of 4 second hand soft compound slicks that still have some life in them (but beyond the point of usefulness for the series cars) I dont have any tyres yet, maybe this coming week. But I'm fizzing to get some and see how they fit up. Hopefully it works out well. The new tyre size has a smaller rolling diameter than current. It'll have the equivalent effect of changing from the 4.3 final drive ratio, to a 4.6 final. With considerably less effort or $$ needed. The car will also receive some free lowering too. sounds like a win-win to me. Having just been blown away by how much grip the car had with old R888R, I think I'm gonna wee my pants with the grip available from soft compound slicks. In regards to the cooling issues that I've been having. One mystery has always been, where does the TRD turbo car get its wider radiator from??? No other cars seem to have it, but it definitely looks like an OEM part. It's distinctive because it uses a single fan on the radiator, then a second area which just has one way flaps on it. Well the reason I've never seen one, is that they are an OEM part on a Eurotrash NLP10 Yaris diesel model. Which no other region had to suffer through thankfully. As they have all of 70hp or something like that. But this might mean that I can source an NLP10 radiator from somewhere for an okay price, perhaps. Something else interesting specific to the diesel model, and it's extra cooling requirements. Is it's got these shrouding panels in place above the front bumper, that none of the other cars have. So it might be useful to copy this idea, or try buy some of those panels if any exist for a reasonable price. I also found that the TRD turbo car ran an OEM heat exchanger for the oil temp management, from a 3SGTE or similar. So it's cool to know that this fits, I think I've got a few 3SGE ones kicking around. But I'll really need the extra radiator capacity, before adding the burden of oil cooling onto it as well. I really like the idea of having some oil cooling without needing to run any oil lines, only coolant. I cant take credit for the above two discoveries, thanks to Nick from one of the Facebook groups for doing the detective work then showing me. However I'll hopefully be able to put some of this news to good use.

-
What a time to be alive
-
Thats really interesting aye, reach that 4500rpm mark and thats where 70% cant flow enough anymore
-
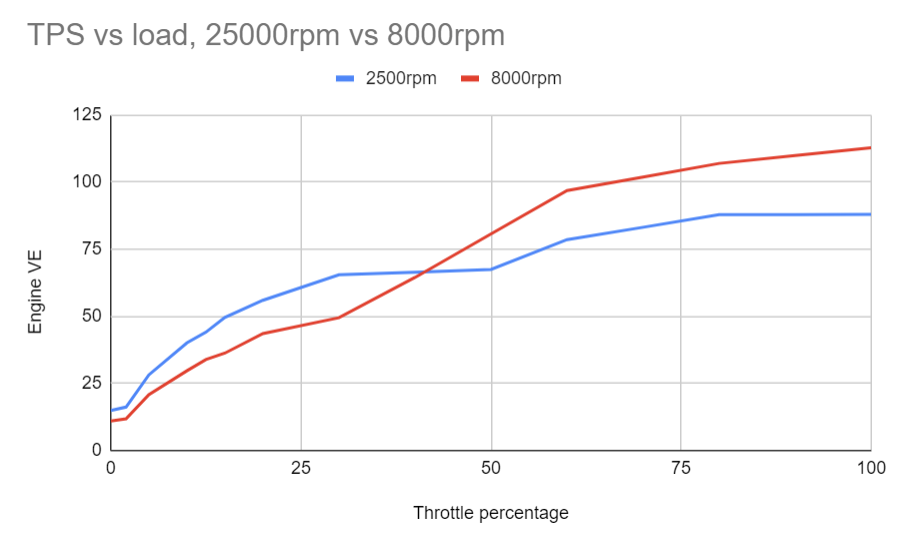
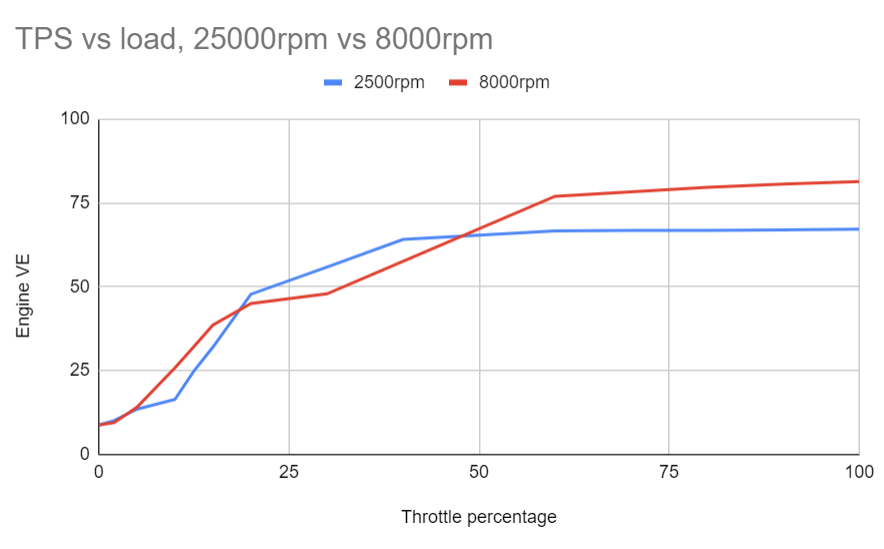
When I had a MAP based tune on my beams motor, (sorry for saying the B word in this thread) I found that I had really inconsistent sort of results at some pressure ranges. So, because I'm a Dave, I plotted some runs at part throttle angles and then referenced back to what the MAP value was. Like so: So at 4000rpm, even 60% throttle as a nearly identical airflow to full throttle - Because MAP only changes once the engines demand exceeds what the throttle can supply. I was very surprised to see that the engine had 75kpa at 20% throttle at low rpm. Got much worse at lower rpm than that. This is why MAF is such a great load axis, just tells you exactly how much airflow there is. On an ITB motor with Alpha N, I dont have a direct comparison however you can look at the shape of the fuel map to get an idea of when the airflow starts being restricted. So at 2500rpm and 8000rpm slices of my fuel map: So using e-throttle you could retune these shapes to make them linear through the rpm range. One advantage of limiting the throttle angle to the range that it's only responsive at, at a given rpm. Is that it actually makes throttle more punchy as you're not travelling through a dead zone where changing throttle angle acheives not much. Here's another datapoint from the same motor, but with the Toyota Aqua manifold on, so it's breathing through a straw on the intake side through a tiny tiny single throttle: It flat lines like crazy even with 2500rpm, haha. My name is Dave, thanks for listening to my story
-
How cool to see a legit Atlantic motor!
-
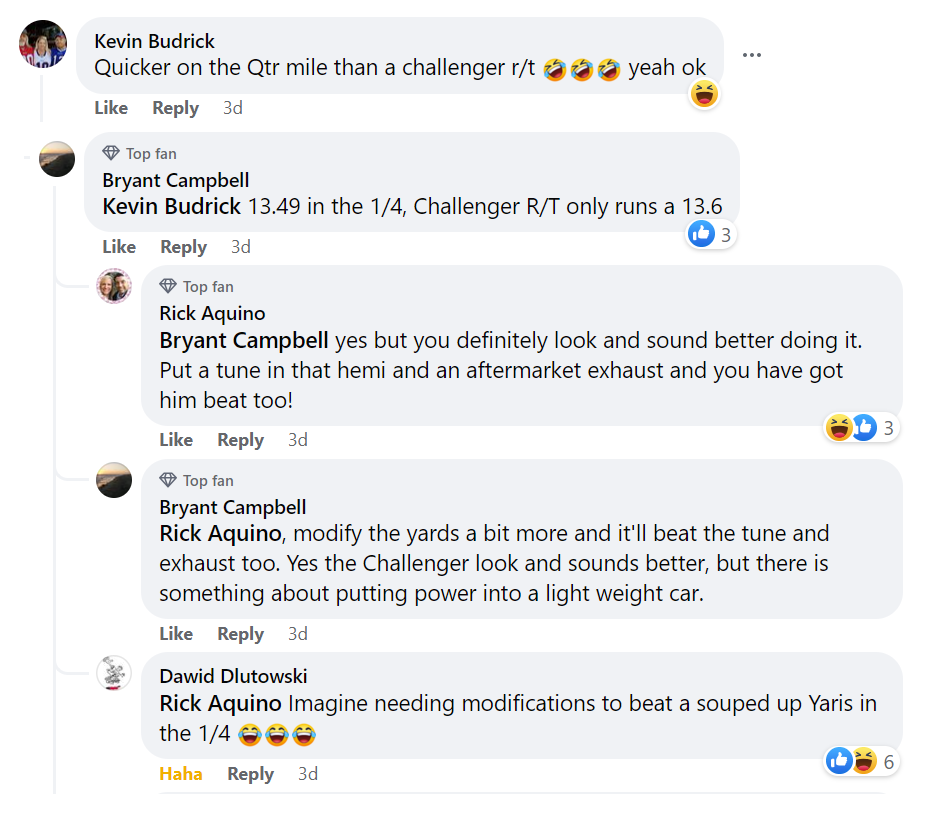
From the article that said on the headline "Quicker than a Dodge Challenger r/t" I've successfully outsourced my trolling and extreme smugness. God bless the internet. haha
-
I've never had issue with plastic top tank radiators in the carina, I think they only go bad once they have zillions of KM on them and maybe with shitty coolant perhaps? Yeah I'll have a look around, I think some people have said that radiator for Scion XA or XB on Ebay is very cheap and fits.
-
Yeah my radiator is pretty crappy, its got lots of bugs stuck in it and bent fins. So just a better radiator would help, but also there's normally a blanking plate beside it to block airflow, which I've left open to let air get to the throttles. Some ducting + replacement standard radiator will probably be fine enough. Dunno about the suspension, yeah I tried not to run the ripple strips too much but I guess the tyre sidewall takes care of it haha. Also, had a few places do a repost of some of my relentless spamming. I feel like I've reached some special milestone of being an internet troll, by making regular people read about toyota echos
-
I would happily lend you drag tyres to put on the back of this to see what it could do. It will be an absolute weapon! Drag tyres reduce shock loads, good for gearbox, you cant afford not to!
-
A few pics came through! Looks pretty slammed during cornering haha
-
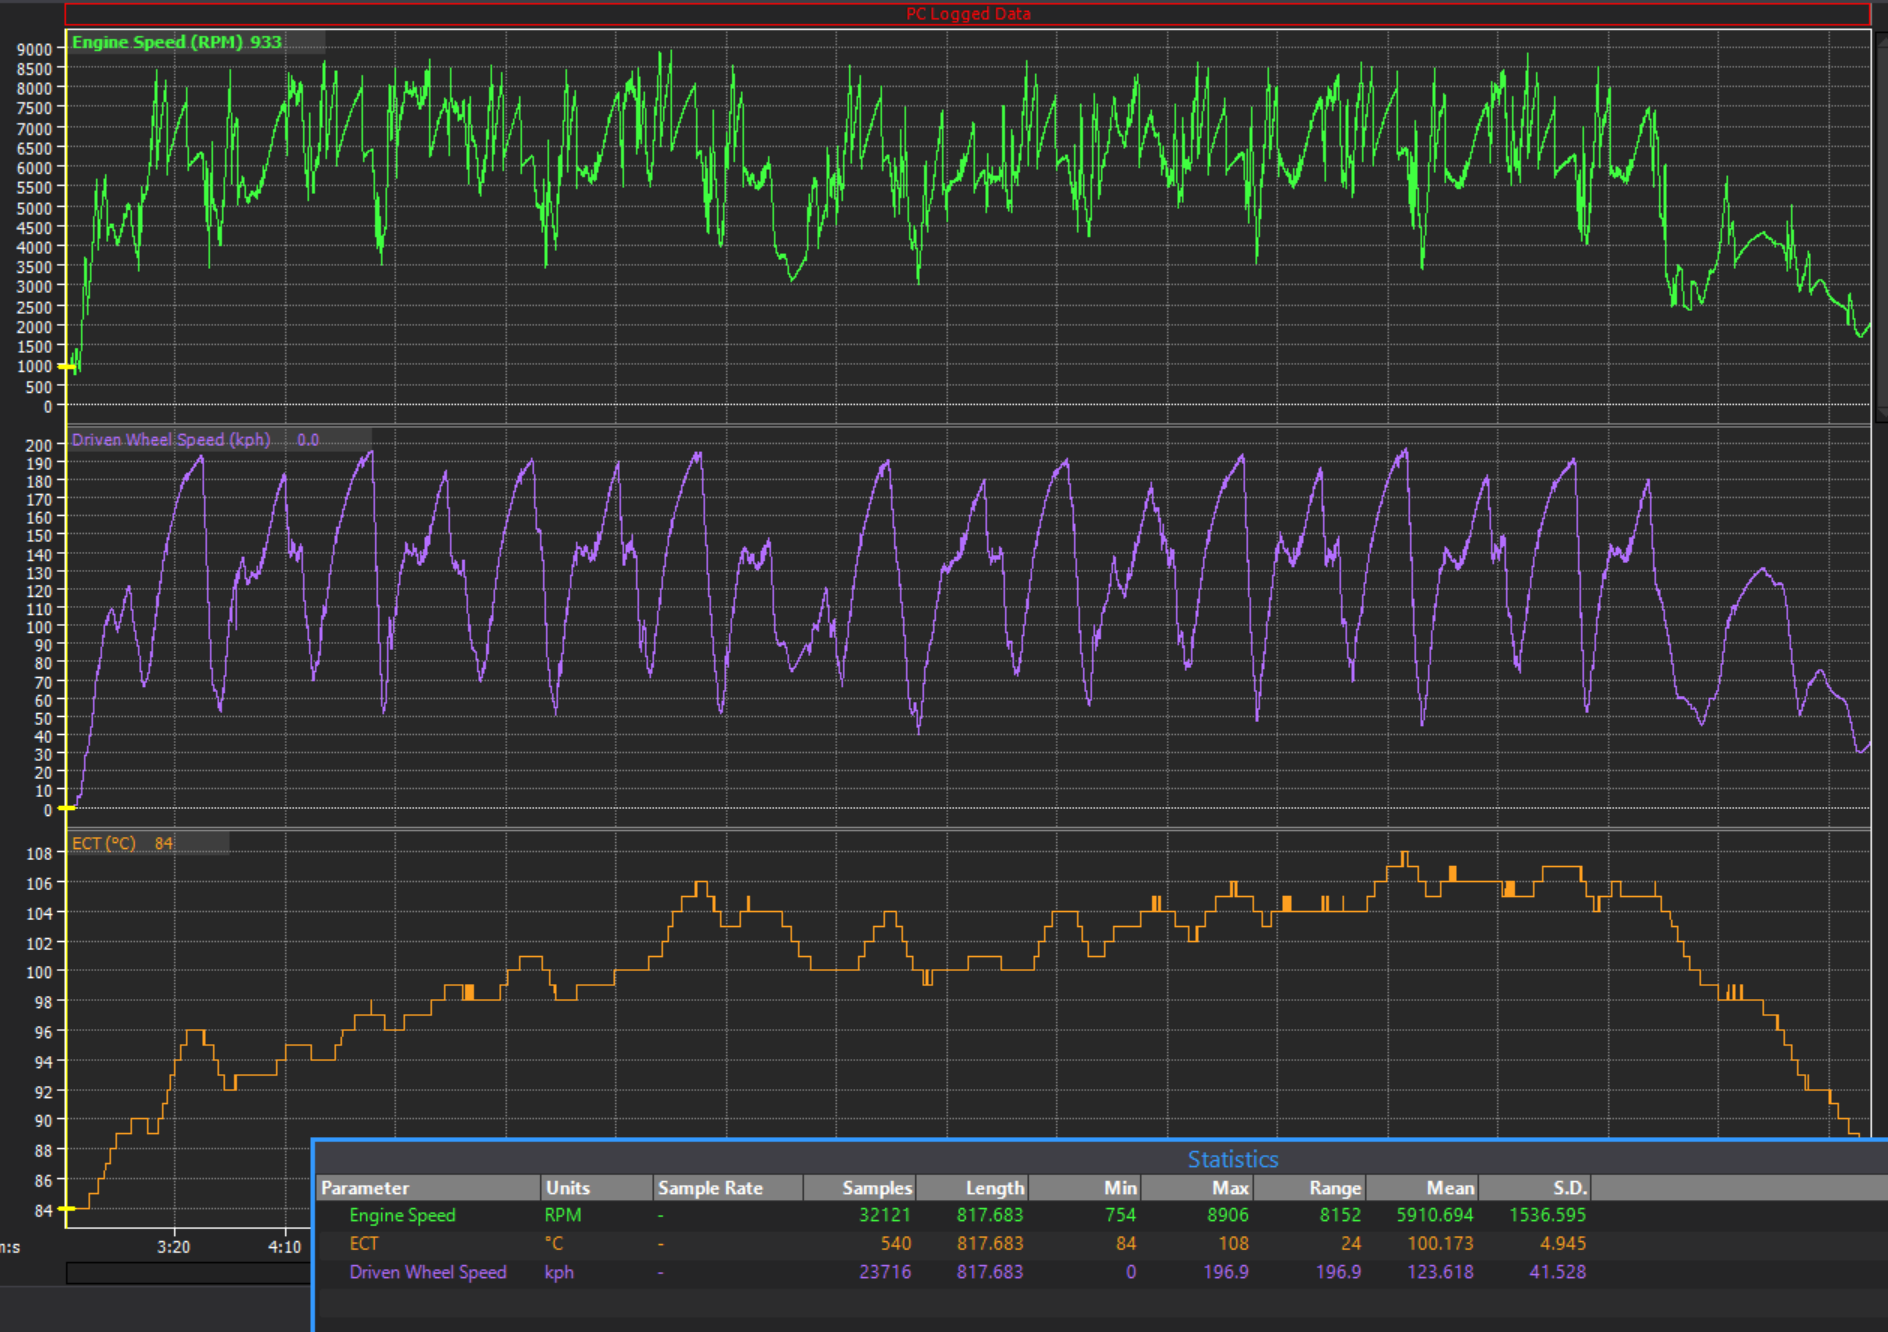
Actually, no I'm a dumb dumb. I forgot I have an engine temp ignition trim table. It was pulling up to 6 degreees of timing out, as the temp crept up past 100. So at 8000rpm it only had 16 degrees advance. Woops. It was also running very rich, at 12:1 AFR. Keeping in mind that the 6 horsepower I gained from going to the dyno last time, all came from making it run leaner! So I would very likely hit 200kph on the straight if I get a better radiator! Exciting. I'll hopefully try get to the dyno first, then sort the cooling and come back for another go I reckon.
-
Here's my fastest lap, I managed to get the RaceChrono overlay working. There are a few spots where the GPS takes a little while to catch up, as I think I had my phone just stuffed down into the door card or something haha. Also, I thought I'd end up running quite hot. So I set up my buzzer to start bleeping at me if it crossed 110 deg coolant temp. Because I'm using a standard radiator that's got lots of bent fins and bugs jammed in it. Maximum temp was 108 degrees near the end of a run. Happy with that. I think a good condition standard radiator would be plenty. With some better ducting towards it if needed.
-
Yeah I had race chrono recording on the phone, I think it can spit out a data overlay to plonk onto a vid. But havent had a look yet. Yeah I was short shifting a bit too, usually a little under 8500 as I was worried about blowing the motor up and not making it home. But so far so good haha. Dyno man says he's free soon-ish as well, so I didnt want to nuke the motor before I get back to that.
-
I've just been driving around on 185/60/14 R888R for the last... ages. This is the first time they have been used for what they're supposed to be doing! haha. No tools out or tyre swaps or anything, just hoon and home! Was awesome. Yeah I had a few good drag races down the straight with some cars. Will spam some other footage a bit later. The brakes were great, I didnt have any fade, even though it's still got the drums on the back still. I wasnt really pushing the braking as hard as I could, as I was just incredibly surprised at how short the braking distances were.
-
It was bloody awesome! Best lap time was 1.14.0, (no chicane) and top speed was 196.9kph. Only just yesterday did I finish getting the e-throttle revmatch working. So if I have clutch and brake pressed at the same time, it assume's I'm shifting down to the next gear, and holds it at the right rpm for that gear. I didnt rev match a single shift in that video, it worked exceptionally well. Very helpful through turn 2-3 to be able to just focus on braking not mashing two pedals at once! Was an awesome day out, I drove there, did hoons, and made it home on a single tank of gas. (just)
-
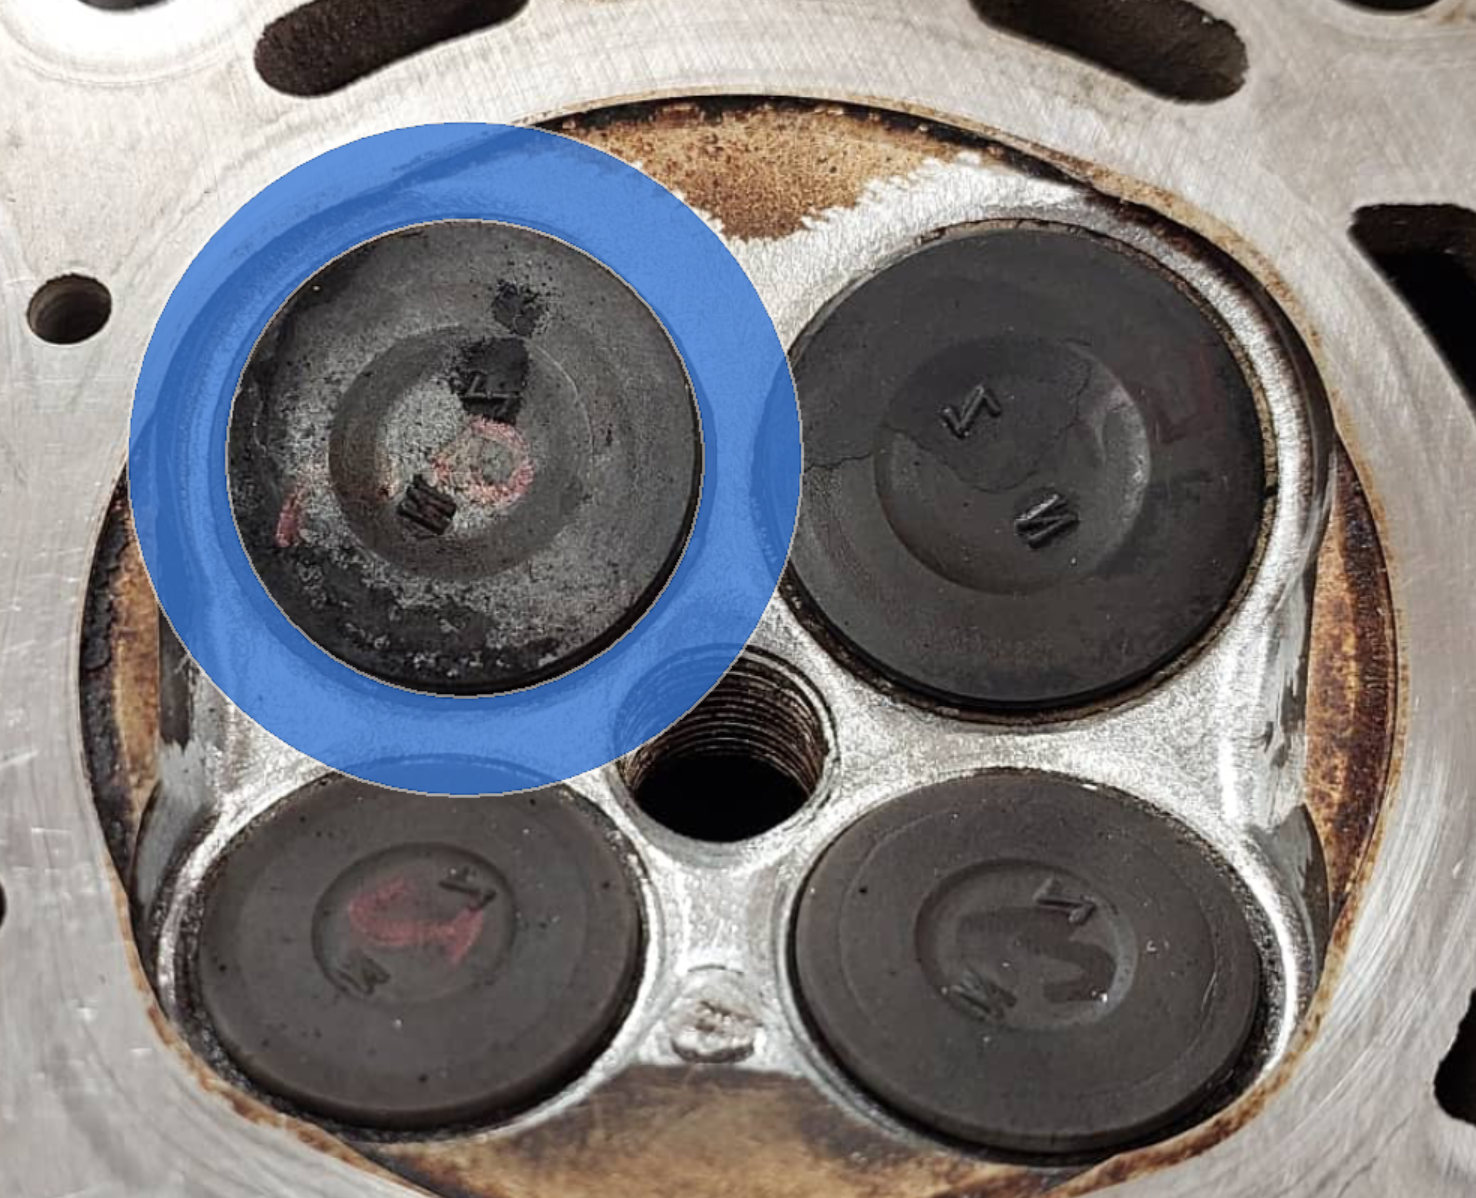
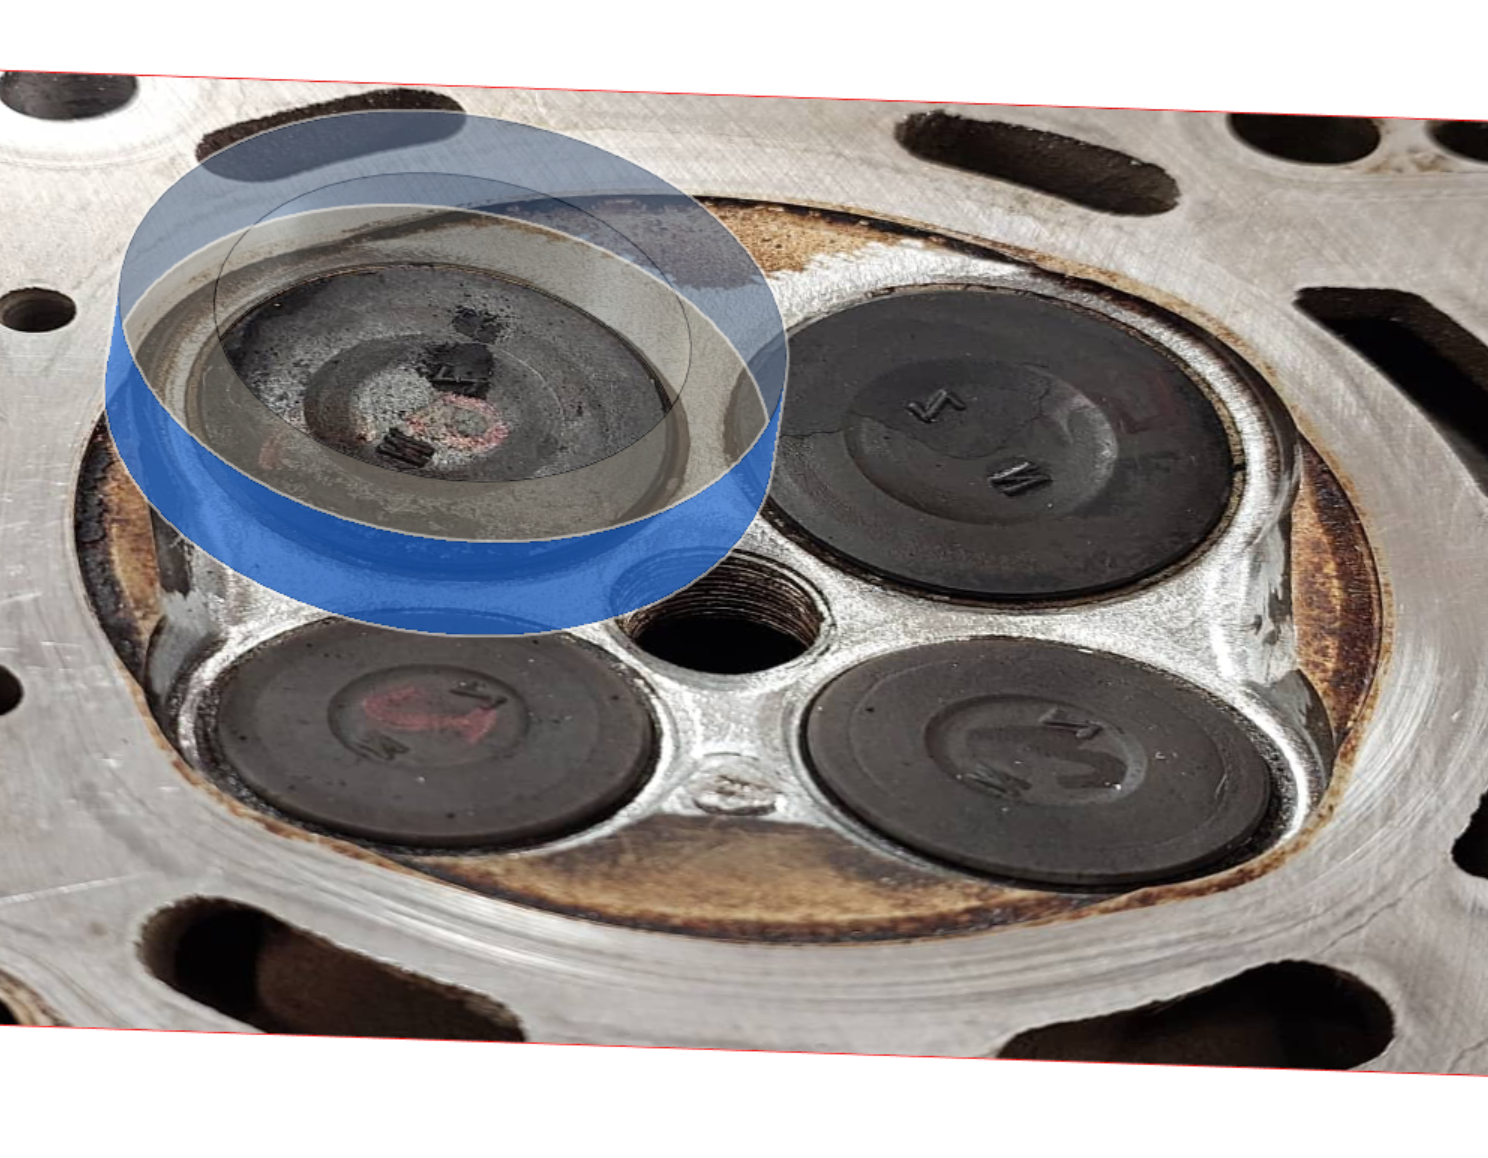
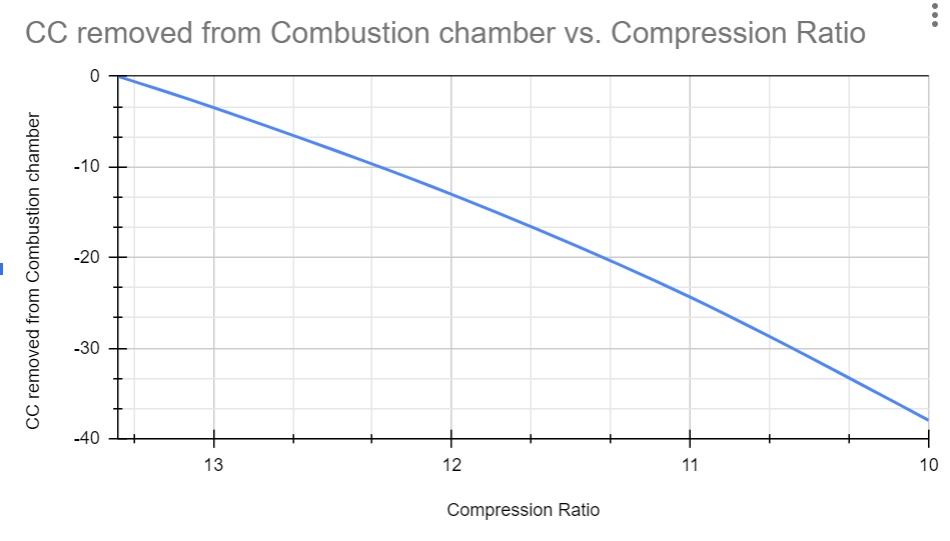
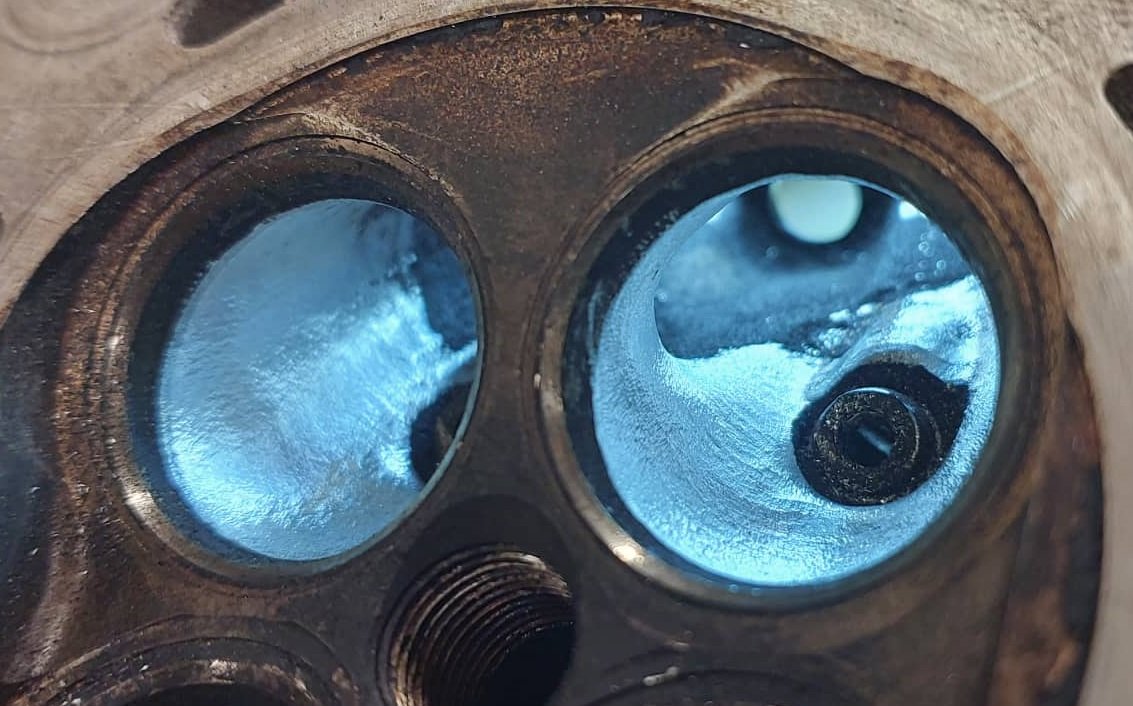
I found there is an online book/audio book app called Scribd, where the first months subscription is free - and David Vizard's book "How to flow test and port cylinder heads" is on it. So you can sign up and if you unsign in first month read it for free, might have some other interesting tech stuff on there. Will just have to try remember to unsubscribe before a month's up. Hah. So, I read through most of this and unfortunately very little of it contained information which feels relevant to a 4 valve head. As there's not really any testing done on things like port dividers, because, its mostly just 2 valve motors. Bummer. However one interesting thing was that it said a valve is fully deshrouded, when the valve has reached 0.25x its diameter in lift, and has 0.2x the valves diameter in clearance from the walls. So scaling against a photo (which isnt even straight, meh) but can get an idea of the fully deshrouded area of the valve "" So theoretically there's value in cutting back the squish pad thingies on the sides, or at least smoothing them out a bit more. Also looks like anything around the far side of the valve towards the cylinder wall, up to edge of the cylinder is fair game. Just to reassure myself, looking at some calcs again of compression ratio drop, I dont think I'll make any meaningful drops. with what I'm planning to do it might drop to 13:1 or something like that, definitely not down to 10:1 or anything. I'd have to carve out absolute shitloads to drop it by that much. Might end up at 13:1 or maybe 12.5:1 worst case scenario. Actually thinking about it some more, 1 cubic centimeter is fucking heaps haha. Dad's CNC machine has turned up, he's slowly troubleshooting issues and getting things fixed. I'm thinking it would be cool to be able to get a CNC profile setup for some combustion chamber mods and smoothing out the intake bump. As they are fairly simple mostly circular paths with a ball nosed cutter. (Simple, says person who knows nothing about it) This way I could be sure everything is exactly the same between cylinders. Also, have signed up for a Pukekohe trackday this Friday, exciting! Looking forward to it.
-
Makes me happy to see a bunch of trouble free kms put on the car after some headaches getting it legal. Love the new wheels!
-
I had a bit of a scheme for making a semi automated bench but I got a bit stuck with needing way gruntier fans to pull enough air. Which then meant I would need a much stronger housing and the whole thing would become big and complicated, aaaaand I ran out of effort. Still want to make one though, one day. A lot of the modern DIY ones use a MAF because it's an incredibly better way to go about it.
-
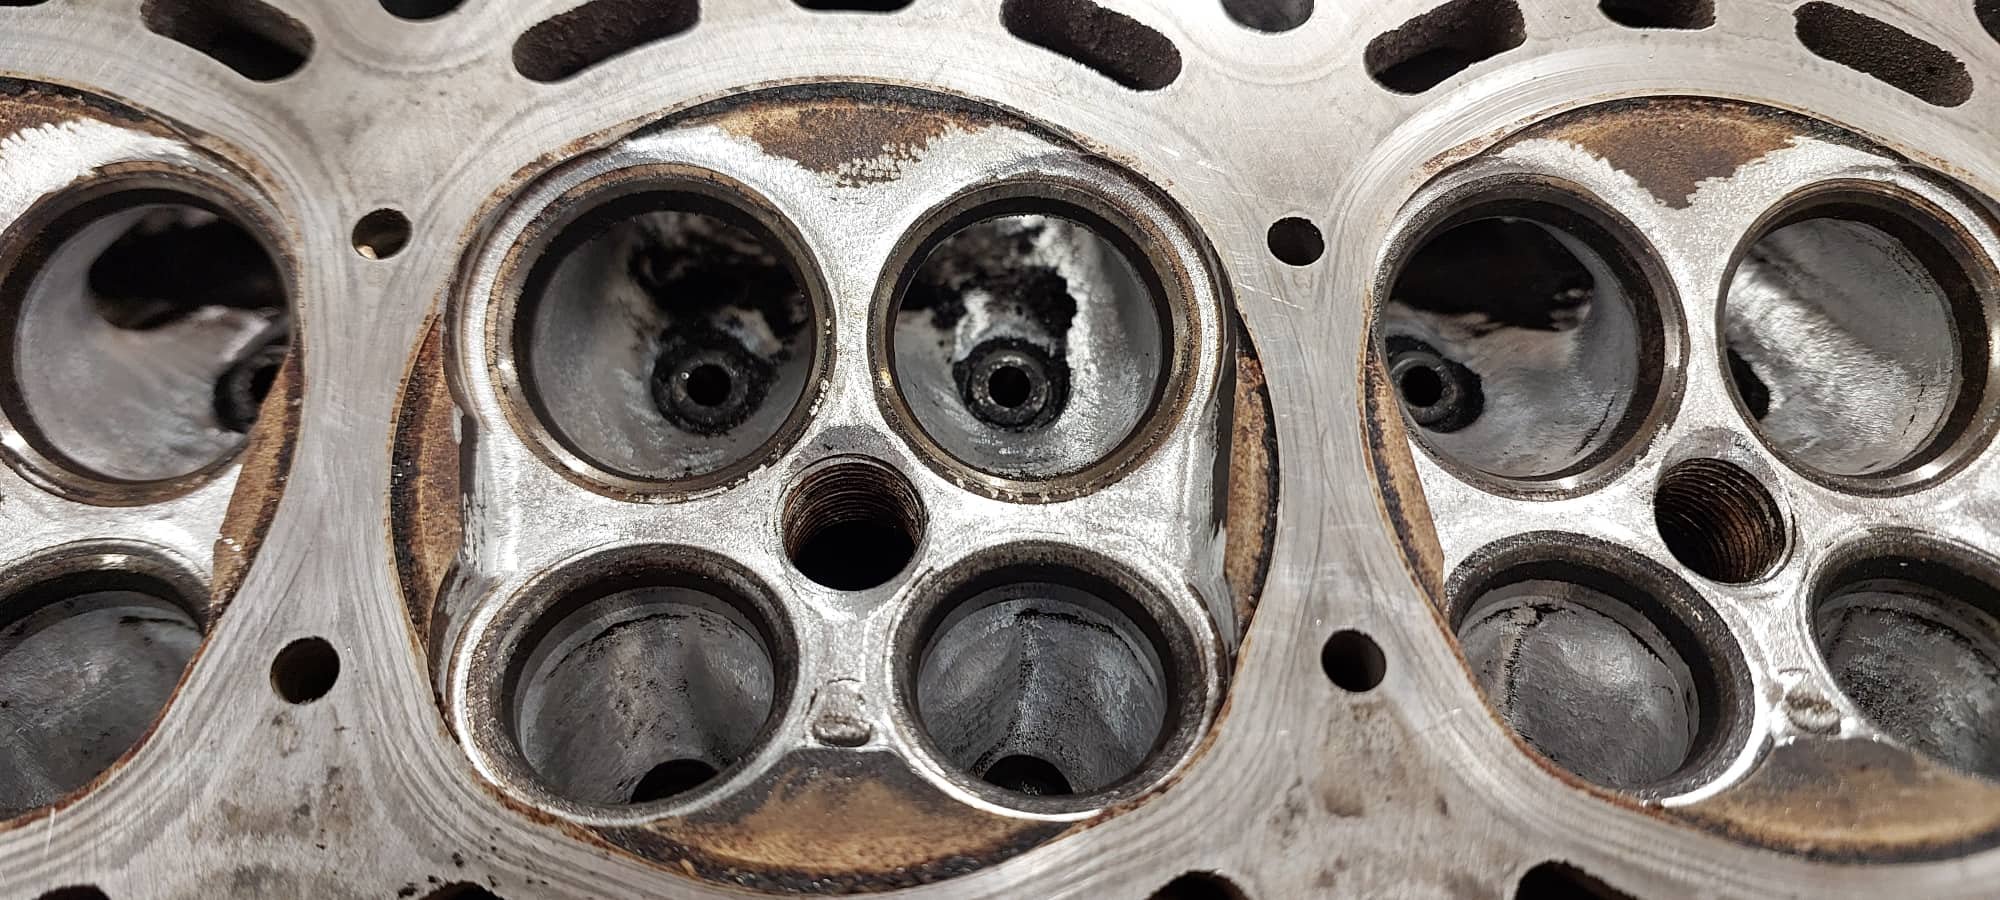
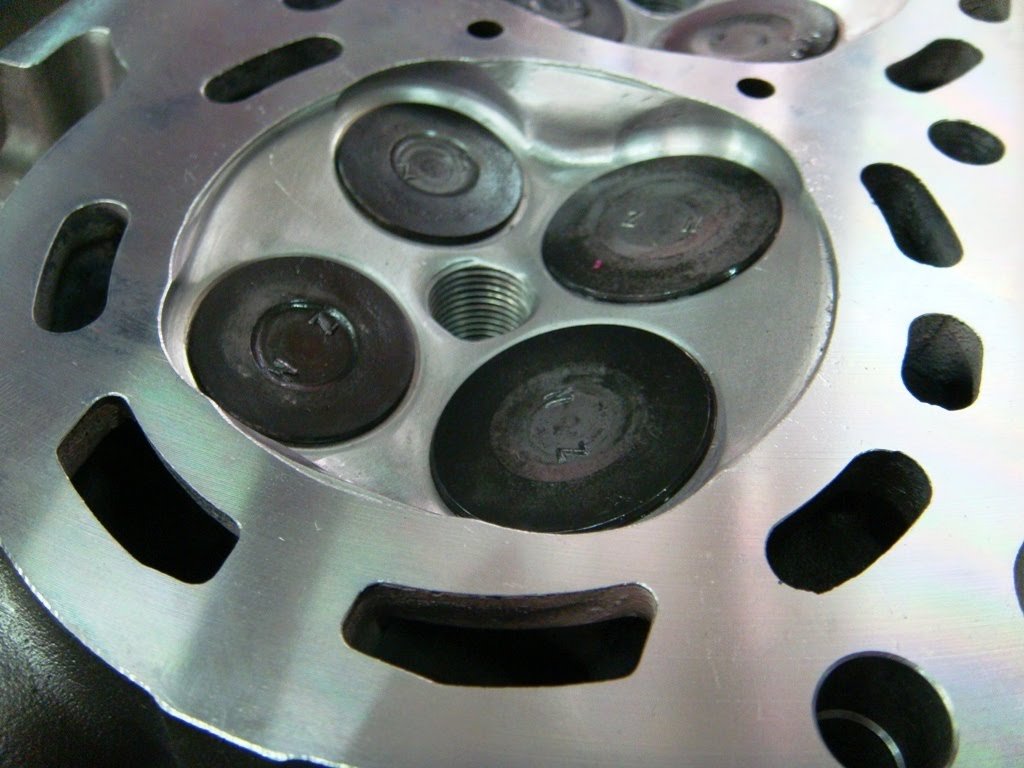
I feel bad that people pitched in for a new motor for me, but now there's a bit of a lull in updates. The dyno guy is busy for a while, and the next thing to do apart from that is... really just get to some events and see how it goes! So I'm looking forward to that. There is a Pukekohe trackday in about 2 weeks time that I've got an eye on. 4&Rotor nats would be fun for sentimental value / have never competed, but I get the feeling it's going to be a whole lot of sitting in queues and not much racing. Then of course oldschool drags but that's a while off yet. I'll try find a drag comp meet where they do a proper track prep during the daytime. So while I've had not much to do, and since from the new motor purchase I only really needed the block. I've now got a spare head for some R&D. Last time with the porting the most major change I made, was downsizing the injector bump in the intake ports. Then the rest was just a bit of a tidy up and just minor smoothing. I was quite conservative about removing material from the combustion chamber as I was concerned about dropping the compression ratio. However this time I'm going to go all in, on improving air flow and not care so much if the CR drops. If the CR does drop too much, it's still not a waste. As the head might then be useful when I eventually get some aftermarket pistons. Will just choose higher CR piston than I need, and the extra chamber volume will drop it back down to target. I've cut back all of the machining ridges around the outer edges of the valves, a bit more than I did last time. But I think I'll spend a bit more time putting a radius all the way around the outer edges as best I can. Firstly I saw this picture below of a ported 1NZ head, for a turbo setup. You can see they have gone hardcore to reduce shrouding around the valves by adding a big radius on the far side of the combustion chamber. I dont like that they have cut back the squish bands, as this will have dropped CR a lot. However it looks like they have done this to promote better flow when lift is higher. I'll definitely try find the right shaped dremel tool to get a nice radius on the outer sides of the valves, but I wont go this extreme. I guess I could get the head milled down slightly if I needed, but then I will lose a bit more usable VVTI range. Then I'm also going to spend a bit more time thinning the dividers between the ports. Man this takes ages. I've been reading a lot of back and forth about whether it's good to knife edge the divider between the two valves. However thinking about almost anything that has liquid or gas flowing around it. Things always seem rounded at the front, and sharp at the back. Teardrop shape. So I think a sharp divider will likely be beneficial on the exhaust side, but a more rounded divider on the intake probably makes more sense. Also since the dividers are quite short, the only way I could fully knife edge them would be to have an angle that's too steep. Will see what I can do. If I had a flow bench setup already, I'd port each of the 4 cylinders differently and then compare them all. However that's not going to be doable for a long time, so I'll have to stick to a best effort approach and compare real life results.
-
Measure resistance across the pins of each injector? EDIT: Reason this might be interesting is that if the wires in the coil have semi shorted or fused together, this can affect injector opening time. As theres a weaker force pulling the injector needle thingy up off the seat. So even if they flow the same, they could take longer to open so run leaner in real life conditions. I've heard of people saying that their injectors come back fucked after ultrasonic cleaning because it messes with the coil of wire inside and shorts the insulation (or whatever)
-
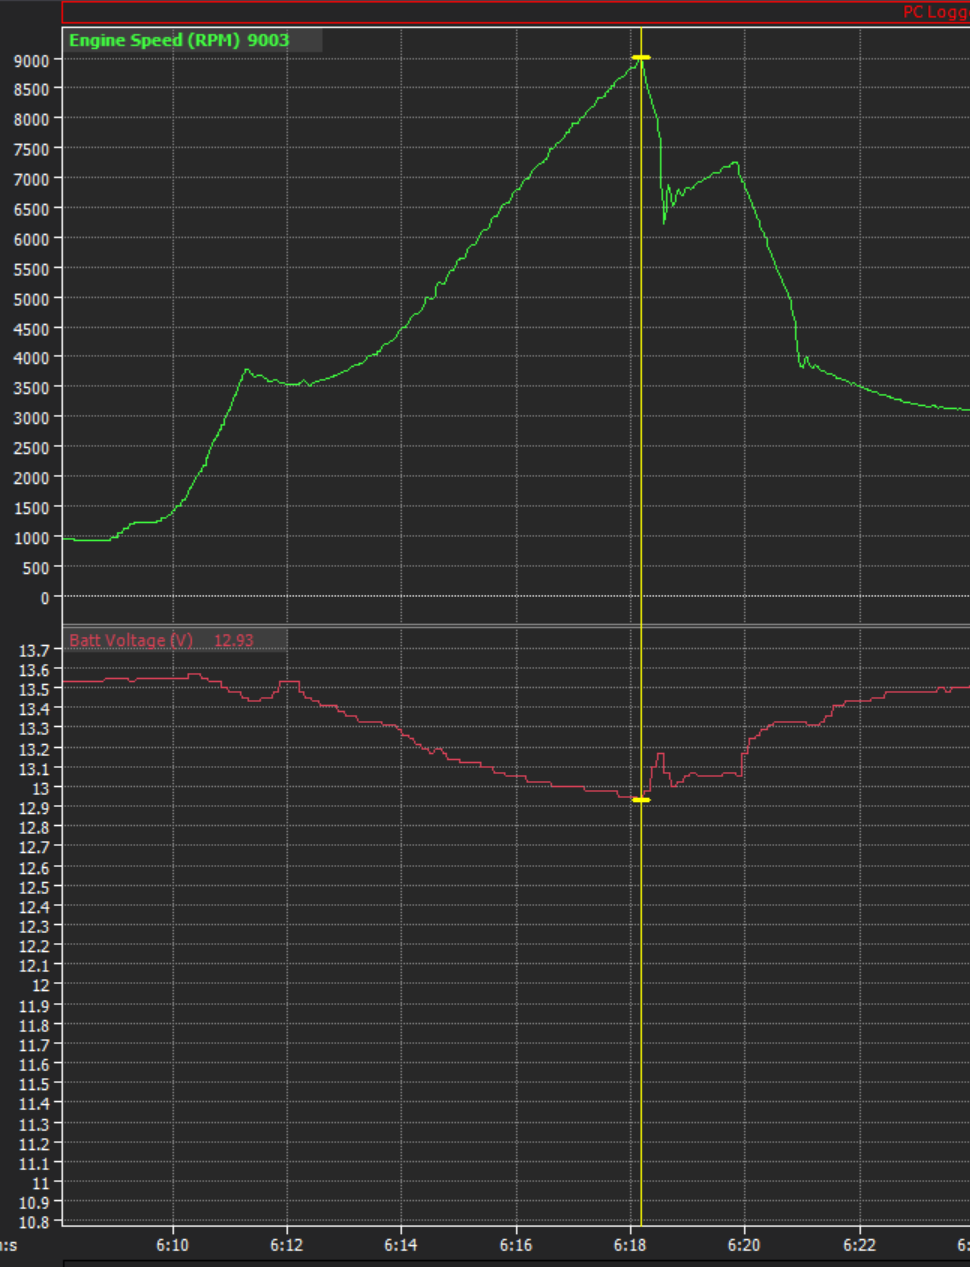
Ahhh yeah I guess that miiigghhht help at the drags but not going to be useful for sustained hooning. I guess if you do the maths, if you were drawing full 60amp from alternator, and it was outputting 14 volts. That's 840 watts Then if its something like 25% efficient at converting mechanical energy into electricity, would be 3.3kw draw on the motor. I guess that is a decent amount! However, looking at the logs from the drags, my voltage drops by quite a lot with high rpm anyway. Maybe it's alternator rpm based reduction, maybe its belt slip, maybe it's Maybelline? Not much interesting stuff to report otherwise at the moment, as I'm just busy trying to fix some maintenance issues. Needs the front ball joints and a tie rod end replaced. Some better brake pads ordered as well, as I'd like to do some trackdays this summer hopefully. I will try get a better radiator too, as this one has had 200,000km worth of bugs smash into the lower 1/3rd of it. I'm waiting on parts that should hopefully arrive in the coming week. My big goal at the moment is to try get it all ready to attend 4&rotor drags and possibly the trackday part which is about another 6 weeks away. It looks like I might have a work trip to Australia the same week though. So fingers crossed that gets postponed or brought a week ahead so I can see how it goes.
-

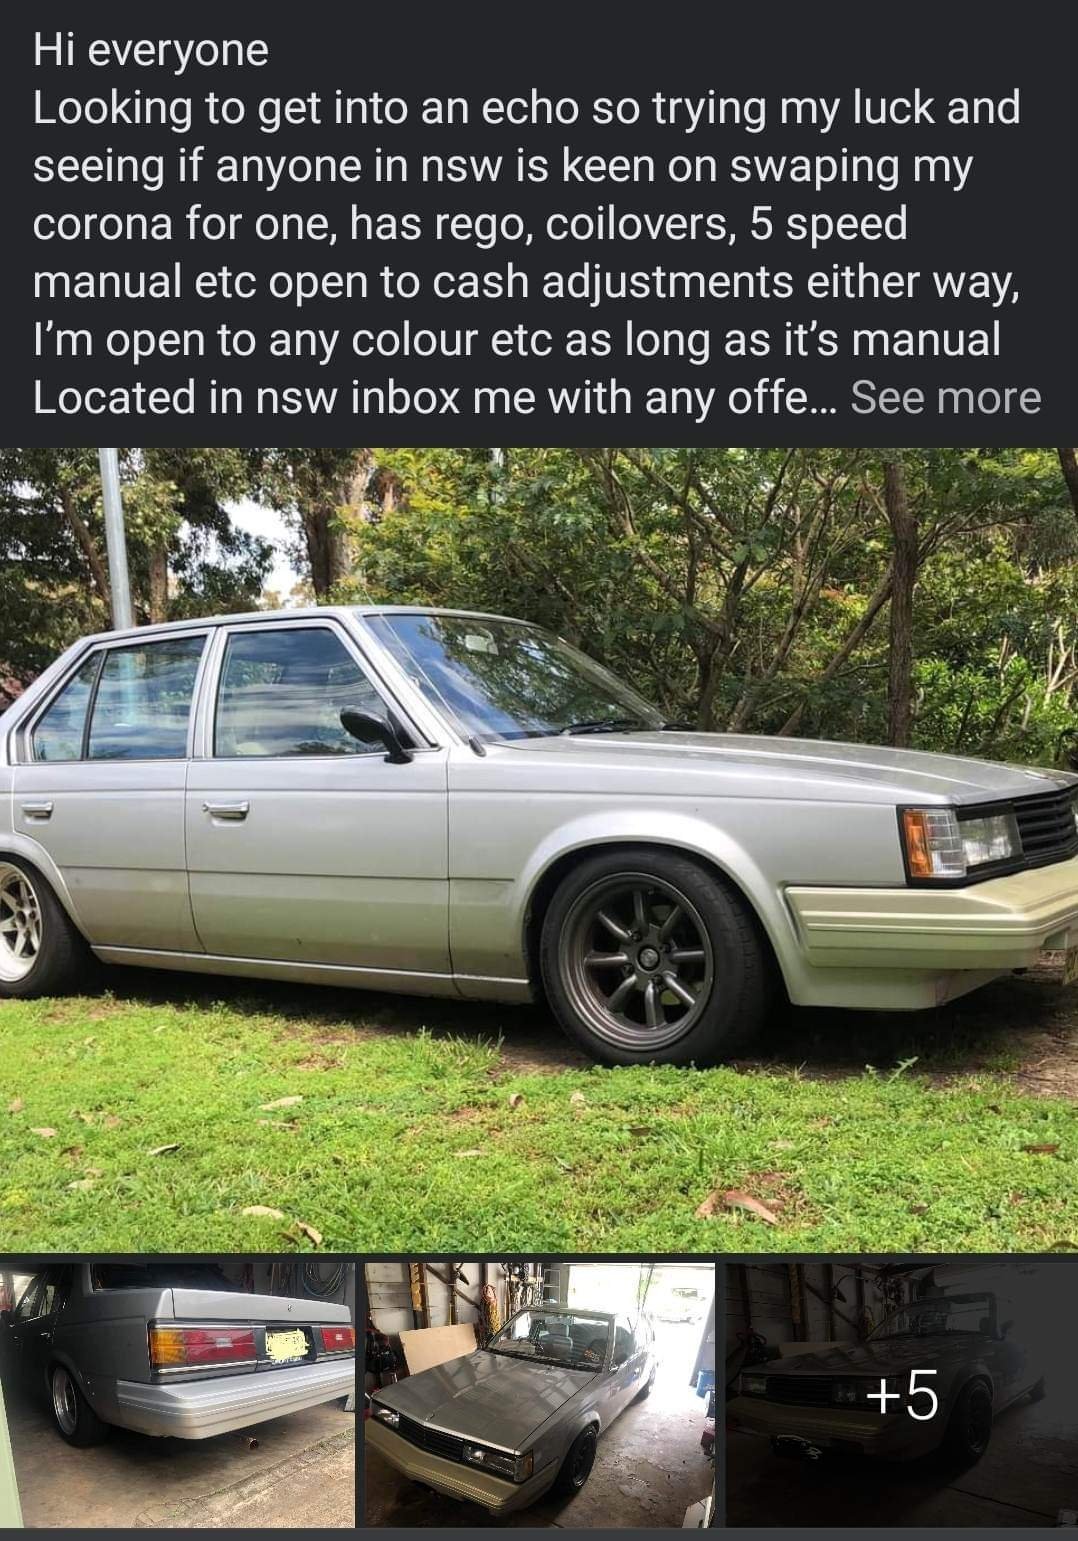
Discuss here about Yoeddynz's little Imp project...
Roman replied to yoeddynz's topic in Project Discussion
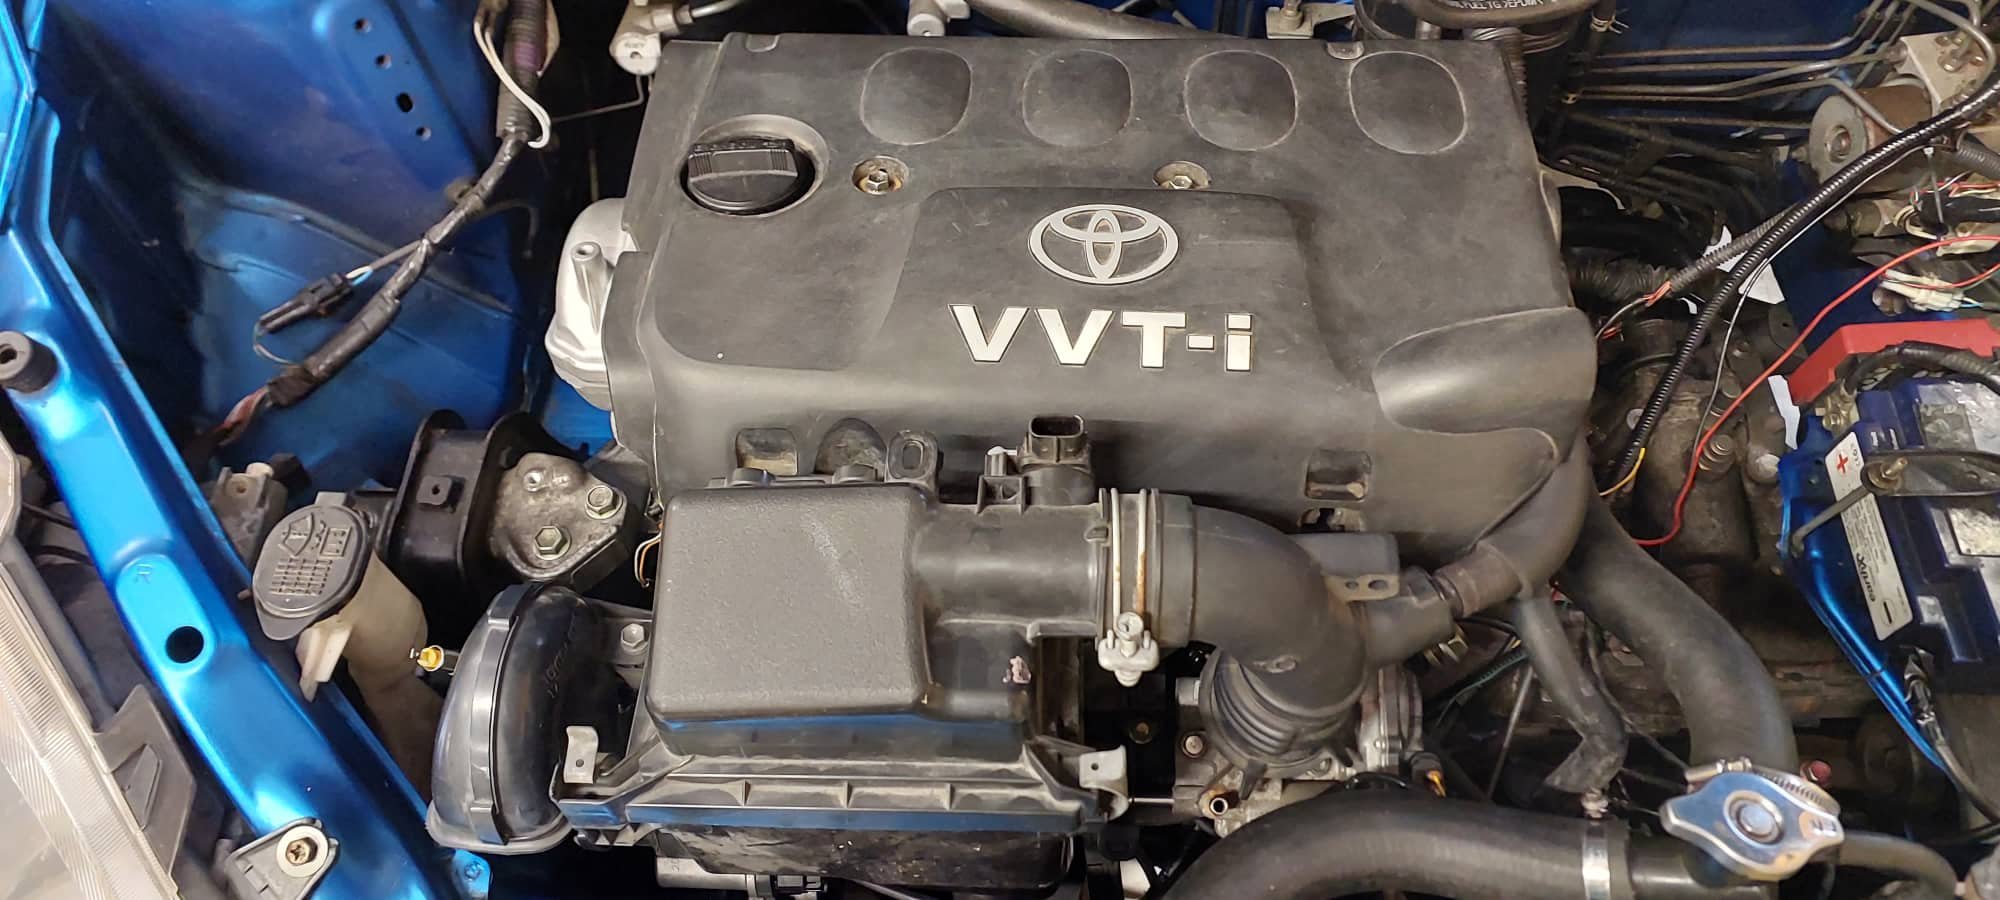
Love your work, as usual! Cant wait to see how the plenum turns out.