


johnny.race
-
Posts
745 -
Joined
-
Last visited
Content Type
Forums
Downloads
Events
Gallery
Everything posted by johnny.race
-

1988 Toyota 2WD Hilux front brake upgrade options
johnny.race replied to johnny.race's topic in Tech Talk
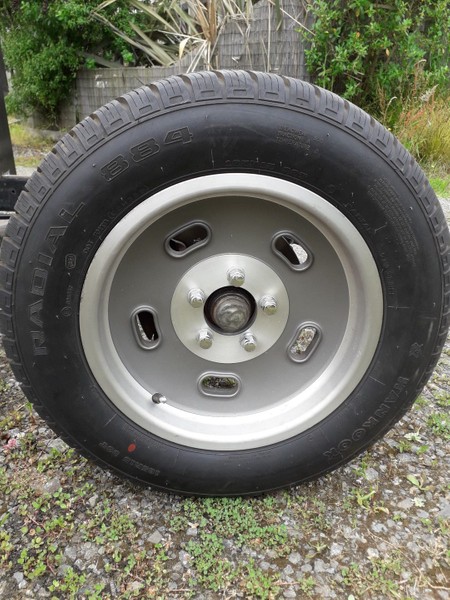
Short answer to your question is I don't know. Long story is the application I used/tried it out on was on the front of a 2wd LN56. The rim I wanted to use was a 15" but skinny. It was 4.5" width I think. It had most of its minimal width towards the outside (old school style if you know what i mean) so was pretty flat looking on the inside. See attached pic of what I am talking about. I couldn't get the rim to sit on the hub properly without it fouling the 4 pot caliper due to the outside facing pots. This is all from memory but this was the gist of it I think. I dunno if i had of had a normal 15" rim whether it would have worked. Might have but didn't check because at the time i wanted to use the rims i was trying. Yo.
-
1988 Toyota 2WD Hilux front brake upgrade options
johnny.race replied to johnny.race's topic in Tech Talk
Just seen this, I'll report tomorrow or the next day. Cheers. -
@ThePog I only just saw your post. I checked our bus. Its a RGW40. What info do you need exactly and do you still need it? Cheer.
-
Ok, just checked online. I need a OBD2 I think. I see them on TM. Does anyone know if there are ones to stay away from or types to seek out for some reason? I'm getting one because I intend to purchase a running Ls1 powered donor car in order to ensure I have all of the parts the factory supplied. I want to be able to scan it prior to purchase plus I take it I'll be using the scanner once the engine has been transplanted in the future so is required' buying for me. Thinking aloud.
-
@vk327 cheers man. I was/am leaning towards the 4L60e that comes in the Commodore already attached to the engine. Are there problems with this type of transmission? My reasoning is I want the overdrive. My intended use centers around being a poser (lol!) using it as my work truck/parts carrier for the most part. The only off-road I foresee is fishing and firewood collecting duties. I'm not into hardcore thrashing of my gear in the mud bro. But yeah, the 4L60e? I have never owned a car that uses an ECU but know they store codes and stuff that can tell the story to some extent of what they monitor. What sort of scanner would one buy to read a 2000 WH Ls1 Commodore?
-
4WD. The vehicle type is a LN106. Its the last of the 4WD Hilux's that came with a live axle (diff) at the front end.
-
Yeah I did, well I sent them an email as I got the impression from their YT clips that they were flatout so didn't want to take their time up. Asked for ball park $ for a drive in drive out deal for driving in a 2.8 LN106 then driving out with a ls1 under the bonnet. They said around the 30k mark and that they were not taking on any new work due to current and booked work load. They also said they don't offer a kit to slip the GM engine into a lux - only a UZ. My personal preference is the LS over the UZ so ... I have since started looking at the Aussie sites for costs for the gearbox adapters and engine install kits. I've spent enough time under and around cars to accept that sometimes its better to bite the bullet and buy a kit than fuck around trying to reinvent something that's already been done a heap of times. Still deciding on box type too. Auto or manual. Like the idea of a slusher though. So yeah ...
-
Hmmm, I've been watching some clips from Cartune NZ and they all seem to be lifted.
-
Everything I have read on this topic involves the inclusion of a body lift. Does anyone have first hand info on why you need to lift the body? What part (or parts) don't fit or foul due to the body being left in the OEM body position in relation to the chassis. Cheers.
-
Ahh for the days of a timing light and screw driver.
-
@chris rYour package has been uplifted and placed into secure lockup. Those two BB Chryslers in the background of the pic want to know wtf a scoota mota is doing in their shed. Yo to the power and reach of the oldschool freight service .
-
@chris r, have you got this sorted? Is it ok where it is currently or do you need to get it moved/shifted. I can provide a place/store it until you sort out freight if needs be. Just saying.
-
I got some in. Here's how these ones actuate the handbrake mechanism ... 1st 2 pics of what they look like with pads fitted. These next 3 pics are taken with pads removed and the handbrake levers showing their movement. Basically each lever presses against the steel backing plate of each pad moving them against the rotor. Might talk to @Taistormsometime about how to go about the handbrake setting up if I can't figure something out myself. But yeah, this is how the Wilwood Powerlite handbrake setup essentially gets it done.
-
@Mark_Fleming thanks for the info above Mark, this is excellent insight to something I've always wondered about. Out of interest, for the 9", is that main adapter plate in the diagram (that bolts to the housing) ... is that holed' for multi fit (like does it do both early and late big bearing bolt patterns) or do they use specific plates for each application. No biggie - just wondering. Cheers.
-
Ahh! I just stalked your project build and see what you are on about. Very nice! Some questions, those are the same calipers being sold by Cardwells, yes? And what is the bracket made from? Is it steel? And the biggie - what is the rotor being used please. I am looking at using DBA637 which is the stock replacement for the rear of an fc s4/s5 but am seeking info for a suitable 4 stud alternative. I take it the spacer you're using is between the rotor and rim? Or is it between the axle flange and rotor? Very nice indeed! I've got some more questions about the handbrake cable set up but want to know the big picture stuff first. Ta man.
-
Cheers Clint @cletus I had an idea they would be looking something like your pic. I'm just scoping out the scene at the moment and collecting parts and idea's. I am having the hell time getting ahold of s4/s5 fc rears now. Strange that - they only stopped making them near 30 odd years, lol!
-
Cheers Mark. A pic would suffice matey, if you could. and yup - I am heading towards what you have going on. Ta.
-
Have just come back from the yard ... revised it from OEM 4 pot to OEM 2 pot off something - to work with the spot caliper. Just looking for options and insight.
-
Oh, I originally asked (and still are) if anyone had had any experience fitting Wilwood 4 pots (of the type that come with the integral handbrake) to a Hilux diff. Plus I also showed I was attempting to get to the same place using an OEM front caliper in conjunction with a mechanical spot caliper. Two efforts to reach an end state of vented rear disc/caliper setup on a Hilux diff that will pass cert.
-
Asked in another post if anyone had had anything to do with adapting Wilwood calipers onto a Hilux differential - nothing. Hmmm. I'm going to purchase a pair of the (currently out of stock) Cardwell ones Pt No 120 - 13517 and fit them onto a Hilux differential. Thats current intention anyway. I know nothing about Wilwoods. I've never mucked around with any aftermarket brake calipers previously. Realm of race cars and rich pricks I always thought. Priced a pair of OEM style rear calipers with the integral handbrake that fit onto OEM rear vented rotors, lately? Thus the reason I am looking at the aftermarket option. I learned what radial mount' meant yesterday also too, lol! Another direction to get to the same place I am looking at is this also ... OEM vented rotors, a mech' aftermarket spot caliper and a soon to be identified OEM 4 pot from off the front of something. Both efforts aimed at a WOF application. Anyway ...
-
Radial mount. Anyone know anything about this sorta setup, done it, seen it done, know where such an adaption can be purchased yada yada.
-
Drop a plumb bob off each sill lap/join at a spot perpendicular to/with the tip of the gearbox output shaft and note the total width. Divide it in half and mark the true center of the vehicle on the floor. Next, drop a plumb bob off the center of the gearbox output shaft to see where it lands and how it compares to true center. If if sits to one side of true center (and it will) note to what side it does and by how much. Measure the width of your OEM MoPar diff and determine if it has any pinion offset. Measure the distance from the end of your gearbox to the differential pinion and note it down. Draw it all out/up and get an appreciation for what drivetrain alignment MoPar engineered into your car. Measure the total width of your new diff and determine if it has any pinion offset. Determine the difference in length between the two axles and subtract this difference from the side of the diff you plan to have shortened. Determine what effect this has on the pinion placement within the new width, draw it up and compare to the original offering. This will give you a chance to check any change to drivetrain alignment you maybe introducing without realizing it. Just sayin.
-
I've been doing a few heads and reckon the best bang for dollar in terms of kit purchase are these from onlineautoparts. Don't go through TM - deal with them direct and save. Check out the matching trans pan drip trays - churr!
-
Haha, I noticed that too. No mention of a fabric in there.
-
Mate, I have (decent) hands on experience in narrowing housings and axles. Re heads ... yeah I suppose so but more from a rebuild of whatever Ford or Hilux head is in front of me. And then, its either a spool or an OEM offering of some sort. This said, upon looking at where that link lead to, the things that popped into my head were - its not out of the ordinary to see axle length (spline) sticking right through side gear and into the center in a open differential head so some trimming might be required and the price. Its priced to take a chunk out of the lower end of current offerings on the aftermarket. I wonder if it requires its own sidegears that have been surfaced or something. Anyway, chur.


.jpg.c0cf9fe15aead0517e4fec9385725252.jpg)

.jpg.25d69cbe8f0cae3d9edd3f56e1067d8f.jpg)
.jpg.4d09ae0e3581226c49270e5603ebc51b.jpg)
.jpg.08f7c12bd313d266bf4418edfb5da7a6.jpg)
.jpg.7b1b86414caef2baae5fb4f532198524.jpg)
.jpg.9ecf2c28a21ed504abed1baf4ab233d9.jpg)
.jpg.cde4e628cd9e016280b7dc6af756748b.jpg)
.jpg.6b12c5935e680b75c63123e5d5a8f176.jpg)
.jpg.236e6a0e065d7e8b3863c4809e7c2873.jpg)
.jpg.6111a47555256599c656ebacdbecb8bb.jpg)