piazzanoob
-
Posts
1,261 -
Joined
-
Days Won
1
Everything posted by piazzanoob
-

piazzanoob's 1964 ford Galaxie 500 seeedaan
piazzanoob replied to piazzanoob's topic in Project Discussion
this is the plan! -
piazzanoob's 1964 Ford Galaxie 500 seeeedaaan
piazzanoob replied to piazzanoob's topic in Projects and Build Ups
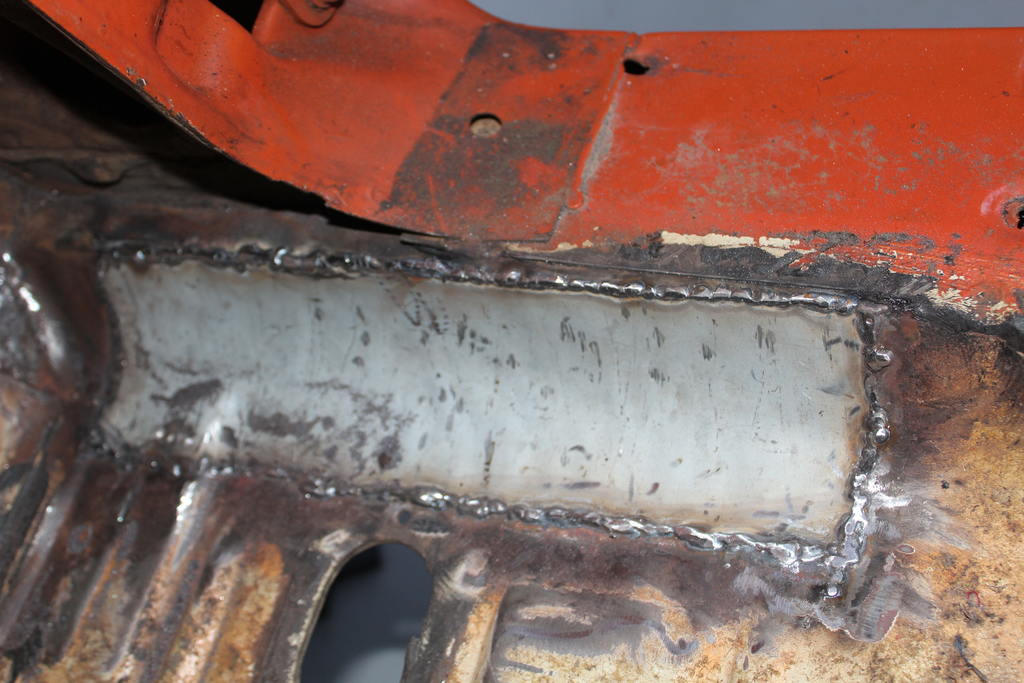
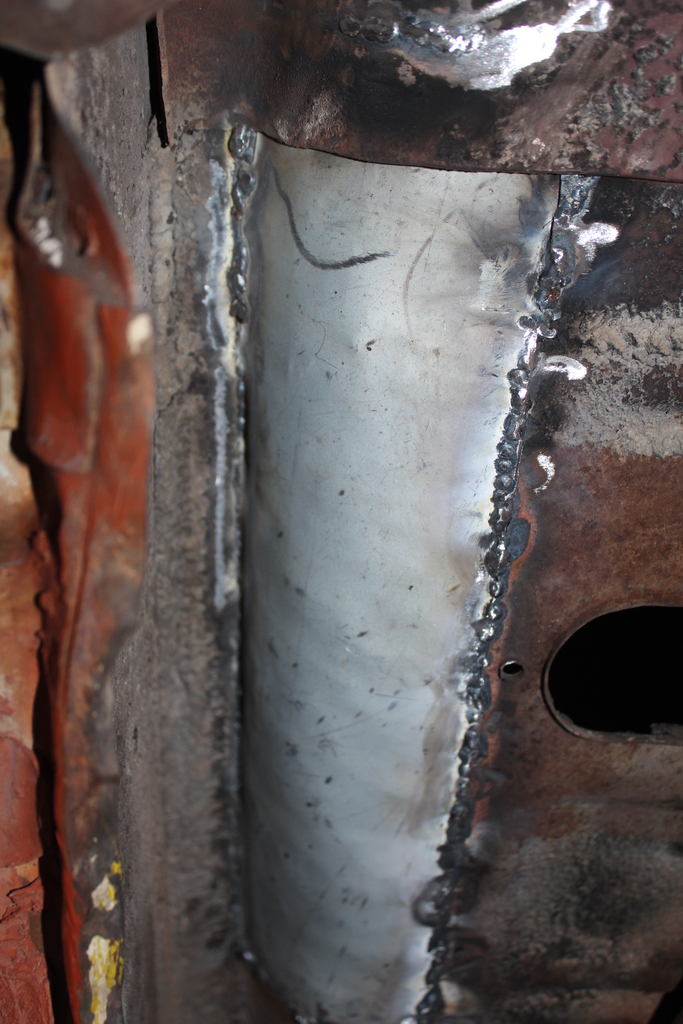
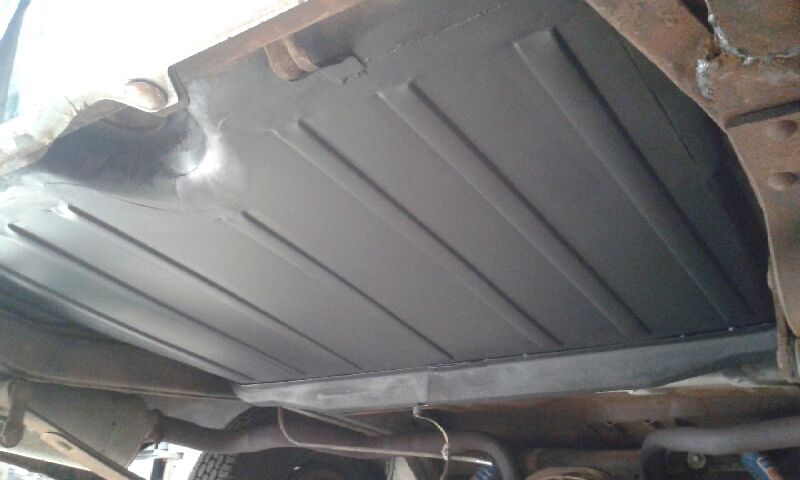
So i was now at the point where i was talking to my panel beater about my rubbish panel And already being past the engineers cut off date for a recheck only for compliance which was the 28th of February and we are now the 10th of march ( As my posts are well overdue) so i took the car in left it with him and uber'd home so this gave him time to put the car in the workshop which was on a monday then went back that evening to drop the fuel tank out for him to keep my bill lower and spin some yarns. I also took the trunk pan i bought to him to see if he could make it work as i stated the amount and hassle it owed me And i think he felt a bit bad about it too as he had recommended me to order a GOOD one from the USA as others had too He then flicked me a texted early Wednesday morning saying it was done following with a photo and invoice. paid 80 percent of the invoice and left the remaining as i couldn't see the numbers properly on the photo invoice he had sent. and planned to come pick it up friday evening. went in friday evening with some burbons to place the tank back in and put the drained gas in and unloaded off the axle stands. done that then explained about the payment i had done when he asked and said i would put the rest through tonight then spun some yarns and drank some beer he supplied and drove the old girl home. And this was the job he did for me. And he didn't end up using my panel as it wasn't going to work. so he made one from some flat 1.3mm zintech steel and used a Trekka swage die to make the swages which is one of these so now my car has Trekka designed floor pan swages in it. but was overall very impressed with the job And the price was fair considering the work involved and is a two man job to weld it in place. And the quick turnaround And also A+ YARNS so thanks to Tony at custom metalshapers LTD In East Tamaki for doing the job.
- 77 replies
-
- 16
-

-
piazzanoob's 1964 Ford Galaxie 500 seeeedaaan
piazzanoob replied to piazzanoob's topic in Projects and Build Ups
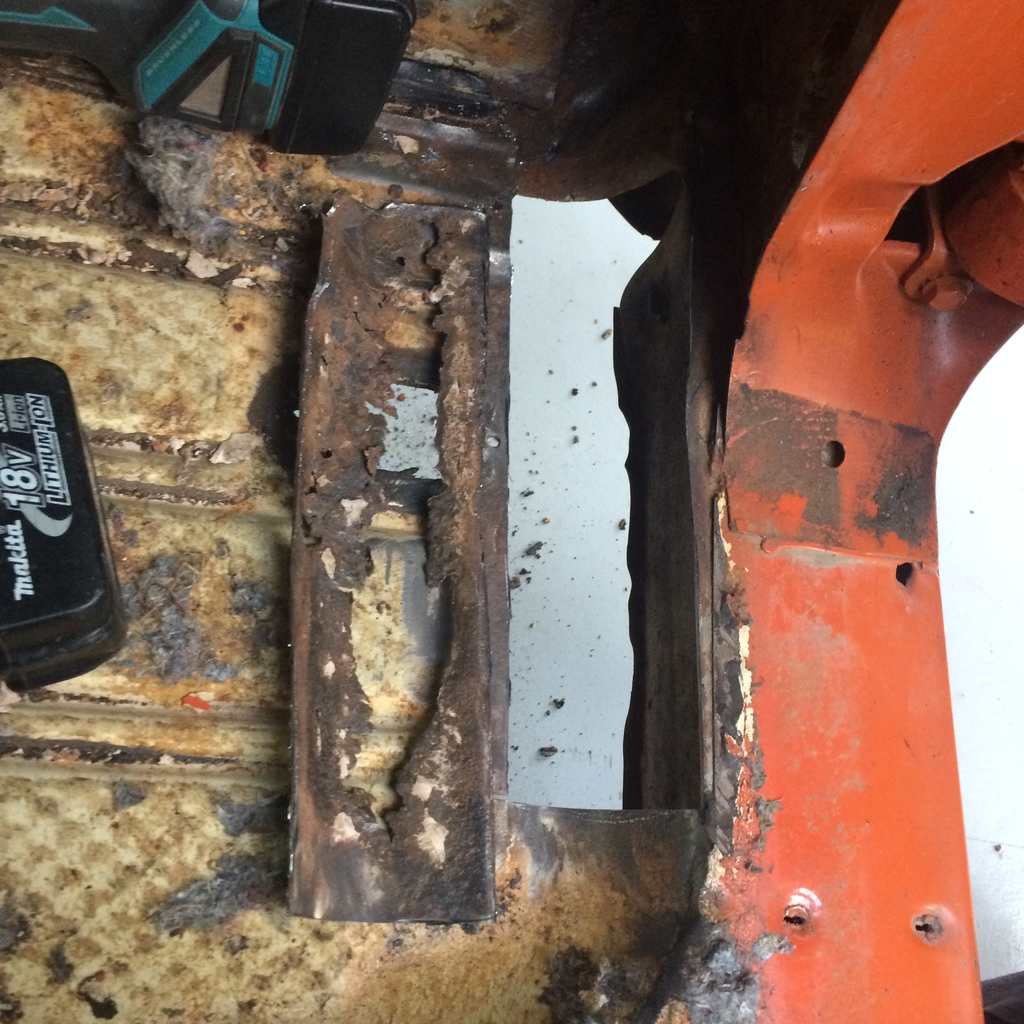
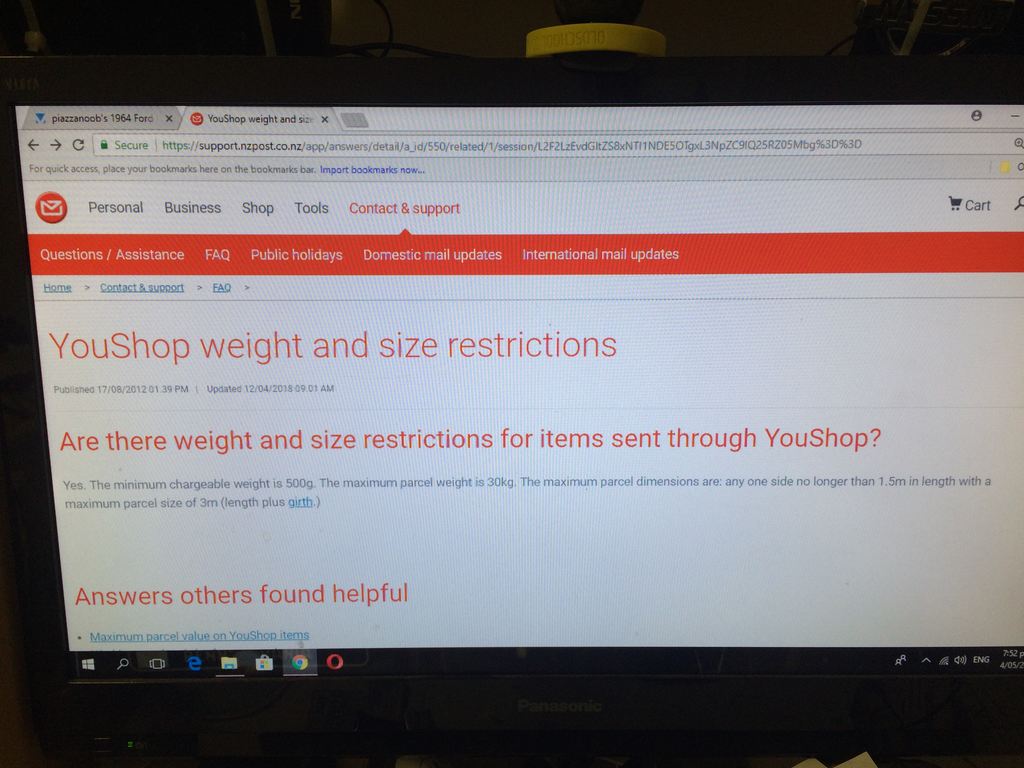
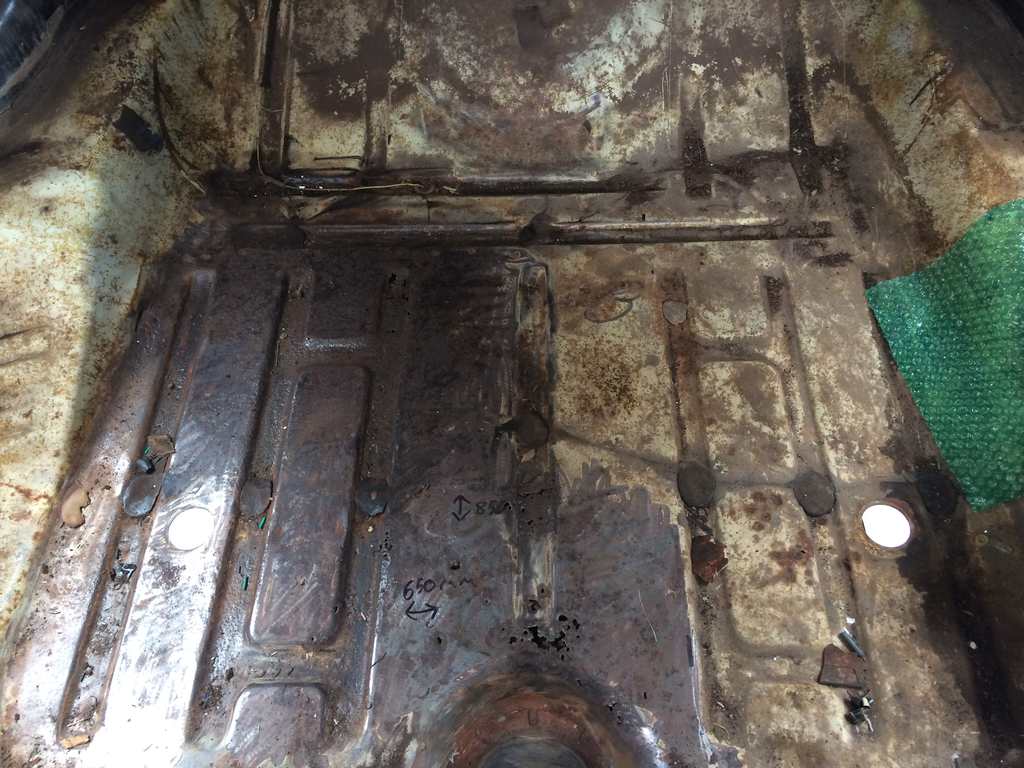
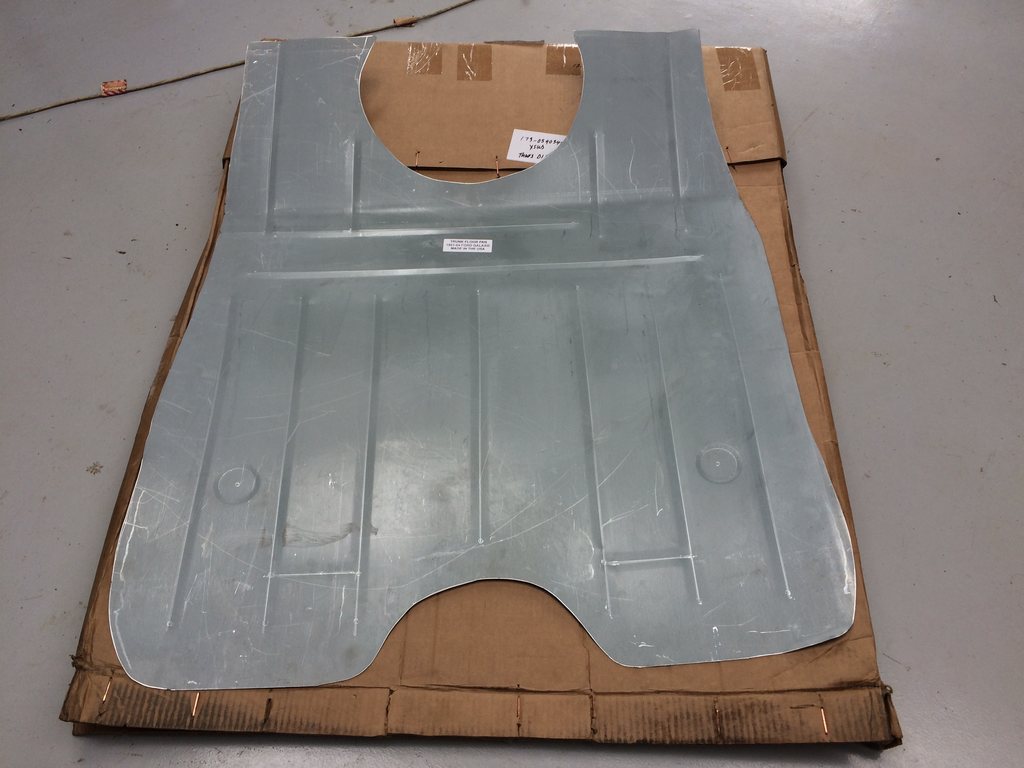
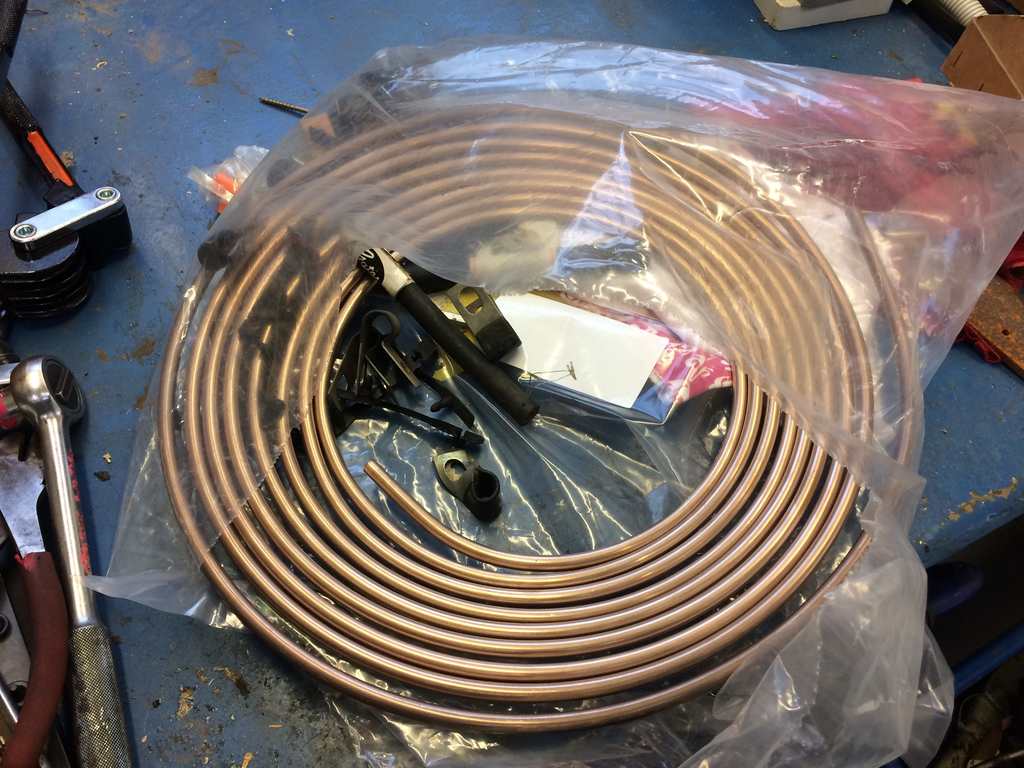
Another compliance job now to be ticked off the list with the car having some previous repair damage and a couple rust areas the job needed to be inspected first by a panel beater engineer before any work was carried out. so i checked with the local panelbeaters who they used and gave that guy a ring so organised a day with him and i put it on the hoist at work for him to inspect and all that was said is make and weld a new patch in nicely in the front R/f floor replace the boot floor (trunk pan) as has many holes and cut out and straighten and reweld chassis in R/R And job done so after talking to a few people and taking the car to a few aswell for the rear trunk floor as that was the last on the list to do with one guy offering to make one for me but me having to cut the floor out and send it to wellington to get made then sent back then spend heaps of time trying to fit the fucking thing. so figured that was an expensive and fuck around way of doing it So the other opinion from who i had seen was to get a good new reproduction trunk floor out of the USA so i found a website who did old ford stuff who i had already bought stuff off so fired away and bought one off them and sent it to the nz post service depot in oregon why they have it there who would know. Then got an email a couple days later stating that the item had arrived but was considered oversize wait what! so gave you shop a call but had to call them here as they don't have a number for the US service 20 minutes on hold and my lunch break is over so called again same thing on hold for 20 minutes so they say they will send an inquiry out for them to check why it is oversize etc so i rang them the next week to get an update as had not heard anything for over 4 days waste more time on hold with the same shitty music then to be told the combined size is too big so my item only being 1350mm or so i figured i was way under so figured it would be fine but no. perhaps they could of worded it abit easier for people to understand the combined size etc? or make people more aware of this? so i was then told i have to email the oversize freight team to get a quote to have it sent here. so did that and had to wait a couple of days for the quote be emailed to me then paid the money as figured it was way less hassle to be Air freighted through them then sending elsewhere and at this point my engineers deadline was coming up. so the item arrived a week later into nz and was waiting customs check for a duty bill etc 3 bloody weeks went by and i had been TRYING to get hold of them but 20 minute holds and by then i just hang up I eventually talk to someone to say an invoice had been sent to me but they sent it to the wrong email address but the thing is i had already been talking to the person who was going to be sending the invoice via email so why didn't he just reply to our current conversation and he did state he would email me the invoice. so i pay the invoice and get told i will get the item on Friday via courier as they don't accept pickups but end up getting the item on MONDAY... so now im a week away from my deadline and there is no chance i can get the trunk pan in because of work. so i open my box to look at nice new trunk floor only too.......... what on earth is this piece of crap where is my swages there is no straight edge on this panel too And they also have the cheek to put a sticker stating its made in the USA m8 could've made a better panel myself with a grinder so this is what the panel should look like. And at this point the panel owes me 835.64 dollars and its scrap so tip one - don't use quality USA replacement panels tip two - don't ring nz post unless you want to waste your life away on hold tip three - nz customs hold times are great also tip four - don't be as gullible as me and assume it would be easier to get one from the states and it would look like the original. like other panel beaters told me.
-
piazzanoob's 1964 Ford Galaxie 500 seeeedaaan
piazzanoob replied to piazzanoob's topic in Projects and Build Ups
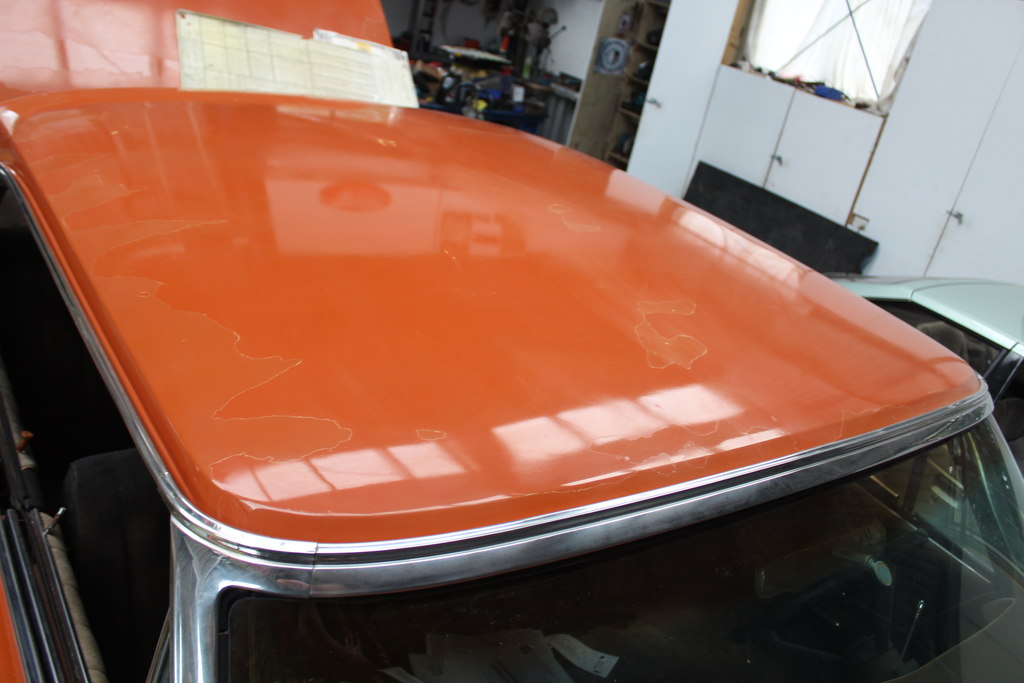
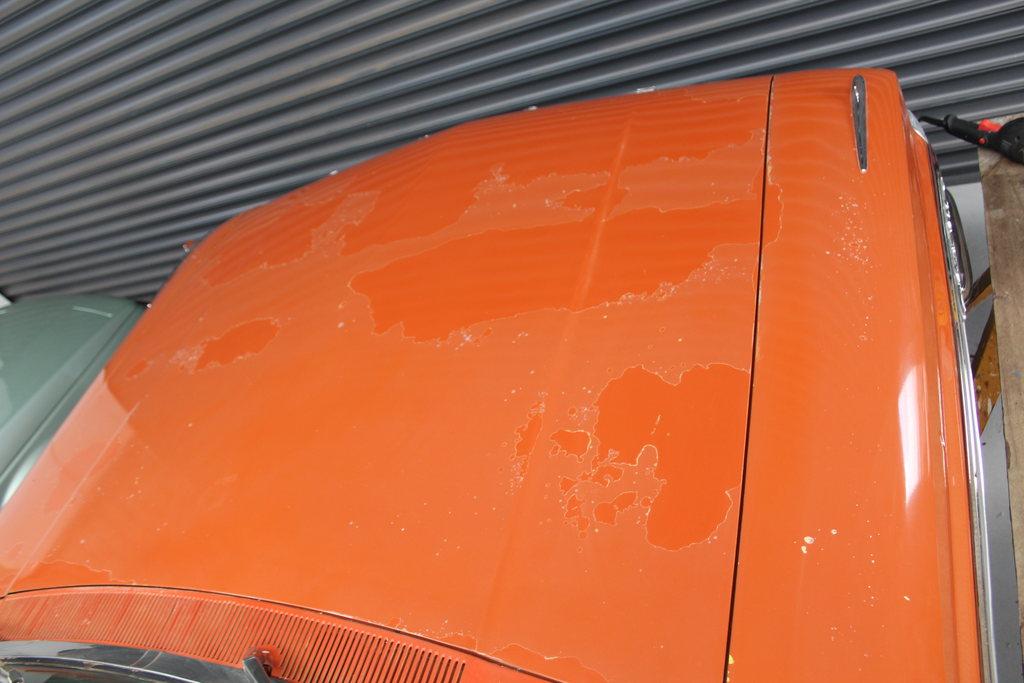
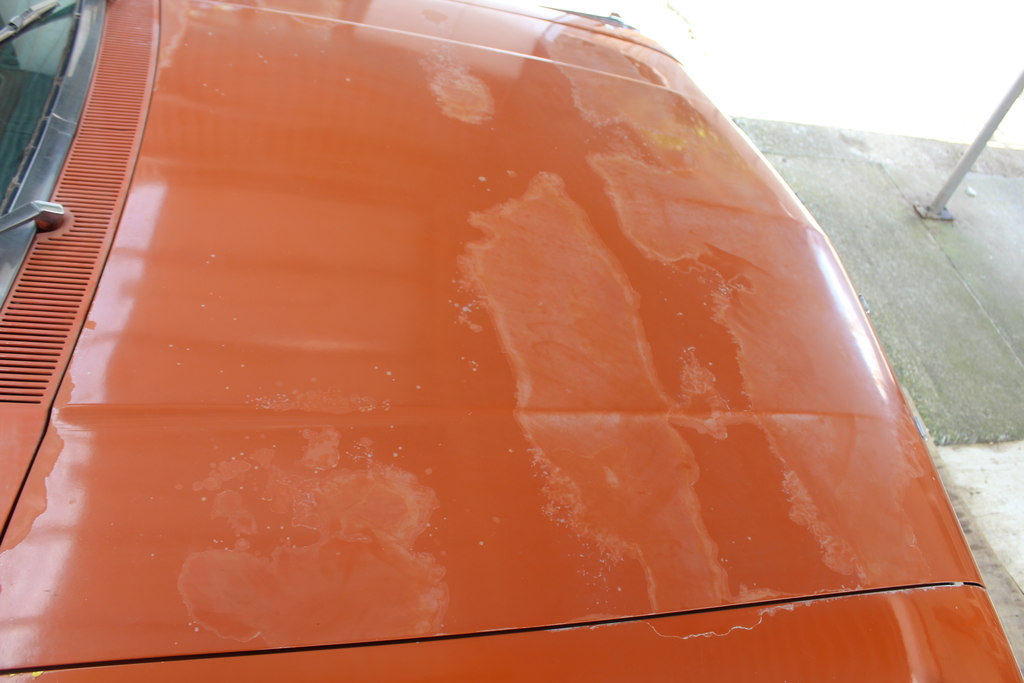
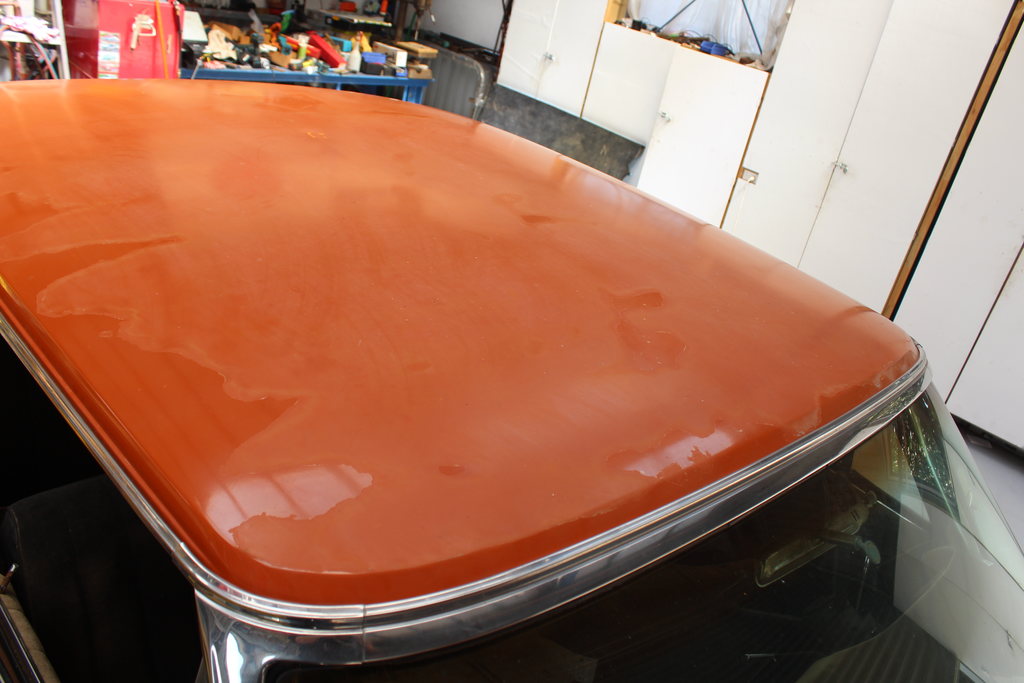
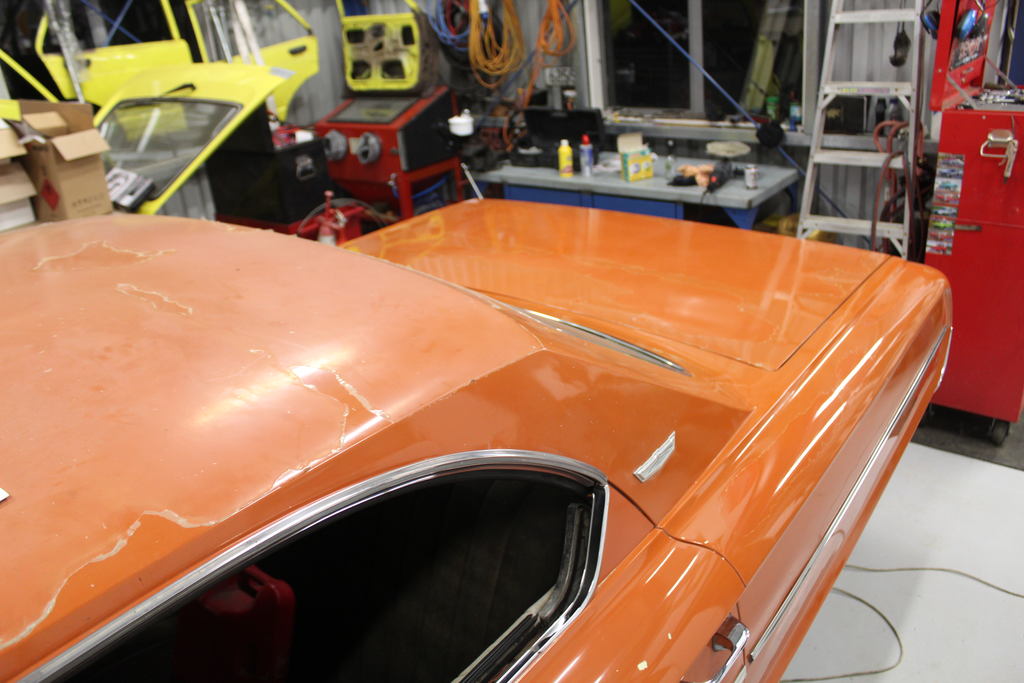
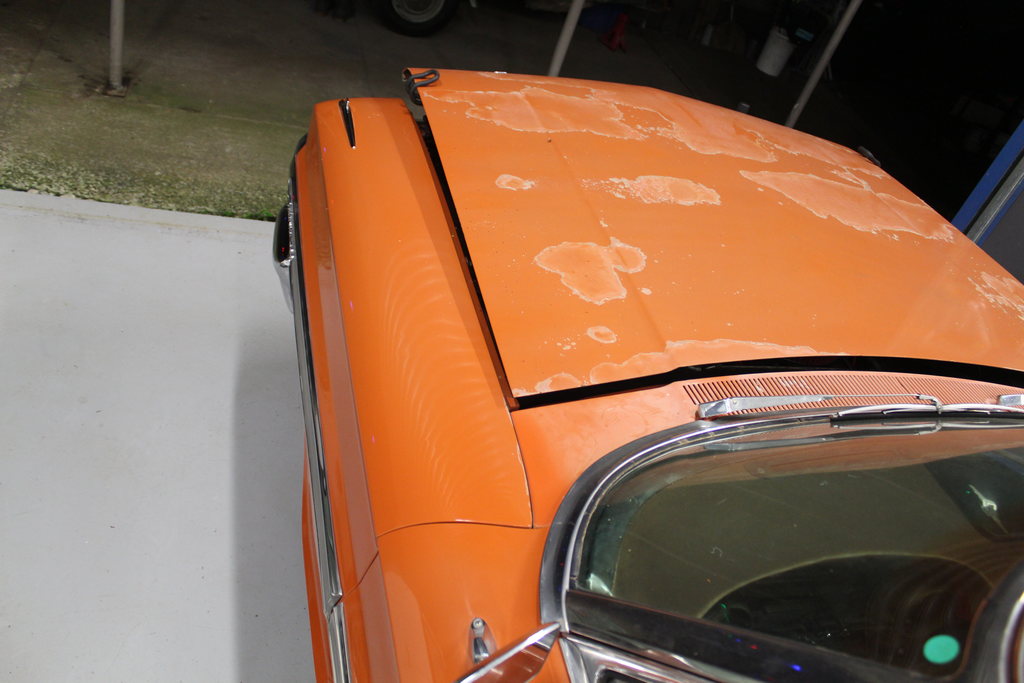
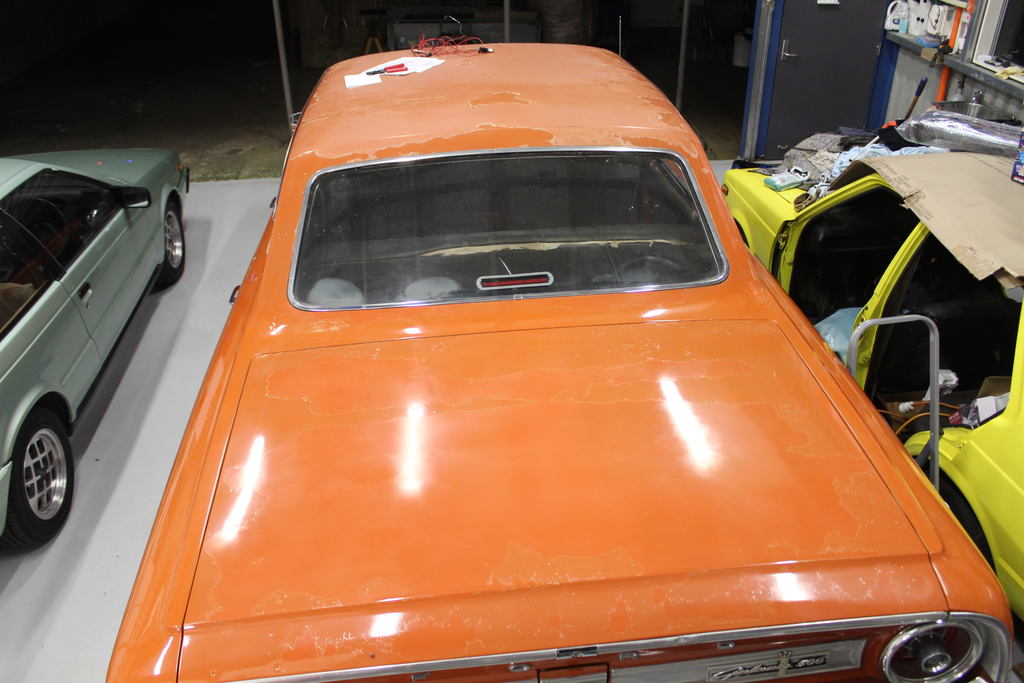
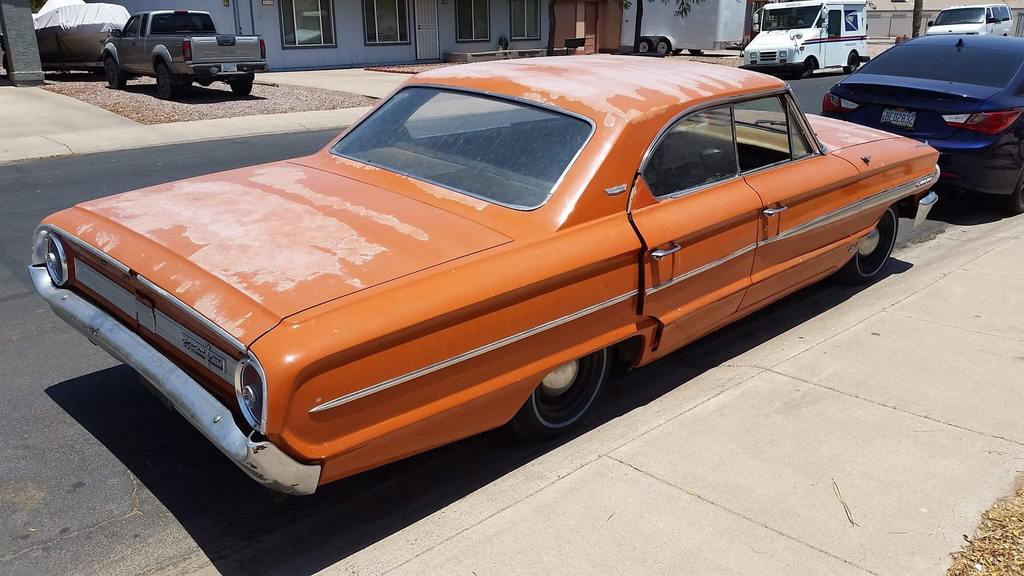
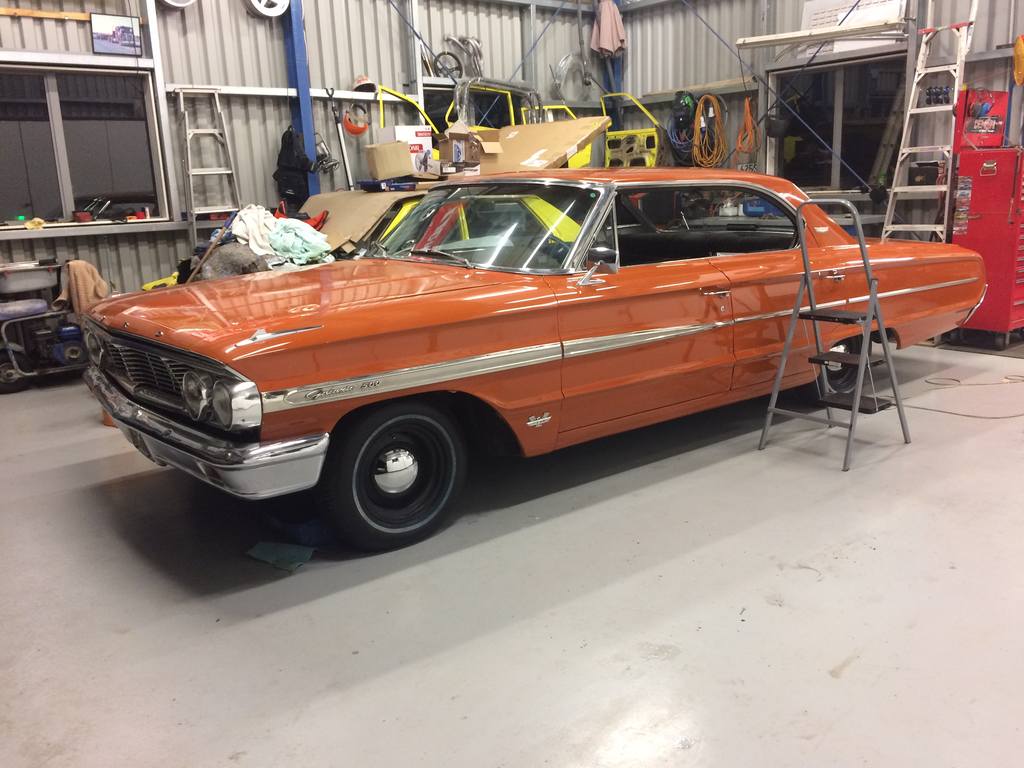
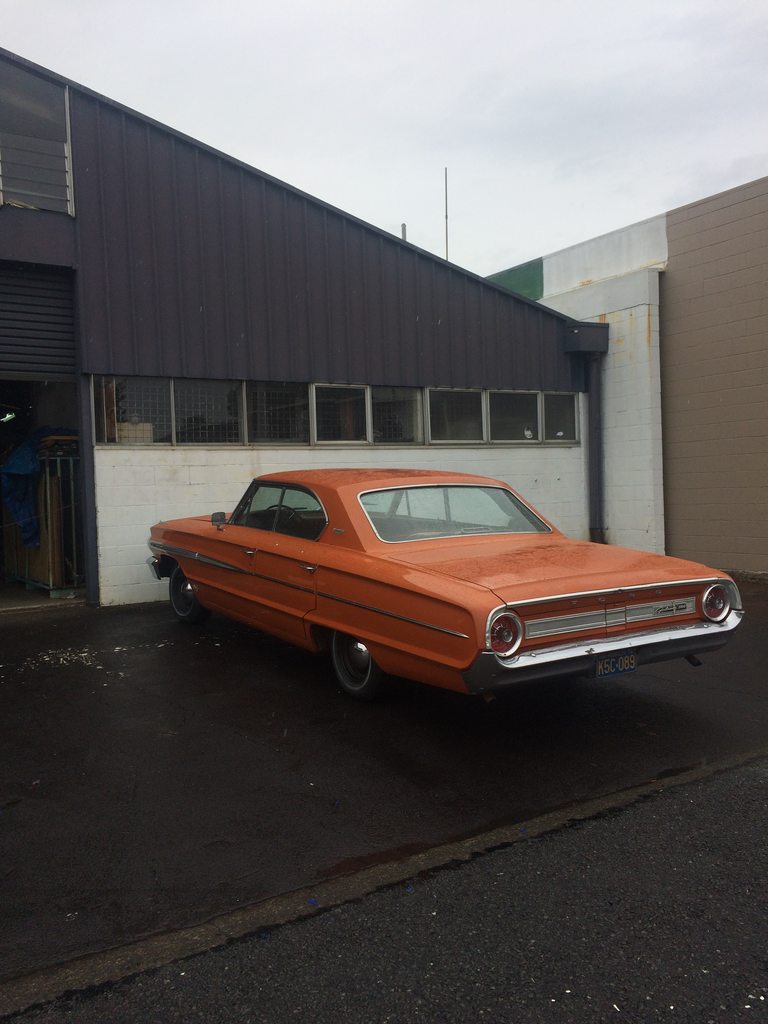
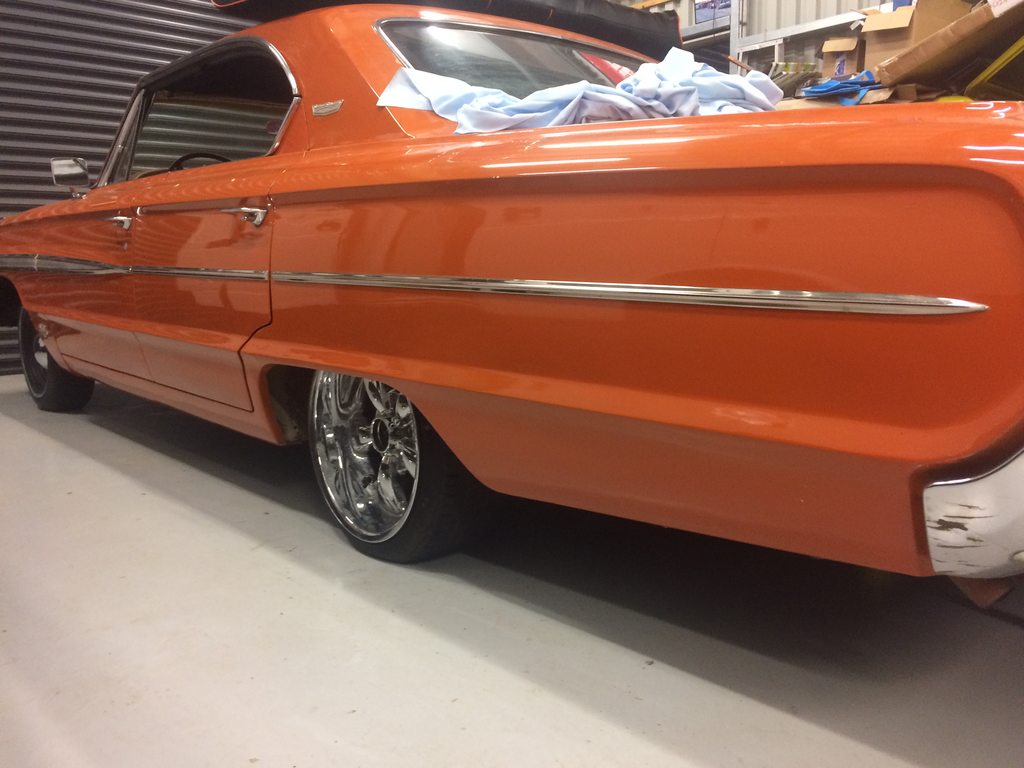
One thing that had always bugged me with this car was the paint. The clear coat on the paint has come off on the bonnet boot and roof and some other smaller areas so it looks like crap. ive decided that the car will not get a respray from me as ive got to many other projects and would rather not know what is below the paint. nor have the time or money to do the job. so to start with i got the compressor with the air duster on it it and blew off the remaining clear coat that was not stuck down as they were the bits that stood out I then used the electric buffer with the sheep wool pad on it and some cutting compound and a mist of water on the surface so the cutting compound would not dry out so now the aim was to restore the current paint as good as i could so this was before any work had been done on it when it was in the USA still which is the best photo comparison for the paint work without looking at it in person so this photo shows the gaurd has been buffed and the bonnet has not i then over a few nights buffed the whole car and having to go over some bits again too And the roof yet to be done in this photo then after buffing the whole car i then buffed on some polishing wax to give it a bit more shine and paint protection And tried on some 17inch cragar's which look crap so now the paint looks a whole lot better than before but is still good from far but far from good. but now to keep it clean as it doesn't get taken in the rain much is just to give it a wipe over with some detail wax and a microfiber cloth and it keeps its shine and helps to stop dust staying on it. now tell me how i should matty B it
- 77 replies
-
- 19
-
-
piazzanoob's 1964 Ford Galaxie 500 seeeedaaan
piazzanoob replied to piazzanoob's topic in Projects and Build Ups
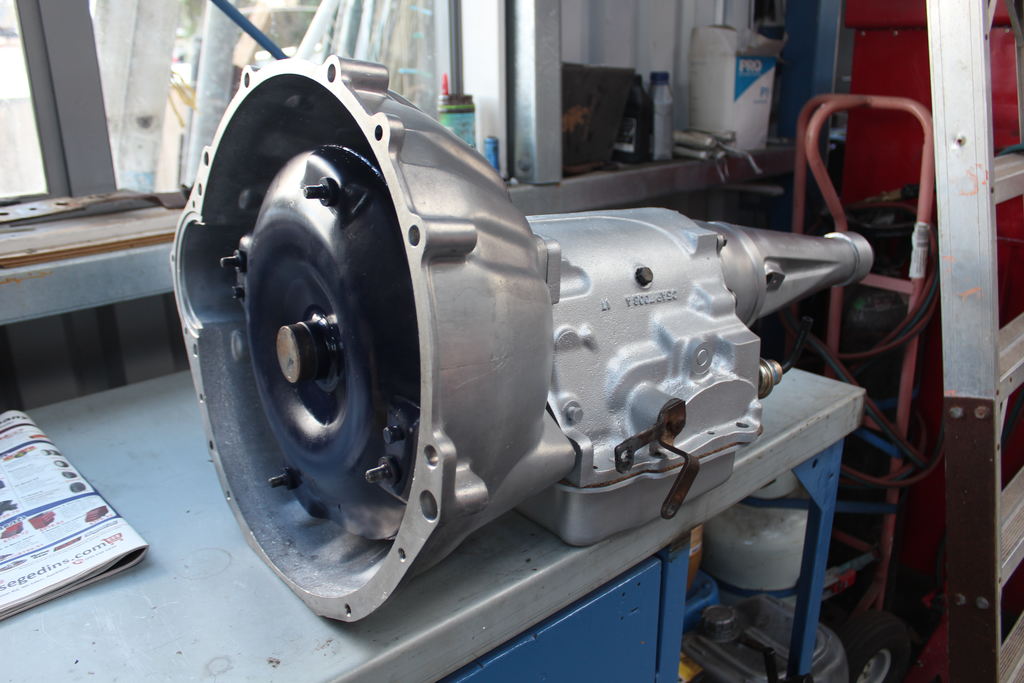
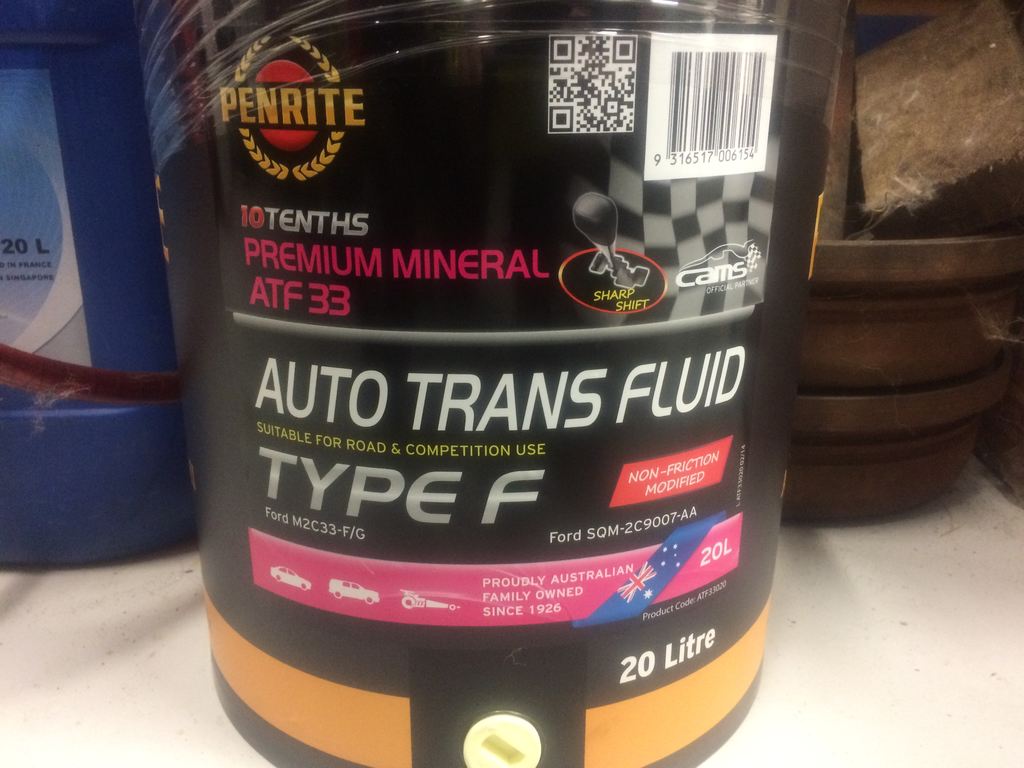
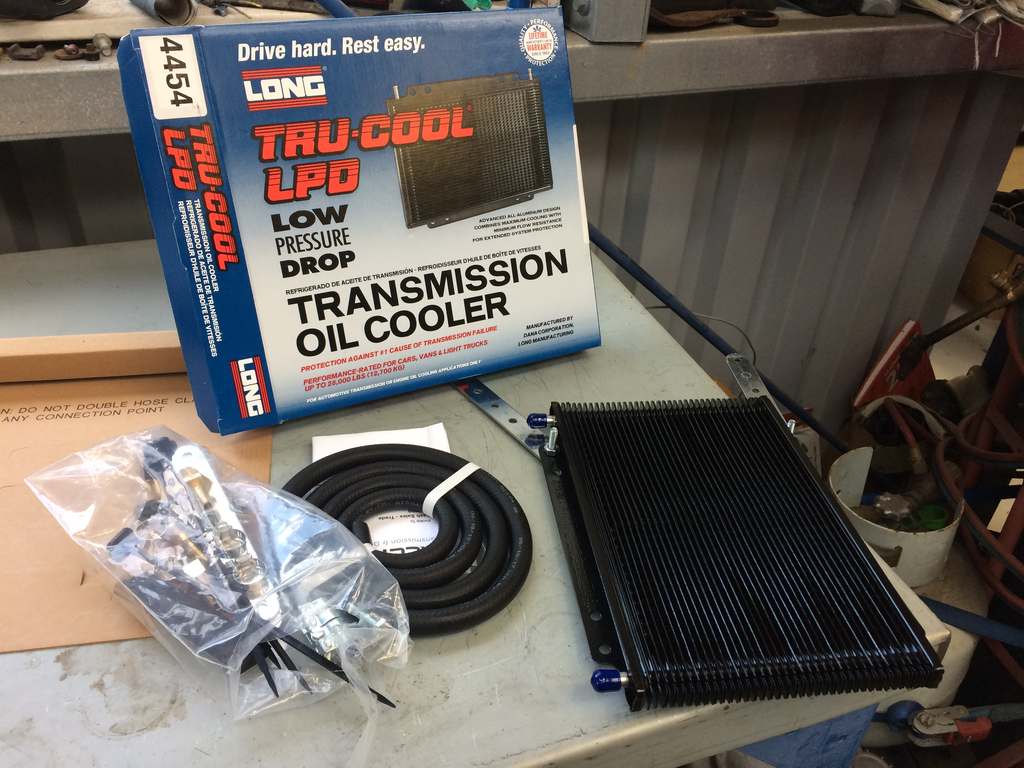
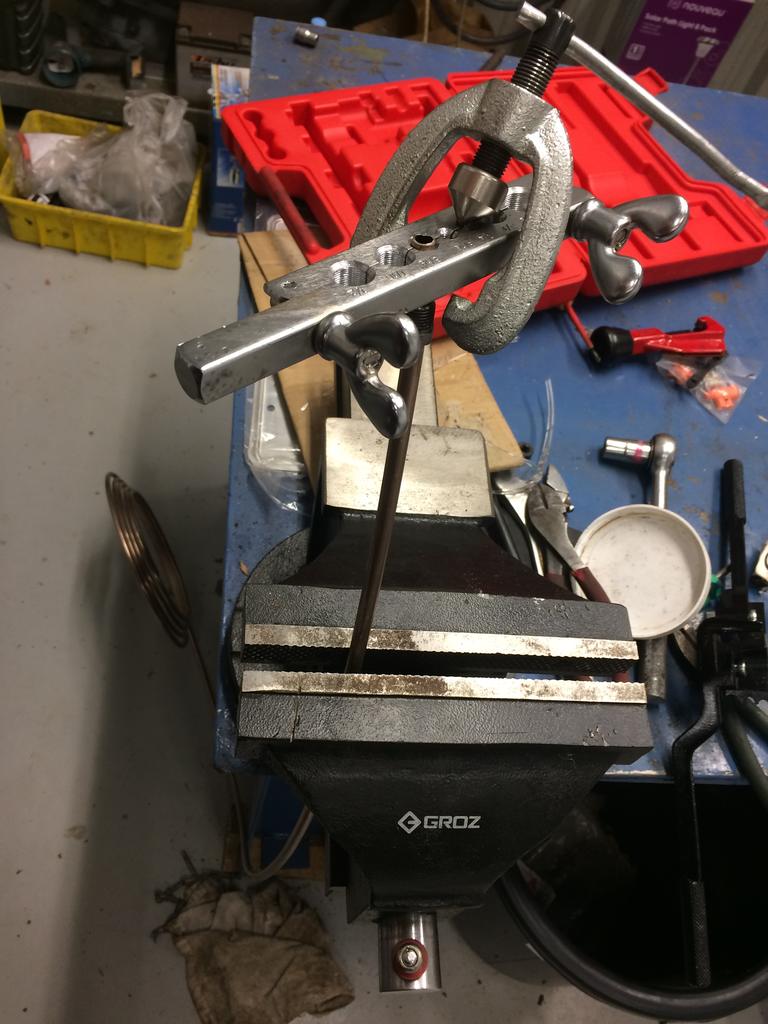
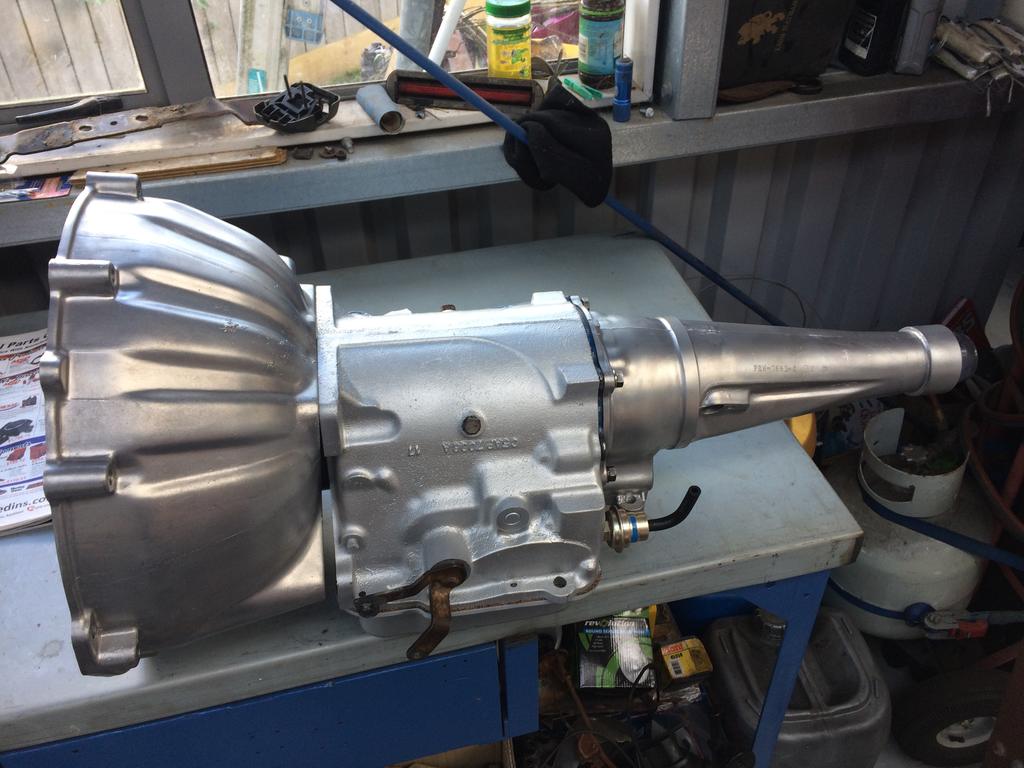
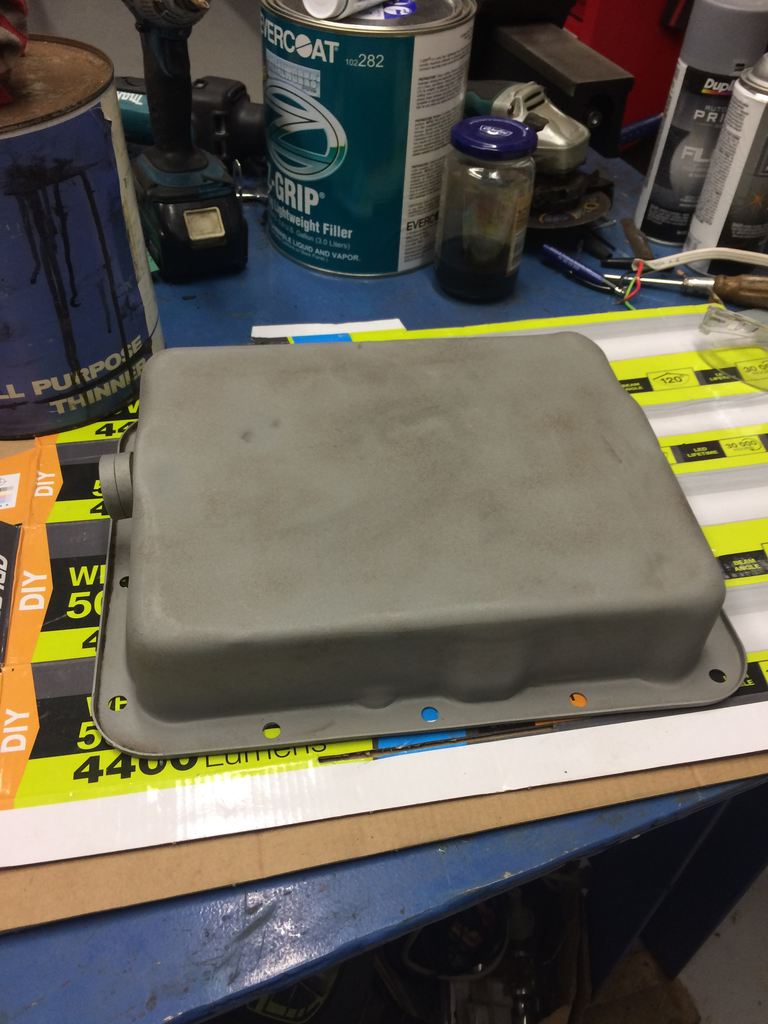
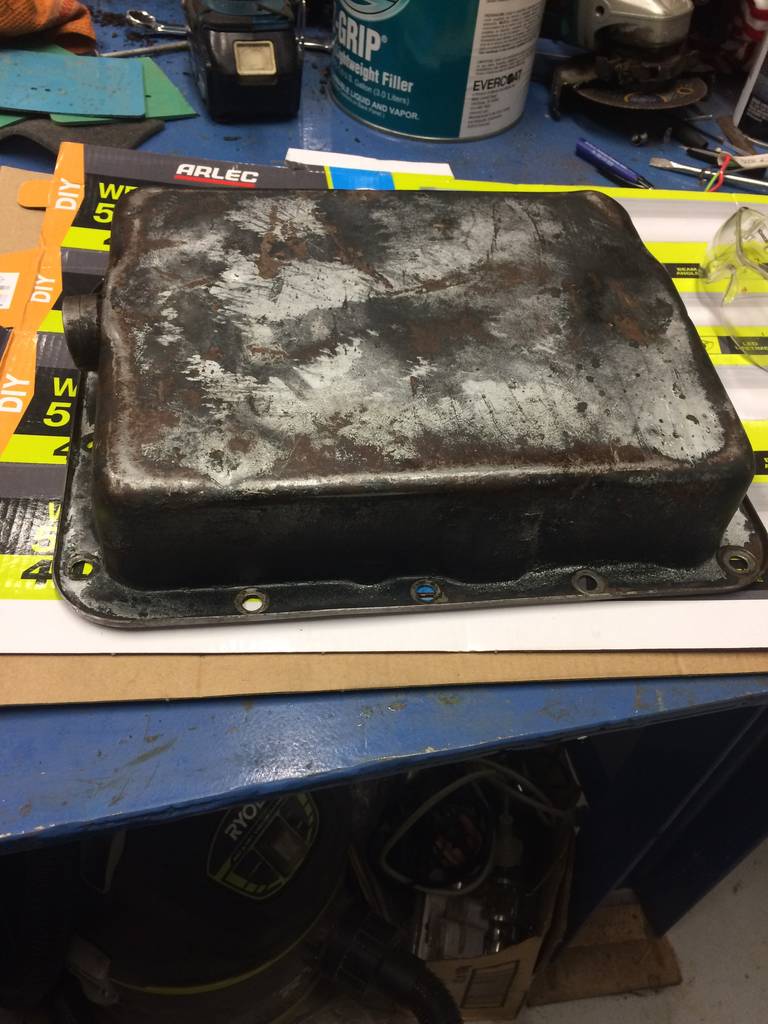
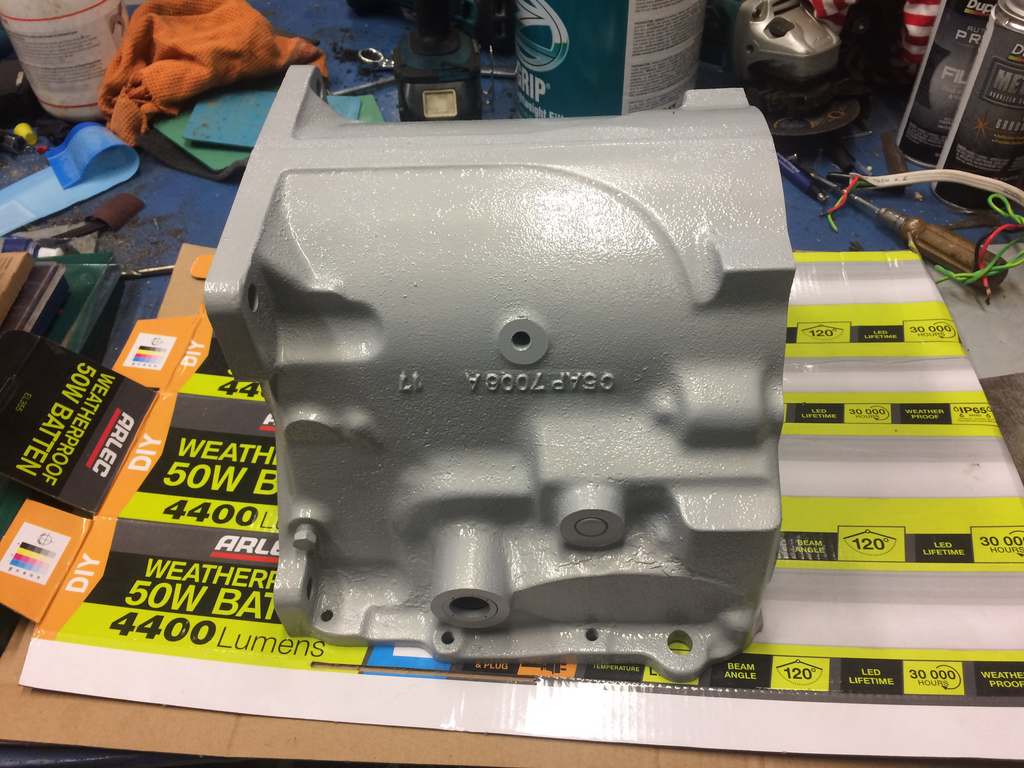
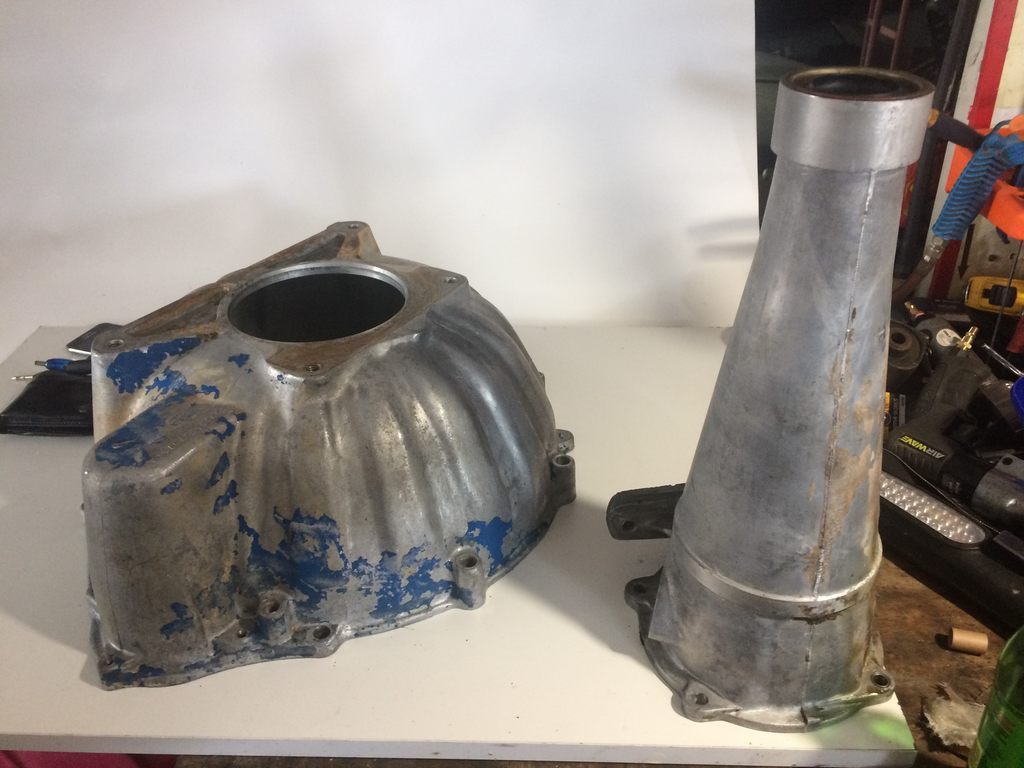
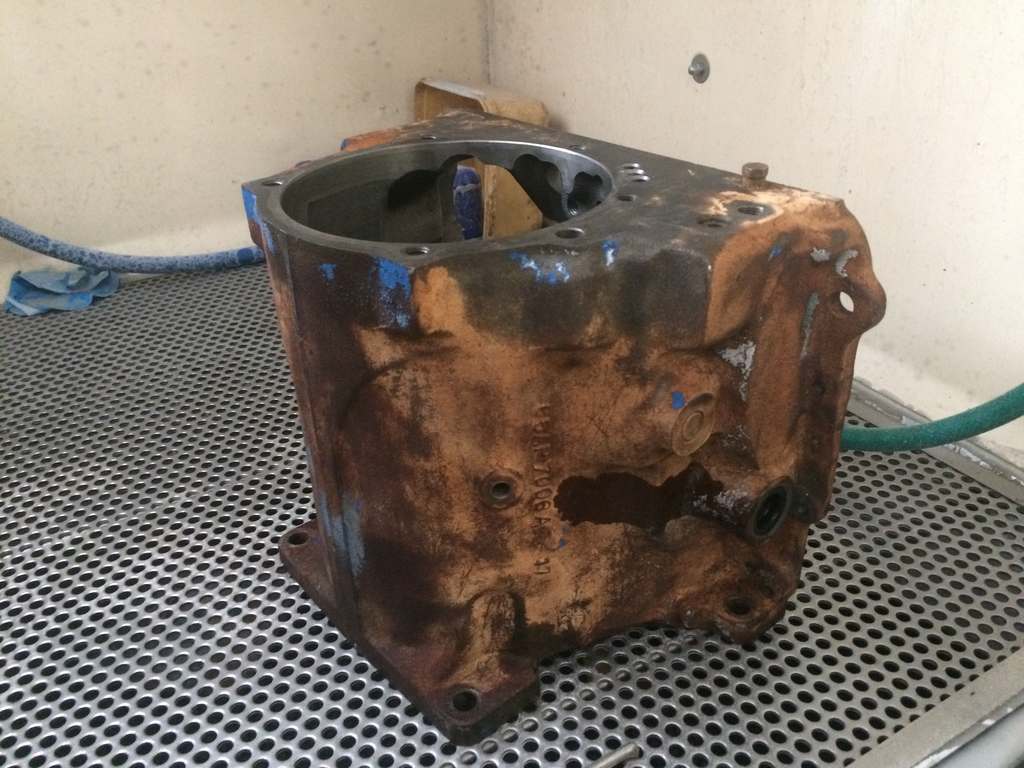
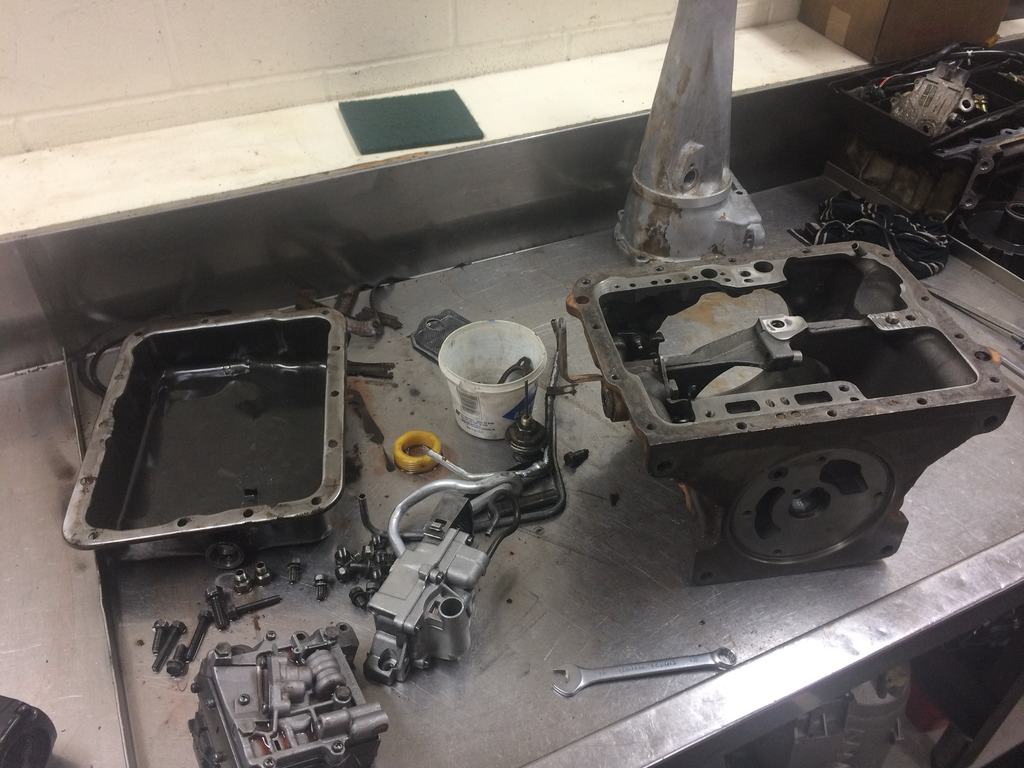
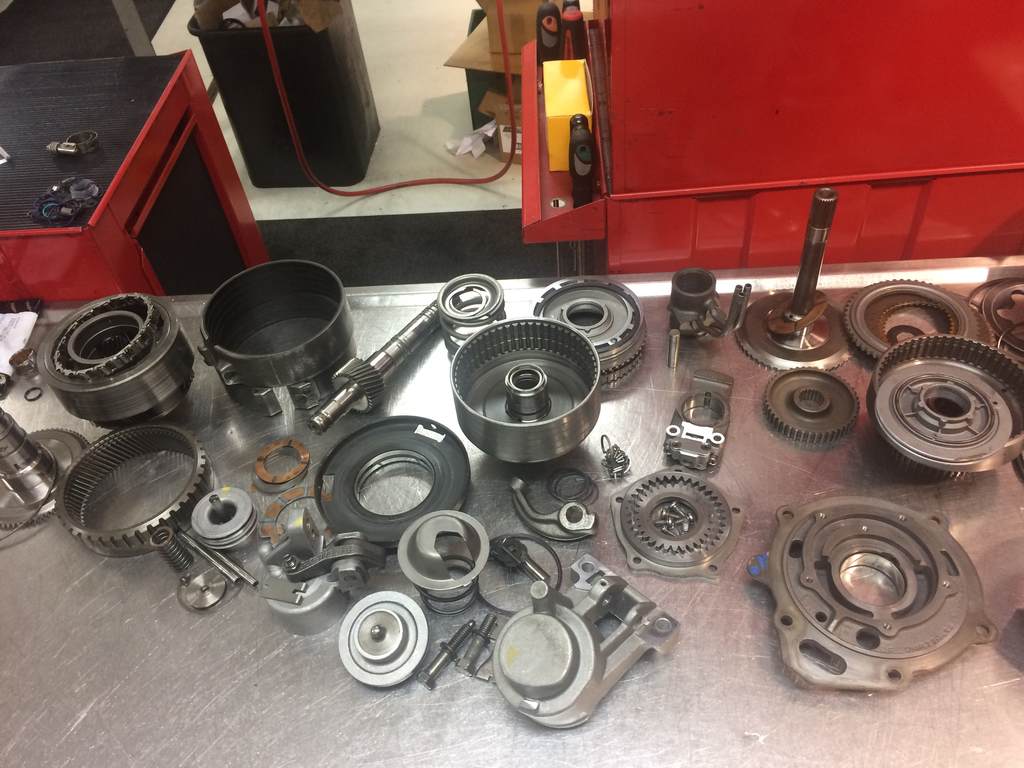
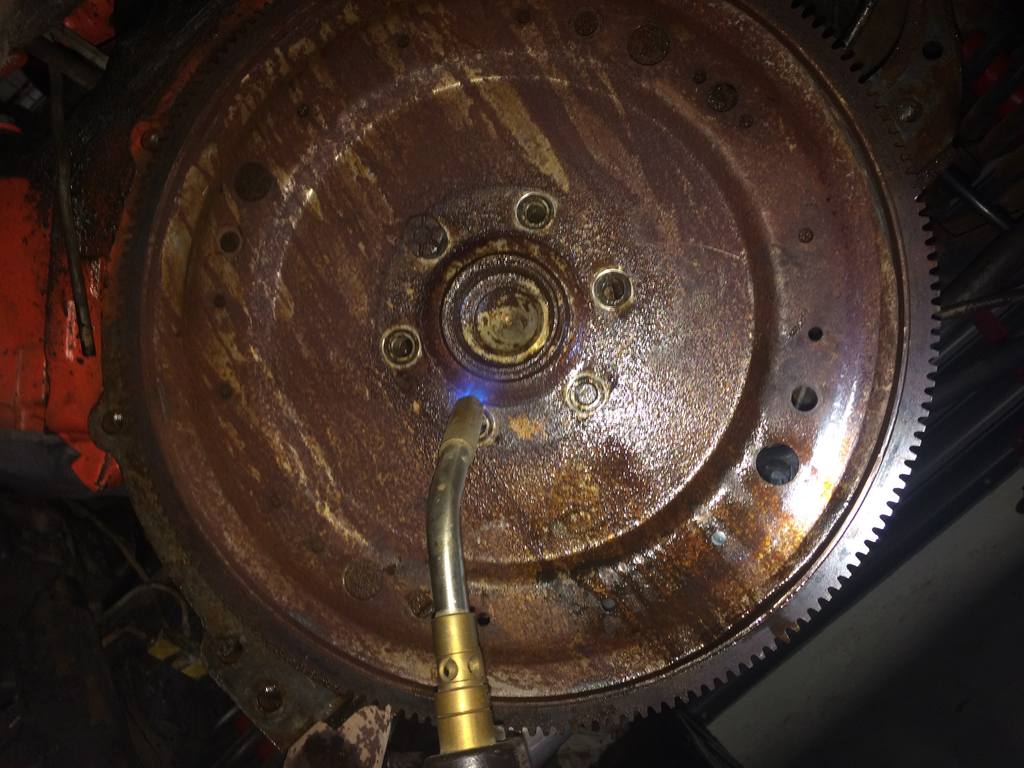
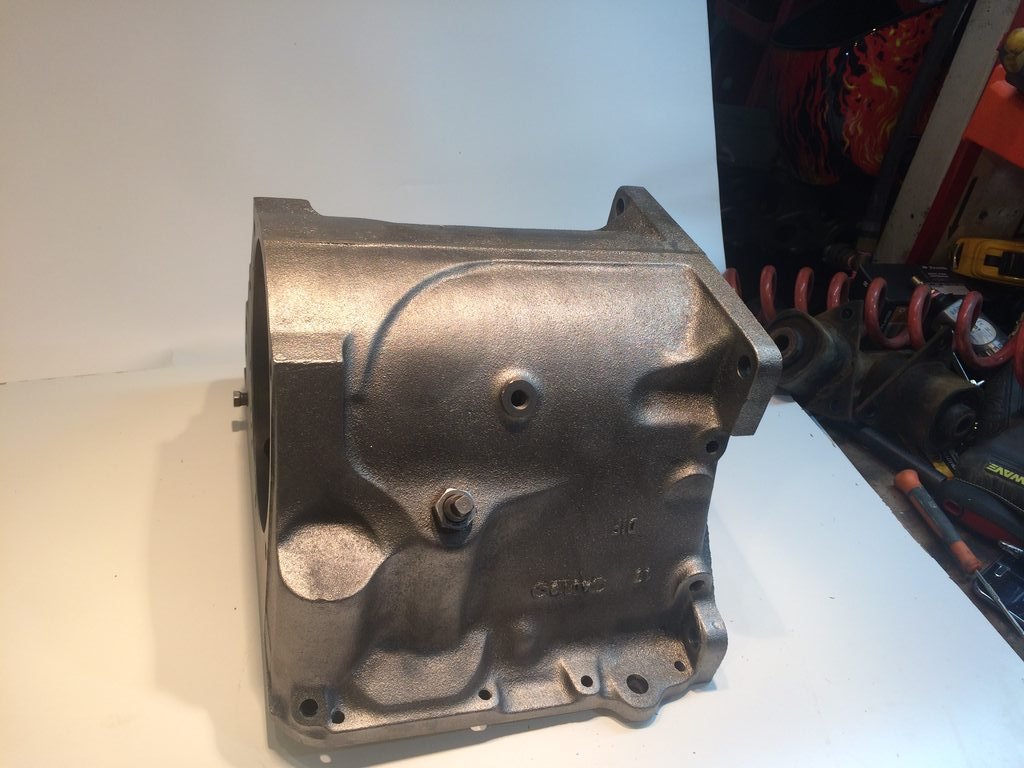
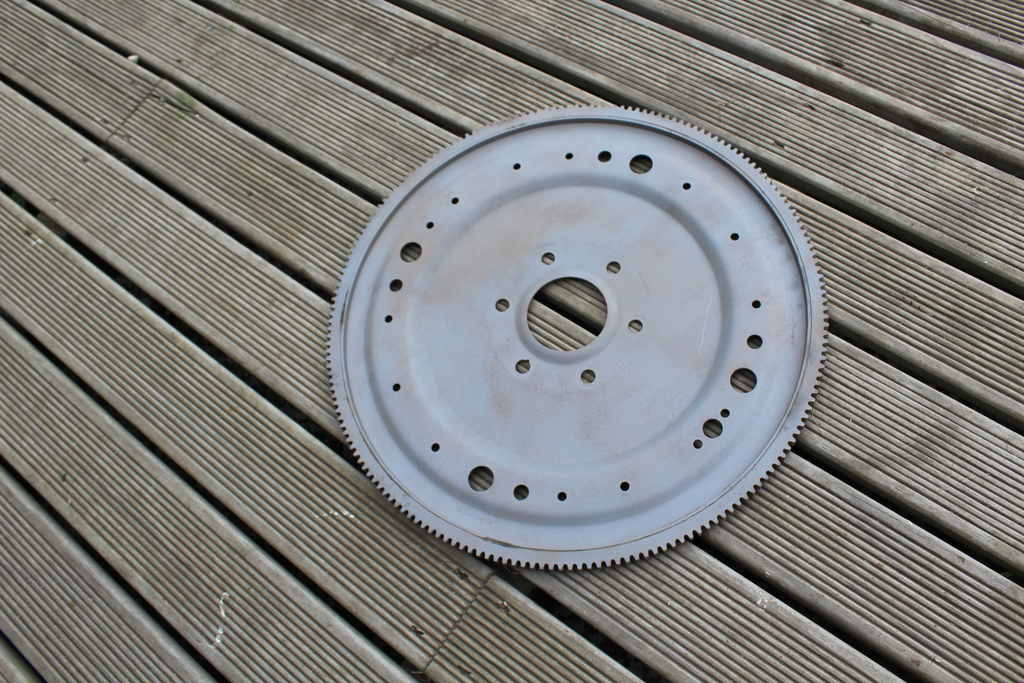
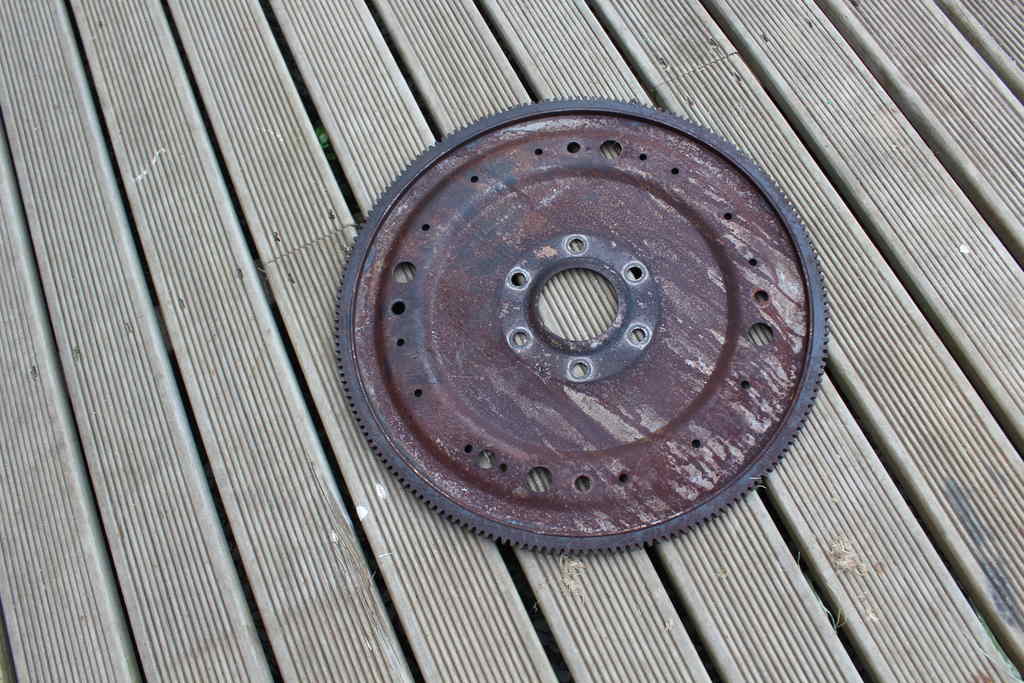
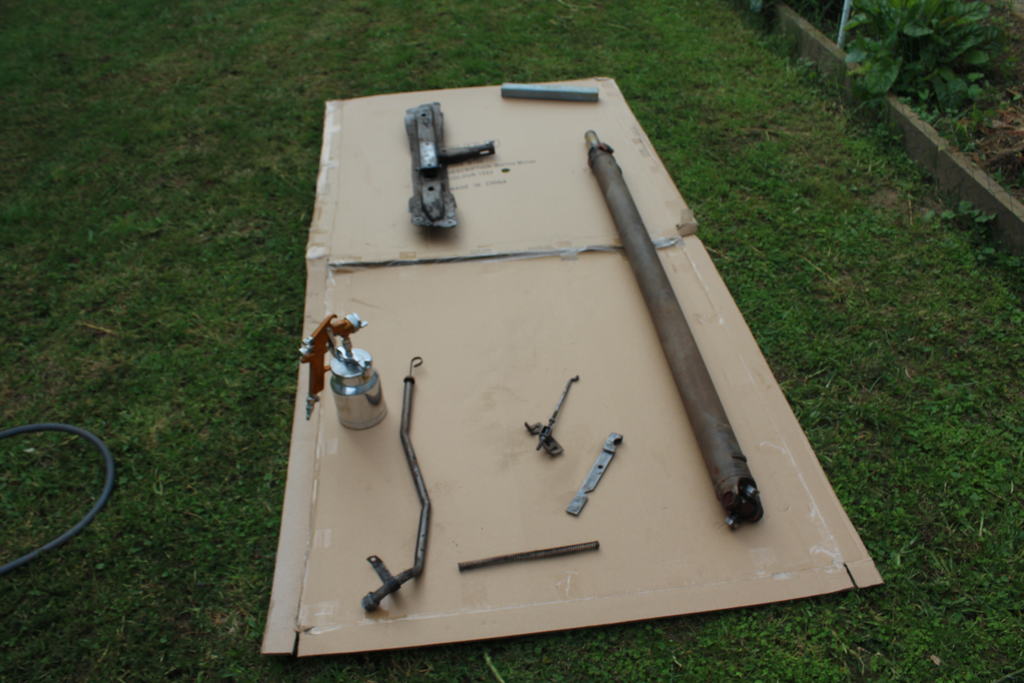
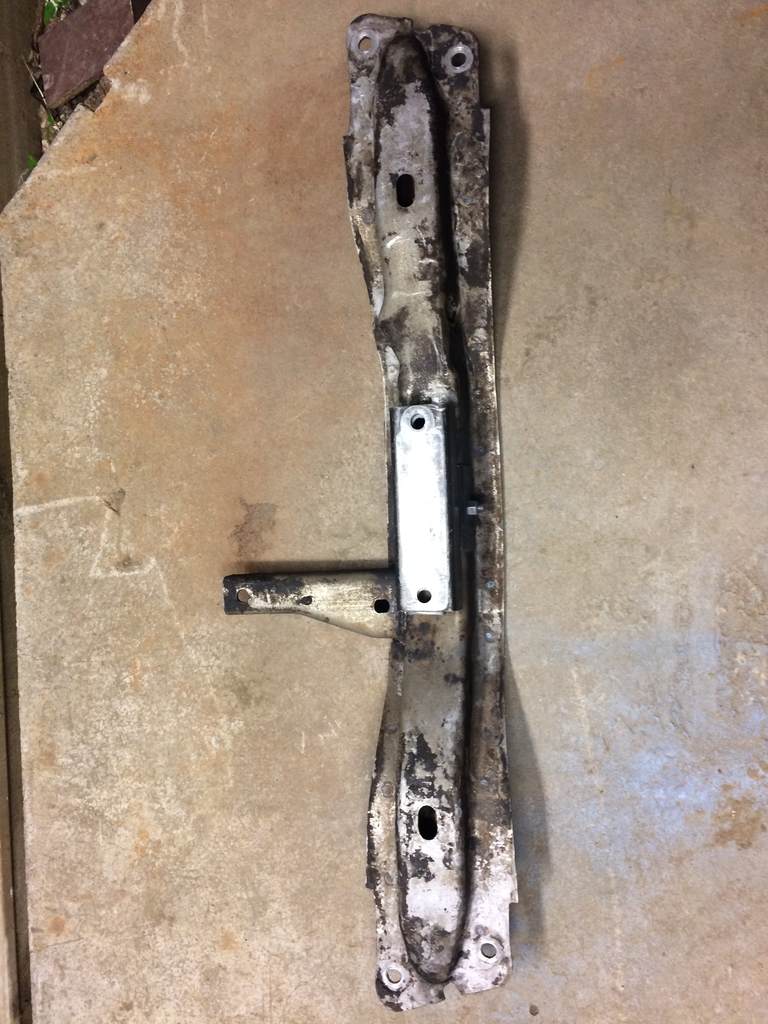
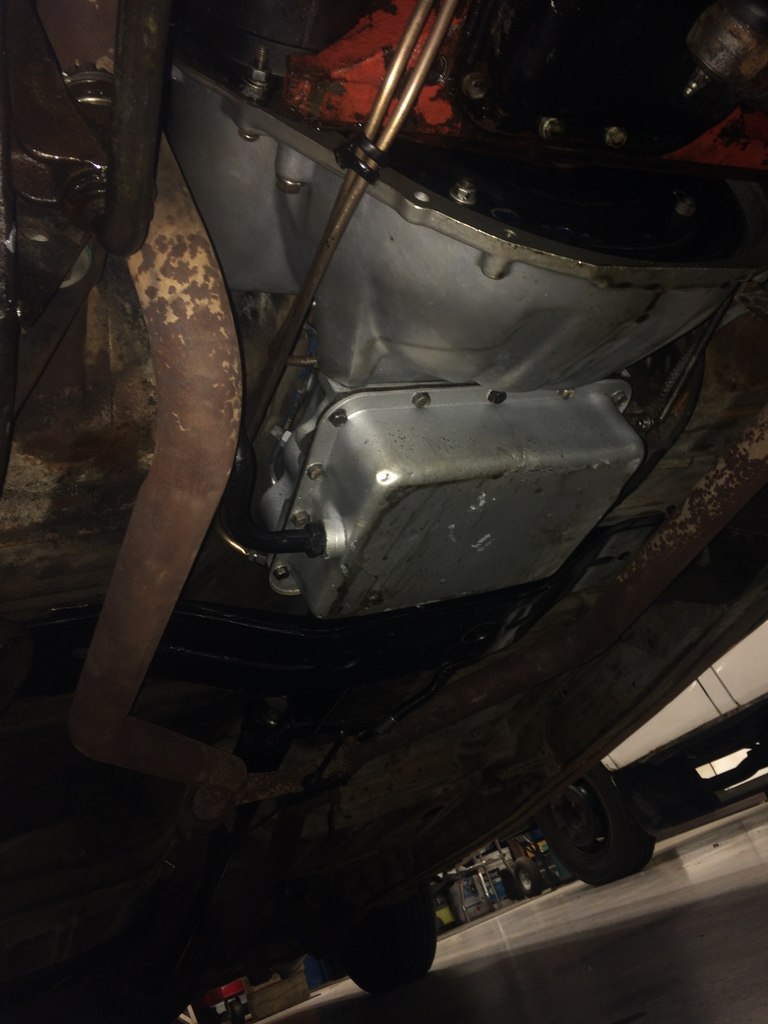
more jobs on the list have been done one that i didn't really want to open my wallet and get done but it needed to be done. The trans had and issue where it would not go into third gear (top gear) all the time and leaked from every hole bar the front seal. And after talking to the trans shop about it it was decided it had to come out to be fixed. so out it came unfortunately never got a photo of it out but the whole trans and crossmember were covered in fluid and grease so pulling it out was not much fun so off to the trans shop it went And god dam these cruise o matics are heavy also note that amount of metal fillings sitting in the trans pan so pretty much under the whole inspection nothing was found to be damaged just everything worn out and metal fillings through the torque converter and valve body which was the cause of the intermittent top gear fault but the trans had clean fluid in it due to it leaking out it required regular top ups so while the trans shop were waiting on parts from the USA i sent the housings off to get blasted even though the trans shop had already done a good job at cleaning them so this job went to @Mr Vapour before vapour blasting And after then applied some paint to the housing Then went to the job of removing the flex plate Left CRC on it for a few days and gave it a few heat cycles with the map torch Then got it hot and spent about 10 mins with 2 prybars and eventually came off then gave some of my other parts a sand blast and water blast before After a steam clean And painted the trans pan the same colour as the trans housing but no photo of that. after a light sandbast treatment then gave the parts a lick of black paint unfortunately turned out average as i thinned out the paint a bit too much then the parts went back to the trans shop and got it back a few days later looking like this too bad you don't get to see it as its under the car then in the car it went also did wreck abit of the pan paint while getting the trans in on the ground after that i made some new cooler hardlines as the old ones were steel and pretty fucked copper pipe m8 gave it a flare job then proceeded to run it from the front to the trans and using a pipe bender where it needed it and placing p clips to retain the hard line. then 2 lines later i was on to fitting this then bought one of these bad boys as the current setup was through the radiator which isn't super efficient and mounted it in front of the radiator which seems to cool it alot better than what it did before then filled the trans with this stuff ended up using about 8 liters could've used dexron 3 but type f runs no additives so is abit better for the trans friction material. so cheers too @Mr Vapour on the great blast work and quick turn around And thanks to Auckland Automatics for doing a great job and emptying my wallet
- 77 replies
-
- 18
-
-

-
so when you are doing the blocking are you just using a big sanding block and using your eye and hands to check its sweet? also is there any reason why you are not using a guide coat primer to help with getting it straight too
-
If this is in a kp starlet? if so i believe they came factory EFI in japan so really you putting in EFI doesn't mean shit to the car. And the power increase would be less than putting a cam in or sidedrafts on. me personally wouldn't even bother with vtnz or any other testing stations just take the car into a local garage who preferably works on older stuff who will most likely appreciate the car for putting EFI on and you should get a wof without to much hassle.
-
piazzanoob's 1964 Ford Galaxie 500 seeeedaaan
piazzanoob replied to piazzanoob's topic in Projects and Build Ups
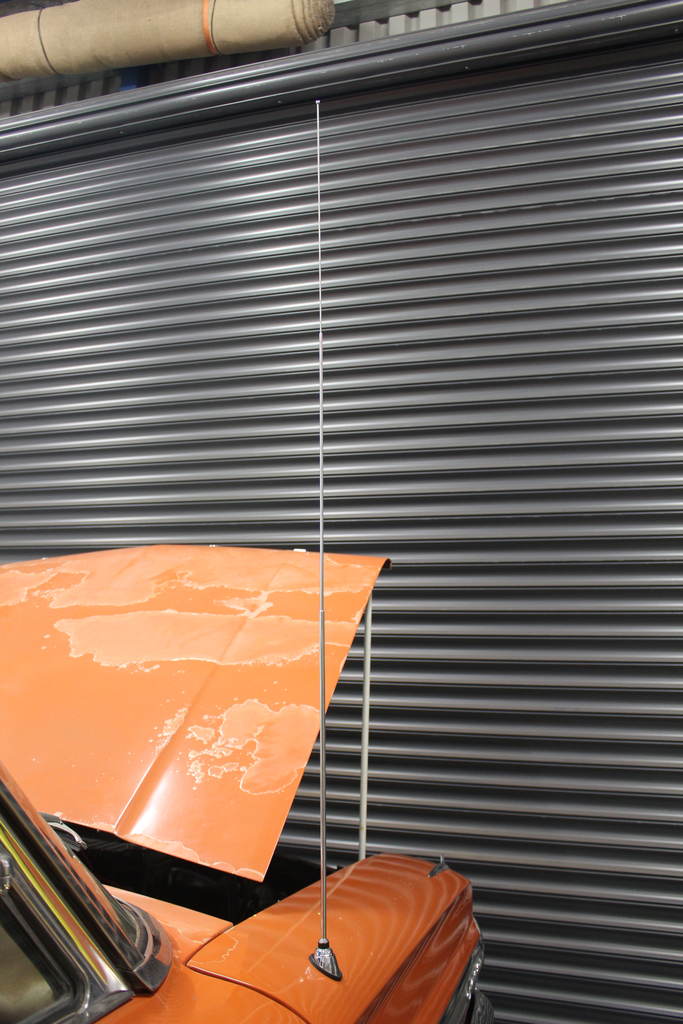
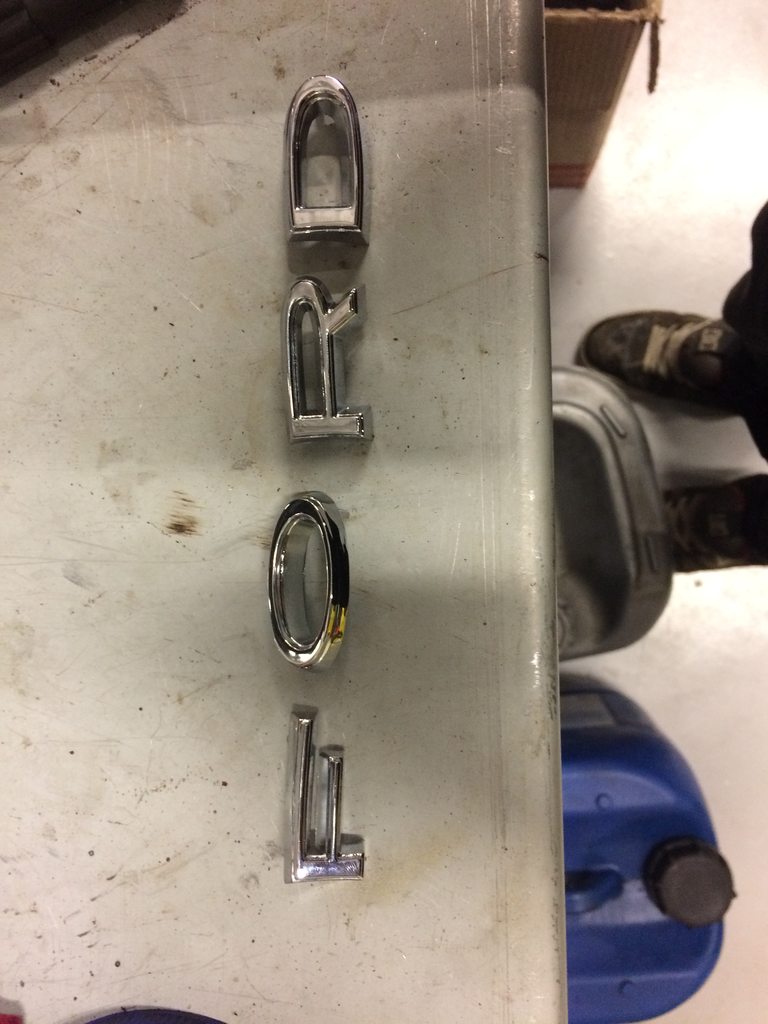
so a wee while back i ordered some parts from the US for this. And some aliexpress shit got a boot lock rod so i could fit the lock that was new that came with the car then some fuel flap rubbers doesn't fit quite flush but ill let the rubber settle itself out for abit first. And a new carboard type glove box insert as it is quite handy to have a working glovebox and also ordered a set of letters for the trunk lid as it previous only had F and O remaining and got myself this sweet Ariel as the one it came with had been snapped off and not working. then after a couple of days of having it fitted i snapped the darn thing off. you silly cunt still got some more things to fit onto this car that ive already received but will do that after she is wof and rego'd
- 77 replies
-
- 14
-
-
Will be driving from auckland to nationals so wanting to know who else is. let me know what day etc would be good to convoy for incase of problems along the way will also have 1x seat free for those who will need a ride cheers m8
-
piazzanoob's 1964 Ford Galaxie 500 seeeedaaan
piazzanoob replied to piazzanoob's topic in Projects and Build Ups
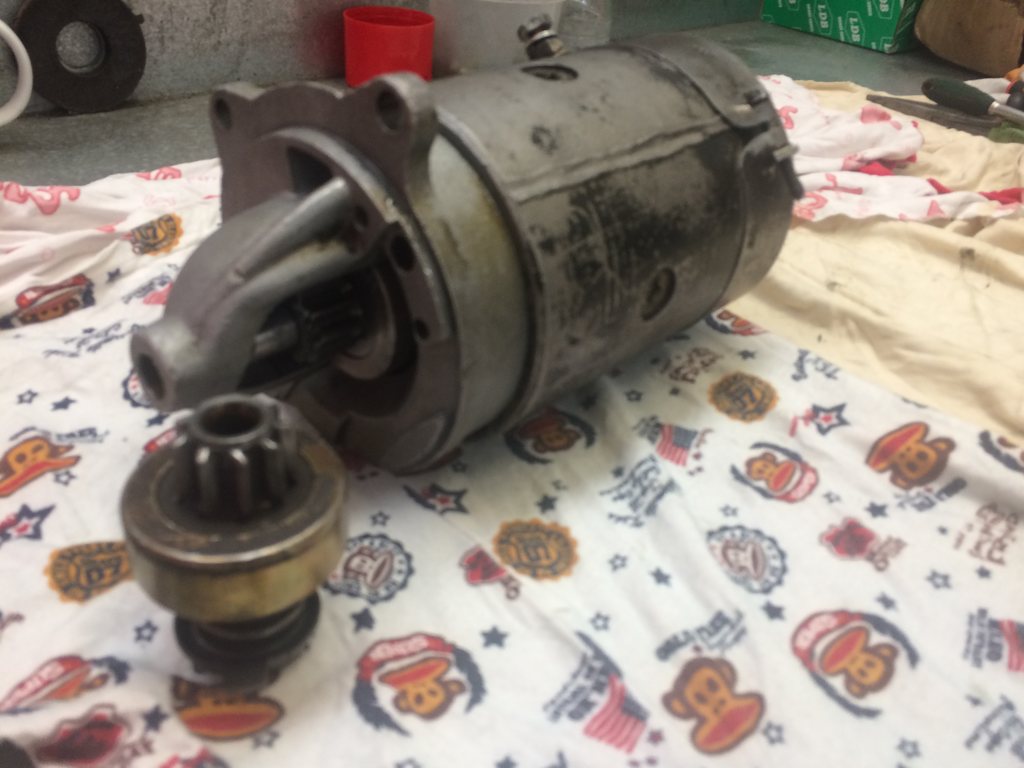
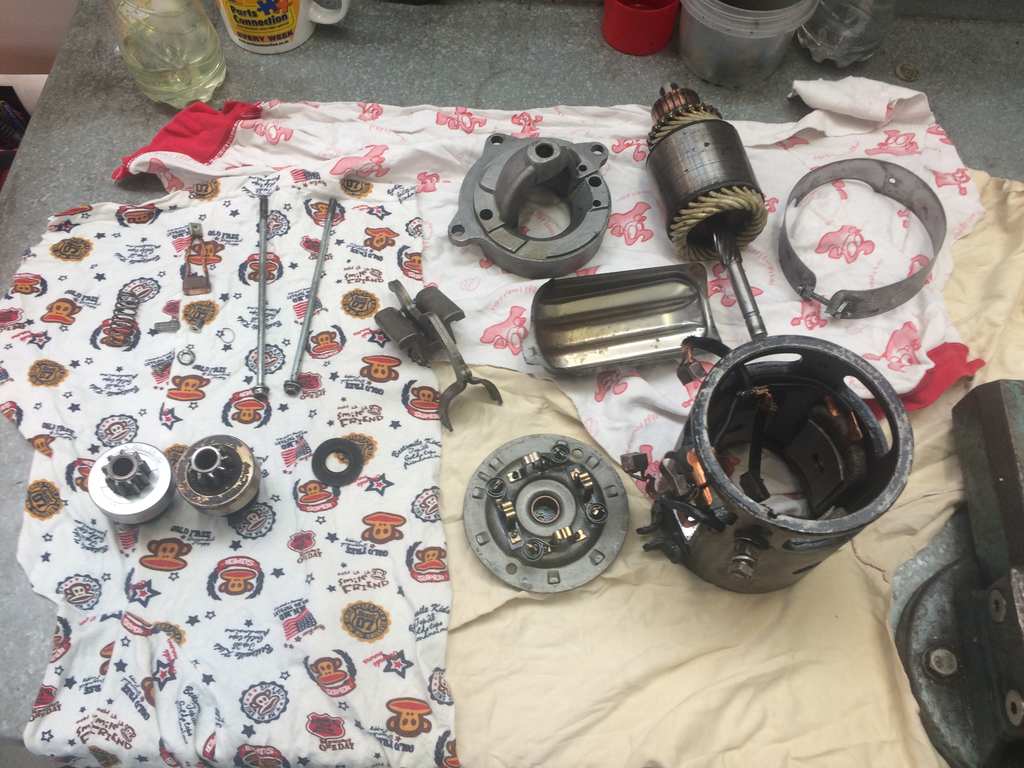
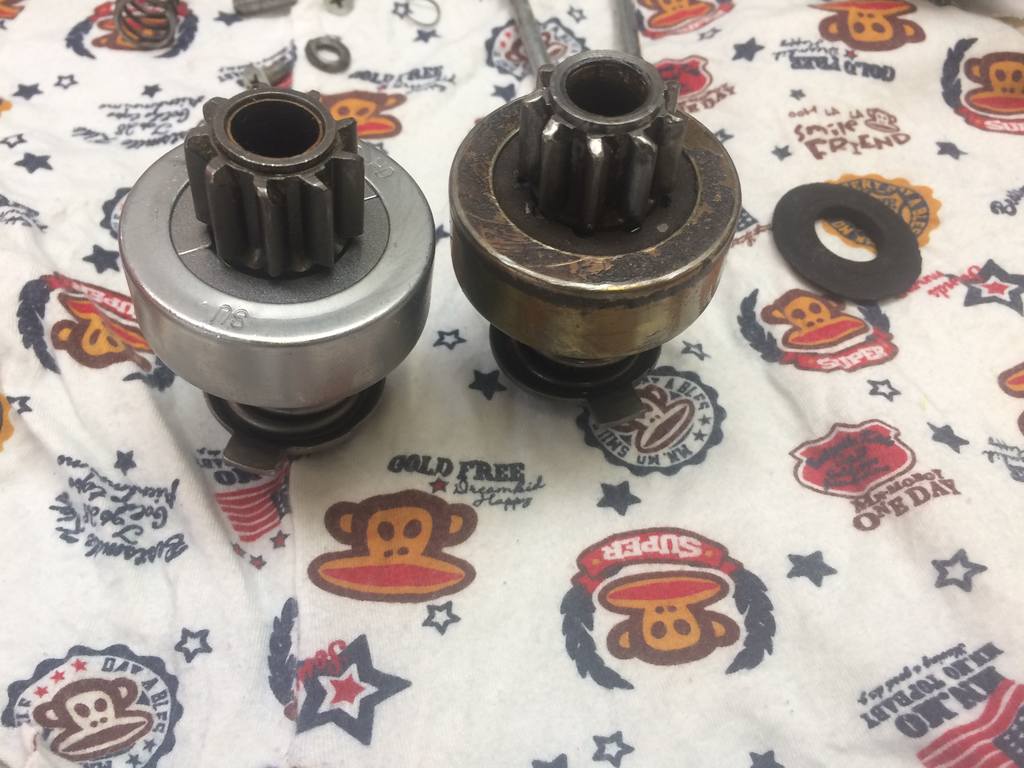
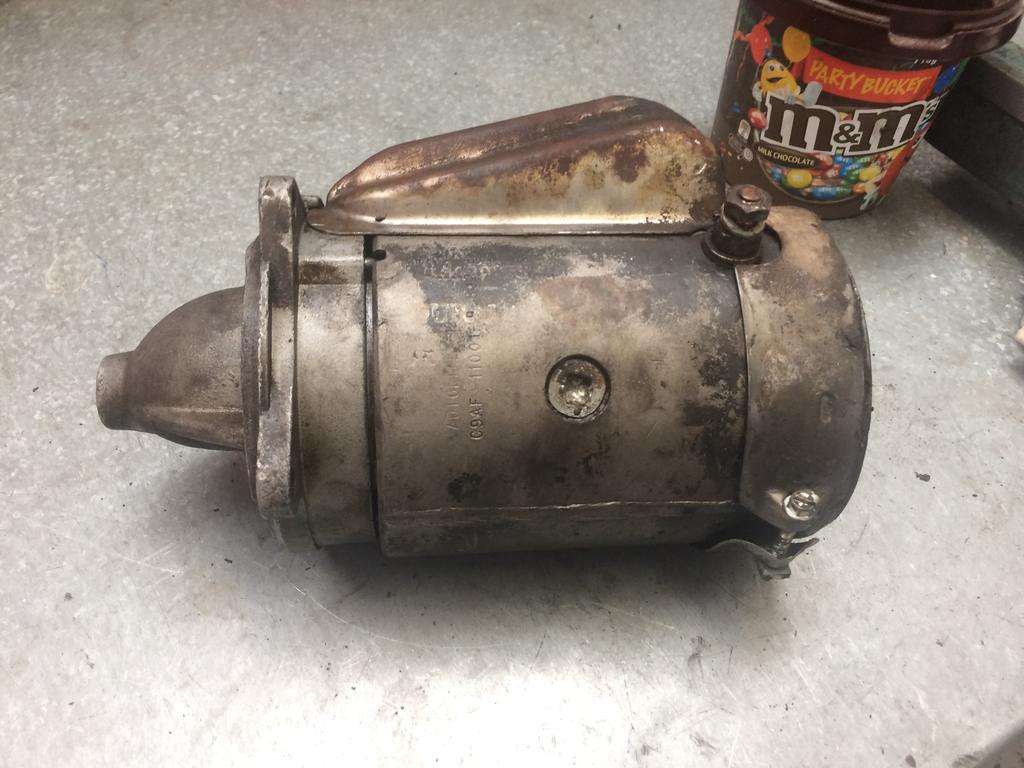
Another job on the to do list done starter motor had an issue where it wouldn't engage alot of the time. so out it came from its hole pulled apart the starter motor and narrowed it down to the clutch not working under load. so ordered a new one from northwestern ford and received it the next day. also gave everything a good clean while it was apart. then reassembled it with the new clutch etc another job done and dusted
-
piazzanoob's 1964 Ford Galaxie 500 seeeedaaan
piazzanoob replied to piazzanoob's topic in Projects and Build Ups
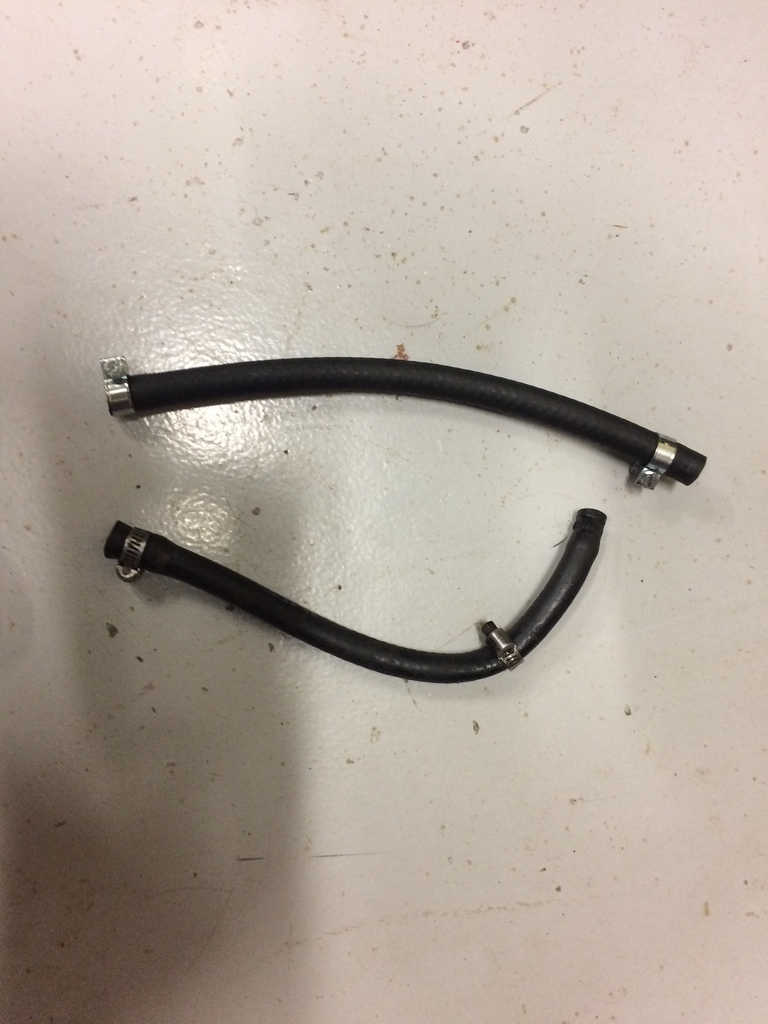
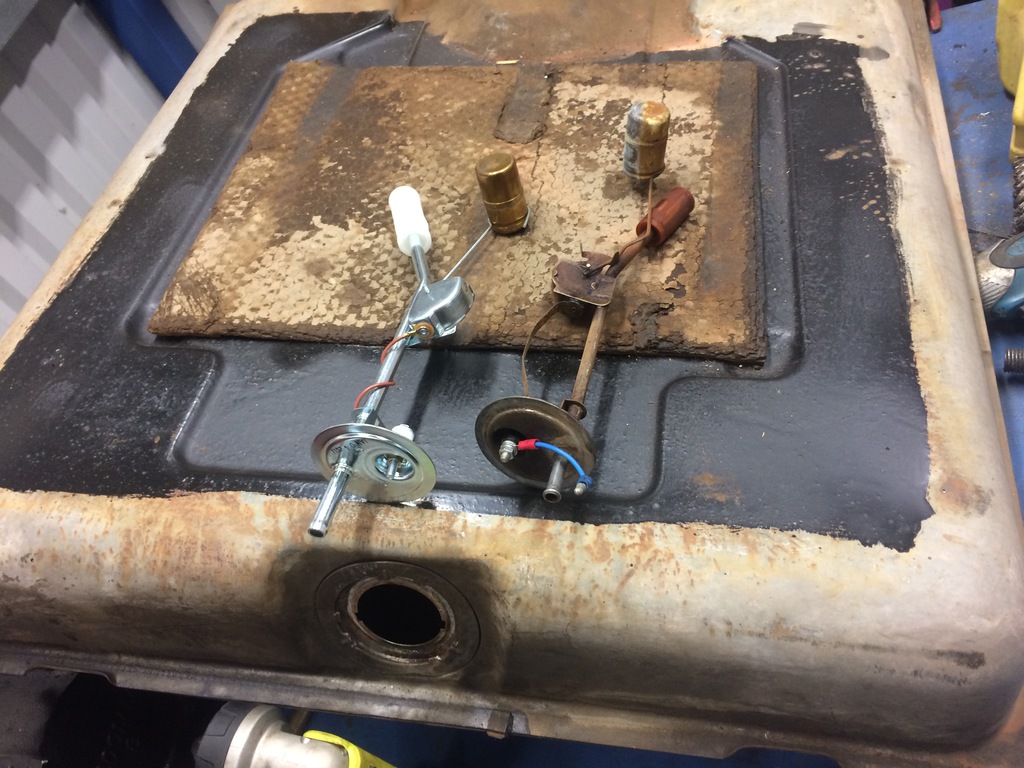
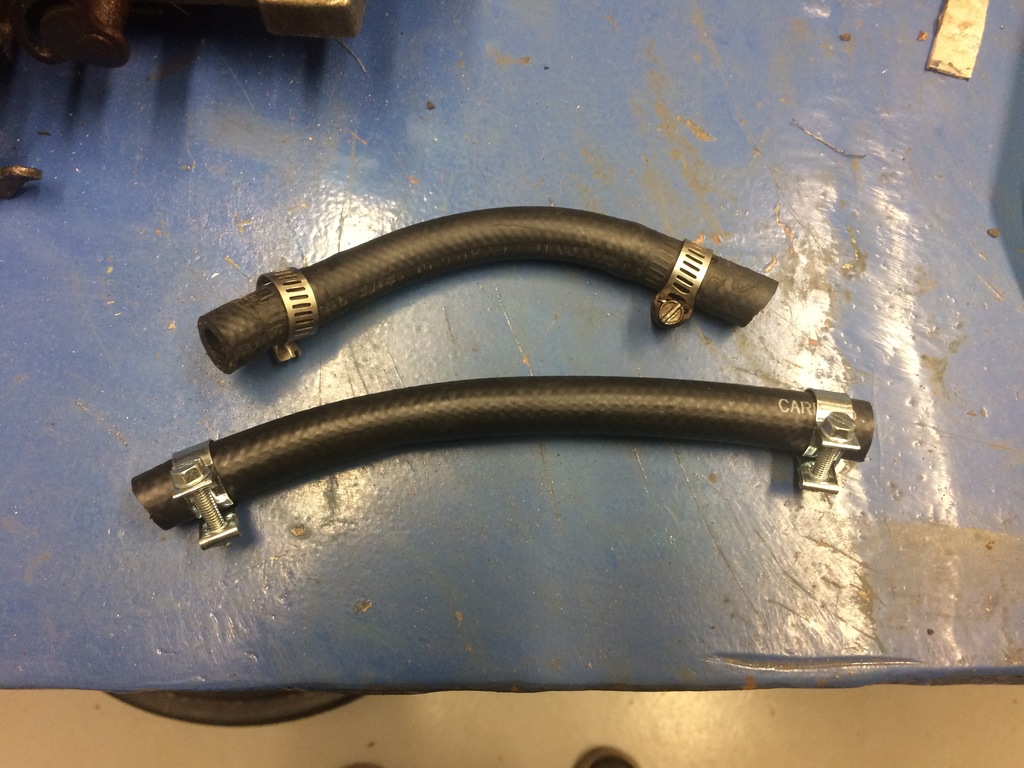
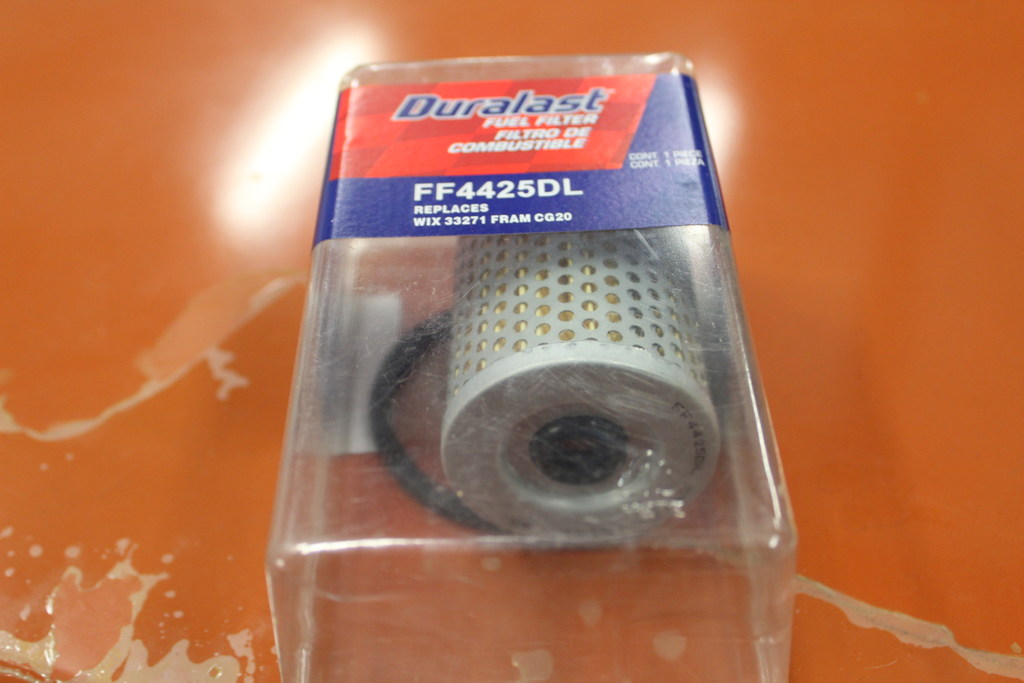
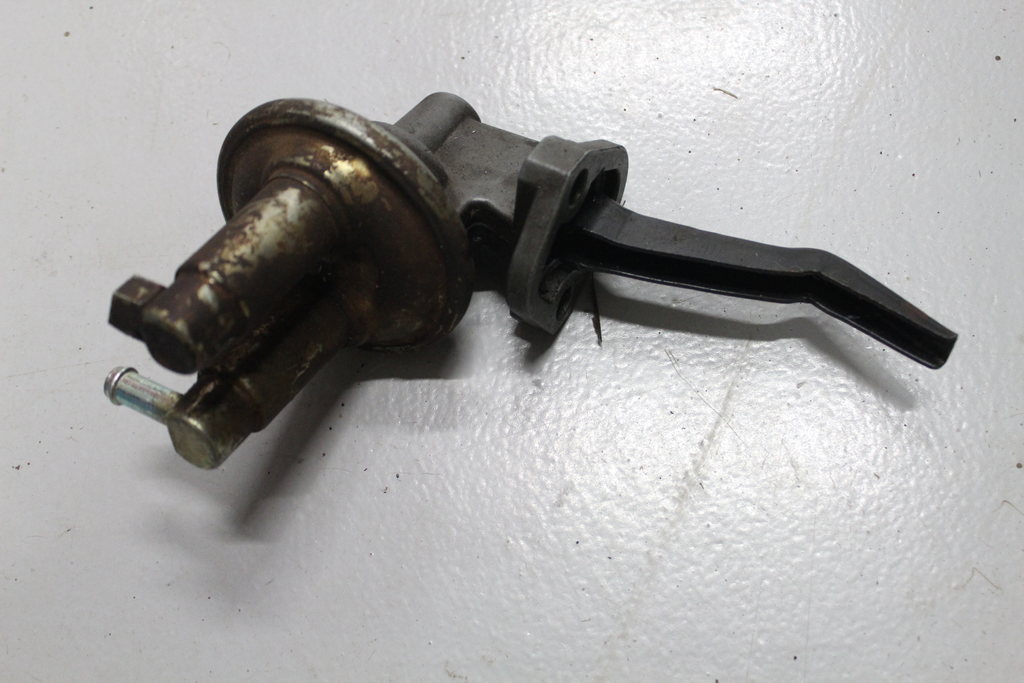
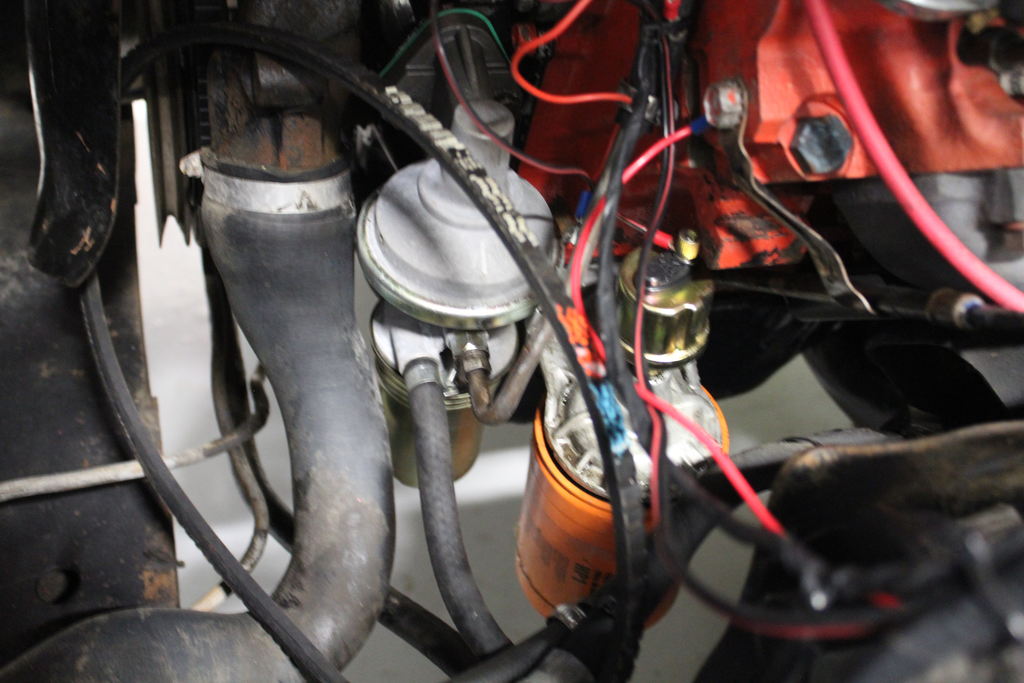
so with one remaining panel replacement being the trunk floor to be done to have the engineer sign off i may as well plod along getting other bits done. it never ends with this car ordered a fuel sender from northwestern ford from palmy north pulled tank out again fitted new seal that came with the kit too as had started leaking before. also made up a new bit of fuel hose from the tank to the hardline And also bought a new fuel pump has also dulled out abit as i put some degreaser on it. And this old shitta was leaking from around its pressed seal so in the bin it went. also new one had the added bonus of a built in filter like this puppy this is one that came with the car and fits too. also fitted a new fuel hose from pump to hard line aswell thanks work for the hose and clamps so now the fuel system is leak free and has new hoses and clamps
-
piazzanoob's 1964 Ford Galaxie 500 seeeedaaan
piazzanoob replied to piazzanoob's topic in Projects and Build Ups
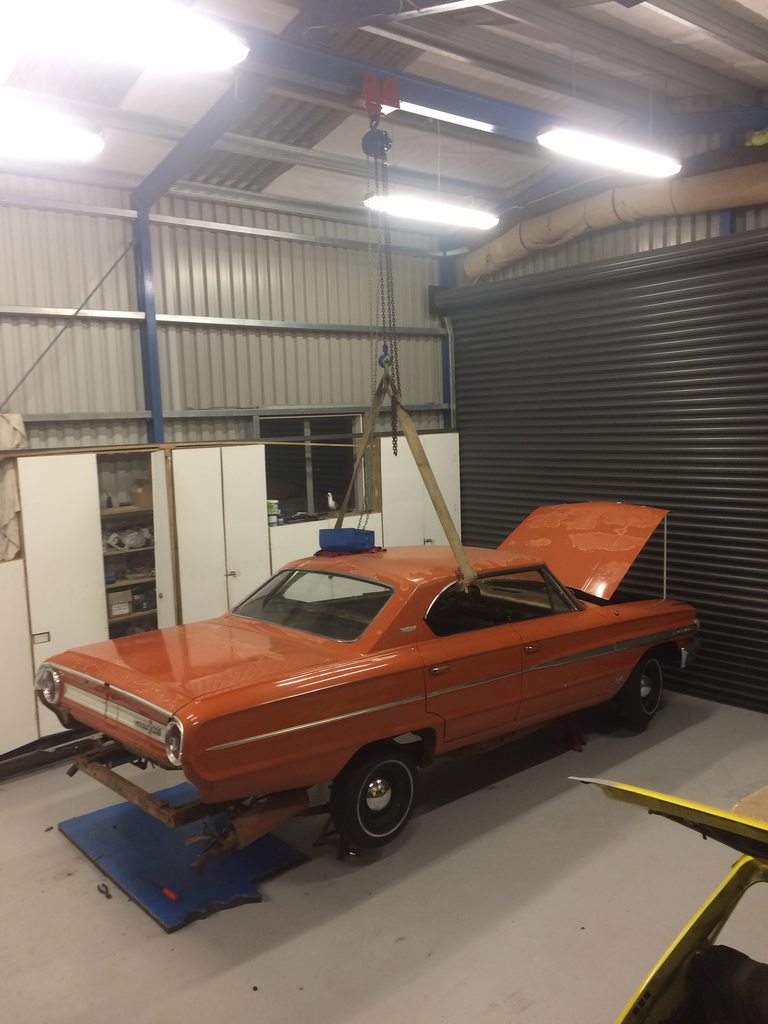
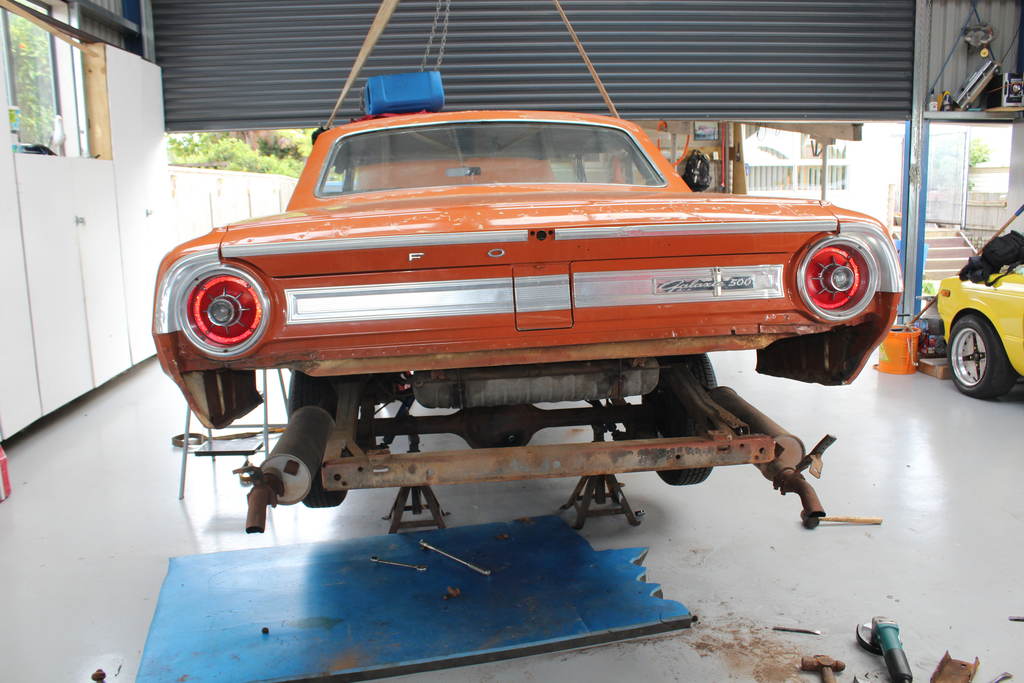
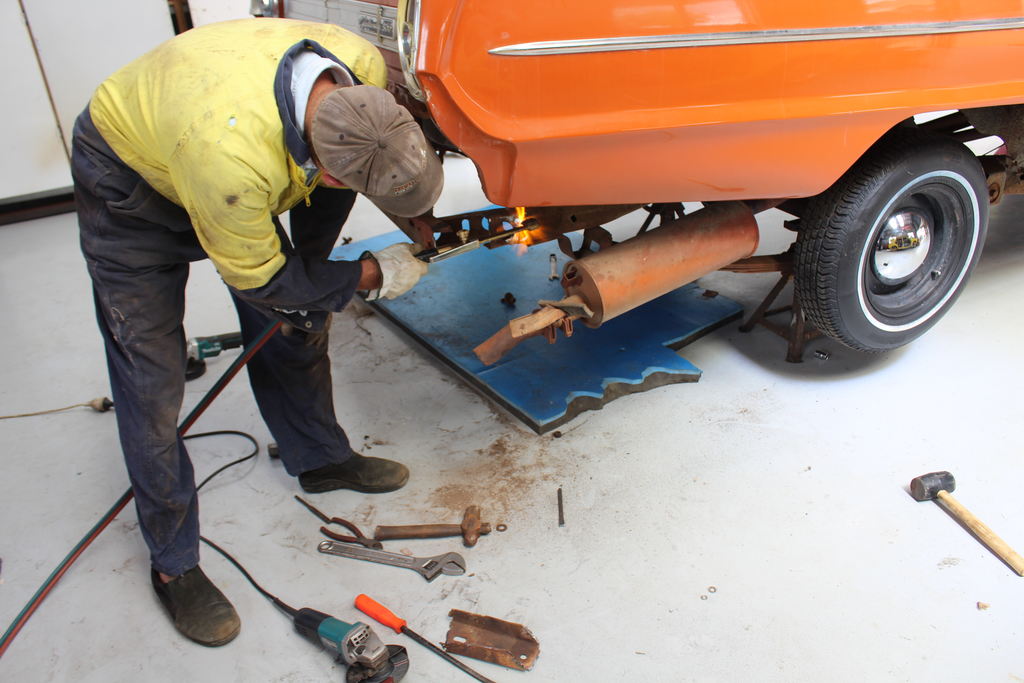
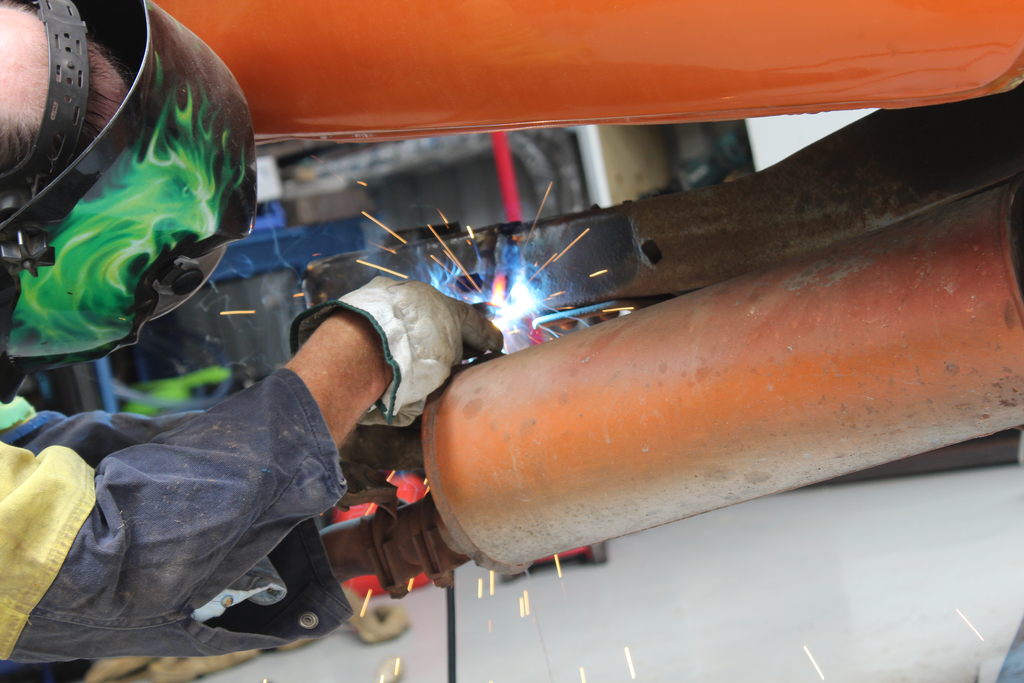
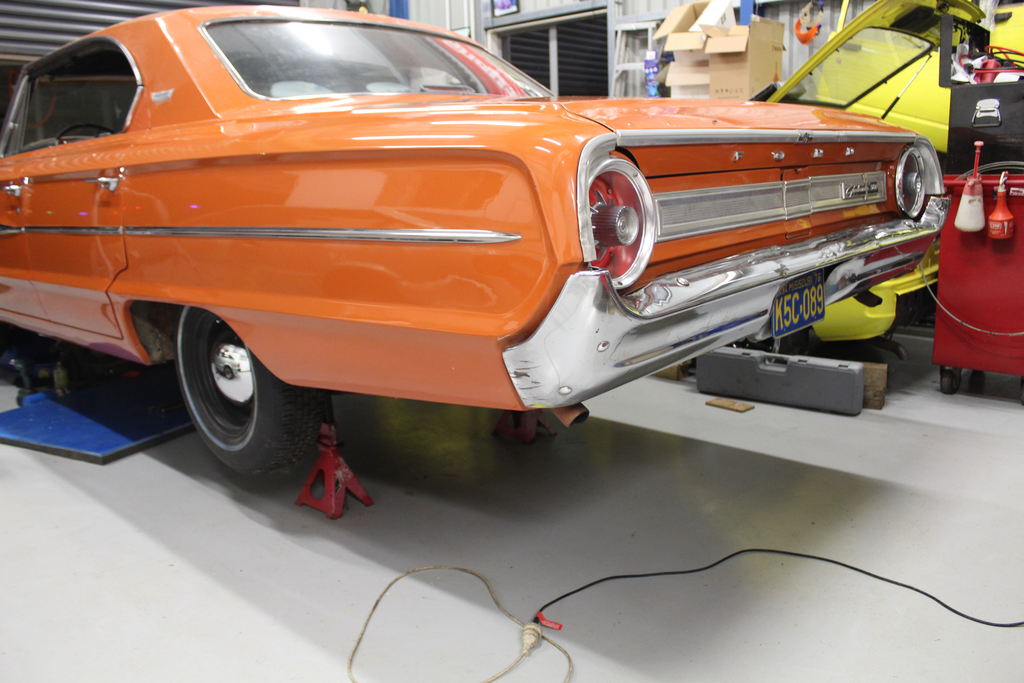
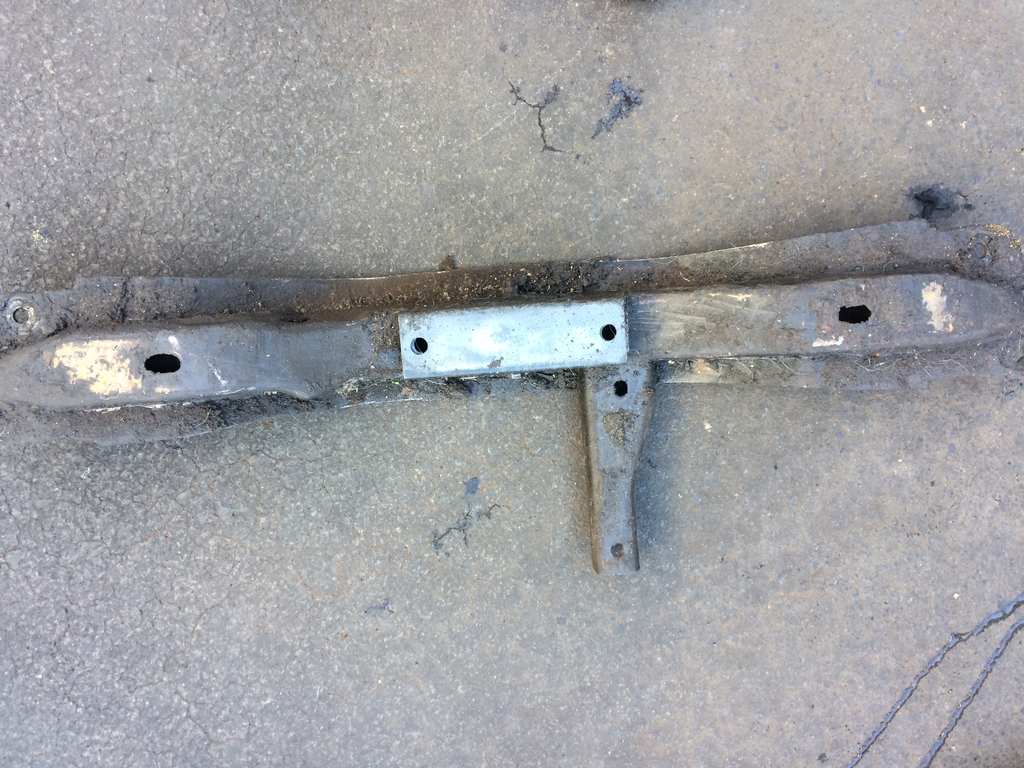
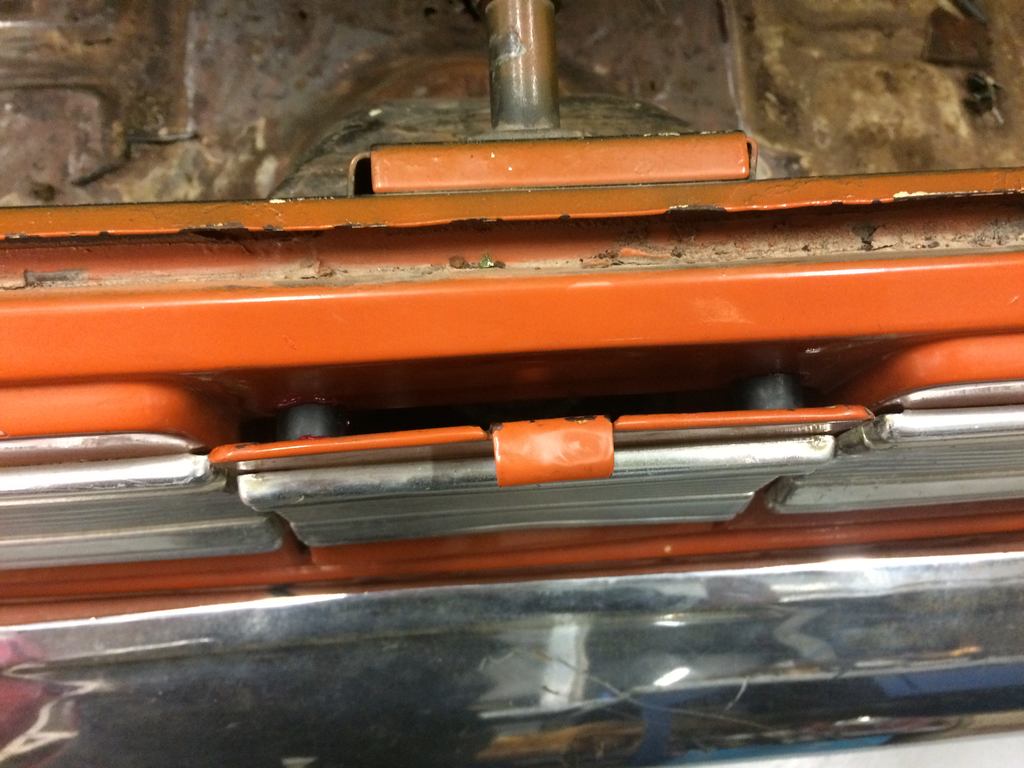
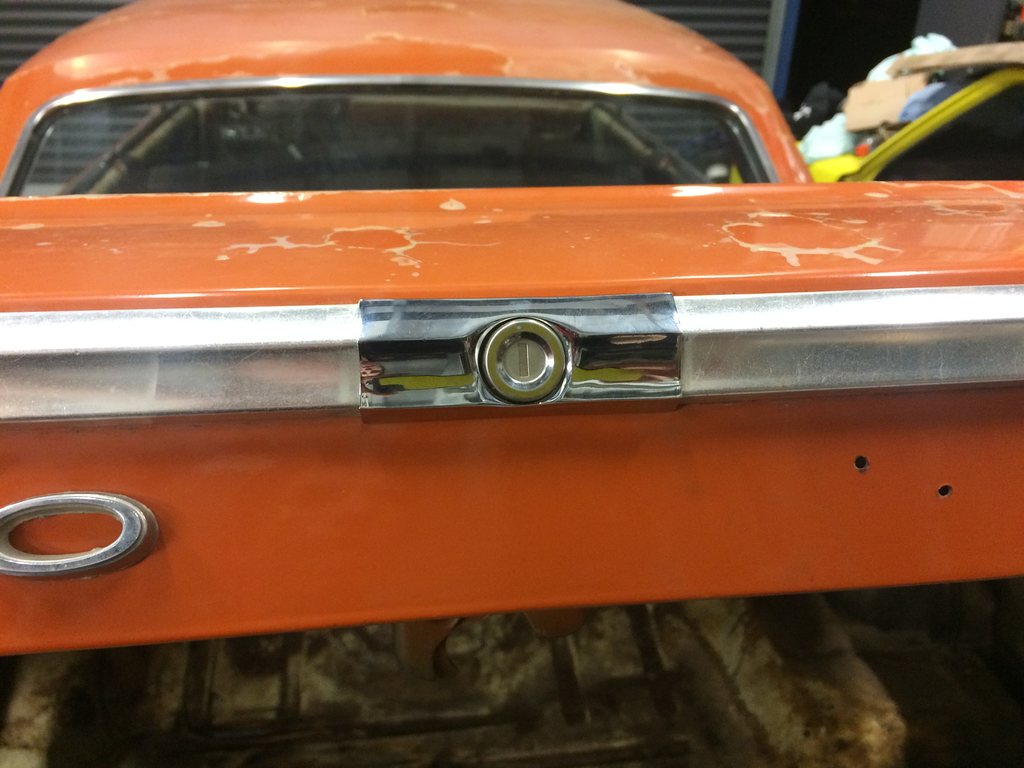
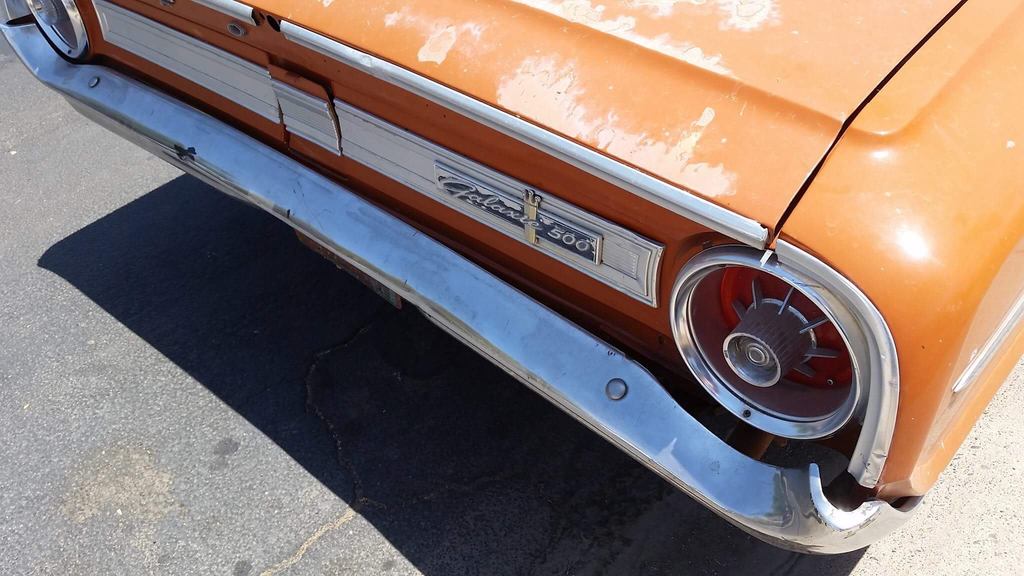
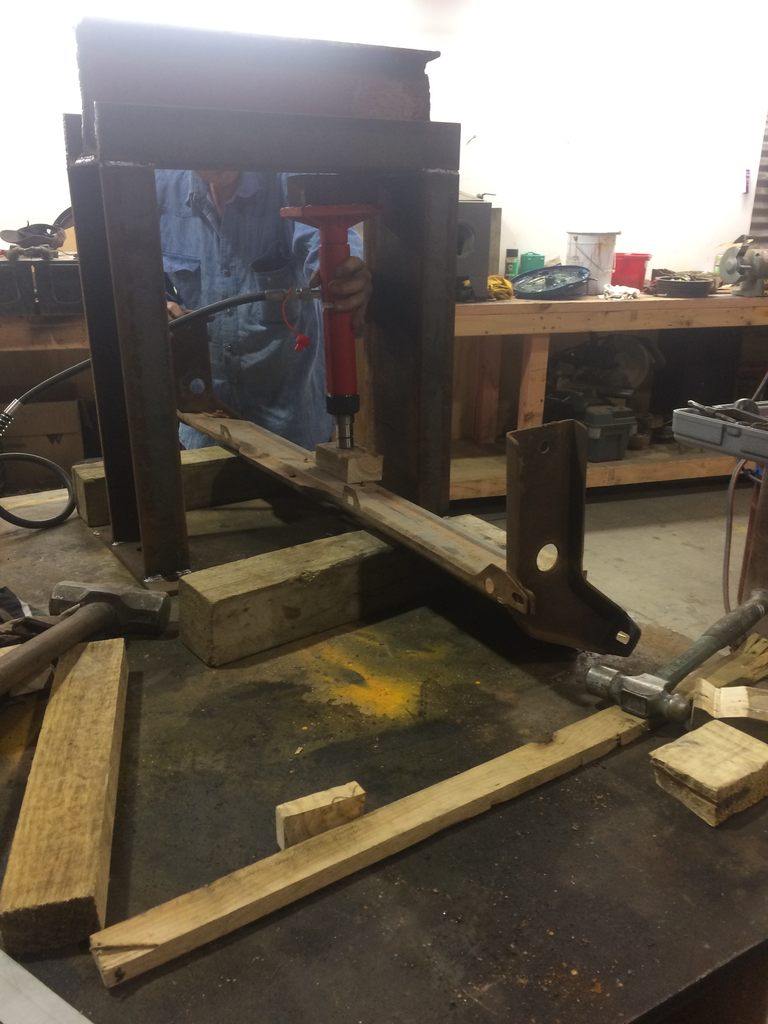
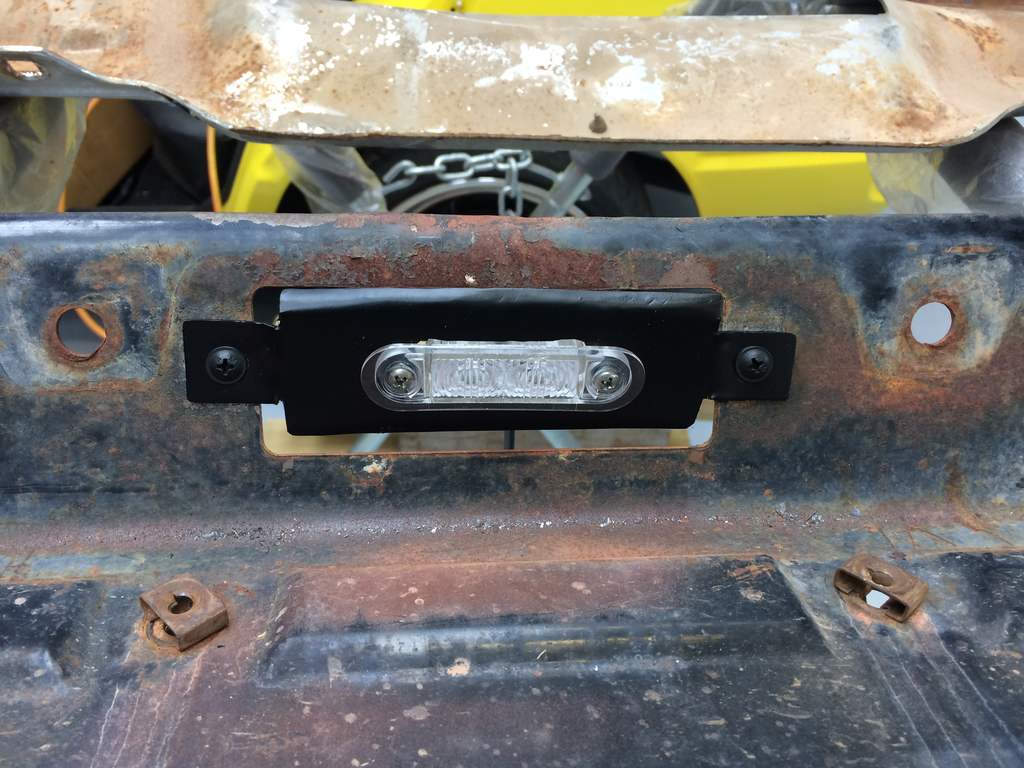
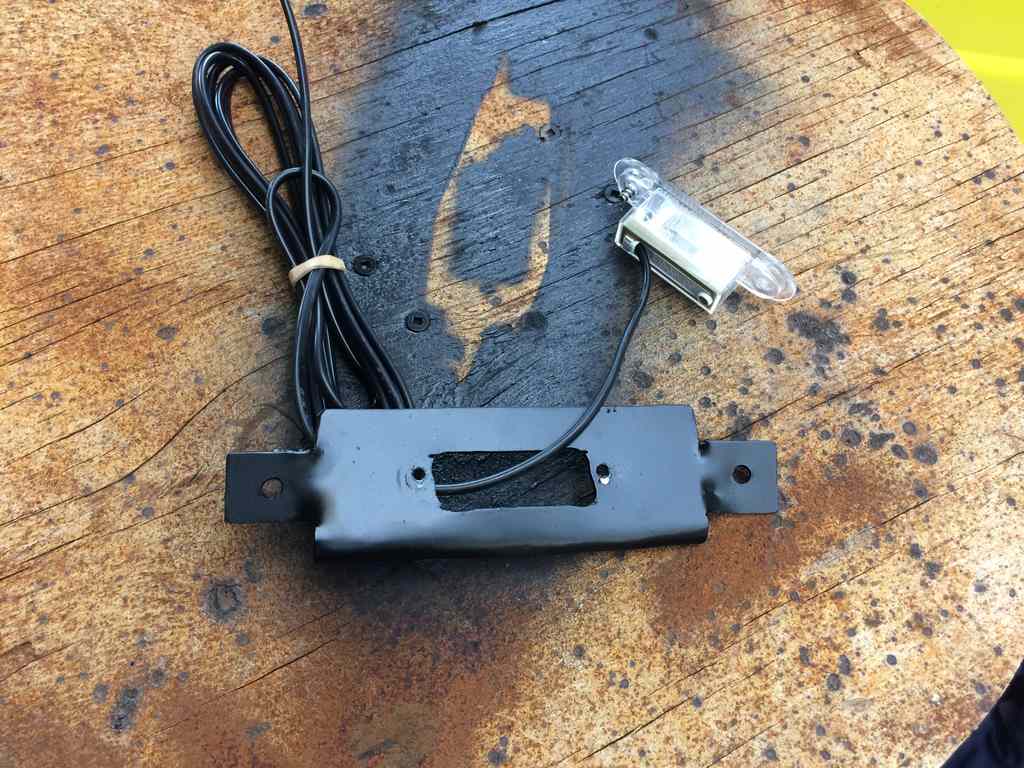
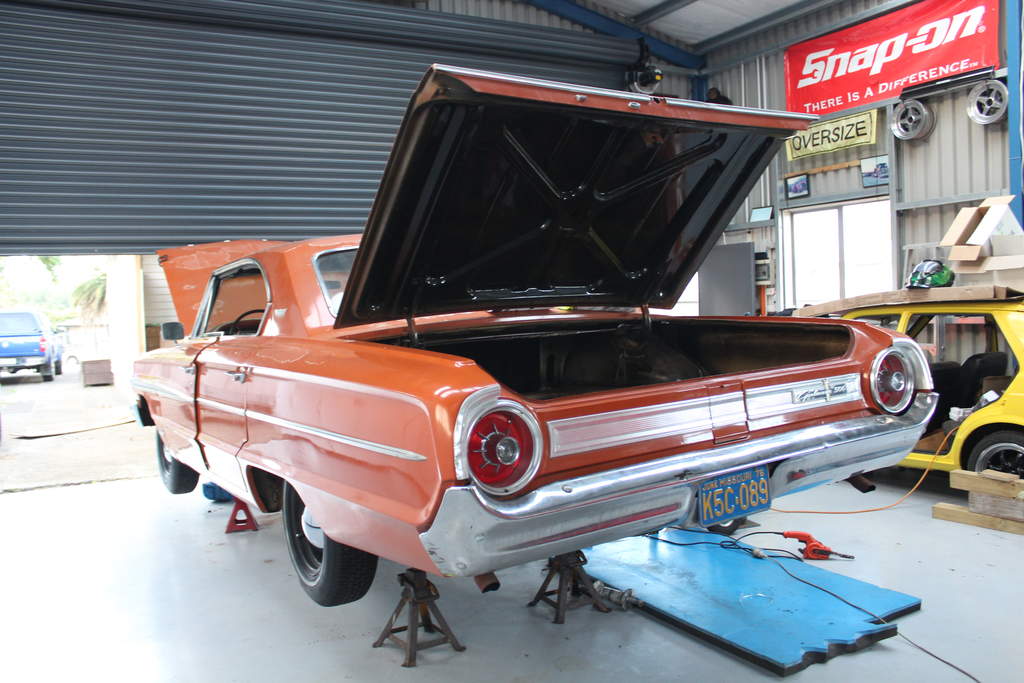
So after fixing the chassis rail i placed the car back on its frame and tighten her up. but seen as it had been hit in the past causing the poor chassis repair the bumper was also bent and twisted upto shit. so we made up a jig so that we could fit our porta power and bend it back into shape. so yeah big ol gap other side you could fit your fingers where the bumper wraps around the car where the side you can see (R/H) side is hard up against the rear quarter so i split the the bumper into pieces so it could be straighten out then placed one at a time on our pressing jig also made up some blocks of wood for underneath in the shape of the bumper. then spent a bit of time pressing the bumper then removing and checking and back in again. while this seemed like a straight forward exercise it took alot of time and we did it by using no heat as we didn't want to damage the chrome on the bumper and had a problem where the top face of the bumper would bend quite noticeably so while we had some pressure on the bumper we used a piece of wood and a big hammer and hit where the big bend was. This worked although it was time consuming as it had to come on and off the jig several times. Then this inner bumper frame was inserted in the jig and bent back into shape. This piece was alot more straight forward and less time consuming. we also had to bend out the corners of the bumper as they were set too far inwards but just did that using the porta power. so when that was done another thing i had to tick off the list for compliance was the rego lamp as when i went back for my recheck he said i had to have a rego lamp lense. would of been a whole lot easier if they had told me in the first inspection. not in the recheck so seen as the cost of a new lense and gasket was much the same cost of a new led generic rego lamp. so i went out and got one. sometimes its better to update and not continue fucking with old crap. although i should have got one from ali tbh. made a real average spec holder for the led one out of some panel steel. then painted it and fitted it. also gave it a bit of angle to face the plate. not really a nice tidy finish i was hoping for but kinda couldn't be bothered making another better one. so on it went. then placed the two halfs of the bumper back on and fitted it too the car. so now has some more even gaps and looks a whole lot tidier.
- 77 replies
-
- 18
-
-
piazzanoob's 1964 ford Galaxie 500 seeedaan
piazzanoob replied to piazzanoob's topic in Project Discussion
yeah dat one -
piazzanoob's 1964 Ford Galaxie 500 seeeedaaan
piazzanoob replied to piazzanoob's topic in Projects and Build Ups
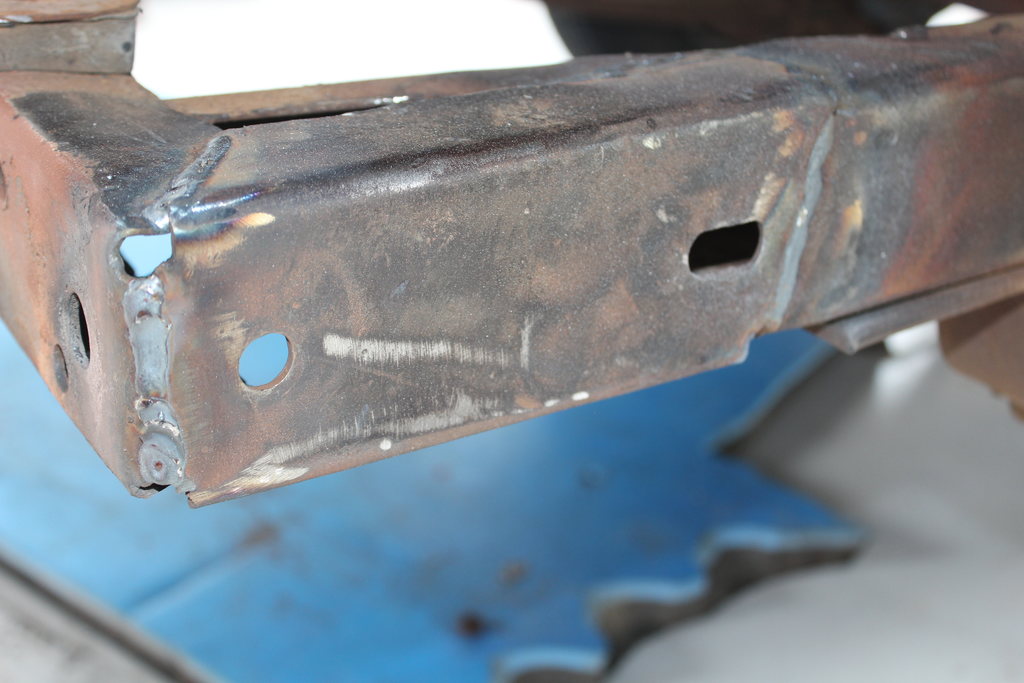
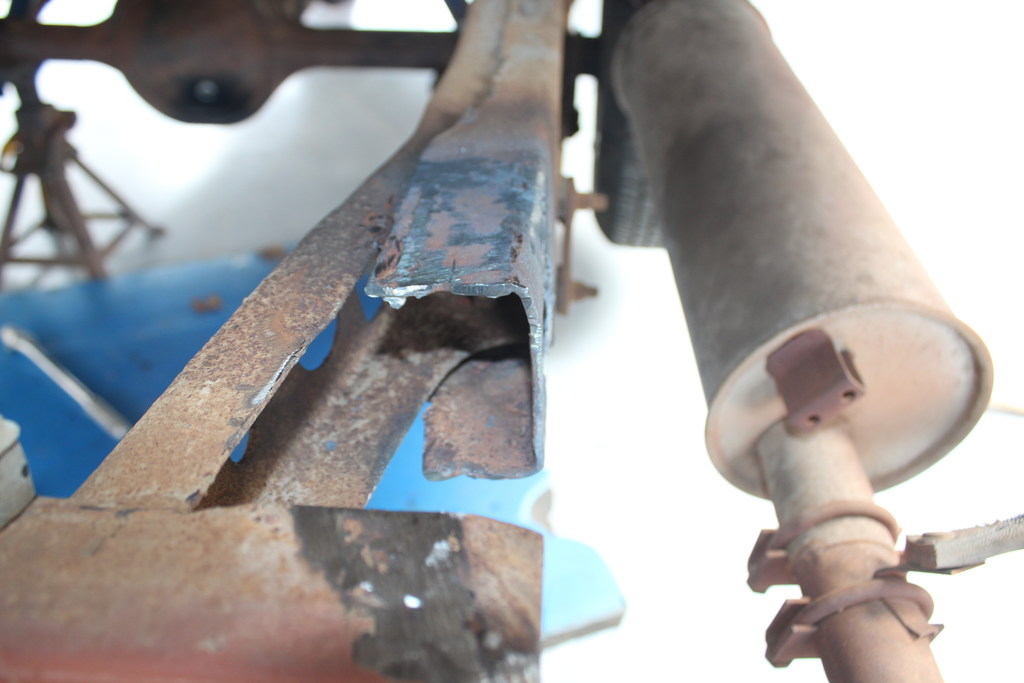
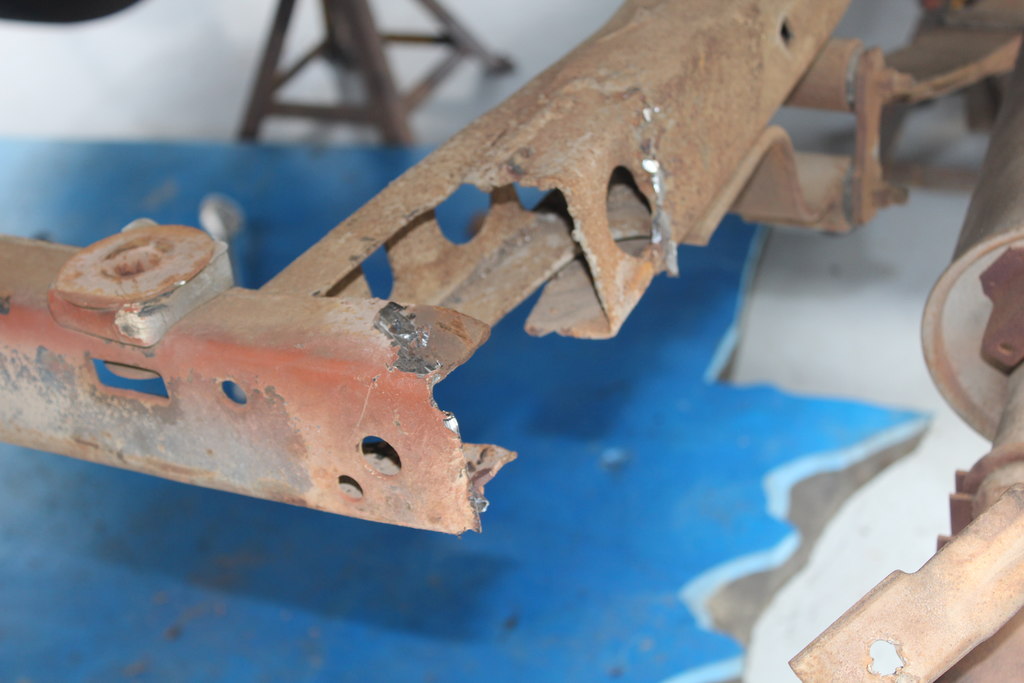
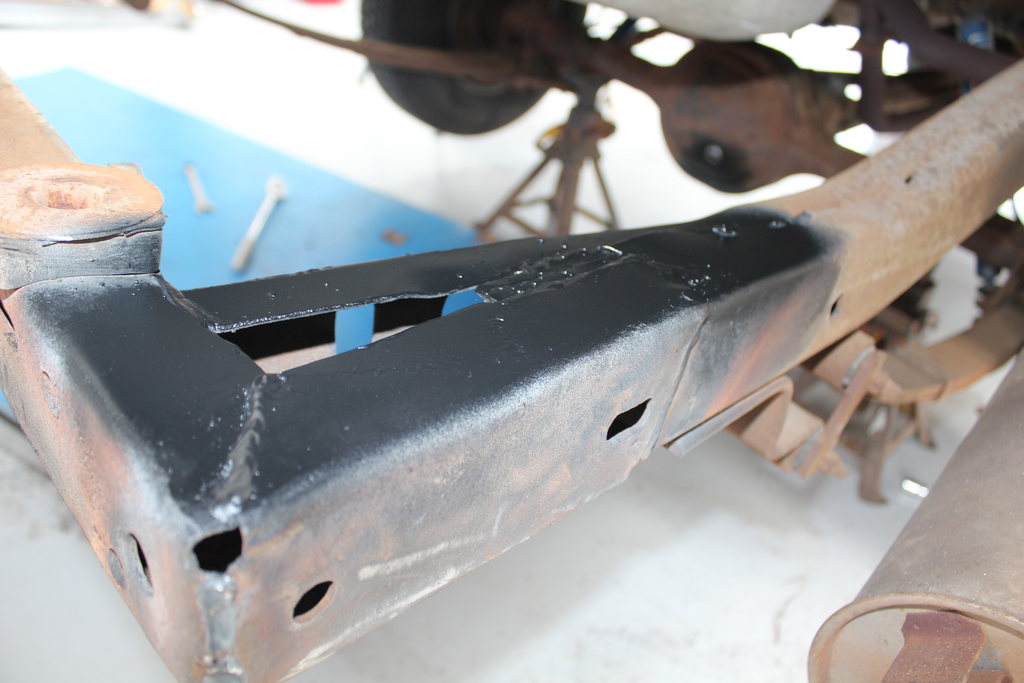
super late reply but never late than never right so during my Christmas break well only the stat days i had off i made a start on the repair on the rear chassis rail. so to do this job the body had to be raised of the chassis on the back so the dog chilled out with me while pulled it apart on Christmas evening then with a few hours work and the help of the gantry crane the old girl was free we then cut out the previous welded piece out As some piss poor american had most likely arc welded it in before which then revealed this which as you can see by the photo that the rail is bent although both of them were. Now here is the part where you say this is a big NO NO and why the hell am i doing it this way. So we gave the chassis rail some heat to move in back into the right shape with the help of a hammer until we got the shape right. So the reason we did it this way as if we had used a porta power or chassis machine it would of had to be done with the body still bolted down otherwise nothing would ever line up again. which also most likely would of bent the chassis even more than it was but i figure that the metal was formed while glowing hot then was rewelded in the past causing it to be glowing hot then we played with it causing it to be glowing hot So really in my opinion it did not change the metal at all. And it had a big dent in the centre of the rail which had to have heat to get it out. Then after we did that we heated up the rail we had cut out and bent that back into the correct shape. Then welded it in. I then applied some anti rust primer and then followed with some semi gloss back. so the only reason the top got done is that it cant very well be seen and once the body is back on you wont be able to get any paint on it. Also note that none of the welding was done by me. my old man done it as he has done plenty of structural welding in the past on trucks and other equipment. plus 30+ years doing welding does help. now go and tell me how ive done it wrong here cheers
-
piazzanoob's 1964 Ford Galaxie 500 seeeedaaan
piazzanoob replied to piazzanoob's topic in Projects and Build Ups
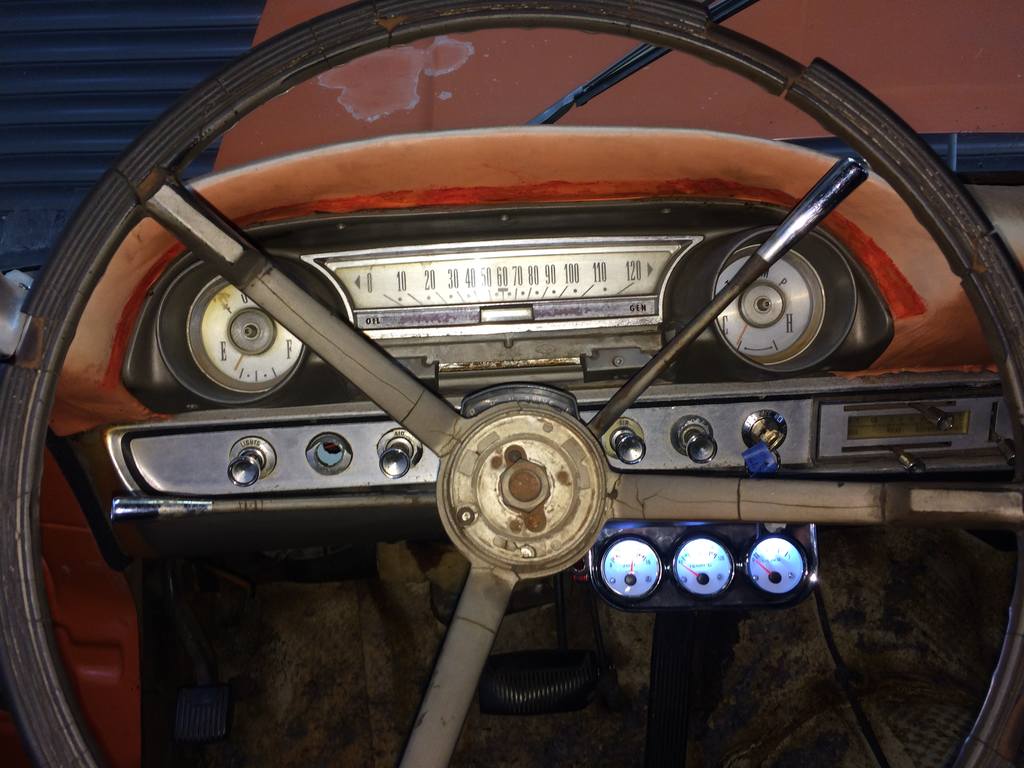
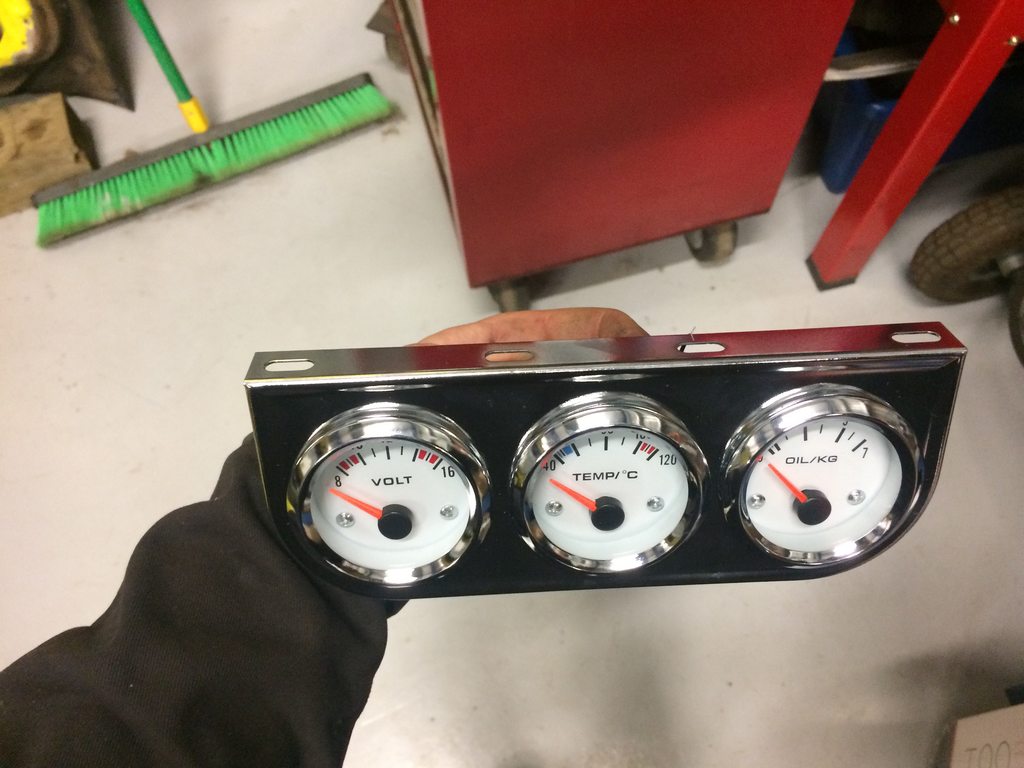
so got my new Ali gauges mounted and wired up by @chris r and the oil pressure gauge is faulty so currently trying to see what he will do about it as he is playing the no reply game.
-
TBH your logo needs to be airbrushed or hand painted onto the doors. would look lush
-
piazzanoob's 1964 Ford Galaxie 500 seeeedaaan
piazzanoob replied to piazzanoob's topic in Projects and Build Ups
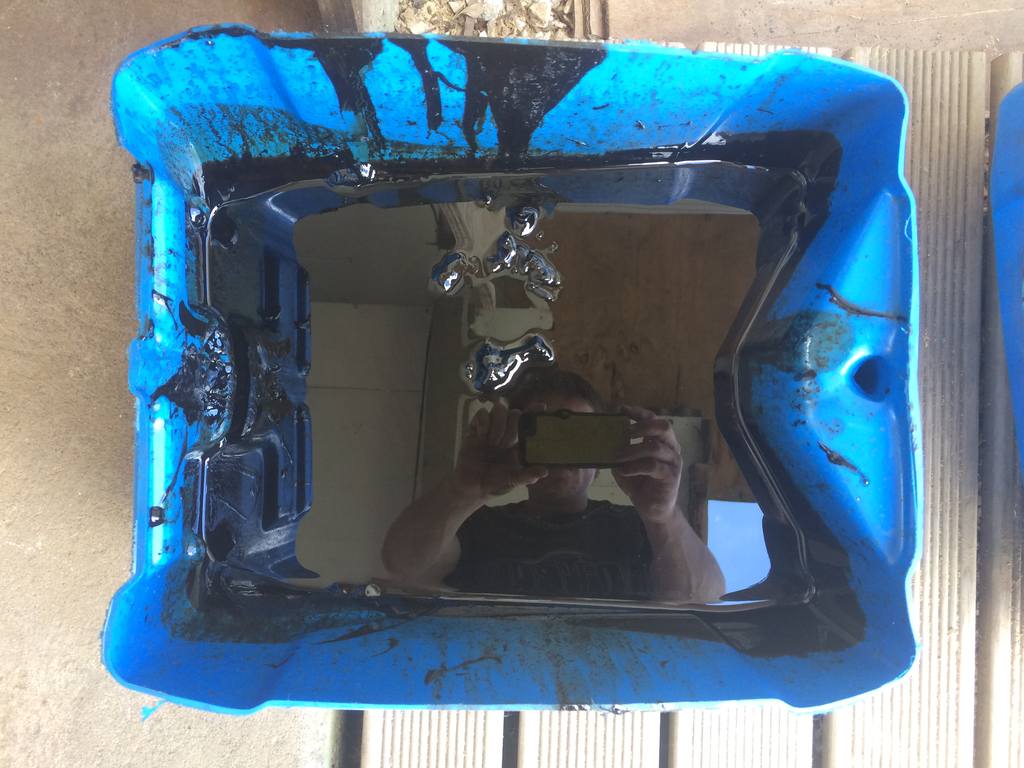
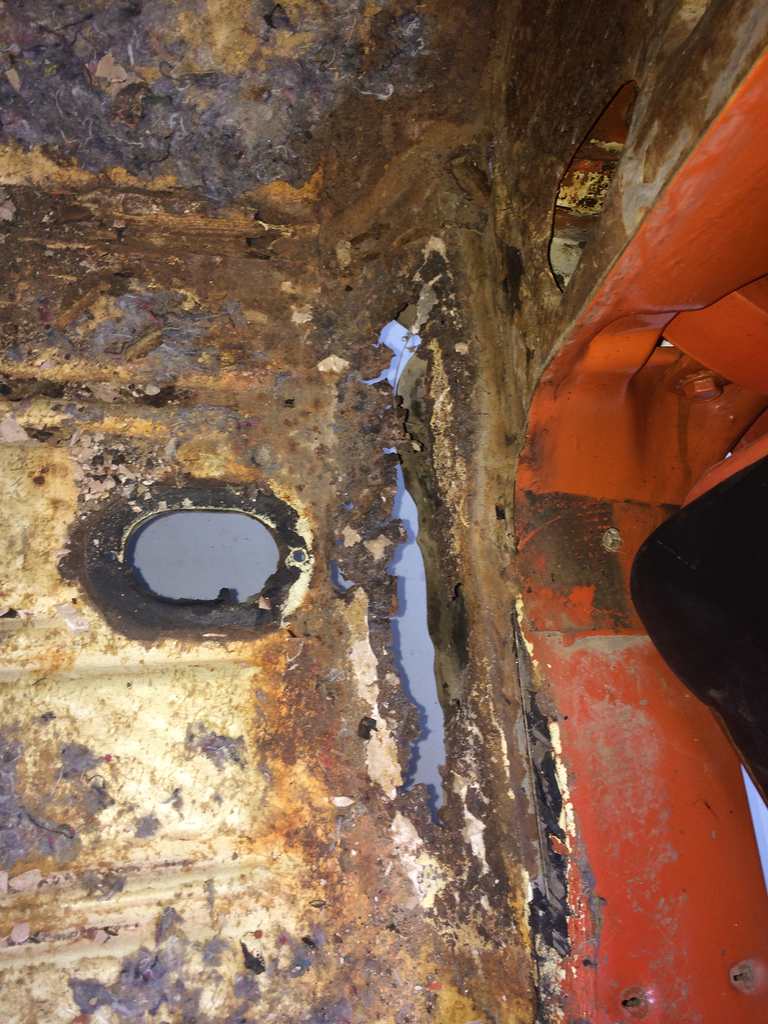
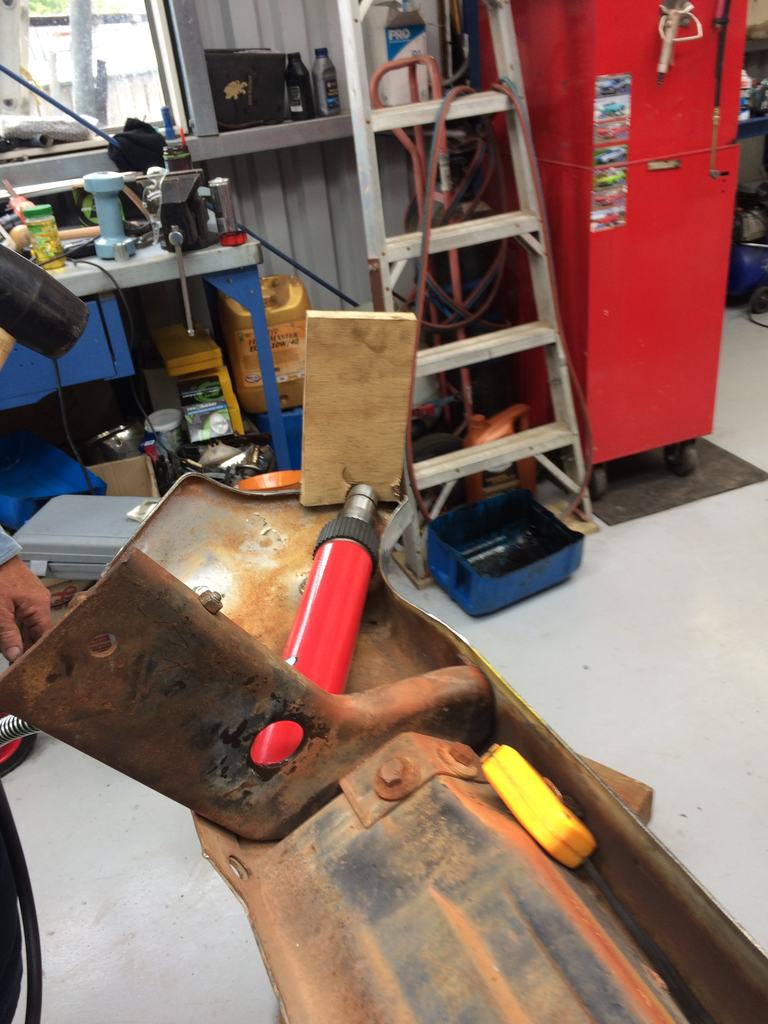
this chipping away at this ol girl cut out this rusty piece of steel in the R/h front floor pan which had been bogged over. this piece has most likely rusted out due to a leaking heater. \ Used this piece of 1.5mm of zintech panelsteel. spend some time panel bashing it with a wooden panel hammer and sandbag and a steel hammer then tack'd it in with some more hitting with the hammer. Then faced my torch underneath to check for any holes welded the remaining holes up a few times and now shes air tight. just like AL's mum puhuhuhu will leave the welding on this patch as is for the moment untill she gets the all clear from the repair certifier along with no paint or rust stuff. also my aliexpress gauges turned up too pretty happy with the quality of them.
-
keen to see the outcome of the vinegar de rusting bolts
-
Also 1+ on the powerfiles awesome for rust repair work ended up getting the black and decker one as have found some of the newer ozito stuff is a bit hit and miss but don't forget to stock up on the belts as they don't last long too. also liking the quick progress
-
this^ i found not setting the speed so high helped with them not breaking. or might of been the change in brand...
-
piazzanoob's 1964 Ford Galaxie 500 seeeedaaan
piazzanoob replied to piazzanoob's topic in Projects and Build Ups
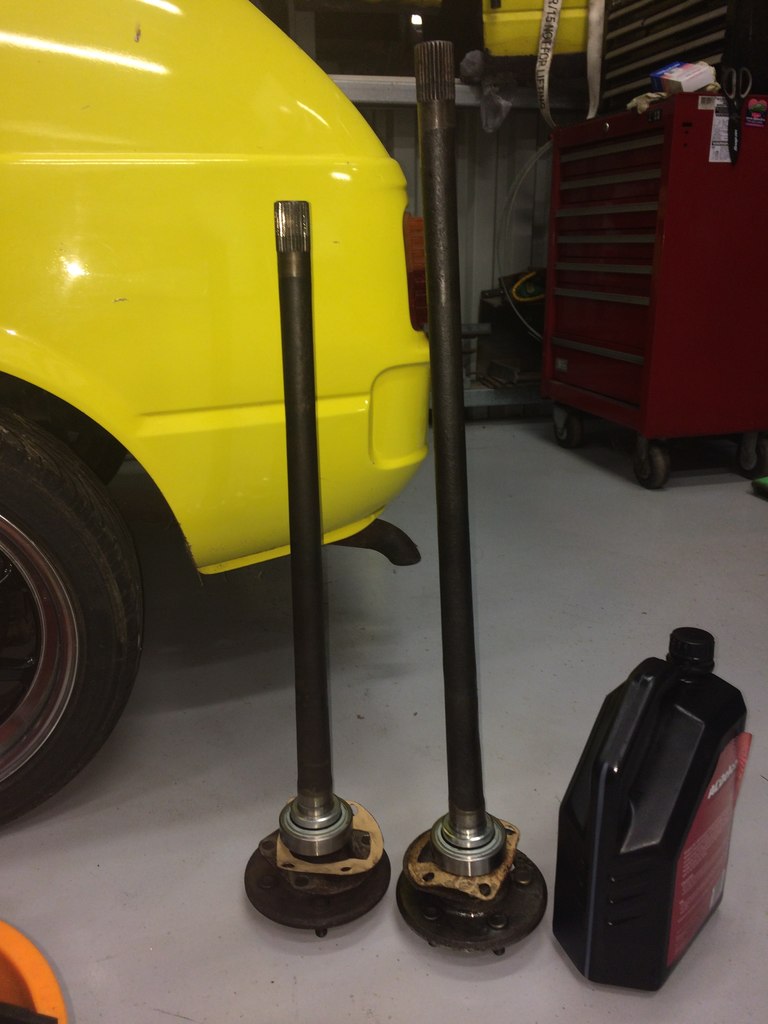
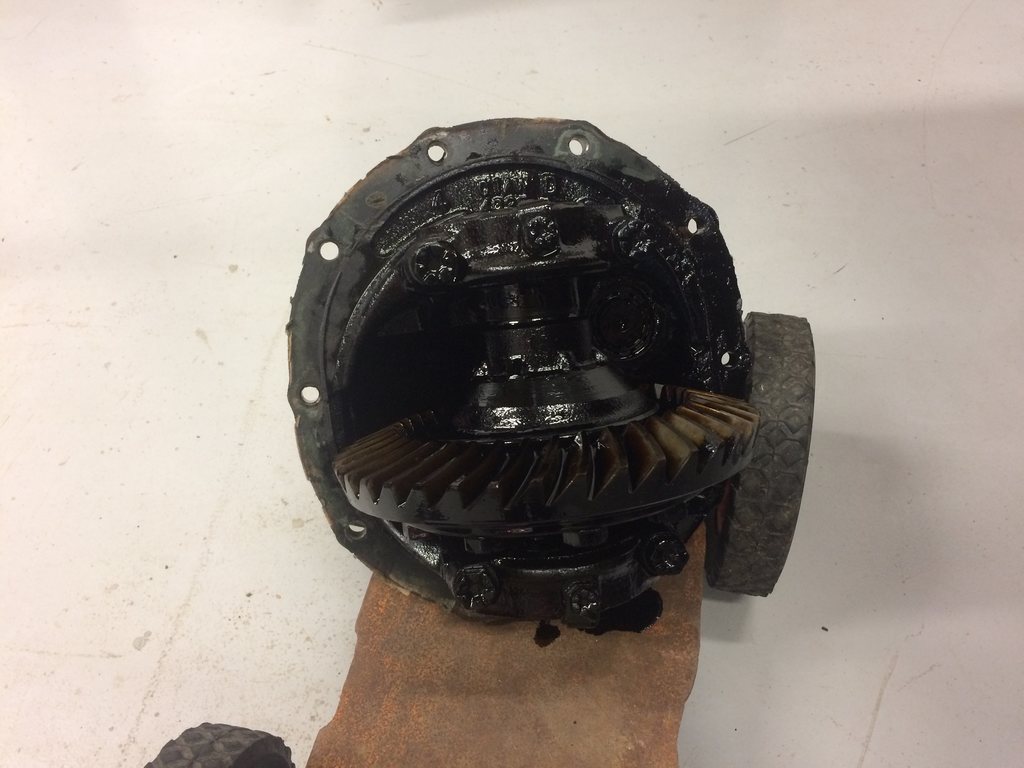
so one of the jobs for compliance was to do the L/R wheel bearing. so out came the driveshaft also popped the diff head out for inspection and out came the axles without too much trouble. so seen as this car has no drain bung for the diff fluid i popped the diff head of its seal and let it all leak out well you would of thought so... then with diff head out... the diff fluid had turned into some hard tar shit. the fluid had not been changed in a looooong time. half of the stuff that came out was a solid. also the diff head and axles were also covered in this crap. so took the diff head and axles into work and gave them both a good cleanup in the parts washer. along with fitting two new wheel bearings as may as well do both while i am in there. also made up some new paper gaskets for the axle flange. and got the diff head as clean as i could. must of spent about 3 hours cleaning all the hard tar shit that is the breakdown of the gear oil that was sitting in the axle tubes and diff head area. then refitted it all and refilled the diff up with some 75w 90 gear oil but will change it again after a few miles just to keep everything in there happy.
- 77 replies
-
- 14
-
-
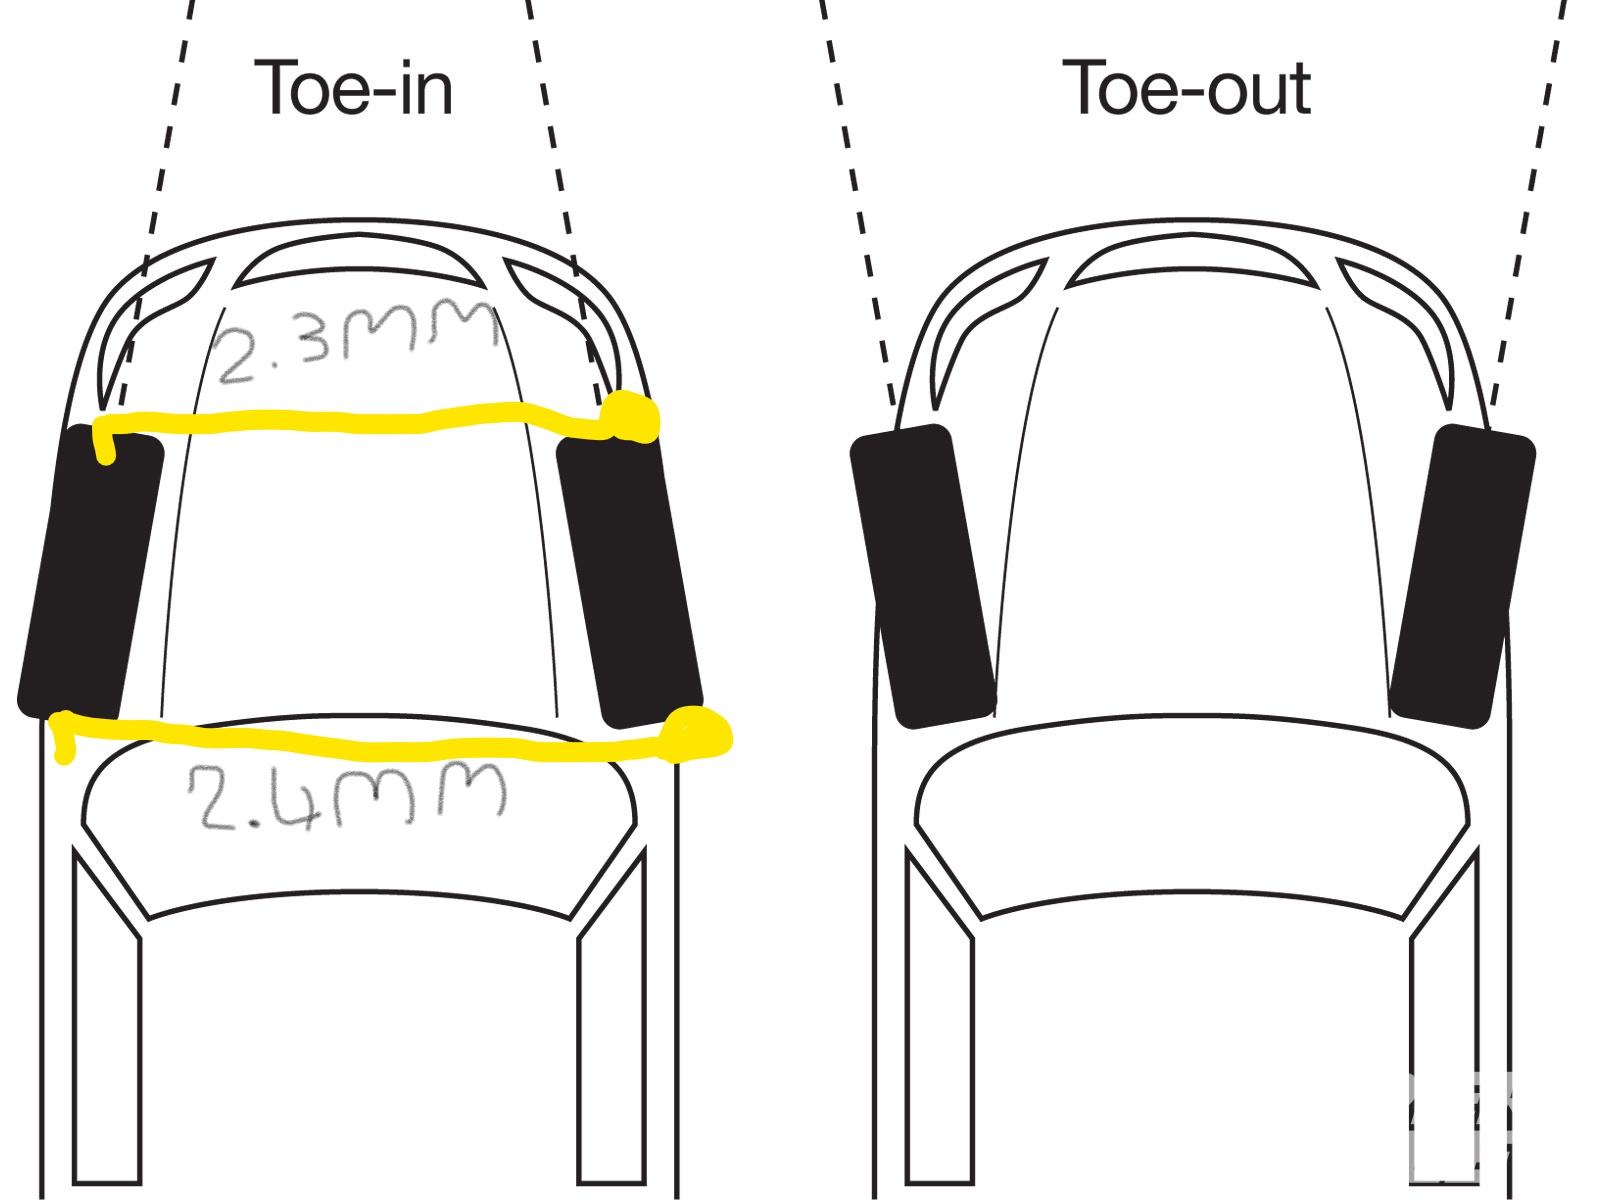
Ive had to do this a couple of times now with customers who wont pay for a wheel alignment after we have replaced steering or suspension components. get yourself out a measuring tape and put one end of the tape in the middle grove of the tyre and run it across to the other front tyre into the same middle grove. so lets say the measurement is 2.300mm for example so now that you have measured the front face on the front tyres now measure from the back face of the front tyres in the same middle tread grove as previously. and lets say the back measurement is 2.400mm so the vehicle has 100,mm of toe out. so set the steering wheel straight. also do this while the car is resting on the ground. not jacked up. and adjust the tie rods until the measurement is the same on both faces or close enough. doing this should get it quite close and fairly straight. but wont be that accurate if your caster and camber is also upto shit. this pic gives you a better idea best of luck!
-
piazzanoob's 1964 ford Galaxie 500 seeedaan
piazzanoob replied to piazzanoob's topic in Project Discussion
The lower anchorages I believe are not factory. I fitted them as car came with none. the seatbelts come out of the bronze's 63 galaxie but his had the factory mounting points. but mine already had some holes there so I just used those holes and bought the correct plates and bolts to suit it. -
piazzanoob's 1964 ford Galaxie 500 seeedaan
piazzanoob replied to piazzanoob's topic in Project Discussion
Thanks so being a pillarless there is no other place to fit a diagonal belt so it will need to keep its lap belt. Doesn't help that I've removed the carpet too so can this be done by having a cert plate on the car or a just a document to say so? Cheers -
piazzanoob's 1964 Ford Galaxie 500 seeeedaaan
piazzanoob replied to piazzanoob's topic in Projects and Build Ups
2 steps forward one step back. as some of you know already from spam this old girl broke down on me last monday on the mangere bridge which is a motorway and this old bus stopped in the bus lane. had been over at work aligning the headlights and getting some other bits done and was going send it back for its recheck. but ended up getting frustrated at the car and calling it quits and taking it back home to sit in the corner. and running the headlamps caused the battery to go flat so i jump started it and off i went. only got 5 mins walking distance till she died. so got my AA cover to come pick me and the car up and drop it at home. was lucky enough that none of the 3 cops that went past didn't stop as the towie said it would of been impounded as no wof or rego and 400 bucks in fines. got her home and charged the battery up and she fired up without an issue as i knew it would. but the carb on it is some no name 50$ napa auto parts POS. have had it off to seal a leak it had and have given it a good clean out but trying to tune it with this carb doesn't get me anywhere and still has a flat spot. so when some money is available that doesn't need to be used for compliance shit a new carb is going on it. was thinking an edelbrock 650cfm 2 barrel with electronic choke. was told edelbrock's are much easier to tune than holley's which i would believe. trunk floor that needs replacing has a few holes in it that could be reapired but the metal is pitted and its easy to just get another piece made. and this is the R/H front floor piece that needs replacing fairly simple shape so will start making it and weld it in. cheers mayte


.jpg.59d91e6fde13f11d1a9d14628ab66c8a.jpg)
.jpg.44b6af475bf9a7fc230b8438bfeb461c.jpg)
.jpg.8f4cf73a40311127701875041ac89643.jpg)