


ta63-1uzze
-
Posts
475 -
Joined
-
Last visited
Everything posted by ta63-1uzze
-
well I am not winning guys and it is starting to bug me , I am not sure if its me or maybe the possibility of me having a faulty machine. I don't want to blame my tools but its starting to look like its faulty. I wish I could video what its doing so I could ask you guys for help . but I don't have the equipment to do so it wont establish an arc on pulse . I have tried allot of setting , I have scoured the internet for help and tried to problem solve this fault . I have tried the 33 33 33 idea with no luck at all. I have increased and decreased gas flow, changed tungsten's from 1.6 to 2.4 , I have tried to increases the base amperage and even wound the peek amp up to where it should just about blow a holes in seconds. if I turn the pulse off , I have found I can make a weld and easily establish an arc, but under no circumstances on pulse can I even get it to puddle . im not sure , and now I am doubting the quality of this machine now . sigh. :( :( this hasn't been much fun , the mig I bought was amazing and such a great experience learning how to use it , I am struggling with this machine
-
home now, will go and investigate now. been waiting to today all week so I could go and have a play, will report back soon : )
-
will try this out when i get home tomorrow. sounds like a good plan. i don't think i had it right last time i tried using so far i don't feel like i have got the beed of coins effect the rest of the welds on the radiator has, almost like mine are shallow and much to close together. when i look through the insider of the pipe the penetration is very deep, almost like it should be the other way round like the weld is upside down . i think my foot control overrides any setting on the machine, cause if i set the power low i can still apply huge amount with the foot controller. and i am having trouble with finishing the weld , like its almost like a crater at the end, i have tried to slow down with the pedal and i have tried to add heaps of filler at the end but that isnt halping at all . if i set the down slope will this help even when using the foot controller ? i havnt had time this week to play around with the welder allot, but hopefully tomorrow i will get some hours in
-
choice, that's a great explanation, I looked at it for awhile when I first got it and it really just looked like nothing much. the more I have been told about what the setting do the more the controls look like what they are . who would have thought I have just about run out of material to weld , all I have is 2mm 2inch pipe about 400mm long . I have a few of cuts and a chunk of 6mm plate which is not really any good for anything I intend on doing but none the less its mine now so im sure I will make use of it at a later date. so far I have not found anything hard at all, the only thing I have found is that I didn't know anything about welding alloy, but I knew that in the beginning . to be honest its not really any different to welding any other material other than the fact you need to set a few more settings. and it feels a bit more like liquid when welding it . anyway I want to thank you guys for all the information, I will be back later with some pictures , now its time to practice with the last bits of ally I have left over : )
-
the set up I have is gas lens, stubby number 8 ceramic . 2.4 thick , gold lanthanated tungsten. (was recommended from weld tech east Tamaki ) ( i have no previous experience to know if its any good or not, seams to weld so must be ok ): ) material is about 2/3mm wall thickness, the thickest I will be doing is 3mm at this stage. . will be dong a filet weld once I am happy that I can achieve a good weld , basically removing and blanking the ports on my radiator and moving them to the side and extending them ,as dumb 1uz has both the inlet and outlet in the middle at the front of the engine ( sigh)
-
sweet turning the cleaning around to the left , and pulsing has made vast improvements, the weld is no longer to high much nicer penetration . but I have found that the weld its self is very wide though, how do I adjust this ? thinner tungsten and a heat to match that size tungsten ? or is it much simpler and I just have it to hot and its melting a huge spot ?
-
ah, duh the switch , the switch . . . . I was wondering why I wasn't getting any noticeable difference, I had the switch set to not pulse, hahahah. thanks for the heads up , that was just the information I needed to hear. I think another couple hours and I will feel confident enough to make some radiator modifications thanks you very much mate : )
-
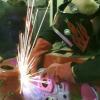
well I've been in the garage all day today playing with welder, I have discovered that I don't understand what a few knobs do, I have been messing around with them but I feel this is too illogical and I cant replicate welds . so time to ask people what's up . and perhaps try there setting out to see if I can improve the welds I am currently producing . my welder doesn't not have these labelled setting "arc frequency" or "ac balance" . I've been on "welding tips and tricks .com" his videos are very helpful . but the settings on his machine are different than my machine so I cant copy his settings outright . how ever , I do have arc force, pulse frequency and pulse duty cycle and clean area width. at this current stage in my learning process for alloy I have everything turned to 0 or if not 0 fully to the left, I have my gas pre flow and post flow set ok and I feel these setting are fine, I have my peek current set to around 12 o clock and its producing good weld and penetration looks good, I have my ac clean set at 12 o'clock , weather or not this is to much or too little I don't know. and to be honest i don't really know what i am meant to be looking for in the weld regarding this setting. so my questions are , what is arc force and do you use it on alloy welding? ( sheepers i read your message about it and i am currently running with a pedal so i am wondering if i just ignore this setting on my machine?? ) pulse frequency and pulse duty cycle , what do these do ? i have adjusted these knobs and i can hear that the welder sounds different but i can not yet feel any difference whilst welding . do i even need to use these setting if i can readily change the heat with foot control ? i dont know i feel quite noob with ac welding , steel was very easy to analyze the weld for faults but with this machine the setting don't yet feel like they are doing much . here is a picture of current setting and current welds produced, any help or recommendations please let me know
-
thanks guys, i appreciate your kind words : )
-
spot on brother. its thermostatically controlled to the cooler. has permanently open valve that allows 10 percent flow so to allow air to always be bleed out of the system . it made life easier for me to house the oil pressure sensor, thermostat valve, and remote oil filter all in one unit . was about 300 NZD landed from the states.
-
shit , so where do i start. ive been bouncing all over the place lately ,i want to get the dry fitting stage over with so i can start the nice bit of painting and re fitting everything. this project feels like its taking to long, so this last few weeks i have been hard at it , possibly pushing a bit to hard , i seem to be lacking direction, but anyway so , for my new job i have been learning a fuck load, and this is my first sold works drawing, first part ive designed and first well everything to do with making shit using computers and cnc machining. its a block adapter for an fittings for remote filter, i chose the remote filter because i wanted to use a oil cooler and i also wanted in increase the oil capacity of the sump . so by moving the filter i can achieve both things . here are some pictures. so i fucked around for along time trying different places to mount the reallocater, and this was the best place i could find with out having to cut away a shit tone of the inner guard or any stupid shit like that, the design of the reallocater leaves allot to be desired with regards to mounting options, but now its all done i have happy with its positioning and i feel it works well with everything else. i also started on the power steering shit too, this is going to be a total cunt face wanker because of how tight the headers are on the drivers side, so i am going to need to remake the flared fitting and tube that go into the rack its self . its going to be tight to say the least well this may look quite funny at this stage but this is the beginning of making a custom sump. i am basically widening it so it holds more oil, i will add some trap doors to help with sloshing around, with out spending a million bucks on dry sump systems i feel just having more oil in the system is going to help me not run out when doing stupid long slides. 1uz's don't hold allot of oil from factory compared to most v8s and i feel this is the main reason they tend to run bearing's cause the reserve is too small to begin with. first i traced it out then i made a square around it by following its straight lines, after that i used a compass to draw in the rest of the arks , now i can measure from the outer edge to the center of the circles, this gives me a position and now i can make a digital drawing on sold works, i will use the same approach to get the wings onto the computer, then once that is done i will make a top and bottom plate, the bottom will be welded to the side walls , and the top will become a adapter between the lower sump its self and the flange of the engine this will turn into something cool, but for now i just need some way to measure the bloody thing, looks dumb but from this i can measure it onto sold works and that's where it all begins and whilst i was at it, i finally saved up enough money to buy a new tig welder , this is primarily so i have the ability to weld alloy, basically modify my radiator at this stage, with the hopes in getting good at it and making more shit out of alloy later in the build. so with that i had to once again modify my welding trolley to hold the new welder. version 4.0.1 is fucking mean, i am surprised that this thing is still together its been fucked with so much, but yeah here it is in all its glory and here is the shit for the new radiator mods , ive got lots to do again .
- 29 replies
-
- 11
-

-
sweet, was thinking more along the lines of basic settings on the machine, I am proficient in tig welding steel , have done a fair bit of stainless but am yet to do any alloy, so more or less don't know what knobs to turn and where about I need to turn them. I haven't got any material yet , will do on Monday, but just for now I want to at least know where abouts I should start with some settings.
-
i just bought one of these bad boys. they are on special at the moment 1600 including gst and loaded into your car . 1 year warranty and technical support IE actually someone you can talk to and go and see, they have a rep for the north and south island also so no one will miss out, they also have parts replacement if necessary. the only bit i don't like is that you have to buy the pedal separately. which i didn't have enough for today but oh well .well get it next week so now to get some scrap alloy and let the fun begin , any tips for alloy settings? i have white tungsten 1.6 , and gas lenses and some nice large cups, looking at welding fairly average size piping and stuff for brackets all for my radiator , and some shit just for mounting stuff in engine bay . so around 2mm to 4mm .
-
Replacing fusable link after battery relocation.
ta63-1uzze replied to datto_610's topic in Tech Talk
get a power feed from a bmw wrecker they have a fusible link from factory.as part of the cable . and they typically put the battery in the boot too. so its a win win normal starter motor will draw well over 100 amps. hence fusible links are used not fuses or circuit barkers. all depending on your engine, but some starters can draw upwards of 500 amps on a cold start. diesels can be even higher -
Replacing fusable link after battery relocation.
ta63-1uzze replied to datto_610's topic in Tech Talk
are you talking about the starter solenoid wire or the actual power feed to the starter motor what engine are you wiring ? -
its all done with an electro magnet on the snout of the ac pump, so it will free spin until it gets power sent to it when you click the ac button on the heater controls. so no your all good everything looks to be right
-
hey guys. i am having an issue with my partners car. its a Toyota Carib, 97 ae111. 4age 20v. i have got code 4 9 from the flash codes . the information i have doesn't have this code in it. so goggled it and found it refers to brake light circuit. so did the normal test the switch at the pedal and that seams to be fine, i replaced it anyway just to be on the safe side. brake lights always worked and still do . now i have been trying to clear the code but i cant seam to do it. have bridged out the TC and E1 with a bit of wire (have removed the jumper pin as per manufactures instruction) , then turn key to on and pump pedal as much as possible . this is meant to reset the memory. . . . BUT no luck ?!? i feel like since all the test information i have has been extracted from Google from unrelated sources that i may just be chasing my tail a bit.and there could perhaps be a much more simple fault some were else in the car. anyone had anything similar or know something i don't. any help would be very appreciated. need to get it sorted as i want her to be safe and have the abs system working,
-
that isn't shielding the pins though, which is what i was talking about. its shielded up to the plug. it will still be vulnerable from electromagnetic inductance . and on anything like oxygen sensor crank and cam even tps wiring where they use small voltages and inductance will create a false signal . he has done a good job but perhaps if the signal pins were as far away as possible in the connector then it would stand a much better chance of not inducing voltage. would be intersting to test to see how much voltage is inducted over the pin area. anyway i looked for ages and couldn't find anything that was cheep enough to justify the expense. the link ecu plug is very small ,its even in that link up above, and if this is the ecu you want to run then simplest option is to use a grommet and make a 40 ish mm hole( might be smaller i cant remember its exact size) i don't think you will find anything that is brand new for under 300 bucks to be honest, but if you do please enlighten me as having one connector would make life easy.
-
I looked down this route but I found it simpler and cheaper to just make the wiring longer and buy a grommet and wrap the wiring in conduit then slip the grommet over the conduit nice and snugly . it looks tidy as , and later when you work on the engine you just pull the loom through the hole. . I got the grommets from trade me and used a centre hole punch a size smaller then the conduit . the major down side to this is the engine loom have to cover everything to make it effective ie: one complete loom for the engine side. takes a bit of time to remember every thing . also you cant keep your shielded wiring shielded in a plug assembly, not sure if you would have that much of an issue with inductance but still something to keep in the back of your mind . also less resistance with less connectors etc. I guess with sensitive wiring applications the less you interrupt it the better as every little bit ads up. the other idea is going to get something like a falcon loom plug from a wrecker , or and other similar weather proof plug. they are not to hard to disassemble and re pin , just need to take time to extract the pins. even if you fuck the pin jay car sell replacement ones .
-
nice, I didn't find these ones in my search.this is the one I have found http://www.ebay.com/itm/Greddy-12401114-Remote-Oil-Cooler-Filter-Relocation-with-Thermostat-/321289930137?pt=Motors_Car_Truck_Parts_Accessories&hash=item4ace5f4599&vxp=mtr its a bit more pricey but it works out at the end of the day as i wanted a thermostat to keep oil temp correct , so by the time you add up extra fittings and buying a separate thermostat it works out easier to buy it all in one unit . i havent got it yet, but it looks nice and shinny i cant wait ! from the pictures the only down side i can see is its going to be shit to mount. and i may be limited in the choice of filter . hopefully i can fit a large filter . will have to wait in see
-
so bit more gard work, made a nice little 2mm plate to support the bumper and a bit of a gusset to support the plate. and with that bit done it was time to make a bumper bar/oil cooler mount. the fit isnt as good as i would like but its only a bumper so will do for now or untill i find a better solution . here are some pictures of the front as it sits now in the garage. am a bit all over the place at the moment, things on the horizon include custom sump, oil "an block" to conect up the oil cooler and remote filter , and finaly get around to fittig the suspension i bought months ago. shit doesn't happen fast around here !
-
so i have been looking around at coolers, engine and power steering namely, just wanted to see what people have used and if they have monitored there temperatures before and after etc. i am looking at fitting a oil cooler for the power steering and one from the engine, but i don't want to over kill it with size and then possabily over cool the oil's. i have been goggling but have not found much in the way of thermostats for either the power steering or the engine. i don't know enough about aftermarket fitment so i am not sure on what i need to look for when building my system , any help would be appreciated.
-
second this, pull the boot trimming out, pillar trimming ect, its all bolted in, you may need tube sockets as I think they are quite deep from memory : )
-
so back into the panel work , I like to chop and change up the order of things , I find it helps to keep me motivated . each time I put more bits on and it starts looking more like a car again it make me want to get fuck loads done. so with that in mind I decided to have a go at some panel work and see if I could tackle the bonnet and guard work . start with a celica supra xx bonnet, ( big thanks to zestripper for the old school hook up ) attack with grinder heaps , then try and fil the holes your just made and well only after looking at this from the computer did i realize that the carina knows its going to be a death machine, and its prepared with its own coffin bonnet hahahahha . . and evil upside down cross which is actually the primer underneath the old supports that i cut out. i capped the supports that i had to cut out, not for another reason than just to try and attempt to tidy it up. kind of worked, will have to seal it up and get some paint on it to know if it worked,. and trimming up the front guards to add a bumper mount, as i will be trying to use the ae corolla bumper. this is as far as i have gotten. need to get some box section to make up the main support frame . but its coming along nicely so far. got this far and then i stepped on the grinder plug on the floor. . . but hey no problem right, no ! just like a fucking key, once you bend it you cant bend it back with out it braking, so with that i finished all the beer and then called it a night,. but tomorrow i might just go and buy a new grinder then i can get a 1000wat one, and stop having to swap over cutting disks and linishing pads. can never have enough tools .
-
braze is actually stronger then welding, because it doesn't change the metals molecular structure , it puts less stress in the joint and far les heat which all helps to keep as minimal stress in the joint as possible . . it wont crack as easily and generally is a very good repair, but have to remember you cant weld on top on braze so if you need to do serious repair later on then it can become an issue, I like to braze most things but the down side is I don't have a OA at home so I end up mig/tig welding everything . braze is insanely strong in the right circumstances what are you thnking of doing ? got any pictures of your intended repairs/modifications
