azzurro
-
Posts
2,878 -
Joined
-
Last visited
-
Days Won
4
Content Type
Forums
Downloads
Events
Gallery
Everything posted by azzurro
-
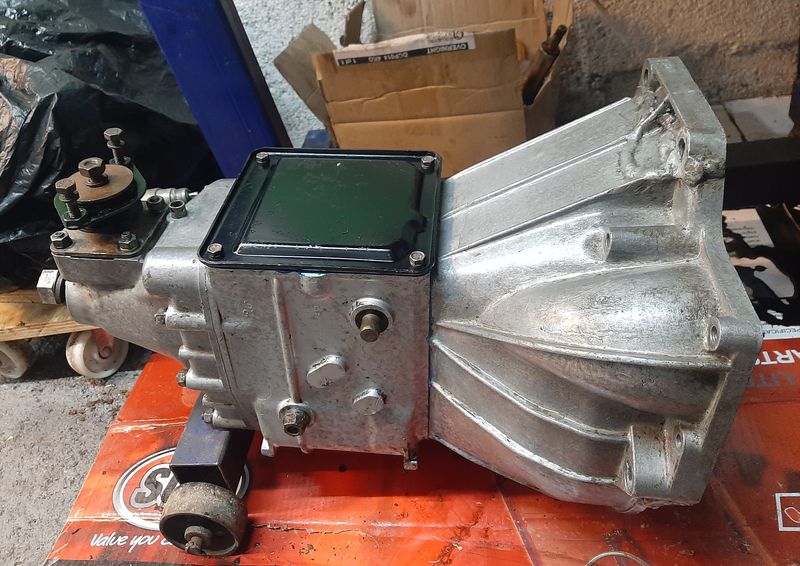
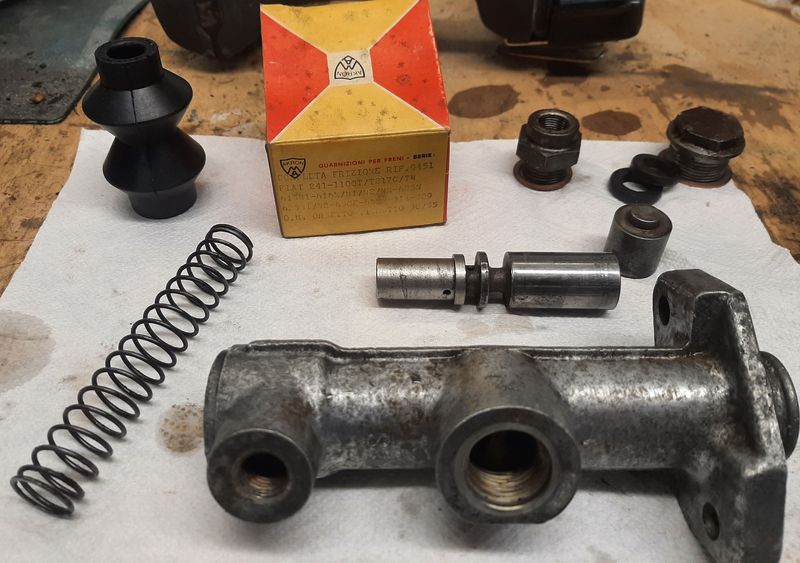
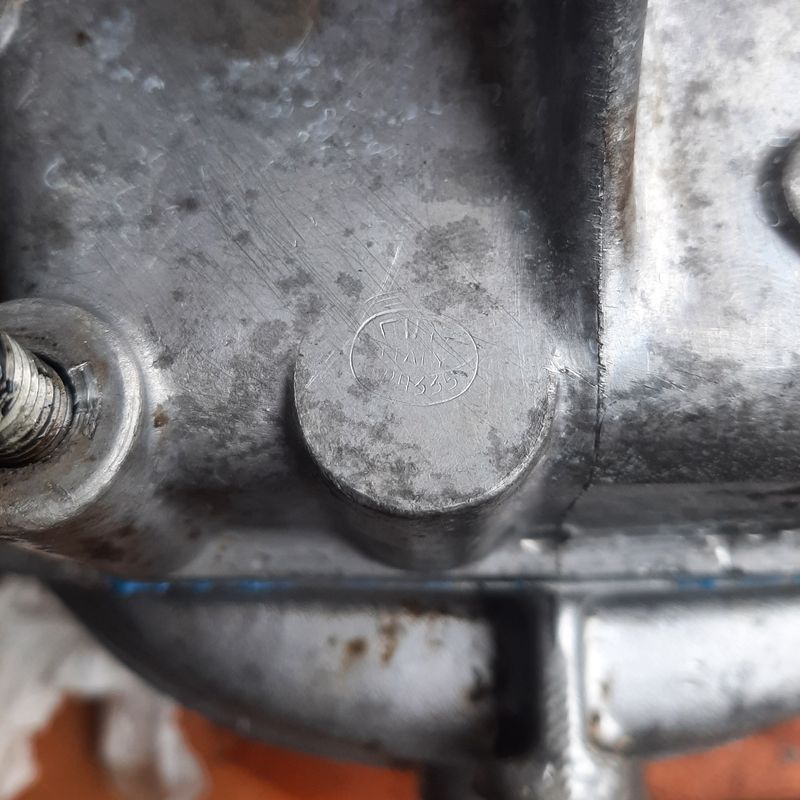
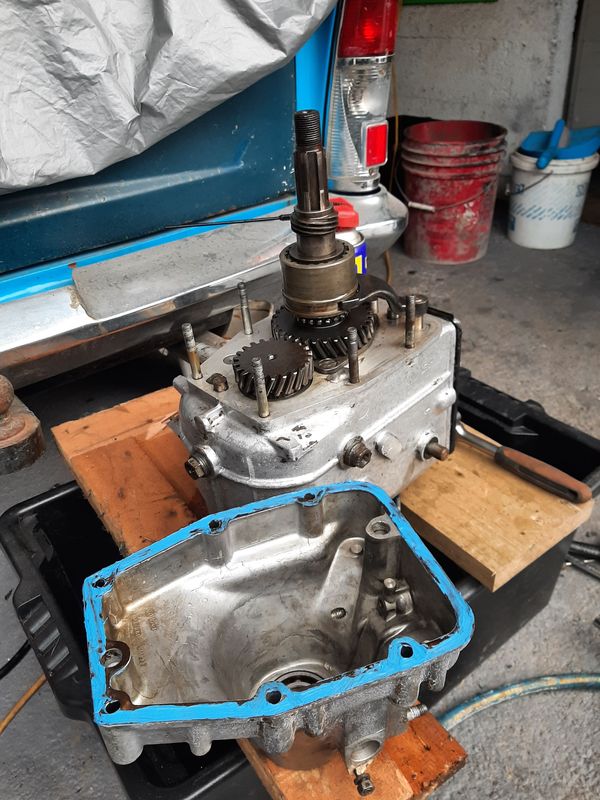
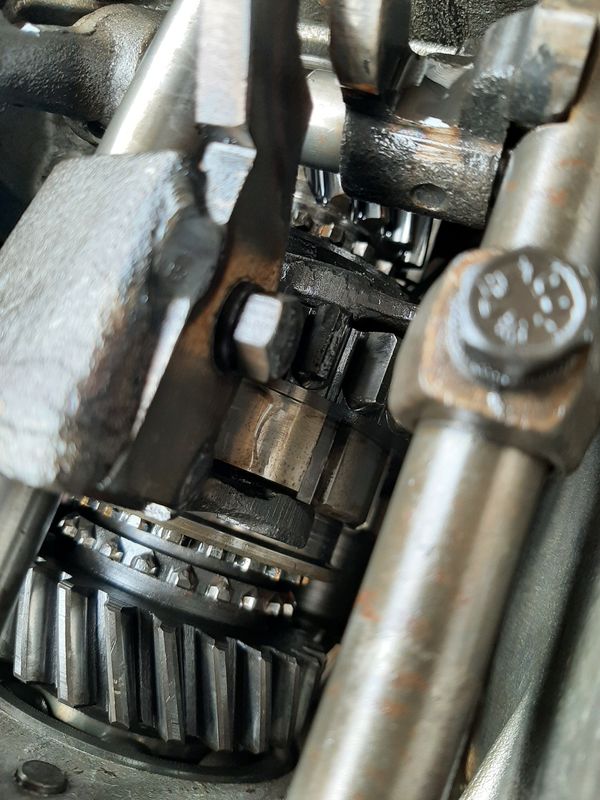
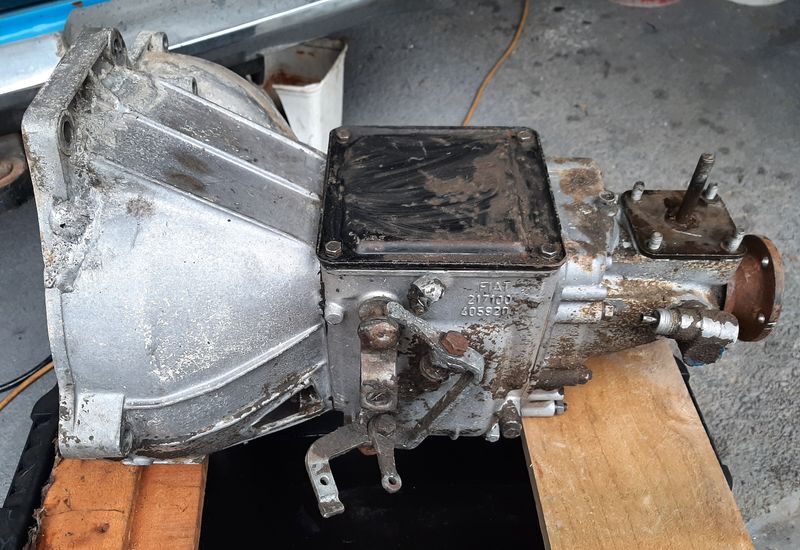
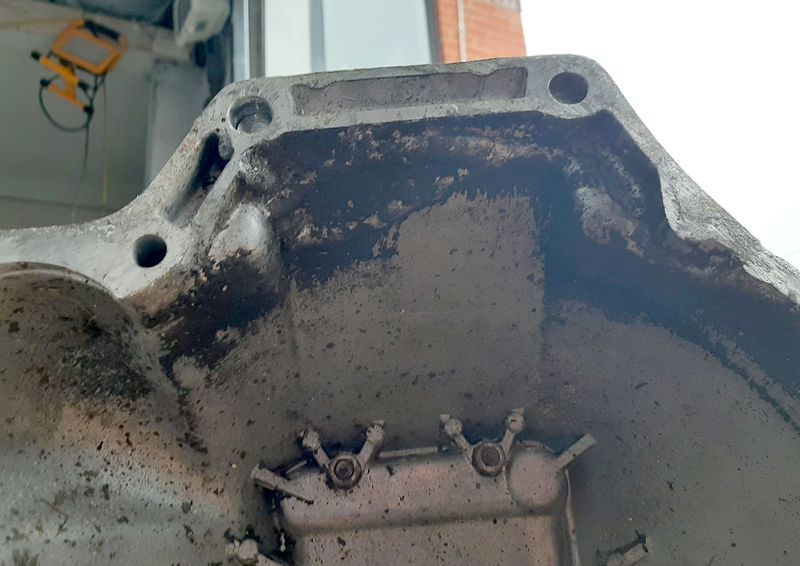
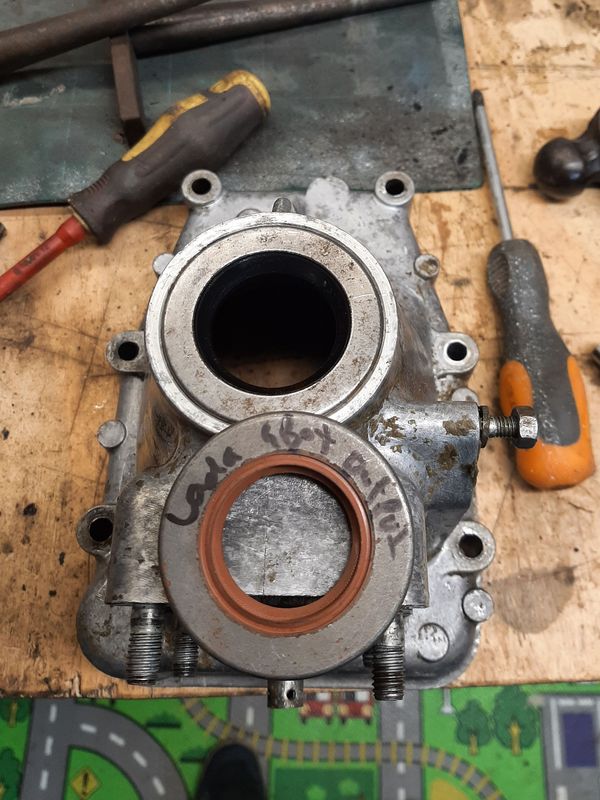
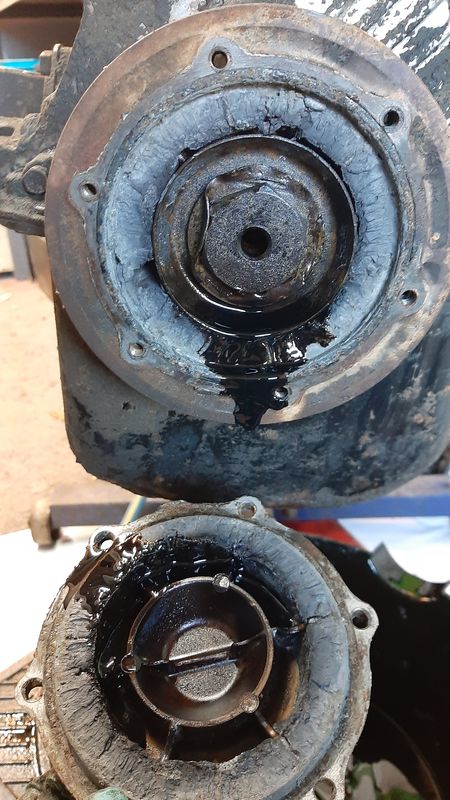
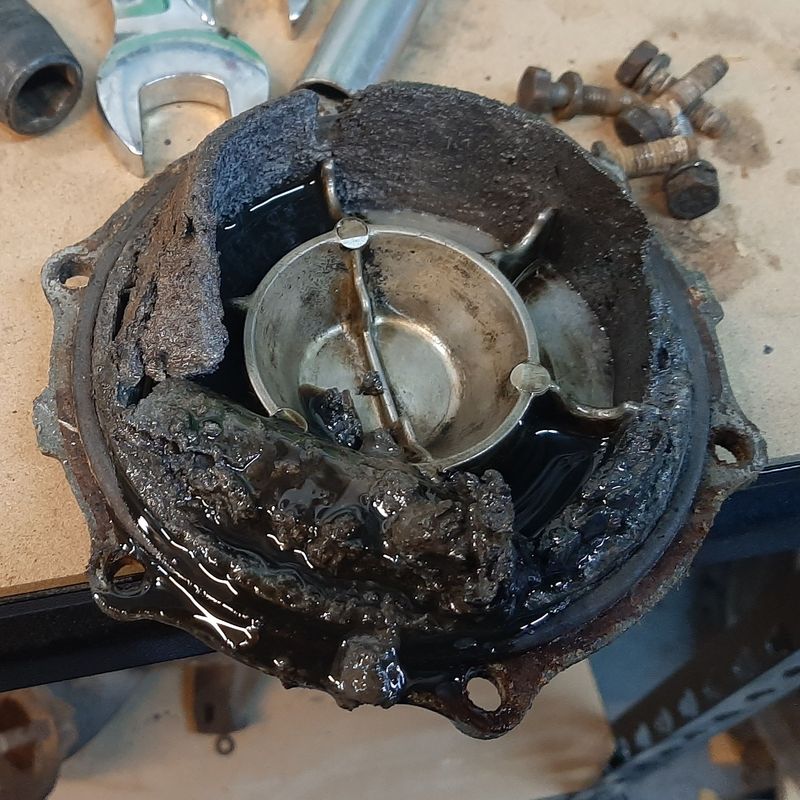
So onto other stuff, Gearbox has been sitting in the corner since being removed It looked pretty suboptimal on initial glace After a waterblast looking better. Box is early 1100 style so pretty light and small. Similar design to my 2300 but that has a steel case and is i bit beefier all round. Linkage has been fuckled with and the top of the bell housing looks to be welded back on. Mounting face is flat and the holes line up, so im letting it be. Insides look ok, i guess? Turns out the output seal is the same as a lada/124/125/1100/1500/2300 which is good as i had one 'in stock' from a past order FIAT ITALY PA335 Removed the bell housing and tail shaft. Nothing seems missing or broken, there is some wear, but nothing i can do anything about. New oil seal and some bloo goo on the original gasket Put back together - ive ordered some more seals for future reference: 1100T 217.000 gearbox output seal - 32x56x10 - same as lada/124/125/1100/1500/2300 input seal - 22x45x8 - shared with other 1100 group boxes selector rod seal - 14x24x7 - shared with 850/1100/2300 Clutch master came apart and cleaned up pretty nicely too - i have already got a NOS rebuild kit ready to go, but i also have also a strong feeling this is a lada compatible part (the slave is) so may drop one in my next ladapower order just in case.

- 64 replies
-
- 24
-

-
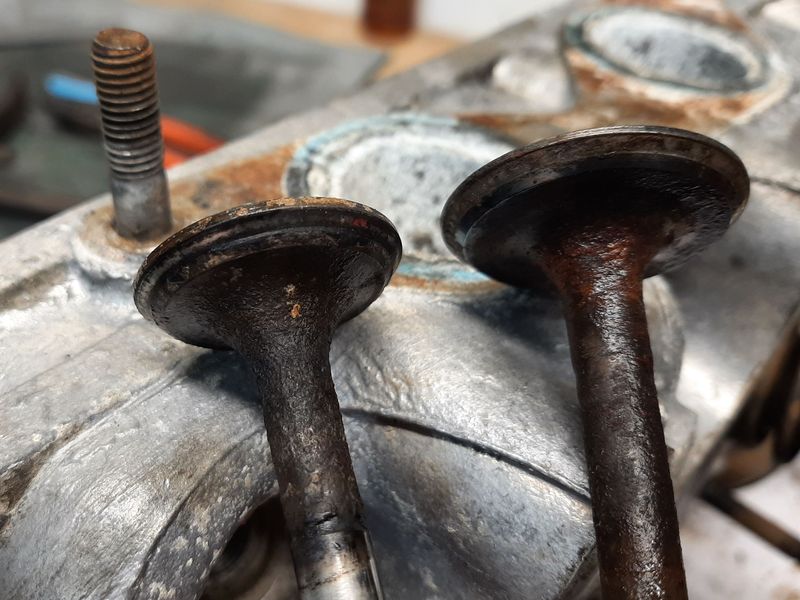
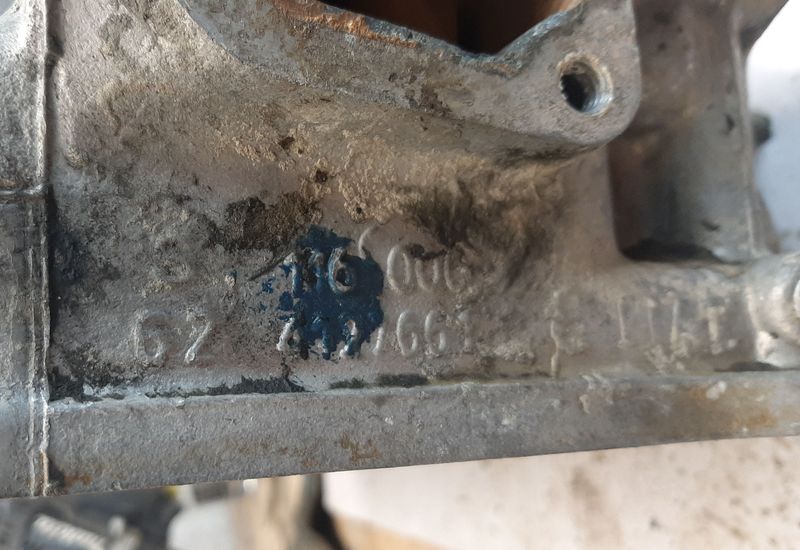
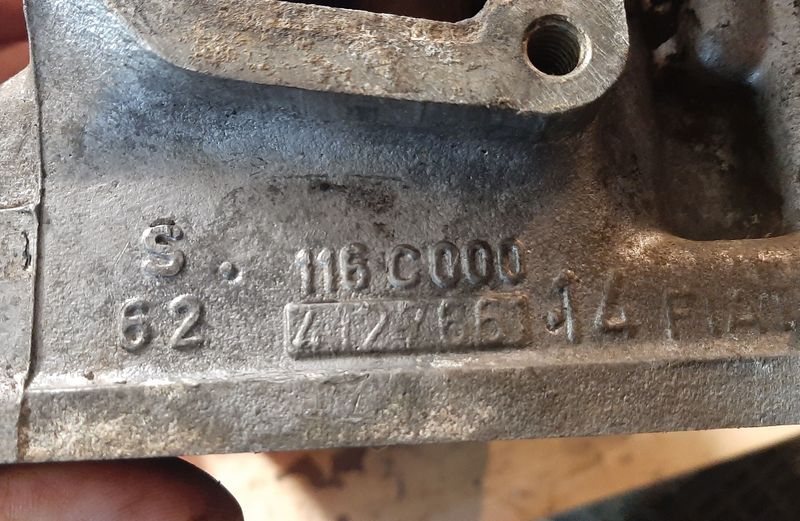
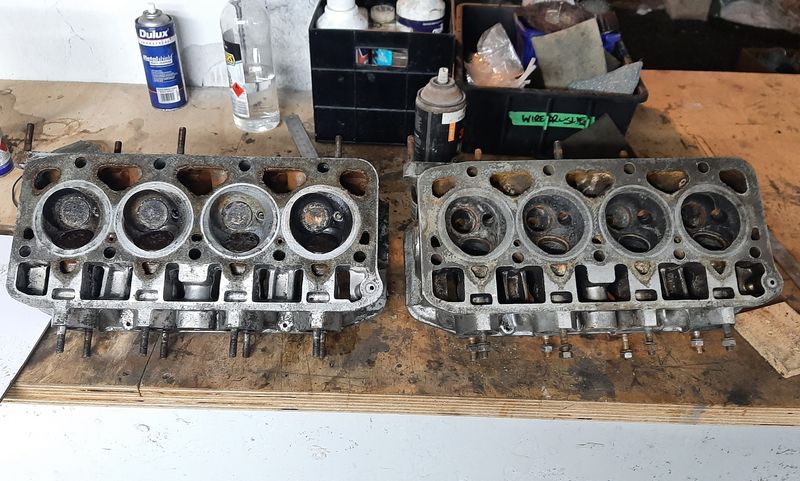
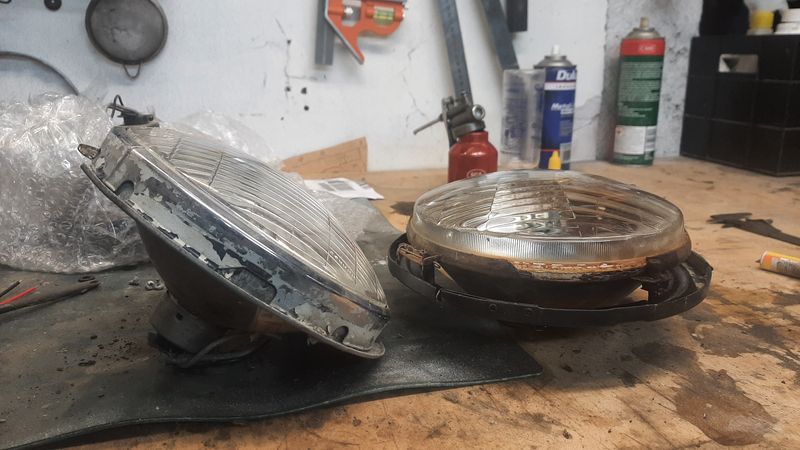
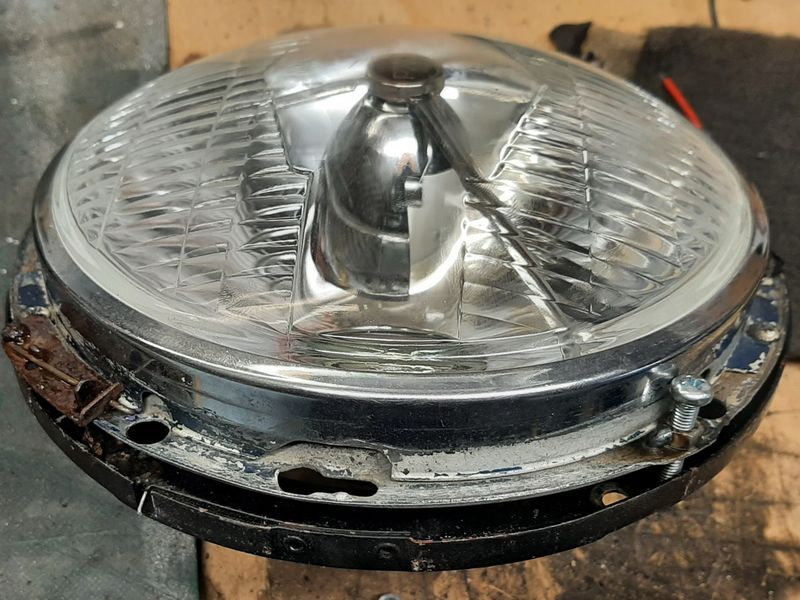
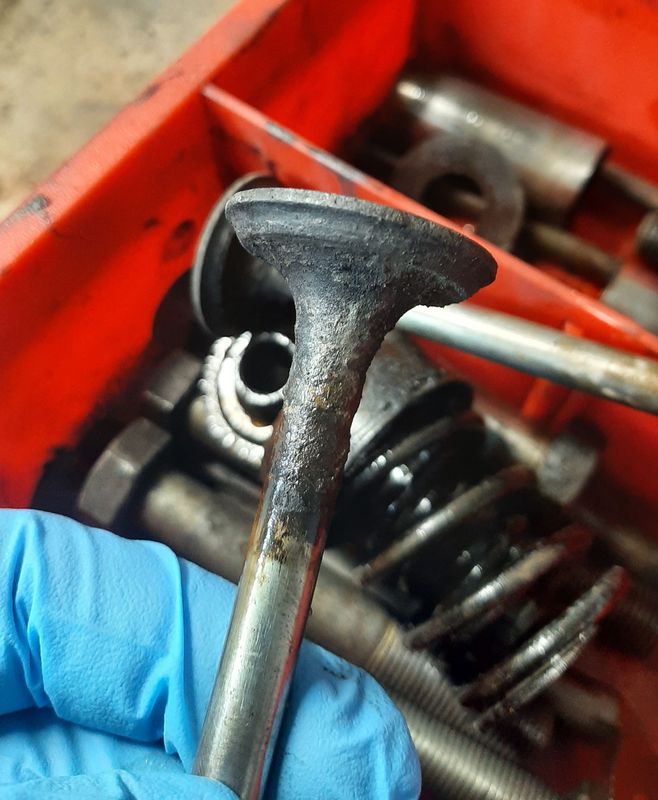
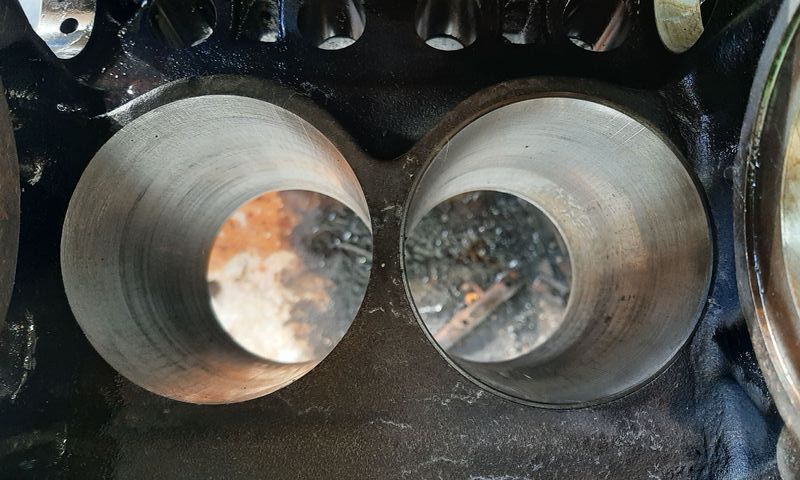
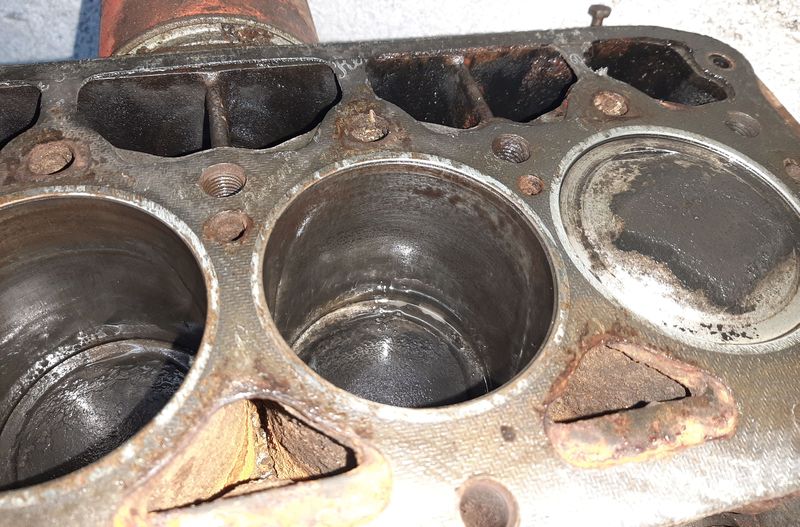
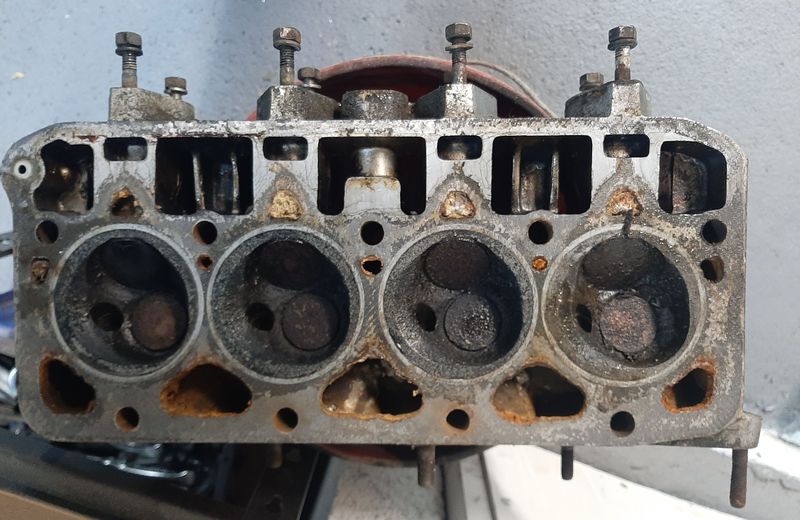
Fingats crossed the van head (left) is better than the Car head (right Both have the same casting number with the van being an '8' the car head being the later one is a '14', chamber head is very slightly different as well Dang it, looks like i will need two new sets of valves and might even need to pay a guy to re grind the seats properly and other similar stuff. Bugger
- 64 replies
-
- 12
-
-
those castor rod nuts were tight as feck on all mine too The design of the valence means you cant get a rattle gun on there either. I think i used a nut splitter on at least one of mine in the end
-
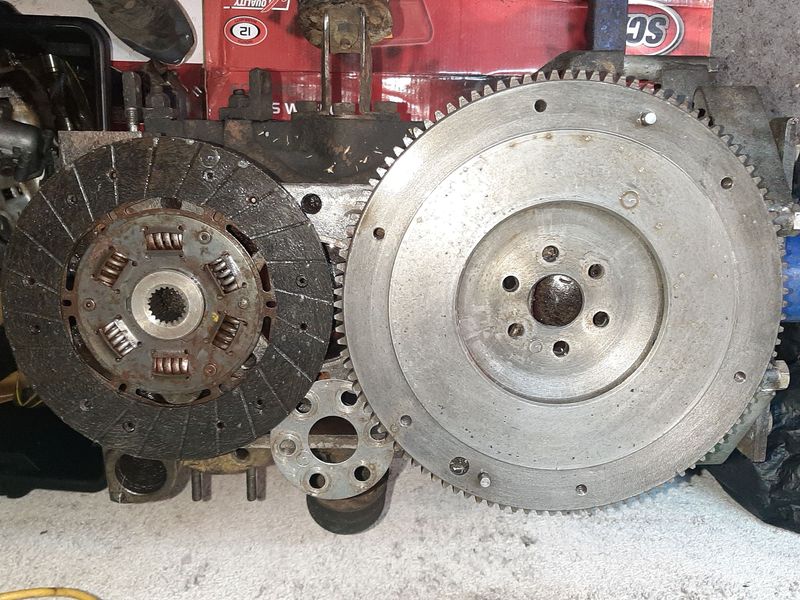
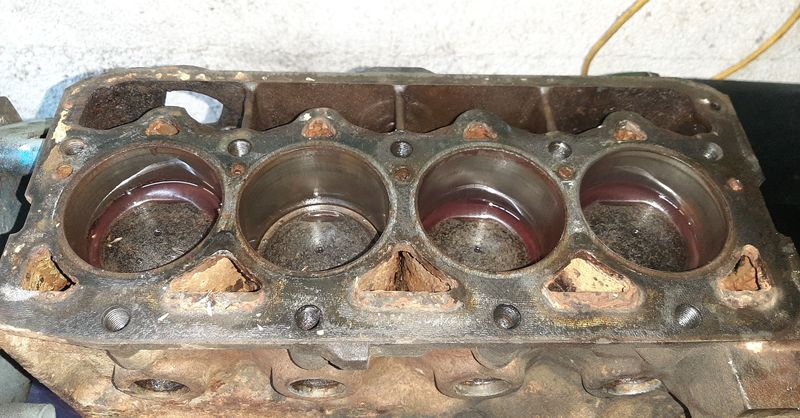
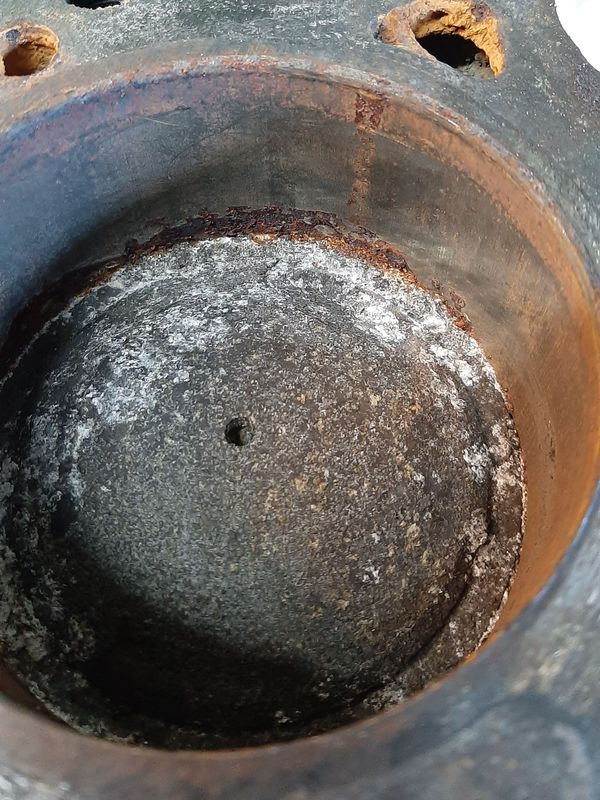
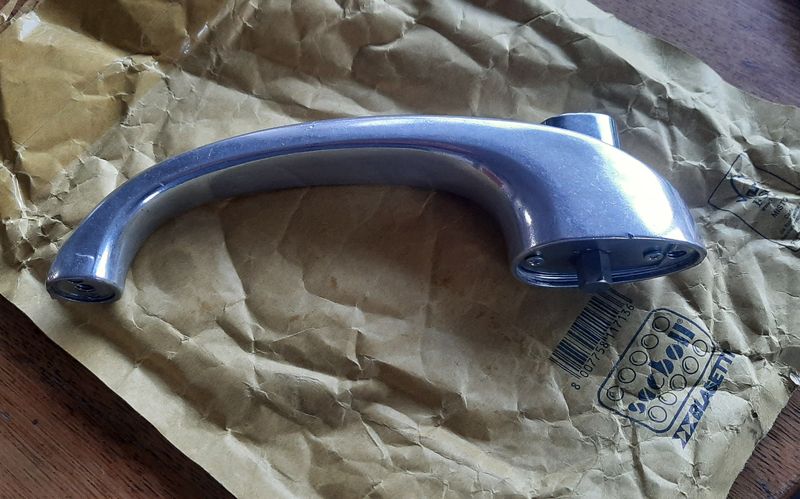
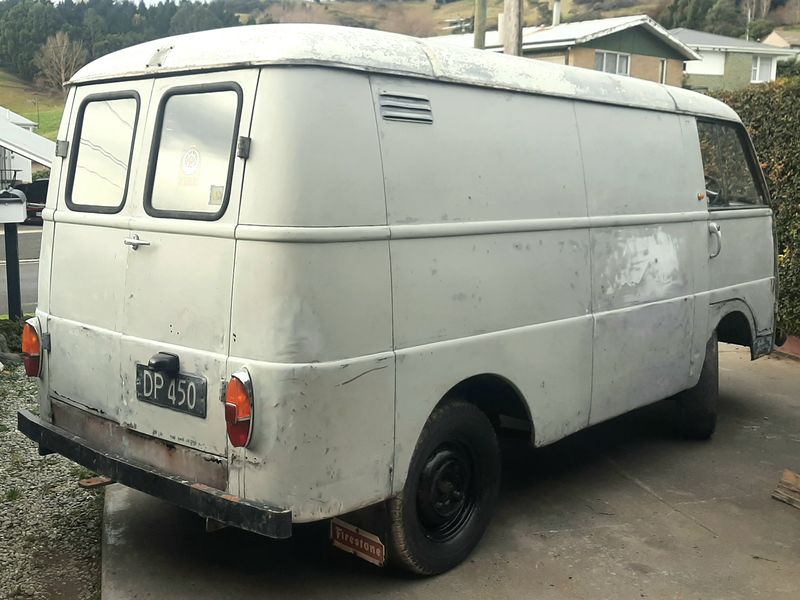
slow progress this week finally started painting the bathroom ceiling i rejibbed after replacing the old 3 in 1 fan a few months ago. Some more treasure from Italy showed up, its the missing sliding door handle. Popped that on and now the van (furgone) is pretty much complete now. Just doesnt go or stop... So shuffled the 'car' engine off the stand and under the bench and got the original one from the van ready, removed clutch and flywheel, and got it on the stand to start the tear down to see what we have to work with. Got a new parts washer - its a revelation - good for cleaning things before (remove the greasy smeg) and after a soak in the vinegar bath (to neutralize it) and after the sand blasting cabinet to get the sand off things before putting them away - flywheel and clutch plate are both in great condition and came up well I know this engine is hard seized and the engine number is about 50,000 lower than the car engine. Both are 115C 000 blocks, but the van one is #35xxxx, car one is #409707. Centrifugal oil filter shows signs of a lot of deferred maintenance! Popped the valve cover, the inside and the head very blackened (from dirty old oil getting hot) and the valve gear has some surface rust from condensation A couple of valves were sticky but they freed up once the head was off and i could tap them back up. Ill strip the head down after work this week some time, hopefully its better than the other one. The valve gear off the other engine is nicer than this This is Cylinder 1 after popping the head off and a quick vacuum. That will buff out? After a good water blast and air dry i stripped the rest of the accessories out. Cam looks ok - cam gears, chain and cover are also in good nick - no witness marks from loose chains either so ill use that cover at least. Oil pump shaft is stuck in its hole- and BLACK Left some ATF and Acetone sitting in the cylinders overnight - only #2 drained out - i know for sure #1 is rusty and stuck, but maybe #3 and #4 just have really good rings? HA haaaa haaaahaaaahahahaha hhmmmm. Hmmm. Shame because it looks like this engine has standard pistons still (77mm vs 77.2 on the car block) and apart from the rust the cylinder walls look less worn as well. Will see if it frees up, but i think ill stick with the car block, hopefully the head off this one turns out to be ok, or at least better than the car one, and with a few other bits swapped around and some new rings ill get 'a runner'
- 64 replies
-
- 27
-
-
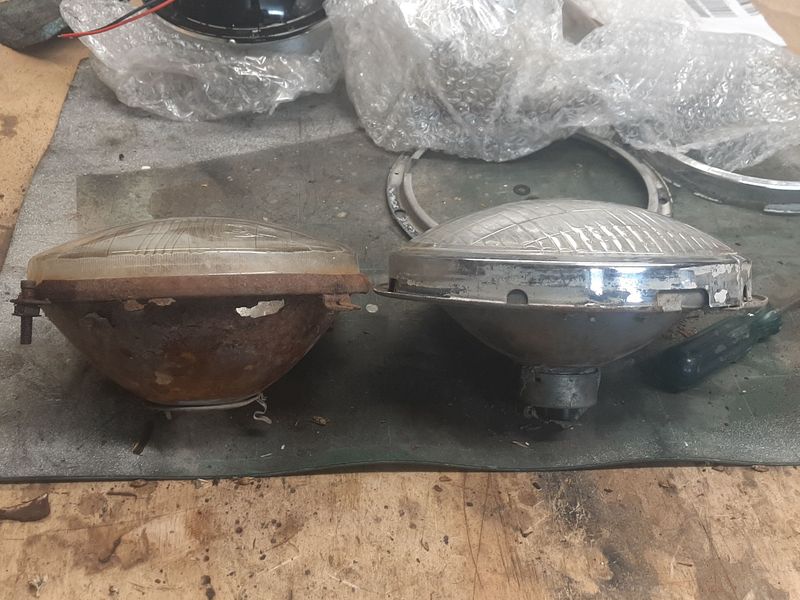
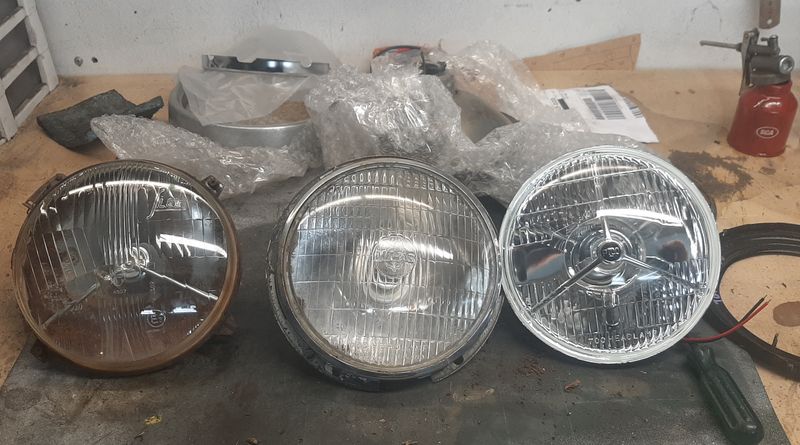
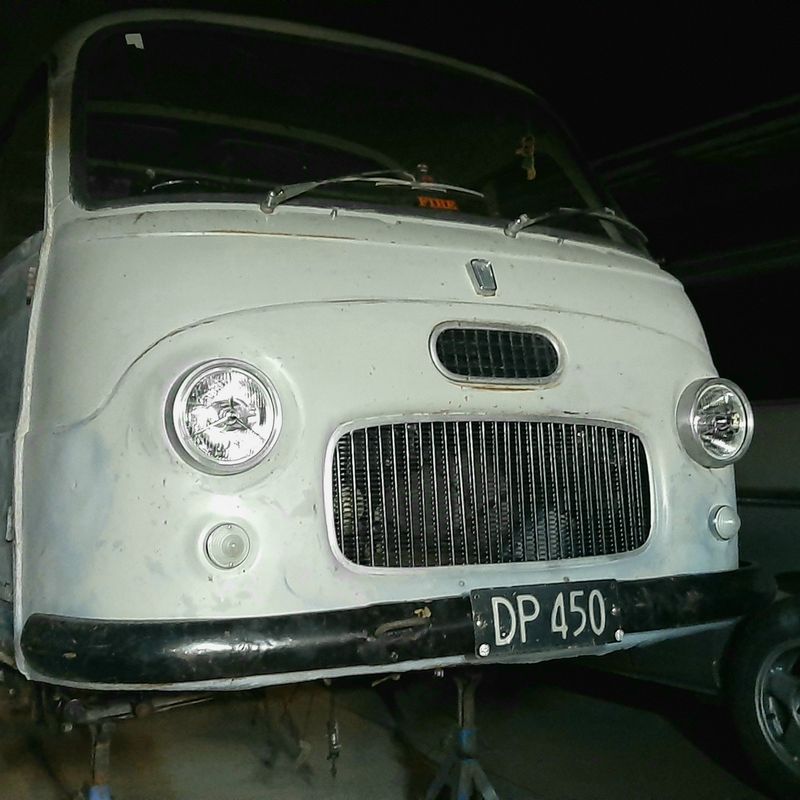
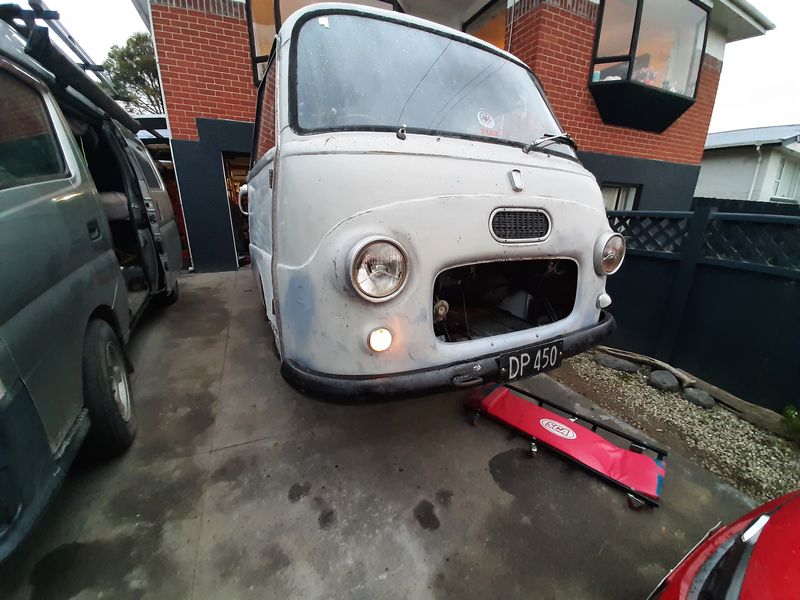
Headlights These take a 7" H1 bulb headlight, which seems common enough, but the bulb housing has the mounting and adjustment built in and clip on to the bucket and are only available NOS, like these for only $500NZ + postage, and these aren't even RHD. https://www.ebay.com.au/itm/124135811511 So i bought the cheapest 7" headlights i could find with a peace symbol which tuned out are Lucas STYLE 700 lamps from here along with some other stuff: https://www.classiccaraccessories.co.nz/collections/lighting/products/classic-lucas-style-p700-headlamps?variant=29025370636376 Unfortunately they didn't mount quite how i imagined but luckily some actual Lucas headlights popped up on FBM and they had the mounting rings too, so I could fabri-cobble something together. OEM SIEM light (H1 bulb), old Lucas 700 with mounting ring (bayonet style bulb) , modern Lucas 'Style' 700 lamp (H4 bulb) The SIEM lamp has a 'long' side glass which gives room for adjustment within the light trim ring. The mounting ring on the lucas makes it a bit tighter Reusing the original mounting buckets (they have small clips for the trim ring built in as well) meant cutting one wee clip off the old headlights, cutting some slots and adding some captive nuts to make some adjusters And they actually fit! Van finally has its face back. H1 and H4 bulb wiring is pretty much the same but ill probably add some relays in for these and a few other things at some point This is normal right? Classic OS, 'saving' money on buying the right thing, by spending almost as much buying old junk that doesn't quite work and spending hours making it fit. Should have probably just bought these, but they were out of stock or I would have https://www.classiccaraccessories.co.nz/collections/lighting/products/7-inch-headlamp-cone-assembly-metal-with-gasket
- 64 replies
-
- 30
-
-
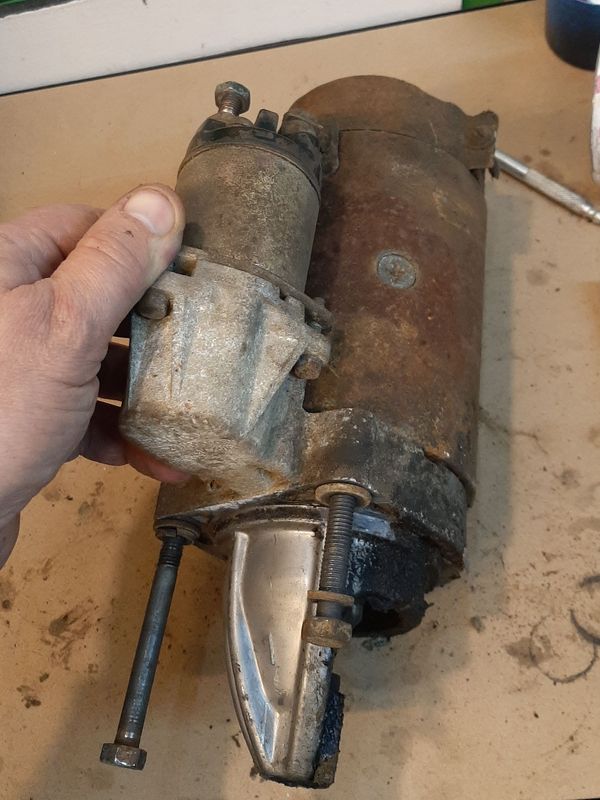
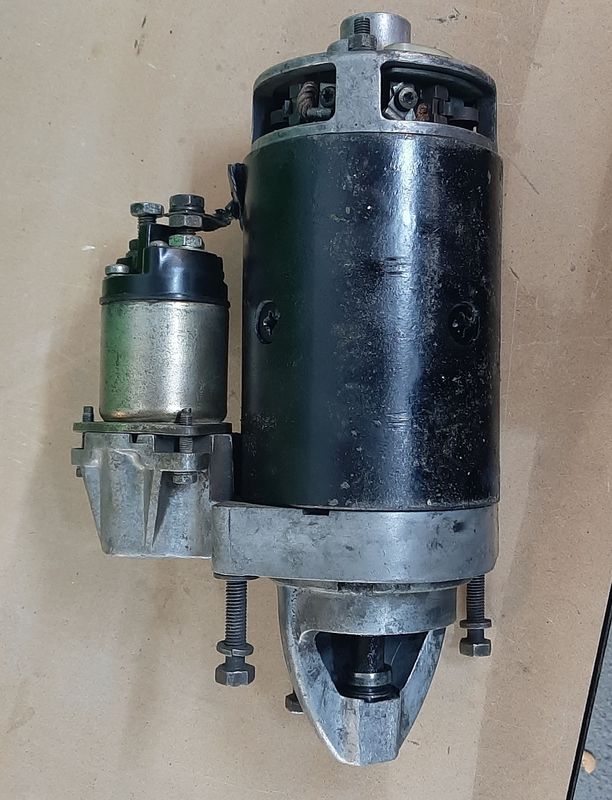
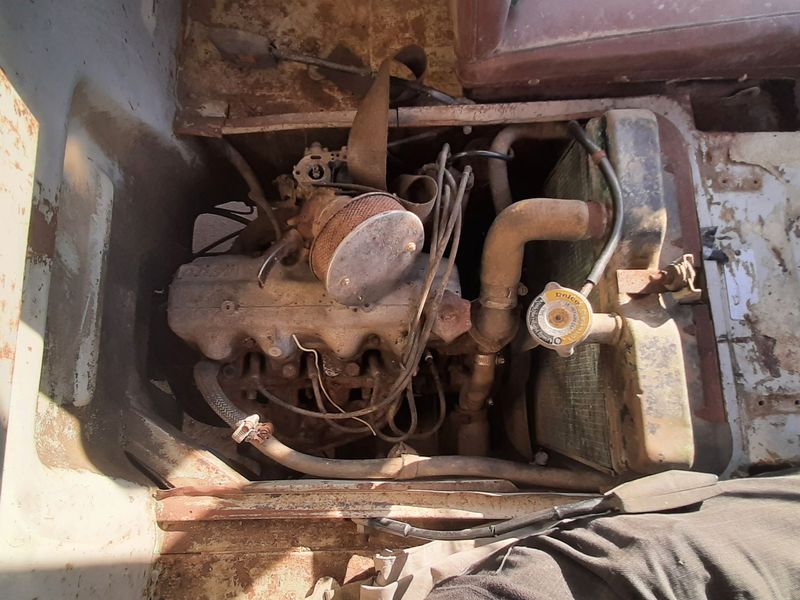
Had a combo of not raining and the Mrs in a mood to help, so got the van turned around. Not quite Austin powers 100 point turn style but nearly - i had a roller jack under the diff which made it a bit easier to pirouette. Jacked it right up, stuck the engine crane though the drivers door and after disconnecting everything (-1) eventually pooped this greasy lump out. Thats a single barrel Solex with about a 25mm venturi and the exhaust manifold is van specific to poke though the engine bay into the front wheel well. Smelly greasy hole Two cans of degreaser later and its much much better - the opening behind that loose pipe is for the exhaust pipe. What looks like a chassis rail the pipe resents on is actually the cold air feed, from in front of the radiator, dumping behind the firewall, with a smaller round hole for the carb - i wonder if that has a ram effects? Tidied up the starter motor, came up really nice, solenoid even has yellow plating still on it, and even bench tested successfully, and happily a bit smoother and quieter than it was before the tidy up Mid tidying up Fresh alternator brushes, I got 4 boxes of these these cheap as (like $10 euro for all four boxes?) ages ago for my 2300, quality West German made. I also swapped the starter bushes for the old 2300 ones i swapped were actually quite a bit longer than the ones in the one that came off the van engine (never throw anything away!) And compared the spare that actually looked slightly better on the outside (but felt a bit crunchy spinning).
- 64 replies
-
- 16
-
-
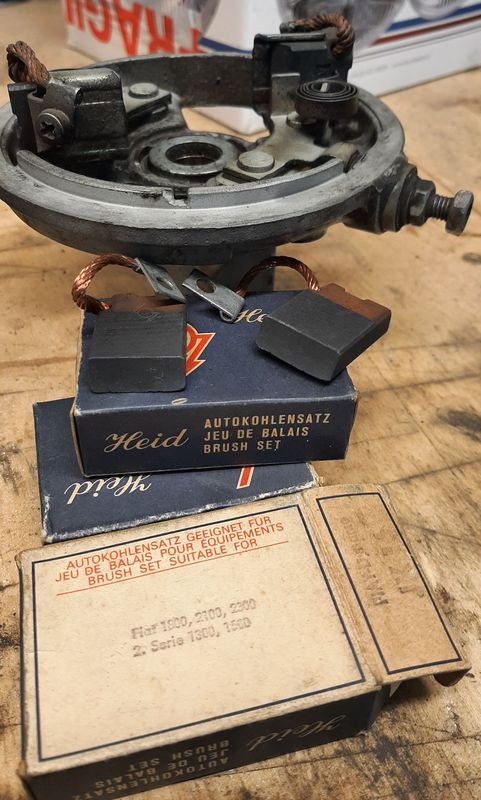
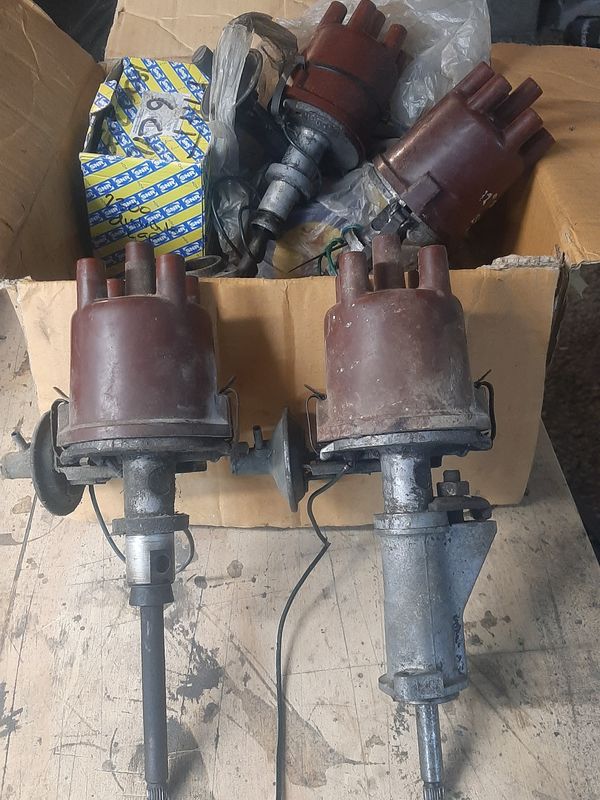
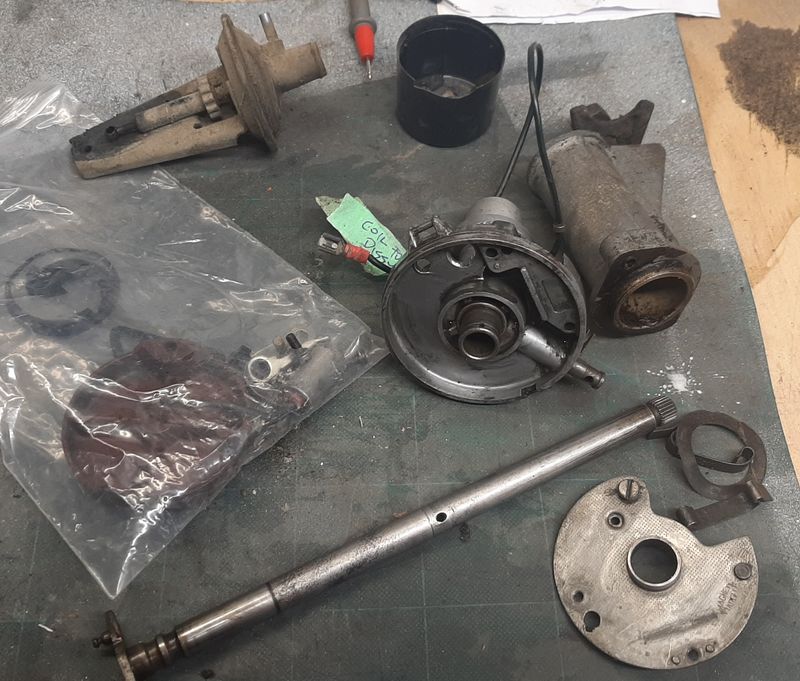
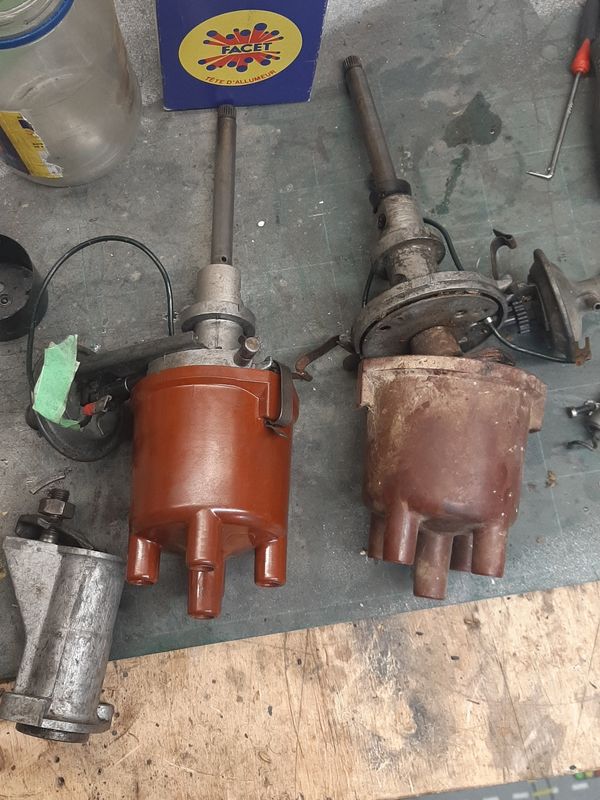
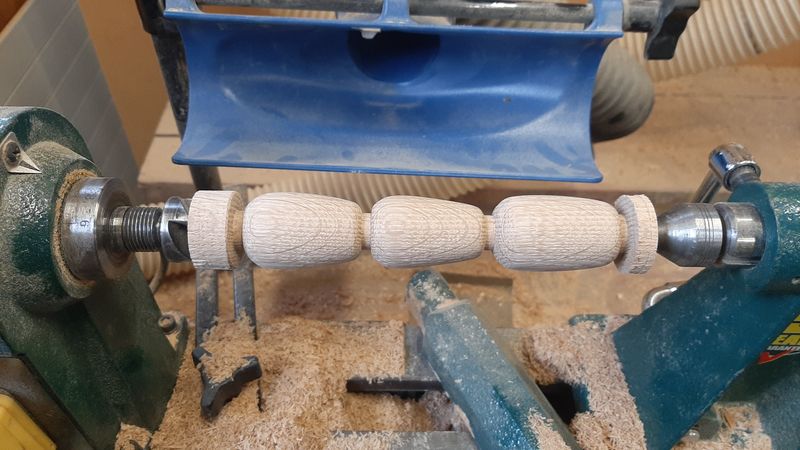
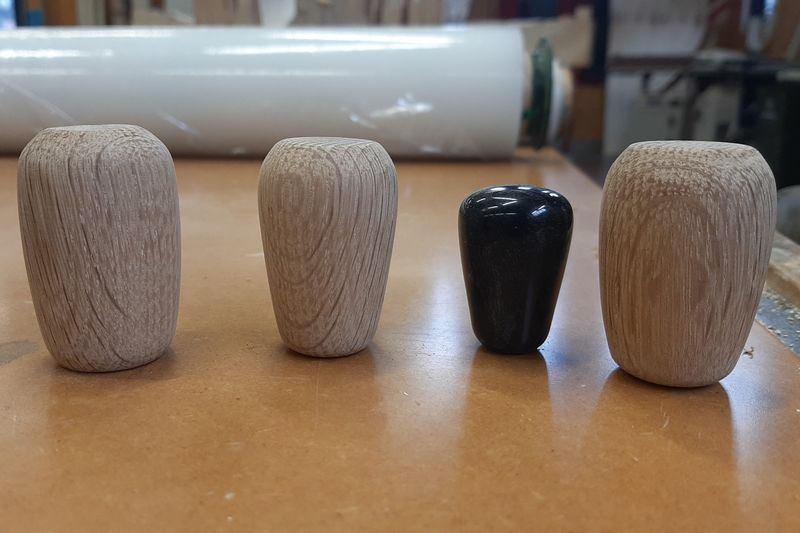
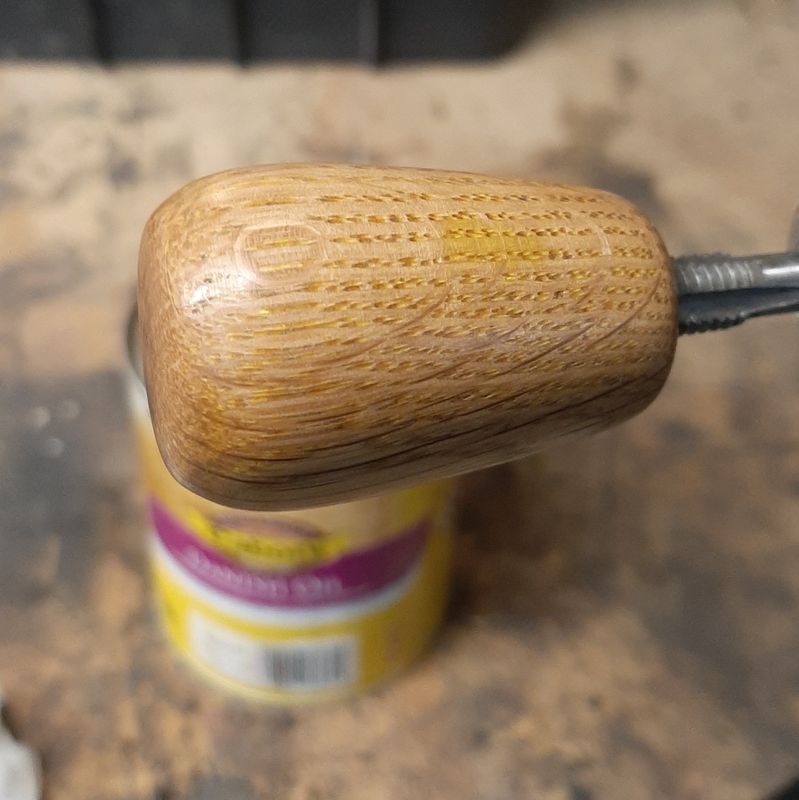
Been poking away at things. Ol' mate runs a Tech room at the local high school, so i did a C+ effort on turning up some oak gear knobs one weekend The black one is the knob off the 2300 wagon, which would be close to if not the exact factory size on the van - ie pretty small, about 25 diameter x 40 long. I havnt been able to find these for sale anywhere, and they are an usuay (for a gear knob) thread The other ones might get used on some other cars. M8 x 1.25 threaded tap into a 7mm drilled hole, and some danish oil. Also tidied up the dizzy. One off each engine, one slightly better nick then the other. Very similar design to the 2300 one (box of bits in the background) but I didnt need to steal any bits. As i managed to make one good one from the two, one set of points was pretty much new, one vacuum advance worked, etc. Reassembled and adjusted up. Got a couple of cheap NOS dizzy caps in a recent order so unboxed that and all looking good.
- 64 replies
-
- 18
-
-
@epoxy124 more 125 content please!
-
Dang. Costs changes are related to variations tho? not just "yeah, nah, quote was for $ but lol, jokes heres the invoice for $$$"? Shame cause otherwise seems like it was going pretty good, nice tidy site, good progress, quality work, etc?
-
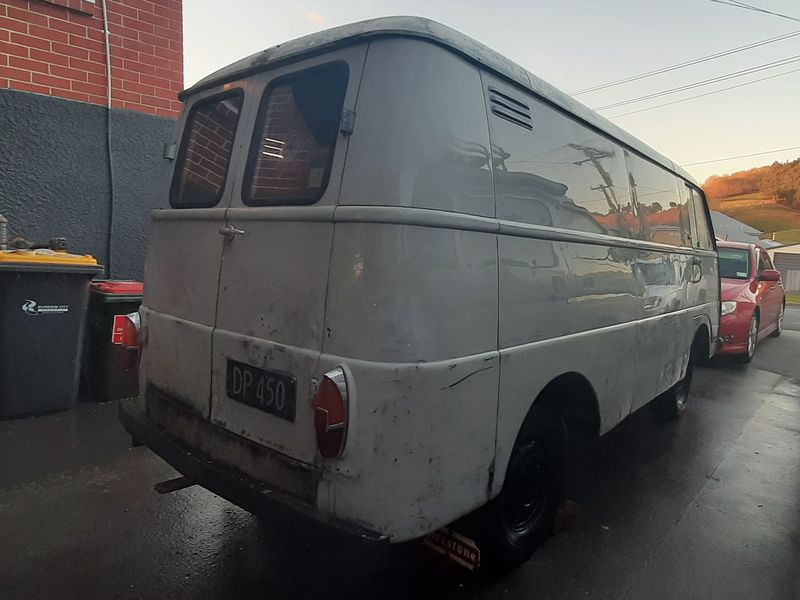
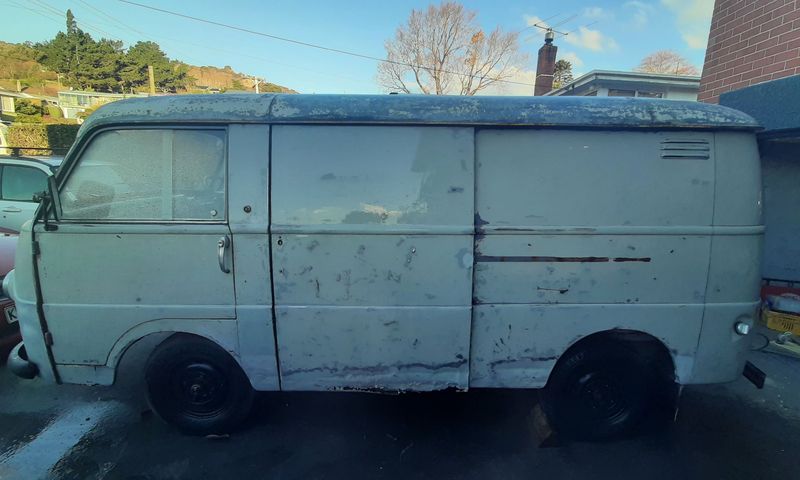
 Everyone needs a rusty column change van project! Top purchase - look forward to forward progress
 -
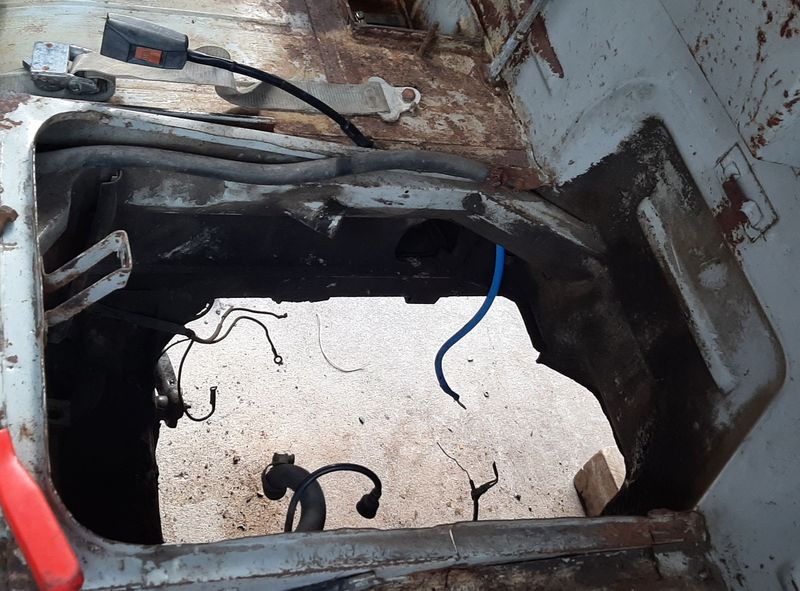
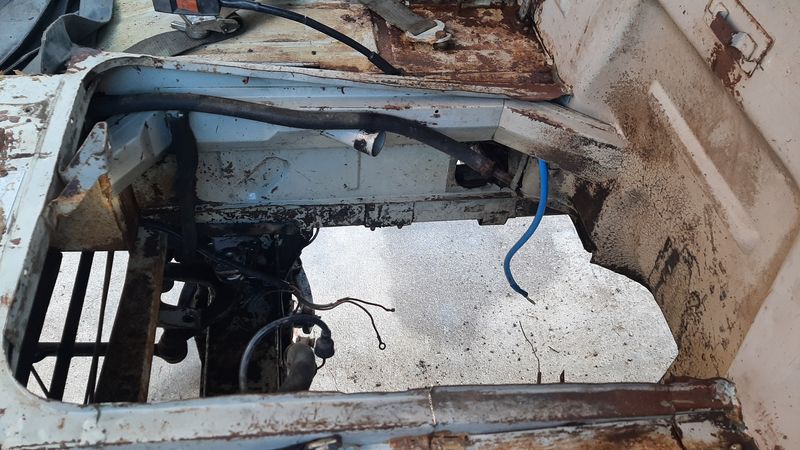
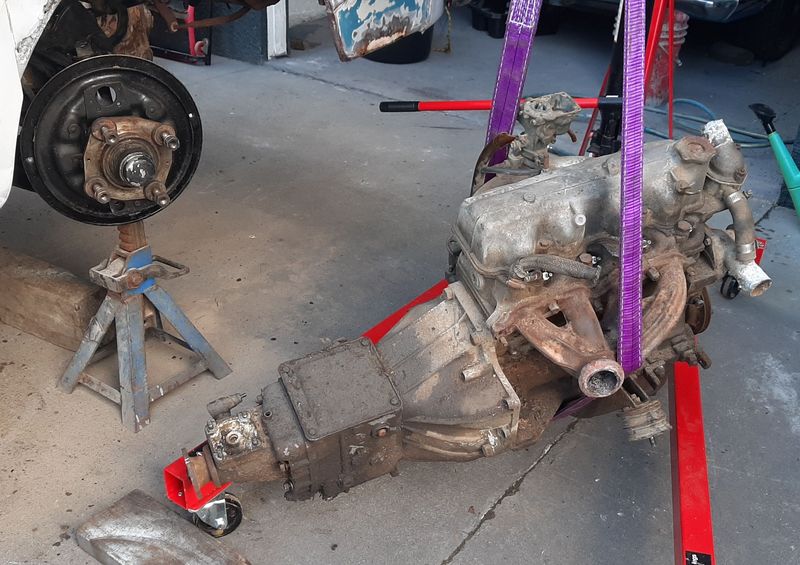
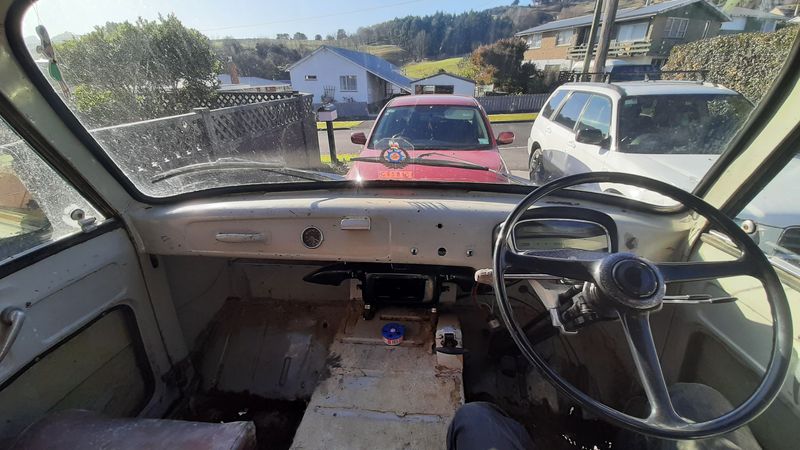
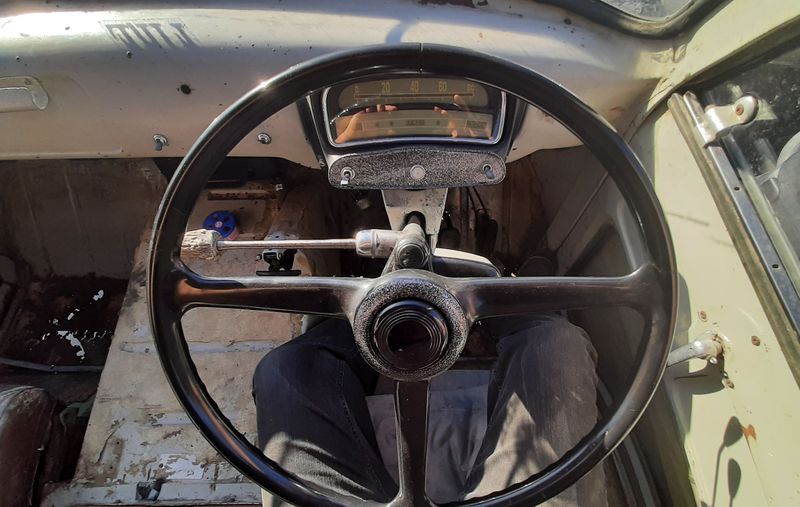
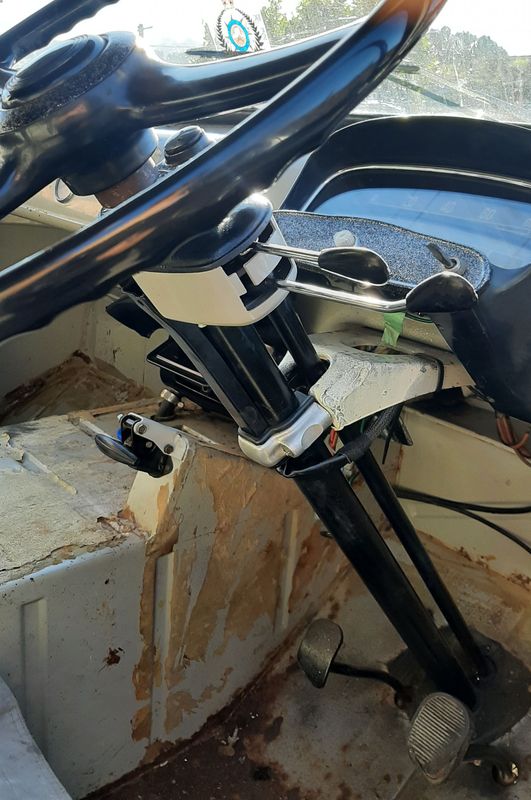
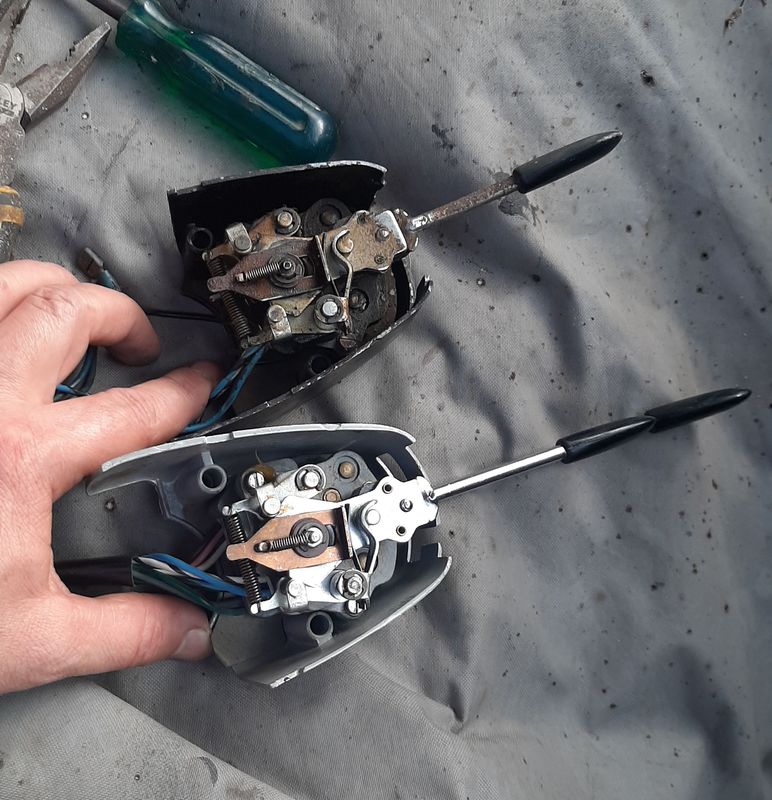
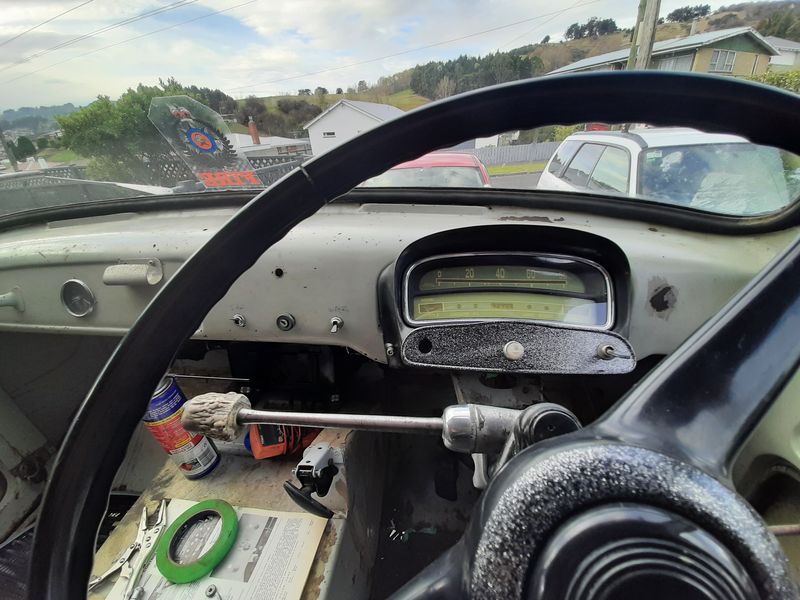
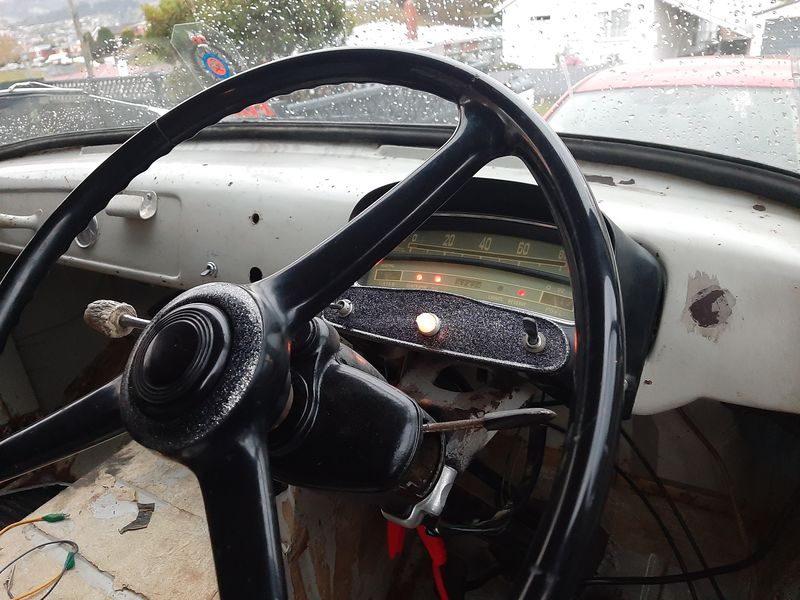
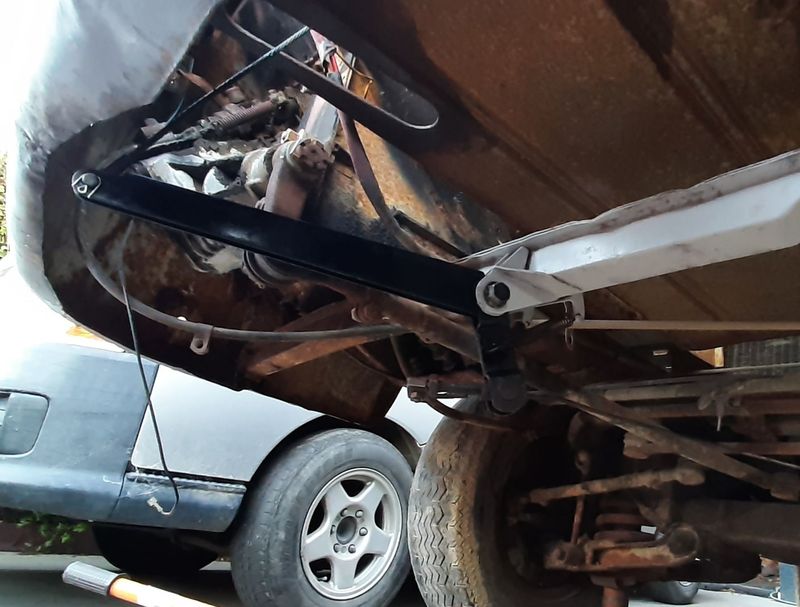
In my last order, a 4 euro part (hand washer squishy button) plus some finangling with tiny hoses under the dash got the window squirters going. A somewhat more expensive part also turned up, all the way from the motherland The original RHD black one on top and new LHD one mirrored below, I almost cried, becasue LHD ones dont exist, but turns out the mounting holes are the same, only the lenth of the sides are different so just needed a careful dremelling, as well as a rewire (9 wire instead of original 8 wire version) which was quite simple as the extra wire was from splitting supply between the headlights individually instead of sharing. And all wired up and installed, with the newly cleaned and operational dash, heater, handbrake, column, wiring etc. Headlights (original bulbs!) now working too off the switch plus the indicators like before, so that's all the accessories officially operational. Ill swap out the non factory switches eventually, and now i have a spare spot as i bypassed the switch for the dash light so it just comes on with the headlights instead of its own switch. Its not exactly luxurious, but at least it all now works! Spose i should worry about getting it to move under its own power instead of making brumbrum noises then! **** Digging thought the stash turns out i have most of a gasket set for one of these (much cheaper to buy than a 2300 one and lots of bits cross over) so I started to put the bottom end of the spare and now slightly cleaner engine back together. Turns out only 2 of the 4 pistons (the ones i casually checked) rings were free, so of course i broke 3 of the remaining stuck rings on 2 of the other cylinder trying to get them out. Bugger. I do also have a spare set of 2300 rings, but they are marginally too thick to fit the grooves on this later (115 C) engine, and id feel weird 'wasting' 2 pistons worth of rings/ a rare set anyway. Seems like the 1500 engine rings are pretty thin on the ground too! So they might fit the engine in the van yet, maybe. Turns out this engine probably isn't as good as i thought/hoped anyway, so made a start on prepping the engine and box to come out so i can see what bits are fucked or different on both, and actually might need to buy. Not really done anything in the engine bay yet, but it is complete excepting the factory air cleaner Radiator was empty and came out (needs the neck resoldering and there is lumps of dried silt in the bottom but otherwise good nick!) wiring disconnected, just starter/alternator wiring to go, and i may remove a few more accessories like the carb just in case. Ill drop this out the bottom, pretty sure its supposed to come out that way, the hole in the top is just for checking fluids but someone has hacked it before. its only 4 bolts each side that hold the engine crossmember on from underneath and has a funny hanging gearbox mount that im glad looks like its not busted as well.
- 64 replies
-
- 35
-
-

-
thats a funny way of saying 8.1%-9% better acceleration the 185/55 14s are uncommon, the 13s were common as muck, they may be 185s too, maybe? Front were Rear springs from (i think??) the FWD version, as in my mind the springs were very easy to pop out of their sockets from the wide selection at PAP. Still needed 2 coils dropped off. Rear springs on my sedan are reset 2 or 3 inches lower (? cant recall) and is pretty soft as a result, but has new Koni yellow up front (softest setting) and 2nd hand koni red in the rear (hardest setting) and it drives very well. Couple of 125 racers said you want the rear soft for traction. - truck as 3 leaves and they are stiff as feck, but that has the spring pack think put in upside down which may be a slightly better approach to maintain the same spring rate but also get lower
-
the tyres ive got are 195/60 13s, or 185/55 14s but ive never really drove it standard/ unlowered which is i think 165/80 13 or similar? All my rims are fairly weak offset too. unless you are track daying it i dont think it will really matter too much, the wider track from new rims will feel more planted and a bit more effort to turn at low speeds, and can feel tracky/tramlining if you dont get the alignment right. Your going to lower it too, right? Right?
-
CD66 If you dont like them, ill take them to the dump for ya
-
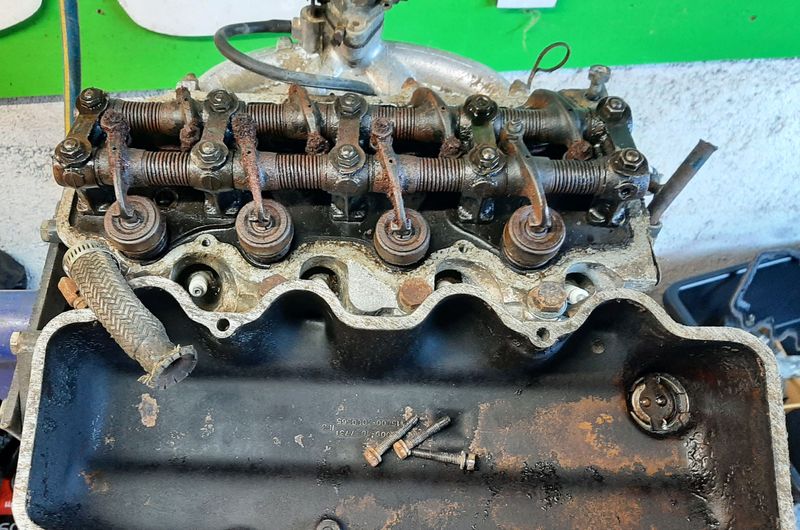
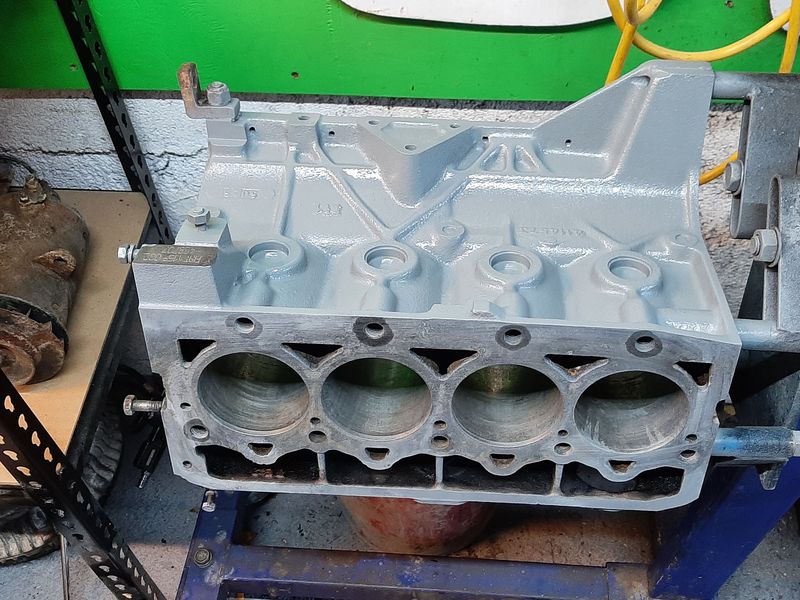
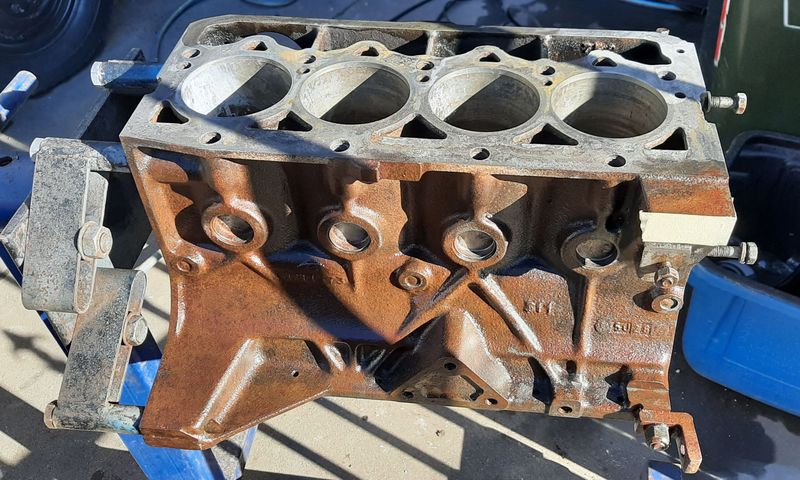
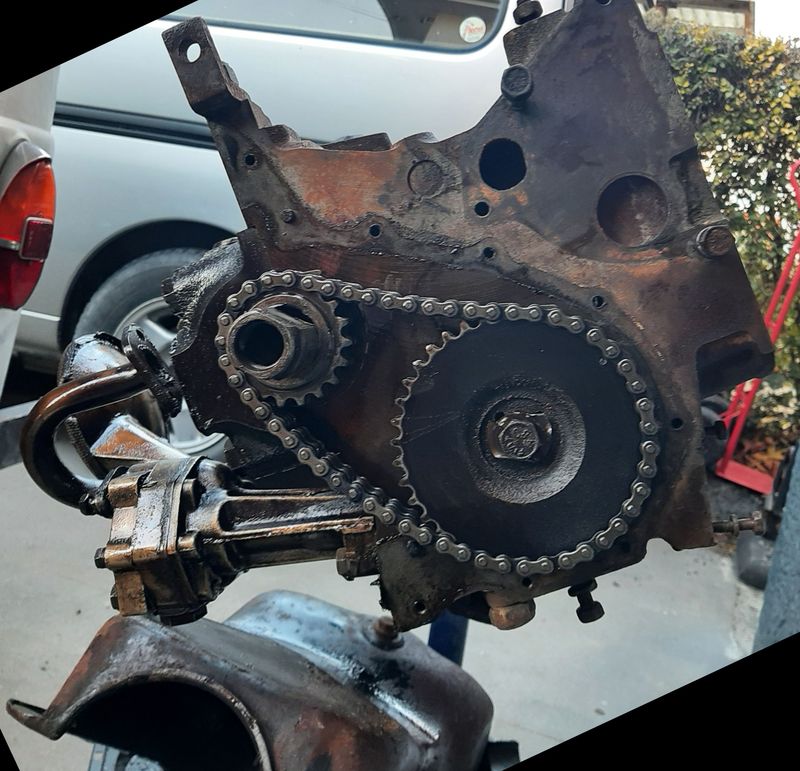
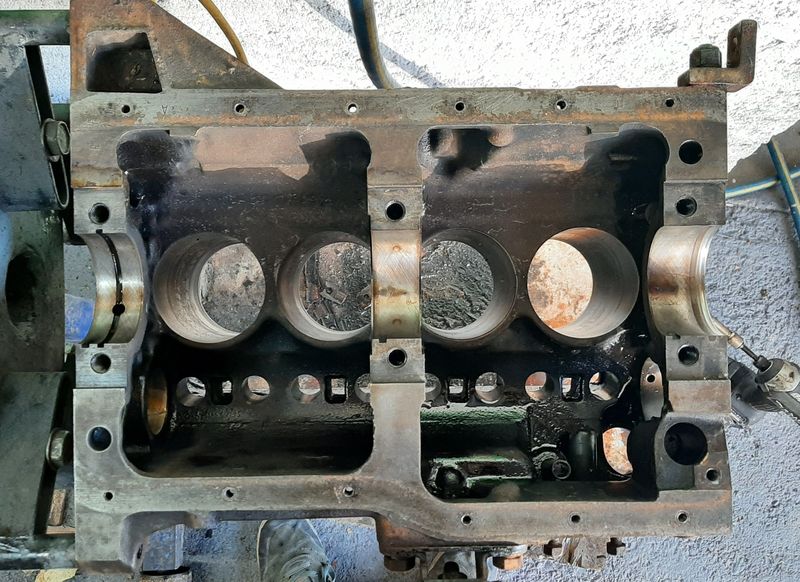
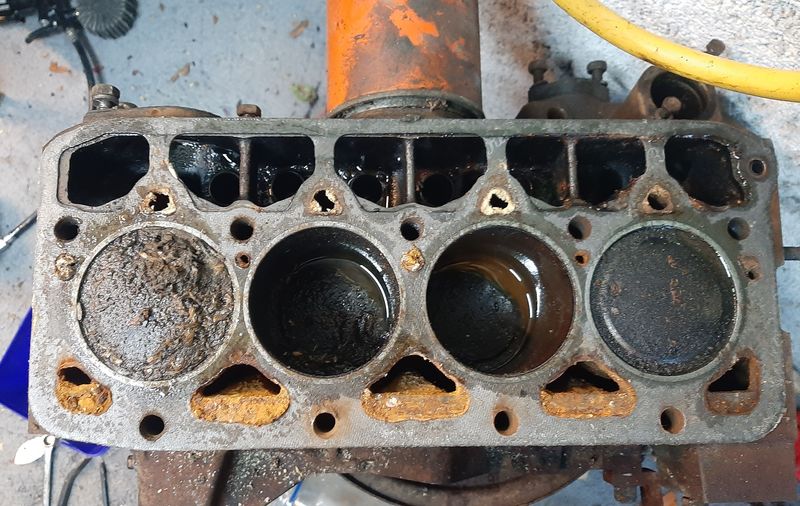
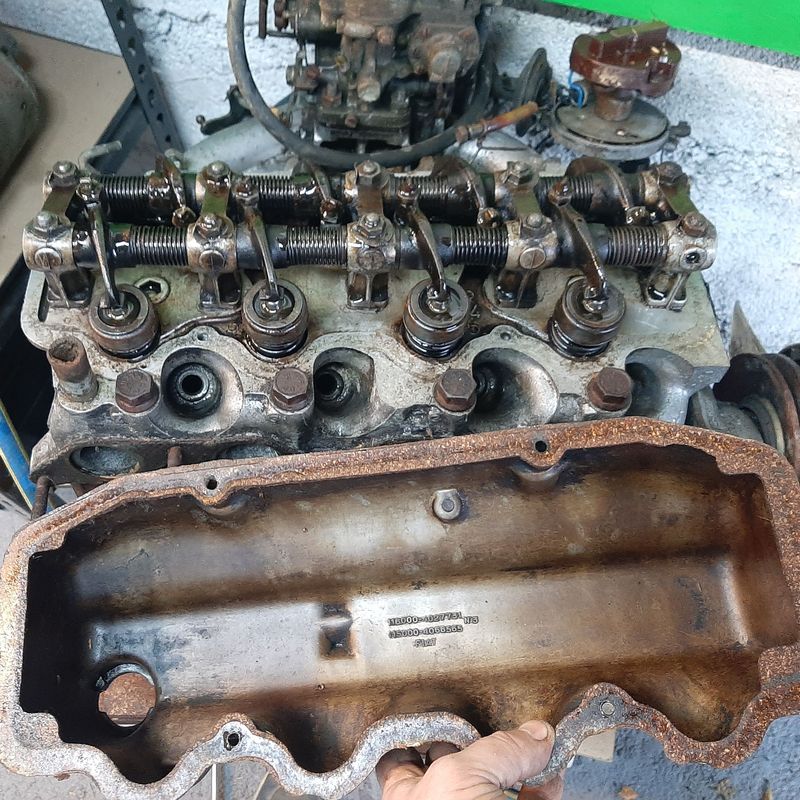
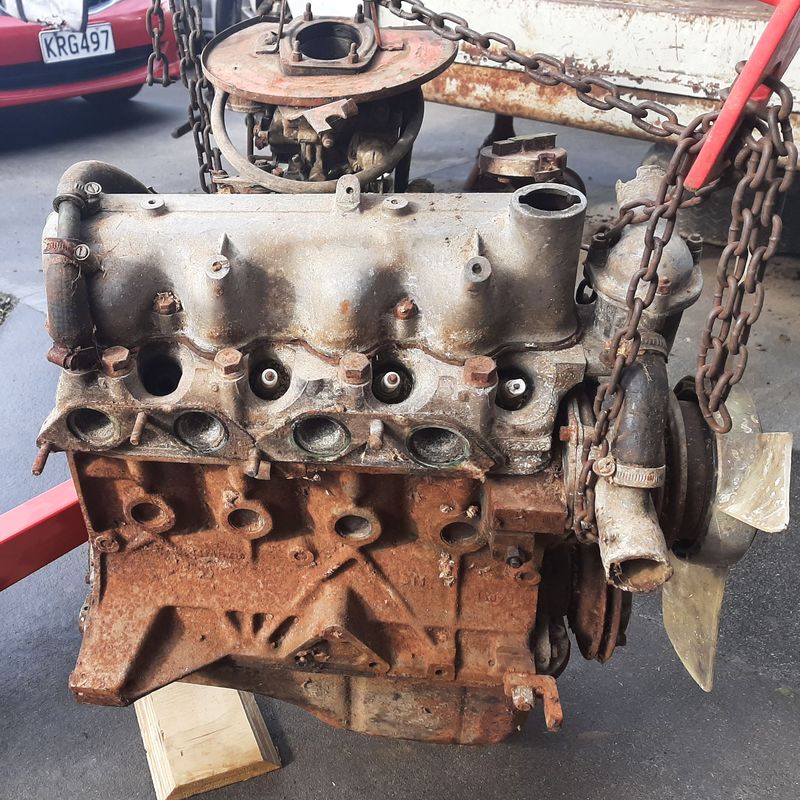
Disassembled the engine a bit more using the lights in a garage after work. Cam chain pretty loose. Is a FIAT stamped one so probably original. The chain stretches a bit over time but the main source of increased tolerance, is the gears themselves wear. The chain had been slapping the inside of the aluminium cover too, and has actually worn a hole in one spot. This will be the source of the metallic crud in the centrifugal filter (which is on the end of the crank nose) Took the head apart, Something ive not seen in any of the old Fiat engines ive dismantled before, pretty bad valve recession on several of the intake and exhaust valves, a couple of the seats are also similarly rounded too. Some of them are also fine. Its pretty weird. Hopefully the head on the engine in the van is better. The block disassembled next, camshaft and crankshaft are good, piston big ends look new, main bearings could do with replacing. Pistons all look new as well, and all the rings freed up pretty easily. Cylinder 3 looks to have a liner installed and the cylinder itself looks the same but has F45 cast on it compared to the other ones which have F35. I wonder if the new head bottom end gaskets and very good condition piston bearings and bores are evidence of some work at some point? Could have had head issues too (dropped a valve maybe?) and they slapped a worn out but 'known runner' on the refreshed bottom end? Anyway, decided this bottom end looks pretty good and given the other engine is seized ill probably run this one, hoping that the other head is in better nick. Bit of a tidy up with some Phosphoric acid on the outside and the water blaster all up and though that to get all the rusty shite out of the block coolant galleries Put some engine enamel on the outside, which is good for at least 10 HP and because its smoke coloured on the outside the engine hopefully wont smoke as much from the inside Dang nang it! Better now than on the first start up i guess.
- 64 replies
-
- 30
-
-
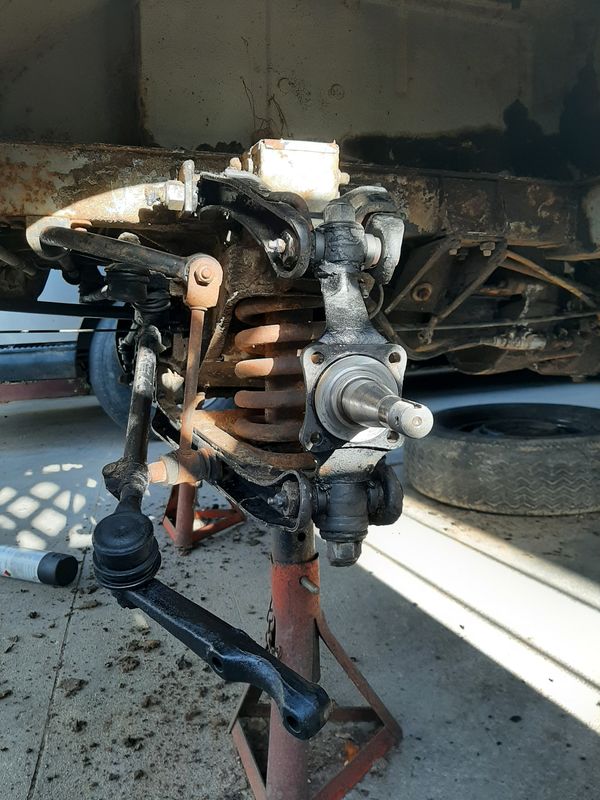
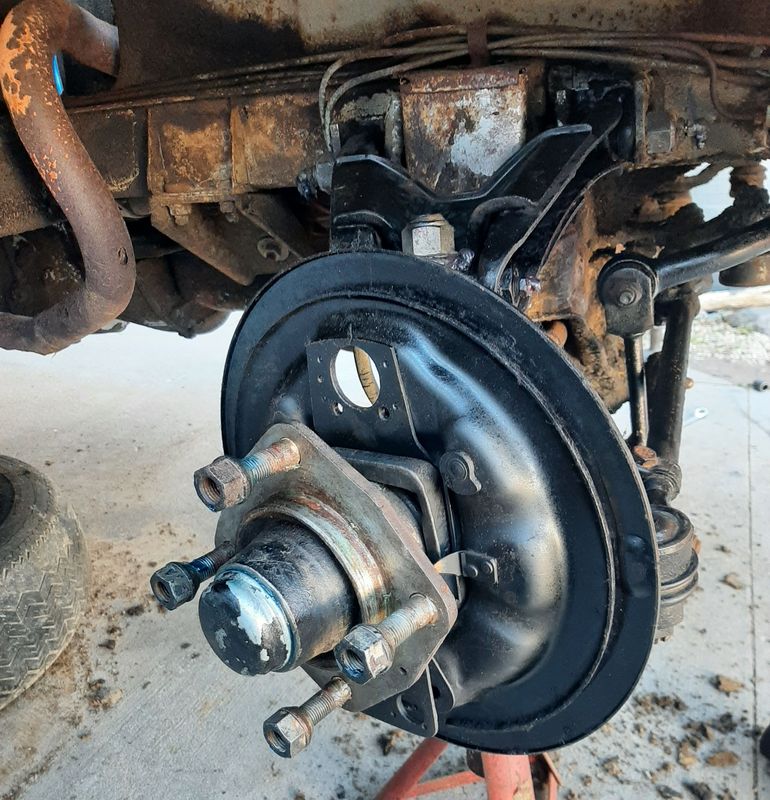
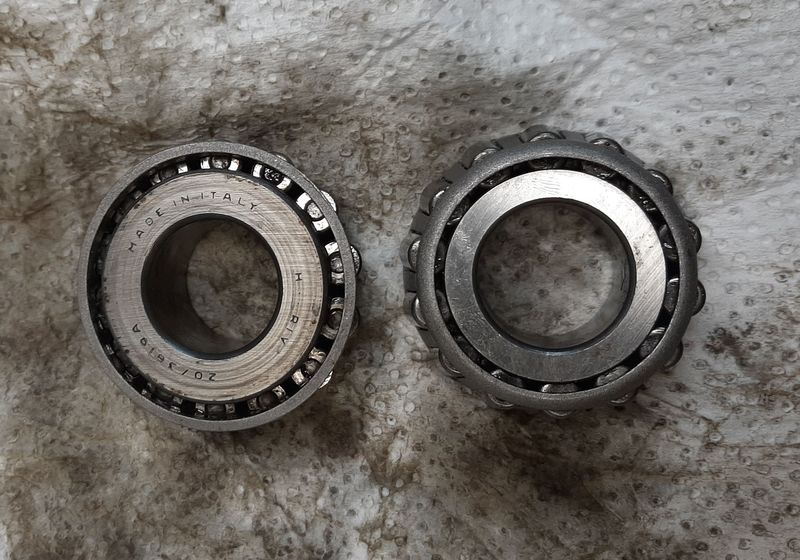
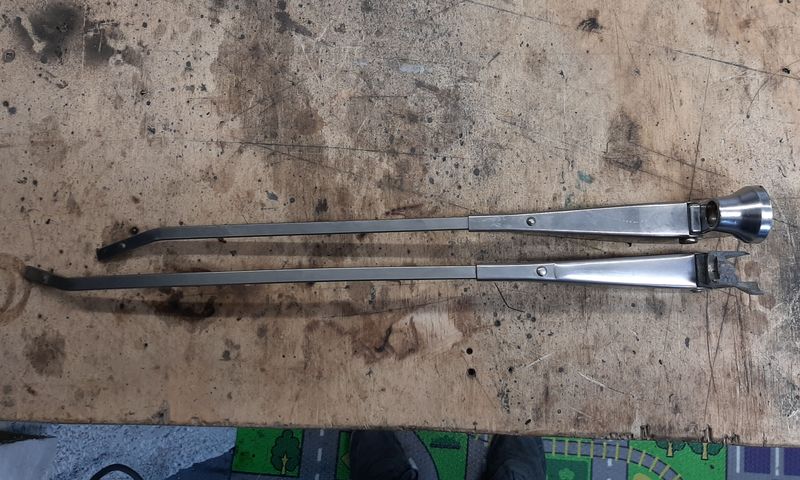
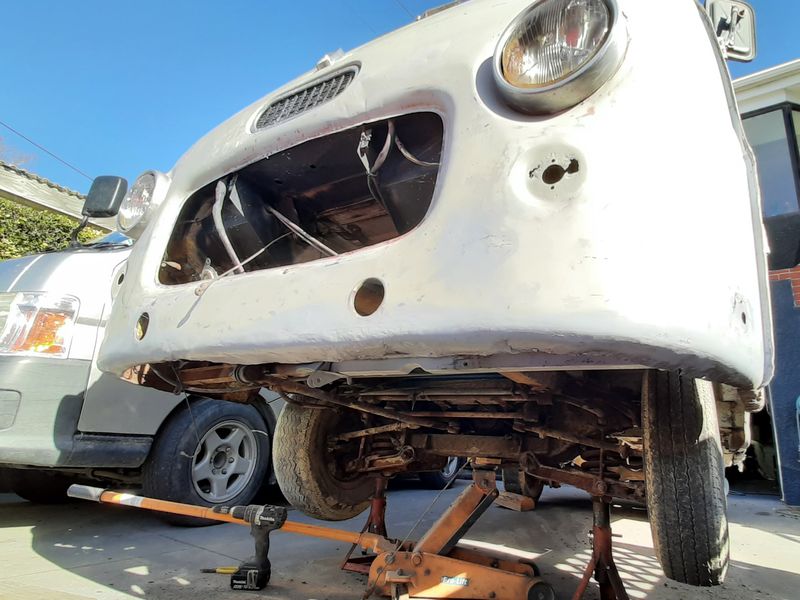
Took a bit of a break from the engine to get the front hubs back together because I want to turn it around, so its easier to drop the engine and box out with the crane on the drivers side, and dragging the whole lot into the garage. Hubs looked ok, wheel bearings are Italian so probably original - races look ok too, but one has an issue from rusty water sitting, will be ok for getting it rolling anyway. Had to very carefully smash the hubs off the drums, they a very tight fit on the centre bore, no way the M6 bolt though 5mm of aluminium was going to press them off. They cleaned up ok, one has some scoring but both are hardly worn at all. Will probably get them vapour blasted or something Scraped the 20mm thick grease and dried dirt off the suspension and pushed more grease in all the zerks and wafted some satin black around. This runs a king pin style knuckle and there are about 20 tie rods in teh steering linkage. Im gonna need some replacement boots! I got some for my 2300 from some guy off ebay will try him again Drivers side back together. I left the drums off as there's no brakes anyway and they are tight as feck to get on and off the hub - i think they need a tiny bit of a clearance on the centre bore. Possibly the outside of the hubs need a tidy up too as that lip got a bit of a hammering Mostly finished sanding off the crappy paint Some of the panels are just fine and had hardly been prepped so the paint basically just fell off, like the driver side behind the front door. However , others like the sliding door and the had been sanded with 40 grit and a hammer from the inside and had 3 layers of different primers and some bog for good measure. Anyway it looks marginally better and has confirmed that other than the obvious bits shes pretty bloody good for what it is! Had an order show up, took about 3 days from the US, mostly small things, rubber stuff, wiper arms, a badge and some switches Wipers are for an 850, and a LHD one at that, so the arm is too short and bends the wrong way. What i really wanted was the part that connects to the wiper spindle, and the plan was to gring off the pin that holds the skinny arm and swap that over but the pressed SS part style is slightly different and feels cheaper than the orginal, so I ground off the pin at the pivot and just swapped it over as well as the new spring and hook, using a small M5 bolt for now* (lol)
- 64 replies
-
- 19
-
-
crooked gate makes me itch given the workmanship elsewhere! Hope its just the camera angle. -_ (ps good work man, time to get some $ coming inwards!)
-
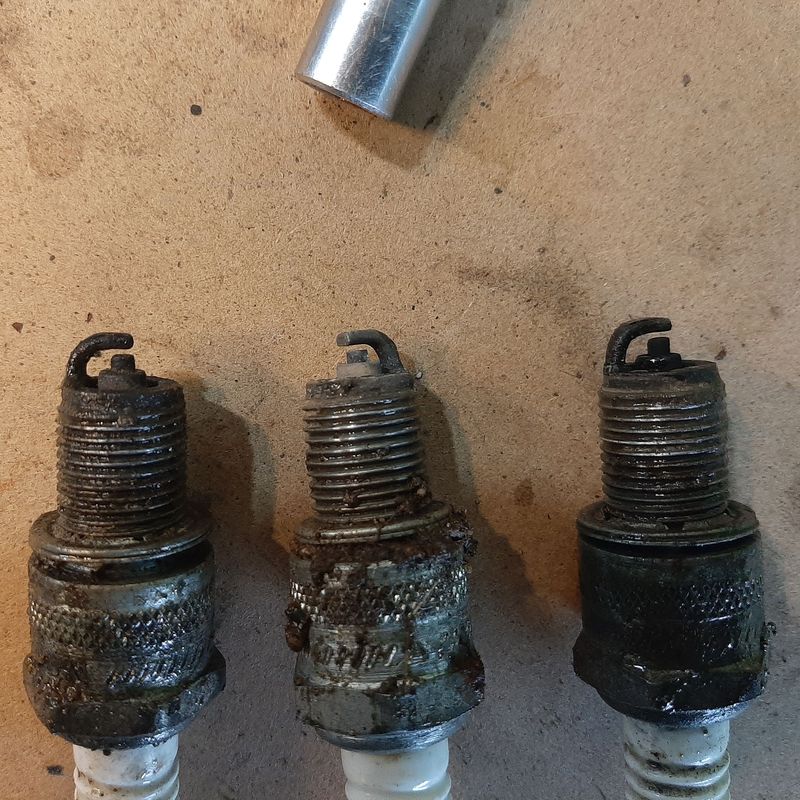
I got a engine crane for my birthday, so i yoinked the spare engine from the boot out and ripped into it. Its a 115.000c engine which was probably from a Fiat 1500 sedan or Crusader based on a Solex carb it has. This would have been the factory engine in my 125P Ute and is also the 2300 engine less two cylinders, so shares a lot of parts and design It only had three spark plugs, no air filter and no oil cap, with grass seed and mouse nests everywhere, and appears to be seized. Perfect. Remaining park plugs out look not bad, not too bad at all, not bad. Hmmm. Valve cover off, well, would you look at that. Bit of crud under the open oil cap, but otherwise clean I guess? Centrifugal oil filter says, well maybe you shouldnt get too excited, just yet... At this point the effort of getting the crank nut loosened the engine shifted. Some more oil down the cylinders and it moved nearly 360 both ways. Couple of the valves were sticking so Head off, Mouses grass seed and fluff so tightly packed in on the inlet valves it was actually stopping the valve from closing again. Ill chuck it in the vinegar for a bit it should clean up i reckon, no damage, just grub Guess which cylinder had a and a mouse living in the spark plug hole! However thats a pretty new head gasket, can still see the writing A bit more brake clean and the pistons look shiny! Bores are a bit surface rusty in a few spots as expected but no scoring, i reckon a hone might be all it needs. This is after some worn out wet and dry and wd40 for about 20 seconds on the worst bit Need some M12 x 1.5 bolts to put it on my engine stand, then ill remove the pan.
- 64 replies
-
- 35
-
-
-
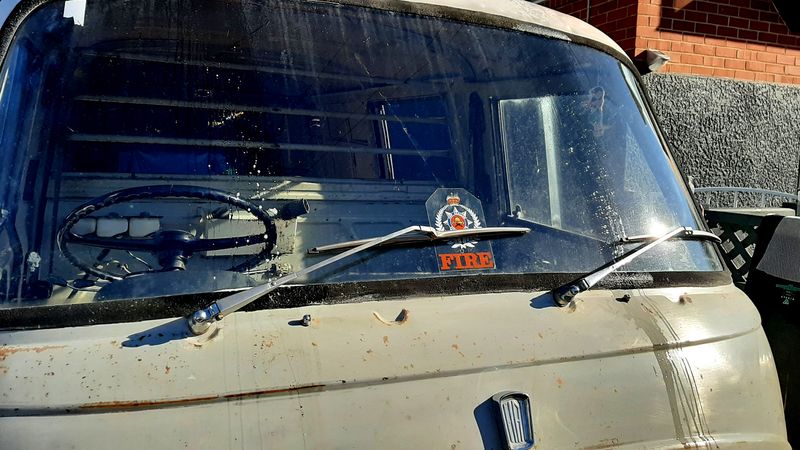
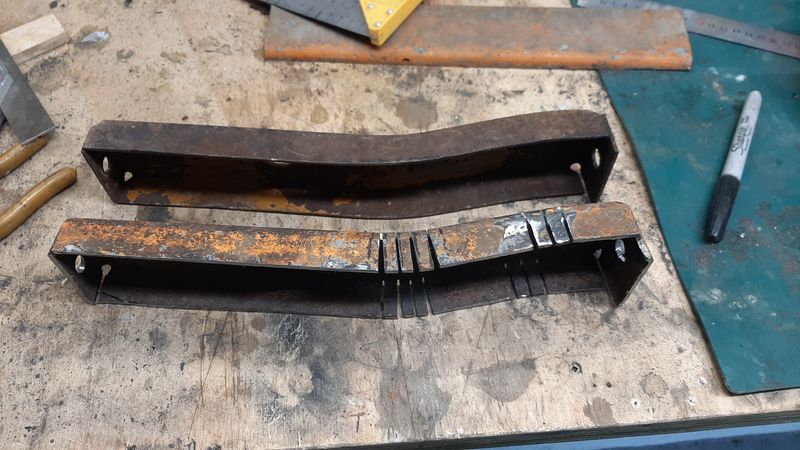
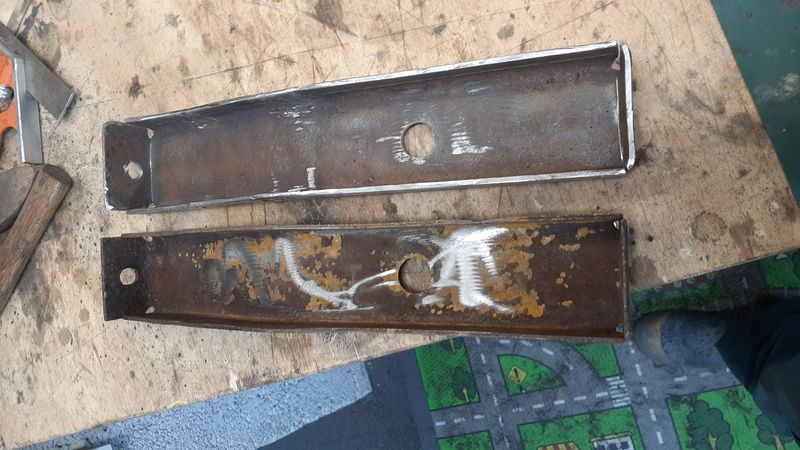
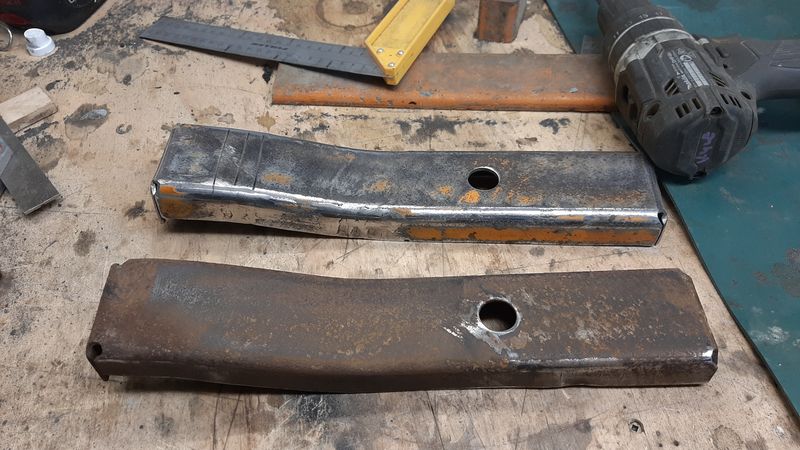
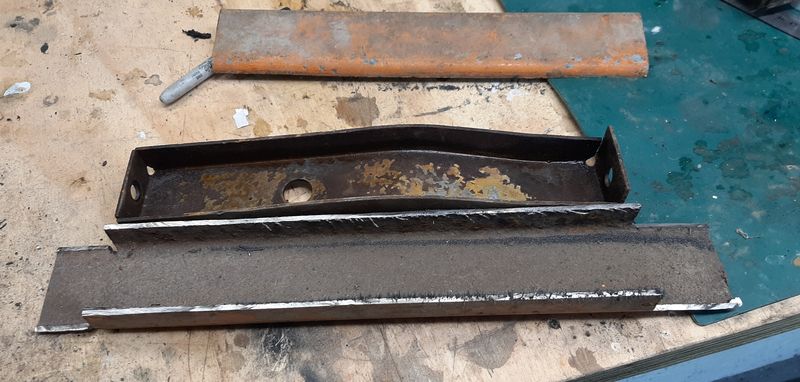
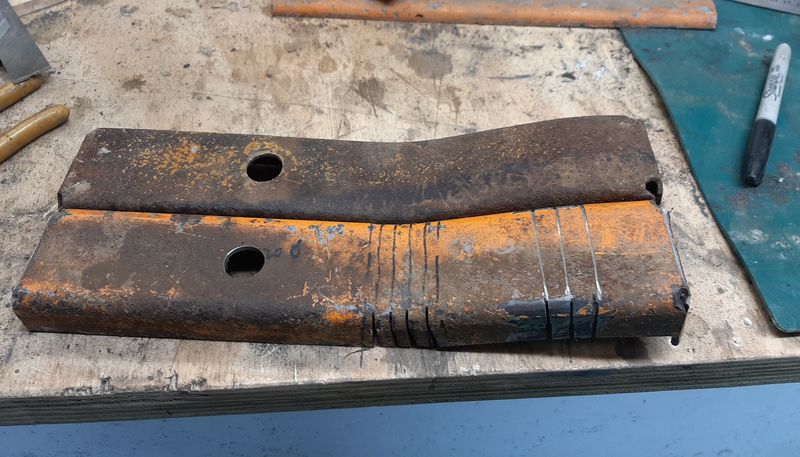
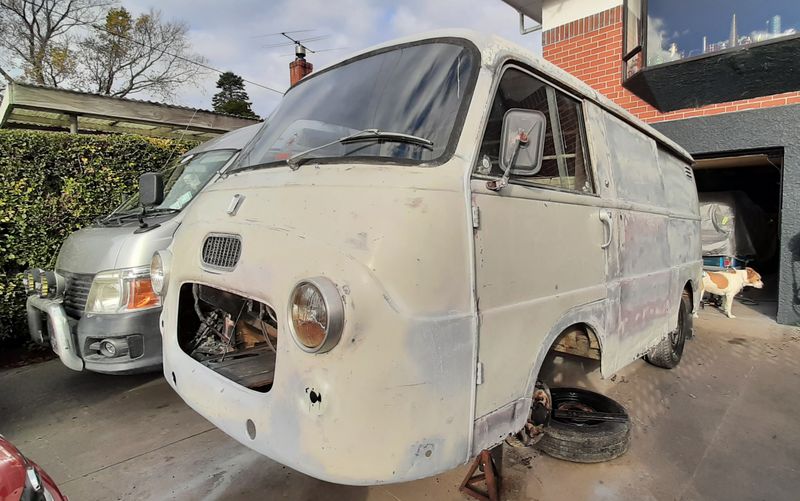
Made a bit of box into something else Its a bumper mount, the front bumper had been removed by a PO and one side was missing some bits. That means i could put the bumper on and finish routing the the wiring from the dash to the engine So i could put the dash back in, and ran a bit of juice though the circuits. IT LIVES! Indicators, dash lights, fan, and wipers all working. TStill some electrical work to do - on the engine side (after i drop it out) need a new column switch so the headlights can works (Ebay, ordered), and to install the new headlight bulbs (stuff in stock). Brake lights use a pressure switch so cant test those yet. So I put the front back together Look at that little face
- 64 replies
-
- 30
-
-
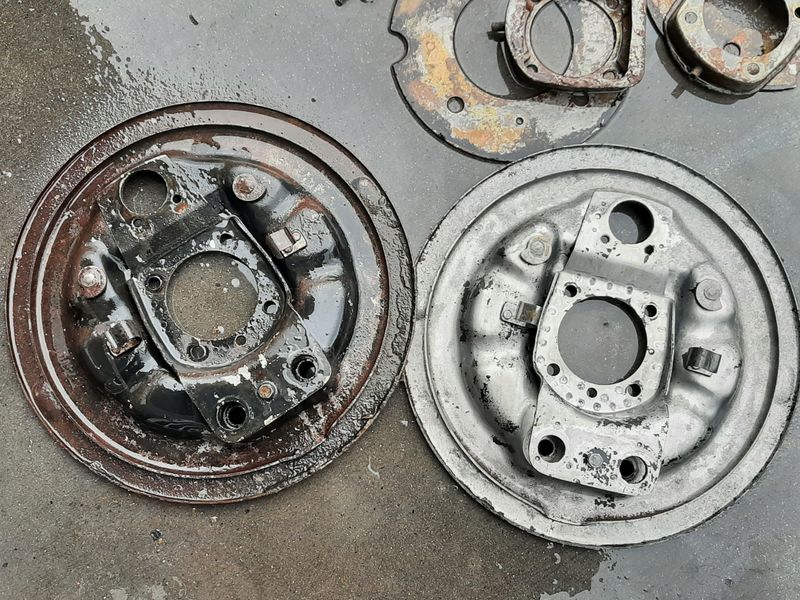
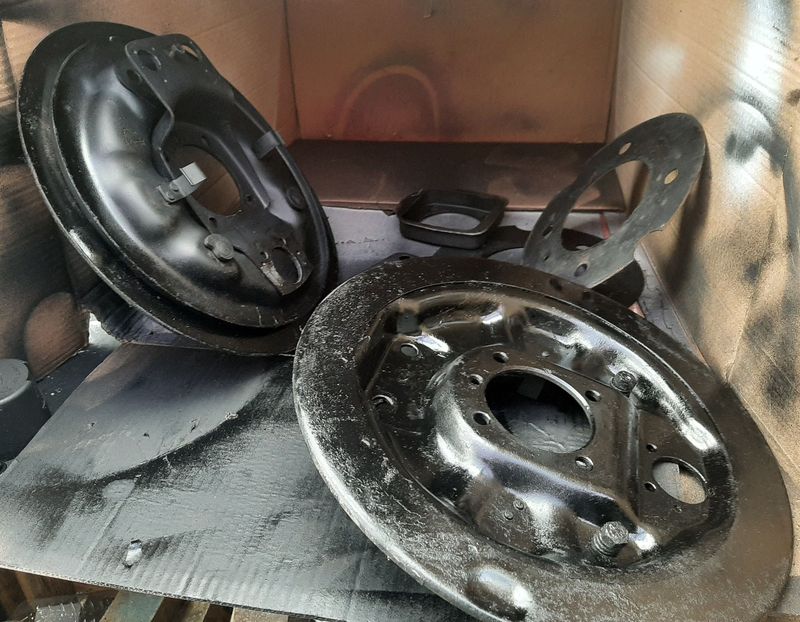
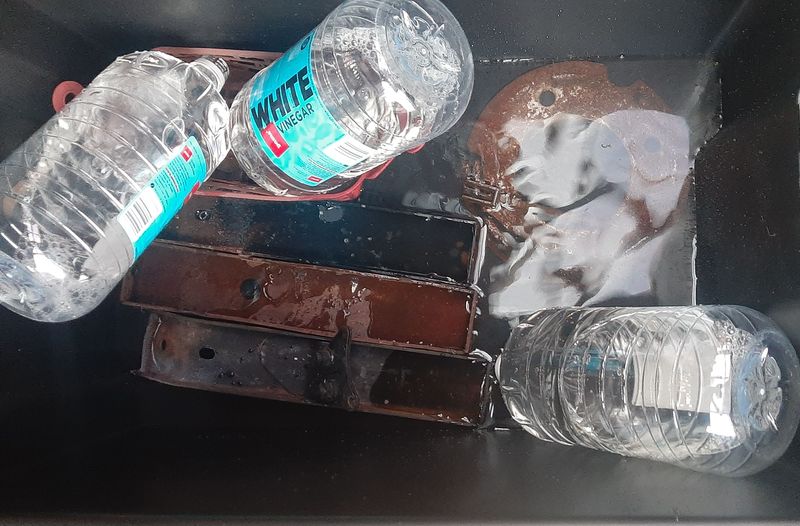
Brake bits out of the vinegar bath after a few days and then a quick water blast. Magic! Before and after, everything just washes off like its dirt. Gotta catch the flash rust tho, i spray them with degreaser (alkaline) to neutralize the vinegar (acid) then wash them again, then a bit of rust converter or evaporust before paint.
- 64 replies
-
- 14
-
-
The agent works for the seller, not the buyer and thier goal, backed by % commission as an incentive, is to get the 'best' price - from the sellers perspective - ie the highest. But not withstanding that, i agree, when we were looking some of them came across as smug lying fucks so tended to work against us putting in our best offer, but with a long line of bigger suckers it seemed like pretty easy money to put up a sign, hold an open home and then sort the offers from highest to lowest.
-
The process allows the provision of 'alternative documentation' beyond any primary documentation (like rego papers and wof sheets), allows them to consider repair receipts, insurance documents old stickers and period and current photos to support the statutory declaration. Its a pathway i would prefer to not abuse as its pretty nice that it exists. Oh, and here is me totally ripped on a sweet beach with a smoking hot babe who is totally also my girlfriend
-
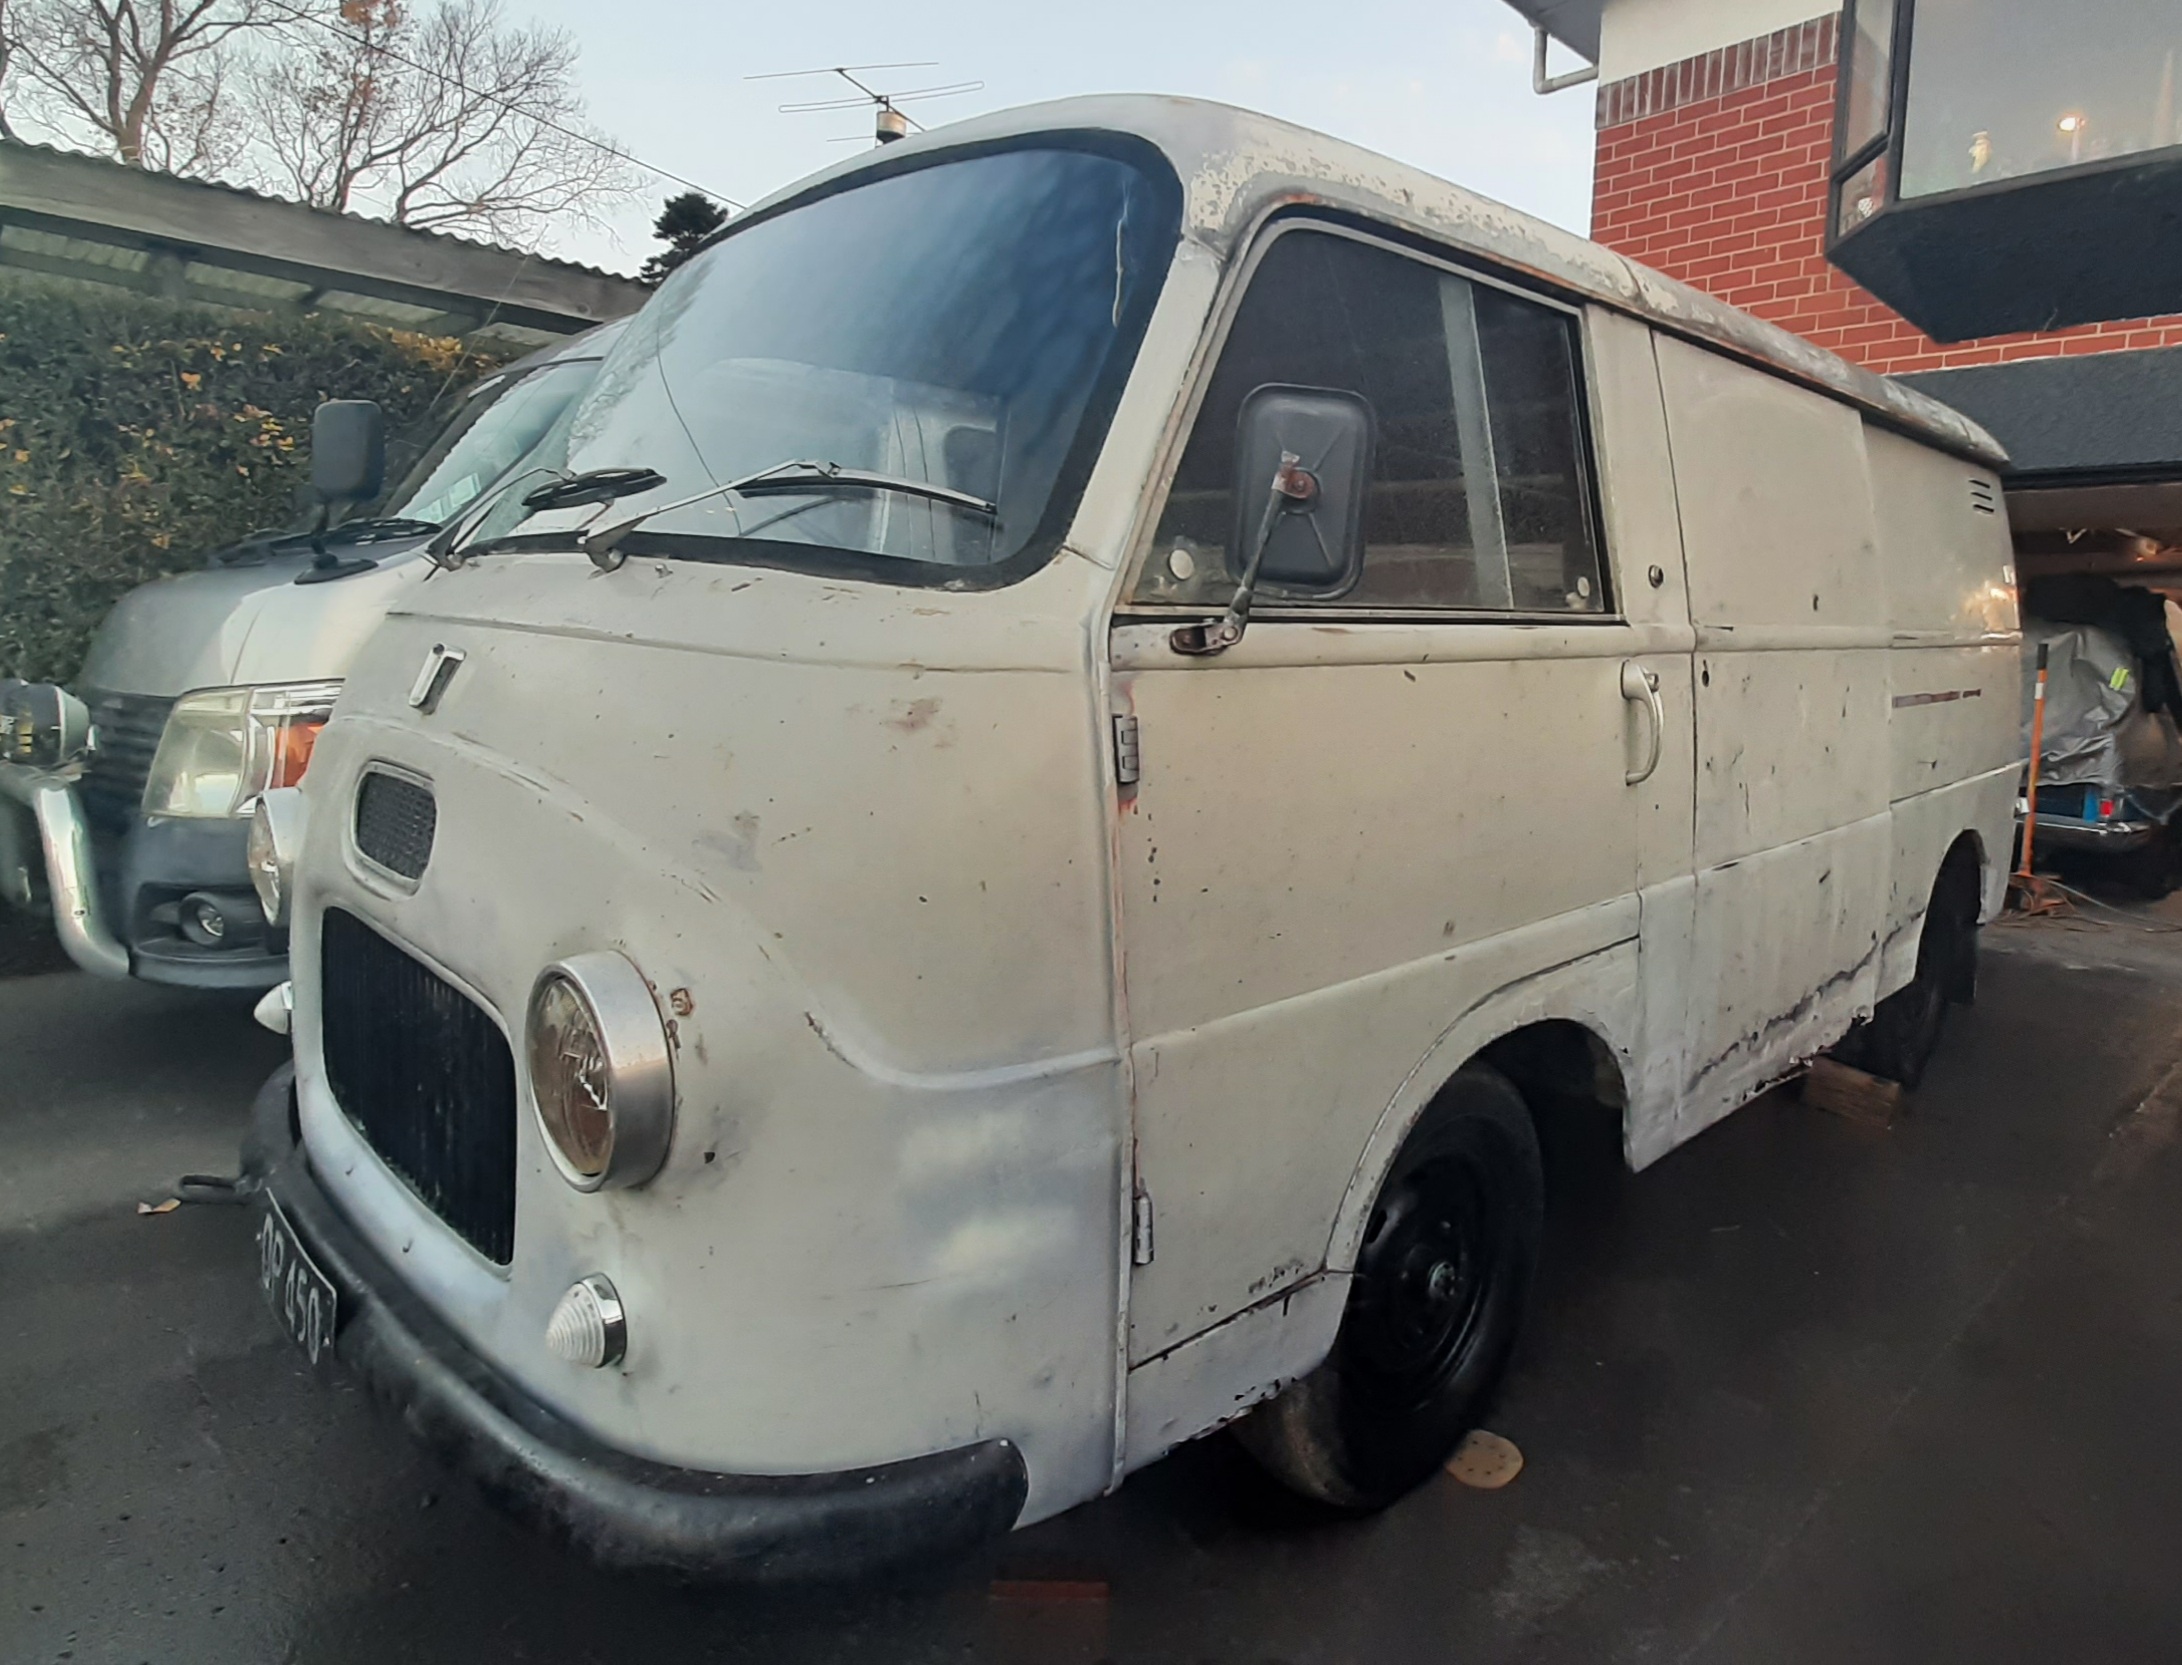
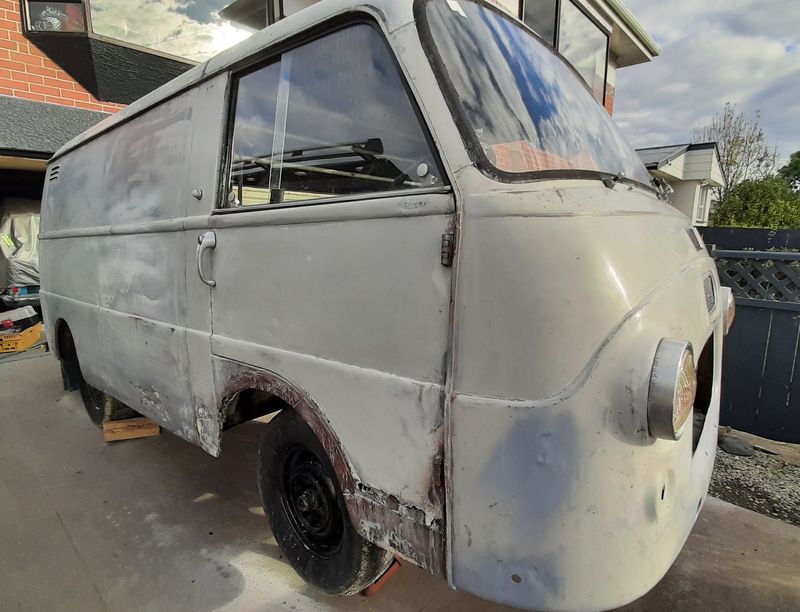
@yoeddynz no, its a lot bigger than that! Its based off the Fiat 1100 sedan, but was a contemporary to the 600 Multipla, so shares a few bits from the broader Fiat parts bin as well as having a similar design language i guess, putting aside the out-thereness of the multipla @dmulally cheers, lots of Sound deadening might help too. There is none apart from the engine cover. I want to get it back on the original plates and thats a bit more involved paperwork wise than rereg on new plates as i need to prove the plate and vehicle relationship.
-
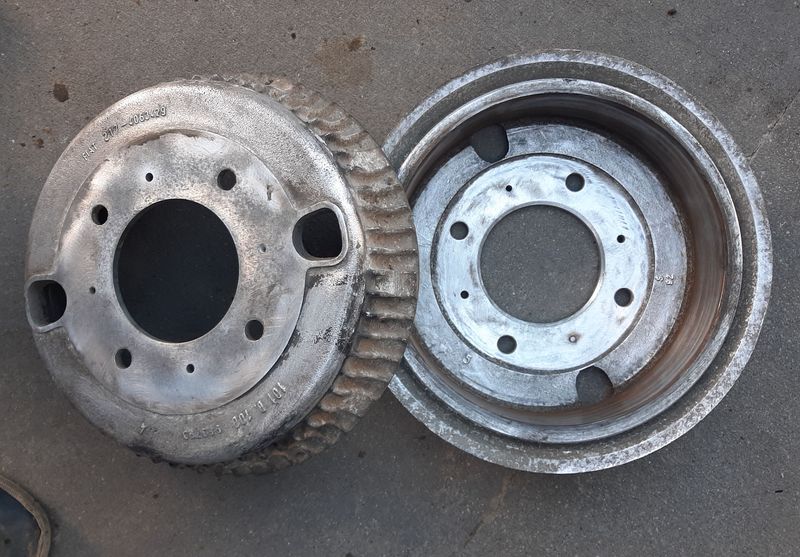
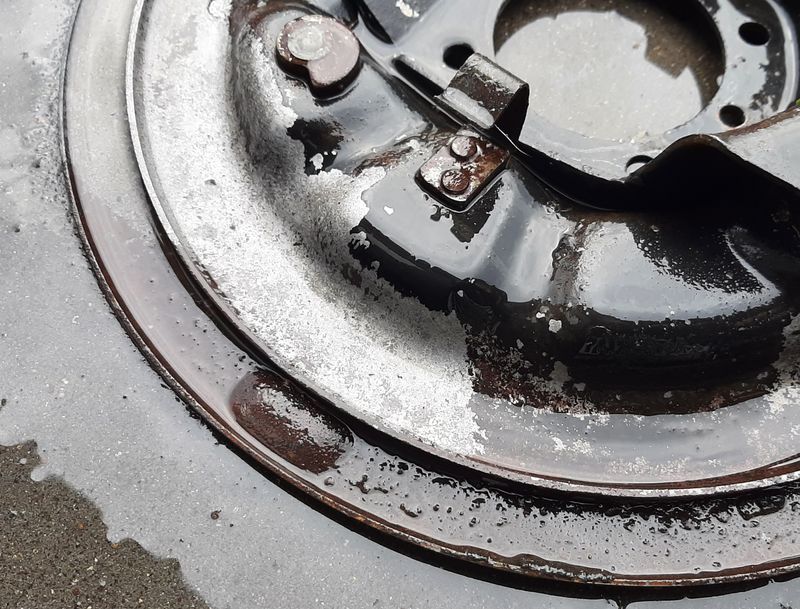
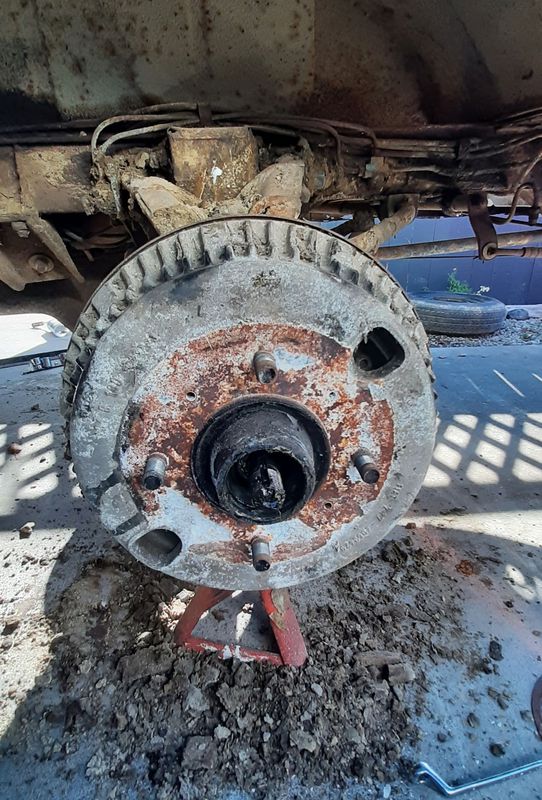
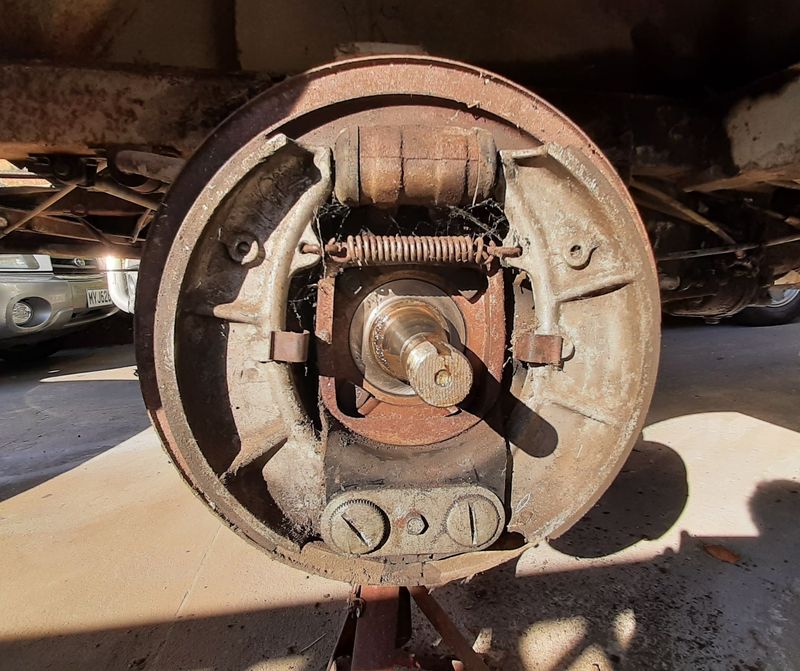
Bit more progress on this, Did some more panel beating of the front end, it had been chinned quite badly on the passenger side especially, and had a sharp bend just below the round bumper mount holes. Now its pretty even and roundedish, way better than before. Once the front bumper is on it will be hidden anyway. Again very finding very little rust holes, there is some, obviously, as well as surface rust, and there are a couple of tears as well, but its held up very well considering. Removed the handbrake mechanism so i could tidy up the handle, and the lower mechanism was scraping on the valance, so that all got removed for a clean paint and grease. its crossmember also got a light sand of the surface rust and a squirt of 'not quite body colour' spray paint as a test, pretty happy with that! Check out the factory cut out for the end of the mechanism, it as all chewed up around the tip of the pivot before Looked good, so did a bit more sanding Its starting to look way less shitty. Still shitty, just less I also got onto the brakes, i needed to pull the fronts to inspect and start parts hunting. 10" Aluminium drums front and rear. Check out the pile of dry dirt and grease i chipped off - its caking everything that pile is just off the backing plate. Ive only done the fronts so far, ended up having to pull the hub off, as the drum had differentially welded itself to the steel hub and the puny M6 spacer plate retainers that get moved to another set of holes were not going to shift it. Got it off in the end and its all clean and dry and no damage. Im glad the drums especially are ok they are simply NLA. Cylinders are rusted stuck tho but they are quite cheap, shoes less so (rears are cheap, fronts are $$$) I bought 16l of vinegar for about $24 and started chucking bits in after i water blasted them, ill check them in the morning. Someone had already taken one of the rear brakes apart already so i have those bits in a shopping cart already. The Brake and clutch master cylinders were already removed too, but praise be, they are not seized. The clutch master and slave is the same as my 2300 wagon, ie Lada stuff can work, so that's good. Im very very happy the brake master cylinder is ok. It is available but not cheap, because its a part that is shared with both Ferrari 330 and Lamborghini Espada, lol https://www.okp.de/xtc2/Ferrari/45-Brakes/Master-cylinders/Brake-master-cylinder-Ferrari-330-1-series-4-holes-flange::19478.html?language=en
- 64 replies
-
- 30
-
-
Yeah, i asked @Carsnz123 last time it was for sale and it was probably still there, but unfortunately the old boy has since passed on or been moved to a home and the place is pretty much cleared out now