PowderJZX
-
Posts
170 -
Joined
-
Last visited
Everything posted by PowderJZX
-
NOOOOOOo ! ever think of doing 16s or 17s?
-
Ghaha he doesn't know wont hurt him! haha nah I don't think its gonna happen, the furthest one i'd go are cams and aftermarket bearings! after all its my daily! besides changing internals would probably be more expensive than my car haha Update from Ryan: The crank shaft seal doesn't quite fit haha! I hope the other parts do fit otherwise I'll cry, seems like I wont be able to drive it till tomorrow haha
-
Do you happen to know what the place is called? I'd be happy to send them mine haha http://www.ebay.com.au/itm/Twin-Sway-Bar-Mounting-Brackets-MX83-Cressida-JZX81-GX81-Chaser-MarkII-Cresta-/301075765083 <-- these were similar to the ones i got. It was cheap enough so why not. bought it mainly because i've never seen one hahaha. Damn those wheels are nice! but I think i'd just go for SSR's 16x8 with low offset! haha Those SSRs I got for my gx71 were only 700 bucks shipped! so I'm pretty sure I'd be able to get one for a similar price? Hmmm stroker crank... as soon as i get my hands on my dream engine, it will definitely go straight for a rebuild! but it wont be chucked in my car for a while tho! otherwise I'll be wasting a good engine.. I'll chuck it on an engine stand and such. I heard the rebuild kit only costs about 700 bucks? but that's the standard Toyota rebuild parts. I could do with after market parts tho? I'll keep the engine with simple na tuning which it probably already has. just need cams and shaved flywheel! haha meanwhile I need to ask for those photos so I can look at it dream of it in my sleep. I need a proper job! so i can get parts and engine quicker than usual hahahahaha Btw: If you guys want to have a quick search for wheels, Visit this site I had setup for the jzx club http://forum.jzx.co.nz/viewtopic.php?f=76&t=865 just click on the size of the wheels, then as soon as you're in the site> choose the brand you're after > on the left hand panel, choose the stud pattern then off you go! if you found what you are looking for, send the link to ewan. at the moment, they have these http://page15.auctions.yahoo.co.jp/jp/auction/t319947921 $1000 + 300 give or take for shipping and commission? Not too bad aye? hahaha Damn you japan! I'd probably stick with 16x8s tho so i wont have to recert hahaha Enjoy
-
Quick update: I did find the problem with the battery voltage draw, If this were to happen to any of you, Maybe get the reserve battery in the alarm checked or just simply buy a new one. The reserve battery that I had was effed, so instead of charging it self when you drive, it draws its power from the battery hence the battery dying overnight. I got quoted 100 bucks for a replacement! Cheap enough if you want your car slightly protected haha Anyway, I did get the other pair of Stern from Kurt. It had a leak on one of the wheels, but as it turned out, it was just the valve thing that needed tightening! haha I Saved a bit of money there... now the wheels on the car look even!!. It doesn't look too aggressive I reckon. It just makes it look a bit cleaner? I'll give it a proper photoshoot when I have the time. A few things I still need to do for the car like the rear quarter panel and the rear bumper painted but other than that just maintenance I guess? I dropped my car off at Ryan's garage yesterday for some service I should have done when I chucked the engine in! Thanks to Ryan, the cambelt change is being done properly! haha gives me that peace of mind especially me, having only done the cambelt change a couple of times and maybe because I am just that lazy? All parts I bought are genuine. It's quite expensive... Should have gone to Partmaster... but when Toyota said the new belts nowadays last at least 150,000kms so I thought maybe it's worth it! Besides, genuine parts do last that long! Or maybe it's a toyota thing.. Few more "important things" I need to get for my car: 1. Get wide 16" SSR's from japan (maybe meshies and get the centres body coloured in white or the silver part) 2. The souped up 1gge from Alex <--- maybe the right time to tune a 1gge? although it's hard to find aftermarket parts for it! haha worse comes to worst, 2jz ) 3. Roof spoiler and boot spoiler and maybe the original front lip? 4. Better exhaust and exhaust tips 5. Cooling system Not so "important things" I wanna get. Not that I will taking it to track since I have another car to take to track haha but just in case! 6. Anything to do with handling and body rigidity! (nolothane bushings? arms etc) Does anyone know anything about the twin sway-bar setup for a gx81? Coz I bought those twin backets from Australia for $77bucks shipped. I'm not sure if will do my car any good but I think I can run twin swaybars.. lol I just need to find a set of aftermarket swaybars! seems impossible for this model! I was thinking of just getting them made up? Does anyone know how much these would cost?
-
Noo what happened! haha did the guys tell you to raise it?
-
Hey guys, I just noticed. My car drains battery when I turn the alarm sound on. When I turn it of, car is fine. anyone in auckland/north shore know how to test if there are any voltage draws throughout the car? I don't have the tools haha maybe i'm missing a ground wire or may have stuffed something up.
-
Most cars have been around the block haha. Yea the 1g stays. It's still strong as it is. Update on car: Wofd and regd haha.. I just cleaned it too! it looks nicer than usual! I just need the other pair of wheels to complete the stern wheels from beachlander and it should be sweet for now! It looks weird with 2 sets of wheels atm. My battery dies sometimes too so I need that checked, Maybe I need more distilled water in it! hahaha
-
Got a lot of maintaining to do before I do anything more to this car! haha
-
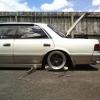
I lifted the car to check for mechanical problems, I did find a bit of play on the front wheels. I took it to Wairau Alignment to double check which one I really needed. Inner rack, bearings or both. Luckily it was just the bearings, It was pretty expensive haha btw, Auckland bearings have them in stock, according to them it's the same as the altezza's bearing. Do check the code on the bearing just to make sure you don't destroy your hubs. Took them to the garage to do the bearings, surprisingly with the x's mechanical simplicity, it took less than an hour to replace both! The old bearings were effed, the flat part where the bearings are meant to be kinda dug their own trail on it. It was pretty bad. I'm guessing it hasn't been replaced in a long time? one more thing was the handbrake was a bit too soft, so i had to adjust that one too from the rear. Now it E-brakes pretty good.. got new tires for the rears etc, the only hard part was trying to get the car in the garage. I failed big time so I decided to do one side at a time. Just made them parts further than usual.. See what I mean haha. Last photo was taken when I was standing in front of the car! It was pretty far for a lazy guy.
-
Oh yea haha and that too!
-
if only gx81s are considered as oldschool haha, would've been nice to start up a project discussion! lol
-
Day 3: This is probably the most exciting car i've done in months! The toyolo crew got the car running! woohoo for that! The auto gearbox mount and the gearbox crossmember did fit my x81 like a glove.. no drilling needed! it was off an x81 S1 Cressida. Got the driveshaft in (was a pain, had to separate them into two pieces just so I could hammer in the spline! wired up the rest of the loom, finished them hoses, gearbox and gearbox oil etc.. Here is a quick vid of it running for the first time! excuse the sound as the exhaust is disconnected. After it started, We just ended up tuning the car. The first one we did was check for leaks and sprayed wd40 towards where the leak was, turned out, we forgot to tighten one of the clamps (heater pipe) so water was pouring out. Adjusted the dizzy to tune the engine to the right sound, adjusted and bled the clutch etc.. now what's left is the exhaust ring gasket and the powersteering fluid(2nd gasket after the main exhaust gaskets) I need to get them tires replaced to but its all good i have a temporary replacement! and oh the reverse ligths (w55 from gx71) didn't fit the plug from the loom so i'll have to modify it which shouldn't take more than 2 mins! I should be going in for a wof tomorrow. Maybe this weekend or next weekend I shall take this beauty to Ryan's garage for a cambelt change. It was so stupid of me to not replace it when the engine was out.. maybe because we were in a hurry to get the car out of the garage haha. Other than that, it all went as planned! It seems easy enough to do but I'm too lazy now! haha can't wait to give this thing a good clean
-
^ typo
-
Haha thanks man! yea I managed to get 4 driveshaft bolts from Alex when I went to pick up the vacuum solenoid! pretty stoked he had them aye! as well as a spare exhaust manifold gasket! now i can finally try starting the car! I was given a battery from a cressida to so that saved me 120 bucks haha anyway i'll keep everyone updated! true, Auto gearboxes
-
Hey guys, Just recently bought this car off Kurt, It was in this condition when I got it hahaha... with a bonnet of course. I took this as soon as I heard the engine is going back in it only to find out that the engine was about 1 hour away from Auckland. But no big deal! The biggest challenge was towing the car from Takanini to Sunnynook with just a car and a 2m tow rope. I tried hiring a trailer but they were taken. Tried calling a tow company but they were all unavailable and I only have 1 week to use my mates garage so we decided to tow rope it. Anyway, started working on the car today. Making a huge progress on day 2. Engine was bolted in and wiring mostly wired up! We have 2 plugs left sitting in the back of the engine. I'm guessing it connects to the tranny.. 2 pins and 3 pins and the airbox plugs. Few parts were missing as well: (drive shaft bolts (i think we left it when we picked up the car. we had to take it off to be able to drive it around), 1 exhaust gasket, exhaust ring seals( dunno what its called), hoses and a broken vacuum solenoid or in stan's words.. "nipples" , broken battery mount with pretty much effed screws but thanks to Alex, I managed to acquire them tonight. I think it should start tomorrow night/ afternoon. I just need to figure out how to mount the gearbox coz all I have are mounts and auto X member, I hope it does fit. I can try make it fit tho. I'm sure there are more ways of fitting them but worse comes to worst, it's gonna get re-drilled. I've got a w55 gearbox from a gx61 from alex but I have an auto xmember from an mx83. Do you reckon the auto mount from an mx83 will fit the car? I heard that the a340 auto cross member should fit fine... maybe I might have to reverse it. If any of you had done this before, do let me know! I'm not sure if gx81s have different boxes compared to x83s.
-
http://www.facebook.com/media/set/?set=a.429753290419357.101447.100001540690467&type=1 Photos from the meet! hope you guys like it!
-
Mk1!!!!!! I'll have mine in 2 weeks hehe
-
This thing is so cool! love them wide wheels!
-
GT86 was awesome! never seen so many 86 in my entire life! New and old! Keisuke from 86 Fighters was there too! NZPC, Freshlywhipped and even blake from FVCK! Here's my car sitting beside our sponsor's car. Peter's JZX110 Verossa My car setting up in the stadium! JZX NZ boys were there too but didn't have a huge turnout mainly because it was a Saturday:( they're only free at night haha ON a side note! So many meets and events! I think its time for the JZX boys to have their own meet again haha! I miss being around JZ engines and X chassis! Its been a few months now since we had a meet of our own! http://www.facebook.com/media/set/?set=a.158182907566115.47806.141546532563086&type=3 I realized.. there's not a lot of us here in NZ haha ^^ this set was the biggest day of all! first official meet of the JZX NZ crew... Heaps has changed now! more mods for everyone to see!! Uni has started again today that means I'll be working on my car real slow haha.. I mean slower** I might work on installing those yellow fog lights for now! and a bit of stan's wiring for his ke70 over the weekends Thats it for now
-
http://www.facebook.com/media/set/?set=a.438157672901969.119782.141546532563086&type=3 what you guys missed
-
FINALLY Found time to photoshoot my car and did a bit of stuff in it! first time I held a camera in few months!
-
Took my car for a spin last night for the first time with the wheels on. I finished polishing up my fronts yesterday so it looked shinier now. now just gotta work on my rears and I can't be bothered atm! haha ok so far all I have to do now is lower the car and get lower tyre profile then cert. I sold my slip on coilovers to one of the members here, turned out that the adjustables that I got for my fronts were crap so now I think I need to buy another slip on coil over. I still have my rear spring set up and seat etc. anyway it looked good last night with polished wheels! anyone wanna do my rears? haha it took me forever to polish up the fronts haha
-
Reserved
-
SO... I have been looking at pics in my folder of GX71 porn.. this is how i want my car to sit. minus the hideous side step! one im getting is slightly smaller side step and since im getting SSR mesh like these, it kinda makes me want to paint the centers white ^.^ Although mine has bigger dish :D yessss! i gotta wait till it arrives tho before i lower it even more so i can flare the guards to fit the rims:) and i relly do wannt put lower tyre profiles like 195 45 or 195 50s Side step is similar to this pic right here Scrolling through different pics of SSRs, I seem to like it's original colour mainly because it saves money Had a vacuum leak problem and mechanics couldn't find what it was.. but got that sorted happened when i replaced the injectors... they thought i had bubbles in the car LOL but no.. haha turns out i just switched something so i downloaded the diagram.. everthing was right its just that how the fuel mount was bolted on before the plate hence causing vacuum leak... i lol'd Car is still on standard rims as I wait for my ssrs set to arrive.. just to be save.. but i will have rims for nst meet. you'll see For everyone with W#: something I found out when I visited a mate of mine...he's a genius.. most of the W gearboxes get a crunch when you reverse, coz they're too fast for the something to cope or something like that haha.. there's a solution to this problem. you can put it on second gear before you reverse and it'll have no crunch haha.. fixes all your crunch problems when reversing... just quickly slide it onto second gear before you reverse haha .. try it i think it goes for any toyota gearbox ....i think.. ANYWAY Here's a video for SEEN88 as promised since he wanted to know how the sound of a 1g is like. its not bad. a 1gge can sound better tho haha but still here it is.. sounds like a 1j 2j hybrid lol.. Please turn your subs up hehe Any questions just ask Went to a car show and borrowed ralph's rims. I aint showing up at toyota meet without my rims on! shot ralph for lending me the rims! turned out pretty good haha
-
TOWBARRRR!!! I managed to install a tow bar the other day. here it is - My car with fuel cell protection..I can now finally tow a boatto the beach and carry bikes to woodhill! anyway if anyone wanted to install a towbar here it is" 2 mounts connected on each side of the frame where the bumper is located and one on the gas mount. It was pretty straight forward. Taking the bumper off has 2 small bolts (10mm) i think on each side and 4 bolts under the carpet cover. Here's the wiring matching for the towbar harness to the RIGHT TAIL LIGHT. I did take some photos but I reckon I can just put it on words. It's just for someone trying to install a harness "Harness - Tailight harness" Red - Green Wire with White lining Light/Lime Green - Green Wire with Yellow Lining Yellow - Green Wire with Black Lining Brown - Light Green White - White with Black Lining Black - Ground For the past few weeks, I have just been doing some touch ups, whats left now is just the front bumper trim to make it looking mint! Got my alarm siren working, turns out I just need to switch it on with a key lol. here it is waiting patiently for the rims to arrive. Im still glat I fixed it! Haven't had the chance to install my yellow fog lights too but I'll probably leave it till my rims arrive! Next is Interior Detailing since I'm on holidays for 4 weeks haha.. Making a silencer atm but I didn't manage to finish it and its still in Uni workshop haha i'll probably finish it off when uni starts. Im making 2 little silencers for my twin pipe