WhangareiKE70
-
Posts
798 -
Joined
-
Last visited
Content Type
Forums
Downloads
Events
Gallery
Everything posted by WhangareiKE70
-

Hayden's Datsun 720 4WD project discussion
WhangareiKE70 replied to WhangareiKE70's topic in Project Discussion
Cheers mate. Yeah, the only saving grace was that it was a 4wd van, so when we hit we essentially went over the bonnet of his little Corolla and then rolled. In a normal height Hiace, where he hit first (straight into the drivers A-pillar with about half a cars overlap, I was already well off the road trying to avoid him) would have been my legs gone. As it was I have a couple of gnarly scars on the shin of my right leg, but no damage to them other than that. Damage to the van was intense, front RH suspension was ripped out, wheel was in about 30pcs. On Mangakahia Rd, about 3kms from the Maungatapere turnoff (there is a little bridge just past Tattons Rd if you know the area). Only about 2 kms from home, we had driven from Pukekohe that day without incident, then get hit by this idiot just before getting home. On a fine day you can still see the marks on the road from where he locked up and skidded, and then where his engine leaked oil all over the road once he hit us. This is almost 5 months later now. -
Hayden's Datsun 720 4WD project discussion
WhangareiKE70 replied to WhangareiKE70's topic in Project Discussion
I will likely make the body mounts up, tack them in, then get him to come inspect, and at the same time show him some welds I've done on some scrap of a similar thickness. Then I can get a yes/no/some improvement needed, and then at least I know where to go from there. -
Hayden's Datsun 720 4WD project discussion
WhangareiKE70 replied to WhangareiKE70's topic in Project Discussion
Can anyone give me good advice as to how to tell if your welds are up to cert standard? Just weld some things together and take them to your local certifier to be inspected? I would like to do it myself as it will save time/money, but while I think my welds are ok, I don't know they are, if that makes sense. Can I tack things together then just get someone to finish weld it, or will the tacks ruin the weld bead and make it look shoddy? -
Just thought I would update this just so it didn't disappear into the nevernever, but then realised I had actually made progress since I last posted on this thread. So firstly my excuses for not doing much... Got hit by a drunk driver, (he was speeding, no license, no WOF/reg since 2008, etc, real winner), lost control and crossed the centre line at well over 100kmh. Hit us and we did a barrel roll (at least one, not quite sure). Mum and our little dog were in the passenger seat, were mostly fine (Mum headbutted the window) but luckily avoided worse through sheer luck (it didn't actually land on her side at the front, went driver front, passenger rear, etc) and Mum held the dog as we went over so she came out unscathed. I however fractured my spine (roof came down to say hi to my head), luckily nothing too major as far as spinal injuries go (compression wedge fracture in my thoracic spine, loss of about 35% height on one side of one of the vertebra), but meant that I couldn't lift anything for what turned out to be about 3 1/2 months. Stupid thing was I was also reaaaallllly gutted about losing the van too (I know "it's just a vehicle, they're replacable, bla bla") but it was a 92 4WD 1KZ-TE Hiace Supercustom, and was fucking awesome. In really good nick, only 200,000kms on it (not a lot for one of them). Only had it about 5 months. Anywho, have mostly recovered from that (happened mid March), and then the other thing that has eaten my time is the tiny house in the background. Been working on it off and on, a lot of off while I did my study etc, for about 3 1/2 years, and it's finally almost done, move in in August is the goal. Will share photos in another thread at some point once it's finished and looks less like a building site. On to the ute, before the accident, I had actually made some progress and taken a few photos, so here goes: Bought adjustable arms for the rear, RAW shocks, Dobinson 4" lift springs, as well as an adjustable panhard rod, all roughly set up until I get the engine properly mounted and the front done so I can measure the angle on the output of the gearbox to get them equal. Sat the body on, and the shortened tray. Need to lower the cross bar to the height of the piece of timber that's clamped on there. Body is just sitting on the pieces of timber at the moment, but that puts it at the right height for everything to fit Mocked the front end up, tacked together the shs rad support so that I could mount up the radiator and intercooler (which is probably to small, will likely get on same thickness and width, just taller and notch the bumper so it sits in, then holesaw the front for airflow. Have done a bunch of research, small jobs, bits and pieces etc, since then, but not a lot. Once the container is done in the coming month, this will start getting time and money thrown at it again. I desperately need to get some paint on it soon (probably just primer until I have everything properly mounted and can do the bodywork), as the fine rust film on it is getting less fine, and it is a Datsun. A big part of going forward with this is getting the engine (RB25/30DET) so that will require some financing, hopefully in the form of selling my Mitsubishi Challenger. If anyone knows of one, preferably a runner as I don't want to do a refresh on it (for the sake of time/expense) at this stage, let me know. Also need to order some parts from Superior Engineering in 'Straya, so that is gonna cost some money too. Let me know what you think in the discussion thread: Cheers, Hayden.
- 11 replies
-
- 28
-

-
Did the head on my 4M40 Challenger. New Chinesium head + swapping old valves etc, general clean and all ready to put back on was about $1200 inc I think? Can't quite remember. This was a local reputable engine builder, but Dad sends them a fair bit of work (diesel mechanic) so I think that may have been slightly cheaper because of that. I would say if you could get ok deals at parts places etc, you could do a new head, tidy block, water pump, belts etc for somewhere in the $1500-2000 range? Plus labour if not confident in doing it yourself obviously. Just my experience/2c, results may vary etc. EDIT: To clarify, this was take the head off ourselves and drop it in/pick it up. Also, there was no damage to the block/crank/rods/pistons/bores/bearings etc in our case, but (especially if the engine is out/on a stand) a visual inspection/measurement of all of this would be a good idea, and consequently may add to the cost of the rebuild.
-
Discuss here about Yoeddynz's little Imp project...
WhangareiKE70 replied to yoeddynz's topic in Project Discussion
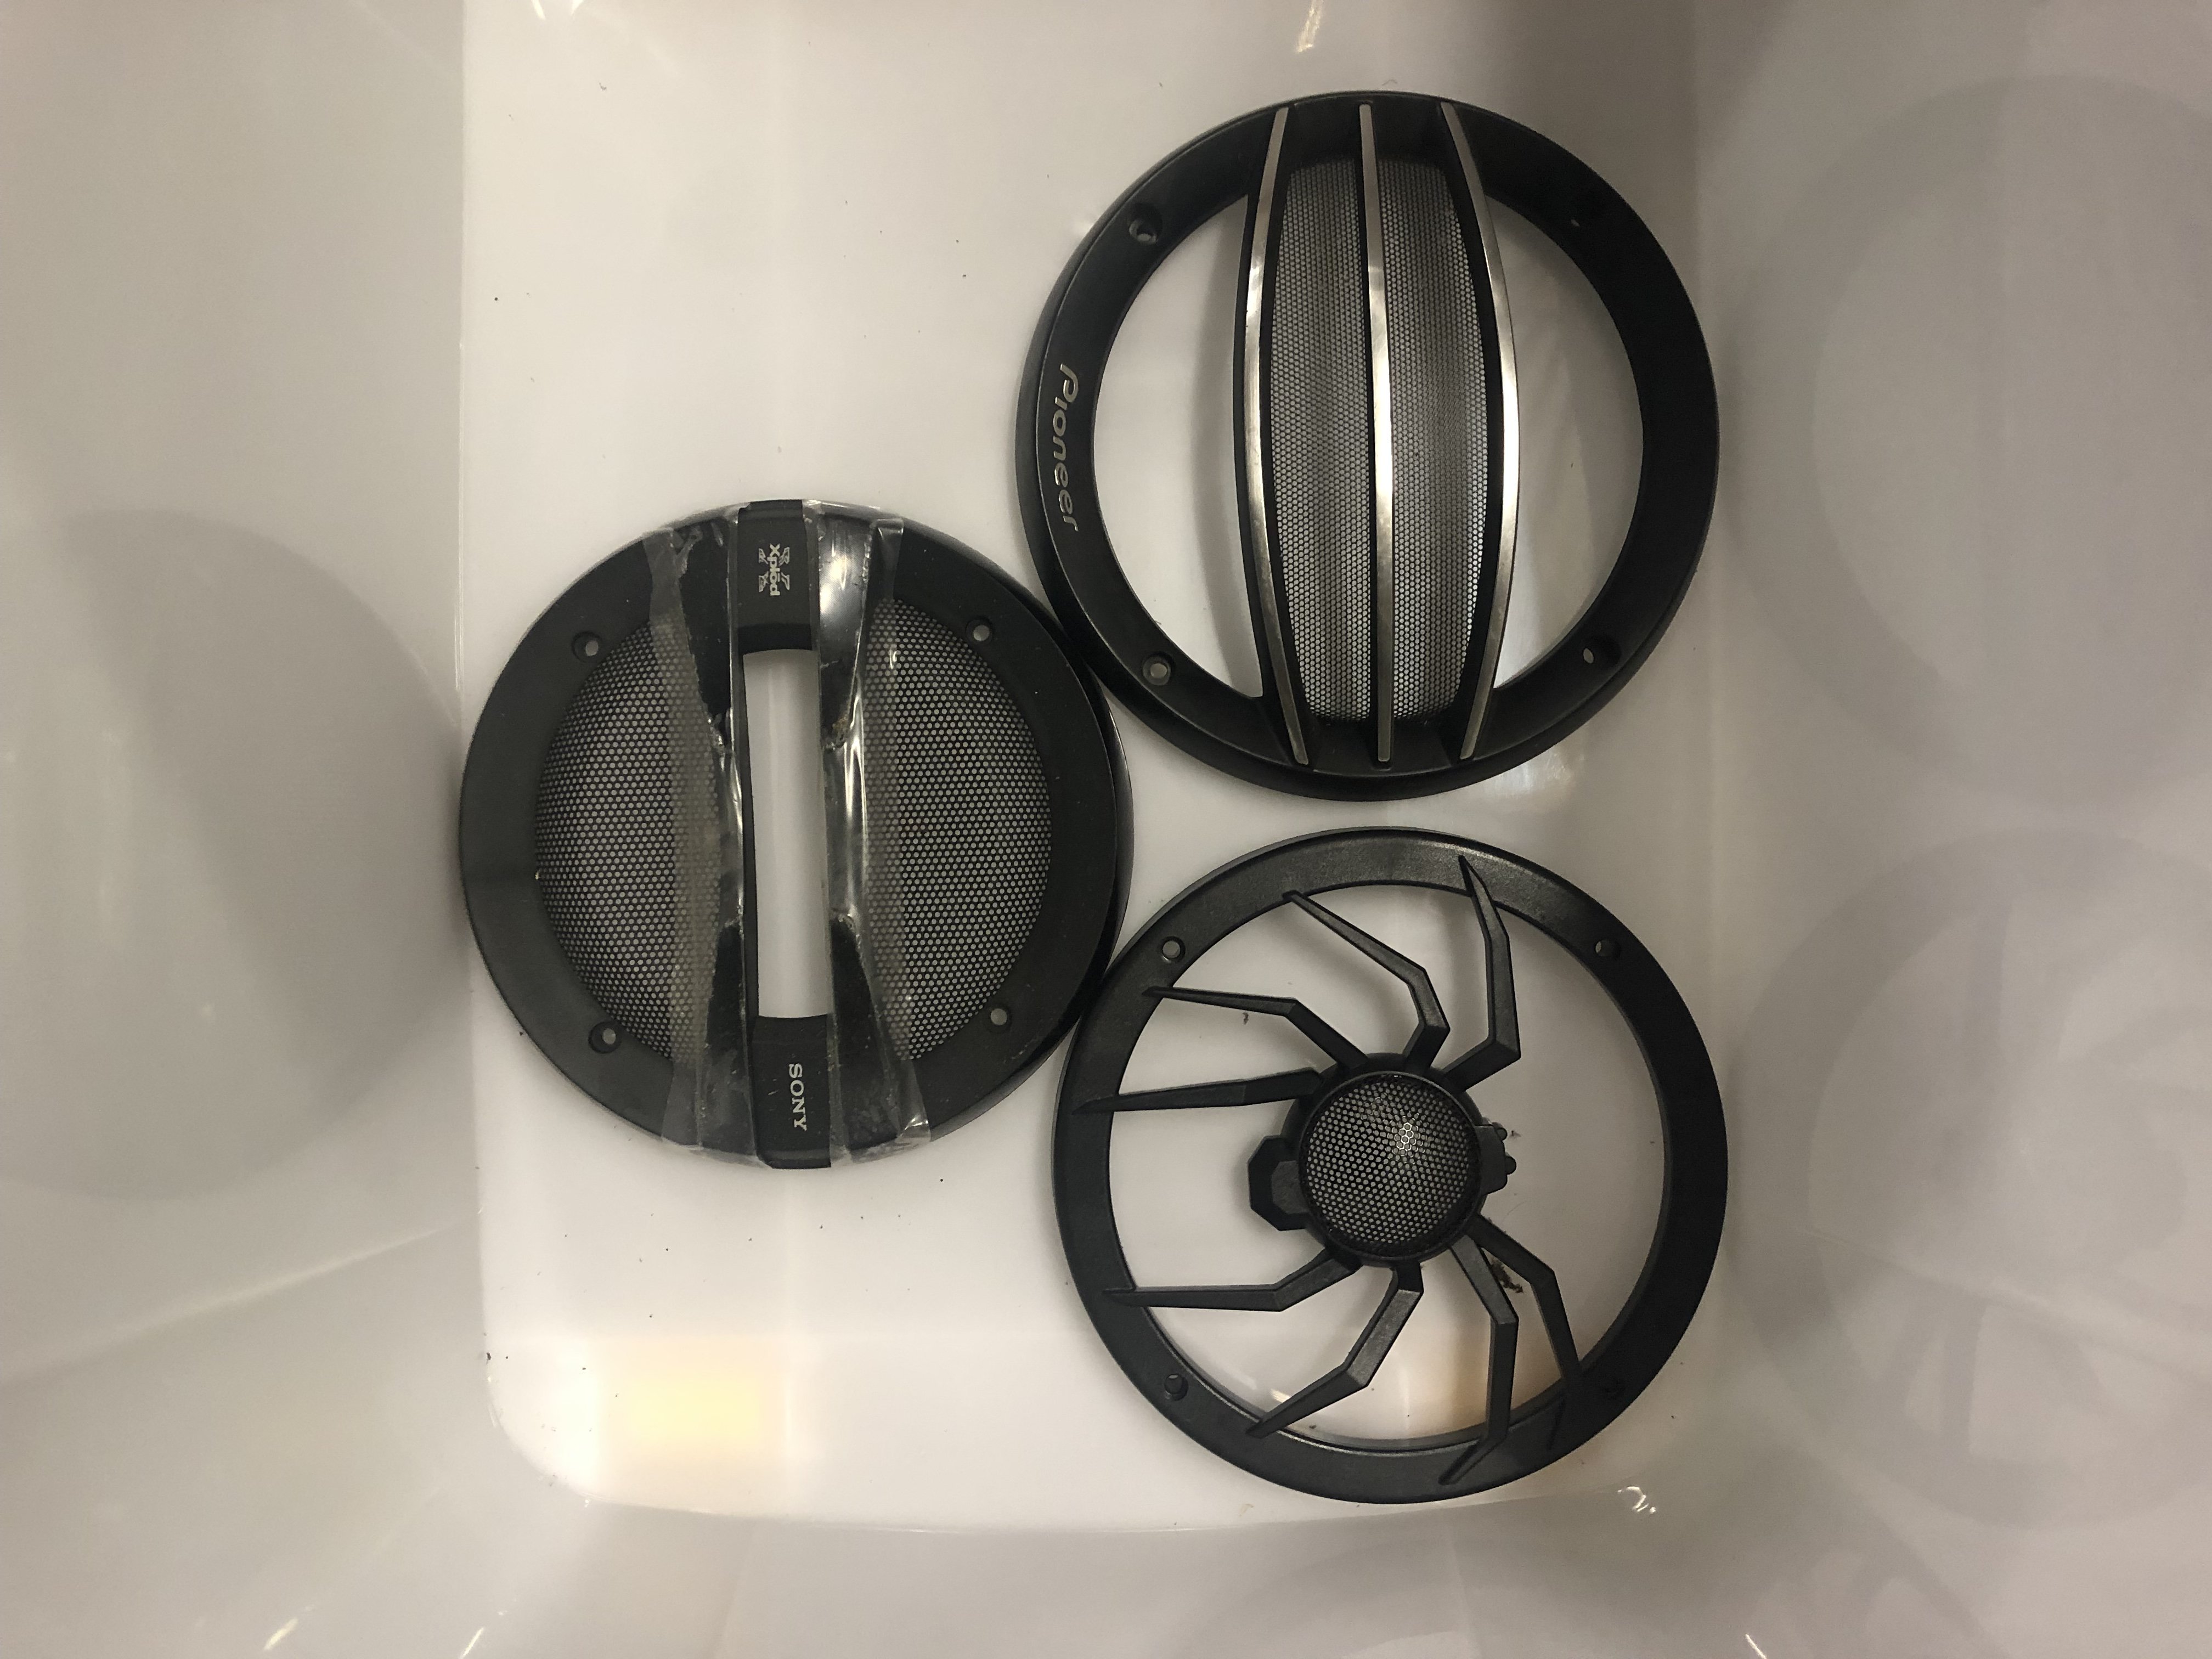
Can you measure the centre to centre of the opposite screws holding them in to the box? All the type I have sit over top of the speaker and the screw goes through the grill and the speaker screw hole and holds the whole lot in. I’m measuring about 158mm centre to centre on two pairs I have (Soundstream ones and the Pioneer ones with the 3 chrome bars across the middle), the Sony ones are slightly closer together.
-
Discuss here about Yoeddynz's little Imp project...
WhangareiKE70 replied to yoeddynz's topic in Project Discussion
What size speakers are those? I have a collection of speaker grills because hoarding (/the speakers have bought usually end up behind factory grills), let me know what size and I can send you pics to see if any of them suit? If they do they are yours for the price of postage? -
King cab. But was suuuuuuuper rusty. Didn't look too bad until I pulled out all the secret silicone that the previous owner had used to 'fix' it. And then I have left it outside for the last few years. It wasn't any good to anyone really then, and it definitely isn't now.
-
Dad is a heavy diesel mechanic, has the Milwaukee M18 1/2 and 3/4 dr guns, barely uses the 3/4 but it is sometimes handy, 1/2 is capable of most things. I have AEG gear, and for the amount I use it I have found it to be as good as Dad's Milwaukee gear (many will dispute this but talking from a fair bit of first hand experience with both). I'm sure if I was using it more often (professionally) it wouldn't hold up as well, but for home handyman/regular weekend work it has always been excellent. As for flat deck, I took the wellside off my 720 and plan to run a flatdeck (when/if it is running again). Doesn't look as cool but it is infinitely more practical in almost every situation.
-
Hey all, Wanting someone to have a look at a Vitara for me, this one: https://www.trademe.co.nz/motors/used-cars/suzuki/auction-2154394858.htm?rsqid=7a35ea17d4284dc0b367debf2639d718-003 If I can sort the money (working on that right now) I will need to get it checked over as I am based in Whangarei. I could go for an AA/VTNZ check but have found them next to useless in the past. Would prefer someone who has access to a hoist if possible or even a trained mechanic? There is money/beer in it for you but also a whole lot of appreciation. As stated in the auction, it has oil leaks, not the prettiest thing you ever did see, and has a 4" suspension lift so will likely have hectic CV angles. I can deal with those back in Whangarei, what I need to know is if it will likely* make it back to Whangarei in one piece. (* you will not be held accountable if it doesn't haha ) . Please someone let me know if they can give me a hand, if I get it I will be flying down either this or next weekend, and will be driving it back. Will update this once I figure out money etc. Cheers, Hayden.
-
Not out the back in a bin. There was a few different types there. Sorry it took me so long to get around to going in.
-
I can pop in after the physio next Tue as that is just around the corner from the Kamo one, if nobody has checked by then.
-
I have no running OS projects/nothing new then. But keen for a meet up.
-
Fair point. Any idea who is a good supplier to buy UJs from?
-
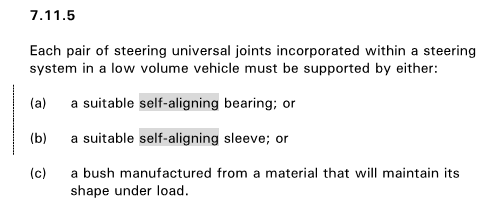
Question regarding steering setups for my 720/Safari mashup. I have the NZCCM, and it has this section: Essentially my question is: The pair of UJs (1 either side of the intermediate shaft) would be supported at the firewall, and the steering box. Is that what it's asking for, or some sort of inline bearing on the intermediate shaft? Probably an obvious answer but I wasn't sure. If the answer is a support on the intermediate shaft, then do I need to incorporate some degree of movement (i.e. rubber mounting) as it is a cab on frame and there will be a degree of flex? Or is that negligible and it can just be hard mounted? Thanks in advance.
-
I am also sad there is no TD42. But they are genuinely about 150mm longer than an RB25, and I have already had to cut the firewall to get that engine far enough back, while still maintaining room (just) for he radiator/fans. It was a very genuine consideration. I have the NZCCM, and it has this section: Which is essentially my question. The pair of UJs (1 either side of the intermediate shaft) would be supported at the firewall, and the steering box. Is that what it's asking for, or some sort of inline bearing on the intermediate shaft? I will post the question in the cert thread too but I wasn't sure if it belonged there or in the technical thread. Hence the confusion in my second post. Cheers for the input guys/now I want a TD42 again.
- 12 replies
-
- 1
-
-
- datsun 720
- patrol
- (and 3 more)
-
I will get a better photo when I get home but that gives you an idea. The body is hovering about half a meter over the chassis on the hoist. The angle of the photo is deceiving, but it has to travel approx 150mm across over the 4-500mm between the steering box and the firewall. I connected it up (without the steering column not bolted in as it was too long) and the angle was harsh to say the least, the rag joint wasn't happy. As I said, I will get a better photo hopefully tonight which should explain it better, and you can tell me if I'm being dumb, and what the obvious fix is if there is one. -Hayden
-
Another bumpity bump. Hopefully someone has some experience with custom steering setups and can advise?. Haven't looked much more at this since the original post, but I have figured out that the spline is the same between the 720 and Safari.
-
Making the trip from Whangarei on the Saturday, meant to be a hot day at this stage so that will be good. Would be good to meet some of y'all if you're around and put faces to names. I should really change my username as I haven't had a KE70 for a looong time. WhangareiHiace maybe? Haha
-
This might be basic but have you tried a different aux cord? Could only be getting mono not stereo through the cord? I have had a similar problem with a faulty cord before.
-
In place. There really isn't any room to go thicker, it is hard up against the grill and the rad support framing, and I have already had to trim the grill a fair bit in behind. If I have to I can go for a taller intercooler and cut out the bottom of the grill, I will just have to come up with a way of hiding it. This is something I want to be hidden/subtle, unlike everything else on this build. EDIT: Also, fun fact, the engine is actually in the engine bay in the bottom photo, hahaha, shouldn't have any problems with air pockets in the cooling system at least?
-
I get that, that is why I put the post up, to be educated. I suppose I knew it wasn’t going to be optimal, just wanted to know if it was going to be a resounding “no, this won’t work at all”, in which case I would have to reassess. There was enough of a “maybe” for me to give it a go. I didn’t say I wasn’t hacking up the front, just not the grill... hahaha. But seriously, trying to find the balance between old school looks and 4wd practicalities (bullbar, winch, proper clearance etc) is difficult. I’m gonna try incorporate the factory bumper into the bullbar somehow.
-
Yeah, true, didn't think about that. Makes sense. Moral of the story is, I bought it, and it is now on its way to me. It will do for mock up, and once everything is running, I will soon discover if it is suitable or not. I hope it is because I don't want to cut the grill. I appreciate all the advice all the same. I will make sure to try and report back once the project runs. -Hayden
-
Intercooler core: 180x65= 11,700 mm2 Intercooler pipe: pi x radius squared= 3.1415 x (32.5x32.5) = 3.1415 x 1056.25 = 3,316.6 So cross sectional area of intercooler core is about 3.5x the piping. I can do math, just not performance engines. Will that difference be enough?
-
Hi all, Have tried looking, but couldn't find the info I was looking for. Looking at an intercooler for my RB25DET Datsun 720 project. Intercooler core size I am looking at (A2A) 500x180x65mm. https://www.trademe.co.nz/Browse/Listing.aspx?id=1795400654 Engine is RB25DET, expected power somewhere around 300-350hp. Mostly on road driving, I am aware of the limitations of A2A in offroad environments. The main reason I am looking at this size is it will package neatly behind the grill with minimal/no clearancing, and allow for very short piping (around 1m total). Inlet/outlet size is 2.5" (63mm) which I have found info on, and believe to be sufficient? If someone believes otherwise feel free to chime in. It is early to be looking at this, but I am fabbing up the rad support so I have to make allowances for mounting the intercooler/oil cooler etc. It is hard to get good info on this subject as most cars running RB25DET engines have intercoolers sized for trucks that hang hectic low and scrape in the KFC drive through. If anyone could help or point in the direction of where/who to ask, that would be really appreciated.