Roman
-
Posts
7,233 -
Joined
-
Last visited
-
Days Won
39
Everything posted by Roman
-
I think its easier for those cars as the engines are solid mounted. It's having to account for engine moving, and the limited front space that makes life tricky.
-
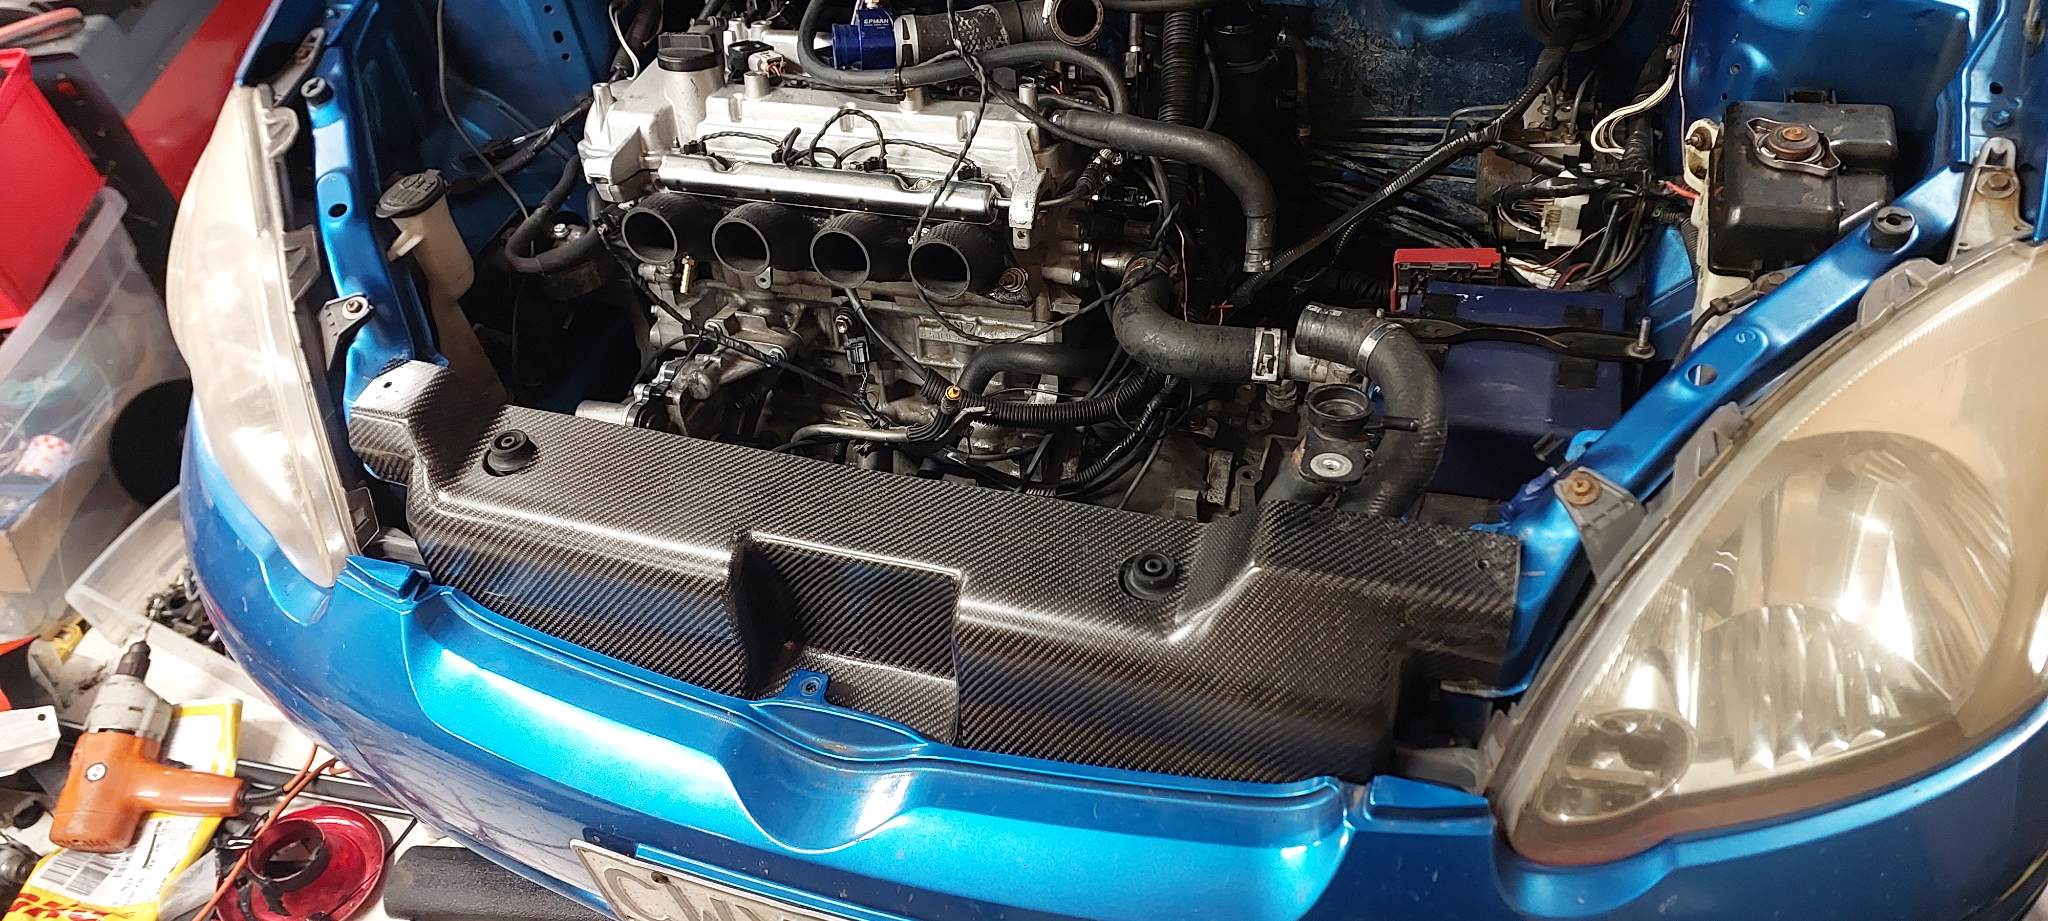
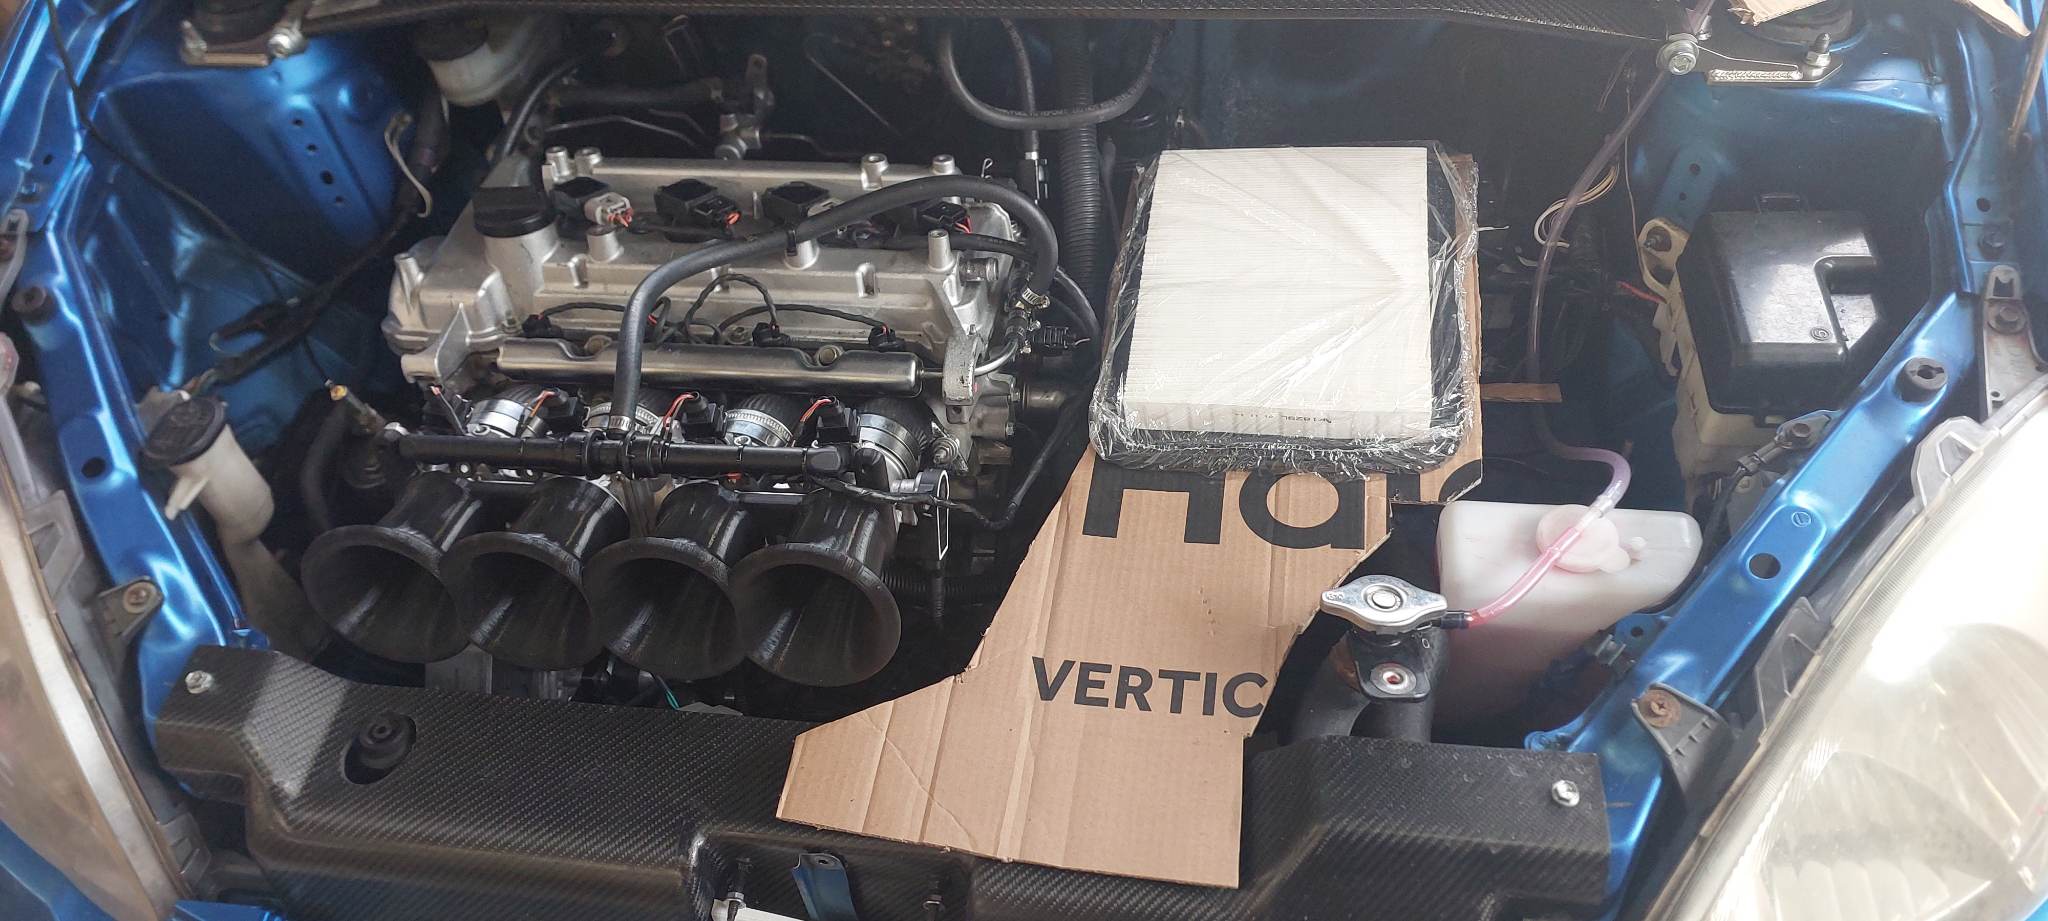
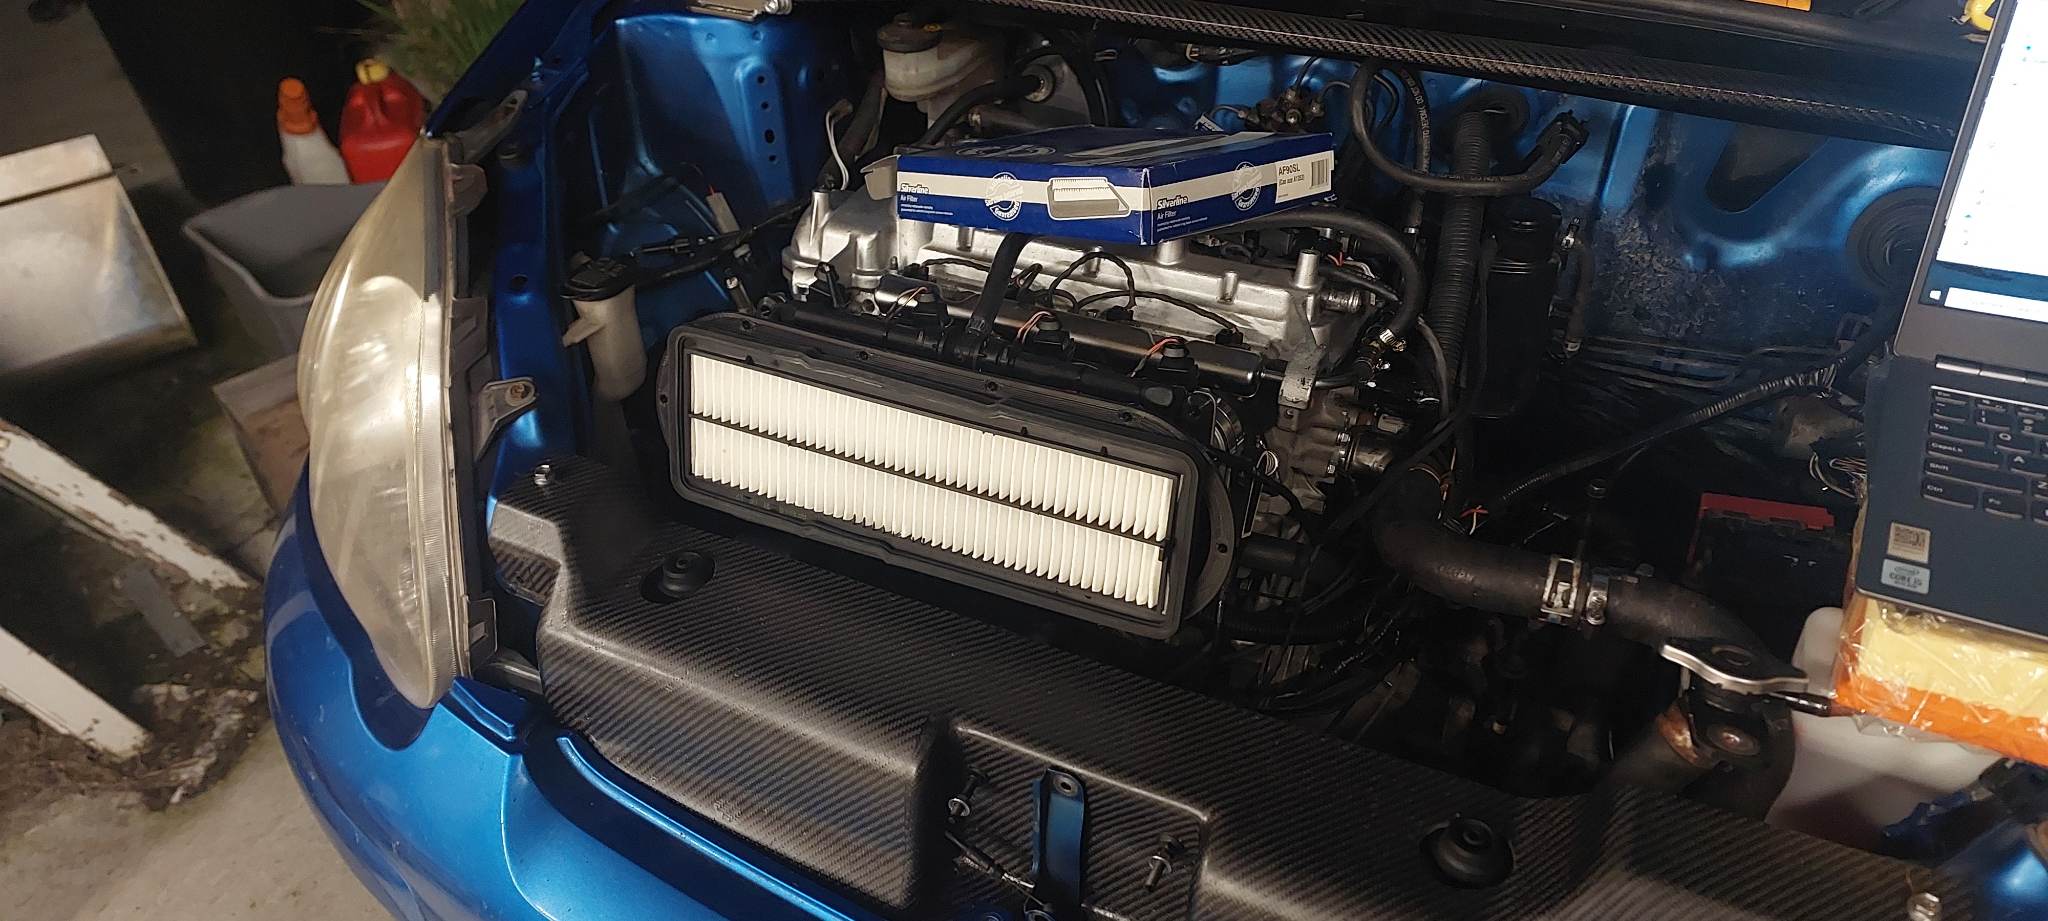
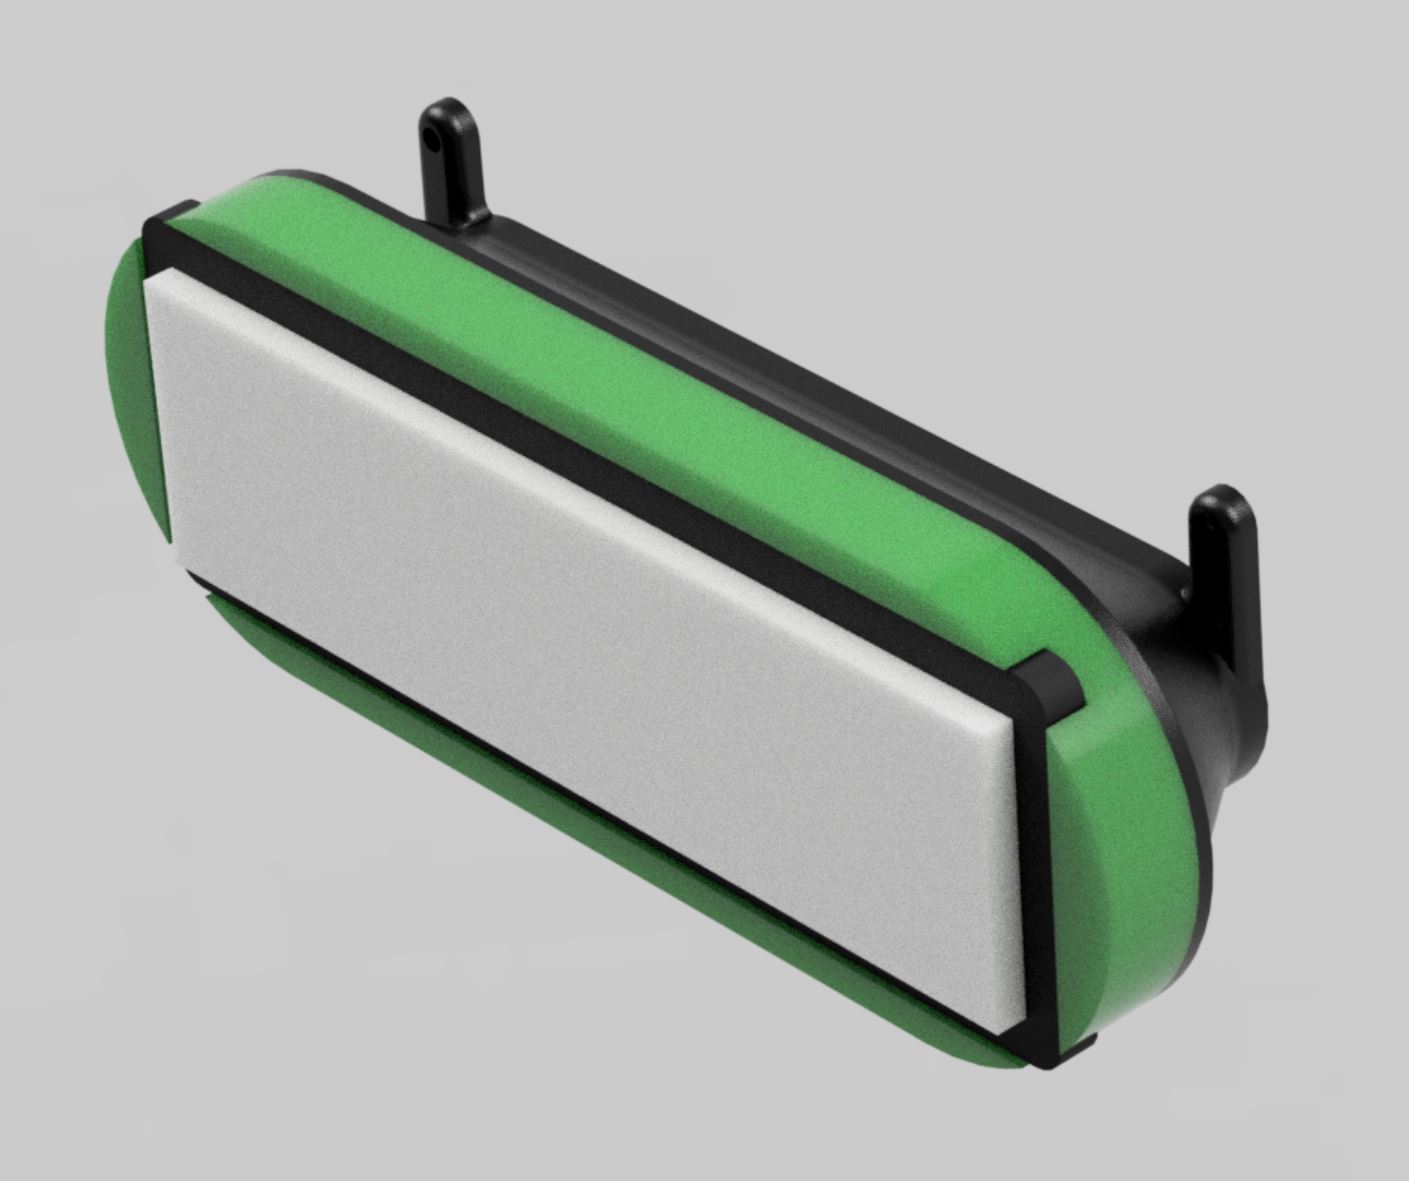
Hey those photos are super cool, cheers! Interesting to see that sneaky low side injector position on the BMW motor - Firing the injectors straight down the guts of the runner definitely doesnt seem to be a necessity. I've been working on a few things slowly. I bought some extra capacitors for the waterpump and have remote mounted them using a DTmini connector so I can hot swap them. I'll switch to Dad's motor controller circuit at some point but this keeps me going in the meantime, and wont leave me stranded if one blows up. I put some satin clear on the crossmember after a bunch of sanding and came up alright. Then I've been looking at air filter situation again. I was thinking about running similar to OEM setup and have a big panel filter over top of the gearbox. So had a dig through my box of filters to find biggest one that would fit. The problem from here is that some portion of it needs to be hard mounted to the body, and some to the motor. So I figured the top part could all be mounted to body, something like this. Then it would need to loop back underneath and feed throttles from the bottom, or something. However It all seemed a bit annoying and heaps of work. While mucking around with this I had another dig through box of filters, and put my trumpets on that had the base section for my big supersnoot intake thing that I didnt end up using. Weeelll shit. haha. This one almost fits in as it is. It might end up being too close to the trumpet entry, and I'll maybe remake the base part so there's more exposed area around the trumpets. Especially on the bottom side where space isnt so critical. But for starters I'll just print a little adapter to hold the filter on. Then see how it goes. If the motor runs real rich with it on, then there's issues. I also need to remind myself that this motor only makes 150-160hp or whatever, it's not going to need an ultra super mega amount of filter area. In saying this I've also got the same height filter but that is closer to the full width of the crossmember gap. So might end up making it run that bigger size then make a carbon cover bit so its drawing air nicely from the front, and to stick to a theme. and it will look cool having an intake run the bigger width. See how this goes first. Currently printing.

-

Daves new school holden shambles. (Is this project oldschool yet?)
Roman replied to Muncie's topic in Other Projects
shit yeah! will be sweet -
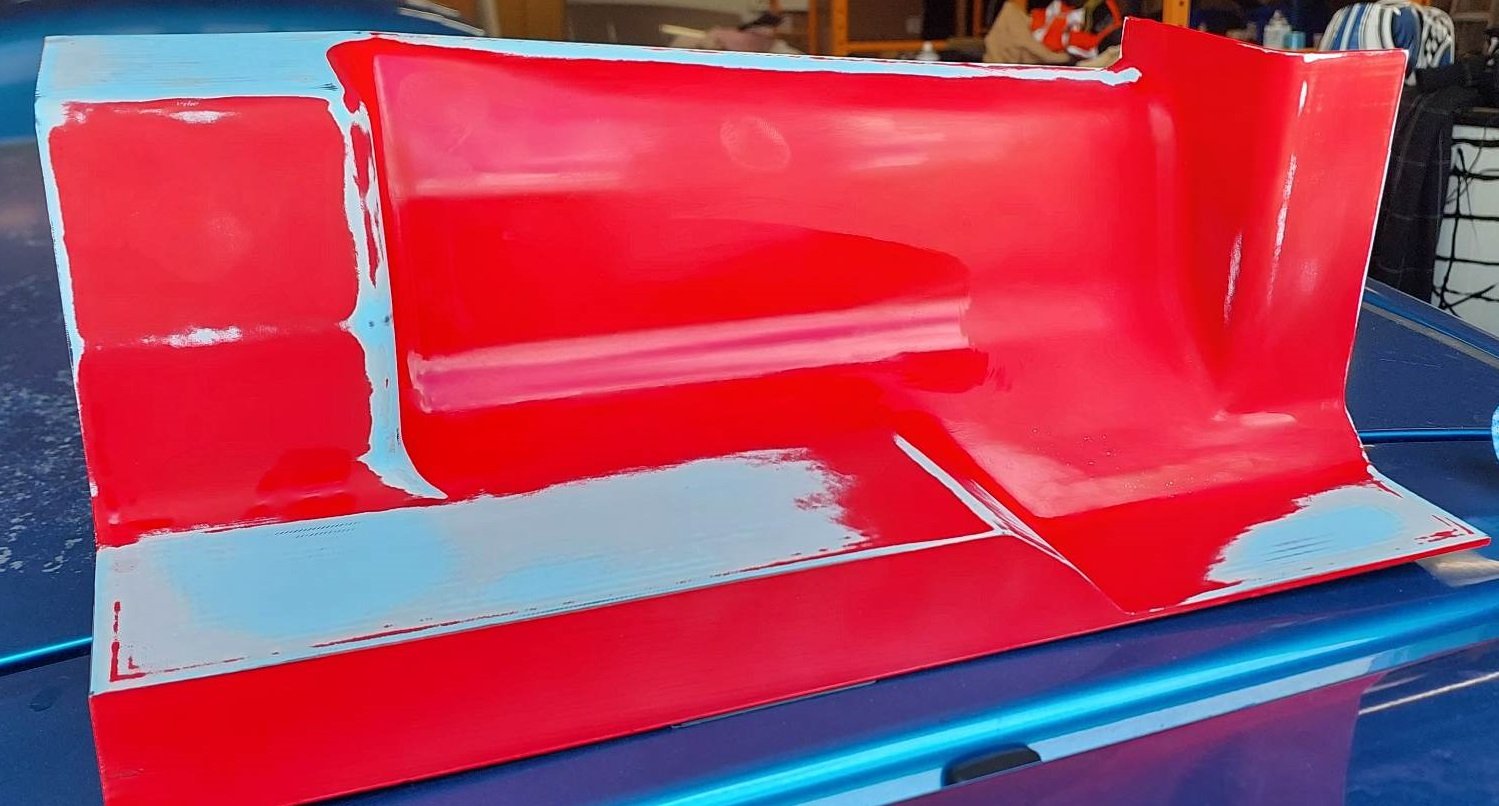
Just used some regular spray can paint that I had laying around. I dont think the paint or surface finish is so important though, so long as it's smooth. @flyingbrick was saying you can use polished up bog as a reliable surface. Important part is the release wax, use a meguires release wax that you buff into it a few times over, stops a chemical bond of the epoxy to the mould. Then some people put the PVA release stuff on it too. But you can still mechanically lock your part in place if you havent allowed enough draft angle to let the part pop off. Using an Adhesive Technologies epoxy, as it's rated for high temp as I originally bought it to make an intake manifold that would bolt directly to the head.
-
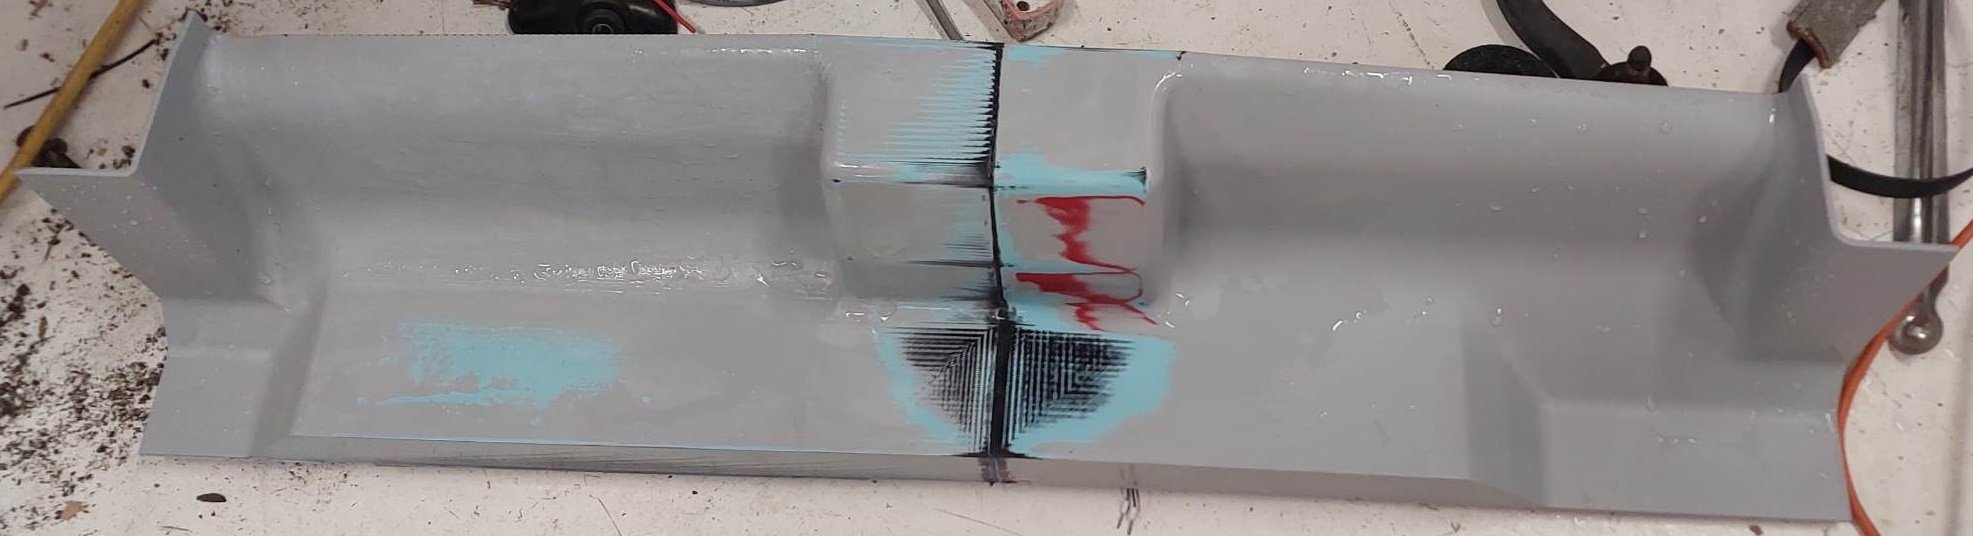
Yeah with hindsight one of the mistakes that I made was using red paint on the mould (figured it would help show where it needs sanding etc) Now I've got tiny red bits stuck here and there ,and it sticks out heaps. If it was black instead you wouldnt even see them. Ahh well! Know for next time haha.
-
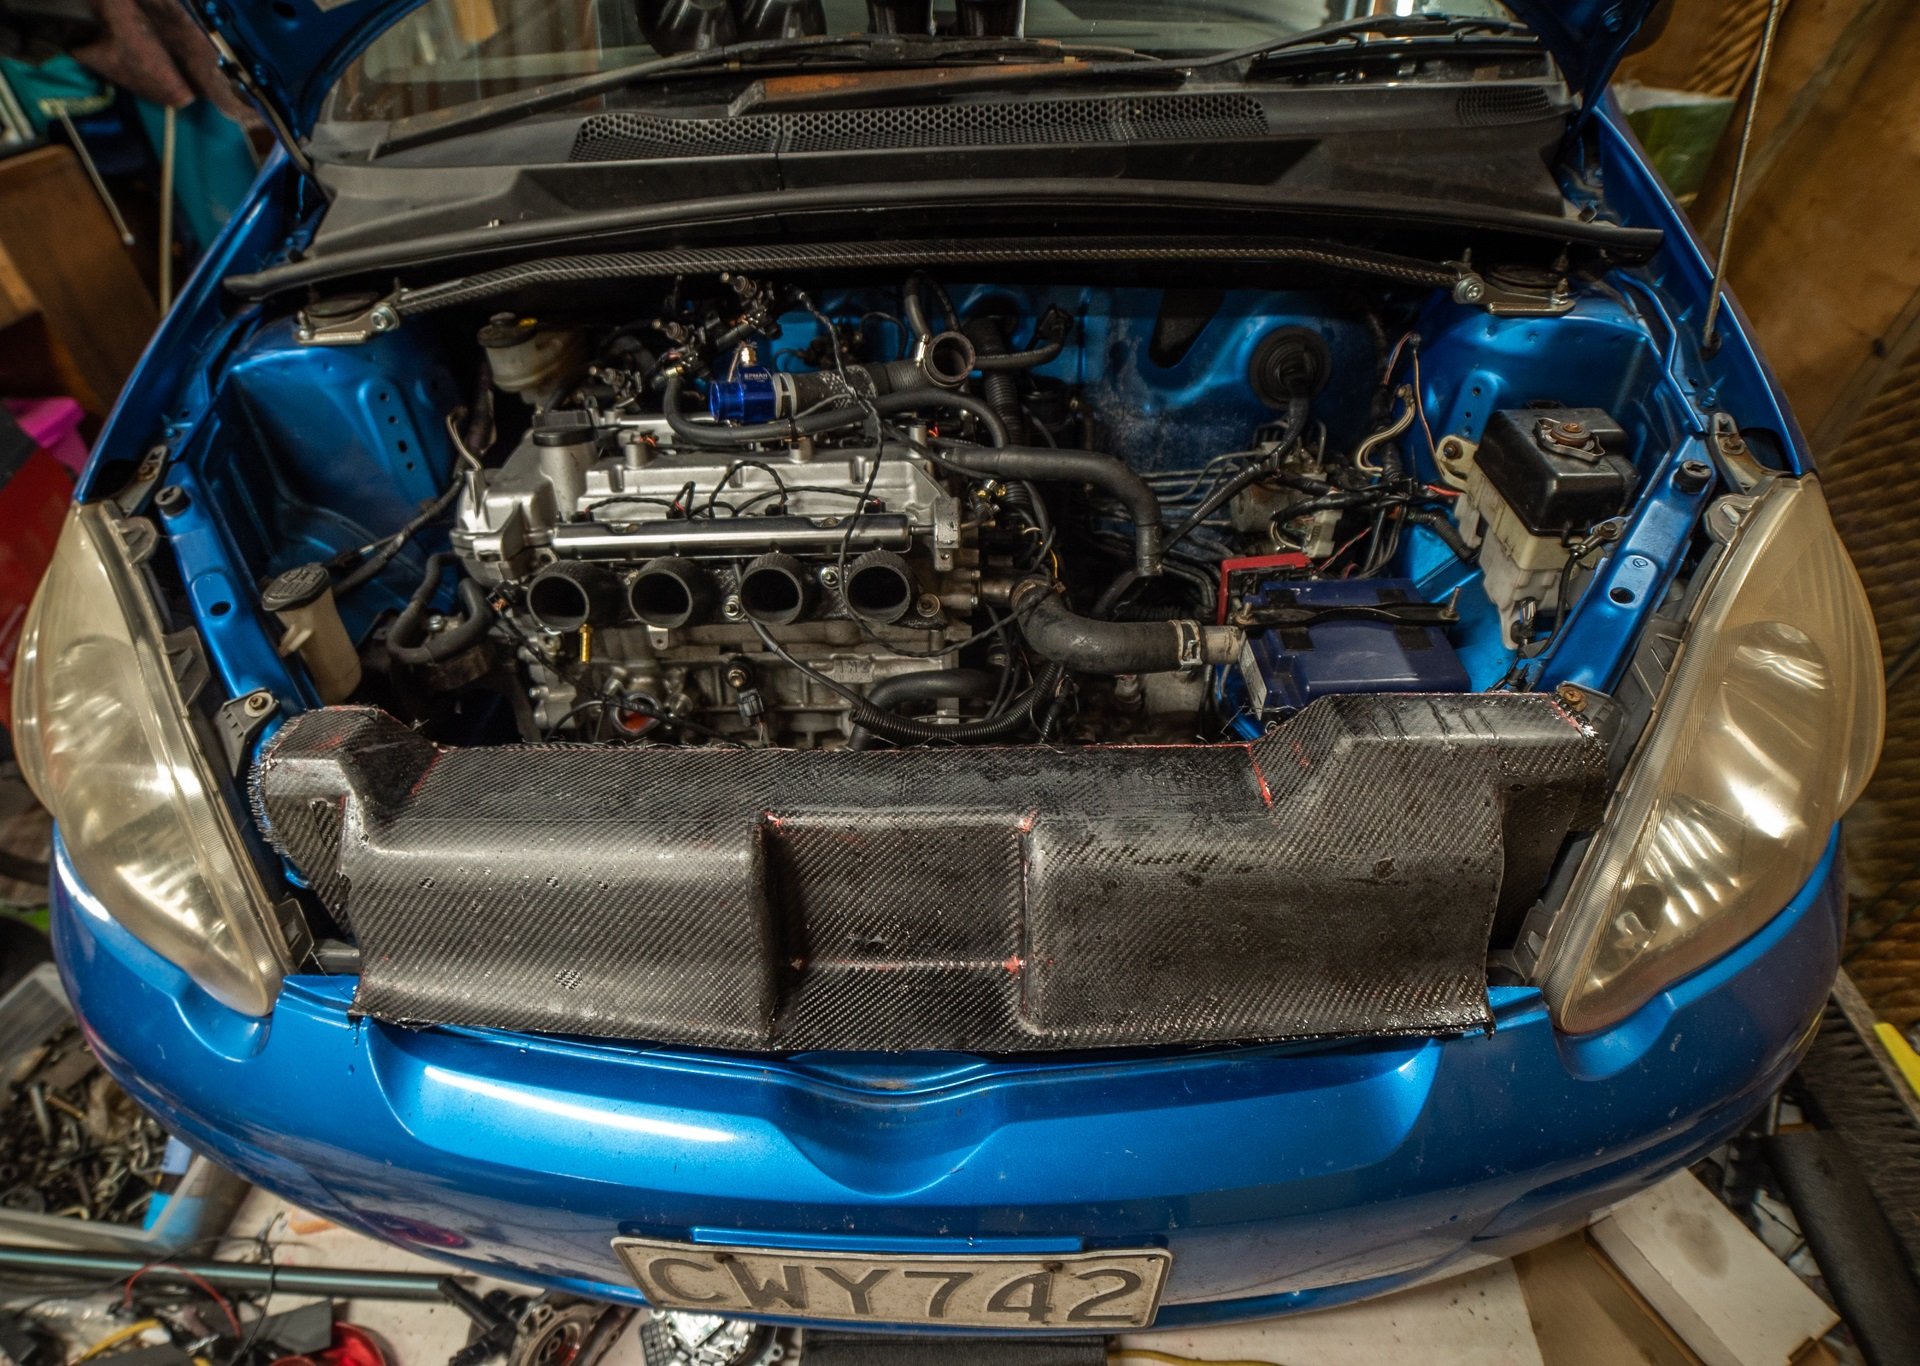
I've had some stuff out of the engine bay because of waterpump situation. My radiator crossmember, when it's got the 3d printed bits on it... Bit heavy. Scales say nearly 3kg. Now considering that doing something stupidly major like losing the power steering or fitting mega light wheels can only make that much difference. Figure I should try do something a bit lighter. The aluminium part isnt that heavy, but my plastic shrouds are a fair bit of the weight. (Thanks again @Stu ) So I thought maybe I should just redo the shroud parts in carbon. But then ahhh what the hell, try make the whole thing. So drew up an inverse model of the radiator panel, this was a mission because it hated nearly all of the geometry so needed to redraw. Then printed in halves as total length was about 850mm. I've found that its a waste of effort trying to sand out layer lines, just build up with filler primer instead. Then sanding smoothing etc etc Stick halves together paint A few layers of release wax and then get some layers on. I used mostly one continous sheet on the front side, so should hopefully look okay once it's sanded etc. Then used up some scrappy bits on the back. Then much to my surprise, many hours later it actually came back off the mould. I still need to trim up the edges, then give it a sand etc, drill some holes etc etc. But pretty happy with it, it's real strong. I was originally thinking of painting it blue but it might actually be good enough to keep as carbon finish after some sanding and a clear coat. See how it goes.
-
That's the exact pump that my engine uses, but since It's not connected to a factory ECU then the diagnostics isnt the same. I guess the good news is that I know what the issue is, and some ways to hopefully resolve it.
-
I reckon you'll see some sweet gains by straightening that intake up to port direction!
-
Heaps of people think that porting is about just smoothing out intake side of the valve. But if you look at how theres like a 45 degree cut around the valve, if you blend that into a radius then you can get some good flow gains. Like you might not see gains from doing that when the valve is at full lift, but if you can improve low lift flow then it's like stretching out the duration of the cam for "free". But depends on how willing or brave you are to mod the combustion chamber (wouldnt reccomend it unless you at least have a spare, and some valves to grind down to protect the seats)
-
Steeper port with a less shitty short side radius will earn its keep. A lot of modern performance engines have quite a narrow valve angle, to get the combustion chamber volume down for higher CR without all of the grossness associated with having a big crown on the piston. Get the VVT and runner length working nicely and you'll have a solid 1600 setup!
-
Yeah but if the port shape is better then it's not going to matter if the valve is smaller. Think about it, why would a bigger valve flow more, it's just a bigger thing in the way of flow? Put a big valve in there and you get problems like the valve being more shrouded by the bore wall and edge of combustion chamber. It needs a bigger seat but then unless the size or the port close to the valve is bigger too then you've not achieved much. Does this head have a different valve angle, or port shape or whatever? You still might be better off with a better shaped port with smaller valves TBH. With VVT you could easily punch ahead of a fixed timing motor with fixed valves, taking whole powerband into account.
-
Little L brackets between underside of wing and the hatch. And some riv nuts near the leading edge. @h4nd one theory my dad has, is that since theres no alternator on the factory engine, the 12v supply is highly regulated and stable. So I might just be running it outside of what its designed for in that regard. But the data sheet for that capacitor shows its susceptible to both heat and vibration, so it could also just be a 9000rpm thing.
-
Cheers, I'm stoked with 13s, it all worked out awesome. Yeah waterpump is a pain alright. Id switch it back to a mechanical pump if it were easy to do on this motor.
-
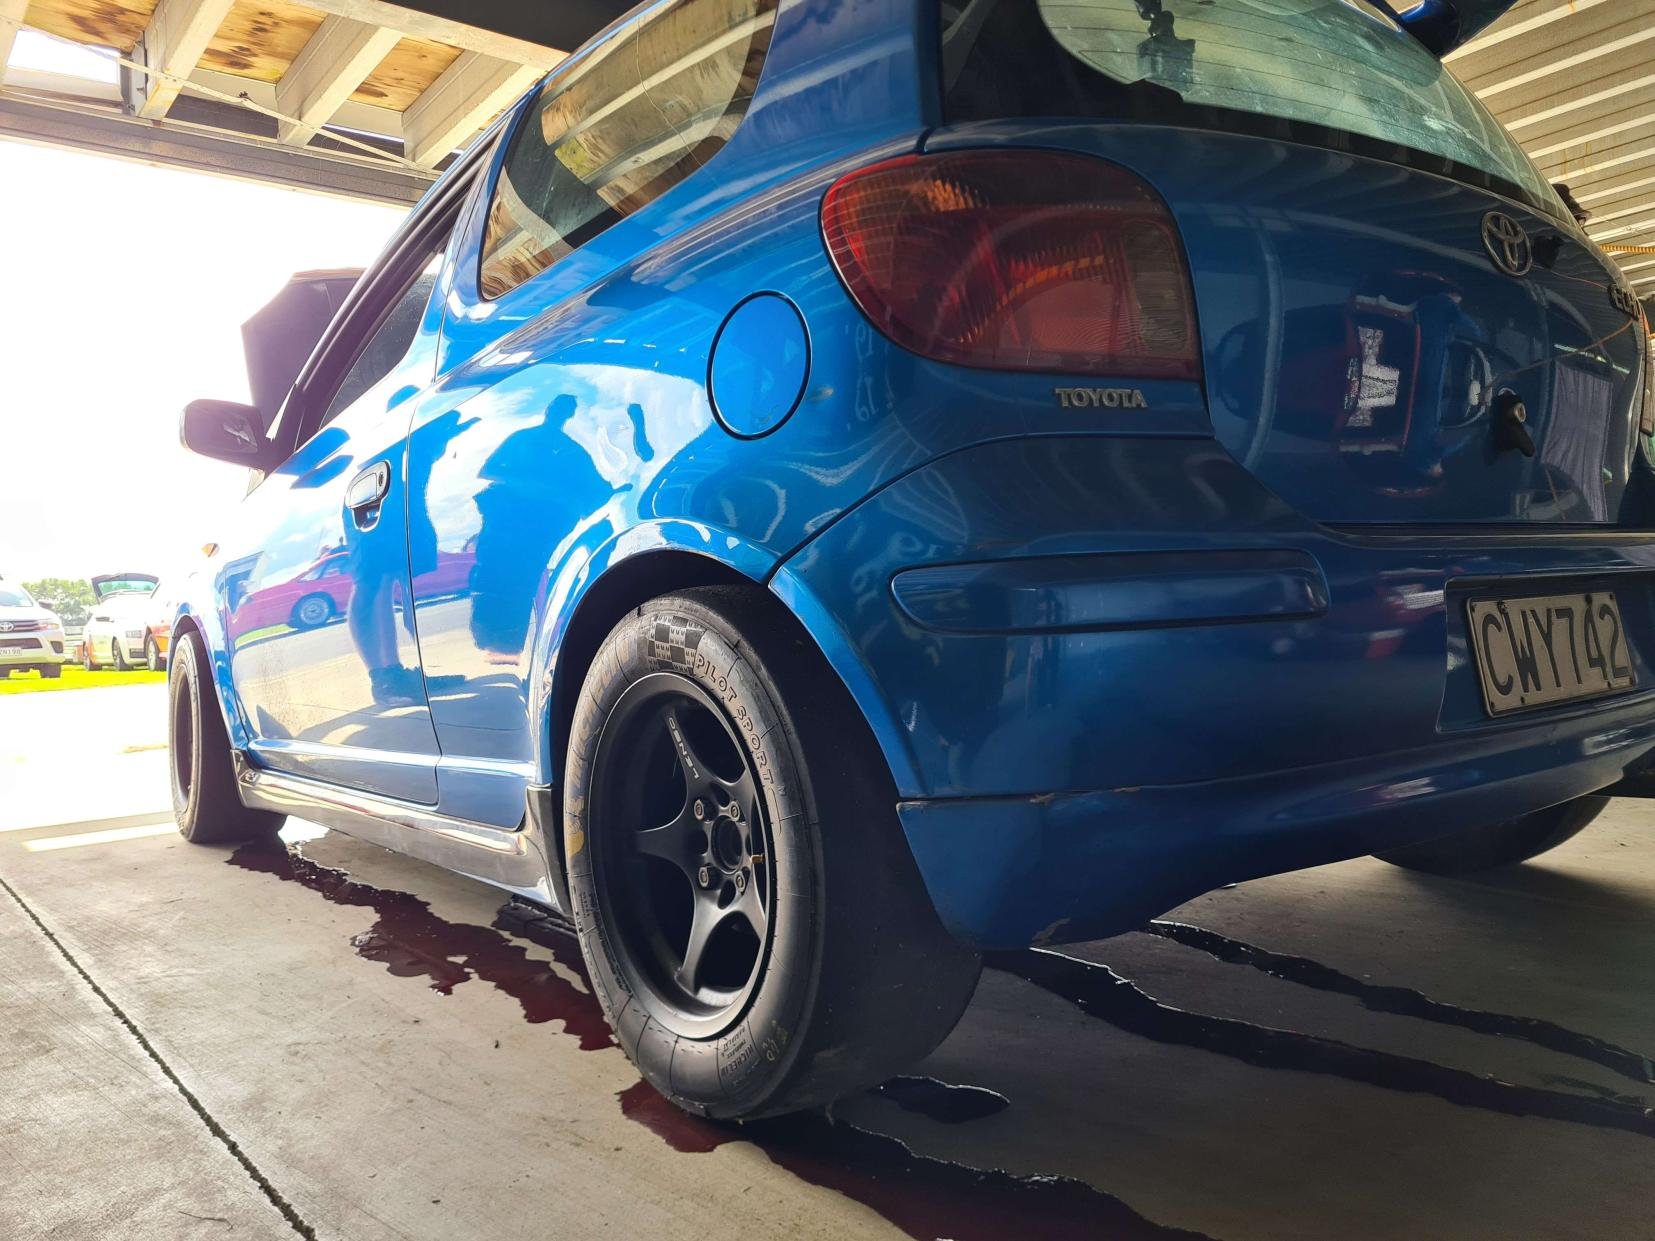
No tyre rubbing at this ride height. How good! Its win win with the small tyres - the effective final drive ratio improves, car gets free slam, and the guard clearance improves as well.
-
Craaappp, and the next one! Bought a ticket to the March event. Might go to 4&rotor day at Hampton.
-
Nah I havent done 10 yet. However there's another one on 28th January. Hoping to get to that. There should be some others before April as well!
-
Very interesting, I'd have thought it would act like a shorter runner if anything - If you were making the air column more dense from the fuel then it you'd imagine that the speed of sound would go up not down. (like how its faster underwater than in air) Maybe its the extra inertia of the fuel that makes it behave like a longer runner rather than the speed of sound stuff.
-
Yes because its a 3 phase motor in it, cant just smoosh voltage into it unfortunately.
-
Thanks! That's an awesome offer. I'll see how my Dad goes for the moment - He's pretty handy with electronics. It's always just that same capacitor that poos itself, even if just making it hot swappable it would 90% fix the problem haha.
-
Yeah i was working to have my digidash finished before trackday but ran out of time. This will give me good visibility of things as well as flash big warnings or whatever. Its always just a capacitor which blows up in the pump. Rest is fine. Have repaired one already. Ive given my Dad my spare pump, and hes going to look at moving the circuitry off the pump itself, so it can be mounted away from the heat and vibrations. This last pump has gone for ages without problems, ever since I left it disconnected from ECU with no speed control. Just running full time. Fitting an aftermarket pump is possible but not preferable, as this is reasonably compact and has the thermostat integrated nicely.
-
Dumb fuck AI doesnt know that echo has a good drag coefficient!
-
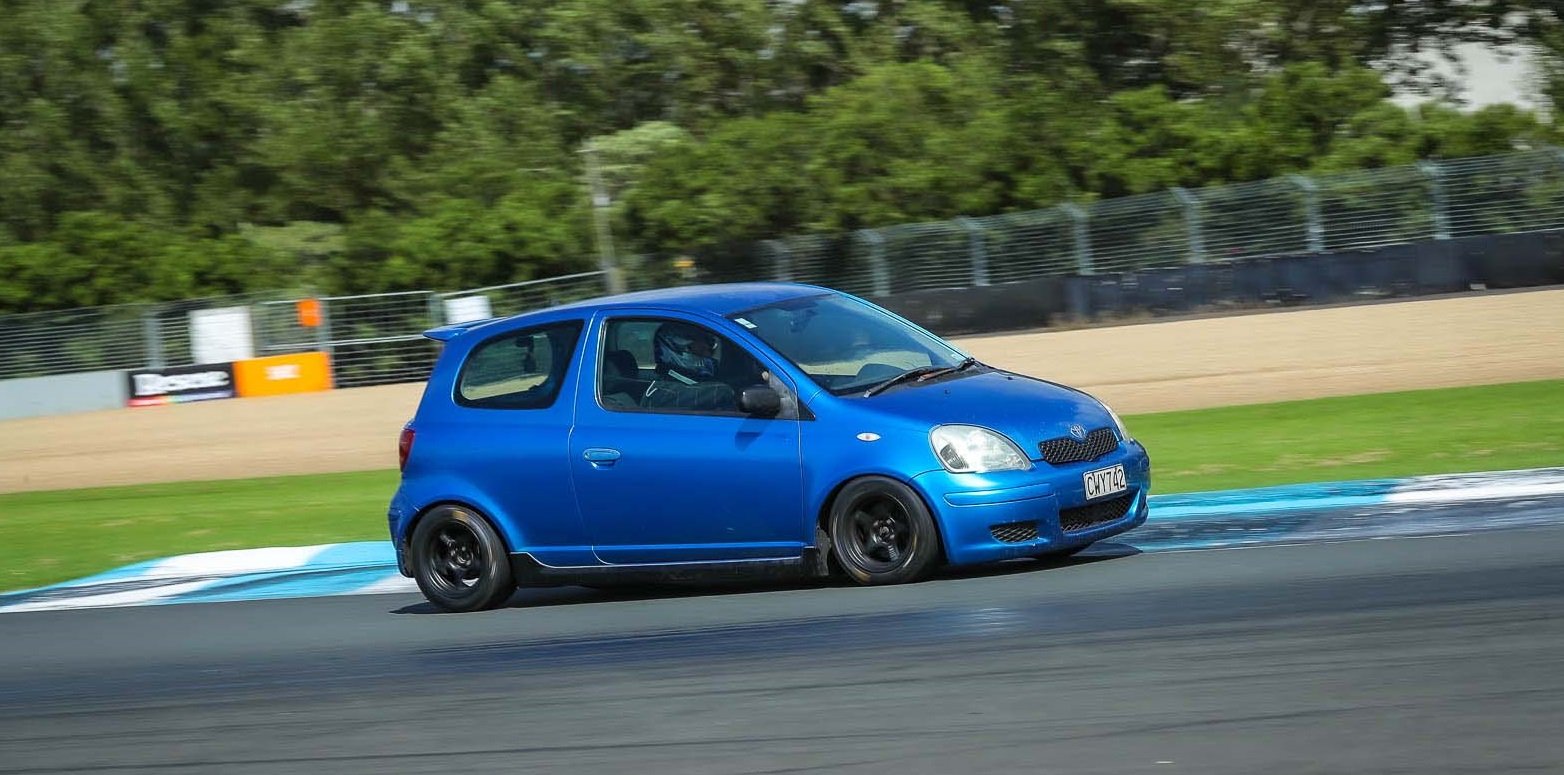
So in terms of recent changes made. New wheel and tyre setup. Absolutely awesome! No rubbing anywhere, no damage to the tyres from scraping guards etc. The tyres themselves were really interesting to drive on. When cornering hard, it didnt feel like the tyre folded over or whatever. But then if I cut near the ripple strips, it was like they just soaked up the bumps. The only run I got was cut in half because someone chooched their car. So I didnt really get the tyres up to full temp either. I suspect they would have been better and better as the day went on. A++ will hoon again! My graduated shifter light setup was inoperable this time so I only had a single shift light that was difficult to see. Since the gearing was effectively different I was sometimes changing into an inappropriate gear and blitzing the limiter a bit more than ideal. But it was cool to notice that it got though the gears a bit quicker. The track was running the chicane so didnt get near 200kph. Fairly impossible to quantifiy any aero changes, when the car felt so different from the tyres. The radiator setup - Much better. The engine temp was staying below 100, still a little hotter than I'd like but not worrying. Definitely keen to get some more seat time once I've figured out a better solution for the waterpump.
-
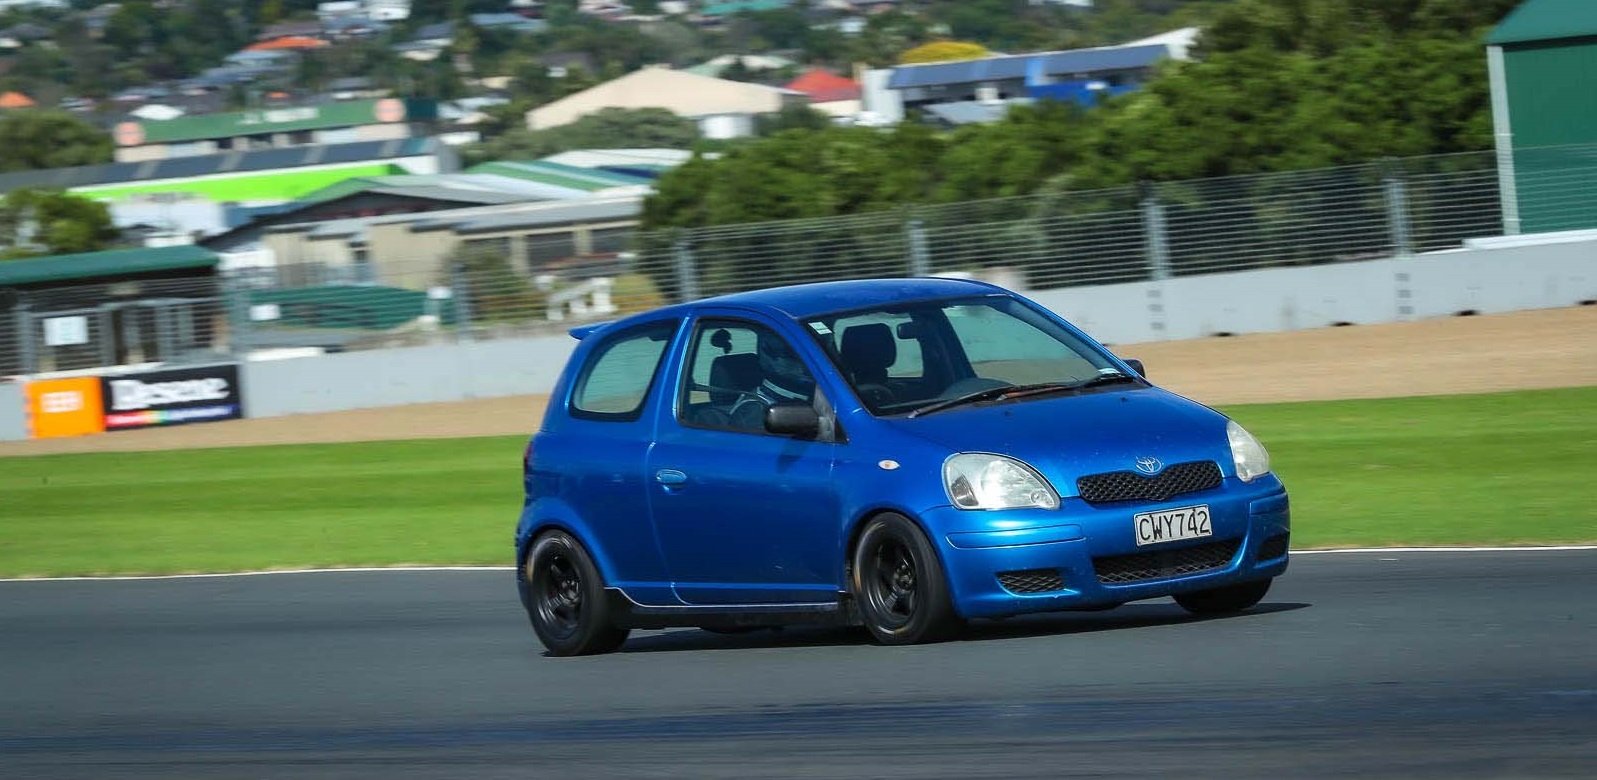
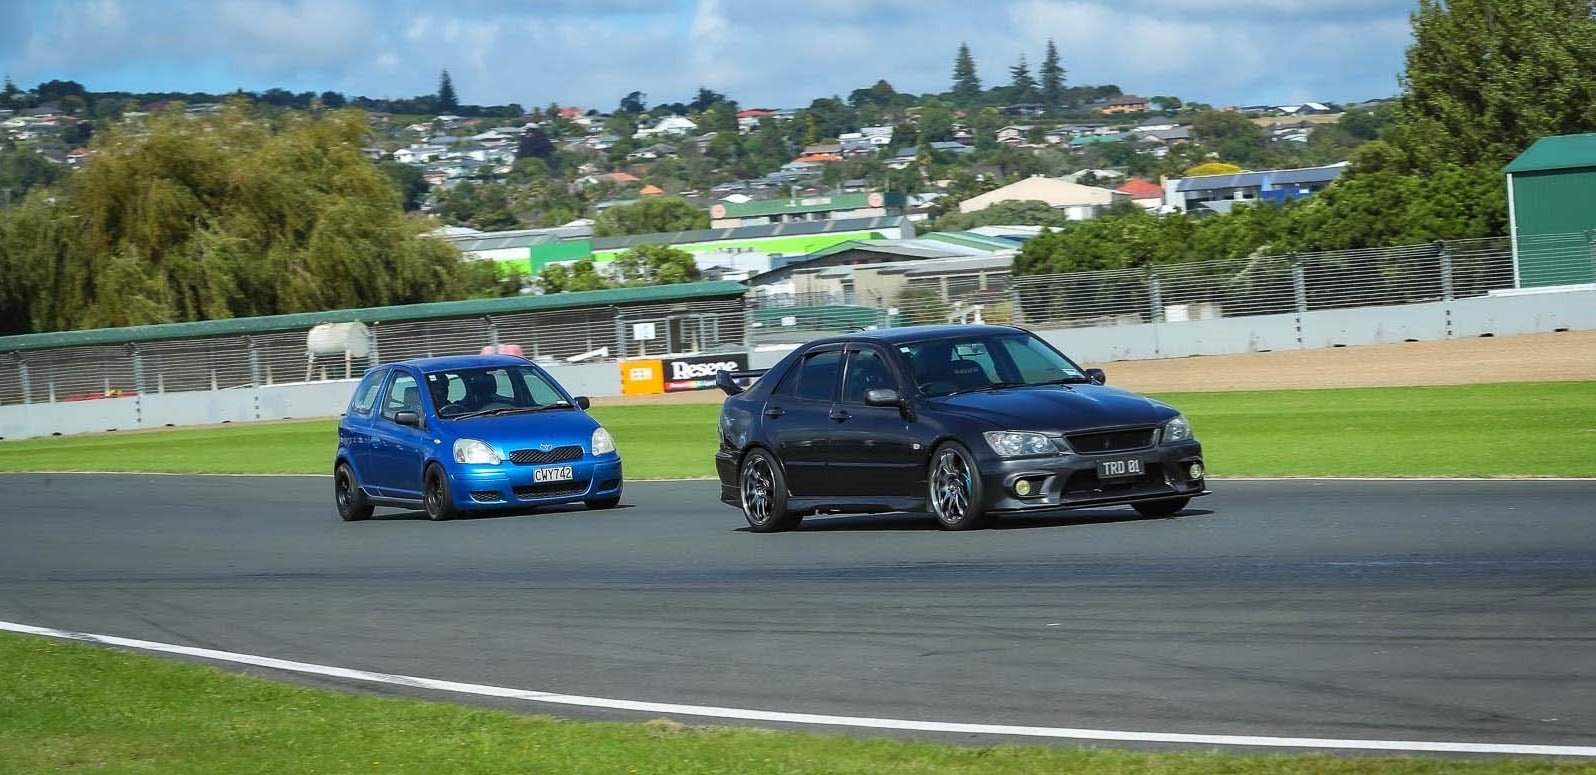
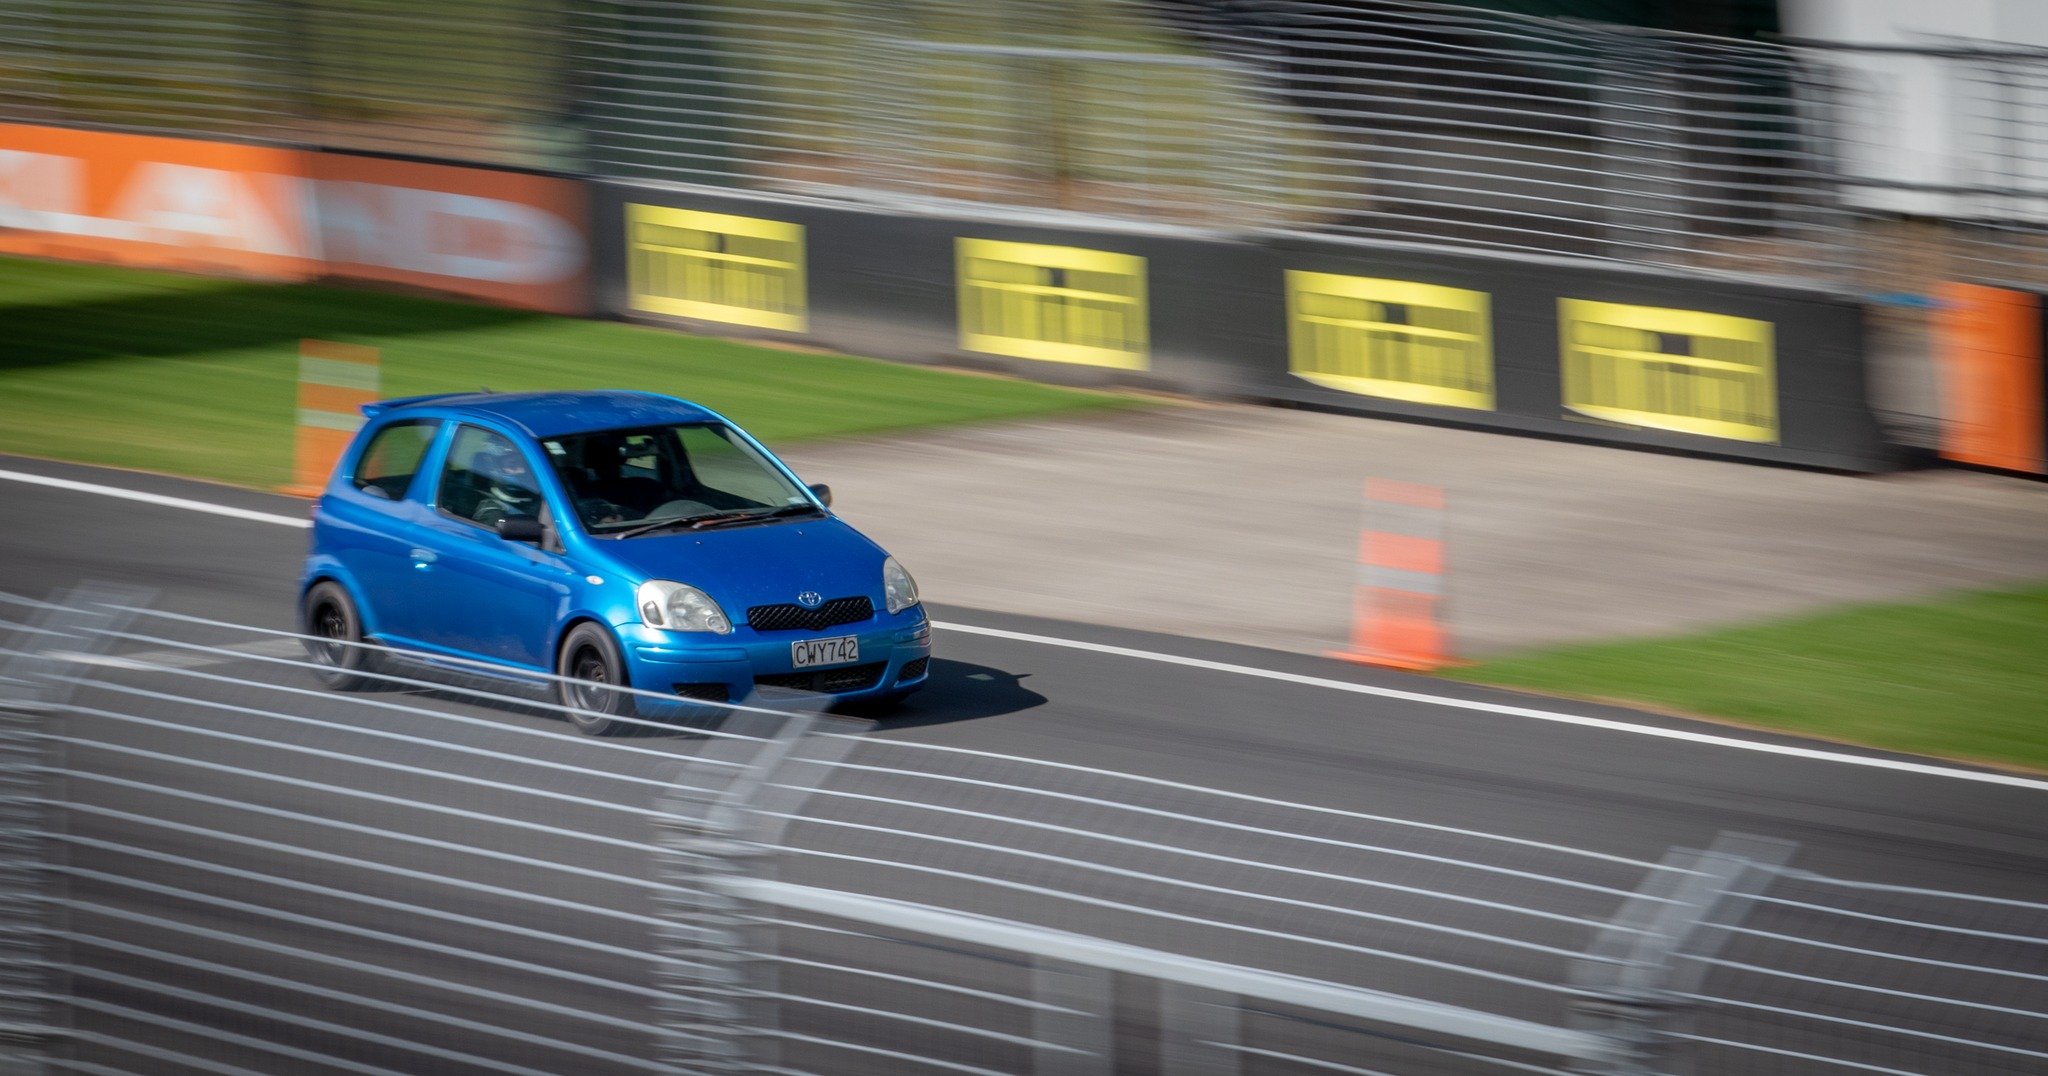
So the stars aligned to get FOUR Echo/vitzes at Pukekohe trackday, haha! How good. All Vitz RS except for my poverty spec Echo. I've got a friend @GaR who I have been doing trackdays with, probably since... 2005 or something? Or earlier? I was at his house the other week, and noticed he had a car trailer Last time I came to Pukekohe I only did 3 out of 6 runs because I was worried about getting home. So I asked if he'd be happy to supply the trailer then we do 3 runs each in the car. Done deal! So he took the car out on the orientation laps, since he'd not had any time driving it yet. Then I had the first proper run. Which unfortunately also ended up also being the last run. It was fine while out on the track, then when I got back to the pits and opened the bonnet, a few seconds later the bottom radiator hose popped off and it bled out in an exceptionally dramatic fashion with the red coolant. Crap. So I figured maybe the bottom hose wasnt on tight enough, so got some more coolant, did it up extra tight, filled it up again. Even while idling motor got up over 100 degrees and temp wasnt coming down. Crap a crap. More troubleshooting, and found that yet again the electric waterpump had shit the bed. I had a spare waterpump with me, but here's the problem - I dont know how or why this issue happens, and I dont have many indicators inside the car to tell me that things are wrong. I decided to pull the pin on it as I didnt want to risk blowing a motor while I dont have particularly good indicators of the coolant temp situation. (My car doesnt even have a water temp gauge, just a light...) As it turns out, another friend who'd come along just to spectate, also brought his mostly standard Vitz RS and it was sitting in the carpark. "Why dont you guys just take that out instead?" I was happy to have had a run in my car, so left it to Gar to take it from there. And he smashed out some absolutely top notch vitzing. This is friggen hilarious: Also the other two cars were out there vitzing their god damn hearts out as well and it was glorious. It was such a cool turn of events after some initial disappointment in the day. Especially since the other 3 cars were reasonably similarly specd. Adam managed to get this shot of my car while it was out, sweet pic. And some doorts on the straight. https://youtube.com/shorts/-vp50GU1XHQ?feature=share
-
Punishing details to follow
-
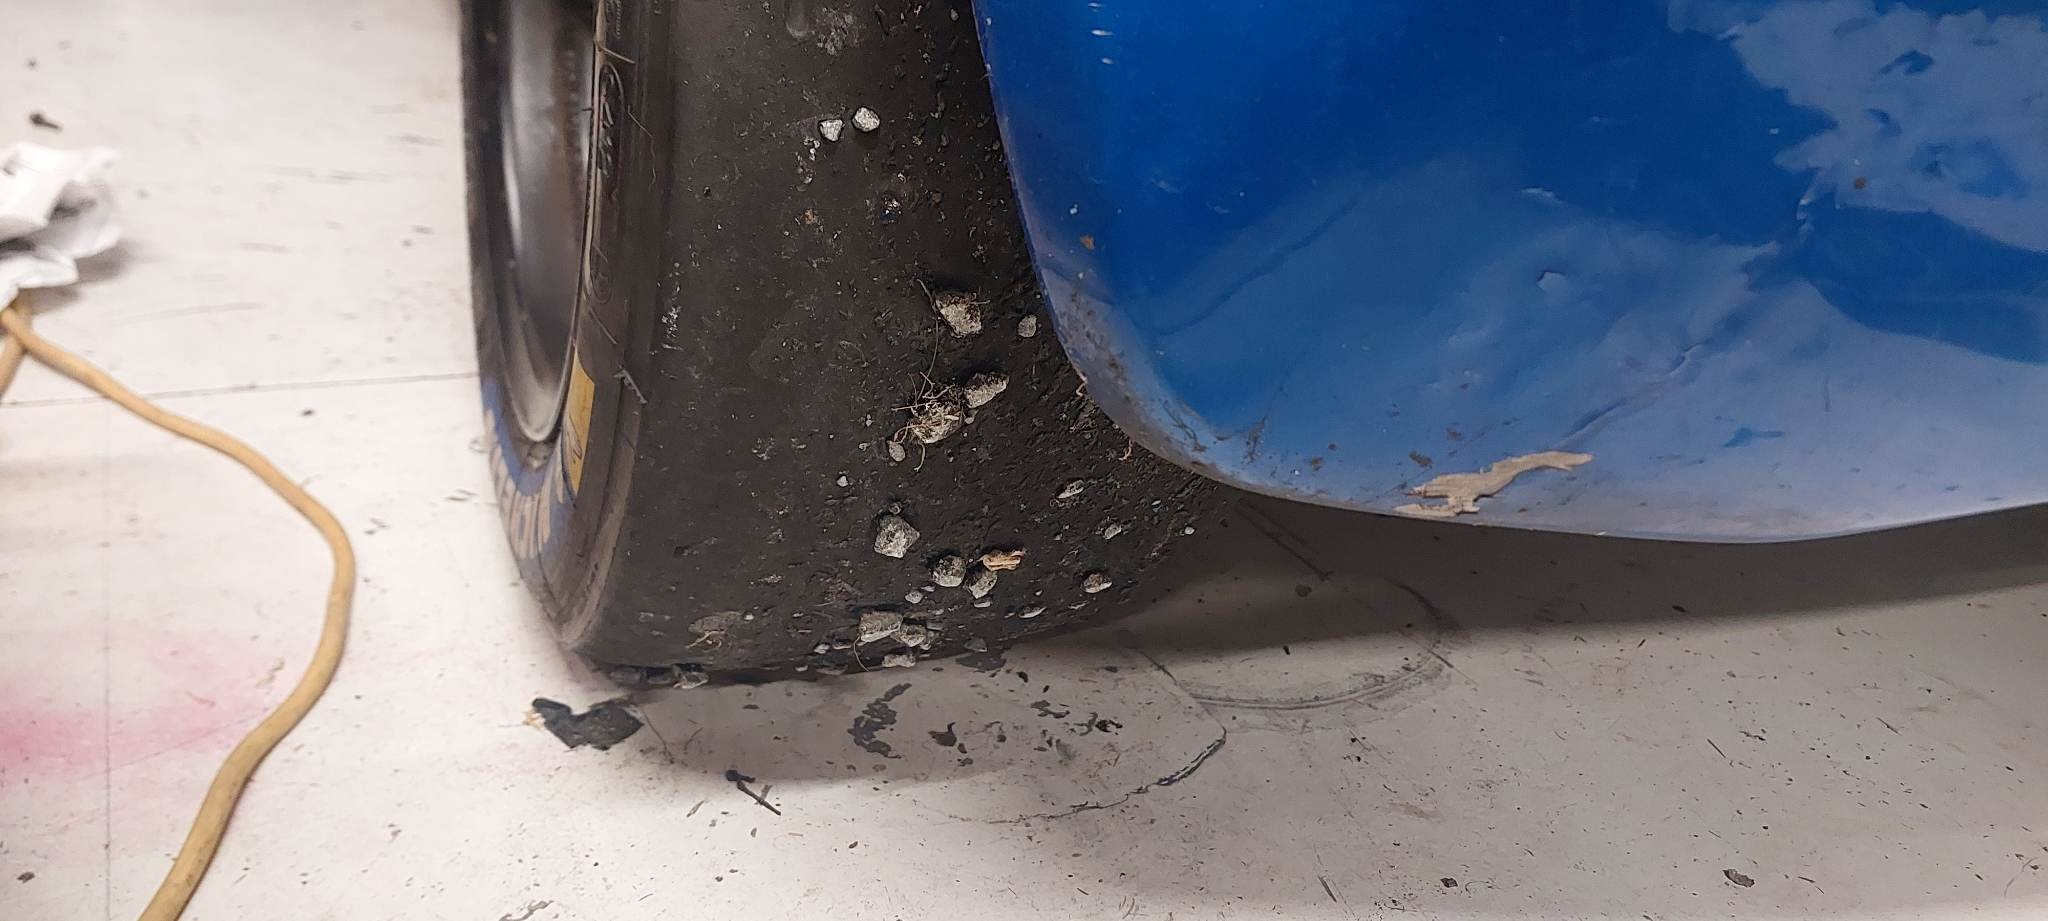
Thanks, I've got all my fingers and toes crossed for the weather to cooperate! There are a few more events after this in coming weeks though, so wont be totally heart broken if the weather doesnt play along. As for grip. Some initial drives around the block to check for rubbing etc. Bringing half the road back with me seems to be a good indicator...