


yoeddynz
-
Posts
19,507 -
Joined
-
Last visited
-
Days Won
158
Everything posted by yoeddynz
-

Discuss here about Yoeddynz's little Imp project...
yoeddynz replied to yoeddynz's topic in Project Discussion
If I'd known all those years ago that Alison Holsts 911 recipe was more far more involved than she'd let on then I'd not have started it. -
Yoeddynzs 1965 Hillman Imp. Dashing about with cowskin.
yoeddynz replied to yoeddynz's topic in Projects and Build Ups
Exhaust box part two, take one. Chasing a more Porschey sound and also move the outlet to the side for less potential fumes being drawn into the cabin when a window is down. I have been studying various classic and modern 911 silencer boxes and decided I'd do my best at replicating the original design which looks like this... I flipped the design so my outlet would be on the drivers side of the car. Ordered some perforated tube online and bought some 1.2mm stainless sheet. The sheet was polished stuff so I had to get this photo before I cut it up... With my old box removed I cut and folded the stainless, extending it back and down a bit for more volume. Machined up some new flanges to suit the existing inlet pipes.. With those welded in place and the inlets bolted up.. ..I checked the box lined straight with the relief on the rear valance.. At this point I stopped taking photos and just built the thing. I had originally wanted to weld it completely using the Tig but access meant I ended up mig welding the interior panels. I figured that as long as the lowest welds were Tigged in stainless I can hope for a bit more longevity than the rusting out mild steel unit that goes behind the Datsun. One photo I did take was of the partition I had fun drilling out many holes in.. So the finished interior ended up like this... I used all of my graphic skills to make these diagrams to 'show the flow' Old straight through box... New baffle box.. I made some more flanges for the tailpipe. Welded one onto the box, where you can also see one of the exhaust hangers.. 2" stainless tailpipe with flange welded on. I can now easily change the tailpipe in size or shape. Box then got a flick of paint, knowing that I'll no doubt be opening it up to change things.. Started it up. Completely different sound as expected. Much more characterful and classic porsche 911 but a bit hollow. Sounds cool when revved up. Took it for a drive and its much quieter with no load on. At just before 3000 there's a resonance. Then again at 5000. Hard to describe but its like the exhaust pulses are matching and it creates a new timbre, like when two voices harmonise. Its almost comical but not what I want. Hannah took some driveby videos that sort of display the sound... Exhaust box part two, take two... We got home and I pulled the box off and cut a slit along the bottom and added a vertical strengthening plate with a folded over edge to hold its shape. This would stiffen up the base which I think was the cause of some of the tinny thrumming... Took it for a hoon and it sounded odd? Got home , removed the box and realised I had almost covered the inlets. Silly boy! Exhaust box part two, take three. I cut some squares out so I could remove the centre strip obscuring the inlets.. I then I realised was also obstructing flow around the 'holey' partition plate. This time I folded up some stainless into a V shape.. It took ages to tig weld in, starting with many tacks. Its not pretty but I figure it cant be seen easily Splashed some more paint on and took it for a hoon. Its much better but still not what I want. I have more ideas but ran out of time. It was now time to pack up the car and head to Blenheim for the big Hospice classic car car. Some alloy flexy tube had a arrived from Chinaexpress so I finished off the passenger side fresh air vent. It works a treat! Inlet here behind the grill.. We took Kevin along for the weekend. I seemed fine with the new exhaust.. Spent the evening at my mums place giving the imp and engine a good clean. Very shiny.. Car show the following morning. I'd made an information board up because there's just too much to explain to folks looking over the conversion.. The conversion was very popular. Always a crowd looking over it. Really positive response and many people I spoke to really appreciated the info board. I caught up with a lot of old hometown friends, many I had not seen in years. Fantastic weather and good coffee carts! The trip each way went perfectly. Cruised with the flow of traffic, had lots of fun on the twisty hills. Filled the tank for each trip and we were really pleasantly surprised that the flat six returned around 7.5L/100km each way!!! (38mpg in old money) I was expecting maybe getting into the 9s. Its such a good cruiser though - that 5th gear really helps and the torque allows the car to stay in it most of the time when cruising. One of my favourite cars at the show was this little thing... More car photos from the show can be seen here...- 121 replies
-
- 46
-

-

-
But my crayon skills are pretty good it must be said. I can even mix colours and get different shades.
-
Imagine the tiny little pens they must use to write those!!!!
-
Gary has cute little paws.
-
This dude makes some amazing models. Well worth checking out his posts. https://www.instagram.com/reel/DG2zbY5i4N-/?igsh=Y2o3YWlwZnB4MnQ4
-
Ahhhhh ok.
-
Does it still start ok with the cam angle sensor unplugged?
-
From what I've read the main issues on either High mileage or service neglected cars are worn timing chains, which means the cam angle sensor sees gets it's signal late and this causes the ecu to throw up codes. Once bad enough the car can become hard to start etc. Common on many cam chain engines though. The cvts should have the oil and filters replaced far more often than what Nissan originally advised. The stock cvt pulley bearings are not japanese items, have a softer hardening so could start to pit, leading to bearing failure (relatively easy and cheap to replace with the box out) The UK cars, as usual from the road salt, can get horrific corrosion. Not an issue here. Also - avoid the 1.4 models. The 1.5 is a much better, more peppy engine. Way nicer for country road driving. The later cvt on the 1.5s is a better unit too.
-
They are sooooo yesterday.
-
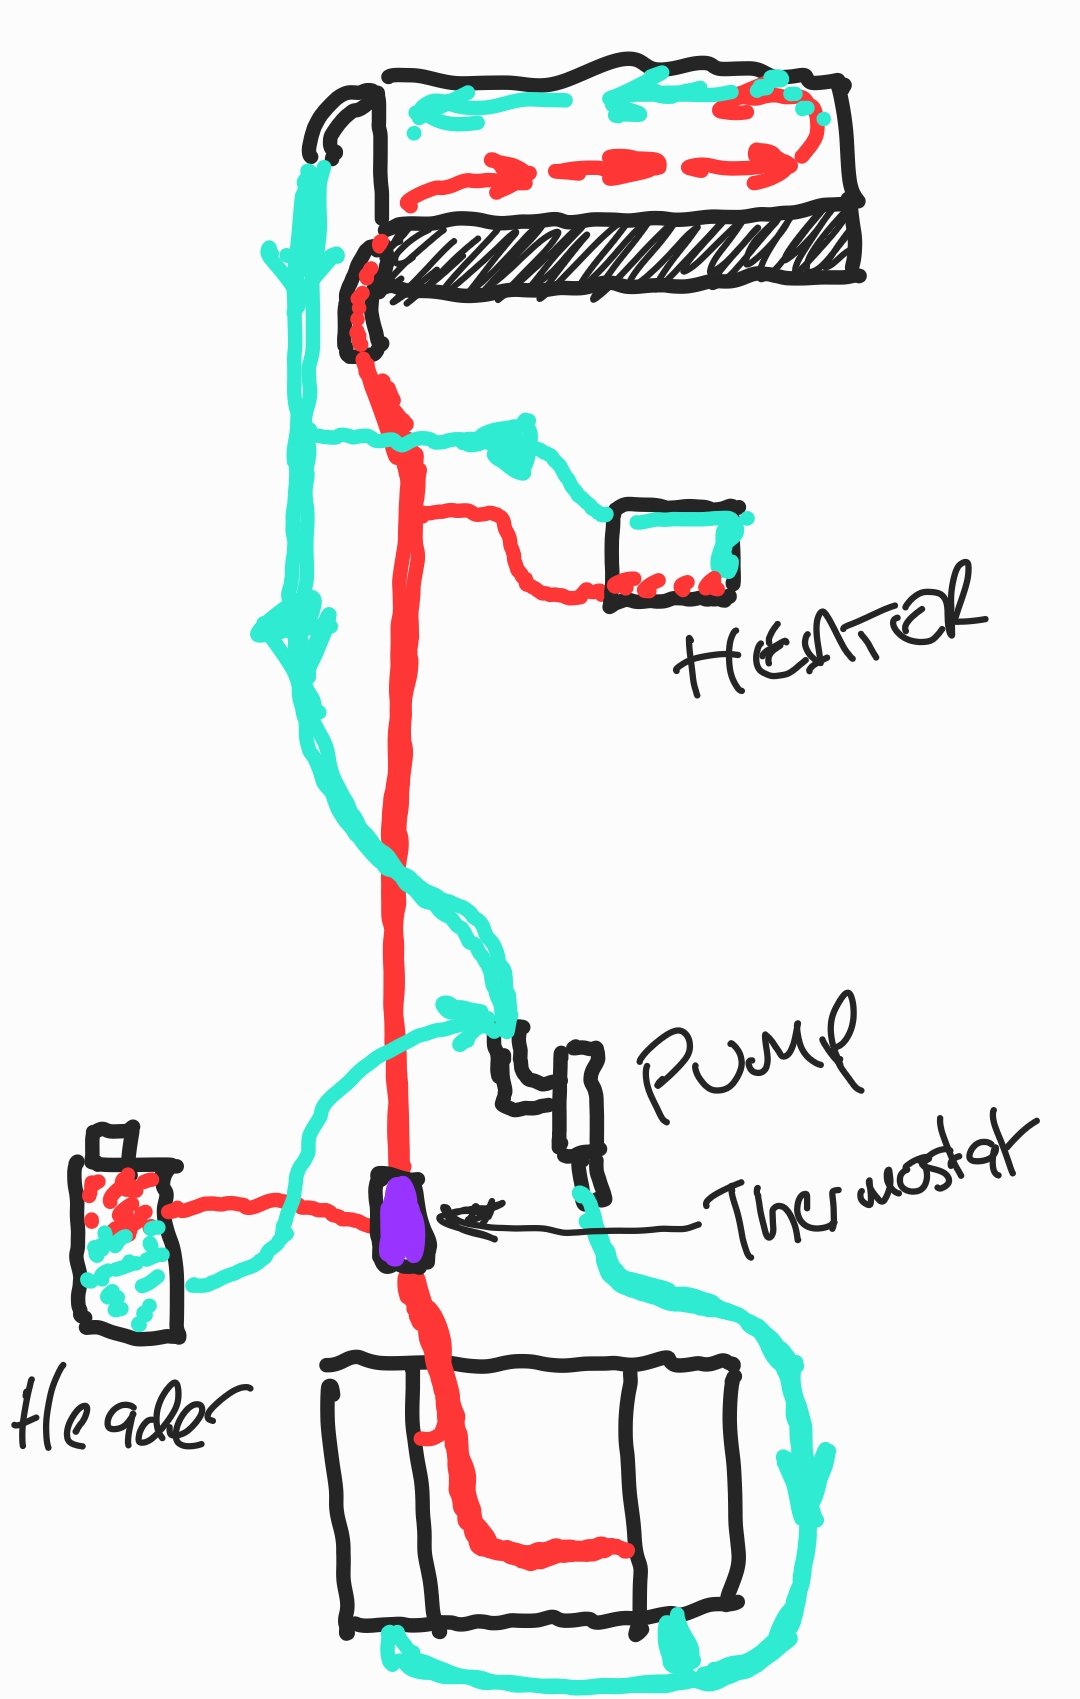
I'd seal off the heater outlets in the block with short bits of hose and bungs. Then up in the frunk you could tee off the main line going to the top of the front radiator for your heater. Mine sends to work fine like this but accept the fact the heater won't pump heat out until the main circuit is flowing hot.
-
@Alfashark I agree. My system has the opposite problem - it has too much cooling so I had to add a thermostat to help the Davies Craig controller to keep temps up. It's pretty simple.

-
@CarolsHusband.... I have no idea if you'll recognise this fella or the context. Or if anyone here will?
-
Your YouTube video comes up as private and I can't view it.
-
I like the fact you've even made a oil puddle stained area under the bearing housing on that winch just like I'd expect to see. Please do a landrover/anything British. You'd have so much fun.
-
That is exceptional weathering! Like seriously. Well done
-
Yoeddynzs 1965 Hillman Imp. Dashing about with cowskin.
yoeddynz replied to yoeddynz's topic in Projects and Build Ups
Still been clocking up the miles on this and its been great fun. almost 2 months since last update. been doing summery things and Hannahs mum has been here the last month so holiday mode all round. As I'd mentioned in the last post there was a cover for the right hand side of engine bay to make. It covers the messy internal panel that has grommit covered holes left over from heater pipes plus a functional, but not very pretty repair section. I made this.. that goes here.. Next up was the sound proofing and fit some carpet. I removed the seats and gave the floors a clean. I'd bought a large roll of self adhesive bitumastic type sound deadening stuff from @Bling ... Quite a fun job cutting out and applying this where ever I felt the panels could 'thrum' or 'ping' from vibrations. I also added it to some other areas where it worked to smooth out factory seams or welds so making the leather covering job to follow easier and neater. I used a mixture of leather and fake leather to cover the inner sills and wheel arches.. The wheel arches are a kind of complex compound curve and couldn't be done with single pieces so I dusted off my 1979 Pafaff sewing machine. With some folded over edges then sewed I was able to make a neater job of anywhere that the coverings overlapped. With a bit of masking tape I carefully applied contact adhesive.. Then started the covering job... I'd bought a roll of automotive carpet quite a few years ago and its been waiting for this moment for a couple of reasons - when I knew there would be no more changes to the floor layout and when I felt confident in my British car to not let any water in. I covered the tunnel first and then made floor mats to suit. The passenger side floor sits higher by about 50mm due to the false floor over the coolant pipe channels. I made the mats over lap and the drivers side was shorter so not to get squished by the pedals. I'd put some vinyl on the floor behind the pedals to neaten that area up. Under the carpets is a firm foam underlay cut to shape. All easily removable for cleaning or work. Sewing time again. I'd bought some heavy cotton in the colour I wanted and cut strips from it. Folded over and double backed then sewed I carefully edged the new mats. Not perfect as it was pretty tricky and I went through a few needles until I honed the method. Happy with the result though! I also made rear mats and a mat for the rear parcel shelf which also got edged. I ended up having just enough carpet to do the lot. Phew! Finished result.. I had a car show to go to. The Moutere Hop. I decided to have another go at removing the Mandalorian windscreen.. Success this time. The foam was squished into more like a double sided tape but a thin butter knife was ideal to slice it through. The windscreen was pretty oily brown from the airborne residue that sneaks through the breather catch can. But it cleaned up great and the screen looked much better. It was super clean inside.. I'll see how long the lid stays clear. I think after the next show I may well remove the Mandos from their role and make a permanent alloy lid. Maybe... I'll see. It is really quite fun seeing peoples reactions upon them spotting the lights and figures. We went to the show. I gave the engine a quick clean.. The car also seemed to have people around the back checking it out whenever we looked. Lots of interest and really nice comments from those I spoke to. I'd scribbled down a basic list of the details and info on some A4 paper that morning at the show and stuck it to the bumper because no one could work out what the engine was from. I think I'll do a better info board before the next show in a few weeks. It was a stinking hot day so we left the show early and went went for a decent swim at the Motueka river. Good way to round off a nice day out..- 121 replies
-
- 51
-
-
I was answering a question on RR forum and posted these figures up to show just how tiny a Z11 is even though it looks chunky. Imp 1525 wide 3580 long 1385 high K11 1590 wide 3695 long 1420 high Z11 1610 wide 3720 long 1625 high
-
Up on the hoist and off with the wheels then out with the struts. As suspected there are no bump stops present at all. Luckily @Slacker_Sam. had some universal items in stock at his work so they were fitted when I swapped the springs out. The Tein springs are I think a 30-35mm drop. I totally forgot to measure the arch height before starting. 1mm thicker steel on the fronts and the backs have a progressive design. Fronts... The rear springs are like a 5 min job to swap over! Gave the original Cube alloys a clean up. Was just brake dust. I used turps which worked but required some effort. Is there a better product that does not risk the paint? Underside of the car is in excellent condition. Happy about that because I really didn't know what it might be like. Sprayed a bit of black 'new car in a can' about on anything with a bit of surface rust and then off the hoist for a test drive. Much better ride. I suspect mainly the 60 series tyres. Certainly its a bit more 'shuffly' on the corners with the higher profile tyres but for what it is its fine. I might get some more struts so I can fit the Teins to them, with bump stops and can then easily swap between springs. It actually doesn't sit as high as I expected on the standard springs though. The bit I want to change is the rear wheel offset. They could come out say another 10mm for a nicer flush look. They sit in further than the fronts do. But it would require longer studs to space the rears. So its all looking pretty clean and sparkly now. It'll probably never be this clean again so I took the opportunity to get some photos this evening.. I'm really quite keen on some side stripes to break up the slab-sidedness actually so I'll nut out some ideas I think.
- 86 replies
-
- 15
-
-
-
Very thin steel too eh! With what seems to be a token this amount of grey primer I think its from leaking windscreens and the water runs along under that seam. I have had an Rx7 Fd in and that had faired not much better either in the same place.
-
Random slightly cool stuff you built but not worth its own thread, thread
yoeddynz replied to h4nd's topic in Other Projects
Haha- that was left over from when my Dad died (It was never used). Mum was going to throw it out but I thought it would be handy and its bloody perfect for doing oil changes! -
That does ring a bell actually. I do remember how the rust on several just tracks along the inner sill above the floor and quite a lot has to be removed to get to the inner bits. Here's some pics from two different gtrs. The rust was just the tip of iceberg. @sidewaysickness does your sister still have her gtr?
-
This will be fun to follow. I have had a couple of these through my workshop, plus some of the lesser models, where I've done pre-vin welding work. They do love to rust it seems. Some of the chassis rail/sill/floor damage from forklifts is crazy given the value of them. Fella reckoned the prices sailed when they became eligible to be imported into the US as classics? Its funny working on them - just very typical nissan construction of the time.
-
Random slightly cool stuff you built but not worth its own thread, thread
yoeddynz replied to h4nd's topic in Other Projects
Also removed all the silly safety stickers it was plastered with due to being mainly sold in USA.. Can now tow it up to the next 3 wood sheds further up that are located near the pines we want to fell.


.jpg.d9ec4fb8de8c976f0b74756aac7f8ce1.jpg)
.jpg.b9bb0f3ff3f130cbf001d1b7841b6b21.jpg)
.jpg.025cfa315197ab52670d593defe7a17e.jpg)
.jpg.46e8ab38034e347f10a7a72d70f854b1.jpg)
.jpg.feb87e273134728d74e94fa3f1eec543.jpg)