

BLIZZO
-
Posts
1144 -
Joined
-
Last visited
Posts posted by BLIZZO
-
-
yea im def coming to this, fizzing and once again will be on a different bike for the 4th time in a row. im building a little 1983 xl100s, with shortened forks, 18" rear wheel, Cg110 tank and xr200 donk. currently trying to make it not look like shit
-
 5
5
-
 1
1
-
-
- Popular Post
- Popular Post
sooooo have hard a good push on this old girl to get it sorted well in time for the brass monkey in May. I dont want to be embarking on a 3000km journey on a super fresh build.

One of the many problems i have in this tidy up is super thick grot yellow paint. I did some research and the plastic used in these fairings is ABS. i did some more research on how to chemically strip paint from ABS plastic and many places suggested brake fluid. Believing the internet i tried this on one side fairing and yea sure enough, it bubbled the paint and didnt seam to harm the plastic, so i tried a little more and stripped the entire piece, then bang, like 4 massive cracks in that one bit that i just put brake fluid on. sooooooo, more research and yes, brake fluid upon contact with ABS plastic causes catalytic embrittlement and internal stresses in the formed plastic part make it crack like fuck. gutted. at least its fixable, the whole part will now be more brittle but hey, ill try to always drop it on the right hand side. So that brings me to the next stage of repair, plastic welding.
For those that know me, know that I'm fucking jewish. not the fun kind of jewish with the funny little hats and nipple tassles on my forehead, but the kind that hates giving away my hard earned shillings and six pence.
I decided commercial plastic welding was too spendy, and these guards have heaps of plastic weld repairs on them already, like a fuck tonne, i dont know why exactly, but its probably got something to do with this photo the previous owner sent me:
actually, its because it got ridden into the side of a garage, then written off, repaired, and re complied, but that photo is too good not to share.
so i found a really handy hint on the interwebs, poor mans plastic welding. Lego is made of ABS, the same material as the fairings, and ABS melts like fuck in acetone. So take a $6 blue lego duck and jam it in some acetone:
mmm lego slurry. just add more lego or acetone to get the consistency right, similar to golden syrup is bang on. then just V out the cracks and dab in the slurry. the acetone in the slurry instantly starts eating / bonding to the ABS in the fairing and makes a super strong bond, like full on two become one Gerri Halliwell show me ya tits bond
i have found the best way to do it, similar to bogging, is to layer it up with thin layers, doing 2 layers to fill a crack. it shrinks a bit and forms a skin as it dries which makes the middle take way longer to dry, so thinner the better. it also gets quite a few air bubbles if you slap it on too quick. Its also handy for making entire new pieces and tabs and shit, took a bit of progress but got there in the end:
So yea, just chipping away at that.
Have also got the plugs almost sorted for the side covers, foam plug is finished and then layered with one layer of woven mat. I'm currently bogging these up to get to the desired finish before I prime and then lay a mold off it.
Simply fizzing and the bung to see this thing come together and be a full on adventure barry.
-
22
-
1
-
- Popular Post
- Popular Post
In my attempt to make the africa twin look nice again i have been playing with / teaching myself how to fibreglass. the RD04 was missing the stock tail section and side panels, of which are stupid money to aquire, so i wanted to make some that look alright and also make the bike slimmer than the stock once so panniers arent too wide. I watched a few youtube vids on how to make plugs / molds / lay up glass then headed down to a local composites workshop and had some sweet yarns with the barry that owned it who preceded to sell me all the bits i need, worked out so much cheaper than buying smaller kits.
first up i needed to make a tail section, so i could then have that piece finished to make sure the side panels fit up to the tail nicely, and its the smallest piece so probably the best bit to learn on.
first up i brought a sheet of XPS foam from bunnings, this stuff is pretty cheap and being closed cell sands nicely to get the shape of your plug. bit of mucking around and i got this-
Next up was to lay one coat of fibreglass cloth over it. Please note that you need to use epoxy resin for this, not polyester as it will eat the foam.
The reason for the tin layer of fibreglass is so you dont accidentally sand though the bog process and muck up the shape of your plug. once that i set i covered the entire plug in about 3mm of body filler/bog and left to cure. once cured i sanded it down to a nice finish. next step was to spray a coat of dark etch primer onto it, as seen in the photo below, once the etch primer was on i brushed on 3 thick coats of high build thinner primer. this gives a good surface to sand back to an immaculate finish. the reason for the dark etch primer is it lets you know when you are sanding though the primer filler before getting to the bog.
sorry i didnt get a photo of the high build primer filler.
once the primer filler is left as your final surface, i rubbed on and let cure 3-4 coats of release wax, and then brushed on a thin layer of PVA, pretty much a special PVA glue that helps release the mould from the plug, the fibeglass barry reccomended this stuff and it sure makes life easier. once the plug is all ready i brushed on 2 thick coats of gel coat, this was the first one that was too thin, around 2mm is ideal.
after the gel coat i built up two layers of chop strant matt using polyester resin. this gives the mold which when released looks like this, the plug got a bit stuck and damaged in the process here.
Once i had the mold i then repeated the process of wax / PVA / gelcoat and then layed up a final piece using a layer of cloth, 2 layers of chop strand mat and then another layer of cloth. once popped out the final product looks like this
im pretty happy for my first try, next time i will use a lighter grade chop strand matt for the mold, i used too heavy of mat and there was airbubbles present between the gelcoat and glass which made this defect, but i will give it a sand back and paint anyway.
with the right practice and finesse, you can easily get a part that pops out as a finished product, but man it sinks up some time.
Just had this sweet little XR style tail light turn up that will get mounted on this guard
next up is the side panels, the blank cutout is shown here but there is lots of shaping to go on still to make it look good.
-
17
-
- Popular Post
- Popular Post
a wee while since the last Blizzshop update as i havent been up to too much other than work and painting the bloody house. Had great fun for a wee bit on the wee GP from above then promptly sold that on for some good coin. Have a new small bike project replacing it which i will put some info up about when i pick up the rest of the bits later this week.
I have been getting over staring at one of my favorite bikes i own that is by far also the ugliest bike I own, so i have started de-uglyfying it. The grot rattle can canary yellow RD04 XRV750 Africa twin is yellow no more.
previous photo for reference lawl
So first up I stripped it down, paint stripped the Fuel tank, etch primed it and started bogging up some dents, still got some more work there to go. The only mechanical issue the bike had was being very hard to start from cold. When not used often these bikes have a notorious habit in which the choke plungers get jammed on (enriched). I dont know what happened to this one but one plunger was disconnected and some numpty had jizzed half a tube of RTV down the plunger hole to block it, after picking most of that out i found a partially drilled out and extraction attempt of a now mangled choke plunger. Unfortunately for me the idiot mangled the wall of the carb while drilling it out, so the carbs are now junk. $400 later i landed a new set from Austria. Fun fact, the rear carb runs a richer main jet than the front carb to compensate for the hotter running temps of the rear cylinder in the V formation, i wonder how potatoes get around this issue with only sucking from one carb, but then again they probably dont go fast enough to get airspeed to cool the front cylinder.
Anyway, the replacement carb has slightly richer getting than my factory one (118/122 opposed to my one at 115/118) on doing research the richer jetting is stock for this model of bike. I will run it like that anyway as mine was a bit lean with the straight through muffler on it. so hopefully that all fixes the starting issue.
Next on the agenda is to sort out the horrendous lack of side covers are i threw the even more horrendous checker plate in the trash. I borrowed some RD07 later model side panels but didnt like how they fit, especially once they will be painted white so am going to pick up some XPS foam and have a crack at making my own fibreglass plug / mould / glass side covers which will be a fun project as i haven't worked with glass before. i have a sweet little tail section on the way which will get rid of the big monstrosity thats on there are the moment and i also got some lush as frig but slightly damaged adventure spec soft cordura panniers for cheap. These are currently with @64valiant getting some repairs done, once thats sorted ill make up some racks to hand them from this thing.
Plans at this stage is to finish this body work, repair the cracks in the front fairings and then paint it all white and get the lads a watermark to do some sweet rothmans livery. will re do the dash setup and make a few other small changes but wont dig too deep. once this is all done ill ride it for a year and then probs fully strip and powdercoat the frame and do all the bearings and shocks and stuff. oh also need to do a preventative mod to the fuel pump. These things have a small mitsi fuel pump to supply fuel when the level drops below carb level (about 1/4 tank) and the points are notorious for welding themselves together. There is a wee mod to add a diode into the pump which through electrical magic reduces this sparking and stops the pumps from clagging out all the time.
Looking forward for some adventure times
-
12
-
1
-
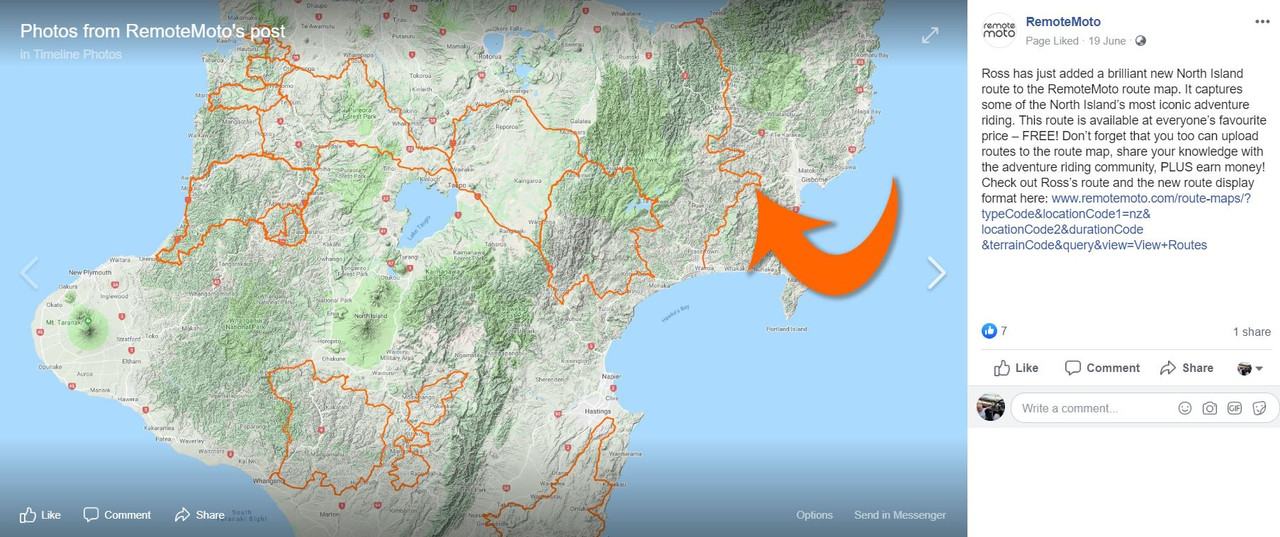
Hey Team, JB gave me a rough outline of the track, i converted it to a route and then re converted back to a track so it hugs the roads we will be going on exactly. Ill have a garmin 64s on my bike displaying this incase people get lost but if anyone else has some form of garmin GPS and wants to know where we are going each day download the GPX file from my dropbox in the link below and just chuck it in ghee (to your device).
https://www.dropbox.com/s/l5aoqezgsao409k/Te Uruwera ride.gpx?dl=0
Captain bliz
-
4
-
-
2 minutes ago, chris r said:
Just keep riding it and let it burn off tbh
its 500ml of gearbox oil, not 2 stroke oil, it doesnt burn off, just gets brunt down into a tacky shitty mess that gums everything up, plus would fill my pipe with shit. im pretty hori, but not thaaaaat hori. If it was 2t oil / petrol yea id just smokescreen until its gone.
-
1
-
 1
1
-
-
sooooo speaking of white smoke ive learnt a timely lesson today. When you go to replace crank seals in a 2-stroke dont be a jew and go to your seal supplier and get a normal rotary seal. normal seals are designed to keep oil in on the inside (spring side), whereas crank seals are a 2 way design and designed to keep induction pressure on the inside, and gearbag oil on the outside. rebuilt bike, filled gearbox oil with 800mls of Motuls finest, went for a 2 km ride, couldnt see the road behind me, had boomers in my fancy suburb yelling at me whilst walking their little designer dogs, quickly realised something was wrong, got home, drained gearbag oil, only 300ml came out.
aside from fitting genuine crank seals, i now either need to tip my entire bike upside down or take engine out and tip that upside down to get rid of all this bloody oil ha
-
4
-
2
-
 3
3
-
-
This is the motu road, its even narrower and very rough in parts. these are very small bikes. i would not be driving a full width car trailer through it, i also would not be driving a bidd ass f150 through it
-
5
-
1
-
-
4 hours ago, anglia4 said:
Dad is planning to bring his F150, we are hoping to be able to have room on the back to pick up 2 broken bikes. Its a 6 seater.
Trying to avoid a trailer if we have enough room just to make it a bit easier to get out of the way of "Young Brody in his venerable bush Hilux"
We will do a trial pack this week and see how much space we've got.
i would probs strongly not reccomend not bringing an F150, the motu road is incredible narrow in places, this thing would just be a burden, if we met cars coming the other way (which we always do, as rememeber this is a public road) you will have to back up for miles, and with this many bikes would just be a giant clusterfuck
-
1
-
1
-
-
- Popular Post
PPSC shakedown run went alright yesterday, i loaded up with gear just to make sure it stayed on the bike, great success. Ridge road - Apiti pub - pohangina loop from palmy. Bikes were neck and neck matched.
Mine was rich, couldnt figure out why, pulled carb apart one more time and whilst doing so found a rag jammed in the piece of the casing that connects the carb housing to the airbox from when i paint stripped the engine. that explains it being flat as hell until 8000rpms
Gr8 success
-
12
-
1
-
2
-
fuck why dont we just camp there haha
-
2
-
-
fucking glad im going self sufficient TBH, how many support wags we got this year? im thinking we are gunna need 2 again for sure lawl
-
just make sure you put your donation in the honesty box. Don't want to anger the locals,
-
3
-
-
PPSC this year are all gunna be fully self sufficient. Im sorted for luggage, got a sweet 40l motorcycle drybag off aliexpress. this fits my small new kathmandu singleman tent and thermarest, small sleeping bag and i have put 2 motorcycle jackets and some motorcycle pants in here to get an idea of what extra room i have in the bag, should be plenty.
The tail section of the bike has a small compartment that holds my spare tube and puncture repair kit, and the factory tool holder has most of my tools with a few extras to go in the tank bag.
Tank bag will hold my wet weather onesie, tools, camp cooker and food as well as a few tools. Its pretty big.
Just need to figure out where i put my booze.
-
2
-
1
-
-
- Popular Post
- Popular Post
So this bad boy is all finished just in time for DGR, had a pretty lush day filled with a few ales and some quality @My name is Russell banter.
tried to find some penguins to club, couldnt, so got a photo instead
when i got home i packed my tent, themarest, sleeping bag and a shit load of clothes into my 40l bag to see how it will sit for east cape, perfect. Gunna be lush to be 100% self sufficient this year
yea rad
-
14
-
1
-
couply hours in the shed and the GP looks like a bike again, should be doing ring dings again later tonight if i can get an hour or two in the shed once the kids are in bed. Tight timeline for DGR but gunna make it!
-
9
-
-
- Popular Post
- Popular Post
oh oh oh i forgot the coolest part. Had our resident PPSC pinstriper do some subtle tank art for it.
PENNY PINCHERS SCOOTER CLUB BUY FOR CHEAPS SELL FOR HEAPS
-
16
-
sooo we moved into our new pad. i sorta half unpacked my shed and then got the itch to do something motorcycle related. Im taking the GP125 on the Te Uruwera ride, and decided to use it on DGR also, so what better idea is there to completley strip it down 2 weeks before DGR and then have it sandblasted and powdercoated right?
bai felicia
Got it back from the blasters yesterday and took it straight to powdercoaters after i put sacrificial bolts into all the threads. Hes gunna have it ready next monday maybe so might have to take a day off work next week to smash it together before DGR. Gave the cylinder and head a lick of paint and scraped back the ends of the fins while I was at it.
I had all the bits for the '82 Z50R sandblasted at the same time so i can start restoring that for the young fulla now too, excite.
-
9
-
-
@Tumeke i got the last 241 in 18" off richard, but im only running it on the fron as they chew out pretty quick on the rear. I brought this shinko 244 (far right) for the GP for this ride, its 18x3.00 but then i stumbled upon the NOS 18x3.00 trials tyre (on the left) which im gunna run in the interest of period correctness. Those 244's are available in a heap of sizes and are good tyres, i run them on my XR. can probs sell you that one if ya want as i likely wont use it now but probs easier for you to grab one local.
-
3
-
1
-
-
KIA ORA WHANAU, MY NAME IS BLIZZO AND I AM THE SON OF BIZZO AND THIS IS MY PICTURE
I WILL BE RINGING AND DINGING ON THIS LOVELY WEE GAY PENIS 125 APTLY NAME "THE RELIEVER", IN BETWEEN THE RINGS AND THE DINGS THERE WILL BE SOME OCCASIONAL DARTS BEING CHOOCHED AND BRIAN LOWNS BEING SUNK.'
WATCH OUT ON THE MOTU COS I WILL FUCK YOU UP UNLESS THERE IS A BOYLE THERE AGAIN ON A BIG BLOCK
TA
-
5
-
2
-
-
On 08/08/2019 at 14:49, TimShadboltfan27 said:
had a new one to go in but it was in there quite loosely, i will strip it down once again and double check everything.
if its anything like the GP removable needle seat there should be a tiny o-ring around the seat that holds it in snug when it goes in, the replacement carb i got didnt have one on it and did massive dinosaur wees until i realised why
-
30 minutes ago, My name is Russell said:
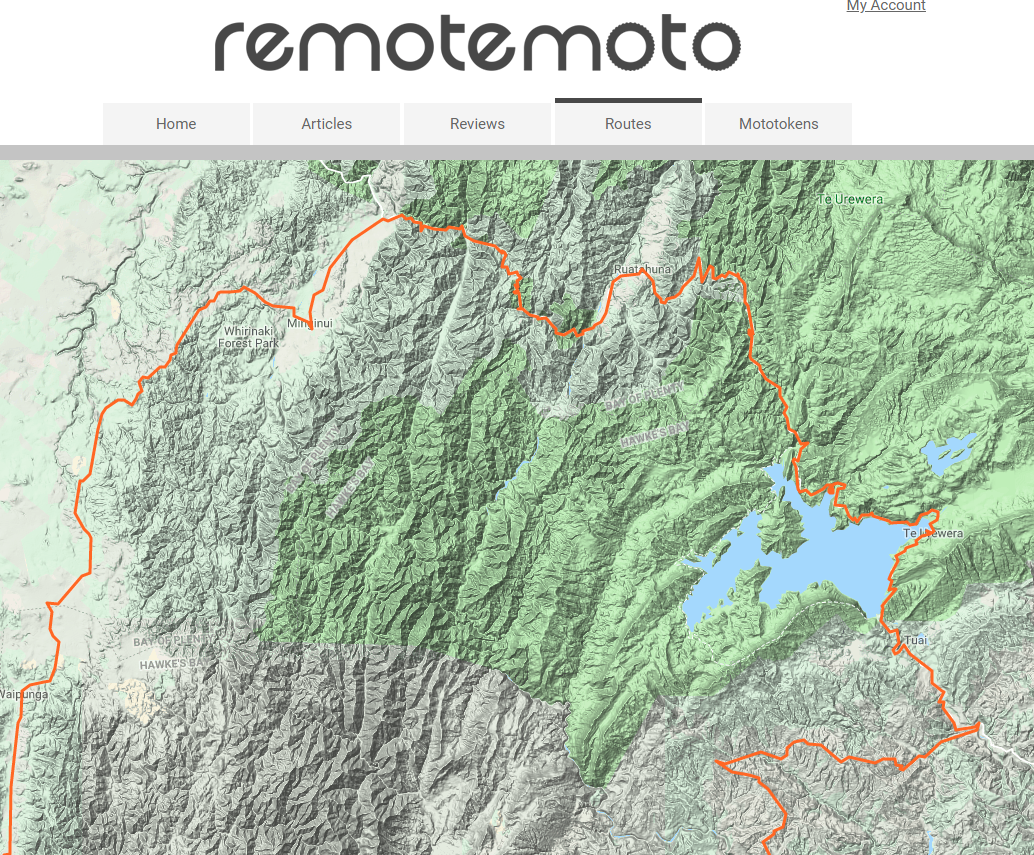
ive talked to J5 about these, they have also added a waikaremoana loop which uses some of the roads we will be on. it confirms there is Fuel at ruatahuna hald way on the first day as well as at waikaremoana too
-
2
-
1
-
-
- Popular Post
- Popular Post
well i was planning on taking the trombone to this years east cape ride (te uruwera) but this wee gem of a GP125 popping up on trademe for a bloody good price, with reg on hold, and after hearing @TimShadboltfan27 harp on like a barry at a sandal convention about how hard the go for that they iz i thought id grab it.
first trap for young players was this hilariously added throttle governing screw that has been added and was wound right in. dude never told me about it and i couldn't figure out why it was slow, turns out it was a riding school bike and they had to limit them to stop dweebs hurting themselfs, not a problem that they have with GN125s anymore id think.
so this was the slide height at full throttle with the governing screw in
also note that dimple on the slide, as it turns out when that circle touches the top of the carb opening as it is in this position, is where you set the CCI oil pump to meter is max amount of oil using the lines on the pump arm and pump body.
so once i had that sorted it still didnt run to good, so i whipped the air filter out which fell to bits and had all solidified so that wasnt helping, i order a sheet to make a new one. i also whipped the baffle out of the exhaust which was like 90% blocked, and with the baffle out you can see here that the muffler is almost half full with scum and oil from 30 odd years of putt putting between cones
so hopefully this weekend it will be back together and close to its original claimed HP of 15 wild wild smokey horses.
should be nice and comfortable for east cape, the tank itself being 10l should be enough for any fuel distance we will require so wont need to carry extra, and will run this tank back and just a small 20l dry bag strapped to the back. looks like i might be taking a bivvy to sleep in too as the cabins at waikaremoana are all booked.
then its just sorting tyres, stock tyre size is a bit better than most small bikes with 300-18 on the rear and 275-18 on the from. i grabbed one 300-18 shinko 244 and will see if it clears the guard on the front, if it does ill order another and run 300-18 all round and if it doesn't ill just smack it on the rear and whack a 275-18 shinko 241 (PPSC control tyre) on the front, but would be nice to have matching styles i think.
bit bloody excited to have a 2 stroke in the shed, hopefully it doesn't cause me headaches which is the predominant reason i don't usually have 2 stokes in the shed.
-
15
-
- Popular Post
myself and PPSC are fizzing, so far Cam, myself, mitch and nick are locked in. trying to sort accommodation this week, what did other people pay for waikanae beach motel? price seems to be $300 for a 3 bed room at the moment.
also im mixing it up this year and going 2 stoke, just acquired this bad boy GP125 to use on this years ride, that will be 3 east cape rides on 3 different bikes yeoww
-
9
-
1


Blizzo's scoot hoard and projects of win
in Two Wheels
Posted
so in true blizzshop fashion i got sidetracked with another project before the Africa Twin was finished. With the Brass Monkey being postponed until next year i lost a bit of motivation to finish the twin, and with East cape not too far around the corner again i thought i better hurry up and build a bike for it.
I had purchased an old Xl100 to build up a while ago, plan was to throw an XR200r engine and a Cg125 tank on it and send it.
Delving further into the XL frame tho, there was some nasty as shit repairs, it was a bit bent and the swing arm was wonky, and it wasnt going to fit the XR200 engine that well, so i shit canned that idea