kws
-
Posts
4,178 -
Joined
-
Last visited
-
Days Won
5
Content Type
Forums
Downloads
Events
Gallery
Everything posted by kws
-
I know the obvious answer is "replace the seal", which will happen, but is having a shitty windscreen seal on a 70s car with a non-bonded windscreen a WOF issue? The glass is secure, but the previous owner replaced the seal with a shite generic one and there are gaps in the corner instead of it being a one piece seal The VIRM only really seems to indicate it should be "strong and securely affixed to the vehicle", which is is, because it ain't gonna fall out.
-
red springs could be Jamex Regarding front panels, a lot of the Evo/GSR ones are obsolete, and ALL rust out, so good to keep spare parts if you can, as you may need it later.
-
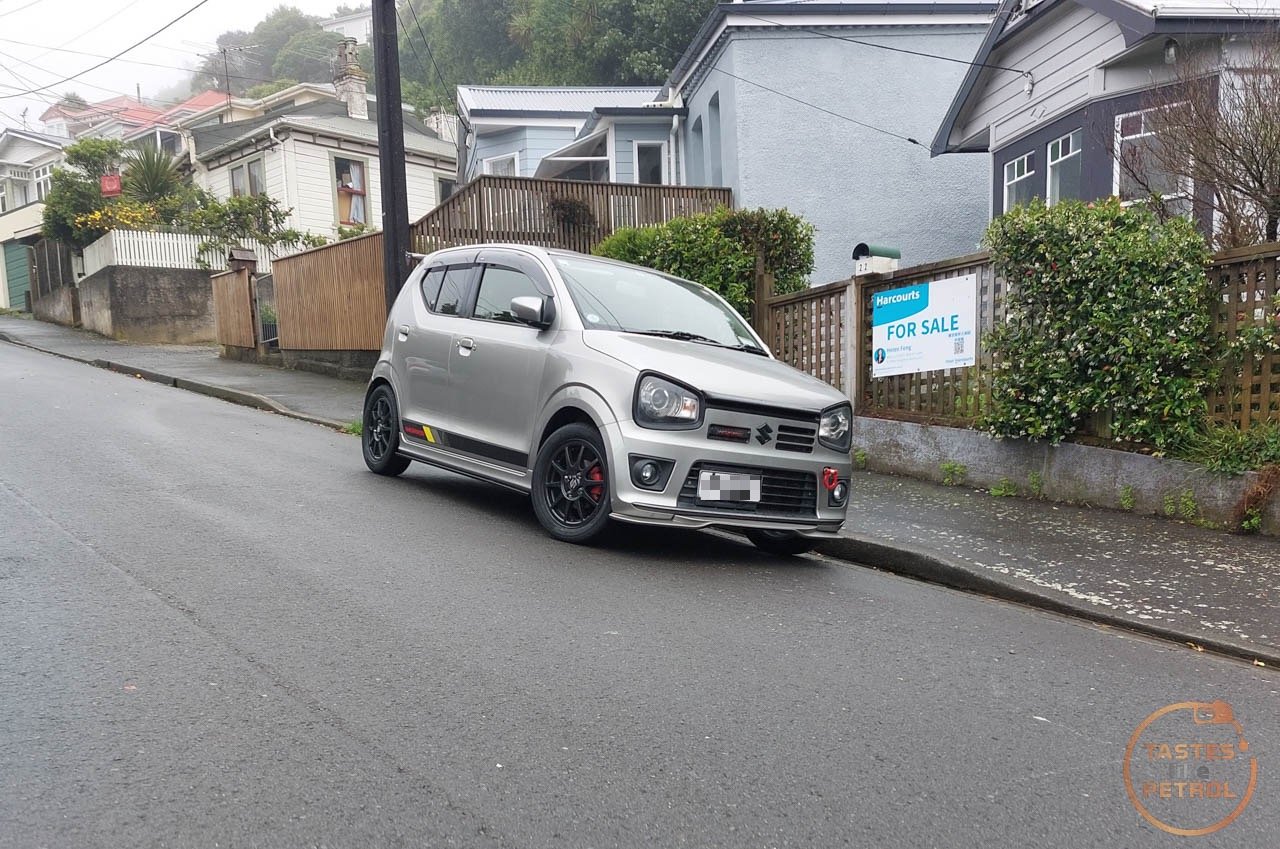
After spending an hour or so driving in the rain yesterday, I'm really loving the weathershields. Could have my window open in all but the heaviest rain and nothing came in the window. Visiting Wellington though, eww. The Alto is perfect for the narrow streets, but so many hills.

- 81 replies
-
- 12
-

-
Weathershields are life, highly recommend. These are the ones I bought https://store.shopping.yahoo.co.jp/parts-conveni/99000-990h6-a01.html
-
We left off the last post waiting on a set of new HKS spark plugs to replace the rather tired-looking ones in the car. They arrived, but did they fix the misfire? I whipped the coils out, which is pretty easy on the Alto. Just remove the two bolts holding the airbox in place, remove the intake duct (pulls off), and loosen the turbo intake hose clamp and remove it from the airbox This gives ample access to the coils and plugs. The old plugs look pretty average compared to the new HKS M40XL. The gap on the old ones was about 0.1mm bigger than the new ones. I'd say the coils were original. The previous owner had stuck heatsinks onto them with tape (not thermal pads) I fit all the plugs, using my fancy new magnetic spark plug socket (so lush) and refit the coils. So, did it fix the misfire? No. It still misfired. I was sure it would be a coil. The RPM reading on the EVC6 was spiking all over the place and dropped to zero when it misfired, leading me to think it was spark, despite it not throwing a misfire code. It was sputtering at idle and broke down at higher RPM or under load. Plenty of research was done and I decided to replace the whole set of coils. I could order some original R06A engine coils like currently fitted, or there are plenty of "high output" aftermarket coils on Yahoo JPN, of course there is also the option to spend heaps and get some brand name aftermarket high output coils (KC Technica and the likes). I chose none of these and found there is an option to use genuine Suzuki coils from a Swift Sport ZC33S with an adaptor harness. This is a kit made by a Jimny owner called dai@works.eng and it's top notch. I ordered this kit and began the wait. In the meantime, now was as good time as any to fit the genuine Suzuki weather shields I had bought from Japan. The instructions are all in Japanese, but with some Google Translating, it wasn't too hard to work it out. I started by cleaning all the areas the tape would stick to with grease and wax remover. I then carefully pulled out the window runchannels. The reason for this, and one of the reasons I went with the genuine option, is that unlike the aftermarket ones that only stick on with tape, the genuine ones have clips that slide over the window frame and are retained by the rubber runchannel as well as VHB tape I carefully worked my way around the car, measuring the areas the instructions told me to, to get the perfect gaps all around Not gonna lie, I'm also a sucker for stuff like this. ALTO I'm a huge fan of weathershields. I don't smoke, but I do like being able to have the window slightly open to get that extra airflow, but keep the rain out and not be buffeted around in the wind. It helps a lot in keeping the windows clear in winter too. While the car was in the garage I also took the chance to polish the carbon blade on the front of the bonnet as it was quite faded. The difference is obvious in the 50:50. I used some Ultimate Compound on a foam ball on my drill After that, the car got parked out on the drive and left while Christmas happened, and DHL flung my coils across the planet to NZ. Finally, today, the coils arrived. Along with a new Greddy air filter to replace the old HKS foam one. Fancy new Swift Sport coils and adaptors The new coils are chonky bois compared to the original ones I plugged the adaptors into the coils, plugged them into the engine harness and slotted the coils into place. They fit perfectly and my screws had no issues reaching (some cars may need longer screws due to the thicker mounting on the coils). I slipped the new air filter in before putting it all together So, did that fix it? Heck yeah it did! The engine runs smoother, idles smoother and under boost it's like butter. I suspect the coil has been weak since I got the car and just gave up when I looked at it and uttered those fateful words, "Preventative Maintenance" I took it for a quick run around the block to confirm the issue was gone but had to fix one more thing before a decent drive. Back when the car was last in the garage I noticed something a bit weird... The drivers front wheel was cambered out at the top, meaning it has positive camber. Not good. The passengers side had ample negative camber. The positive camber was really obvious when looking at it in person. A quick and dirty check indicated I had about 2 degree positive camber on the RH side and about 1 degree negative on the LH side The wheels were literally like \ - \ instead of / - \ I recall I had read on the previous owners blog that he had fitted camber bolts at one point, so that was the obvious place to start. My plan was to remove them for now and just run standard bolts, so after a Pick A Part run to grab some of the correct part number from an old Ignis, I jacked the car up and had a look. Sure enough, camber bolts fitted to the top of the knuckles I could've just adjusted the bolts correctly and dialled the camber in how it should be, but at the end of the day the car isn't lowered anymore, it's on standard suspension and I don't really need heaps of camber at this point. So out they came. Both sides had been badly adjusted. I'm not sure if the guy I got it off who swapped the suspension forgot to set them, didn't know how to set them, or just didn't notice they were cammed bolts. Who knows. The RH side bolts were barely hand tight too, which was a concern. I fit the replacement standard bolts and gave them a good elbow-clicking torque. After reassembling everything, we now have about half a degree of negative camber on both sides And what a difference it's made. I took the car for a decent run over some twisty hill roads and it's much more controllable now. Before, when you let off the throttle mid corner and the diff unlocked, it would dart sharply toward the middle of the corner (usually toward the center line) with murderous intent. Now it still noticeably unlocks and tucks in, but it is much tamer. The car in general is running much better, much smoother and loves being driven hard. The diff just pulls the car around corners on boost. I've had cars with torsen LSDs before, but this plate diff is a different beast. The new gearbox oil has improved shifting, and the diff seems a bit happier, although it's still a clunky old thing when cold. I can live with that, we'll call it character. Now that we're back up and running, I'm looking forward to getting some Ks under the new tires and seeing how this little thing really goes. So far, I'm loving it. Hopefully it'll be on the track next month as I have another track day booked. That'll be exciting. Finally, here are some photos of the car that aren't in my garage, sans stickers and with weathershields. The carpet should be here in the new year, which I'm really looking forward to.
- 81 replies
-
- 27
-
-

-
Same with my Alto, seller ran it through compliance, it got a WOF, and I just took the MR2A to VTNZ and they exchanged money for plates. They didn't even need to see the car.
-
As long as the plates made arent more modern than MX#### I guess
-
Cheers, mine arrived this arvo. NZC didn't try and deliver them to the wrong suburb this time, which is nice.
-
Despite the car currently throwing a grump and being stuck in the garage, there was still work to be done. One of the main things I needed to do before driving the car more was to replace the tires. All four tires, based on the date code, were the original ones that came with the car new. Unsurprisingly, they were all down to their wear markers, and not that safe to be driving on. I ordered some new Yokohama ES32 Bluearth in 175/55R15. This is one size wider than the standard fitment 165/55 tires because 165 isn't a very common size here in NZ. I can order some awesome tires like the AD09R in the correct size from Japan, but would mean if I blew or damaged a tire I would potentially be months away from having a replacement, and that's no good. 175s are on the shelf, ready to go, albeit not in some of the best semi-slick tread patterns. I've been running the ES32s on the daily Honda for years, and I like the compromise between comfort, wear and grip. Even in the wet I have confidence in them. After work, I fit them to the Alto. I had originally planned to run some nice new red (to match the calipers) open-ended wheel nuts, but they're just too long and stick out past the face of the wheel The reason I wanted open-ended nuts is because the owner in Japan had been running spacers at one point and had replaced all the studs with slightly longer ones, which poke out the end of the stock nuts. Not to mention the lock nut is unsightly. I've found Aeroflow does some short, open-ended black wheels nuts, so will grab some of those at some point, but for now, whats on it will have to do. The new tires look good, very purposeful and slightly chunkier than the old ones. Hopefully they aren't too soft in the sidewall from being that little bit fatter, but we will see. While in the garage I took the chance to fit some more bits that arrived from Japan. I have a real hatred for cars that don't have rear wipers, especially with tinted rear glass, as once it's dirty the glass is impossible to see through. In Japan, the previous owner had removed the wiper and fitted an R's Racing Parts wiper blank Removal is easy. Remove all the clips on the tailgate trim and remove the trim. This is the cheapest, lightest and most "cost-effective" trim I have seen. No effort to hide the clips or anything. With that removed, you can see where the motor should be, and the back of the blank. The previous owner had kindly ziptied the plug I needed up and put the bolts back in their holes so I could reuse them. Using a spanner, I removed the blank. It has the inner and out parts, both with a rubber seal to seal against the tailgate These are the parts from Japan. A motor, with seal, wiper arm and blade. The motor came with some harness but wasn't needed. I fit the grommet to the tailgate, put some silicone grease on the motor shaft and fit the motor into place. The arm just slides onto the spline and is held with a nut. It took a couple of tries to get the arm in the right place, so it sat horizontal when parked. Tested and working well. Probably needs a new blade at some point, but it's fine for now You can see here the difference it makes in clearing the glass Very happy with that. Now I'm just waiting on spark plugs, to see if it cures the misfire, if not, I'll need to wait until the coils arrive from Japan and cross everything they fix it.
- 81 replies
-
- 11
-
-
Good spotting, but I'd wager that unless you've somehow removed the factory fittings, they'll fail it until you refit it as standard. I guess it depends how much of a dick you wof man is though. Regarding the black plates, I'm surprised they haven't pulled them yet or done some sort of swap out recall to fix the ones you can't read in the dark. All in the interests of safety, no doubt.
-
https://vehicleinspection.nzta.govt.nz/__data/assets/pdf_file/0007/98575/In-service-WoF-and-CoF-VIRM-March-2024-amendment-preview.pdf This was sent around work today. From March 24 you can new fail a WOF on your licence plates not being up to spec, and that includes the plates not being official (with the correct markings) and even goes as far as to indicate date and letter ranges for the types of plates. So if you had an aftermarket supplier convert your plates that are newer than MX#### to black, they have grounds to fail them since they know they are too modern, and don't have the reflective NZ logo of modern black plates. It also straight up says that plates have to me aluminium, so a sticker plate now fails a WOF. Plates too dirty, fail. Plates worn or faded, fail. Gonna be a lot of people caught by this.
-

Tomble's adorable go cart / distraction / Alto Works
kws replied to tomble's topic in Other Projects
Big wang gang! -
Yeah, as I have discussed with you before, I didn't bid the first time around, but did the second time. I had a similar experience to you the first time around, where they refused to bid on it because "its not a Works, they never came out in that colour and it doesn't have the interior" and it got to the point they called me and argued over the phone about it until I could prove via the chassis number it was actually a Works, just in the Type 2 blue, and with seat covers on the Recaros. I honestly got the feeling they don't actually know what they're talking about when it comes to compliance requirements, or specifics of vehicles, but are more than happy to try and turn you away if its easier for them. I guess if it was an easy to import, high grade, low KM car, it would've been fine, but as soon as it gets a little bit different with mods or rust, they just fall over. I don't think they were trying to stiff me, just that they were a bit useless. They were very apologetic along the way, and did what they could to try and remedy the situation, and tbh if I had the refund when they originally said i would, i wouldn't be so salty about it all, but having to chase them to the point of threatening legal action was a bit shit.
-
This is the one I got, the "7inch 2 32GB carplay" one specifically. https://www.aliexpress.com/item/1005005259929995.html?channel=twinner It's not perfect, but for what I paid it seems to do what I want. I haven't had a decent chance to live with it yet, so my opinion could change.
-
With no real service history, I wanted to give the car a good going over before driving it too much more. The plan this weekend was to change the engine oil and filter, gearbox oil, install a headunit, and swap out the illegal fog lamp bulbs. I started with the fog lamp bulbs, since it was raining outside and it was easier to do this before the car got wet warming it up for the oil change. As part of the compliance inspection, the front fog lamps were disconnected. I had a quick look and noted they were LEDs, which isn't allowed (scatters the beam in a reflector lamp and is blinding to others), so I presumed that's all it was. I was wrong. I plugged the LEDs in and switched them on. Woah! They cast a very "green apple" shade of green. Definitely not legal. I grabbed a pair of "white" H16 halogen bulbs to replace them. Since the front of my guard liners are currently missing their clips, it's quite easy to peel the liner back to access the back of the fog lamp, even with the wheel on. Much better, now I can actually use the fog lamps if I want After a quick drive around the block a couple of times to warm the engine up, I lifted the car on Quickjacks and got to work The underside is remarkably clean, although thankfully it was grimy so hasn't been recently cleaned to hide anything. Not a drop or misting of liquid where it shouldn't be. I should say, having been under the car now, the undersealing work the panebeater did was very good. They undersealed and then painted it all body colour, it's a very tidy job. The engine oil is very easy to change. The sump plug and filter are just right there I drained the old oil out and removed the filter. According to the sticker on the door, the old oil was about 1000km old, so wasn't bad but was a little dark. I don't know when 1000km ago was in time though, maybe 2021, but IIRC they do dates differently in Japan. I imagine it's had a lot of cold starts moving it around during import and compliance. I refilled with 2.6L of Castrol 5W40 full synthetic and moved on to the gearbox oil. Draining was easy, the plug is right on the bottom of the box The fill plug though was a real pain. It was very tight, and I had limited space. It's above the axle, hidden above this rib on the gearbox casing. Always loosen/remove the fill plug before draining the box, just in case you can't get it open. I managed to get just enough leverage on it using my floppy head ratchet and a 3/8th square adaptor (to move the ratchet away from the gearbox). I tried the normal ratchet and an extension and couldn't get it. With the filler opened, I drained the old fluid out. The level was bang on, so that was good, but the fluid was looking quite dark The new fluid had a more clear-yellow/green look to it Also good was no chunks came out and the magnet had minimal sludge on it. Because the gearbox has a Cusco plate LSD in it, I had to use special oil with LSD additives, so the LSD wouldn't excessively wear, or cause drivability issues when cold. In this case, I thought it best to just spend the money and get the proper Cusco oil. The gearbox uses 2.3L. I had noticed the LSD was a right grump when it was cold. Chattering, clunking and binding when turning. I'm hoping new fluid will lessen these issues. I know they're pretty normal for a plate type LSD, so might have to just get used to racecar life. Refilling was done, like all my gearbox oil changes, with the pump bottle of goodness. So easy to use, and with the dual-action pump, quick. I filled the box until it started to run out, waited for it to stop and then plugged it back up again. Both plugs had some thread sealer applied. There were a couple of items I wanted to check under the bonnet while I was there. Firstly, I removed a coil pack and spark plug to check it. It's an HKS M40XL high performance plug. The condition of the tip didn't look bad, but the corona stain on the ceramic was very dark indicating it was probably either quite old or had a hard life (maybe both) I also checked the air filter, which had been replaced with an HKS panel filter It wasn't too dirty, but I'm not a fan of HKS filters. This side, the dirty side, is a fabric sheet. The other side, on the turbo inlet, is foam. As they get older the foam can break down and get sucked into the turbo/engine which can cause failure. This filter seemed ok, but the foam was starting to age. I have another Blitz panel filter on order to replace it. With those checks done, I removed the intercooler water sprayer setup as it wasn't connected and wouldn't be needed when I fit the larger intercooler. I removed the hose all the way to the boot, which is where the bottle used to be fitted. I also found both battery terminals barely finger-tight, so sorted that. The last thing to do while the car was in the air, was to finish removing the door decals on the RH side. This was painstakingly done with a heatgun and gently picking the letters off one by one with my thumbnails. I had to be careful not to dig into and damage the underlying Works decal these were stuck on top of. The Works decals are quite interesting, the black section is patterned and textured. You can also see the letters had faded into it, but it's barely noticeable in person. With that done, and the car lowered to the ground, it was time to warm the oil up and circulate the gearbox oil. Unfortunately this is where it all went a bit wrong. Immediately out of the drive the car was misfiring. Back into the garage, I removed the coil I had checked, refitted it and tried again. This time the car was running great; I warmed it up and it was boosting a solid 14PSI happily. And then it started to misfire under load, now you can hear it breaking up just by revving it to about 4000rpm. I suspect it's sparkplugs and/or coils (since it's the only thing I touched that could cause a misfire), so have a new set of HKS spark plug on the way and some new uprated ZC33S coil packs to replace the stock ones, but they have to be shipped from Japan. So in the meantime, I worked on a couple of other things. First, I checked the rear washer jet. Turning the wiper stalk to activate the washer resulted in the pump making the right noises, but nothing on the glass. Interesting. I checked everywhere to make sure the hose wasn't disconnected somewhere and pouring into the car, since I believe the previous owner had been using the wiper stalk to trigger the intercooler pump. No leaks were found, so I just kept the stalk turned. Sure enough, after about 20 seconds of whirring, I hear the PSHHP PSHHP of air coming out of the rear washer jet, followed by a steady stream of fluid. I guess it's been a very long time since it was last used and it had to prime the hoses. With no wiper, all it did was make a mess down the back of the car, but at least now I know it works, so when the wiper arrives it will be one less thing to fix. Tinted glass = zero visibility when the glass is dirty, so having a wiper is a no-brainer. Next on the list was to fill the big gap in the dash with a headunit. I love how this car sounds, but man you hear a lot of other noises when you don't have music playing in the background. I had imported a replacement surround, radio brackets and an adaptor harness from Japan. The first step is to yank the old surround out. It's just clipped in around its perimeter, and without a radio installed, I could just grab it and pull. The factory plugs were still present, which was excellent. I was also replacing the surround as the owner in Japan had cut this one to mount the Defi dash in it, and it had two screw holes from the visor. The chosen headunit was a cheap $80 (on sale) Android unit from Aliexpress. The main reason for this was so I could run TorquePro on it natively, when on the track, and keep my phone free for Racechrono. When I had the Jazz on the track I wanted to keep an eye on coolant temps, but with no temp gauge I had to rely on TorquePro, but couldn't display that alongside Racechrono, so this should sort that issue. Mounting it was easy, until I realised that the unit was so short it only had one set of mounting holes. I discover what this means later. Having previously soldered the adaptor harness to the headunit harness, I plugged it in and installed the headunit. And pressed the start button to give it power It booted right up, and since I had previously bench-tested the unit and updated it, the wireless Android Auto kicked into life Not bad for $80! I then went to fit the surround and noticed the headunit was sunken way into the dash. It seems because it only has one set of mounting holes I couldn't move it forward far enough on the brackets. To fix this I used washers on the mounting screws to space the whole thing forward, which helped a lot. The unit also includes its own GPS antenna, which I routed across the dash and up near the windscreen The main interface is nice and clear. Just usual Android things. If I cared, the FM radio does actually work too. Seems I need to work out the time and date though... Torque connects well to a BT OBD2 device connected to the car Plenty of customisation to be had. Hard to miss a nice big easy-to-read number though. That should do the trick nicely. The final thing to look at was the horn. I wanted to test it and see what it sounds like since the Japanese owner fitted some Bosch "Rally Evolution" horns and they appear to still be fitted. I pressed the horn pad on the steering wheel. Nothing. Key on maybe? nothing. Hmmm.... The steering column shrouds had to be removed again for a look. Everything on the column was connected, nothing looked out of place. I knew from my searching that the horn wire was the pink wire on this plug I grounded it with a test light, and sure enough, just about shite myself at how loud the horn was! Well, that works then. The issue must be in the horn pad. The only way to access it is to remove the airbag. Using a 10mm spanner I removed the negative terminal from the battery and set about removing the airbag. There are three small holes behind the spokes (one on either side and one at the bottom), which I pushed a long hex key into, which pressed on a release clip and popped the airbag forward That'll be the issue then, the horn pad isn't connected to the clock spring. There should be a plug with a single wire on it in the plug next to the yellow wire. That single wire should go to a terminal on the horn pad. Using my multimeter on continuity, and staying well away from any yellow airbag wiring, I checked the continuity between the pink wire on the column, and the pins in the plug in the steering wheel. The first pin was the horn pin, it had continuity to the pink wire. I made a little jumper harness using a pair of insulated spade terminals I plugged both ends in, plugged the airbag in and pushed the horn pad home with a click. I reconnected the battery, and suddenly we had a horn on demand. Excellent. The previous owner swapped steering wheels before I got the car, so I suspect he must have forgotten to refit that plug when he did it. And that's about as far as I can go since the car isn't drivable. I have put it on Quickjacks again since I need to have the tires replaced on Tuesday, and will just send the wheels in instead of the car. I'm hoping the spark plugs show up quickly, so I can swap those and see if it fixes it. I really hope it does.
- 81 replies
-
- 23
-
-
So, we left off with me giving up on importing an Alto. Where to from here then? I nearly gave up on Altos. The whole importing thing had really stressed me out, and the constant rollcoaster of emotions involved in it just did my head in. I started looking at other cars, but absolutely nothing interested me... except an Alto Works. In the time I had been trying to import an Alto, I had heard of one that had been brought into the country earlier in the year, with the intention to be a track car for the owner. He never got around to doing anything with it, so asked on a Facebook group I'm part of if anyone was interested in it, and posted these photos Phwoar, what an angry looking little car! Obviously it had had a life in Japan, being fitted with a bolt in cage, no carpets, obviously lowered and on nice wheels. Under the bonnet were some visible goodies too. Hold on a sec, that engine bay looks familiar.... Sure enough, using my Google searching powers I managed to dig up where I had seen the engine bay photo before; a Minkara Carview blog from the previous Japanese owner! The most interesting bit though? It was a legit JDM trackday car. I even found the owner's Youtube channel, which has many videos of the car fanging around tight little tracks in Japan Along with finding out it was a track car, I also found out all the mods the owner in Japan had done to it. Now, I didn't know what was still fitted to the car and what had been removed, but I knew two important things it still had; a Cusco 1-way LSD in the gearbox, and a Cadcars 3685MAX 85hp upgrade kit, including an HKS FCON piggyback computer and HKS EVC6 boost controller. It also had adjustable suspension, wider 15" alloys, full exhaust, the front lip and rear spoiler, carbon blade on the bonnet and some bigger intakes under the bonnet. (It also still has the Cusco front swaybar, discovered after purchase) It was missing its factory Recaro front seats and anything resembling a rear seat though, which wasn't ideal. You can see in the above interior photos it has some billy basic Alto seats fitted in the front. Anyway, I got in touch with the seller in NZ, and found out he was in the process of having the car complied for road use in NZ since it would be easier to sell on the road, than as a track-only car. As part of that process, the cage had to go. It wouldn't meet NZ cage standards, and couldn't be used in a normal road car. To make the process easier, and not have to certify the car (an extra process and expense, limiting me from further changes to the car), the owner swapped back to standard Works KYB shocks and springs and some wheels he had from another Alto. Yes, the owner had privately imported three Altos, a Turbo RS and two Works (this one and an AGS "automated manual" one). After quite a bit of discussion, I agreed to buy the car, with some conditions. It needed to be complied and on the road. It needed to have the full Works Recaro interior, a stock airbag steering wheel, and had to be on standard suspension and Works wheels. With some jiggery-pokery involving his other two Altos, and one that was being wrecked local to him (a real low spec poverty one), he managed to get this one into the spec I needed, and still have two other complete Altos, albeit missing some of the Works bits from one. The car went in, and failed its inspection. The cage holes needed to be welded up by a panelbeater and signed off by a repair certifier. Not a problem, it was booked in for the work to be done, and we waited. And waited. And more waiting. Eventually we heard from the compliance shop that the work had been done, and it was all ready to go, but they had been waiting on the one and only repair certifier down there to actually give it the big tick, and he had been away on unplanned leave. After a couple of weeks, the car was finally signed off, it had a new WOF and just needed to be registered and have plates fitted in order to drive it on the road (A task left up to me to keep costs down). As it turns out, as part of the work at the panelbeaters, the underside of the car had been completely sandblasted and undersealed... and guess what, it cost about $2,000. I believe on this car it wasn't done because of rust, but because they had to protect multiple areas on the underside where it had been welded, so was easiest to just do the whole underside. Once back the seller changed to the stock wheels. The car looked much better on the stock 15" alloys (even if I don't like black wheels; they suit it). The tires on these are stuffed, which is why they weren't fitted during compliance. The seller also fitted the Recaro interior front and rear (the rear fabric matches), and a stock Alto (not Works) airbag steering wheel. A truck was booked. They sent the biggest one they had. An anxious wait over the weekend and I had the call, it was 10 mins away. I wait outside, expecting to see a delivery truck with the car on the back. No, I hear this angry little growl coming up the drive, and sure enough, it's the Alto. The guy gets out and apologises, he had to drive it the 10 mins from the depot because the Alto was too small for their local delivery trucks. He loves it though. I park it up, have a quick look over it and take some initial photos First impressions; it's small, but also very spacious. The Recaros are more comfortable than expected and fit my wide frame fine. The gearshift is divine, it's almost rifle bolt action. It makes great noises and pulls like crazy on boost (and it's not even at its full boost currently). It's not all perfect. Everything is covered in dust from the panel shop. Its everywhere. There are some areas where the paint isn't perfect, and the dash has some random screw holes and things from various track based gubbins being used. It's not an open road car, at all. At 100kph, it's pulling just shy of 4000rpm. Sure, it's on boost instantly, but that little 3 cylinder 600cc engine is just whirring away constantly. There are kits to replace 5th gear, and lower the rpm to about 3000rpm, so I'll probably look into that at some point. The LSD is brutal. It's a clutch type Cusco Type RS 1-Way unit. When cold, it knocks, it binds, it thumps. It's quiet and smooth when warm though, so I have some new Cusco oil to change shortly. The way it works is making me rethink how I drive and corner though. When on the throttle, the diff will relentlessly pull you around the corner. The steering feels heavy, but where you point the wheel is where you are going, no exceptions. The moment you come off throttle though, the front end suddenly darts to the inside of the corner as the differential unlocks and allows a speed difference between wheels. I can't wait to see what it's like exiting a corner on the track. I have already started removing the decals on the bonnet and along the Works side stripes. It was a shopping list of some things the car no longer had, and I wanted the nice clean stripe instead. Stickers were the previous owners thing, not mine. There's plenty to do. Parts are constantly arriving from Japan for it. Being a 2016 car, and so modern, parts are ridiculously plentiful and readily available for it. I'm used to having to hunt around for scraps years after the cars stopped being popular, but currently, anything I want, I can get. This weekend it'll get a full oil service, since I don't have any real service history, and it'll get a couple of the goodies that have already arrived from Japan fitted. It's not the stock, 4WD one I was planning on, but I love it. *Parked next to my colleagues Honda S660. One of few cars that makes the Alto look giant.
- 81 replies
-
- 36
-
-
-
Mainly because they eventually came through with the refund, so feel mean completely blasting them. If you wanted to Import Your Car, it wouldn't be hard to work out who it is.
- 81 replies
-
- 15
-
-
-

-
Well, here it is, the culmination of months of trying to import a car. Months ago, I heard through Facebook about an estate sale auction that was happening a couple of hours north of where I live. There were a few cars there, including some cool MG and Healey classics, but only one really caught my eye; a little 1990 Suzuki Alto Works nugget. I've always loved Altos, and here was one that was small, manual and turbocharged. It had been off the road for at least 11 years or so, and the rego was on hold. There were no keys, the condition was unknown and they could not confirm it ran. Excellent, my sort of car then! Long story short, I took some time off work, borrowed a truck that could tow a trailer, and made a trip up the line to see if I could win the car, with a plan to bring a trailer back the next day if I won it. We get there, and there it is, in all its glory. Look at that little face, what a nugget. I'm not sure how long it had been up on the blocks, but it was certainly in "barn find" condition, dust and all. It's clear that it hadn't been touched in a long time. The interior was.... disgusting. Everything was covered in dirt, or mould. On the plus side, it still had all the original features, like the cool seats and steering wheel with WORKS horn button. How good is the dash cluster though The little F6A twin cam 660cc turbo engine would love to rev all the way to the 7500rpm redline. The car had been converted to manual, and wasn't quite in showroom condition, with peeling paint, the horrible interior, and a large dent in the front RH guard, which had slightly damaged the door and bent the hinges Worst of all though it had rust in both sills, and the rear boot seal lip was just crunchy flakes at this point. Still, I wanted it. I found the keys to it (on the keyring for the Wagon R next to the Alto), but didn't try to start it. Long story short, the bidding started at about $200, and there were a handful of us bidding on it. Suddenly it was jumping up in hundreds, and only two of us were left bidding, in the thousands now. I had a firm budget in mind but the guy I was bidding against was there to win. Not once did he drop his hand. I hit my limit, and bowed out. I later heard from someone else there, that the winner had wanted an Alto Works as a garage ornament for years, and was prepared to pay whatever it took to secure it. It was not to be. Hopefully he got what he wanted, and it sees the road again one day. So, I did what any reasonable person does and began to obsess over Alto Works. Old ones were cool, but had the inherent issues of being old, and harder to keep on the road. I knew of the newer HA36S models from 2015, and although I always loved how they looked with their angry face, I had never seen one in NZ and didn't think I could afford one. But as it turned out, between the sale of the Yaris, and Lucas, I suddenly had a healthy looking bank account. The next problem was the fact that as far as I could tell, when I started this process, there were none in NZ. I had been curious about the importing process and buying from auction in Japan, so got in touch with an importing broker, who agreed I should be able to get what I want, with the budget I have. The HA36S Alto Works comes in a few variants (including the Turbo RS, which is more common but didn't come in manual and is a bit less "hard core"). I wanted manual, not black or red, and preferably 4WD. I bid on a few cars at auction in Japan and just kept falling flat. Despite watching auctions for a bit before I could afford to jump in, the prices were suddenly thousands of dollars more than I was expecting. Not only that though, 4WD ones were proving rare, particularly ones that weren't from the snowy northern regions. After bidding on a couple of dozen cars, and missing out (one, a nice blue 2wd one, by only a few hundred dollars, which ended up being imported by another Kiwi and now lives locally), I finally had one on the hook. It was 4WD, manual, wasn't from the north, in silver, and had good KMs. It was grade 4, and had minimal damage marks on the sheet. It looked nice in the photos, but Japanese auctions are very limited in the info and photos they provide unless you can get an inspection. In this case, it had a couple of exterior photos, and an interior one. No underside or engine bay. I did spot and liked the slightly wider flares, and aftermarket muffler though. I liked it. I contacted the importers, who translated the auction sheet and gave me some bad news. It had underbody coating, and some rust. Not to worry though, in their own words, "for around $2000 trade rust repair will be carried out under the supervision of the repair certifier and come with a repair certificate. It will be sandblasted and rust treated and painted black. Rust repair is in fact a good thing, your car will be protected from future rust and will pass every WOF for a long future". Sounds good, but to be sure, I ordered an inspection at my cost. In the mean time, knowing that it'd only be a couple of grand to have it blasted and coated, I submitted my bid, factoring that repair work into my bid. It was all the specs I wanted. The auction came and went, and I heard nothing, and no inspection results were provided. Guessing I had lost it, I went to bed that night and forgot about it. I woke up the next morning to two emails. One, at 10:51PM "YOU WON A CAR TODAY!" and a second, at 11:03PM, the inspection result with photos from the inspection. Handy. Well then, I had an Alto! I was excited. I looked over the inspection photos, and noticed some spots of rust I would rather weren't there, like in the bottom of one of the doors and around the engine bay But other than that, nothing really concerned me. The underside had been undersealed and there was still some rust in the seams, but nothing a couple of grand of repair work couldn't fix This is where it started to go pear shaped. I got an email from the importer, asking "are you sure you want to import the car, we don't know how bad the rust is and the rust work costs could be higher". Based on the photos, I was still confident it wasn't that bad. Heck, I could've fixed most of it in an afternoon with a wire brush and some rust killer. Also, I had agreed to buy the car already, I didn't know at this point rejecting it was even an option. I said to continue. The invoice for the car comes through, and I pay promptly. Yay, I'm getting an Alto! Three days later, I get another email. This is where the scaremongering really kicked up a notch. They had "spoken to compliance" and would need the engine removed to repair the rust, plus sand blast, plus repair cert $$$$$. "Good thing the car will be protected from any future rust" he continues to say. Suddenly the repair work was being quoted at approx $5000. Well, I own it now. I've paid. What other choice do I have? About two weeks of radio silence later, I get an email from the boss. It failed border check and has been flagged for rust. That was expected, they fail any signs of underbody rust. The advice was to abort, and send the car back to auction, otherwise the potential repair costs were now "$8000++". That's a lot of money for a car that was already going to be $15,000 landed, on the road. I weighed up my options. I could import it and risk the costs. Or lose my $1000 deposit, get a refund and either try again, or find a different sort of car. I chose the latter. I rejected the car, and asked for a refund. That was the end of that car He agreed to refund my money, less the deposit, by the end of the week. Happy days. The money didn't arrive. I wasn't too worried though, I could use that money to bid on another car; so I was still looking, and bidding in the mean time. I was advised to stick to higher grades like 4.5, and to avoid anything that mentioned rust. In order to be sure, they wanted to get an inspection on any car before I could place a bid. The funny thing is, now they could suddenly get an inspection to me before the auction closed, unlike the one I won. I found a nice looking blue one. It was manual, 4WD, 67,000km and grade 4.5. It sounds like a winner, so got them to get an inspection with the intention to throw big money at it. The auction sheet said nothing about rust. I actually found this car later listed on Beforward (another importing site), listed in the north, in Hokkaido. Not a good start. The inspection came through quickly, well before the auction time. Externally, it looked very nice. The drivers seat was worse for wear. The bolsters were squished, and the fabric looked very worn and gross. Surprising for 67,000km. But worst of all. Rust. It wasn't as bad as the one I won, but it was there. It was on suspension components, on the sills and worst of all, coming out in the seams in the engine bay. Clear signs of having spent time in the snow. Keep in mind, this was a grade 4.5, with no rust noted on the auction sheet! I decided not to bid on that one, I couldn't take the risk again. There were a couple more, but only one that was really notable, made me very angry, and was the nail in the coffin of my importing experience. Manual, 4WD, silver, completely stock standard, 117,000km on the clock. It was the spec and condition I wanted, in the Ks I could afford. It was a grade 4. I wanted it. I asked for an inspection, and sure enough, it came through with plenty of time to spare. And it looked GOOOOOD. It was spotless. New AD09R tires all around, the underside was clean, no sign of rust, the interior was nice. The body even had minimal dents and marks. Someone had looked after this one. I was very excited. It was perfect. Nothing could stop me now. I placed a very generous bid on it, to make sure I would win it. I didn't win it. It sold for well under my top bid. It went for less than my last one. Why did I lose it? Because they chose not to bid on it, based on the recommendation from the person in Japan bidding on the car. Why? because of this dent in the rear quarter panel. Apparently that would "need a repair cert" to import. I threw my toys at that point. There is no way a dent you can barely see would stop that car being imported. My closest guess is they forgot to place my bid. I was angry. On top of that, I still hadn't got my refund. Twenty two days after I was told it would be refunded by the end of the week, after me asking repeatedly, I received a partial payment of about a third of my money, with an excuse that "Japan was holding the money from him" but he could "manage it next week". Next week came and went. Just shy of a month later, after a rather terse email, I received anther partial payment of less than half of what was left and yet another excuse, about the car having not sold (not that that was ever a condition or term of the refund, that's what the deposit is for), but that it would be sorted. Two weeks later, and my patience was done. I threatened court action to recover the remaining money. I was sick of the broken promises and deadlines. Two days later, I had the rest of my refund, in full. I know it's not the norm, but the whole auction and importing thing just left me feeling really bitter. If I didn't know two people now who have used their service (albeit at least in one case, not completely smoothly either), I would've wondered if it were a scam of some sort. The auction system itself seems to be broken and the auction grades mean nothing. A grade 5 is as close to a new car as a used car can be, so a 4.5 should be near new with some minor marks. Grade 4 should still be very good, with a couple of slightly bigger marks. So why were the grade 4 and 4.5s so junk? I have heard reports of corruption in the system too, where sellers have paid for higher grades, but I don't know how true that is. Long story short, I was left $1000 out of pocket, with no car to show for it, and a bitter taste in my mouth. I'm very glad I could even get a refund; although the Terms on their site allow for it, I still wouldn't have been that surprised if they tried to decline the refund, or wait for the car to sell first. Don't worry though, not all is lost. I gave up on importing, but I didn't give up on an Alto Works.
- 81 replies
-
- 25
-
-

-
-
Tomble's adorable go cart / distraction / Alto Works
kws replied to tomble's topic in Other Projects
Looking good. Let me know if you need any genuine part numbers, I have a copy of the parts book here, albeit in Japanese. Im pretty sure I can guess where you live, since you went passed my colleagues place in your dashcam video #stalker Regarding the broken exhaust mount, looks like a pretty generic rubber exhaust bobbin. The issue there is they aren't really designed to be used in that sideways sort of loading, so you'll probably keep breaking them. Might be worth seeing if there is another option you can put together. My nugget should be here this week. Hopefully I'll see yours around. -
Tomble's adorable go cart / distraction / Alto Works
kws replied to tomble's topic in Other Projects
I'm stoked for you man, what a cool wee car and an awesome colour. Still a little dark you outbid me though The aftermarket on these things is incredible. Almost anything you can think of, so ill be watching closely how you get on. -
Don't count on it
-
Going a full circle into a Marina again. KwS's 1973 Morris Marina Coupe.
kws replied to kws's topic in Projects and Build Ups
I've been pushing forward with the Marina this week, spending a couple of days after work finishing up some of the bodywork. I started by finishing the LH rear quarter window frame; sanding out the filler, and then priming and painting the frame. The colour match in the rattle cans is pretty good really. This little corner has come a long way since it was a gaping hole With the frame painted, I test-fitted some spare door seal I had from the TVR, and to my surprise it's a perfect fit, so I will use that. I still need to cut and join the front edge, but otherwise it's a good fit. I test fitted the window and it and seems to fit well, but I have a lot of work to do to the window before it can be fitted. It spent many years out in a field. With that success, I moved on to the rear valance. I'm sick of working on this, so smoothed back the filler, primed and painted it. It's still fairly wobbly, but it's solid and hidden under the bumper for the most part. It looks good at 20ft away, anyway. I undersealed the back of the fuel tank and filler pipe, to hide them. The plate was also refitted; would you be surprised to find the two holes that were previously used, and that I had been working around, aren't spaced correctly and I had to slot the plate holes for it to fit with the new rivnuts in the original holes? I was both surprised and annoyed. I should've just welded them up and drilled new ones. I'll drill two new ones for the inner pair of holes on the plate so I don't have to slot the personalised plate when I put it on the Marina. Unfortunately the number plate bulb holder broke at some point, so I'm working on a replacement that should be a bit more reliable than the original that grounds by touching the mounting bracket it's on. With the bodywork at a point I was happy with, I moved on to the last thing I needed to do before I could finally get the car off the stands; sort the rear suspension. Even though I had sorted the brakes, I hadn't touched the rear suspension at all. I knew one side was missing a bump stop, and everything else was just a bit tired. I purchased a 1 inch lowering block set to suit a Capri, Escort, Anglia etc, and some escort poly spring pads. The bump stops are a good pair of used UK spec bump stops. Speaking of bump stops, it's interesting to note the UK ones are shorter than the Aus spec ones, and have a slightly different shape. The shorter ones are better for a lowered car anyway. I removed the rather random collection of nuts on the bottom of the original U bolts Which meant everything started to come apart In hindsight, I would undo and remove the shock from the bottom spring plate, just so there is more movement in it come time to reassemble. The old spring pads were in good shape. They appear to already be poly, not rubber, so may have been replaced before. A nice little collection of bits, less the top plate (still stuck on the axle, but can be removed with a couple of taps of a hammer). The plates appear to be galvanised which would explain why they were in excellent shape under the dirt I did a test fit with the new blocks, but found reusing the old spring pads wouldn't work because the thicker U bolts would bind on them (the old, thinner bolts had moulded into them). Speaking of thicker U bolts, one thing you do need to do is open the bolts in all the mounting plates out a bit, as the holes are a tad too small. I opened them out to the 12mm step on my step drill. A clamp helps squeeze the U bolt together and fit it through the holes as they come a little too spread apart All fitted together, with the replacement bump stop, new spring pads, U bolts and 1 inch lowering block. It took a lot of mucking around with the jack and a ratchet strap to get the axle to line up on the spring holes/pins, as the axle wanted to rotate forward and move backwards, and needed to be pulled forward again; this was made harder on this side because of the forward link on the top of the axle. The other side went a lot quicker and easier since I had worked out the secret formula on the first side. The main reason I was doing this, was because of the missing bump stop, which would be a WOF failure. Here it is, with the new parts and a bump stop I did have to go around with the angle grinder afterwards and just nip the ends off the U bolts as they were a bit long for my liking. I reinstalled the wheels, cleaned the glass, lowered it off the stands and finally got to see how it looked. In the garage, it looked awesome. The obvious thing to do now was to see what it looked like out in the cold light of day. After a few goes to get the old inertia start to stop kicking back out, it started without too much fuss and settled into a nice idle. The benefits of an electric fuel pump filling the carb bowl without needing to crank over and over. There are about two years between these two photos, and hours upon hours of work The lowered front is the obvious difference, but the rear is subtly lower, the whole lower quarter panel ahead of the wheel has been remade, and the complete outer sill has been replaced. Lowering it has made a huge difference in how it looks, and I love it. I genuinely think it's one of the coolest looking cars I have owned.- 80 replies
-
- 30
-
-
-
Pretty common with old switches. I used a fibreglass brush to clean the contacts, and then smothered them in dielectric grease. You could test this by unplugging the switch and shorting the wires in the connector (simulating pressing the switch and see if it operates). Check which is your switched positive with a test light first.
-
Could you cut the old pressed in pipe flush, run a pipe thread tap down it and use an off the shelf fitting? Those sort of pressed-in pipes can usually be yanked out after heating the housing for a bit
-
Going a full circle into a Marina again. KwS's 1973 Morris Marina Coupe.
kws replied to kws's topic in Projects and Build Ups
Just quickly, before moving on, a quick update on the rear quarter panel I left in filler last time. After much sanding, this is where it is. It needs some touching up, but I'm much happier with it. Finally, something other than bodywork. You're sick of reading about it, I'm sick of doing and writing about it. In a change of scenery, I moved to the front suspension to sort out an issue this Marina had. Say what you will about the Marina suspension, well no not that; it's not been pulled from the Minor, but anyway, it's very simple. This simplicity works both ways. It's easy to work on and adjust, but it's also simple in how it operates which can cause some compromises in ride comfort and handling. One way it's delightfully simple is that it uses a pair of torsion bars in the front suspension instead of traditional springs. These operate as a spring by twisting a spring steel rod along its length. As it always wants to try to unwind, it causes a springing effect. These have one simple benefit for car weirdos like me; they can be adjusted without special tools, on the car (for the most part), and without any legal headaches. This makes the ride height adjustable. At the back of the torsion bar, which is about half way down the length of the car, is a trim adjuster. This is used to adjust the fine height of the car. These are usually set about half way in their travel, so the ride can be altered higher or lower by a certain amount (usually an inch or two either way). Coarse adjustment is done by moving the arm by one or more splines on the shaft, one spline is one inch in adjustment. Mine is pretty ugly because it's 50 years old, and covered in thick underseal, but the basics can be seen. The orange arrow is the torsion bar, this is heading off towards the front of the car to meet the lower front suspension arm. The blue arrow is a locking bolt, this will need to be loosened (not removed) to adjust the arm, and the green arrow is the actual adjuster (which presses against a thick steel "bucket" so it doesn't dig into the floor pan). The adjuster works but moving the lever up and down, causing more or less twist in the torsion bar. So, the issue the Marina had. Well, just look at it It was very nose-up. As it turns out, according to the workshop manual, it should be 14.6-15" (37-38cm) when measured from the center of the front wheel dust cap to the arch lip. This is how mine was sitting, up to a full inch too high. I noticed this when I reassembled the front suspension after its rebuild. I was careful not to move the lower arm on the splines, so it wasn't me that threw it out of whack, but the suspension was so high that the top arm was pressed firmly against the droop stop when at rest. This is not good for ride quality. It's quite a large gap It's visible in the delivery photos too, even if the tire is a bit flat on the top. To correct this was quite simple really. Well, mostly. To actually fix the issue I would ideally need to disassemble the suspension and turn the lower arm one spline on the torsion bar to set the adjuster in the middle again, but because I don't want to do that all over again, I wire brushed off the adjuster, loosened the locking bolt and wound the adjuster bolt out. Loosening the bolt lowers the car as it takes tension off the torsion bar. I started with the RH side due to easier access and lowered it until the bucket on the top of the adjuster bolt was no longer captive, and wound it back in until it was. It got it about spot on for what I had in mind, about an inch lower than the lowest stock spec. It looked pretty good, so I moved to the other side. Unfortunately this adjuster wasn't in the middle of its travel, so it bottomed out about here. A smidge more than half an inch lower than stock. To be fair, this actually looked really good too, even though it wasn't quite as low. I wound the RH side up to level it out and ended up with this Compared to what it was, it's a decent difference. Should improve handling too, both by being lower, but also not having the top arm resting on the droop stop anymore. Pretty good result on the front. I do have a set of one-inch lowering blocks for the rear, but I want to see what it looks like on the ground again before I decide to lower the rear or not. I think I will, but we'll see. I'm hoping to get through a lot more work over the coming holiday period and have the car ready for a WOF early next year. It's way behind schedule, but it's slowly getting there.- 80 replies
-
- 23
-