Rhyscar
-
Posts
923 -
Joined
-
Last visited
-
Days Won
1
Content Type
Forums
Downloads
Events
Gallery
Everything posted by Rhyscar
-
Thanks! I need about 10mm on the drivers side. This is because the engine isn’t level, on account of me fabricating the drivers side mount a bit wonky. Never thought it would matter and now the headers and everything is so tight fitting changing it isn’t really viable. But good news is I figured out where my issue came from - the passenger side strut tower is 10mm closer to the bonnet than the driver side! So when I prototyped it, it was literally touching the bonnet so I took 4mm off and copied to the other side. Unsure when/how this damage may have happened @Truenotch any idea?? 😜🙃 So great idea, but I'm not sure I could create 10mm in clearance from the rocker cover. After thinking about possible solutions a bit more, printing another part for the driver side with 10mm extra boss is probably the easiest way forward. Part cost is around $60-70nzd so not that bad, and easier than the hours I’d spend modifying bits to make it work. Unless you look for it, it won’t be visually noticeable and won’t look hacked up. Not ideal, but a workable solution that doesn’t involve reinventing the wheel!
-
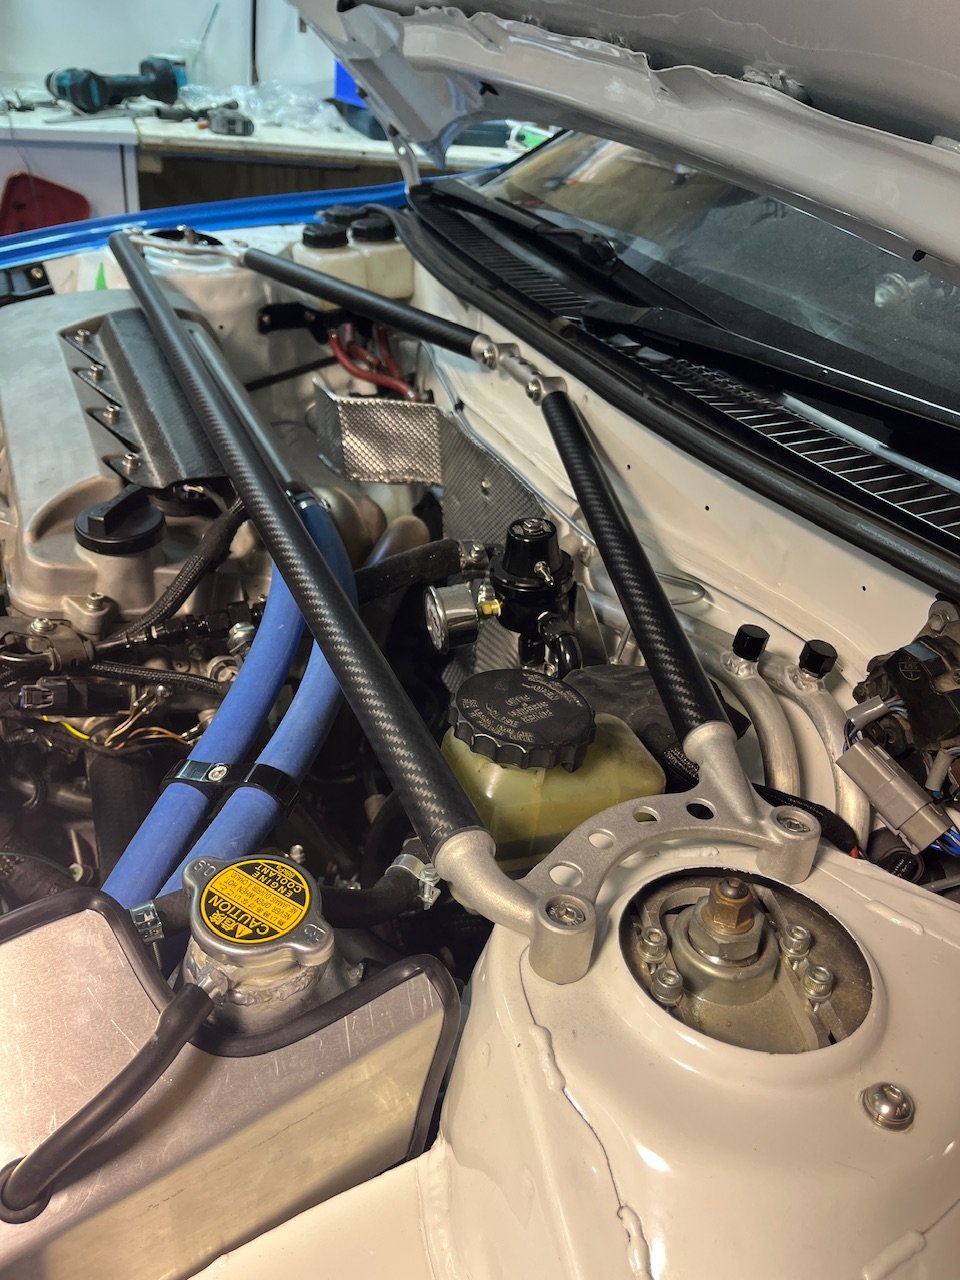
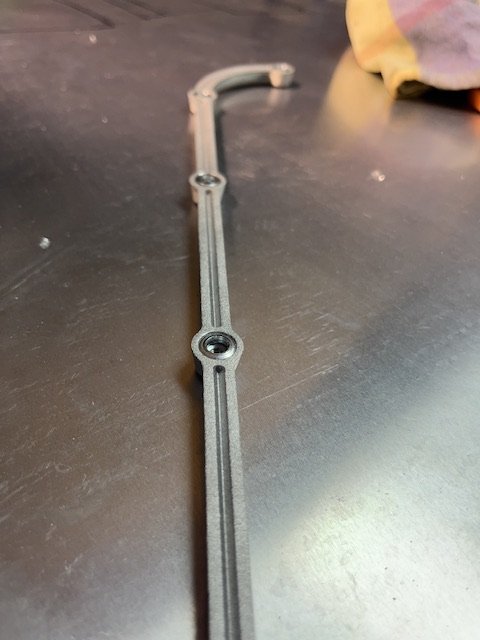
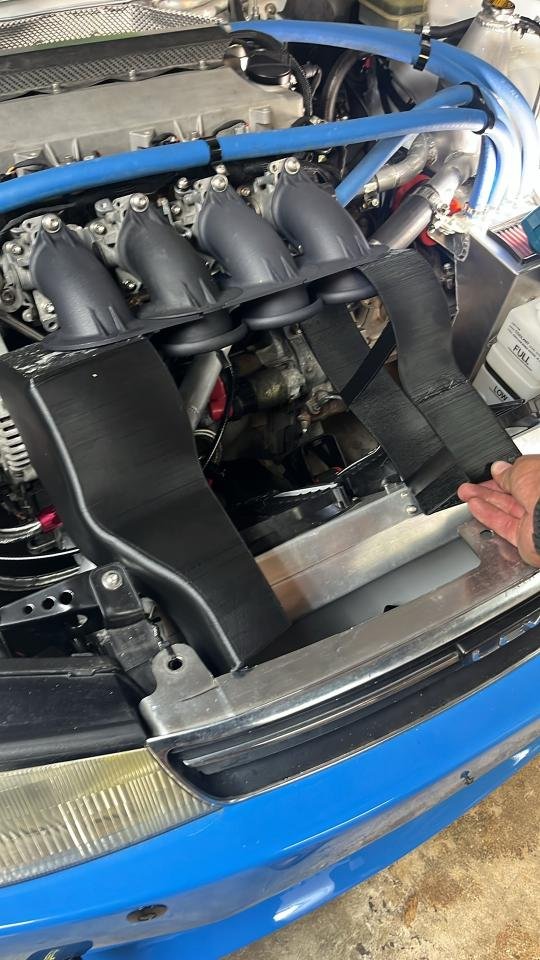
Bit of a mock up of the strut brace. Pretty chuffed with how it turned out

- 418 replies
-
- 13
-

-

-
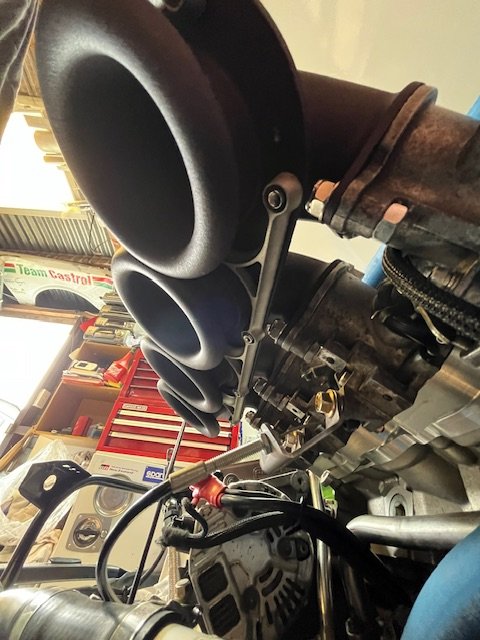
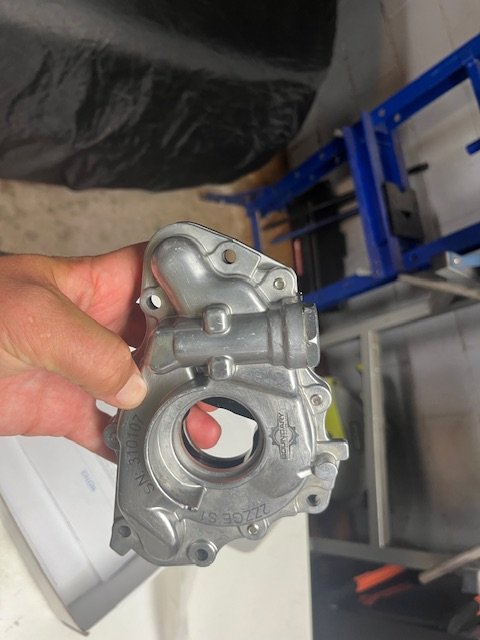
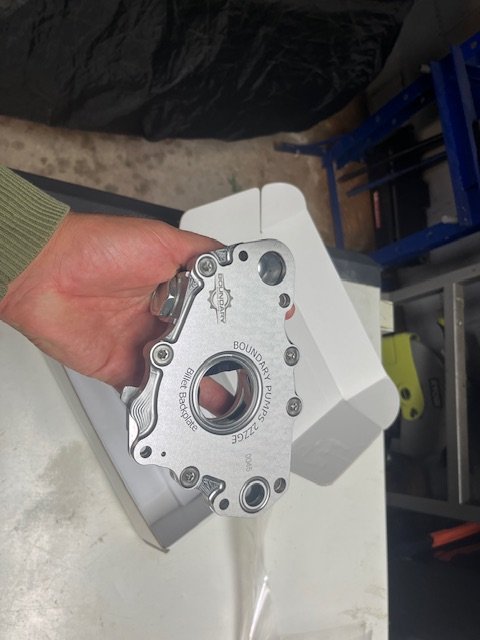
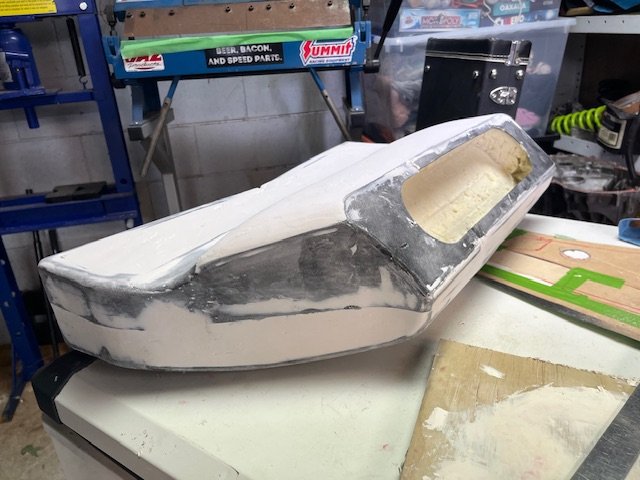
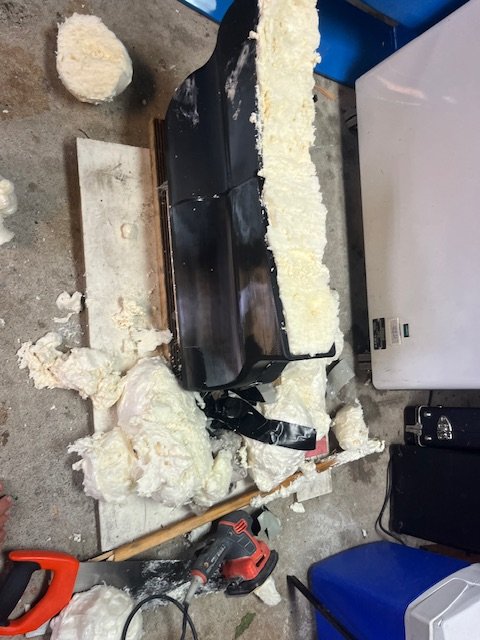
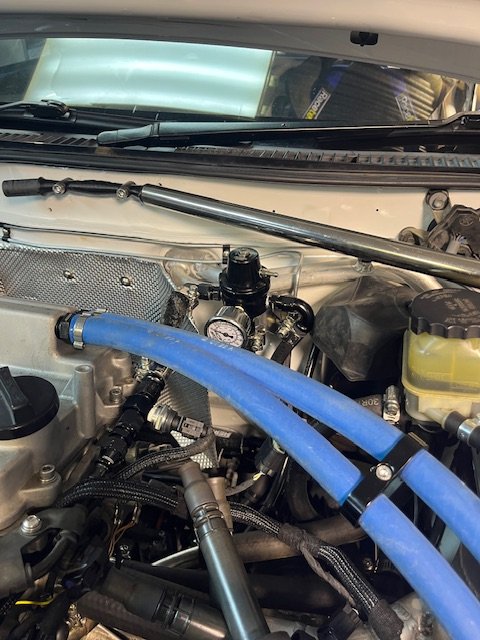
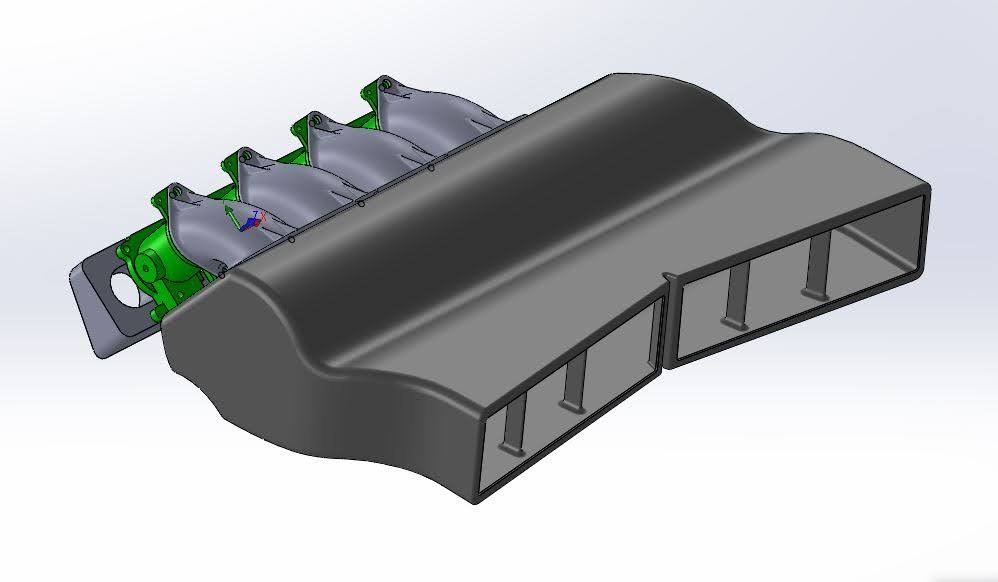
Wow so much progress lately, including delivery of a new son! First up replaced the c5 corvette filter reg with a turbosmart return regulator. Added a gauge for a visual double check of what the ecu says. Took airbox to Mike Shaw fibreglass and discussed the plan. Agreed to put a but of work into flattening it out and remedying the errors in the 3d printing. Unsure if this is due to using petg, the company or the design - could be a combination of all 3. But unfortunately this has caused a huge amount of extra effort and will probably double the cost of the airbox too. Filled with foam, cut 10mm off the top where it was hitting the bonnet. Made a removable core so I could slip it over the trumpets once I’d filled with foam. I had a go at bogging it myself to varying levels of success. It got it maybe 30% of the way there. Mike Shaw will finish the rest of it. so oil pump from boundary in USA showed up. Pretty cool piece of gear. Came as a complete assembly with front cover, billet back plate and relief valve etc. pretty much the best solution for oil pressure I could find other than a mega expensive dry sump. Cut holes in bonnet for vents and working on sanding smooth and painting these stain black. Been working on ducting for power steering and oil coolers. Keen to get this finished off soon so I can get off to powdercoaters Some aluminium 3d printed parts showed up today. First is a retaining ring for the inside of the airbox. This is so I avoid needing to tighten 20x m4 nuts in a tight space where I’m likely to drop one and it end up inside the engine!! Pretty cool level of detail and strength in this part. Section is 8mm tall and 8mm wide for reference. Another cool piece of 3d printing is the strut brace tops. I made a few design changes to these to make them lower profile and a little stronger. I’ve actually made it too low profile and now it’s touching the rocker cover, so will need to figure out what mods I’ll do to solve this. Thinking I’ll take a section from the carbon tube at this stage. Can prob get a few mm from spacing the bosses before they hit the bonnet too. Love the design, looking forward to finishing this part off. got injectors cleaned and flow tested as we had a slightly lean plug on #1 cyl on dyno. Injectors checked out algood thankfully. Thinking it could be due to non-return rail and slightly different flow characteristics at the end of the rail. Drained gearbox oil and turns out there wasn’t much there maybe 2L or so. So i discovered I’ve had an oil leak and more than I expected must have disappeared. Unfortunately it is leaking from the Input shaft seal which is annoying as it’s complete gearbox disassembly to replace… So that will be a massive job I’ll put off for another day (maybe when I finally pull the trigger on a final drive kit from Thailand!) Also got some new Cv boots from Toyota to fit with hi temp grease. Slowly getting through the list to do before next dyno session. It’s doing a pretty good job of emptying my bank account as well, so looking forward to the finish line. Onwards and upwards, getting closer to being finished!
- 418 replies
-
- 14
-
-
-
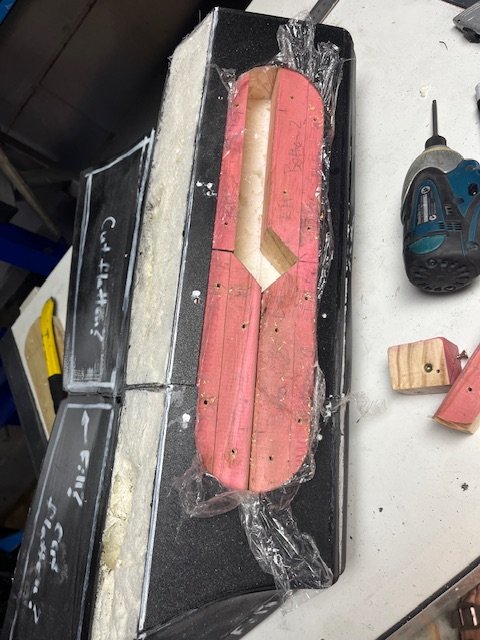
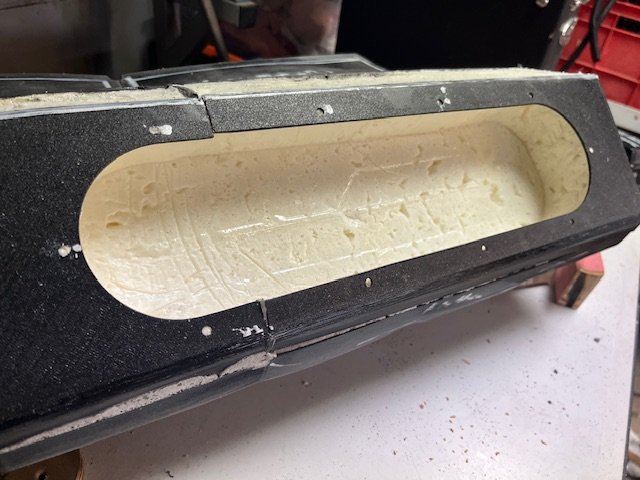
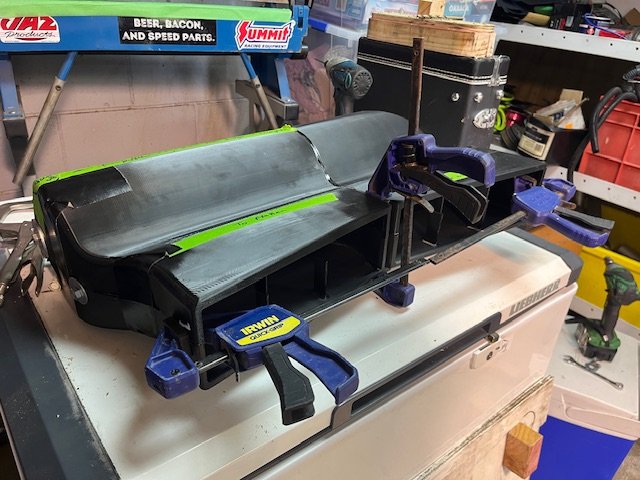
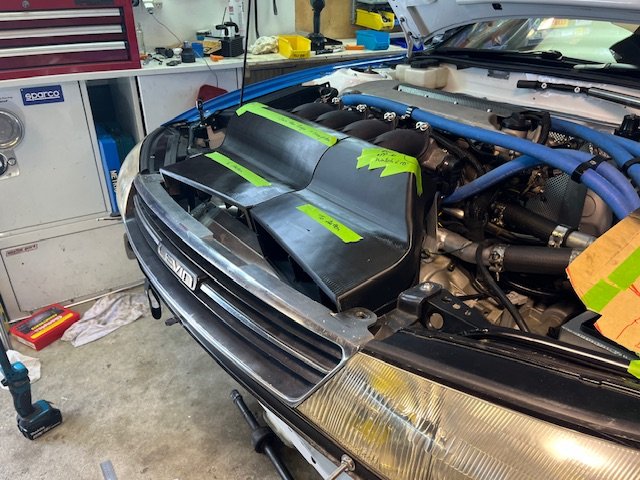
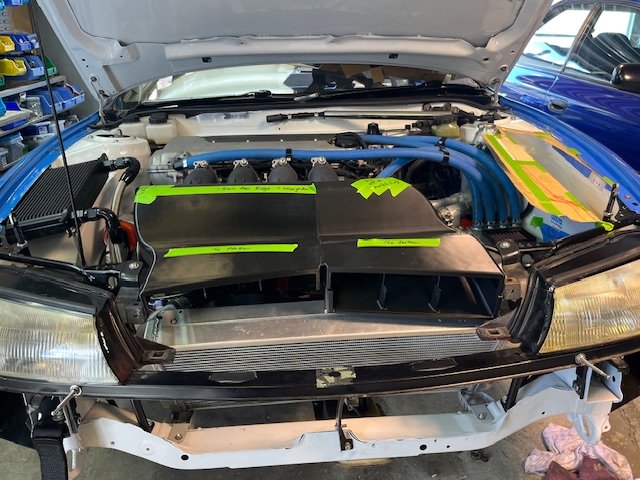
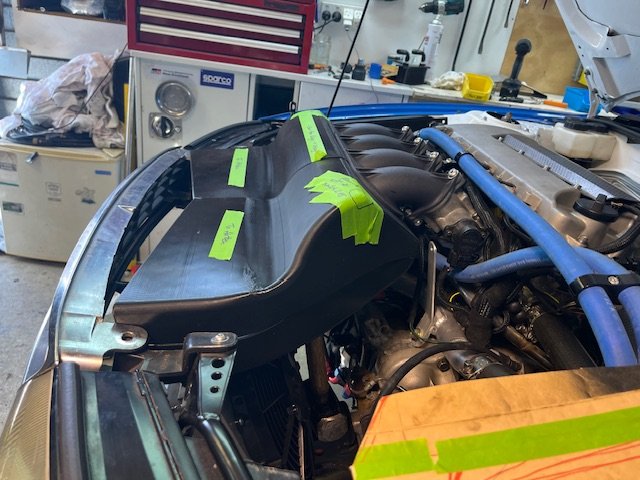
Airbox update #37… full size print arrived from Lithuania. Quality is very average, but should be good enough to make a mold and get a carbon part from. Found a few more small adjustments needed but these should be easy to sort in the mold. Annoyingly, I didn’t check bonnet clearance thoroughly enough on my previous prototype and the extra 5mm means it makes contact. Next challenge is to design and 3d print a stainless retaining ring for the inside with blind nutserts so I don’t need to individually locate 12x nuts inside the airbox when installing. This will also act as a washer to spread the load across the carbon. Also means less chance of tiny nuts vibrating loose and going through the intake! Very excited about the next step!! Been a long time coming
- 418 replies
-
- 13
-
-
Yeah, there should be plenty of near-off the shelf options available that should fit. QA1 and GAZ are good options, or have a chat to Suspension Tech - he should be able to match up a shock for the length you need. More important than length is compression/droop - general rule is 2" minimum in each direction from ride height. A little more droop in rear can help with stability. This may be less on a mini though as they don't have a lot of travel anyway. Just remember, not all adjustable shocks are made equal, and you literally get what you pay for - GAZ would be the minimum quality I'd recommend. An off-the-shelf non-adjustable shock such as Bilstein can often provide much better performance than an average-quality adjustable shock.
-
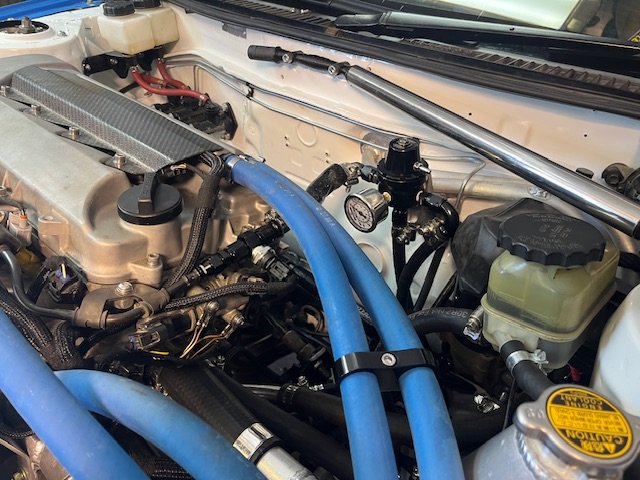
@Rookie after more research and talking to people, oil pressures varies in these engines massively. Some have seen as low as 43psi even using pump upgrade, cooler and ECU (5w30 instead of the 10w50 I'm using). But no run bearings. Others have seen pressures consistently in the low 60's also. So, I don't think it's as simple as at XXpsi it will blow up.. however its not going to hurt to do the following; OEM oil filter (+5psi) Flow filter relocation housings (+few more psi) Upgrade oil pump to stop it falling apart. Talking to Boundary pumps, the tip speed at 9000rpm is guaranteed to shatter an OEM pump. Even their billet pump requires extra heat treatment to withstand anything above factory redline (8200rpm) 10w60 oil (what they ran in TRS) Everyone I've talked to has mentioned running a harmonic balancer for long-term reliability. I won't do this right away, but something I need to do before it gets too much abuse. I managed to talk with David Gouk who built all the TRS motors about the dry sump system. Interestingly, they used the OEM gear pump for pressure, with the belt driven pump only doing scavenging. He mentioned it worked fine, but still had pressure drop-off up top as the gear speed gets too high. It was a compromised solution for reasons outside his control, so probably not the way to go. Apparently the Dailey Dry sump system is the way to go - but is big $$$$. So to summarise the oiling issue, I'm going back to the plan of upgrading the pump/backing plate and trying to get everything as good as possible. A little bit of pressure drop-off up top seems OK/normal so all I can do is mitigate the risk as much as possible and live with it. In other progress, nothing too exciting but still slowly moving forward as we wait for baby #2 to arrive. CV's are currently apart for a rebuild, and I'm working on new Turbosmart fuel pressure reg install. C5 Corvette reg would read 48psi when primed, then 70psi when engine running. I double checked plumbing, sensor calibration etc etc. May have just been a faulty unit, but without indication and ability to adjust, is just another thing that can go wrong and end your day - so in the bin it goes. Once I get this running I'll get the injectors checked out in case there is any sworf that ends up in the Fuel lines. Going to need to book some shed time for my month off on paternity leave because there's so much to do and have a deadline looming!
-
@Rookie thanks, it surprising how cheap the key parts are! Although, I'm under no illusion it won't be it's own version of hell trying to get the whole setup right. And yeah, I don't have anywhere to put the tank except in the boot which means heaps of large braided hose.. At this stage of the project, I just want the thing running and driving. So even if costs were equal, I'm 100% going to go the easiest route for sure. Boundary pumps are 1week + some airfreight away and should hopefully provide some reassurance it won't all fall apart at 9000rpm.. Don't get me wrong, I'd love to indulge in the dry sump idea sometime in the future.
-
@kpr did that one have a cooler or remote oil filter? I'm wondering if I've got a pressure drop through the housing as I haven't smoothed out the flow patht... So could be causing it to drop a little sooner than expected. Another thought I had was that I don't know anything about the pressure relief on the 2zz.. is it same as oldschool pressure reliefs where you can run a shim/washer to increase it's max a little? Oil pump and pressure relief are easily accessible so might be worth mucking with? hahaha @shrike if money were free, and parts could be purchased with Doorts (a much more enjoyable currency than $$ obv.), I'd be all over this option. I've asked a contact to try track down a TRS sump for me... however I expect it will be out of my budget.
-
Dropped off to 55psi, which seems to be the point they go bang (if prolonged at that pressure) So I did some digging through my old invoices when we built the engine in 2012, and we never installed a MWR oil pump, but a brand new Toyota one. Which isn’t bad, but isn’t great either and 100% explains the pressure drop off I’m getting. Will be interested to compare with other logs of 2zz oil pressure you may have. Thanks to Dave for putting me onto Matt Gill, because I’ve been talking to Boundary pumps in the US of A. They have a special gear and billet backing plate option that they reckon will hold pressure through to 9000rpm. Seems like the way to go, but haven’t seen any logs yet with data to back it up. https://boundarypumps.com/shop/toyota/2zzge/2zzge-billet-oil-pump-assembly/
-
Yeah even with some tuning, the gearing and final drive in them isn't very sporty (even worse if he was using 1zz gearbox). 4.8 or 5.1 final drive livens them up A LOT.. I'll do this eventually, but a few other things to get sorted first.
-
Toyota was behind Honda in the 90's in terms of engine development. This engine is more a competitor to the B18cr, but came out when Honda was already doing K series things. The 20v's made 220hp in group A form, but geez it must have been a lot of work, as that HP is very difficult to achieve from a 20v. Whereas B18cr makes that HP without too much effort. Beams was good head, but was never awesome because of old-design 3sge bottom end was originally developed for group B rallying in 222D which never came to fruition. Even with the 2zz they dropped the ball at ecomony and boring cars - develop this awesome engine made for 9000+ and then put it in boring overweight hatchbacks with shitty exhaust manifolds that would damper all the good noises they liked to make. It's a story of what could of been if they had this engine in the ae111 2drs for example... Toyota does mass production and reliability amazingly first and foremost and performance comes second.... but its also now the biggest auto manufacturer whereas Honda is struggling
-
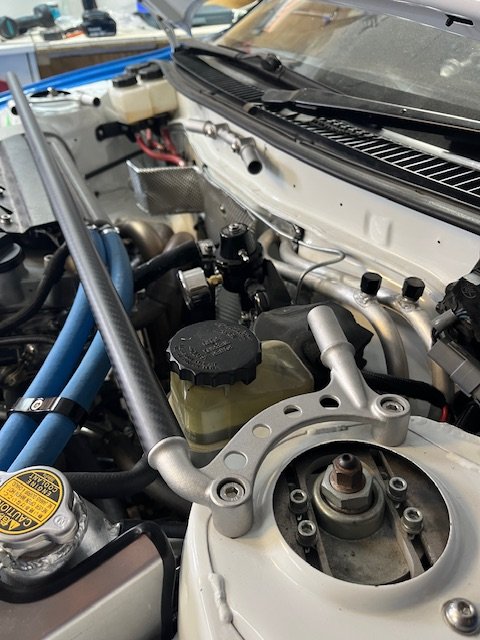
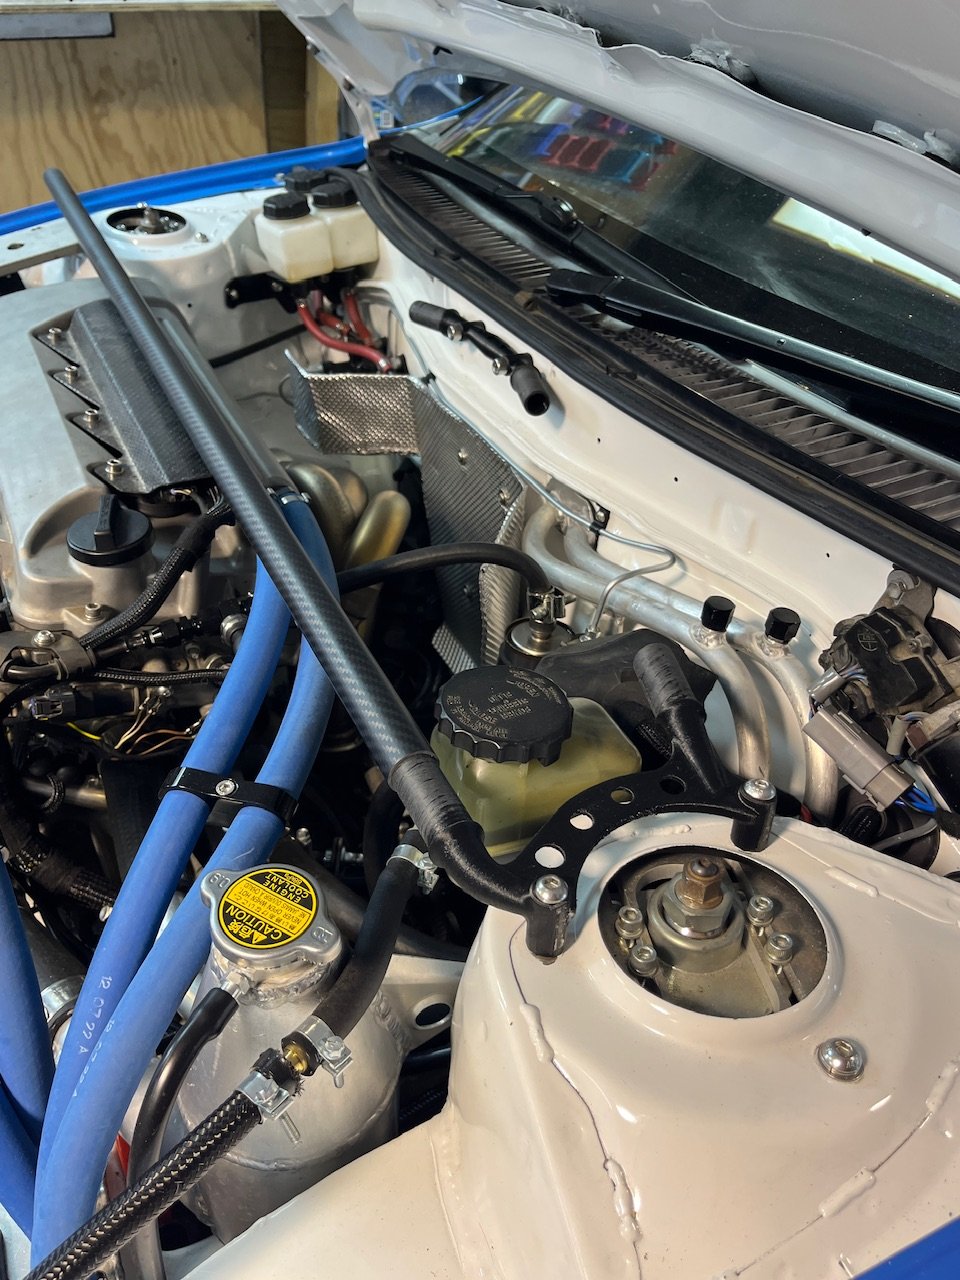
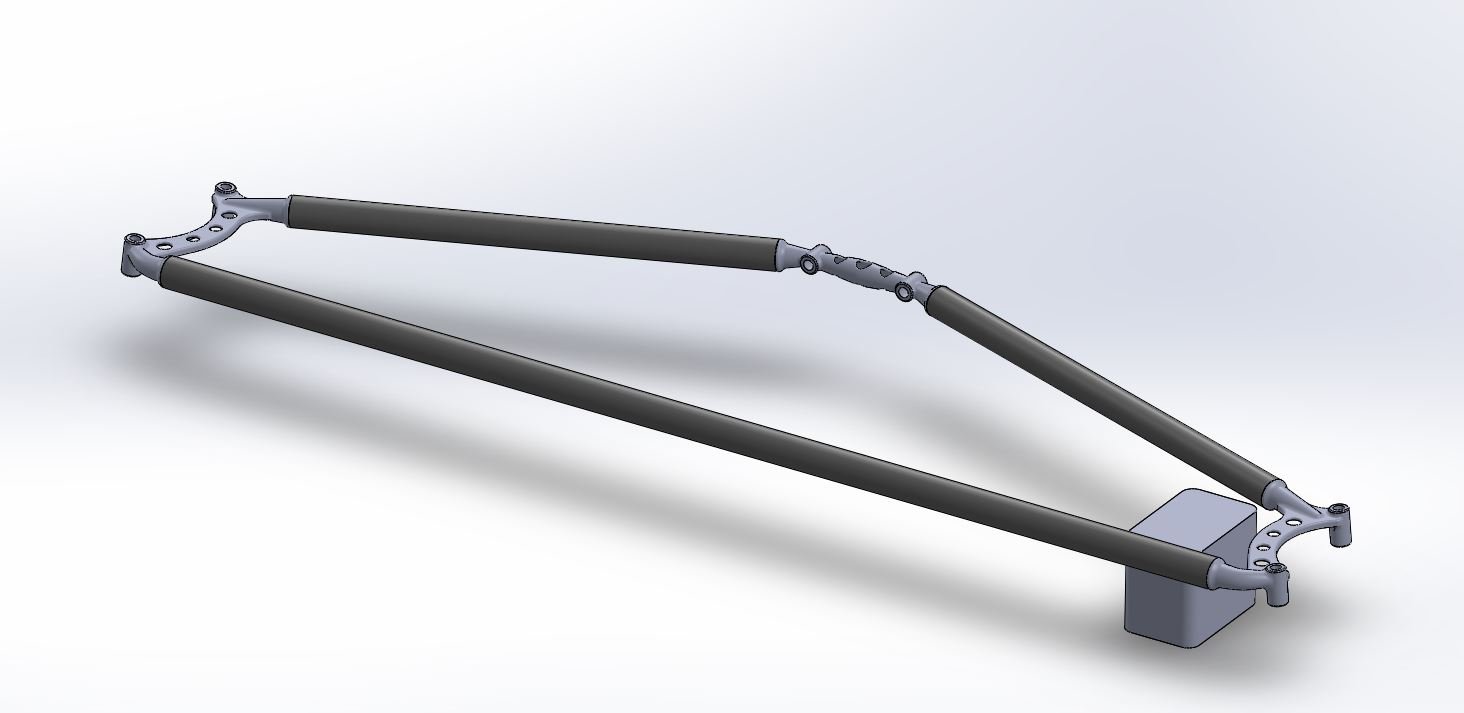
Yeah it doesn't move much. Probably biggest flex will be under big compressions as with mac strut all spring pressure goes through tophat. I've tied the cage through the strut tower so this brace is really just to tie the two 'legs' of the cage together, and get whatever triangulation stregnth I can from the lightweight slam panel at the top of the firewall. It's as decorative as it is functional, but my engineering brain couldn't let myself not do anything.
-
@GARDRB I knew someone would mention that... I'd considered it, but it makes the part a lot more expensive as the dimensions increase significantly, along with signficant increase in material weight for only a slight increase in strength. So I decided not to. In reality, a 22mm OD boss with a M8 bolt through the middle of it is grunty as all buggery and will happily transfer as much load as I like, until it rips the thread from the aluminium tophat (this is probably my weakest link tbh).
-
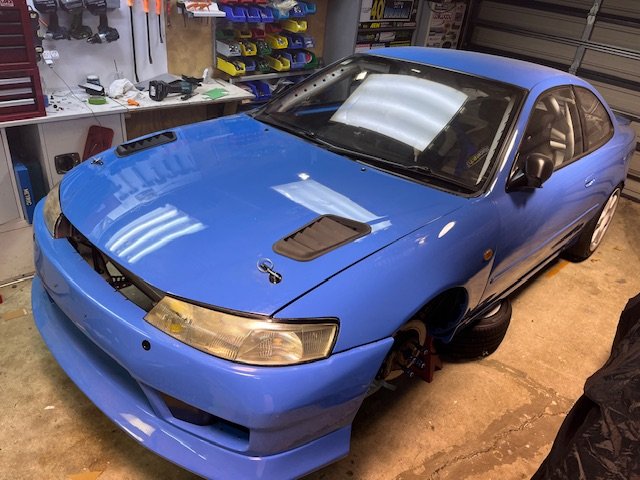
Thanks man, it’s been a long time coming. Wow I can’t even imagine a louder intake noise at this point. Going to be off the chain. This one was 1050kg factory, but there’s a lot that isn’t in this car now, so expecting 900s but would be nice to confirm the numbers. They tend to be a bit lighter than the Hondas due to no over-complicated double wishbone suspension 🤣
-
Has about the same level of creature comforts but Toms racing blue instead of British racing green??
-
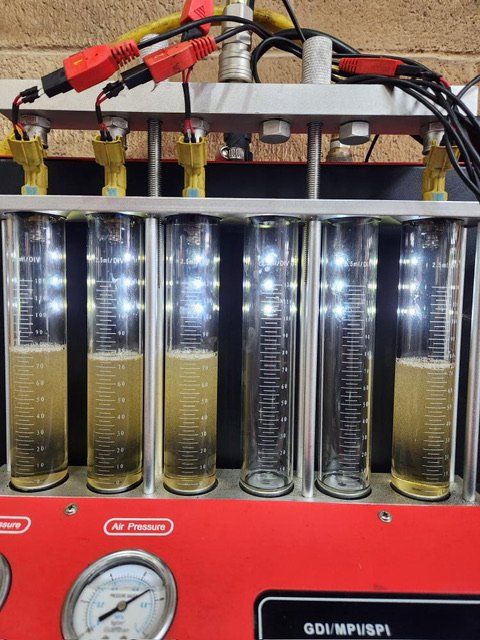
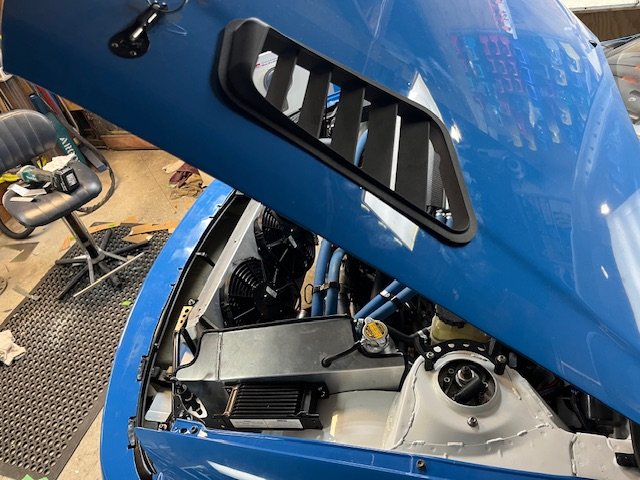
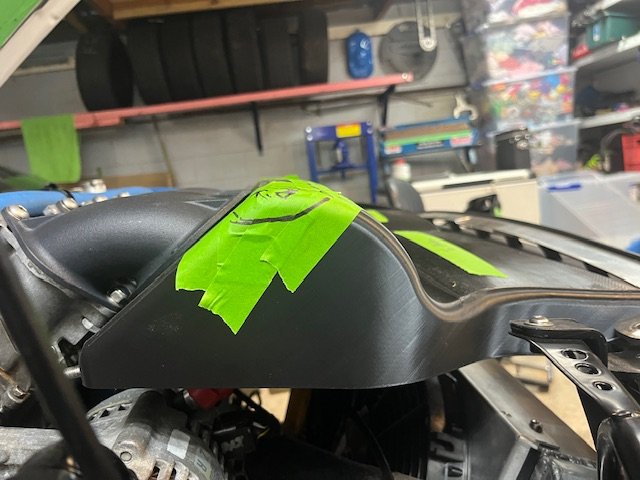
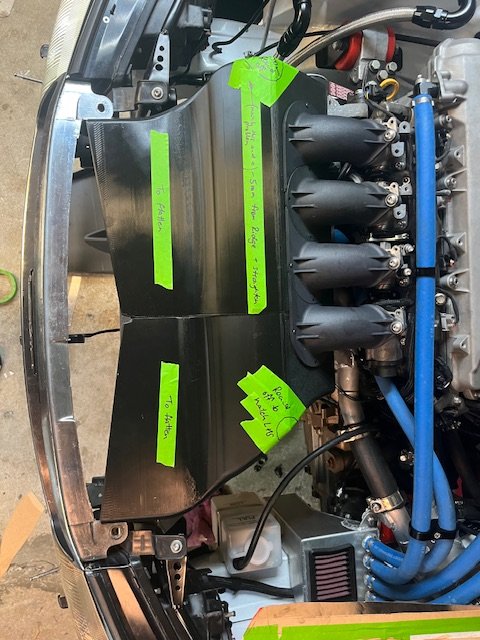
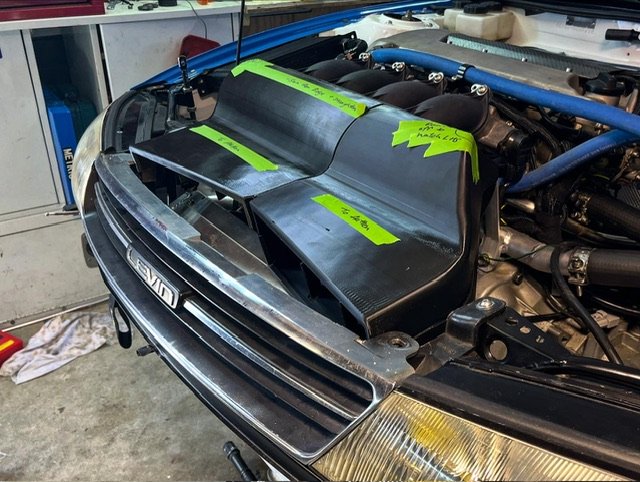
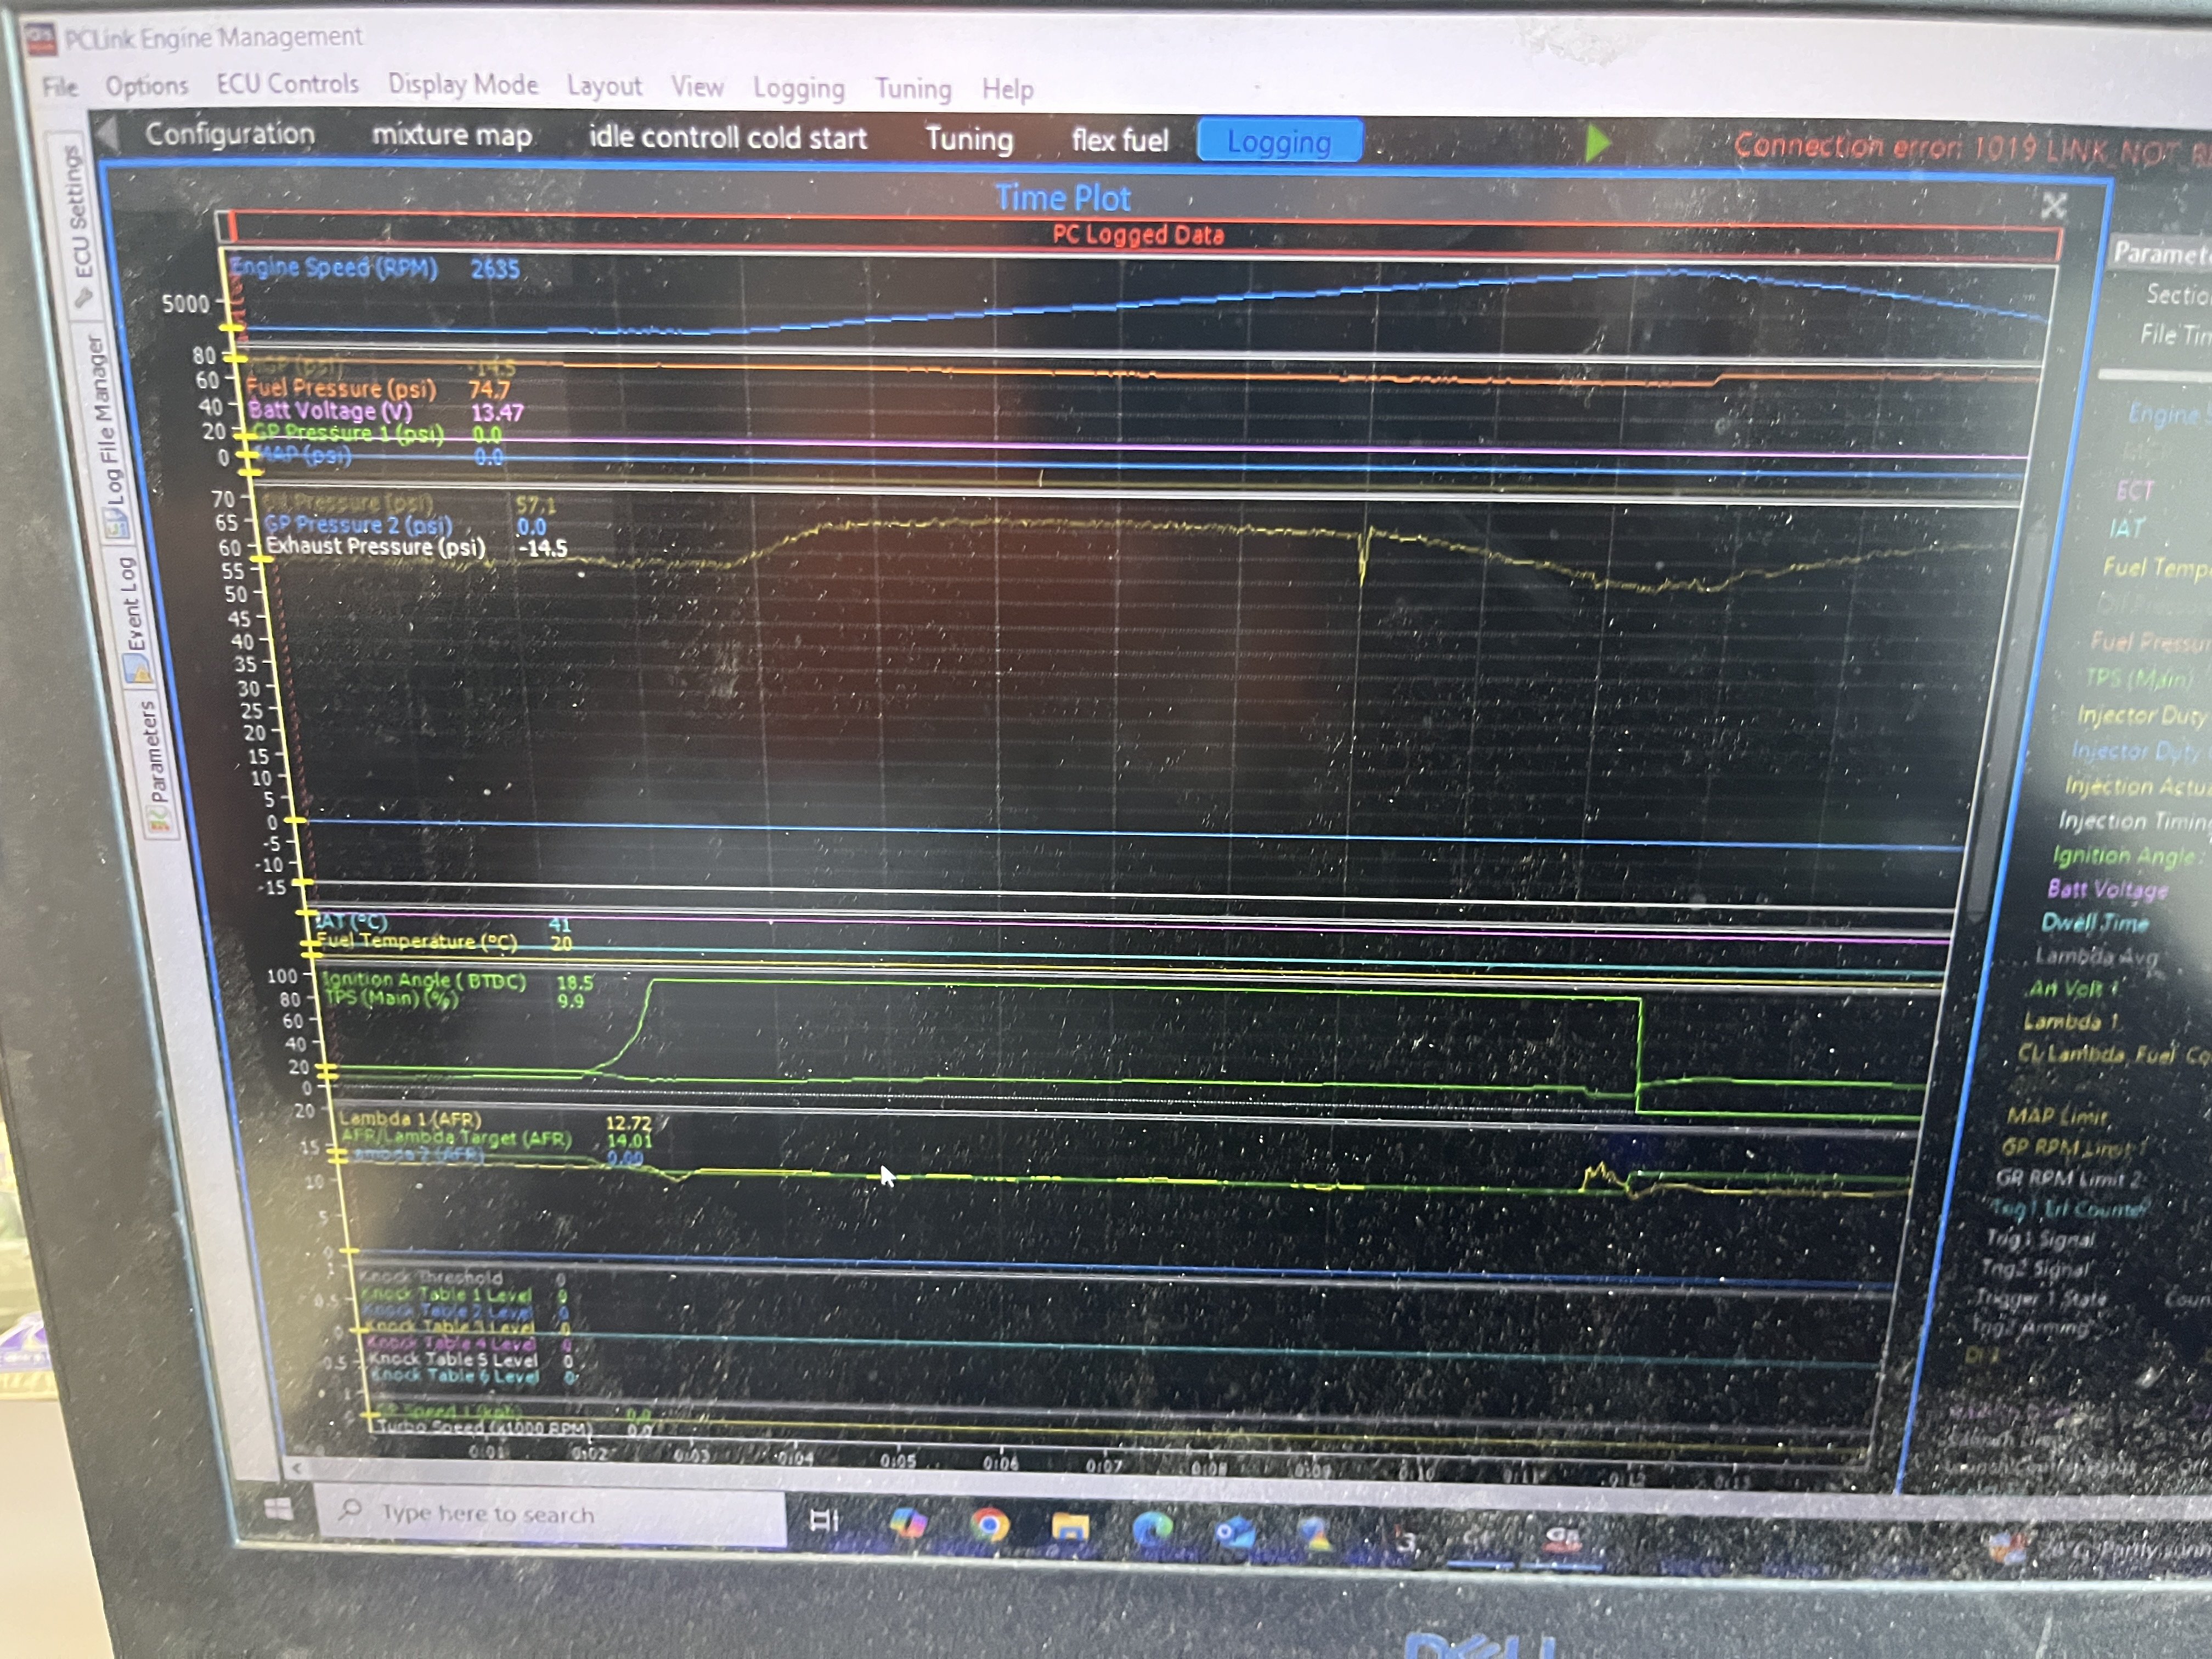
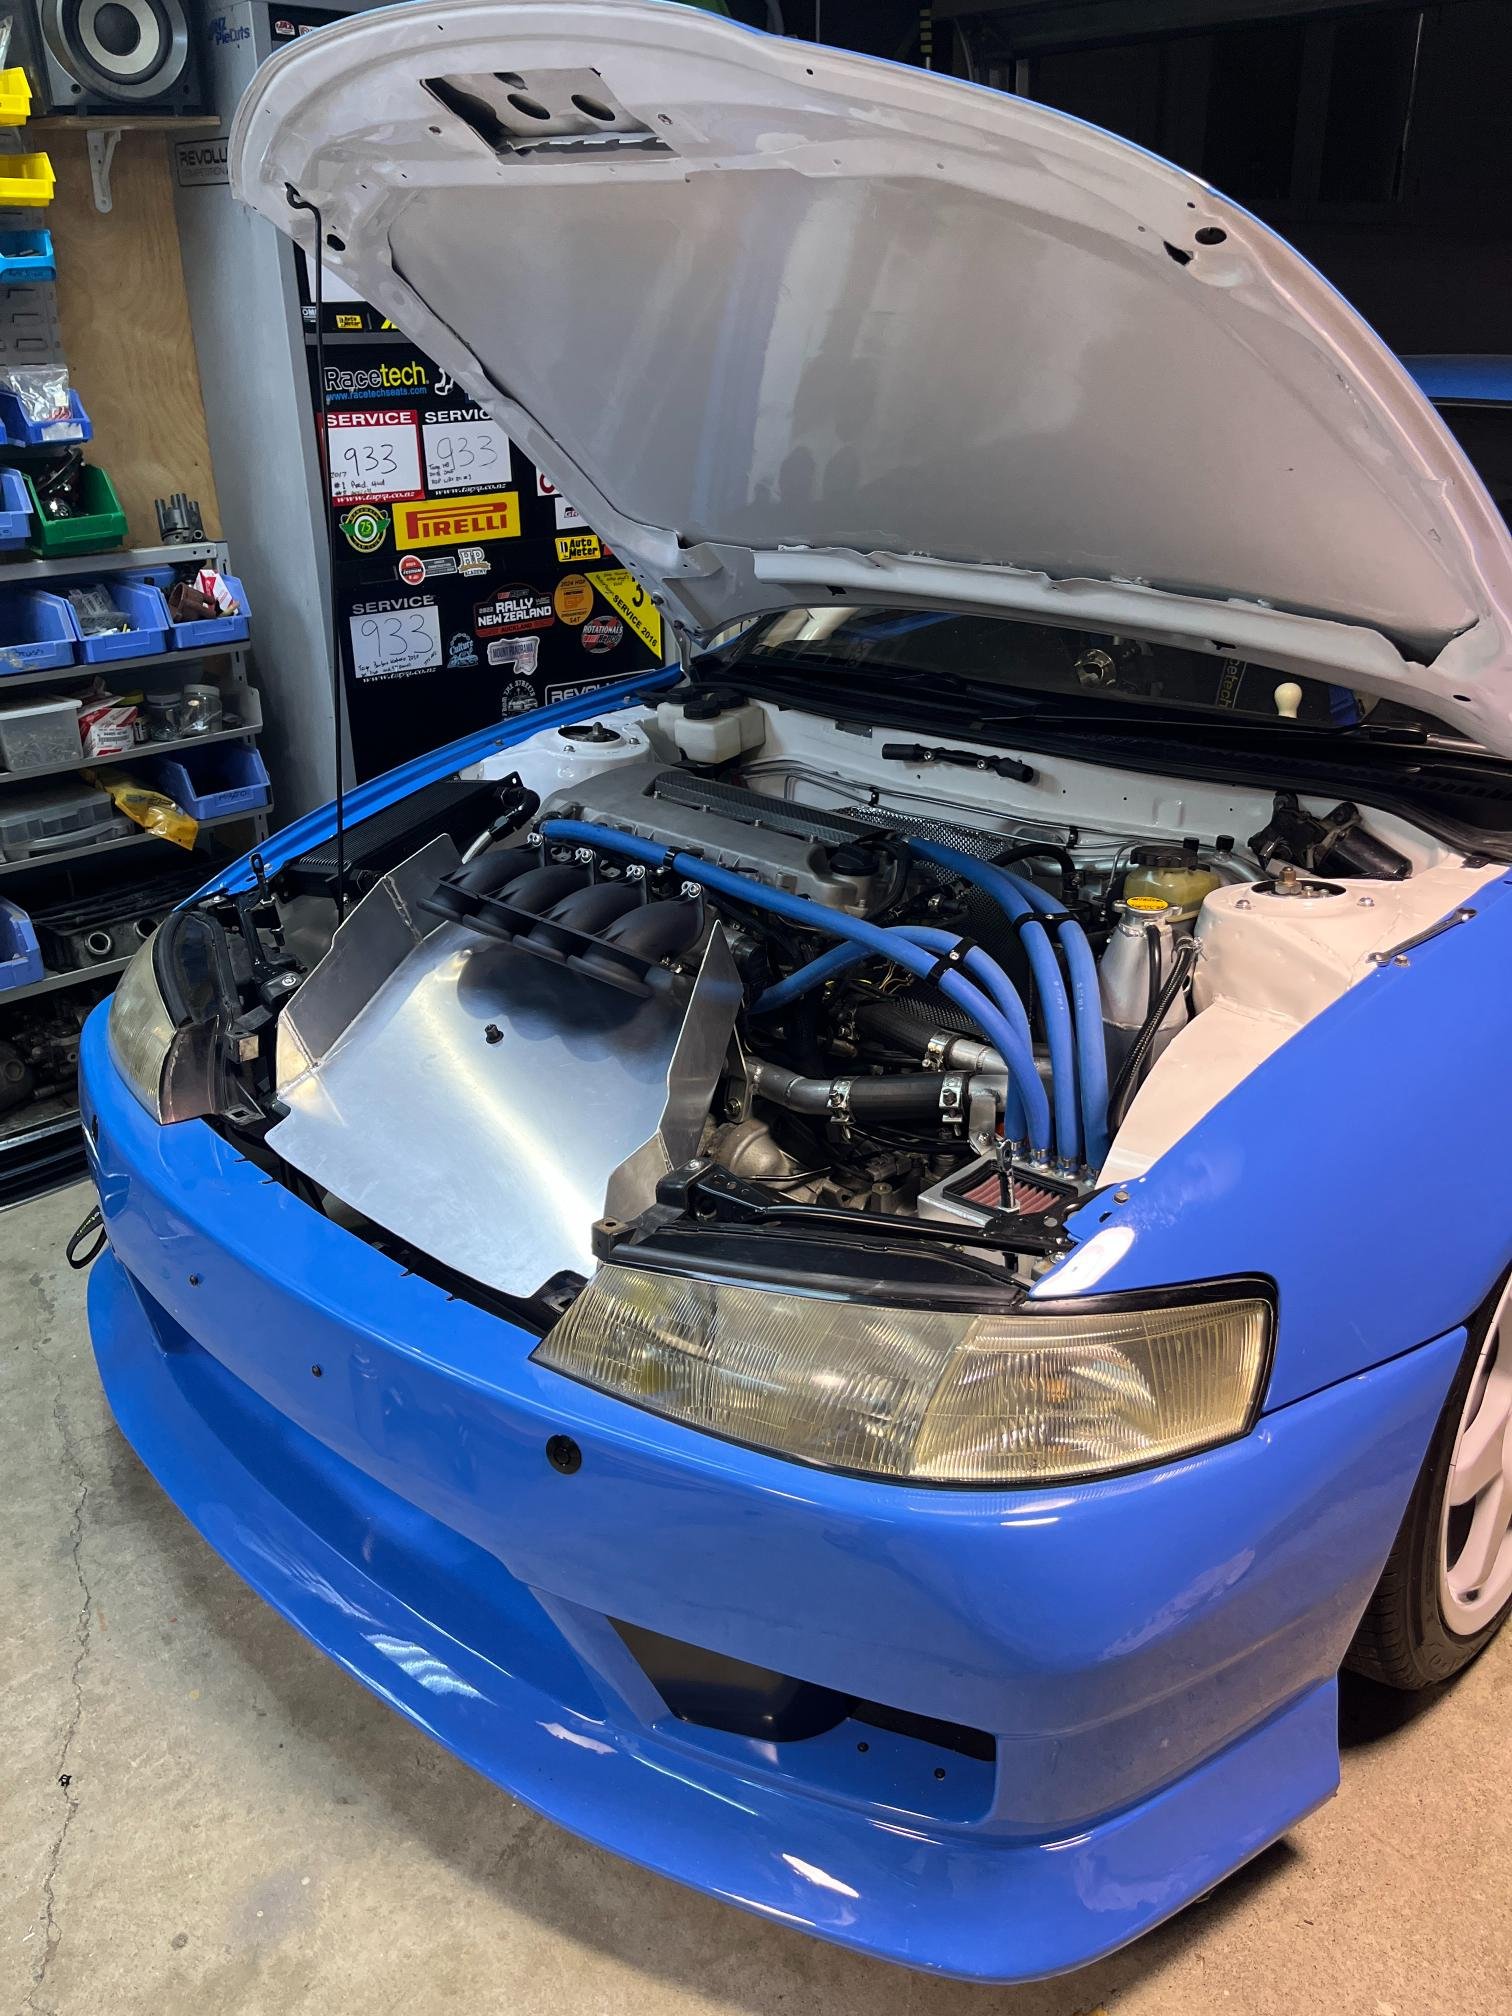
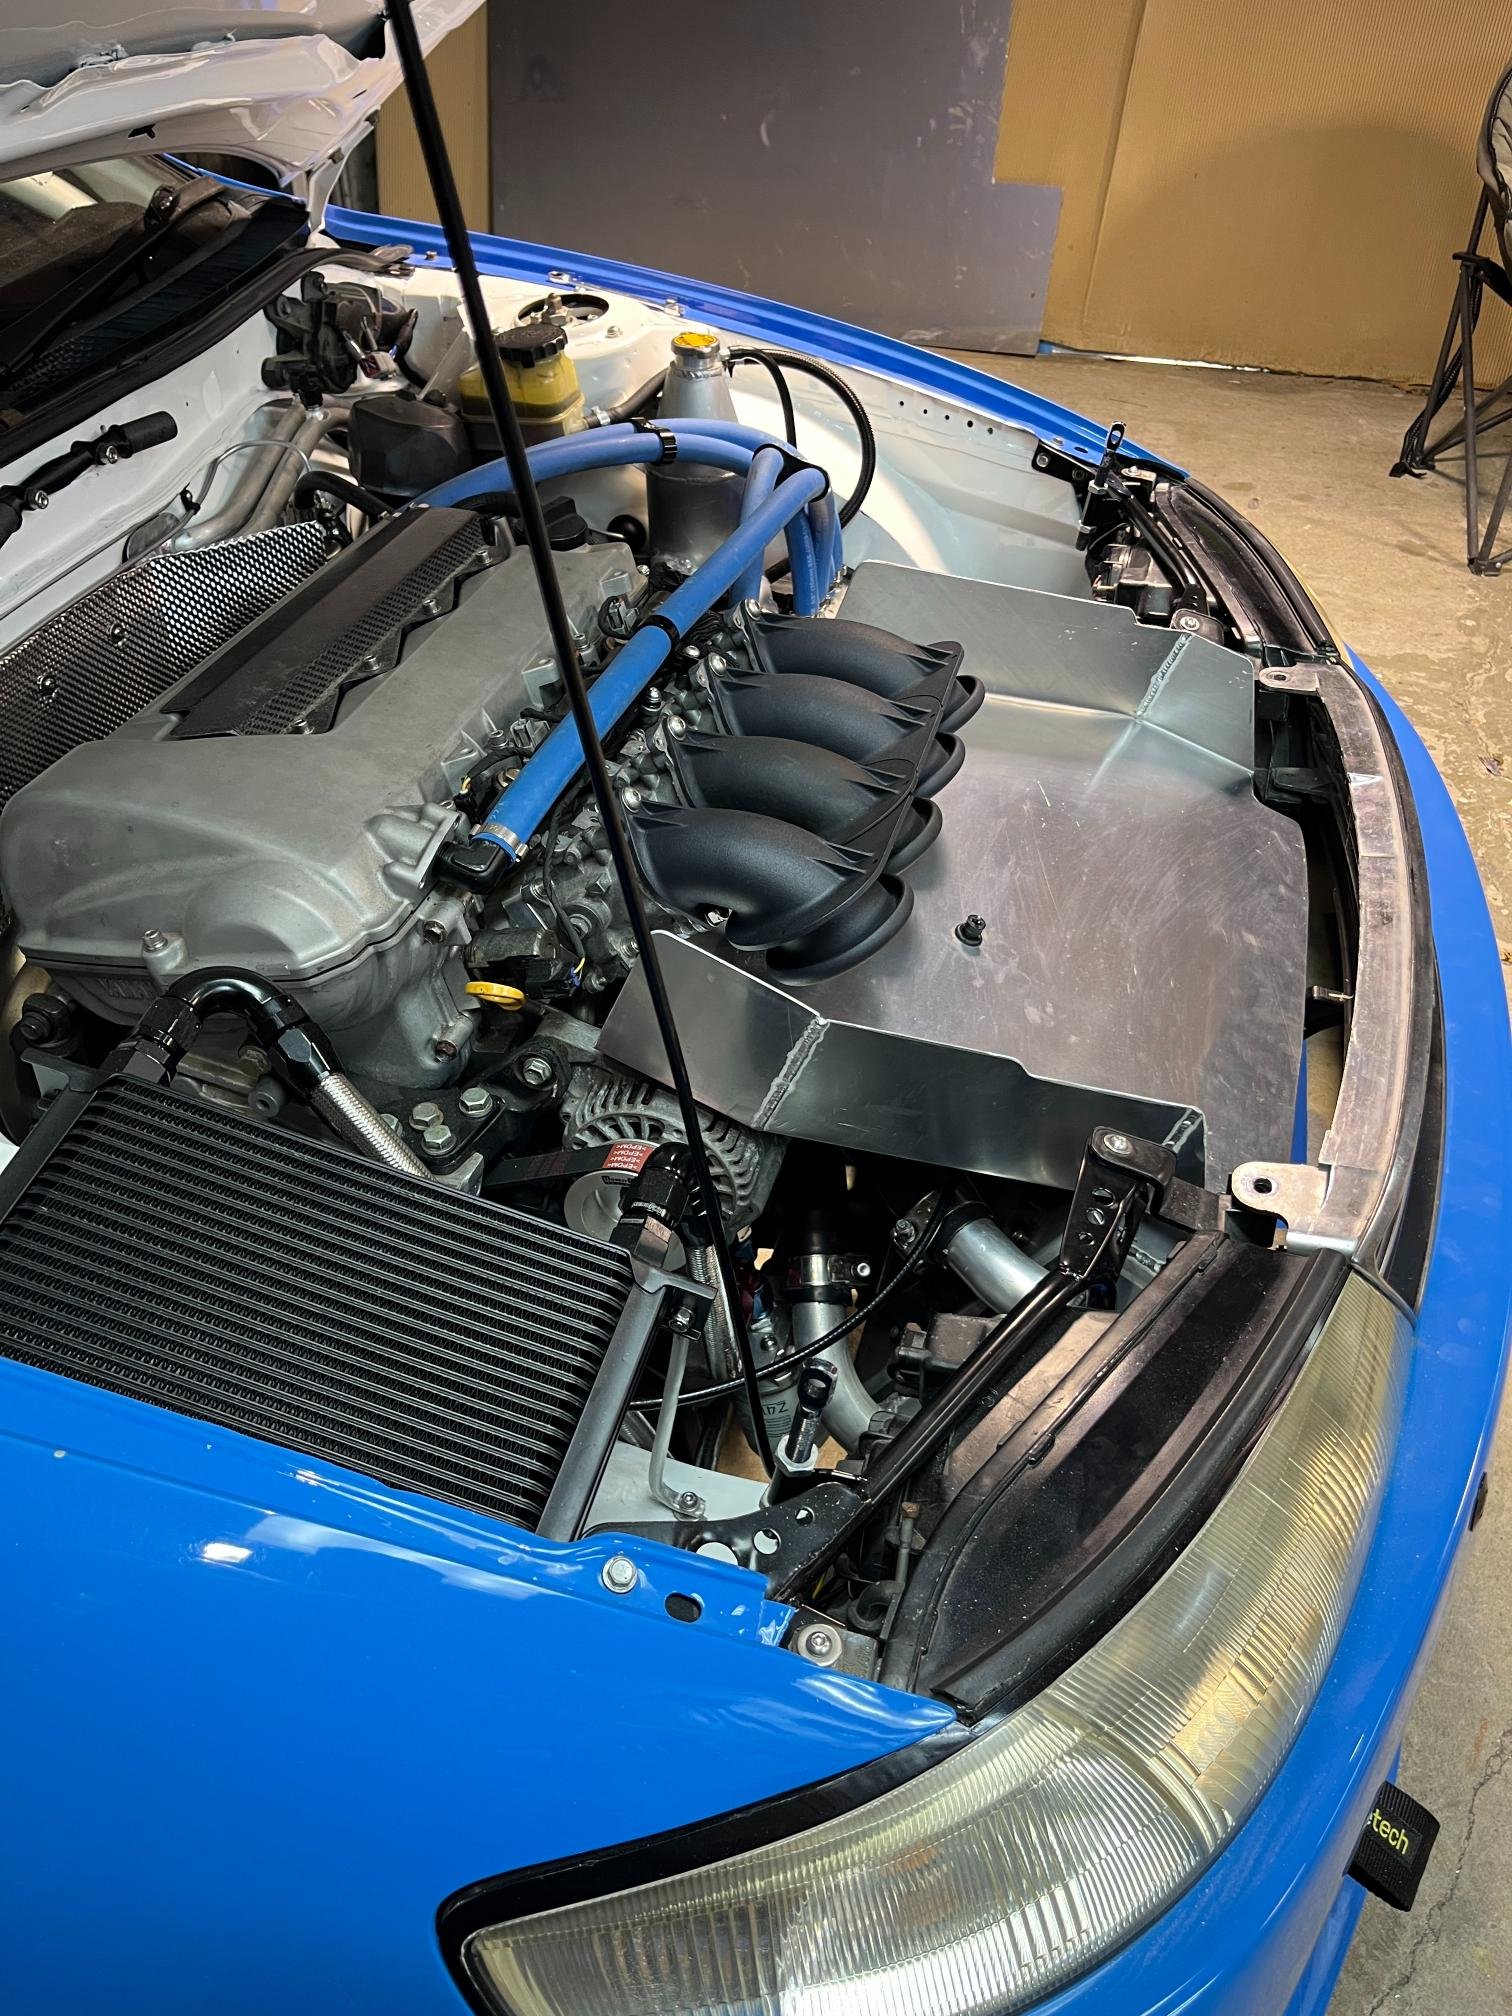
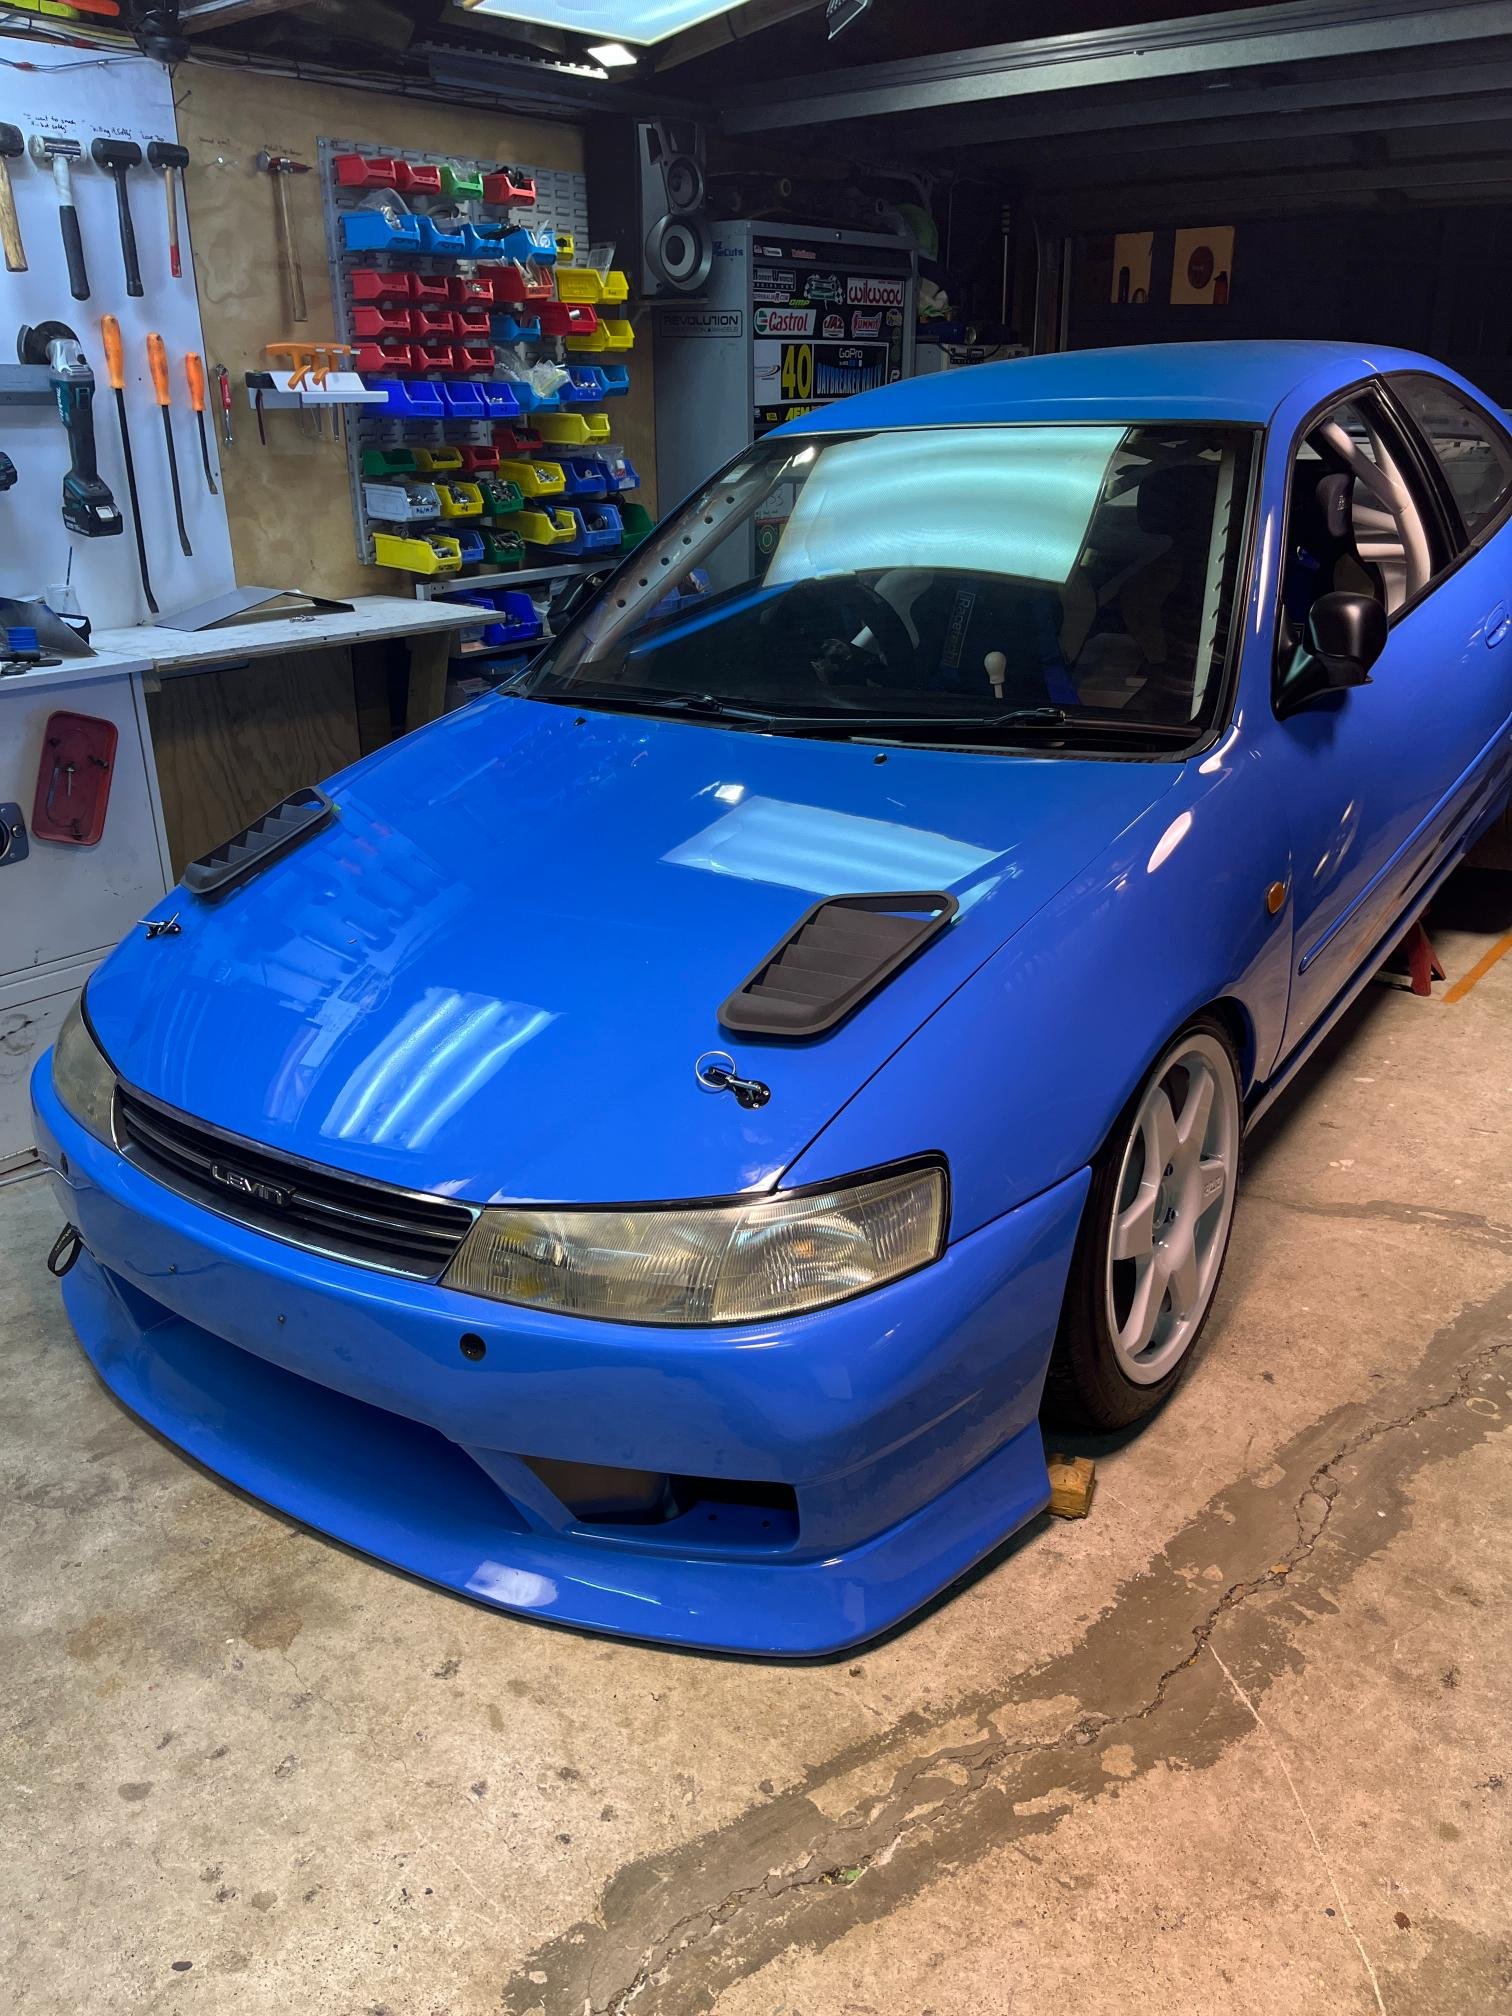
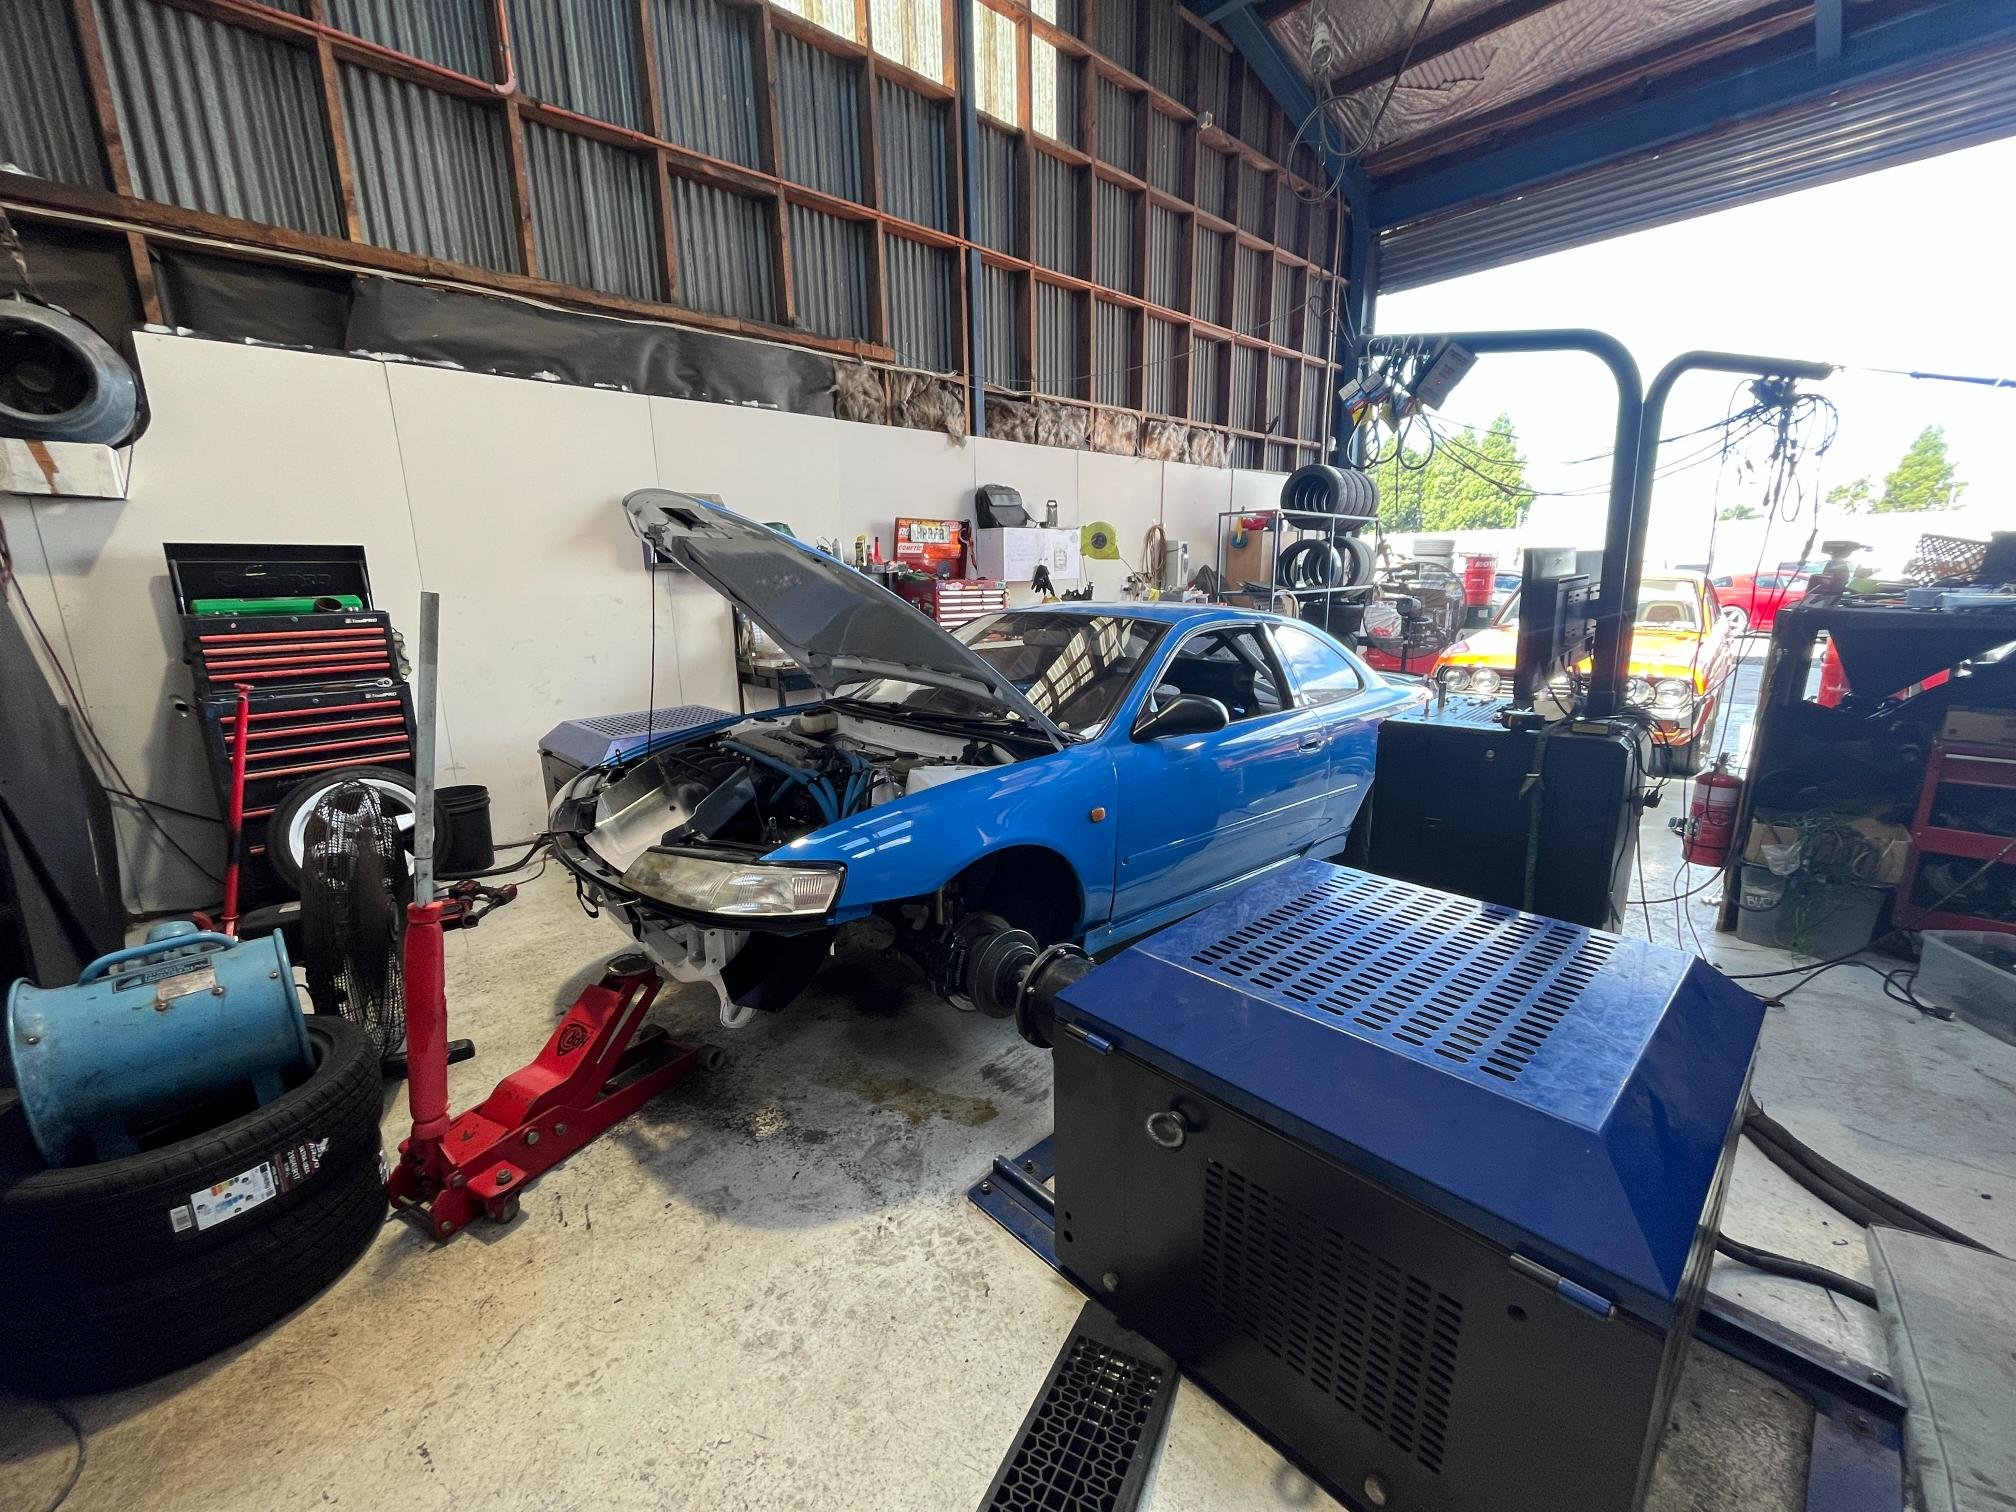
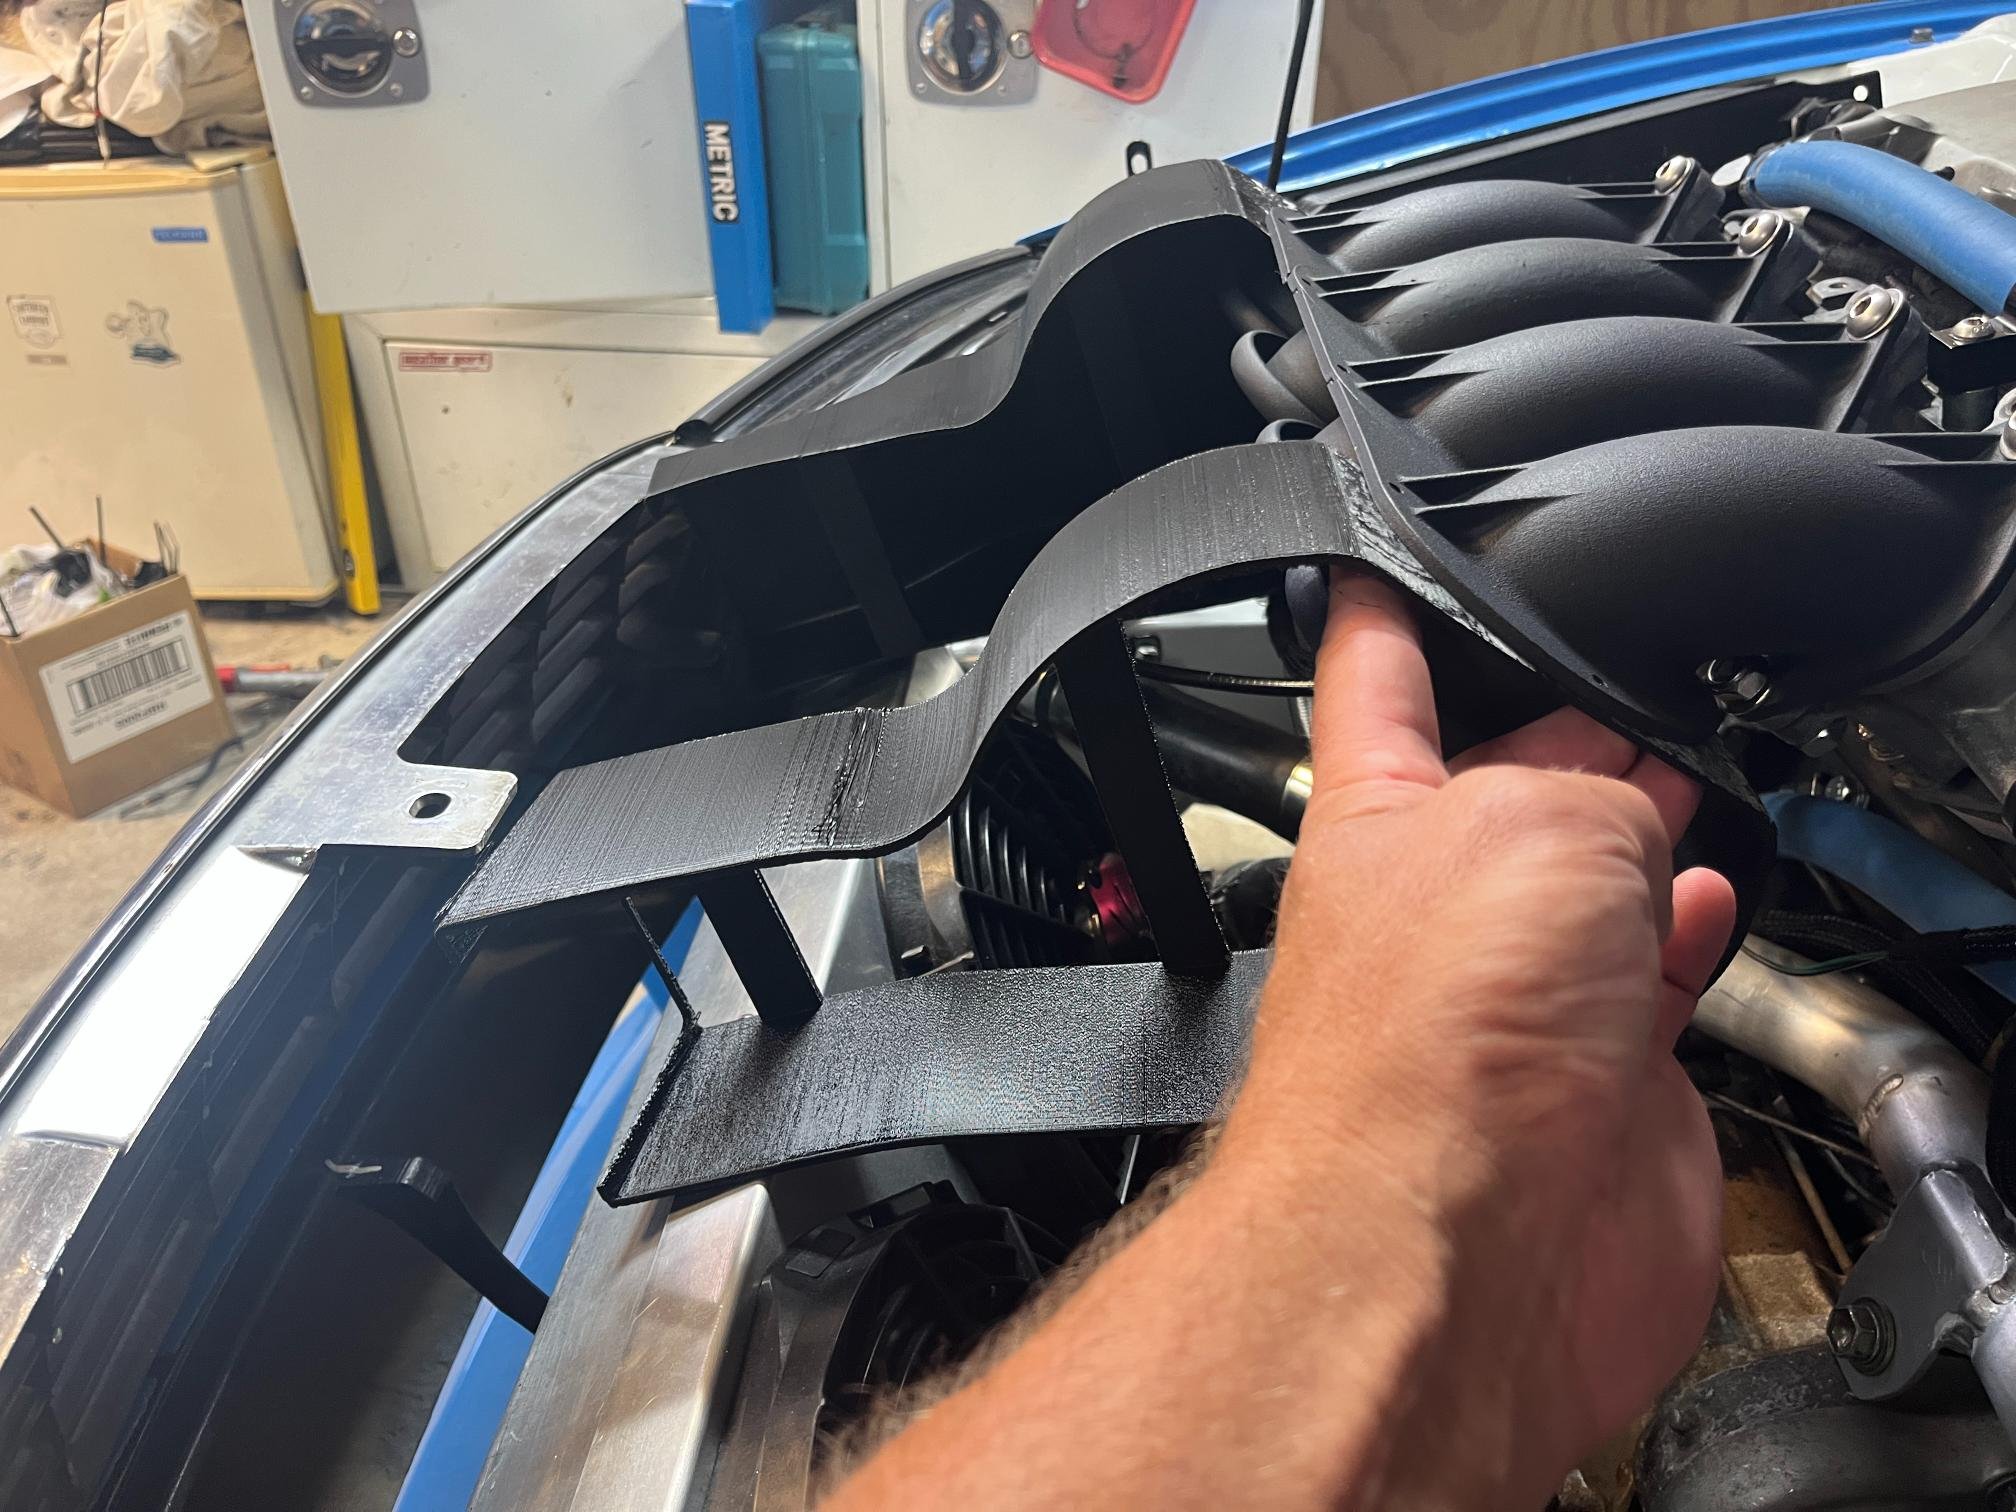
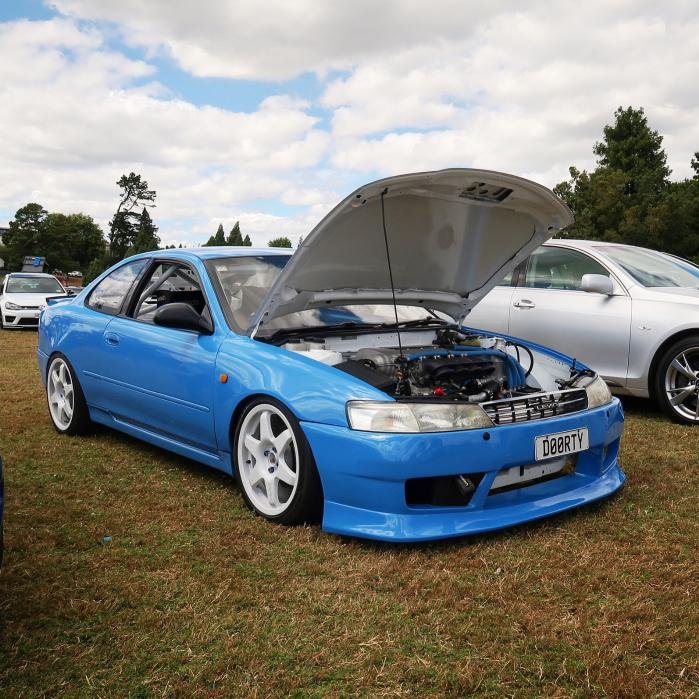
In preparation for the Dyno, I made a heat shield to keep radiator air away from intake. it's a bit crude, but does the job. Even got the AIT in the right spot. Will go in the bin as soon as Airbox is sorted. Also had my 3D printed bonnet ducts show up. These will exit the air above the Oil and PS cooler ducts. Very happy with the aesthetics. Will need to cut holes and glue them in at some point. Rough placement of where they'll sit. So this happened this week. Been a journey. Some days I thought it would never come... hard to know what emotions to feel - relief, anxiousness, excitment and pessimism all rolled into one. And it made the good DOORTY noises!! Exhaust and intake note are something else I could feel it through my whole body when lift comes on! Only basic tune so far, got through RPM range, low revs sorted and lift coming in. Some weird things were happening so decided to pull pin and resolve them before trying to go any further. It was a massive day of trouble shooting all the issues you have a with a ground-up built like this, so the results aren't really worth sharing at this stage, I guess biggest takeaway is it wants to rev to the moon! Power still happily climbing at 8500rpms.. Issues we came across and worked through; Ran-in engine medium load and then changed oil and filter. After speaking with a friend in the know, I went with a 10w50 4 stroke motorbike oil from Total. Fuel pressure reading 70psi. Need to check sensor range & for airlocks. Will change to adjustable FPR anyway just to rule out regulator issues as C5 corvette filter/reg has no adjustment. Running rich on #1 - injectors need to be checked. checked/changed plugs, coils and even compression tested - 200psi on all 4, valve lash seemed OK to rule out mechanical issue. Rollover fitting in top of fuel tank leaking - bitch of a job to do (almost need to remove whole tank). Hadn't filled the fuel tank all the way up previous to this. Found #1 coil spring was weirdly jammed in. Wasn't sparking properly for run-in but managed to sort it out. Still can't explain how this happened. Oil pressure dropping off at high made us not want to push it any further. Doing some research, MWR say this is normal https://www.monkeywrenchracing.com/tech-2zz-race-track-prep/. Further research says likely cause it backing plate warping at relieving some pressure. Unsure if I'll do this change this, may just limit the RPM's within a safe limit. Also need to pull apart oil filter relocation housing and port it to reduce any pressure drops. Lift turning on very late at 6200rpm (same as factory ecu). Didn't want to come on earlier, but this was without VVTI turned on, so most likely not an accurate representation of what it will look like after a bit more tuning. But, we did have a thought that the exhaust manifold or megaphone is causing excess backpressure which makes everything want to go backwards when lift turned on. Want to double check megaphone calcs first as this will cause a negative effect before the timing required for it to arrive at the valve at the correct time for everything to work as it should. Would be a bit weird, but my extractors ended up a little longer than anticipated and it's been years since I've visited the megaphone calcs so it's worth a check. We found some metal chunks in oil filter approx 2-3mm dia. Came to conclusion these mustn't have been cleaned out after motor failure in previous life, as there's no way these could of gone through the pick or oil filter without exploding everything. Other likely source is cam chain teeth/vvti pulley so will do an inspection to double check nothing is amiss. Inner CV boot shat the bed - not suprising as were using 5th gear which is over 200kph.. need to rebuild and add some of the special NEO grease. Positives to take away; 1. Engine isn't completely f^%ked after sitting for 10yrs since rebuilding it in a mates shed, with the help of 8% diesels. 2. Cooling system worked well. We had to add another small fan to front as Dyno was made for RWD cars, but we repeatedly beat on it for an hour at a time and it held 87deg. Oil cooler duct also worked great - maintaining 87deg oil temp with very little airflow over it. 3. General car stuff worked good. Fuel pump and filter is well setup, no issues with supply. Gearbox, shifter and clutch worked mint. 4. It didn't catch on fire with exhaust being so close to everything - this was a genuine concern of mine after making everything so custom!! 5. Good god it sounds amazing!! 6. I took for a quick drive down the street and it feels a lot quicker than I thought it would. Pulls very well into the next gear (lands right where peak torque is). Waaay better than a 4age thats for sure! This also made me think the chassis may be lighter than I expect (900ish KG). Need to put it on the scales at the dump next time I take it out for a drive. At this point, I’m also super grateful for the OS and other peps who have reached out and helped out with advice, I’m not much of a tuning person so it’s much appreciated! Eager to make more progress, but now have to spend multiple nights inside with 9-month pregnant wife to regain all brownie points the effort this exercise burned!! I'm sure many can relate.
- 418 replies
-
- 20
-
-
-
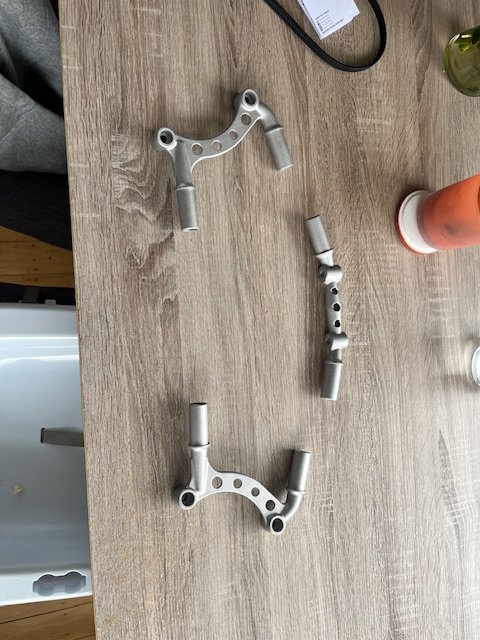
That’s super interesting! I guess carbon has lots of resistance to expanding so a shrink makes a pretty strong bond. My plan is to allow 0.5mm of clearance to take up a bit of slop in the angles as I’m not 100% confident I’ve got them perfect - but they are close at least. Also I’m unsure how accurate tolerances will work out after printing as I’ve heard aluminium can shrink in weird ways during sintering. Another thought was any bonding material needs so room as it won’t penetrate either the carbon or aluminium Yeah it’s a useful tool for this stage of the project - but I’ve struggled to find useful applications for it until now. I’m also very lucky I’ve got an engineering degree in design and spent 5yrs designing bespoke machines in solidworks. If it wasn’t for that experience these little projects would be about 1000x harder to do.
-
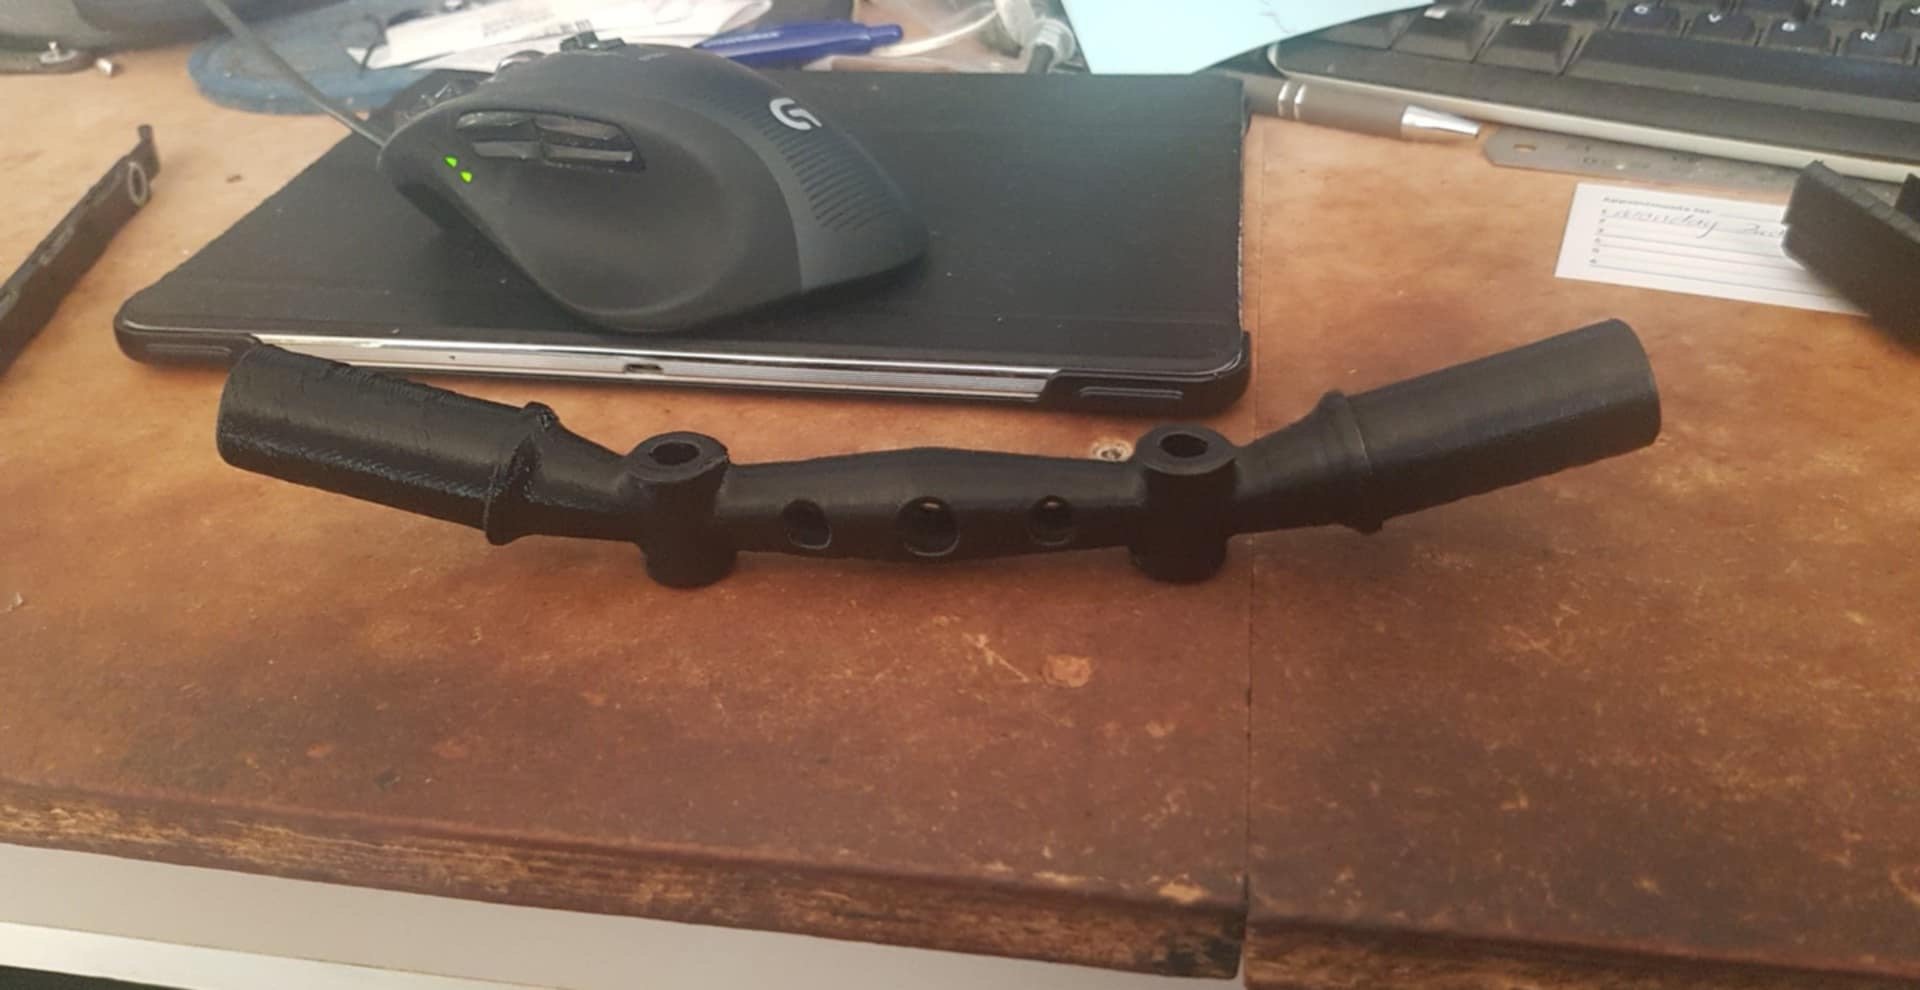
Cheers guys! This stuff is way easier than the tedious years of piecing everything else together. Kinda feels like cheating to go from idea to finished part in only a few months 😂 In other news… test fitted the prototype pieces for strut brace. Didn’t get slip on sizes correct so can’t assemble properly but you get the idea. Few tweaks to make for bonnet clearance etc but design work is close to being finished. even printed in PLA the part is super strong in all the right directions. Confident it will be strong enough once printed in aluminium.
-
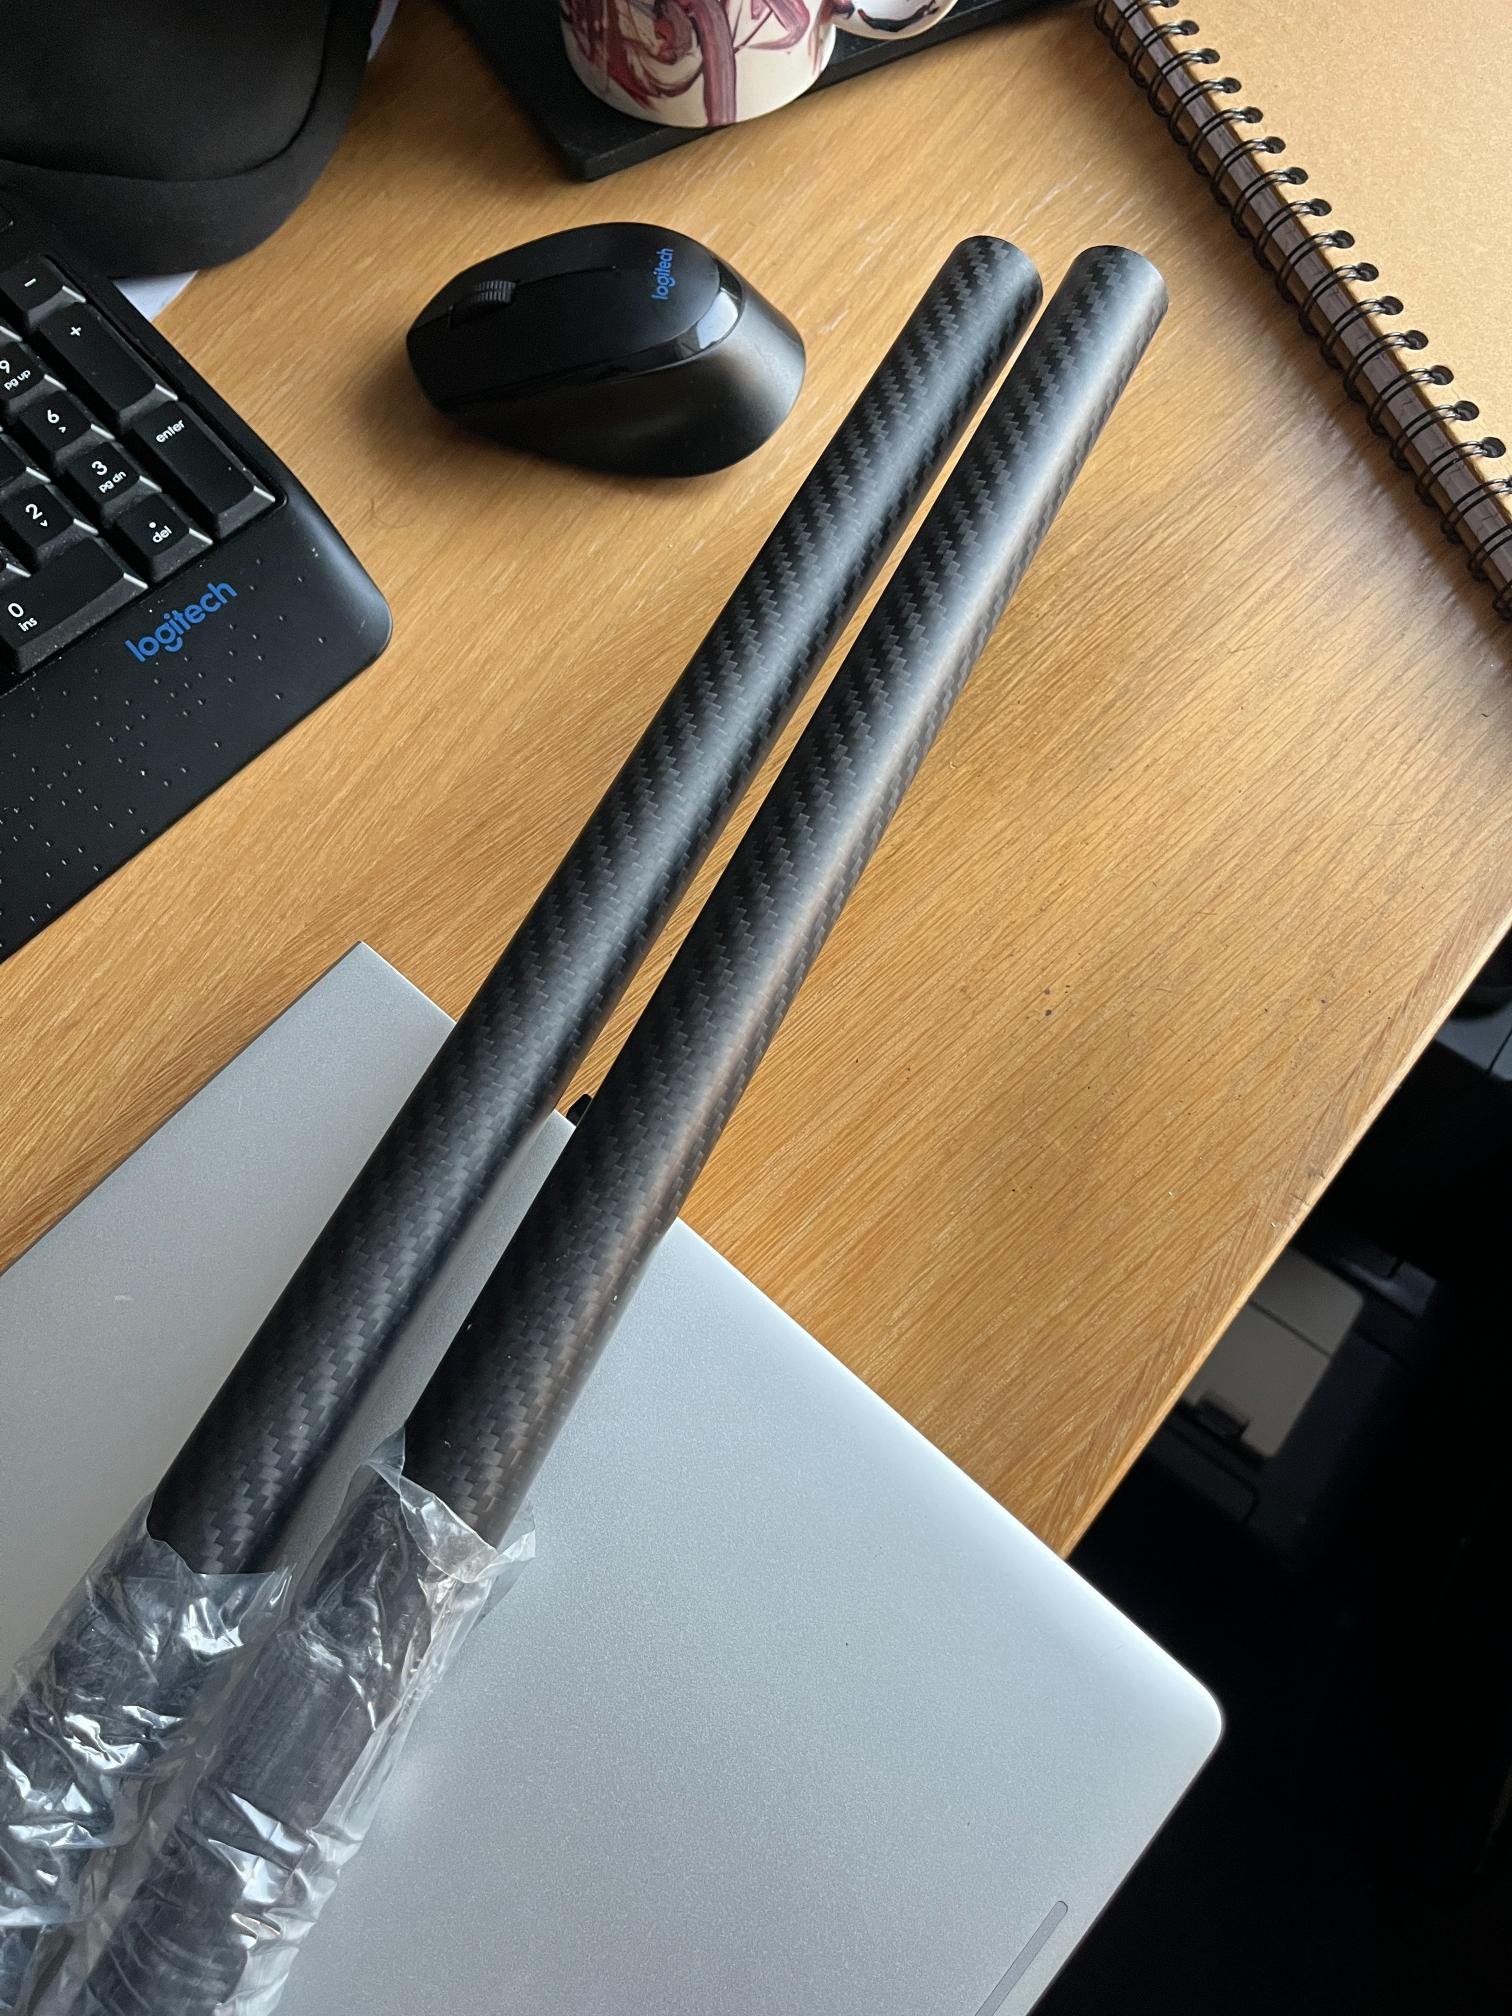
@Honda Ass Dragger the algorithm must recognize your fine taste in automobiles. Couldn't find it anywhere on the net though. Lots of background progress still. Had V0.3 of the airbox test printed which showed me I'd overlooked a few items so money well spent. This was a fairly big change, so only 2-3 issues feels pretty good. Bonnet clearance still looks good. Alternator clearance is the most problematic and also the hardest to properly measure! Anyway, drawing updated to revision V0.4 and STEP files have been sent off to Lithuania for printing!! Split the airbox into 4 parts to get price down to around $400 which seems reasonable if it's good enough to take a mold from. Fingers crossed these will be here early March! Carbon tube for strut brace showed up the other day. Super cool material 25mm OD and 21mm ID - not as light as I expected due to thick wall (prob a bit lighter than alloy, but not by heaps), but it sure is a rigid shaft! Aint no bending will be happening. Makes me excited for the finished product. Locally printing a few test pieces for the strut brace ends to test geometry/fit before printing in aluminum. Already discovered a few tweaks that may required so will be another valuable prototyping exercise. Onwards and upwards. Car is off to the dyno next week. Will be interesting to see what we discover.
- 418 replies
-
- 19
-
-
-
@Honda Ass Dragger where'd you find that pic?? Great colour choice obv.
-
Strut brace design complete, just need to double check a few dimensions and then it's off to the printers. Tried to design in a few features that would be impossible to fabricate just because I can... Stoked with how the carbon/alloy combo will look when complete too.
- 418 replies
-
- 12
-
-
Pretty much a brand new boat at this point! bloody awesome
-
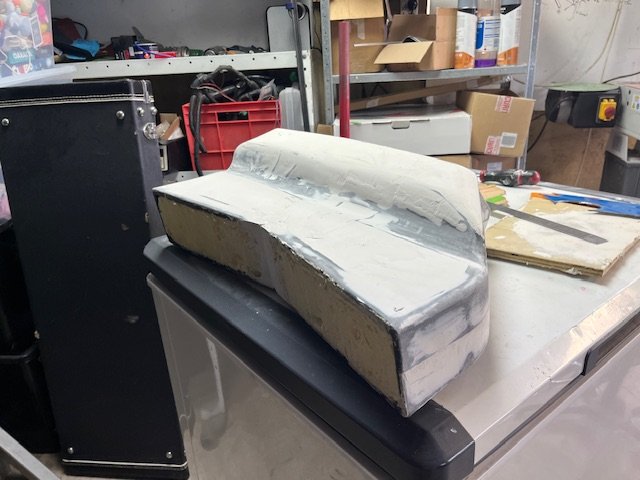
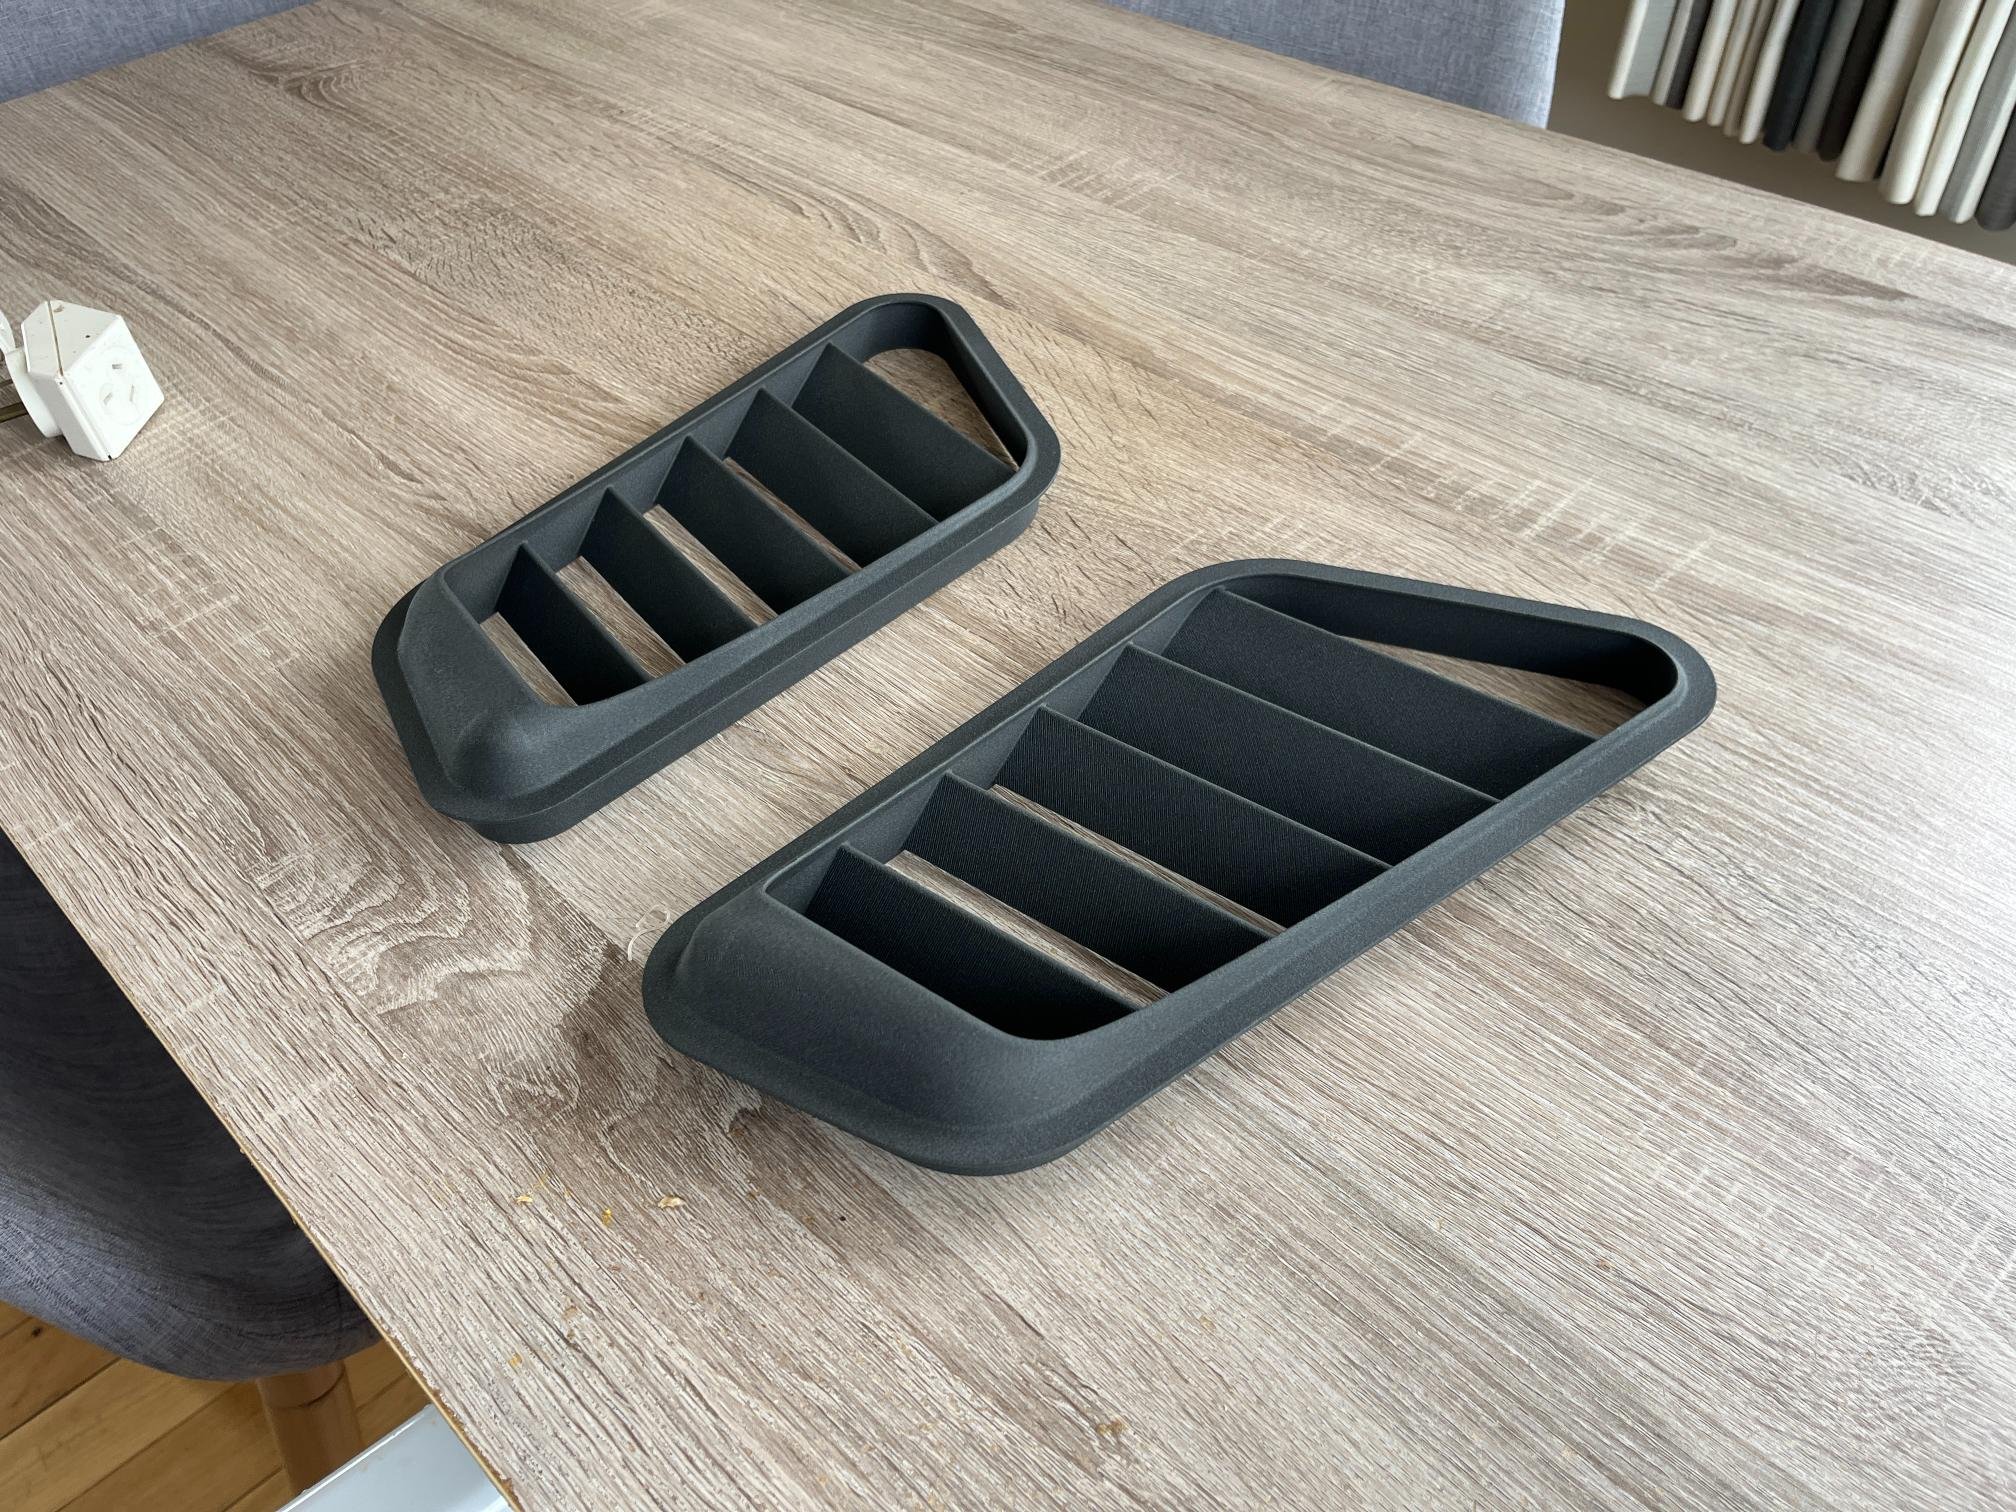
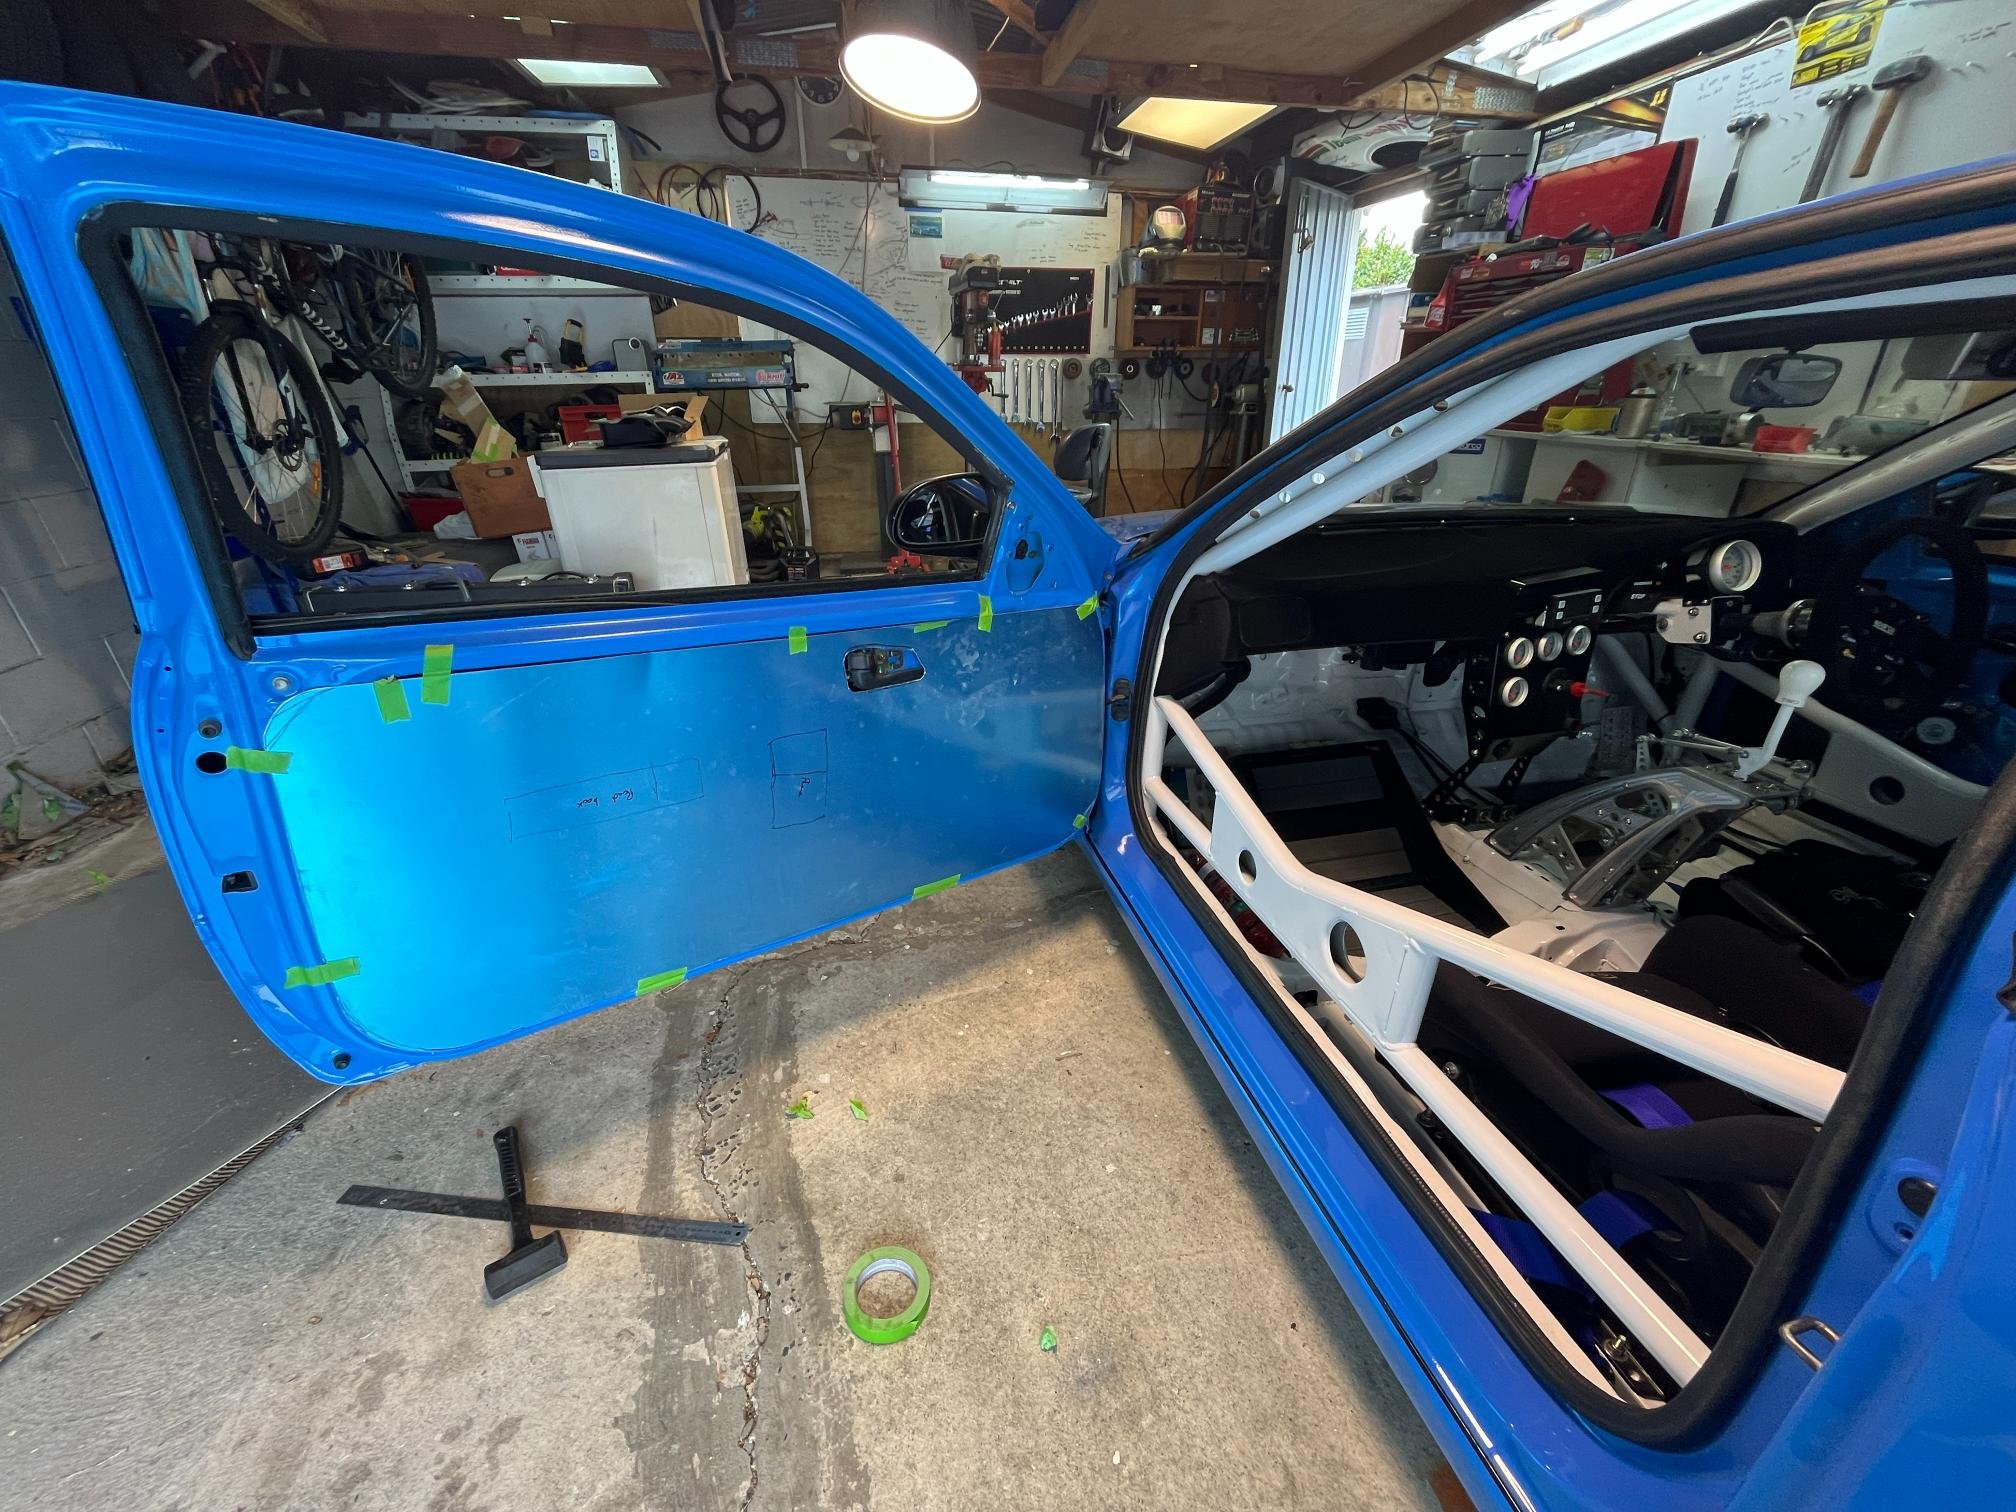
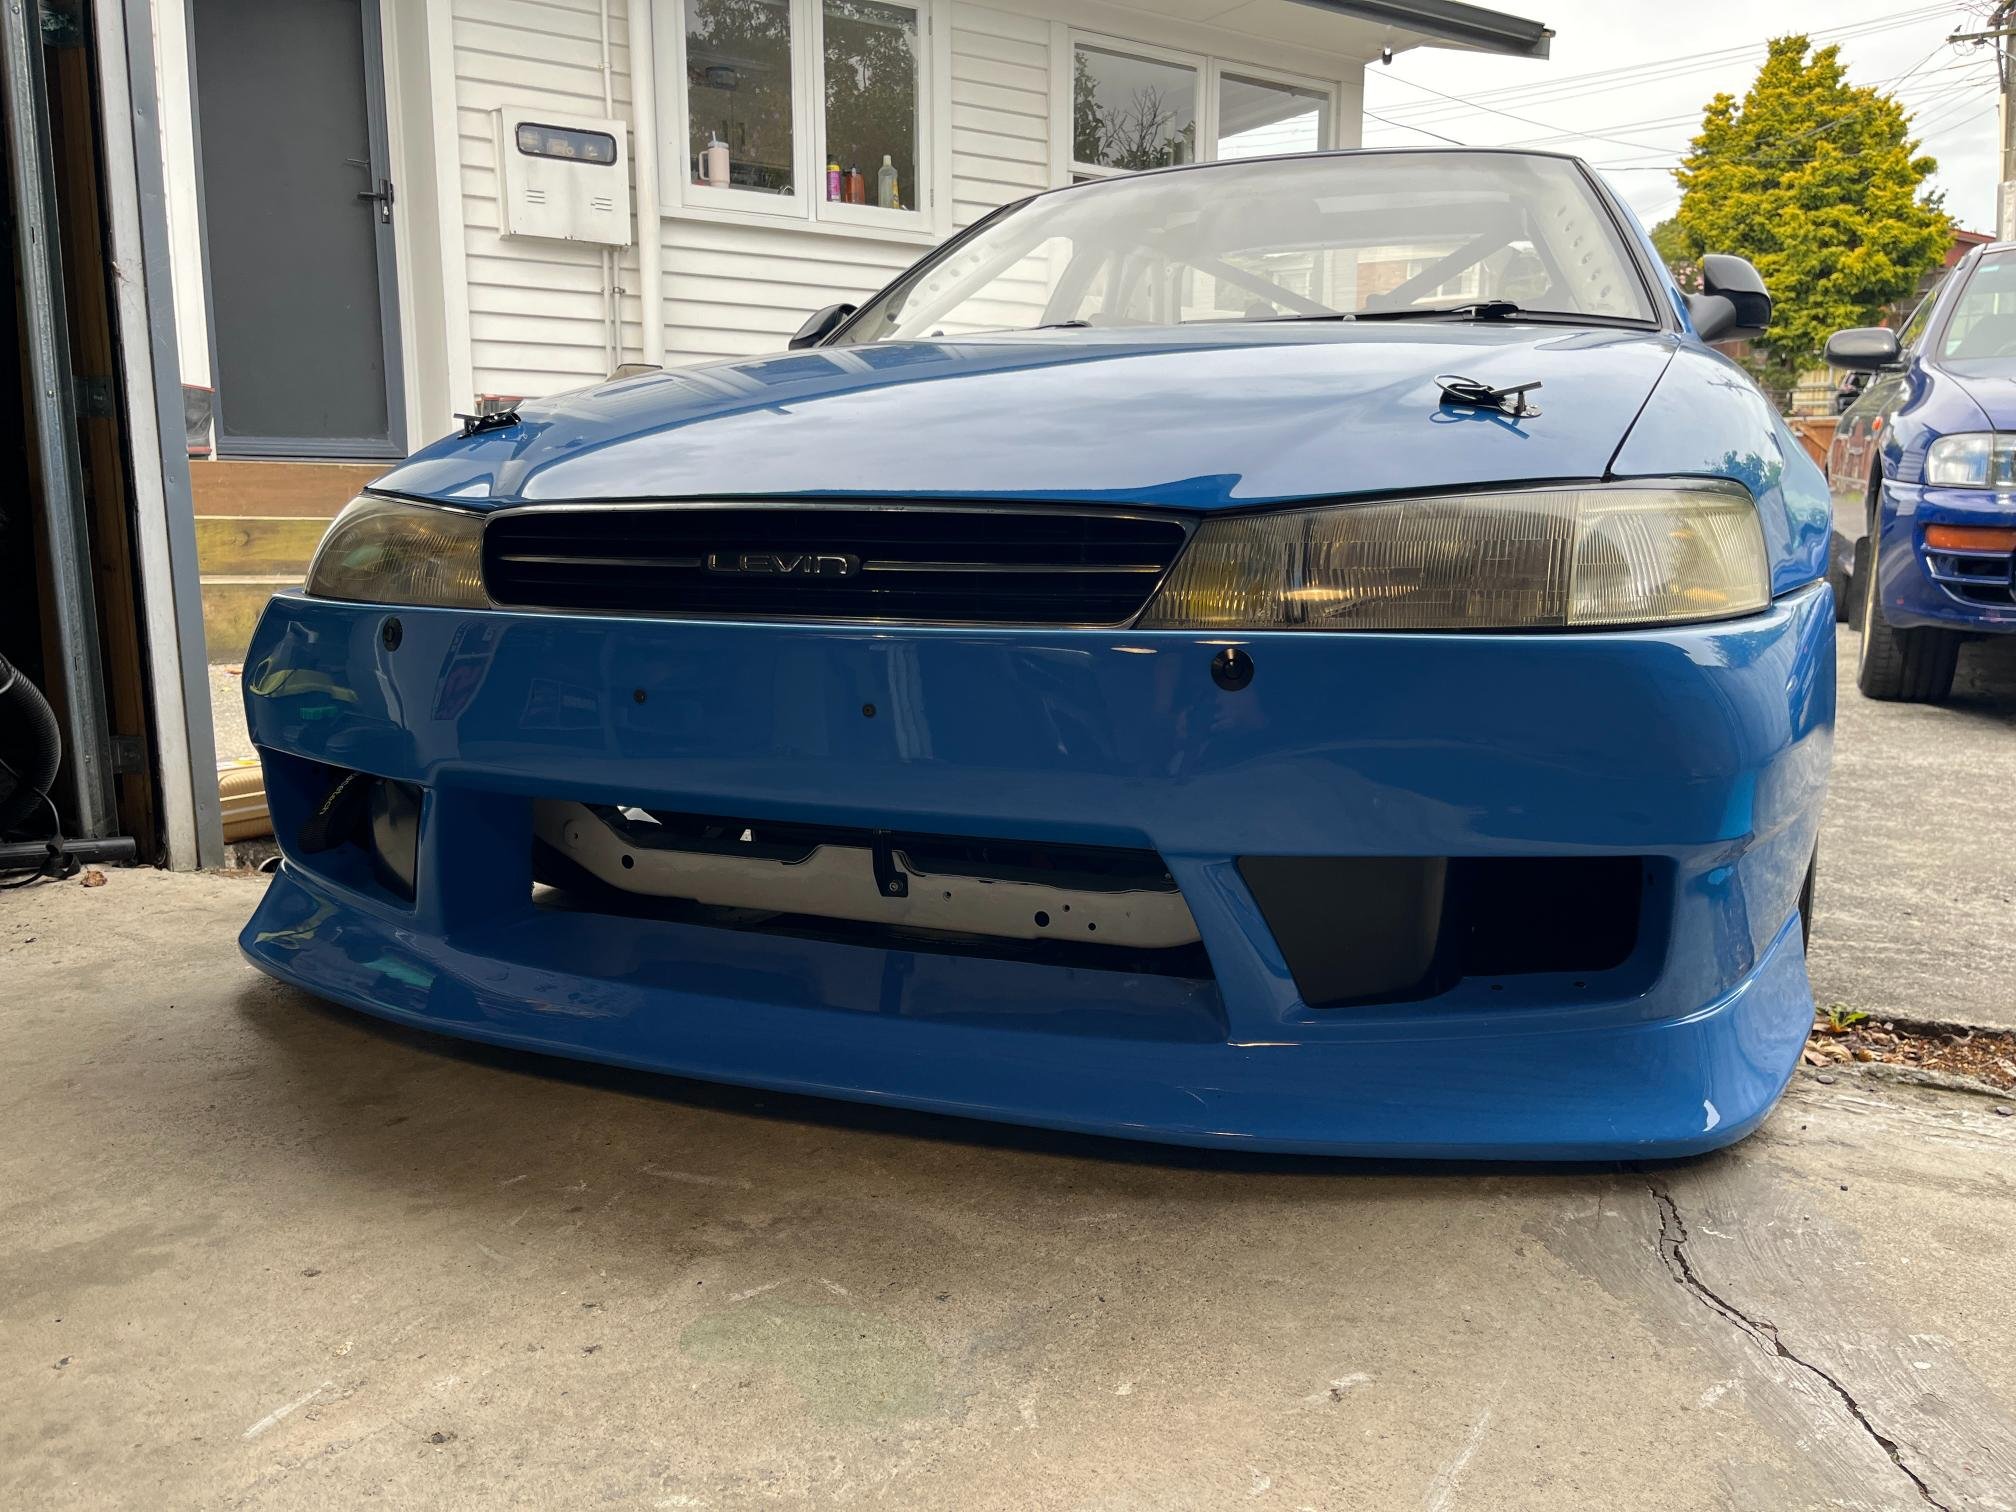
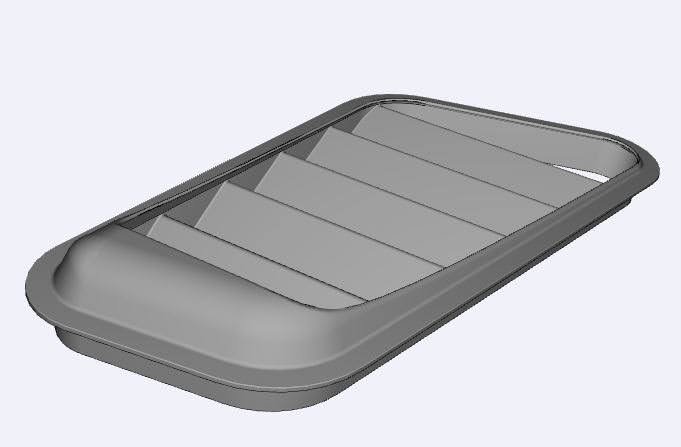
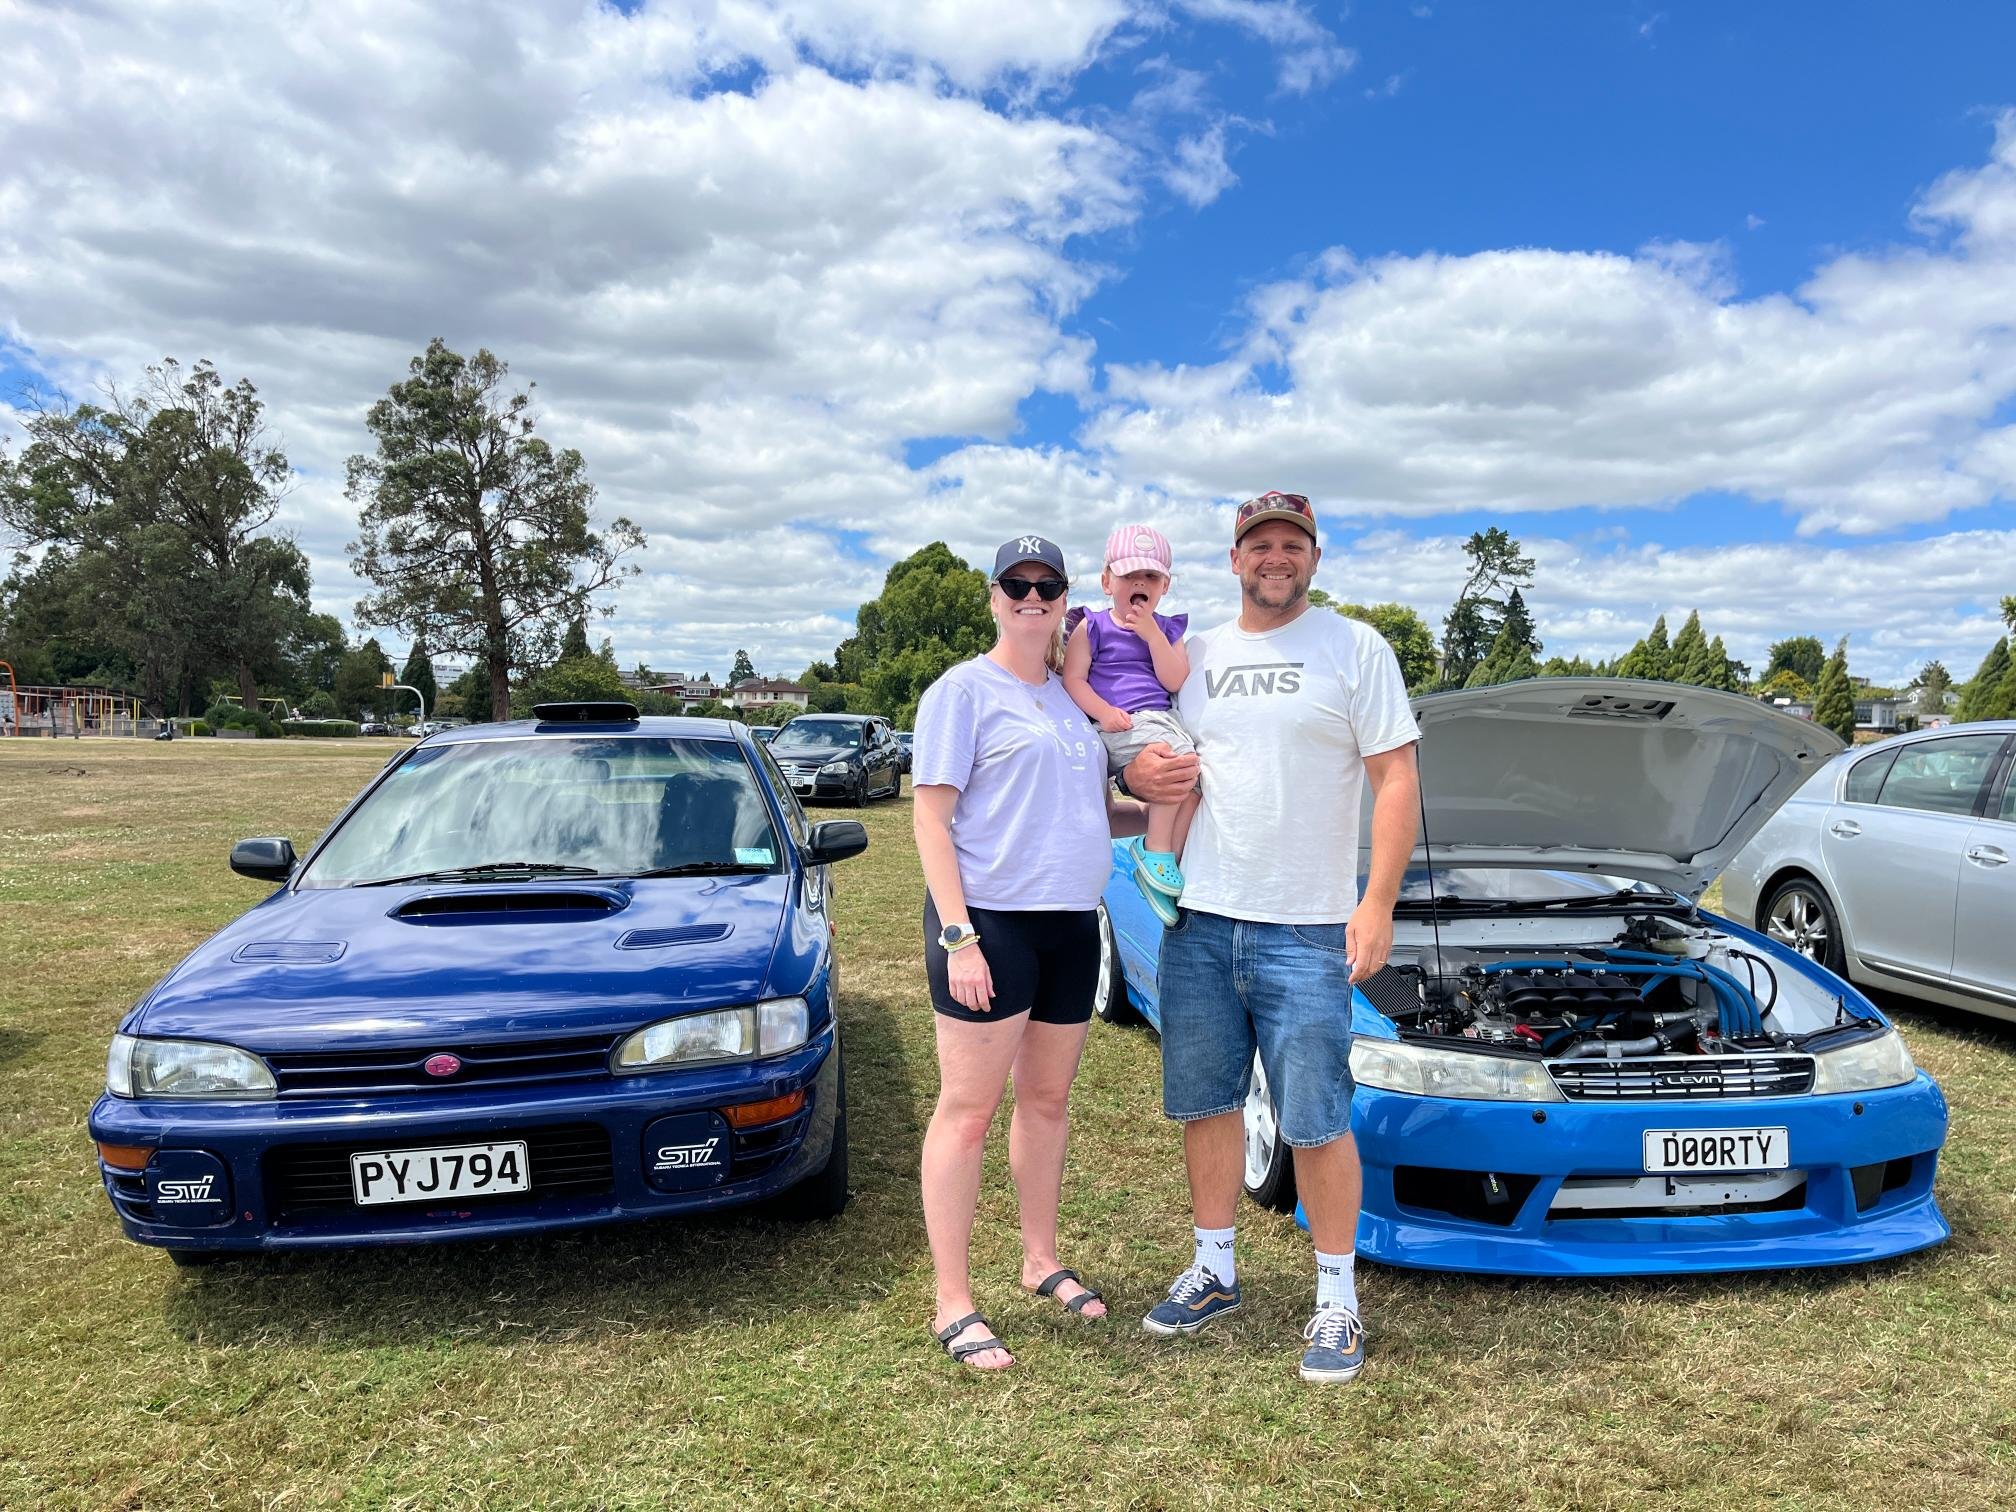
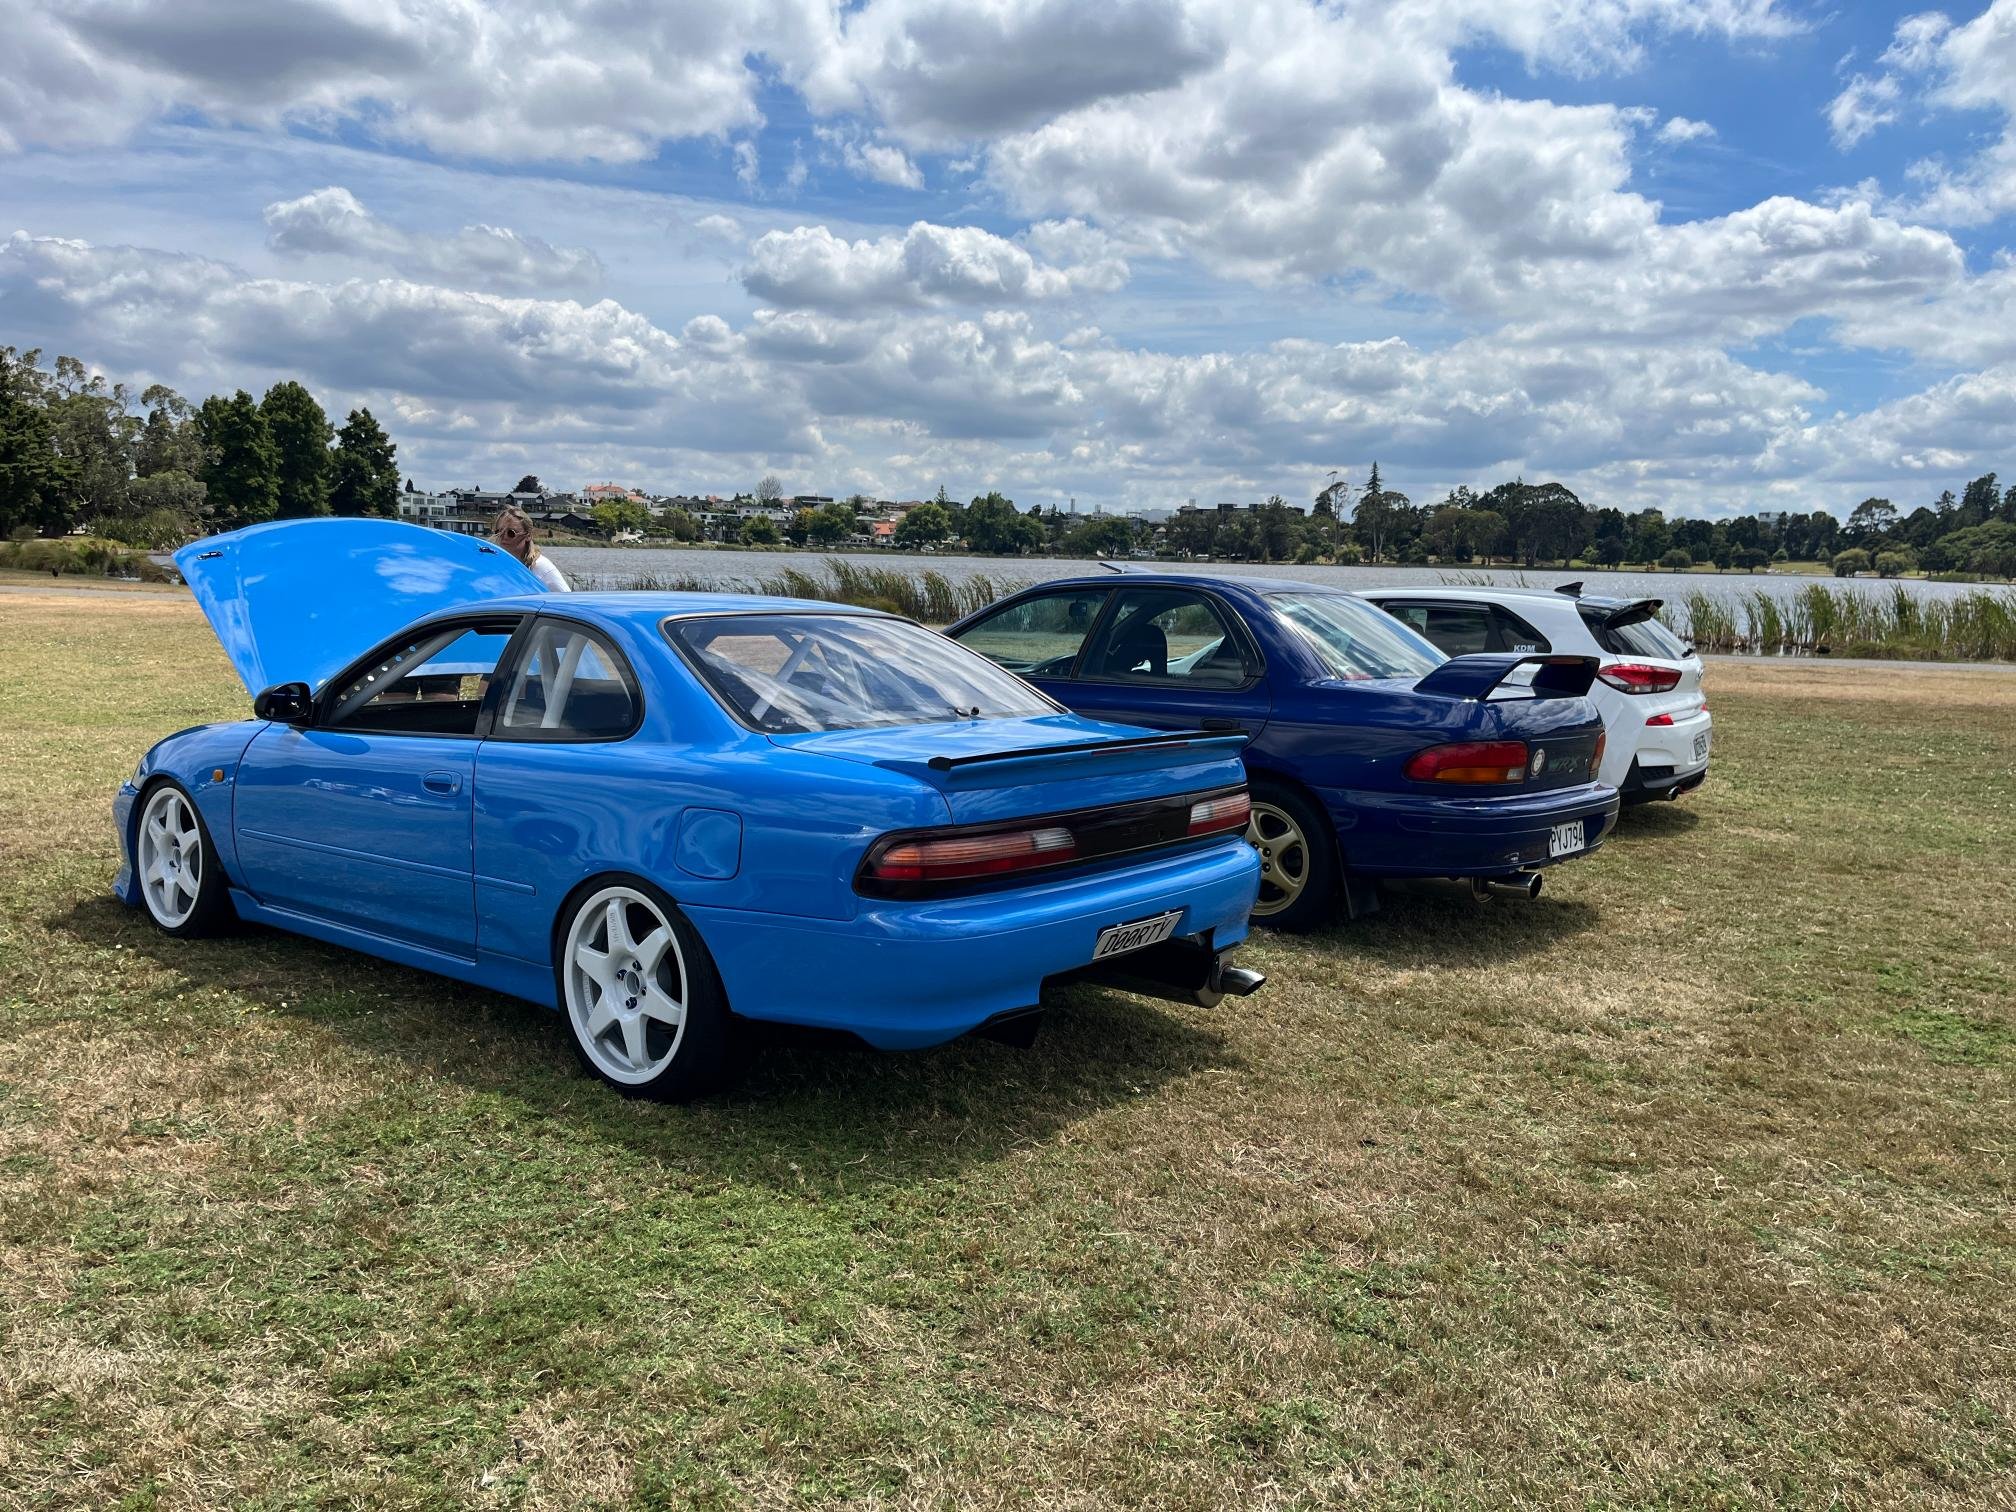
lots of little things been happening but not much progress to show for it... yet. Finished off the airbox model. Made adjustments I found from last prototype. I wanted to check the changes - particularly around alternator clearance as I dropped the floor by 40mm to gain the volume. So got a friend printing a few 'slices' of the airbox around the bits I'm concerned about. Next step is to print the whole airbox as 1 piece from a cheap material then get Mike Shaw to Carbon over it (either in halves or take a mold from it and make a real pretty part). I was considering using resin for this part. Does anyone have experience with how brittle a resin part will be for shipping and holding it's shape to take a part off? Finally fitted the front ducts to the bumper. Attached using M3 & M4 black cap screws (were as cunty as you think they would be!) instead of rivets for stealth look and big washers. Also fitted a tow hook cause it needed to happen at some point. Looks mint. Still got the centre duct piece to make and powder coat to cover up the white lower radiator member... Managed to drive the car to a car show 2km down the road at the Hamilton Lake. Was awesome to get it out in public. Lots of people interested which is cool. Pretty surreal moment that at times I wouldn't know if it would ever arrive. Enjoyed the moment anyway. Started making door cards. One of those jobs I've been putting off for a long time. Turns out using 0.6mm ali too thin and warped like buggery when bead rolled it. Ordered a sheet of 0.9mm to try again when I get around to it. Next 3D printing job is a set of bonnet vents to get the coolers air out the top. This has always been the plan, I just hadn't converted the sketch on my whiteboard to a model. Managed to get it looking aesthetically good (I think anyway). Will be interesting to see what it comes out like. Going with Nylon PA12 material again but getting them shot peened which will hopefully make them smooth enough to paint for UV protection. Got a pretty cool design on the go for a strut brace with Alloy 3D printed ends and carbon tube... Will share once I've got model looking acceptable. Tune booked in for 18th Feb. Will be interesting to see how that goes. Wish me luck!!
- 418 replies
-
- 19
-
-
Bloody awesome. Excited to see how you resurrect this one. I remember seeing this in NZPC drags coverage back in the day