gibbon
-
Posts
2,700 -
Joined
-
Last visited
-
Days Won
6
Everything posted by gibbon
-
Point of interest, "Russell, drive shaft specialists, Andromeda crescent east tamaki" found the company you mentioned. But actually using their name; "Driveshaft Specialists Nz Ltd" brings up a load of fucking garbage including 800 people in hard hats and a six story crane. Search engines are completely poisoned
-
awesome thanks
-
Normally I'd just throw this in tech spam but thought I might get more responses here Google has failed me, I want the contact details of a local company staffed by human beings who can talk to me in english and assemble a driveshaft. Northland would be perfect, auckland good enough The Internet keeps directing me to globocorp engineering ltd with 800 people in hard hats and a six story crane in the background
-

Gibbon’s 1971 GT6 bothering - comment here
gibbon replied to VitesseEFI's topic in Project Discussion
jesus that's a lot of work... I think they're stretching the definition of "the engine fits". I wonder what would actually happen if he floored it -
Gibbon’s 1971 GT6 bothering - comment here
gibbon replied to VitesseEFI's topic in Project Discussion
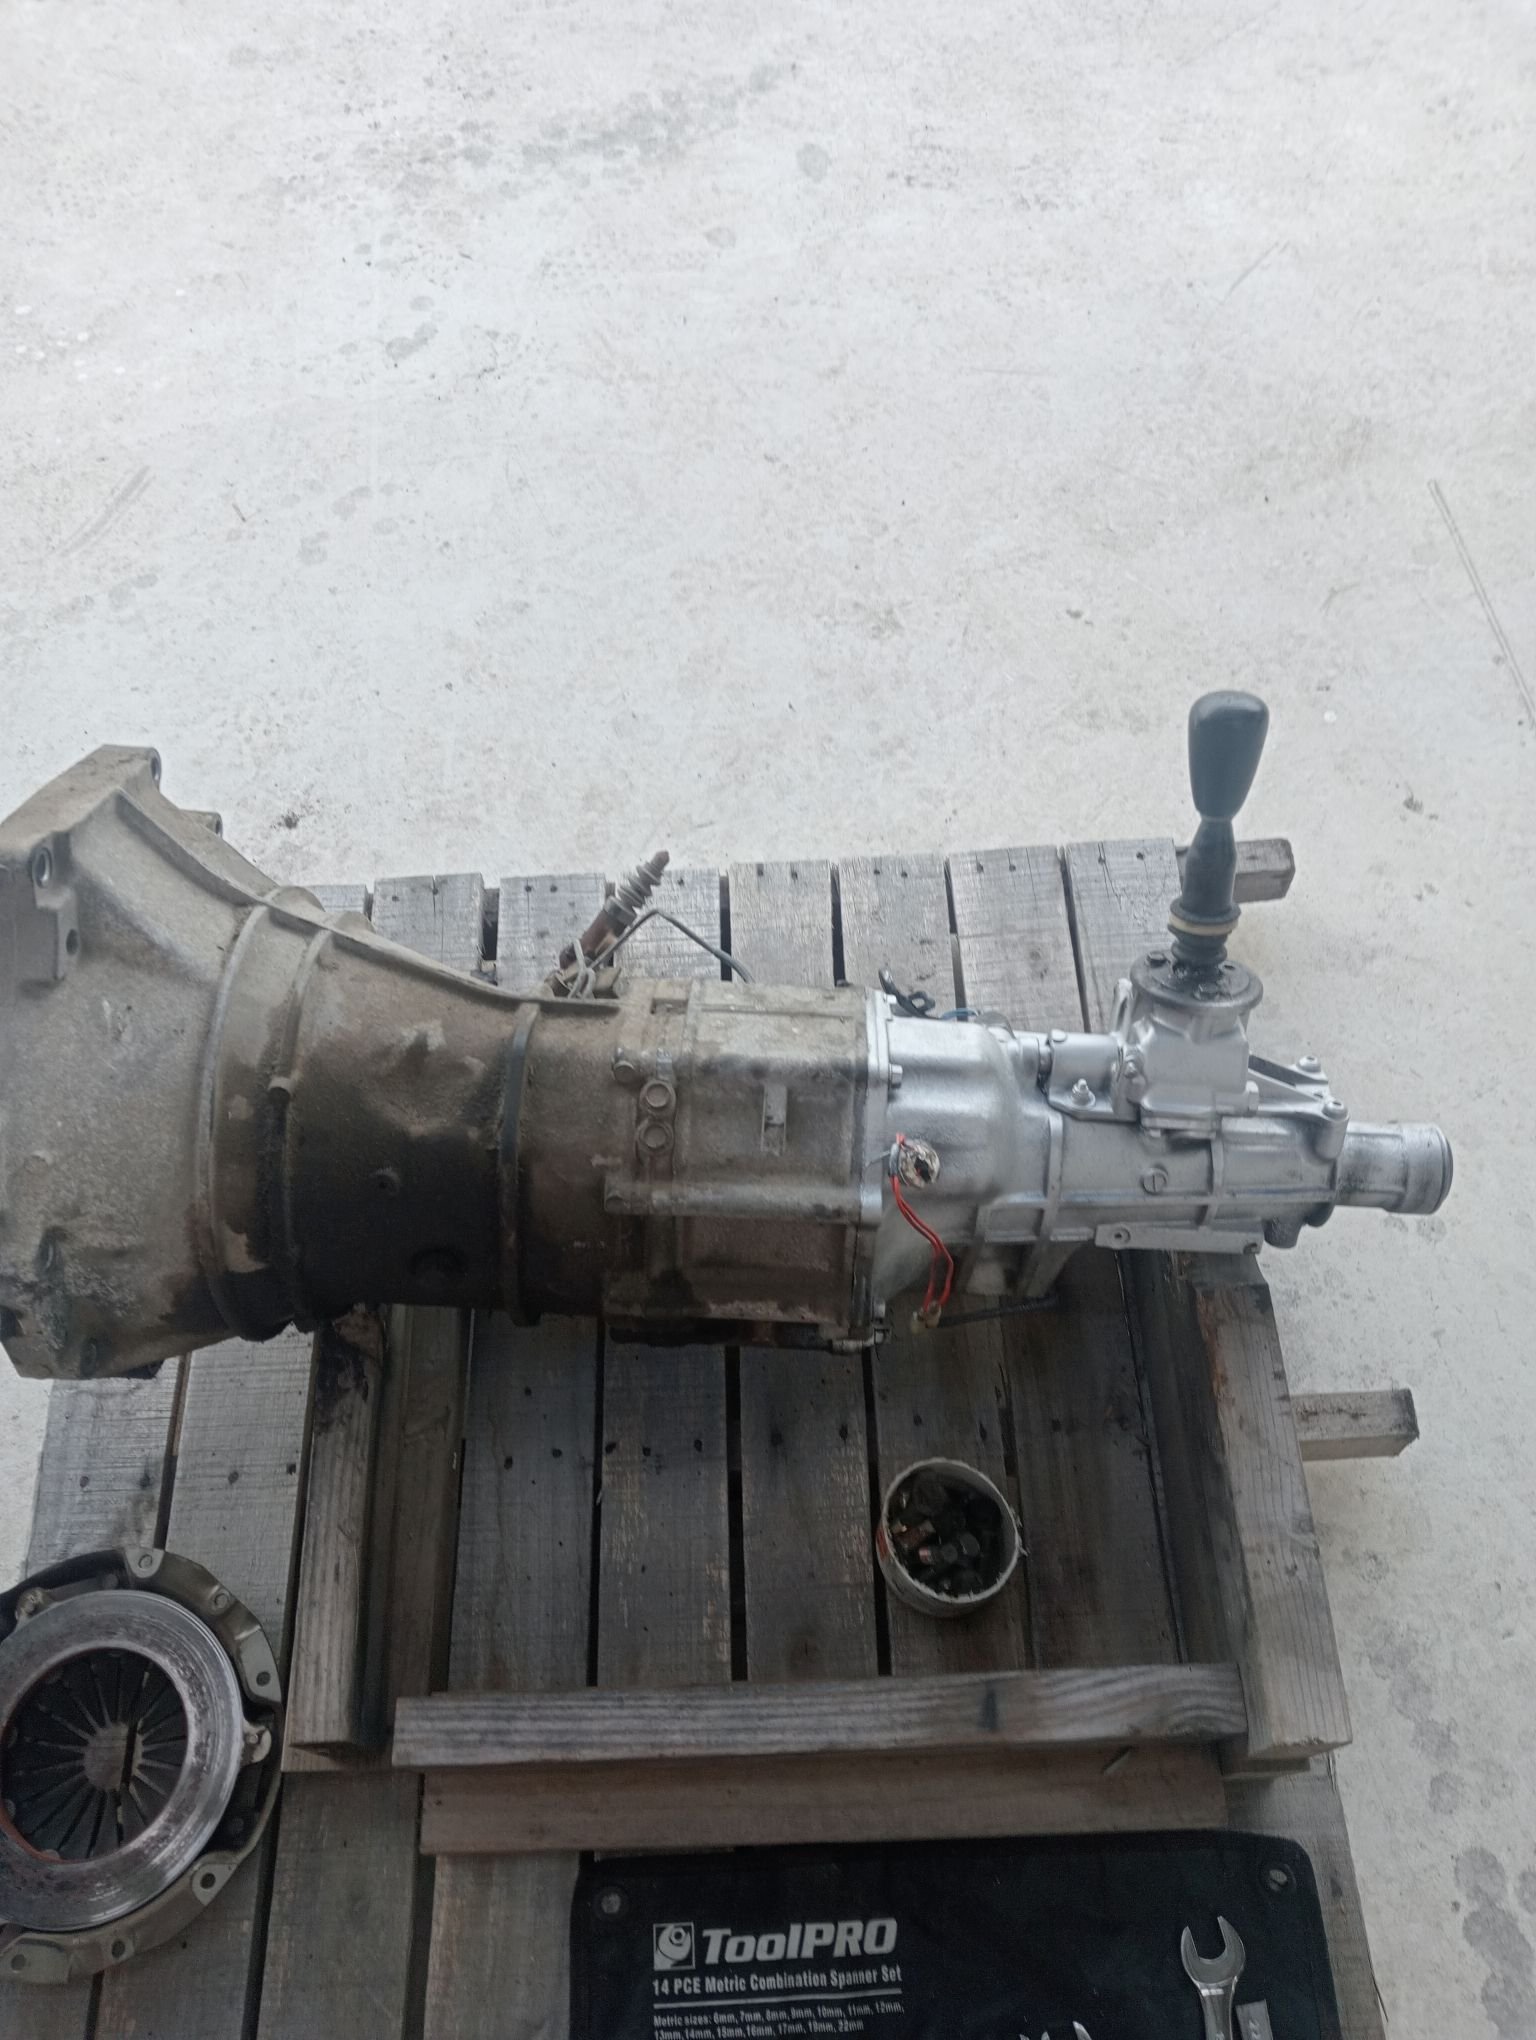
I had heard that they were "non-replaceable" - didn't know if that meant you couldn't just cut behind them and join the tubes, but then again i appreciate not having to have a new driveshaft made if a u-joint wore out That gearbox and it's variants got used in a few other cars, I wonder if any other models were lucky enough to get replaceable u-joints, did Ford use them as well? anyway the long story short - so there's no reason for me to buy an mx5 shaft? -
Gibbon’s 1971 GT6 bothering - comment here
gibbon replied to VitesseEFI's topic in Project Discussion
hey @VitesseEFI, what's the best bet for a custom propshaft, just a MX5 front and GT6 rear somehow mated together? -
Gibbon's 1971 triumph GT6 that everyone told him not to mess with
gibbon replied to gibbon's topic in Projects and Build Ups
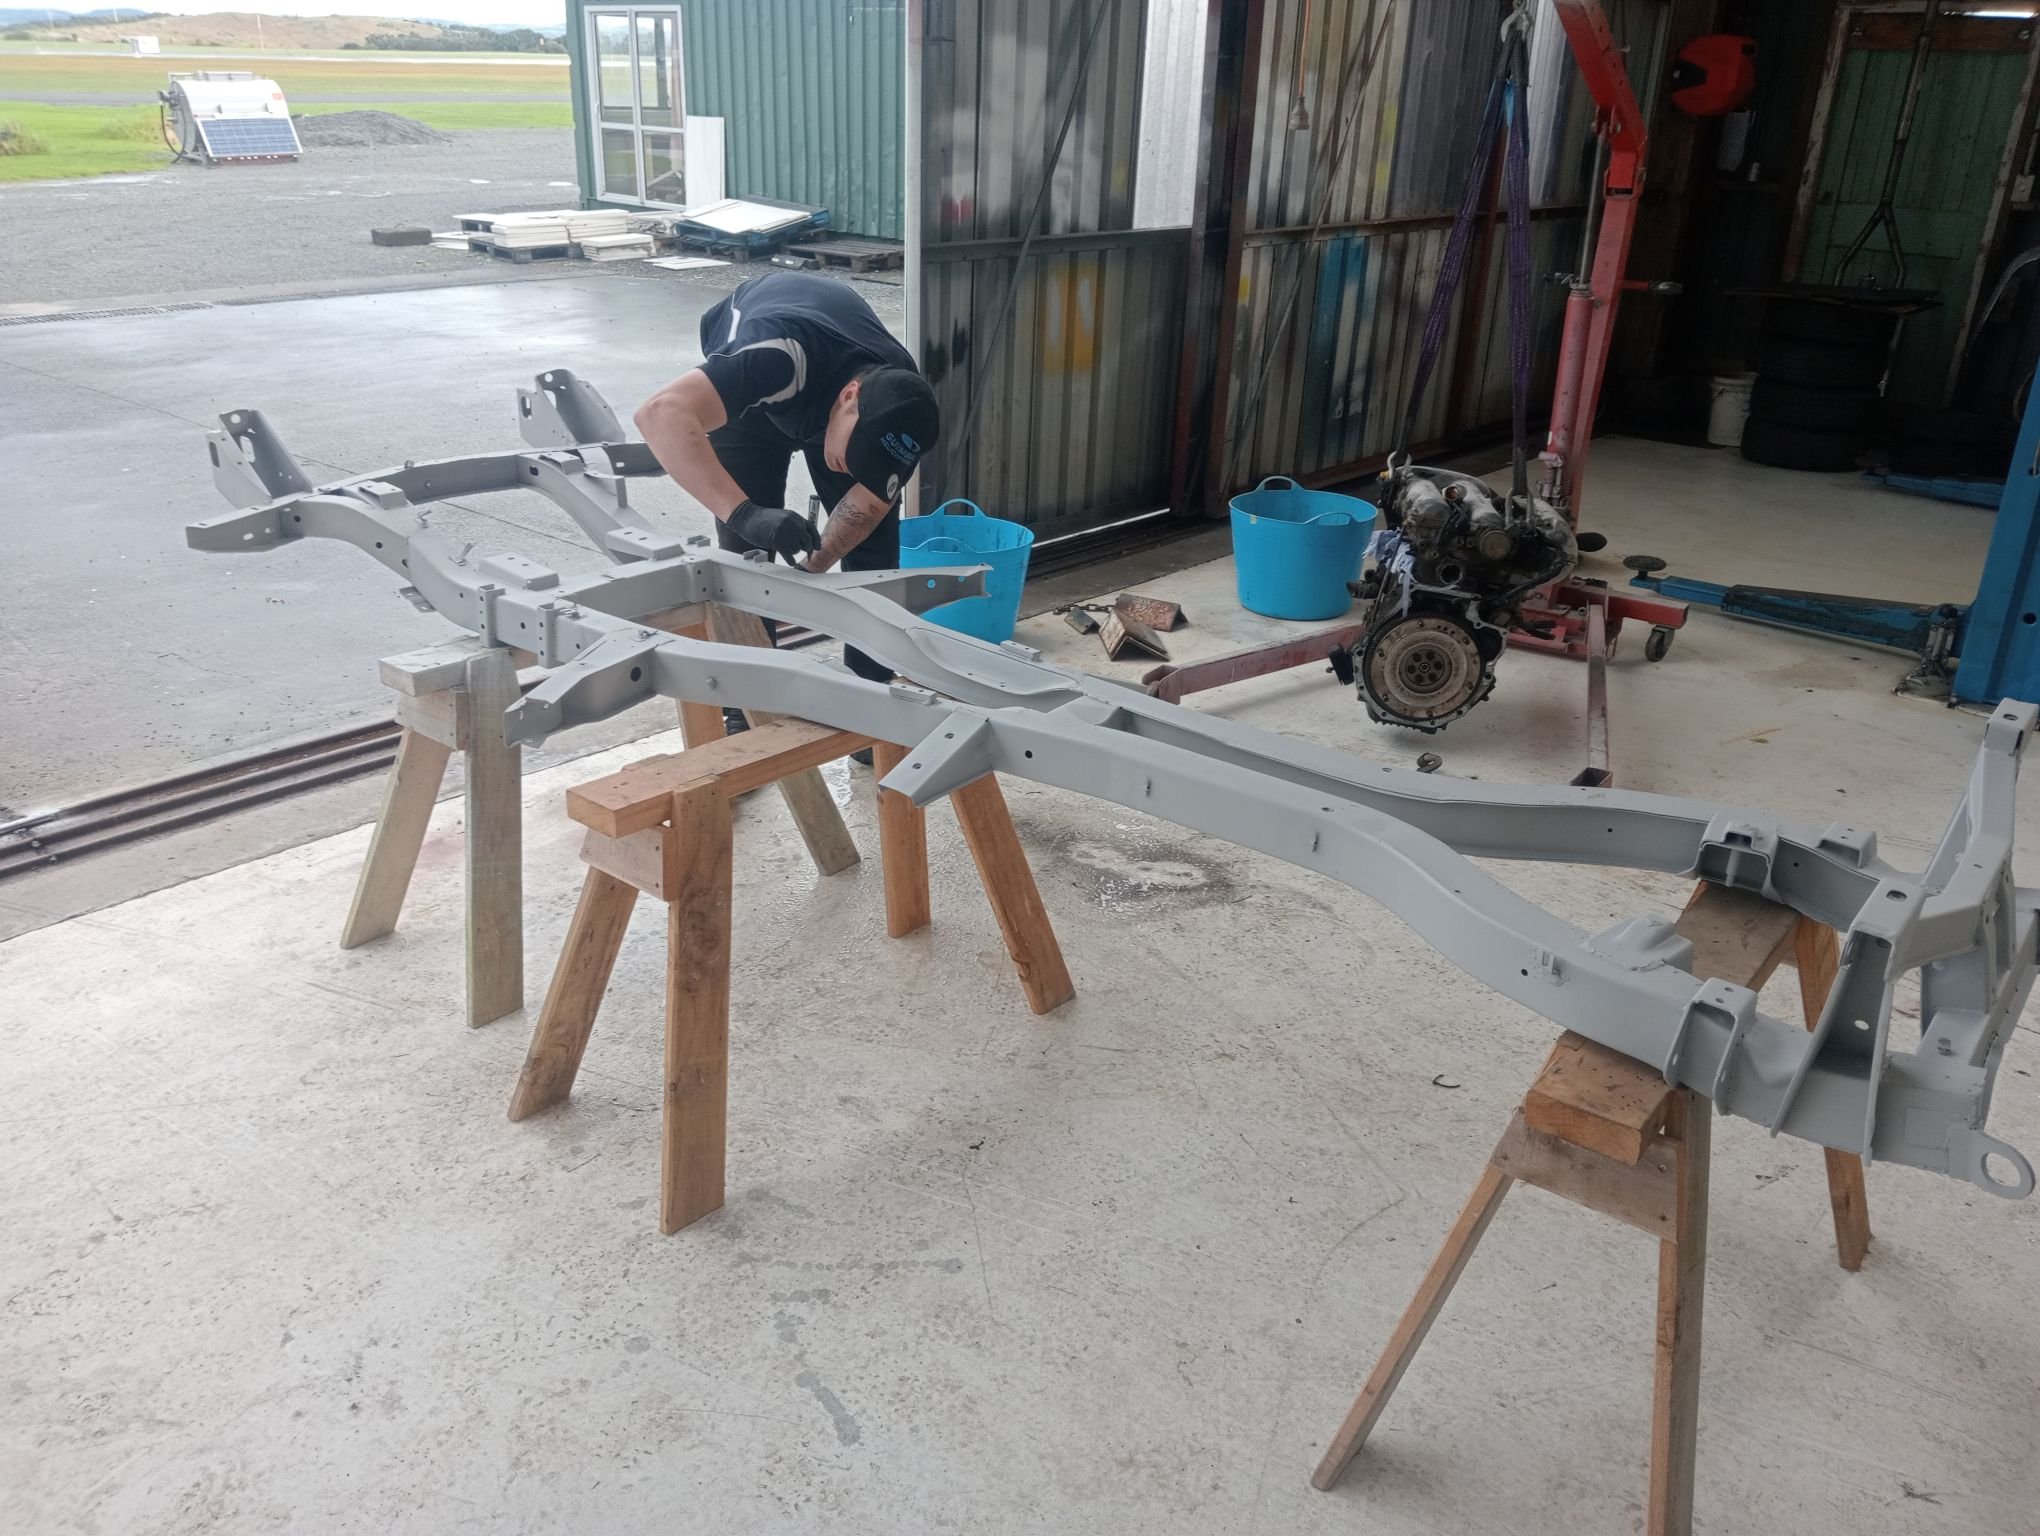
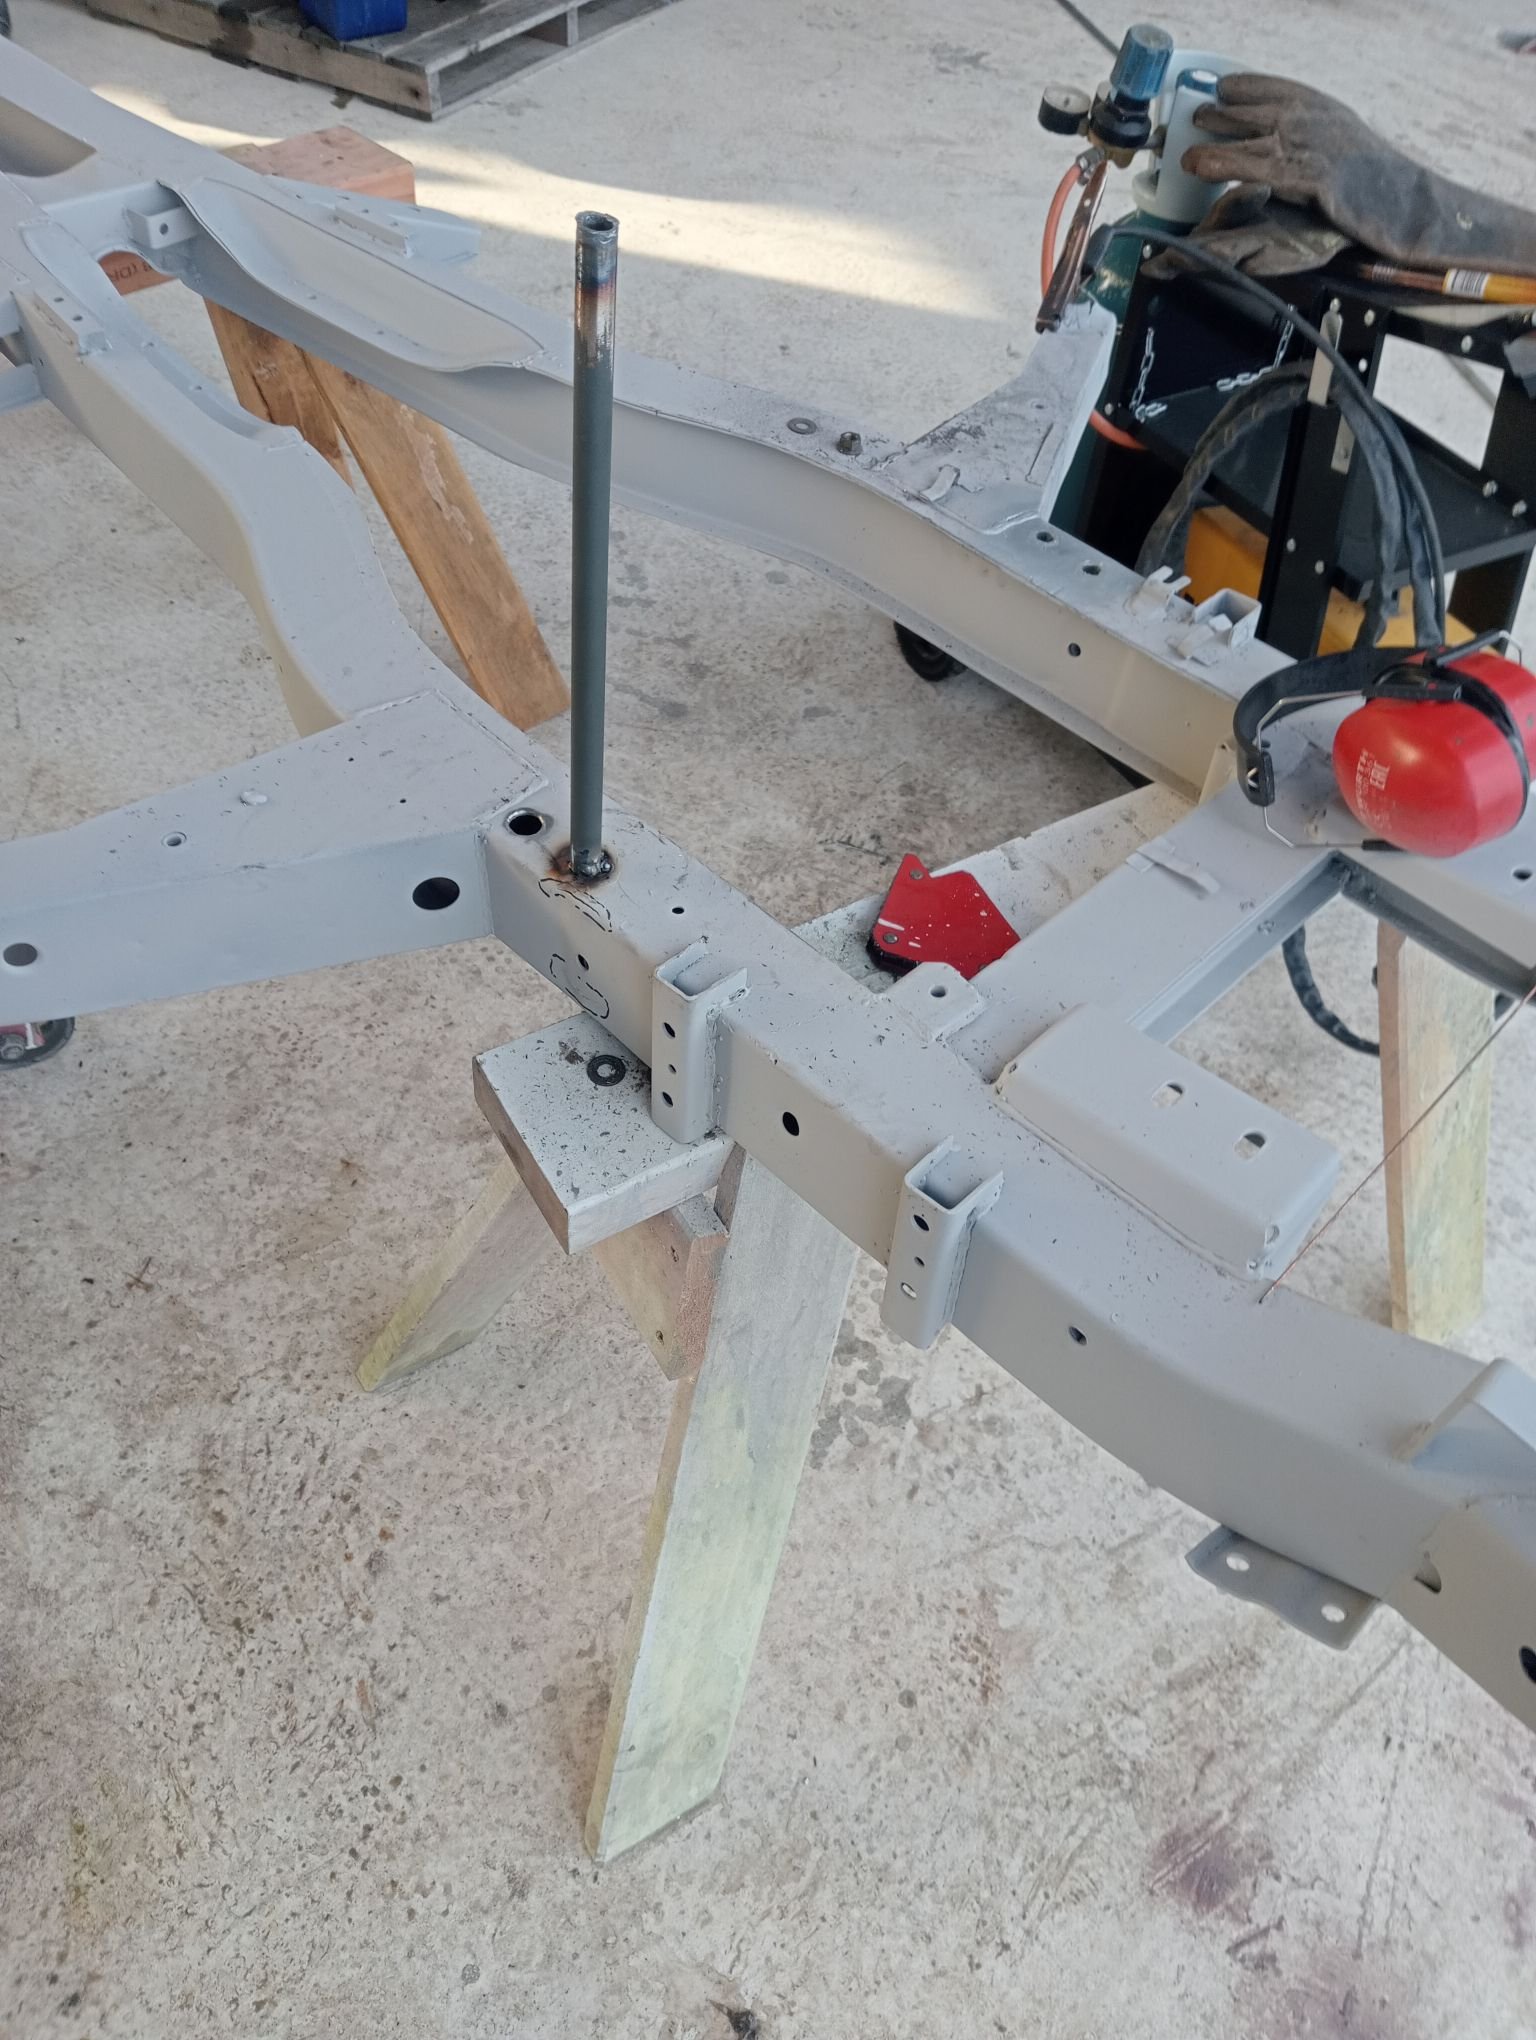
extension housing finished, installed and cynically painted in a coat of hammerite direct-to-shit silver. presented on this angle which just so happens to hide every single weld, how convenient. Ended up having to ream it out as the selector rod kept getting locked up mounts welded up and pretty much finalised, these are comprised of 80% stock triumph mounts on their side and 20% bunnings pool umbrella stand. chassis came back, one of my guys got to play "mark all the cracks" uh oh. as suspected, it was definitely time for a birthday. (Also, are all chassis welds this bad under the paint?) RHS lower wishbone attach point lots of other bits came back at the same time I was having a mental health moment earlier, the diff did NOT have a drain port. It does now. crush tubes going in for where the mounts will sit. I guess I could have welded the brackets on directly but it might've made getting the engine back out a bit funny. Plus the chassis is so thin I'd much rather have the big bolt sandwich Frustratingly I don't have half the suspension bushes that I need, otherwise I'd probably have the chassis repainted and all the doodads back on it this week. Also waiting on a new clutch and drive axles.
- 7 replies
-
- 23
-

-
Gibbon's 1971 triumph GT6 that everyone told him not to mess with
gibbon replied to gibbon's topic in Projects and Build Ups
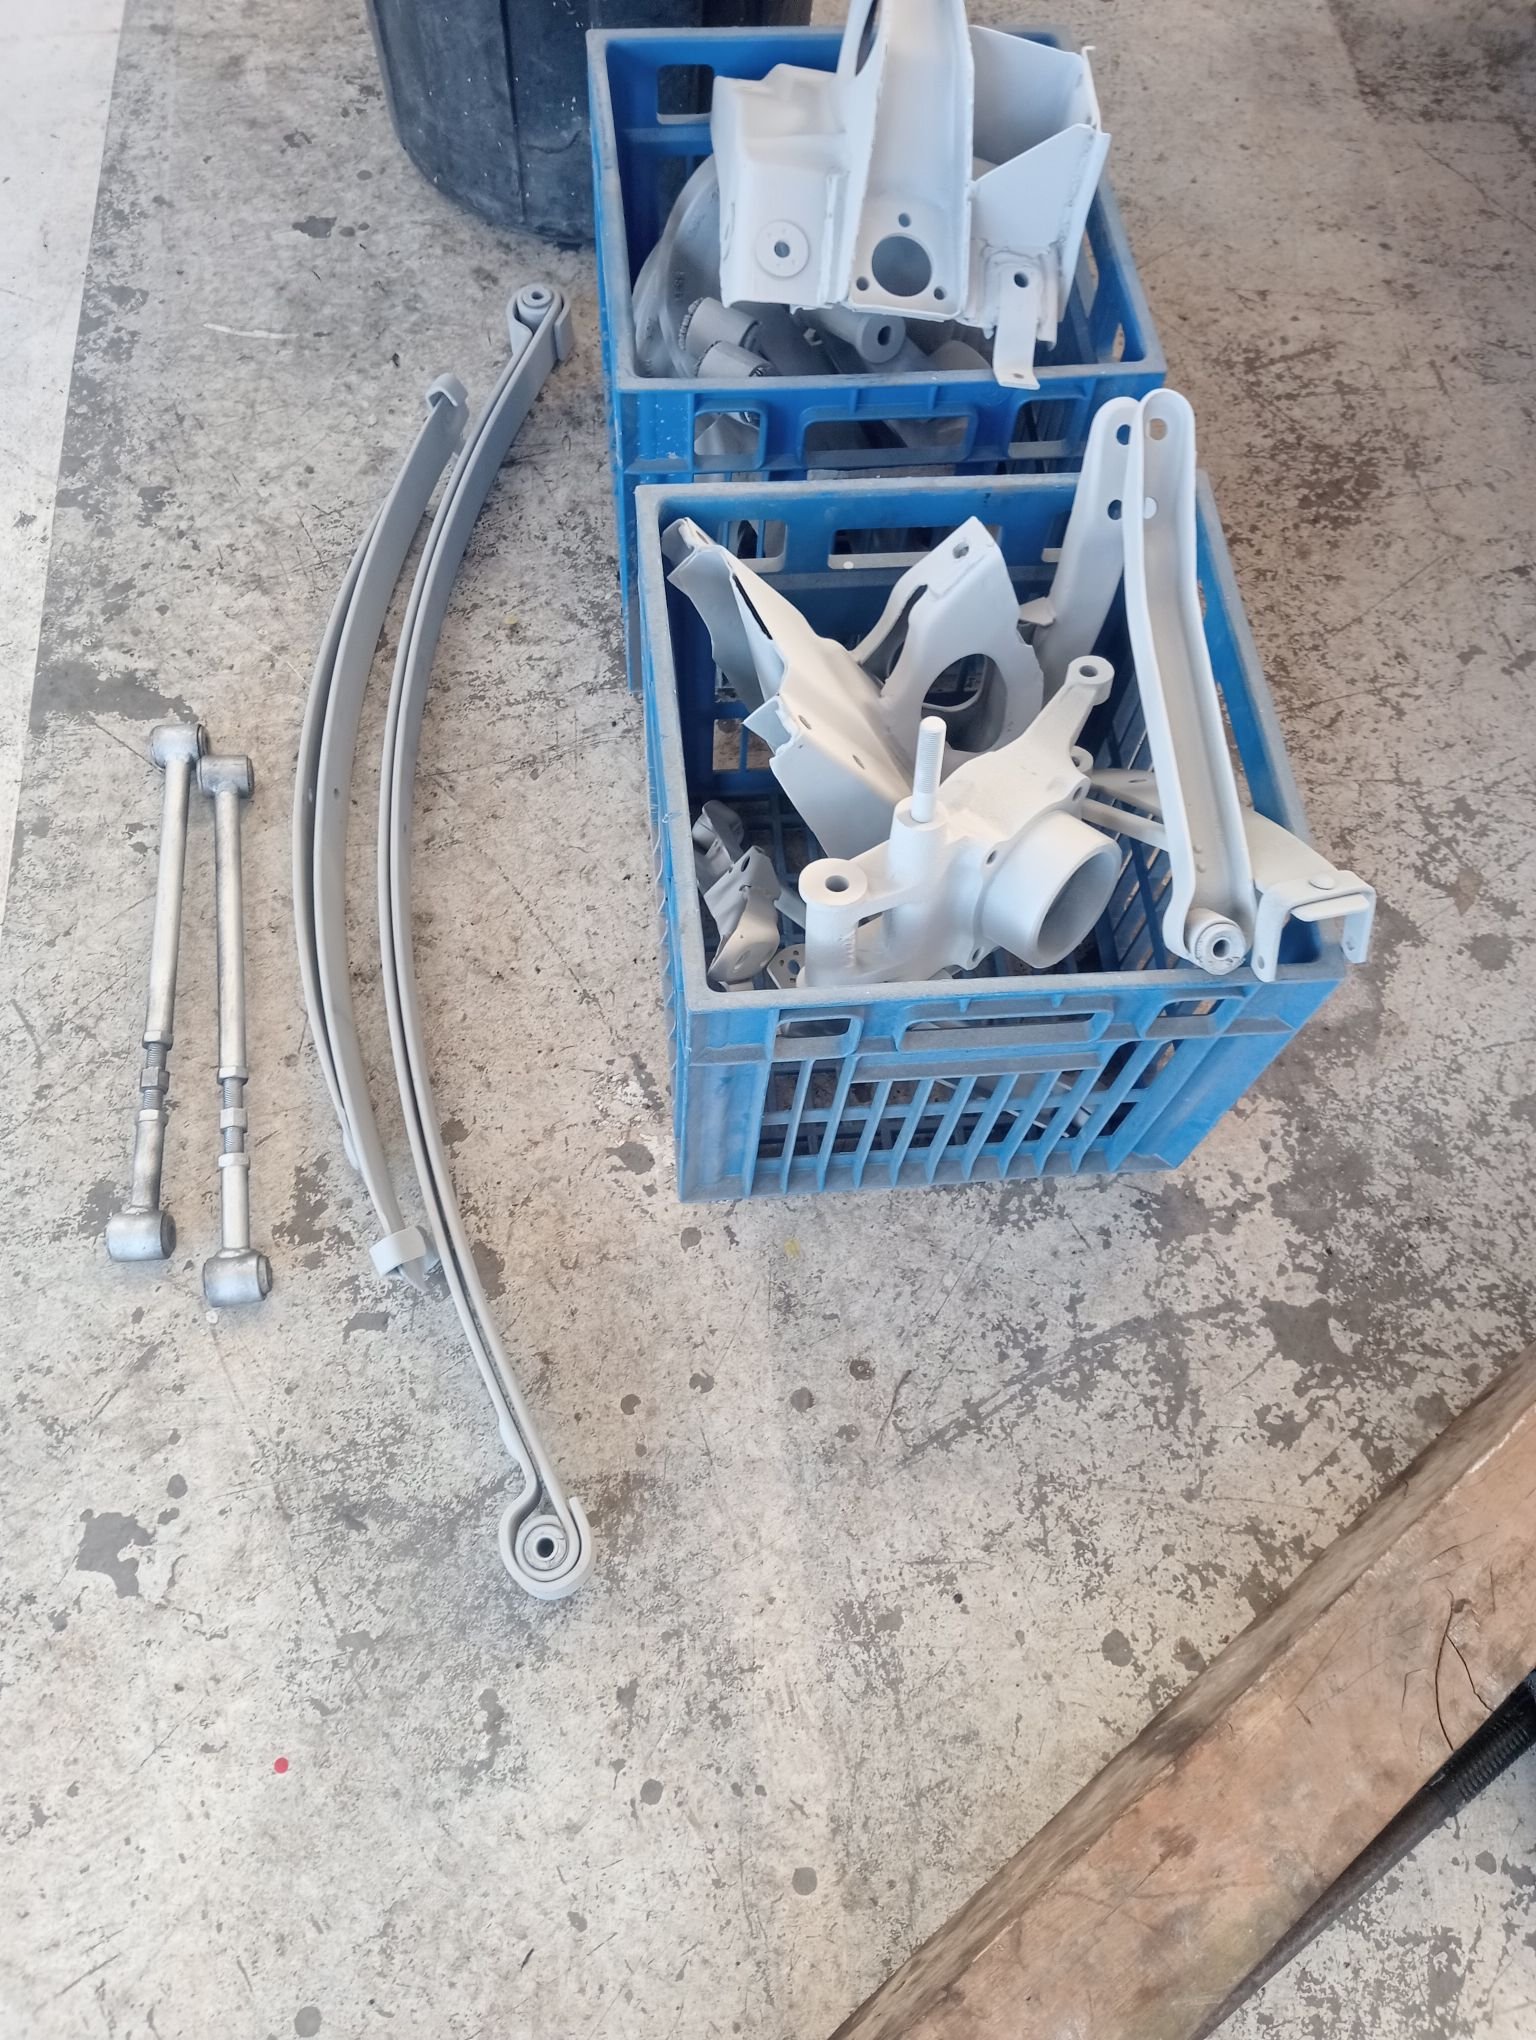
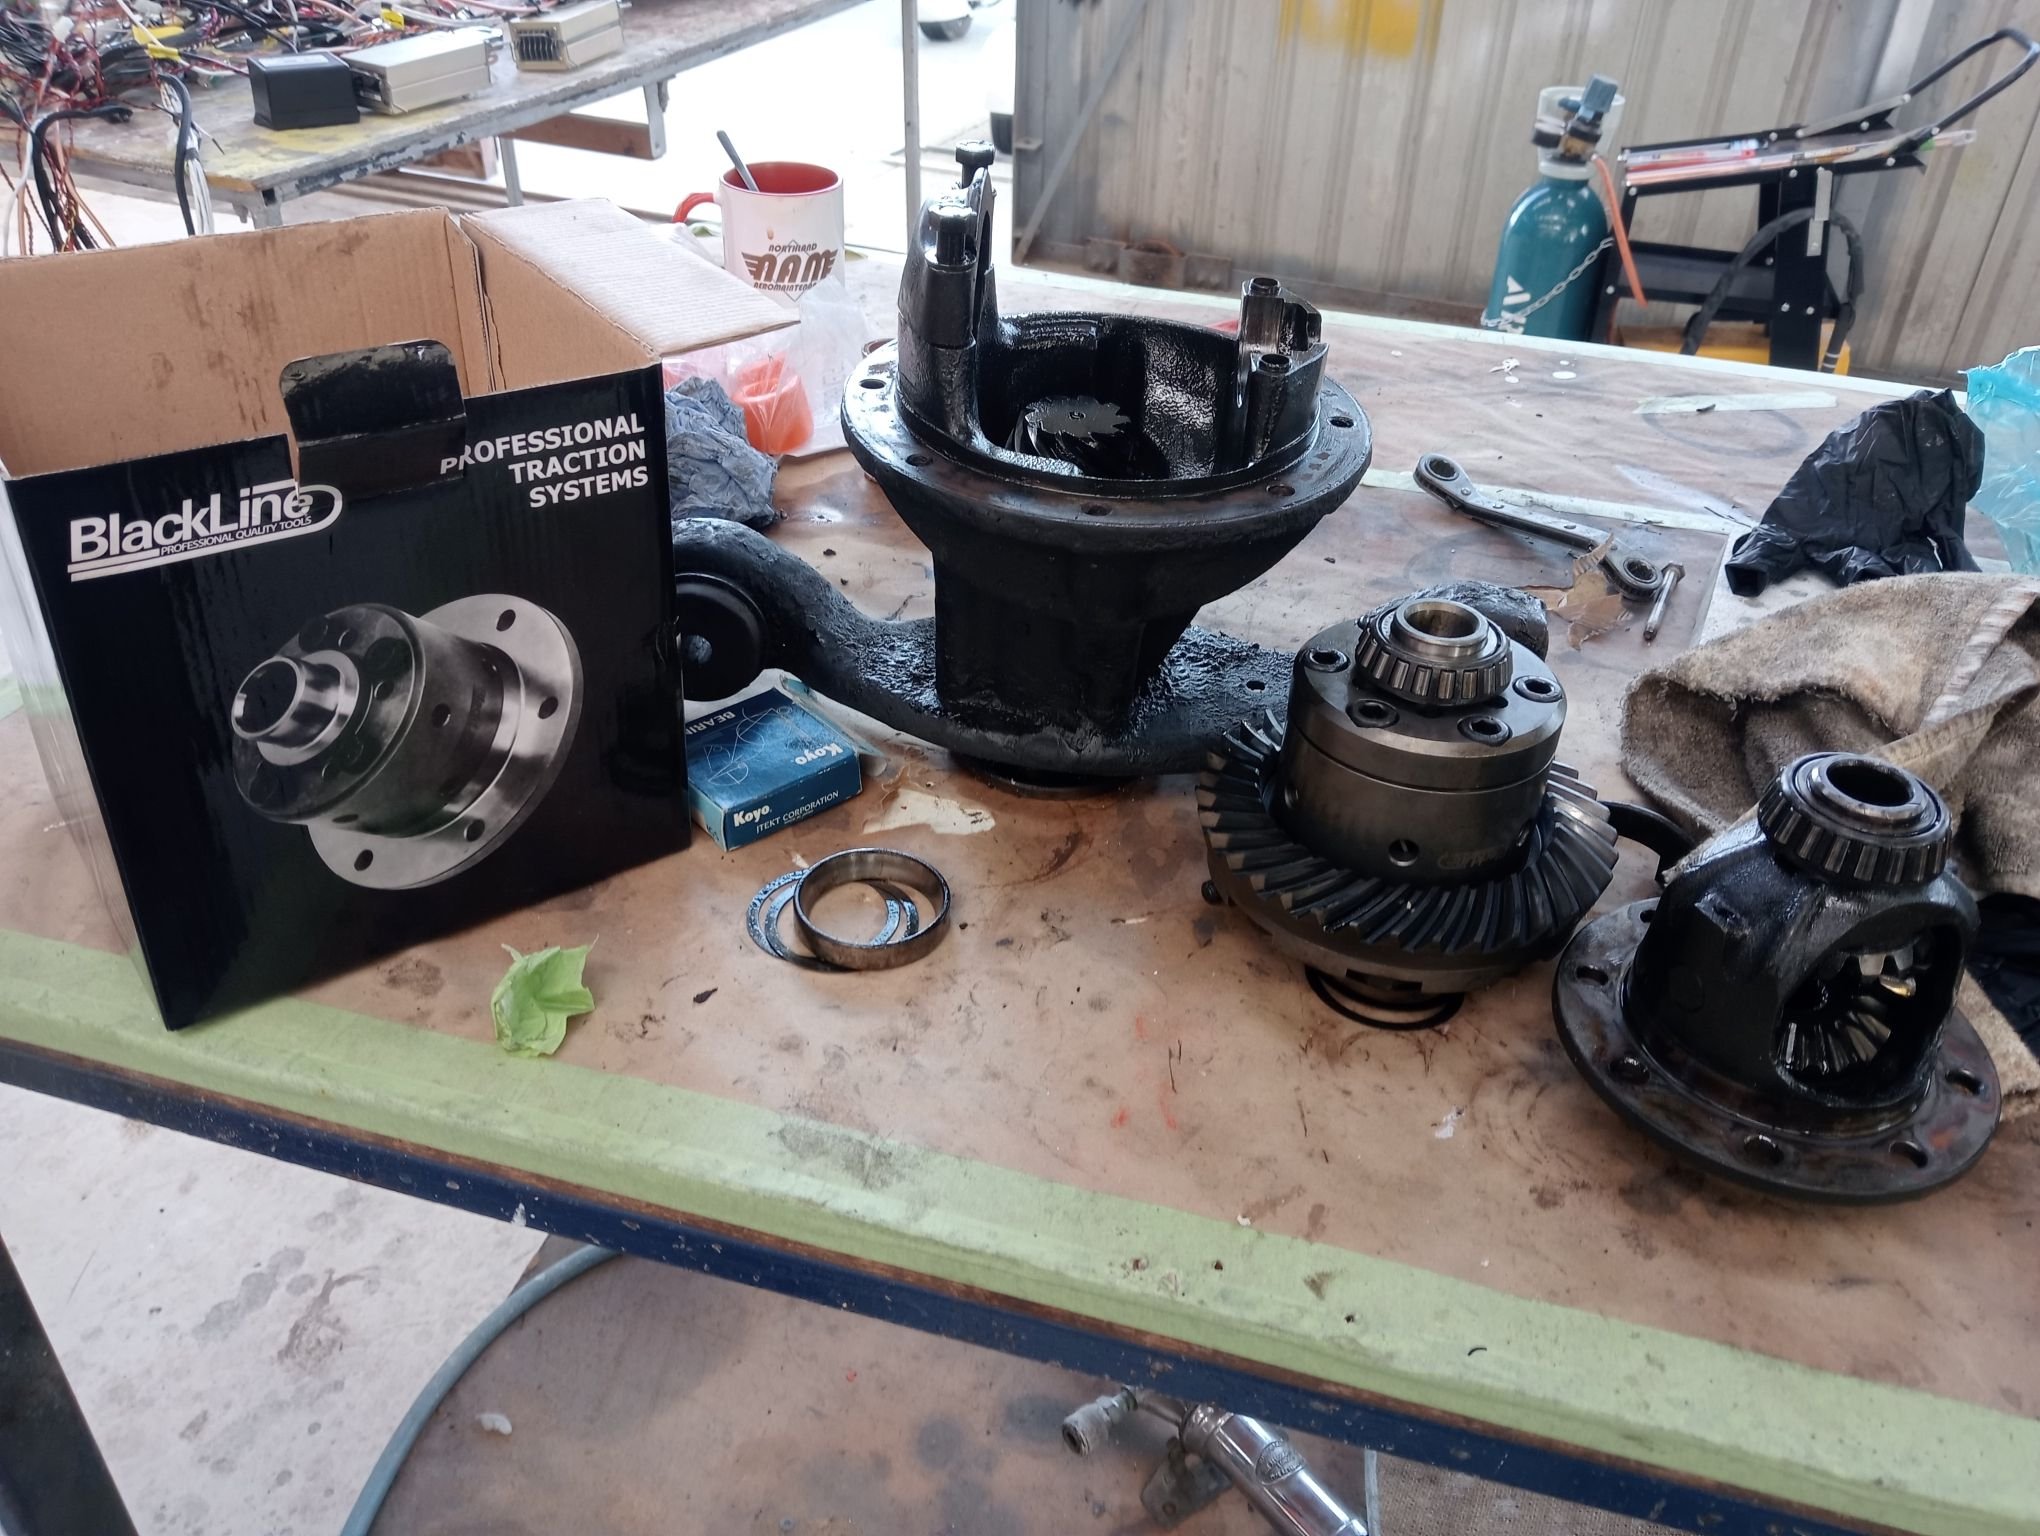
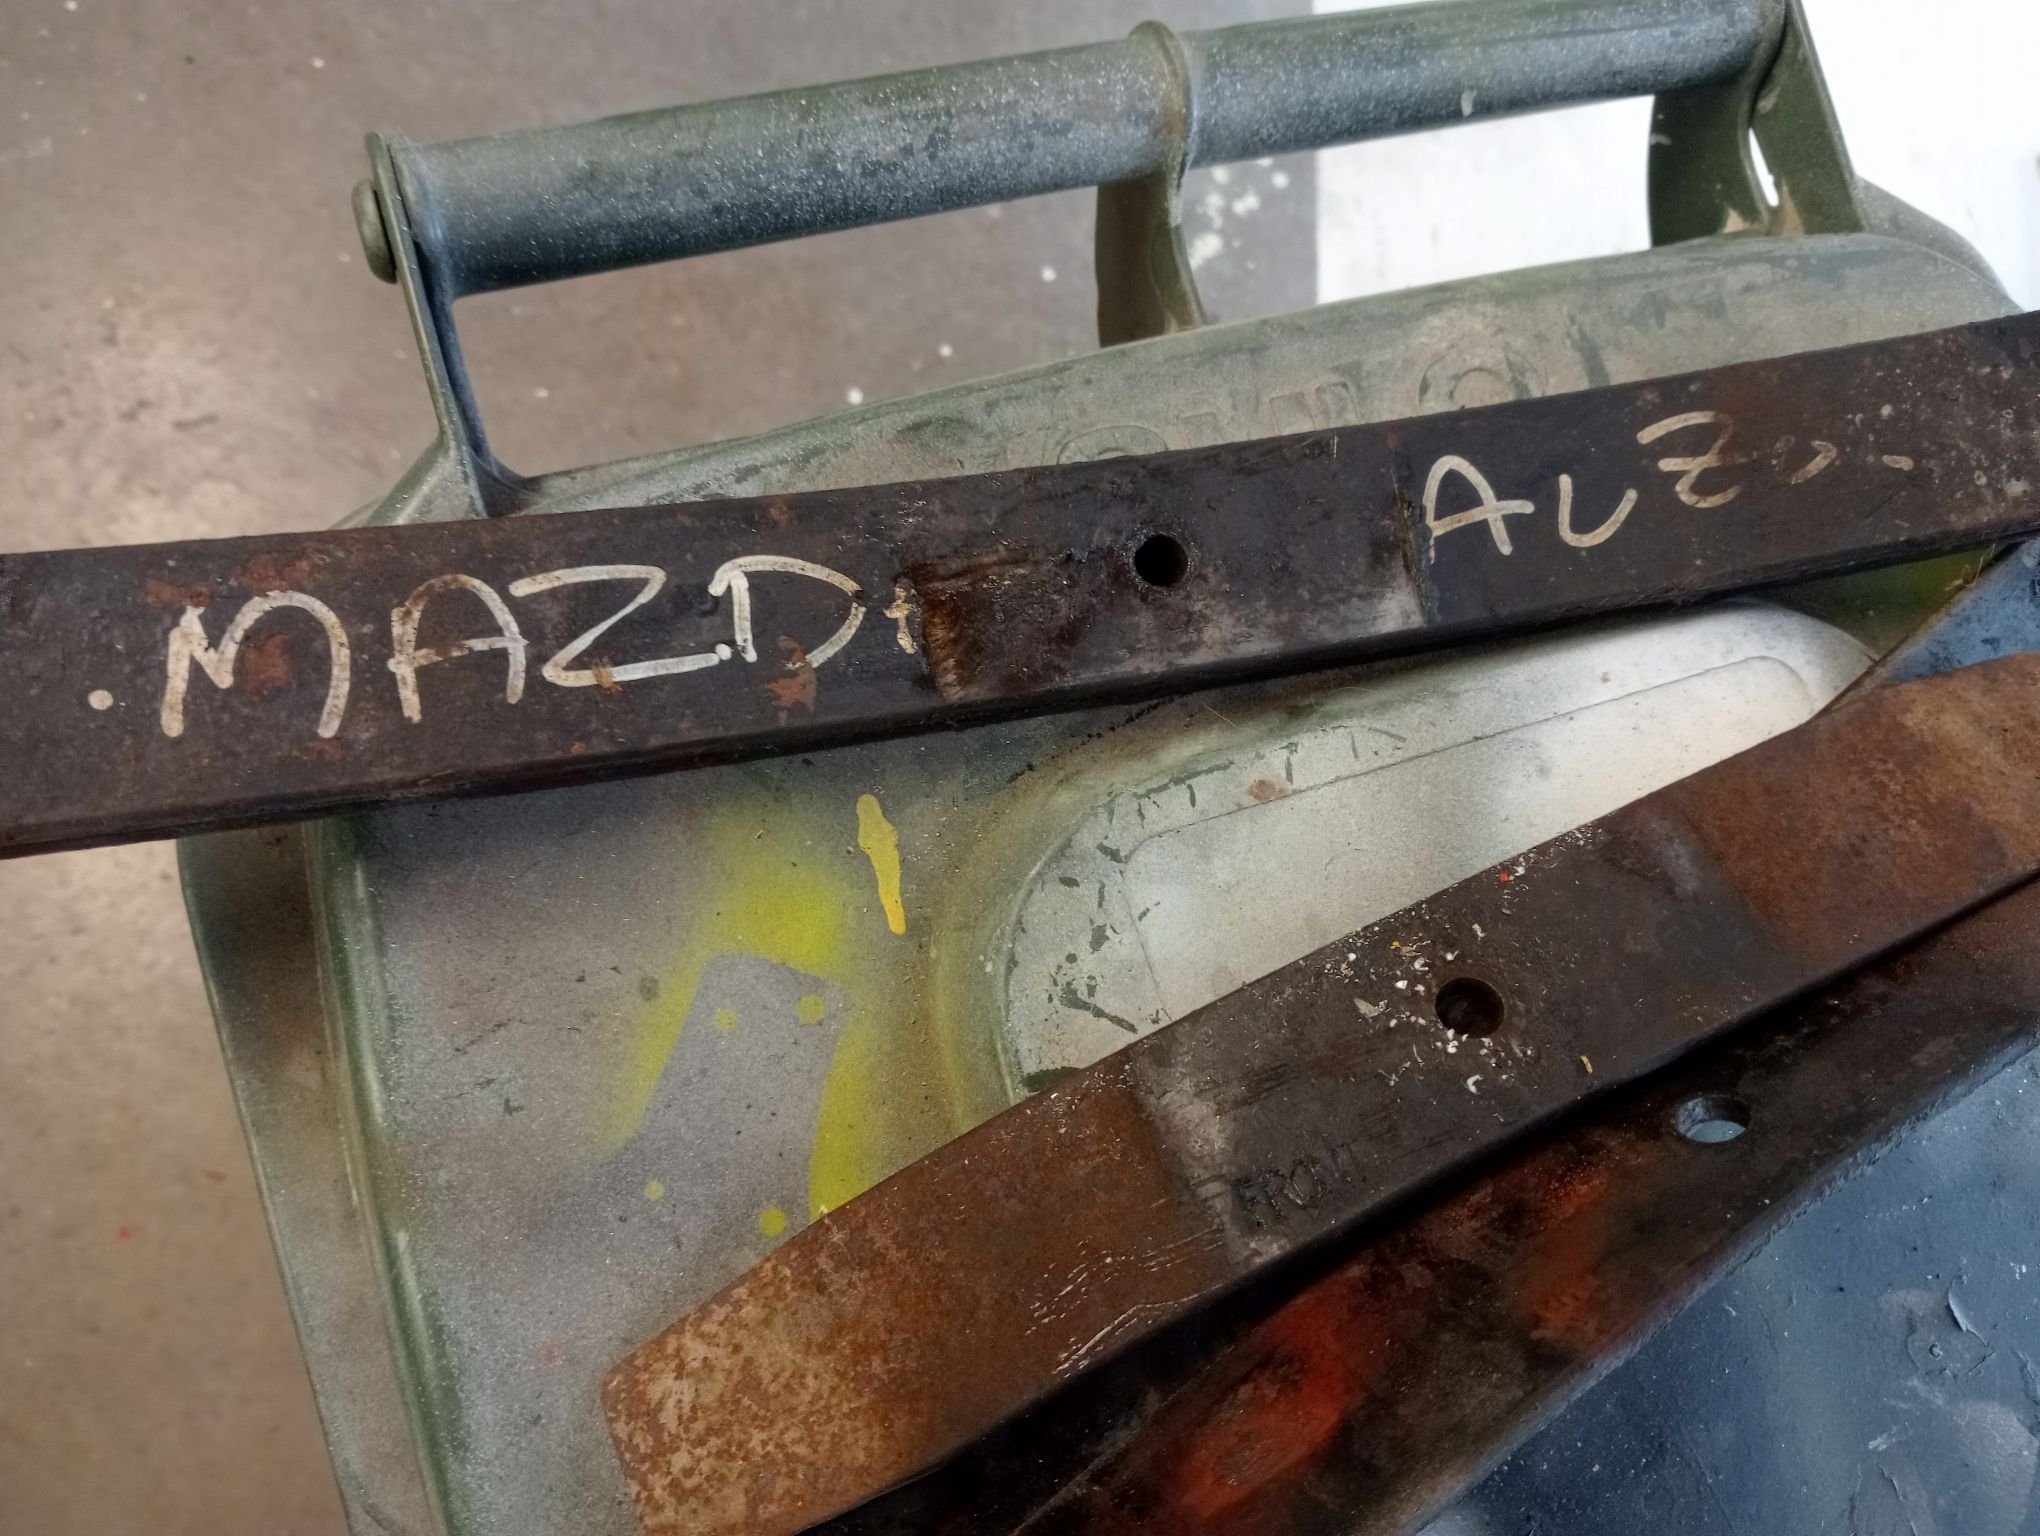
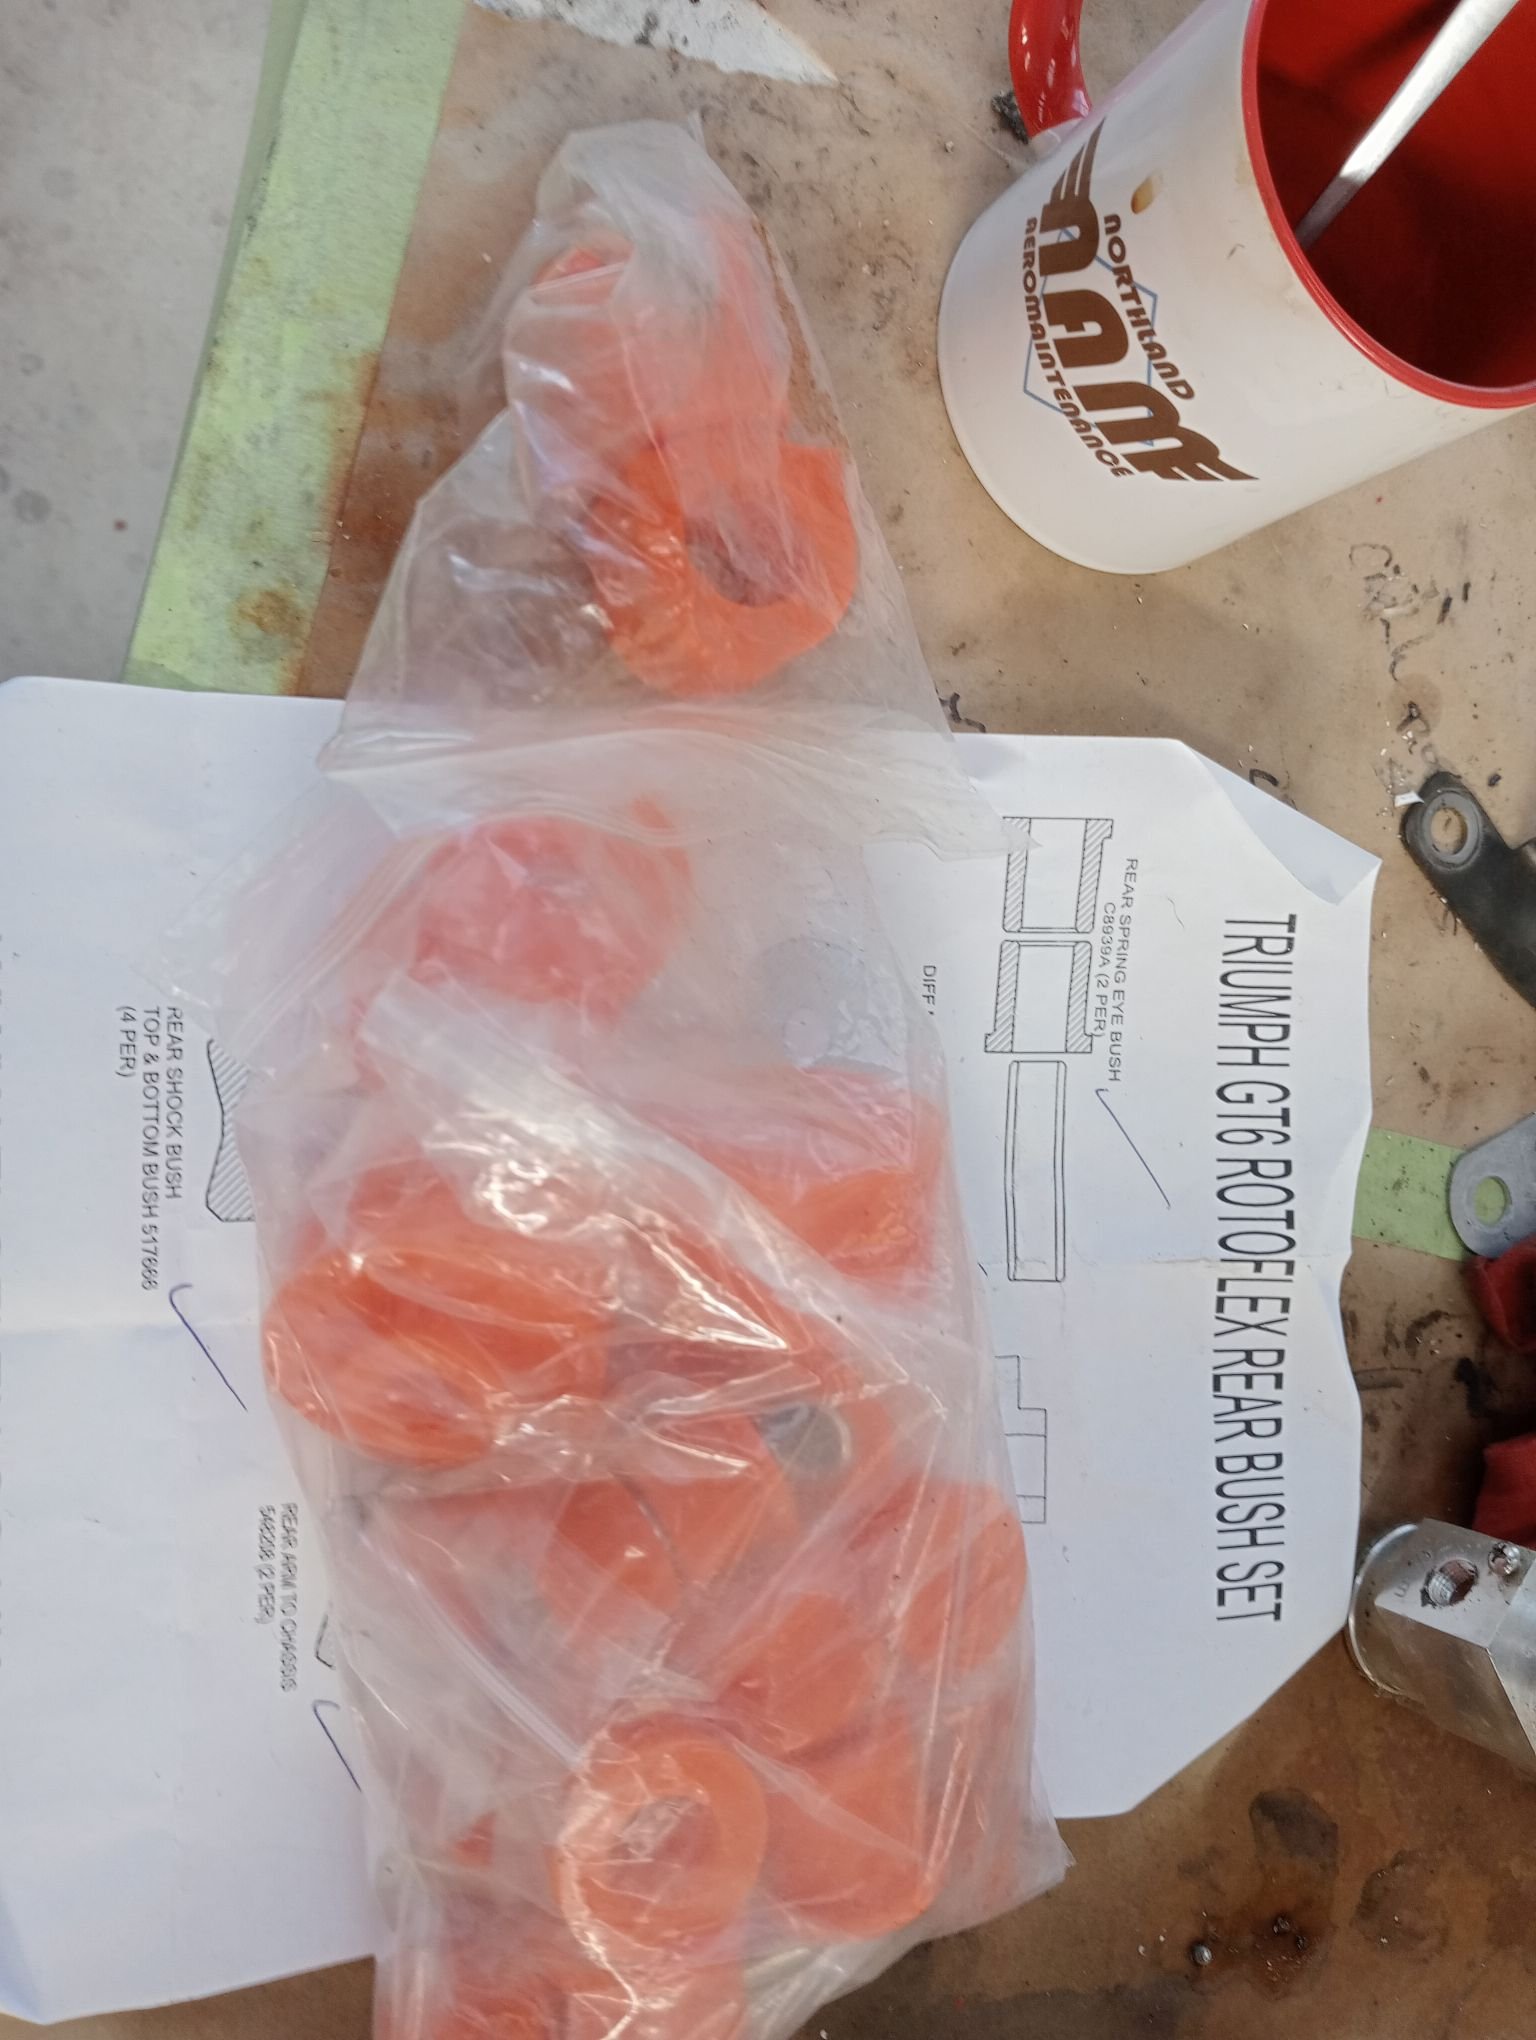
the wife and kids went away for the day so I snuck downtown for some filthy rear end action Having being informed that the gear carrier was the weakest point of the diff, and that the diff is the weakest point of the car, it seemed the simplest solution to replace the whole unit with an "I Can't Believe It's Not Quaife" LSD. The maintenance manual talked about carefully spreading the carrier bearing caps with a Churchill tool in order to extricate the carrier, well mine just fell straight out, but I decided to not be worried about this and forge ahead. By the looks of things someone has been in here before. Another thing to do was install a drain plug, and that's already been done. It was difficult to see originally because the entire diff looked like a small planetoid consisting of mud and oil. Surprisingly had a lot of oil still in it. Going to give it the mega clean off but I'm doubtful it'll ever get clean enough to repaint it. Incidentally the carrier on this on is in good condition, perhaps it's worth something to someone pulled the rear suspension and hubs to bits, which was shitty and greasy but not difficult. Did some research and couldn't see any truly compelling reason to not send the drums off to the sandblasters along with the rest of the bits and pieces. The buggered bushings can stay in place because I suddenly had an ancestral memory from decades ago and remembered; I still have a set of rear poly bushes in the garage! I bought them shortly after I bought the car, did the fronts which was a huge pain in the ass, took one look at the rears and decided it'd keep for another day. Incidentally the radius arms and lower wishbones in the rear already have polybushes, guessing the previous owner was slowly replacing them as they crapped out. They actually look pretty good and sometimes I wonder if a quarter-century old bush is actually better than a modern pirate part made God knows where pulled the rear leaf apart and wondered why it has "MAZDA" written on it, very odd. There's apparently some button guide thingies which are supposed to be between them but they are long gone there is now a large and growing list of things that I am waiting on which is preventing anything from going back together. Ergo the only way to progress is to pull things more apart. I also have some major grudge purchases like new engine mounts, probably a clutch and a cambelt and all the other bits and pieces you really wished you did when it was in bits and easy
- 7 replies
-
- 17
-
-

-
Can anyone email me a copy of the lvvta construction manual? Like many people before I've tried applying for an email link to download it from the official channels, received nothing, and been told "not our problem"
-
Gibbon’s 1971 GT6 bothering - comment here
gibbon replied to VitesseEFI's topic in Project Discussion
12a would be a pretty serious goer given that the gearbox fits, just the exhaust would come out directly inline with the steering shaft. Plus I've already got one other rotary to worry about Also it looks like that "heater outlet" on the back of the head should be anything but blanked, mx5 people have kits to INCREASE the flow out of it because apparently cylinder 4 overheats under enough load otherwise. So I guess I'll weld a hard pipe to it, and maybe look at adding a second outlet on the other side. Or I could notch the firewall for clearance but that's kinda going against my principles -
Gibbon’s 1971 GT6 bothering - comment here
gibbon replied to VitesseEFI's topic in Project Discussion
forgot to answer this, yes 14", they were on the car when I bought it and I've never actually seen another gt6 with different wheels that made me think "wow I wish I had a set of those instead". I actually think the body design is so nice that wheels will always play second fiddle (unless they're grabbing attention by virtue of being horrible!) -
Gibbon’s 1971 GT6 bothering - comment here
gibbon replied to VitesseEFI's topic in Project Discussion
the 6 does sound incredible, especially with the wheelbarrow exhaust My final plans actually include a supercharger, with which I will mask all other drivetrain whining -
Gibbon’s 1971 GT6 bothering - comment here
gibbon replied to VitesseEFI's topic in Project Discussion
ah, I actually read through that thread while researching, didn't realize it was you! suffice to say I doubt you'll be learning anything from my thread but hopefully you'll get a laugh and might lend some advice, which you already have my modified shifter sits just behind where yours is, and yes I absolutely regret it haha. Did you have a bastard of a time keeping the rod aligned? -
Gibbon’s 1971 GT6 bothering - comment here
gibbon replied to VitesseEFI's topic in Project Discussion
I'm firmly of the opinion that they blew the entire budget on the styling and made up the shortfall by parts-binning the rest of the project -
Gibbon's 1971 triumph GT6 that everyone told him not to mess with
gibbon replied to gibbon's topic in Projects and Build Ups
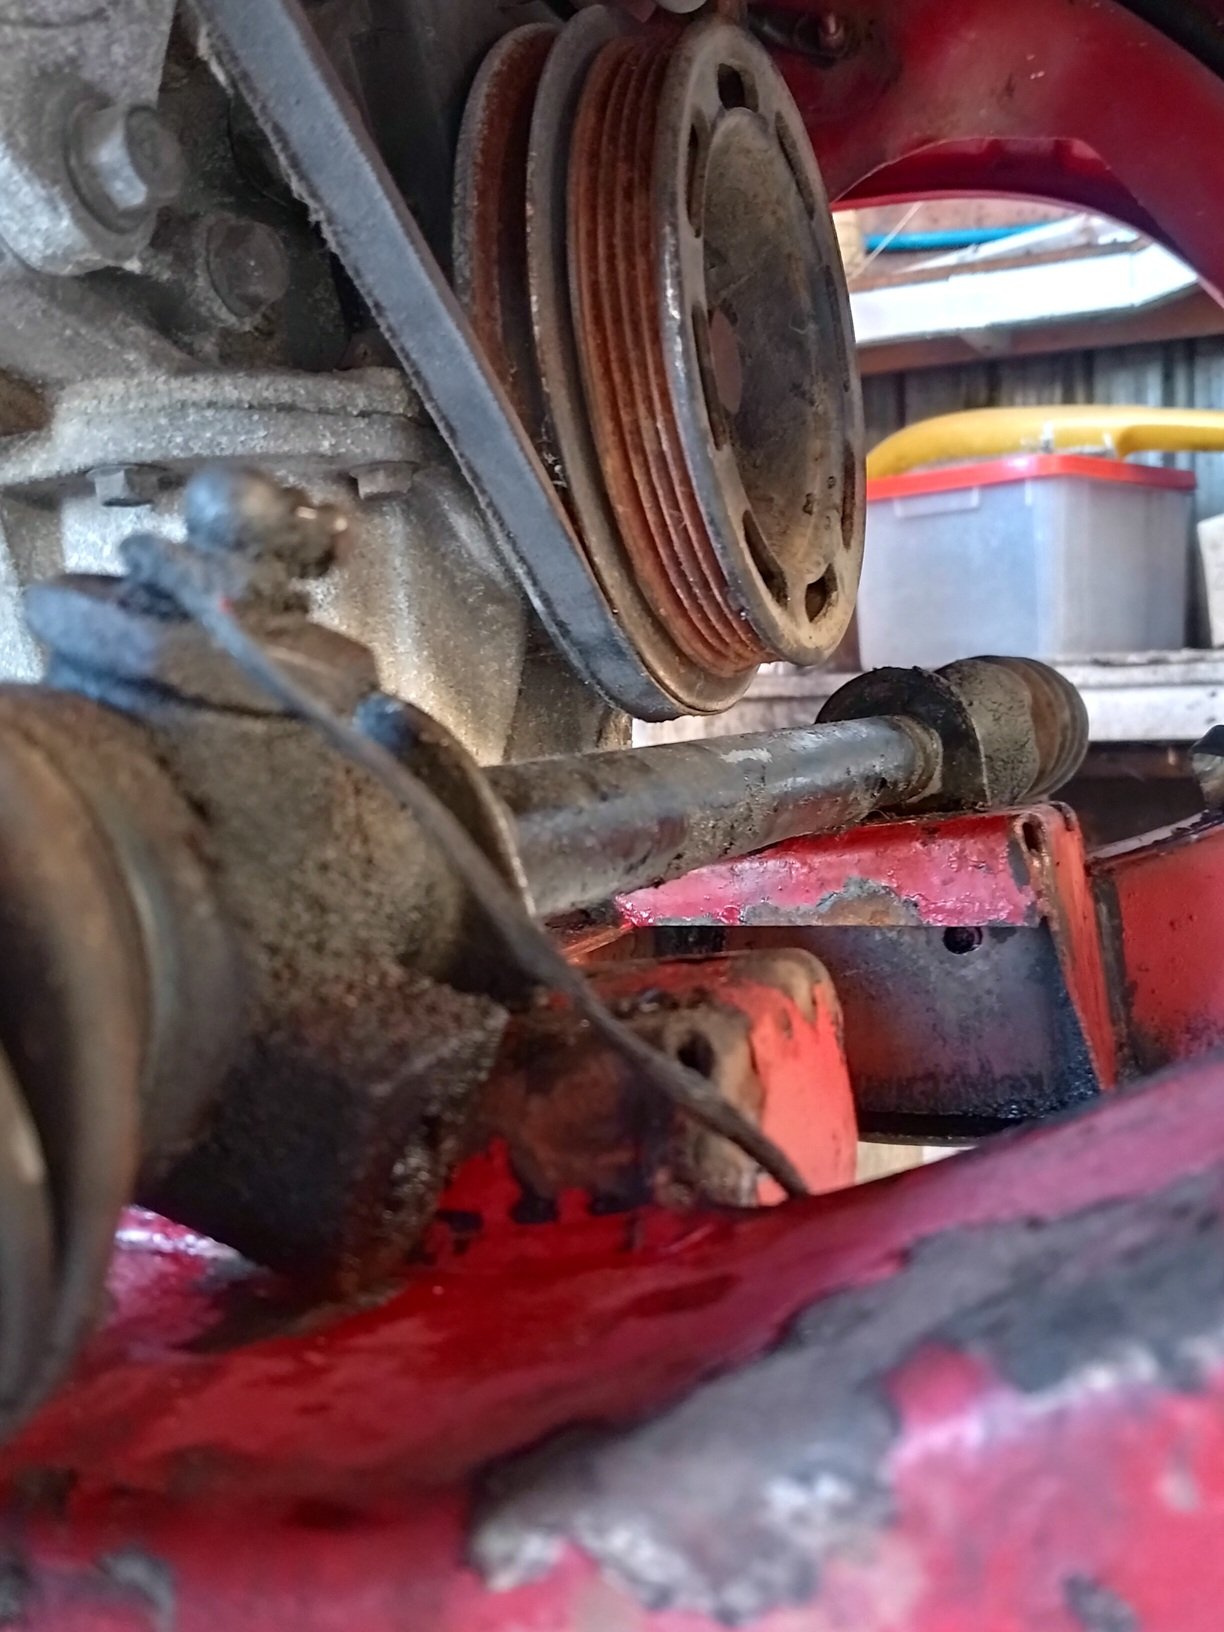
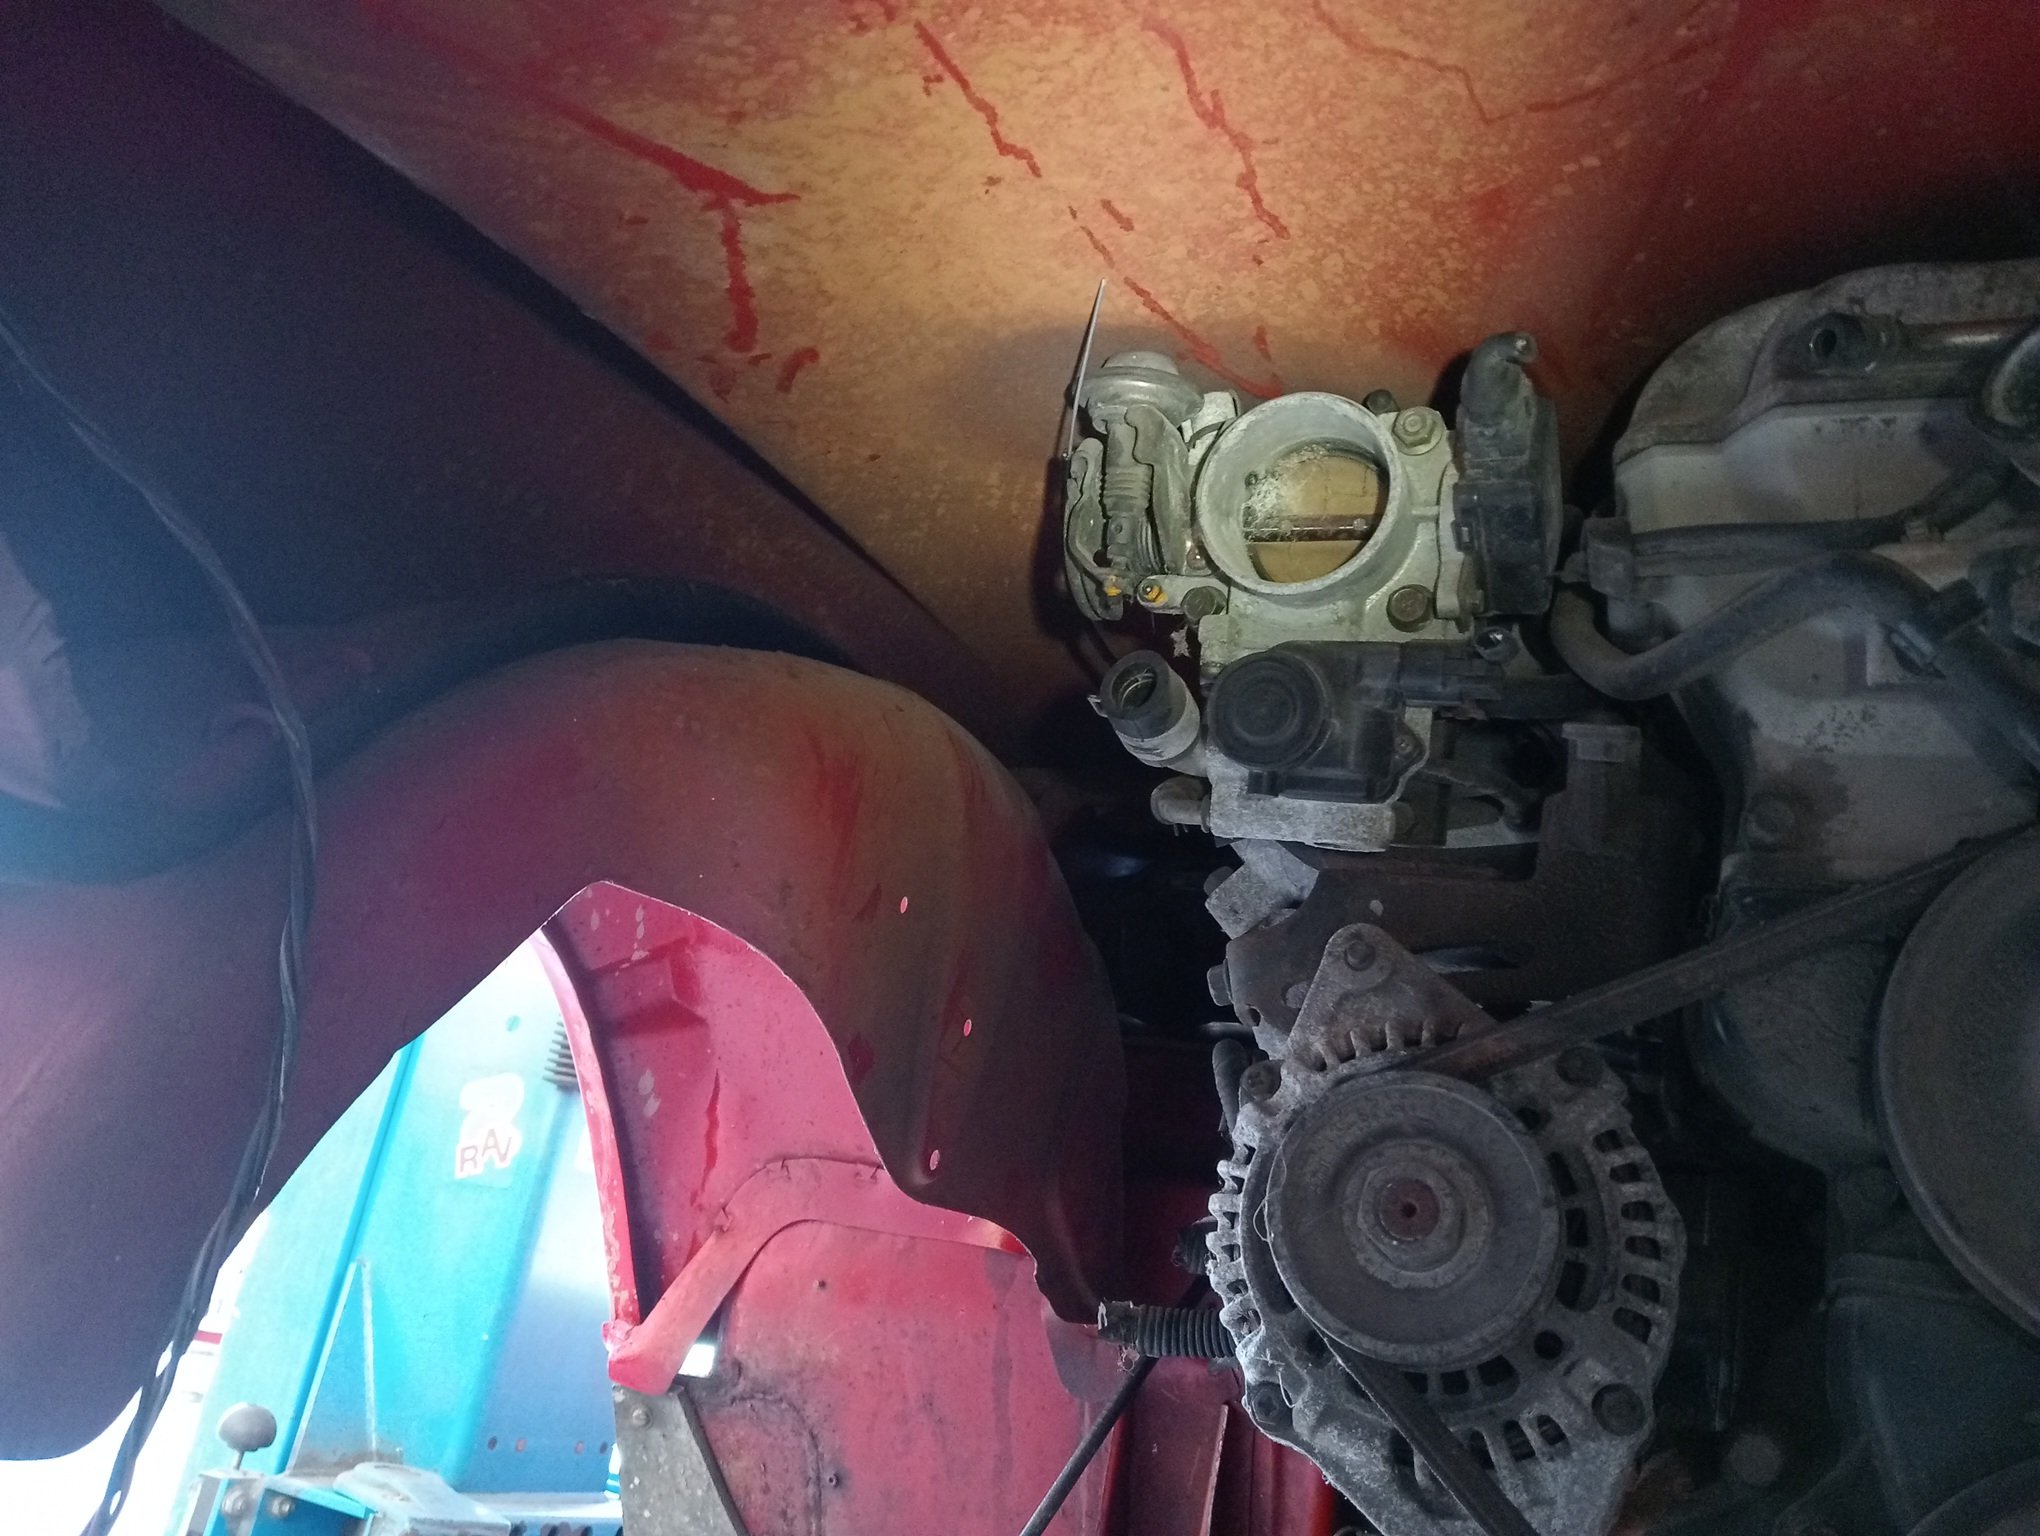
some uninteresting photos unless you're interested - here's the current longitudinal alignment; which results in this arrangement over the steering rack and this somewhat tight throttle body clearance under the bonnet (with bonnet set to it's lowest) - but clearance nonetheless
- 7 replies
-
- 21
-
-
Gibbon's 1971 triumph GT6 that everyone told him not to mess with
gibbon replied to gibbon's topic in Projects and Build Ups
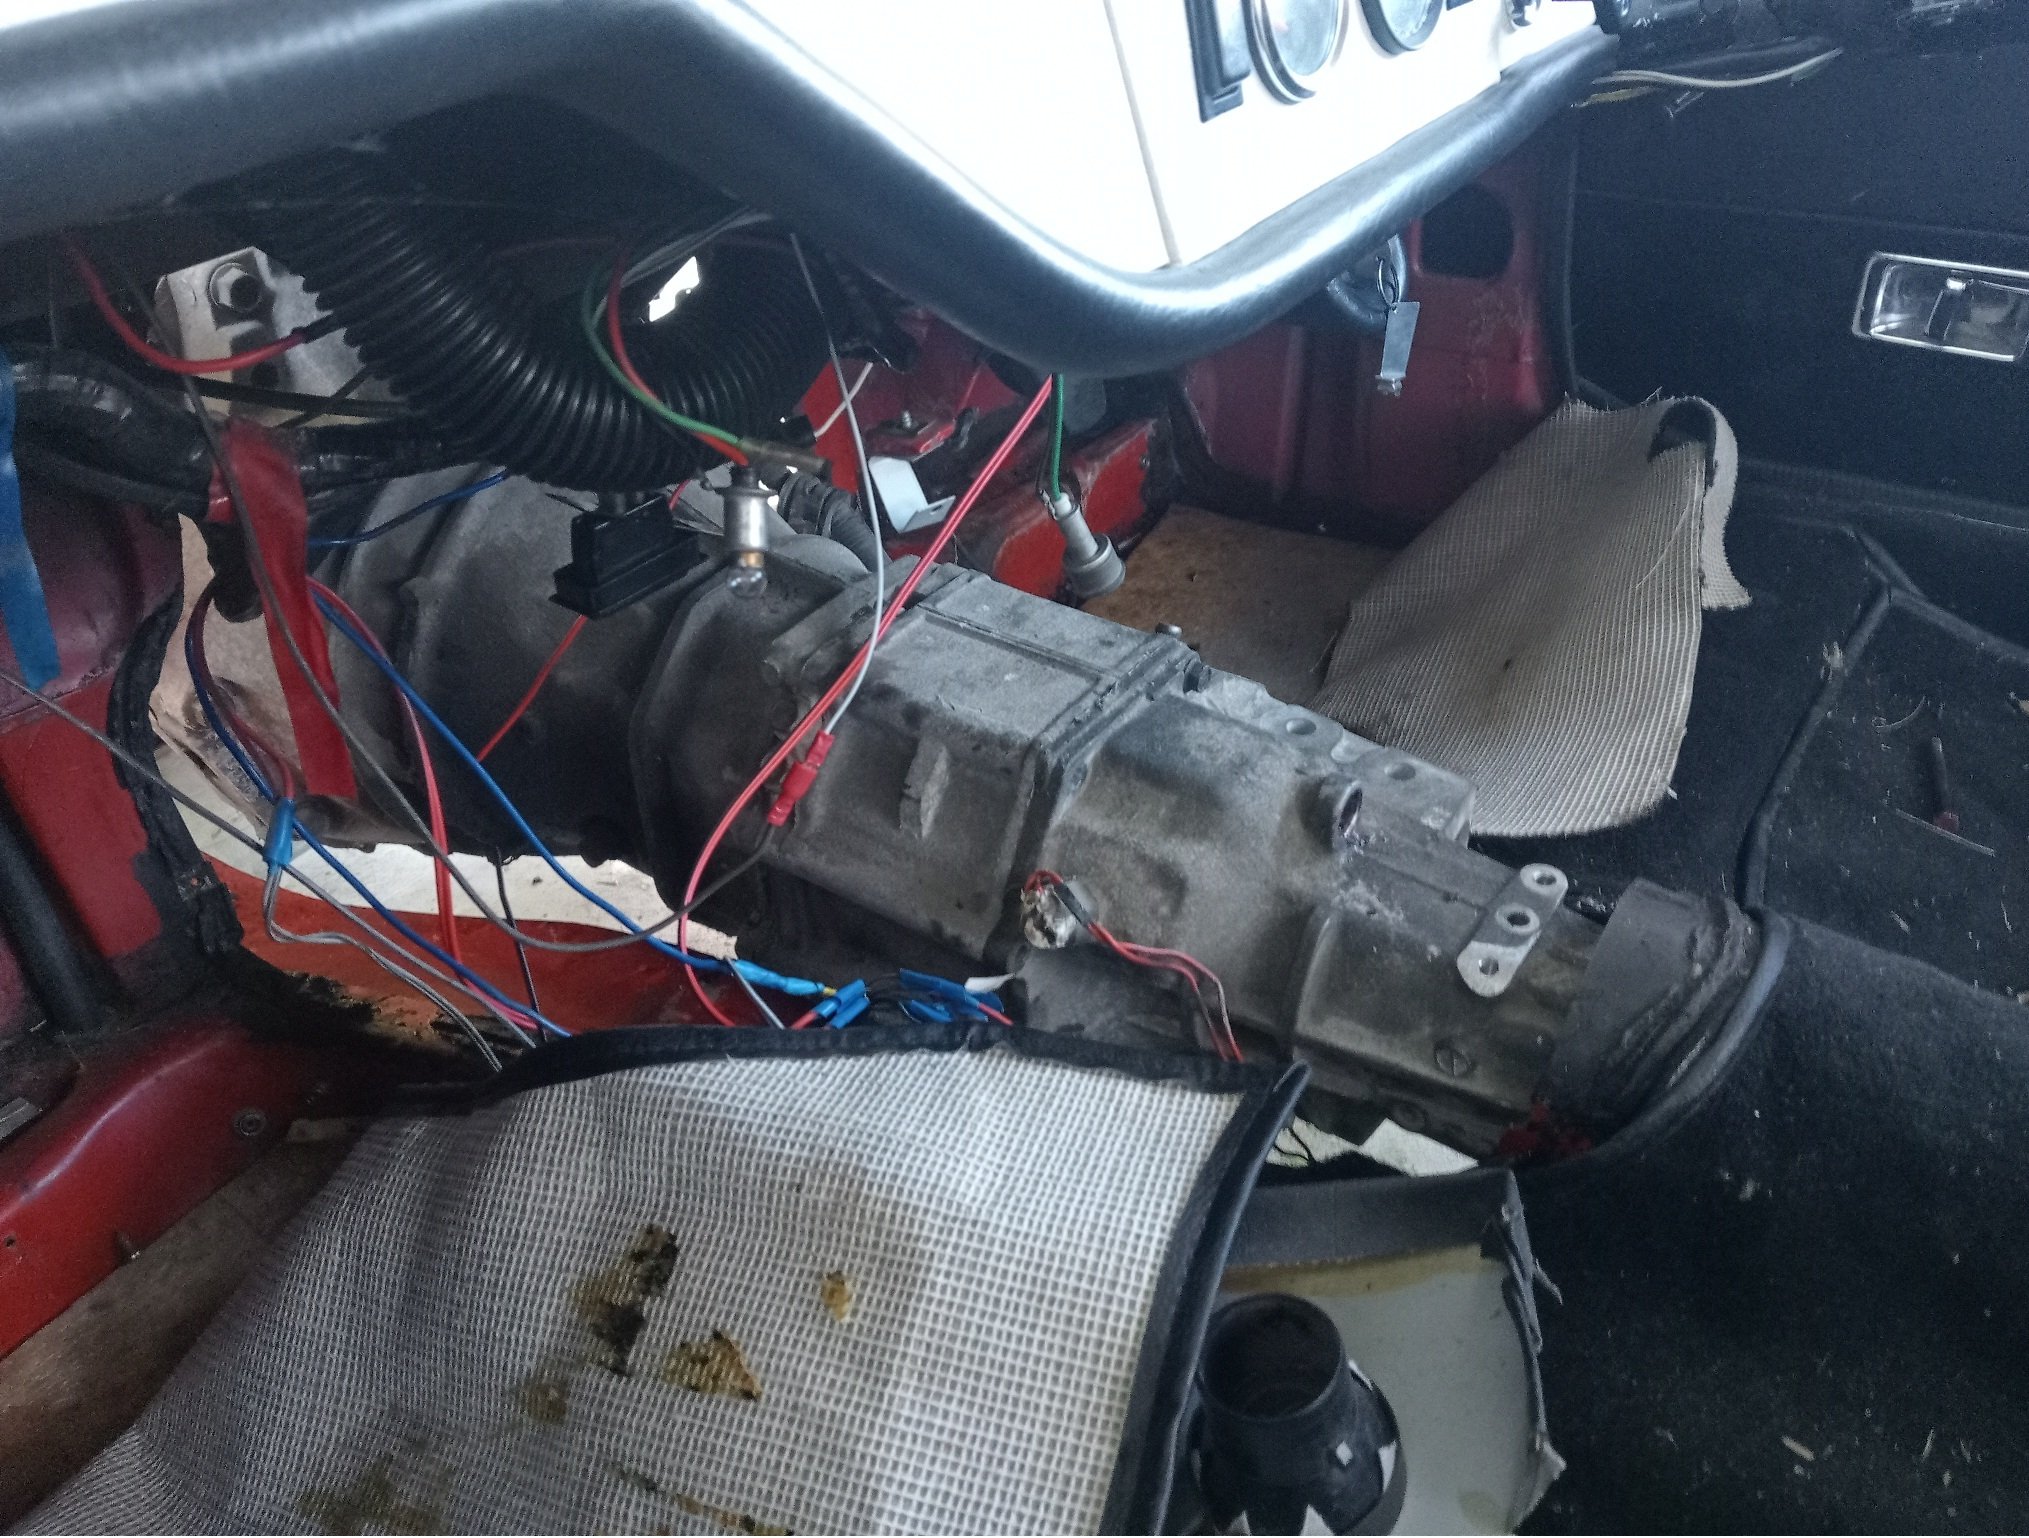
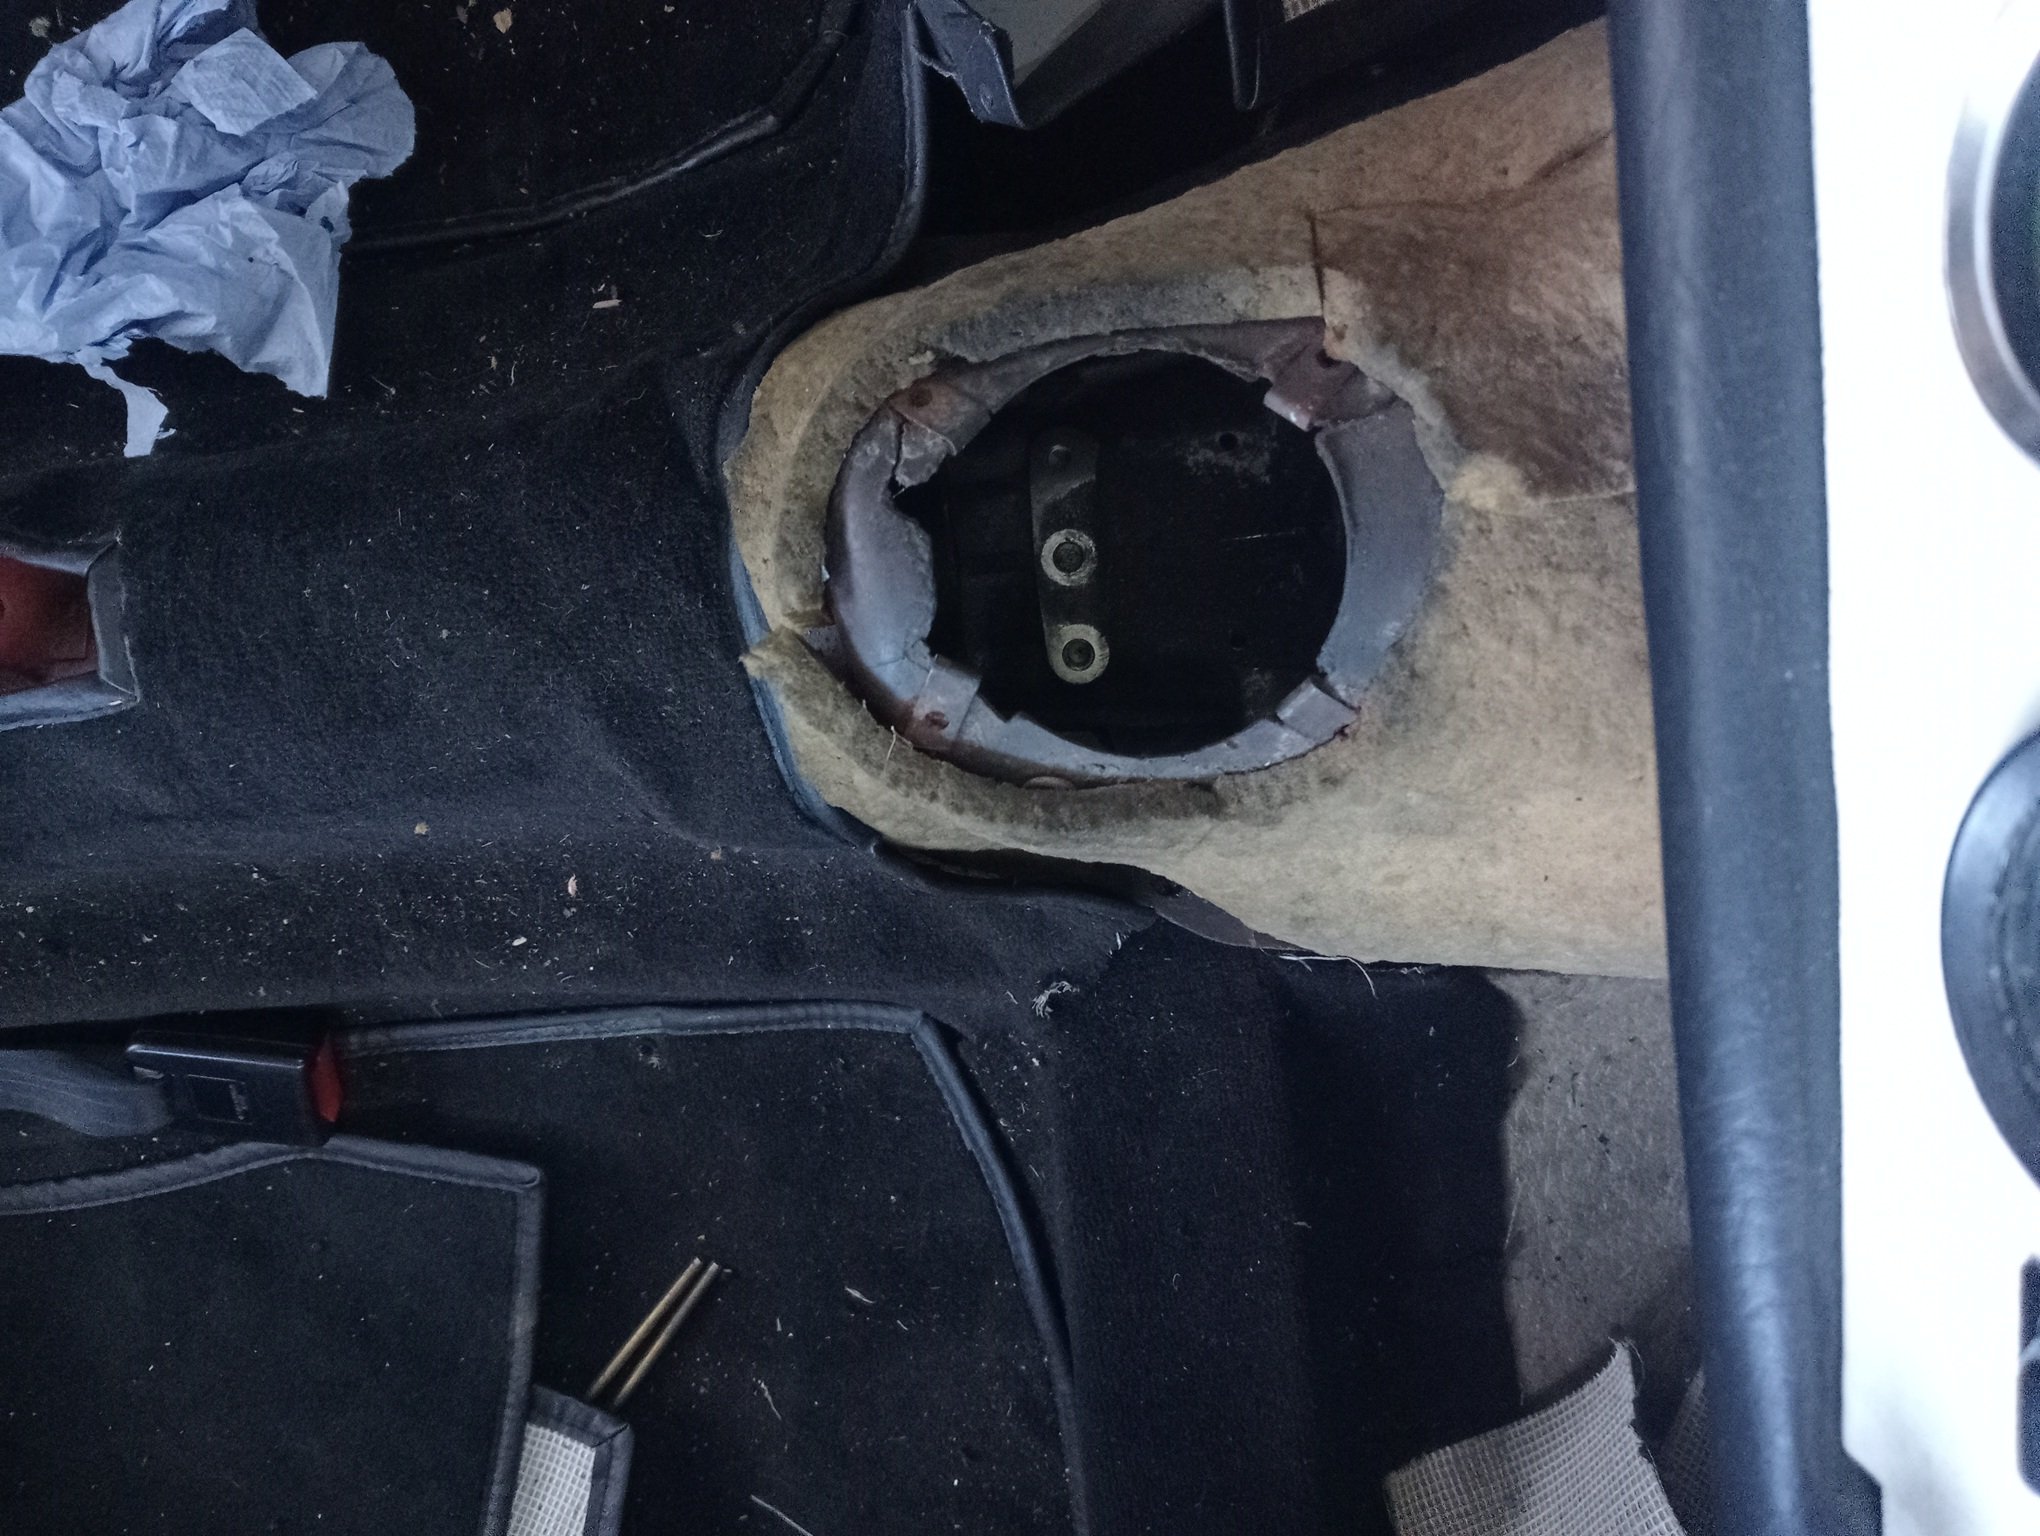
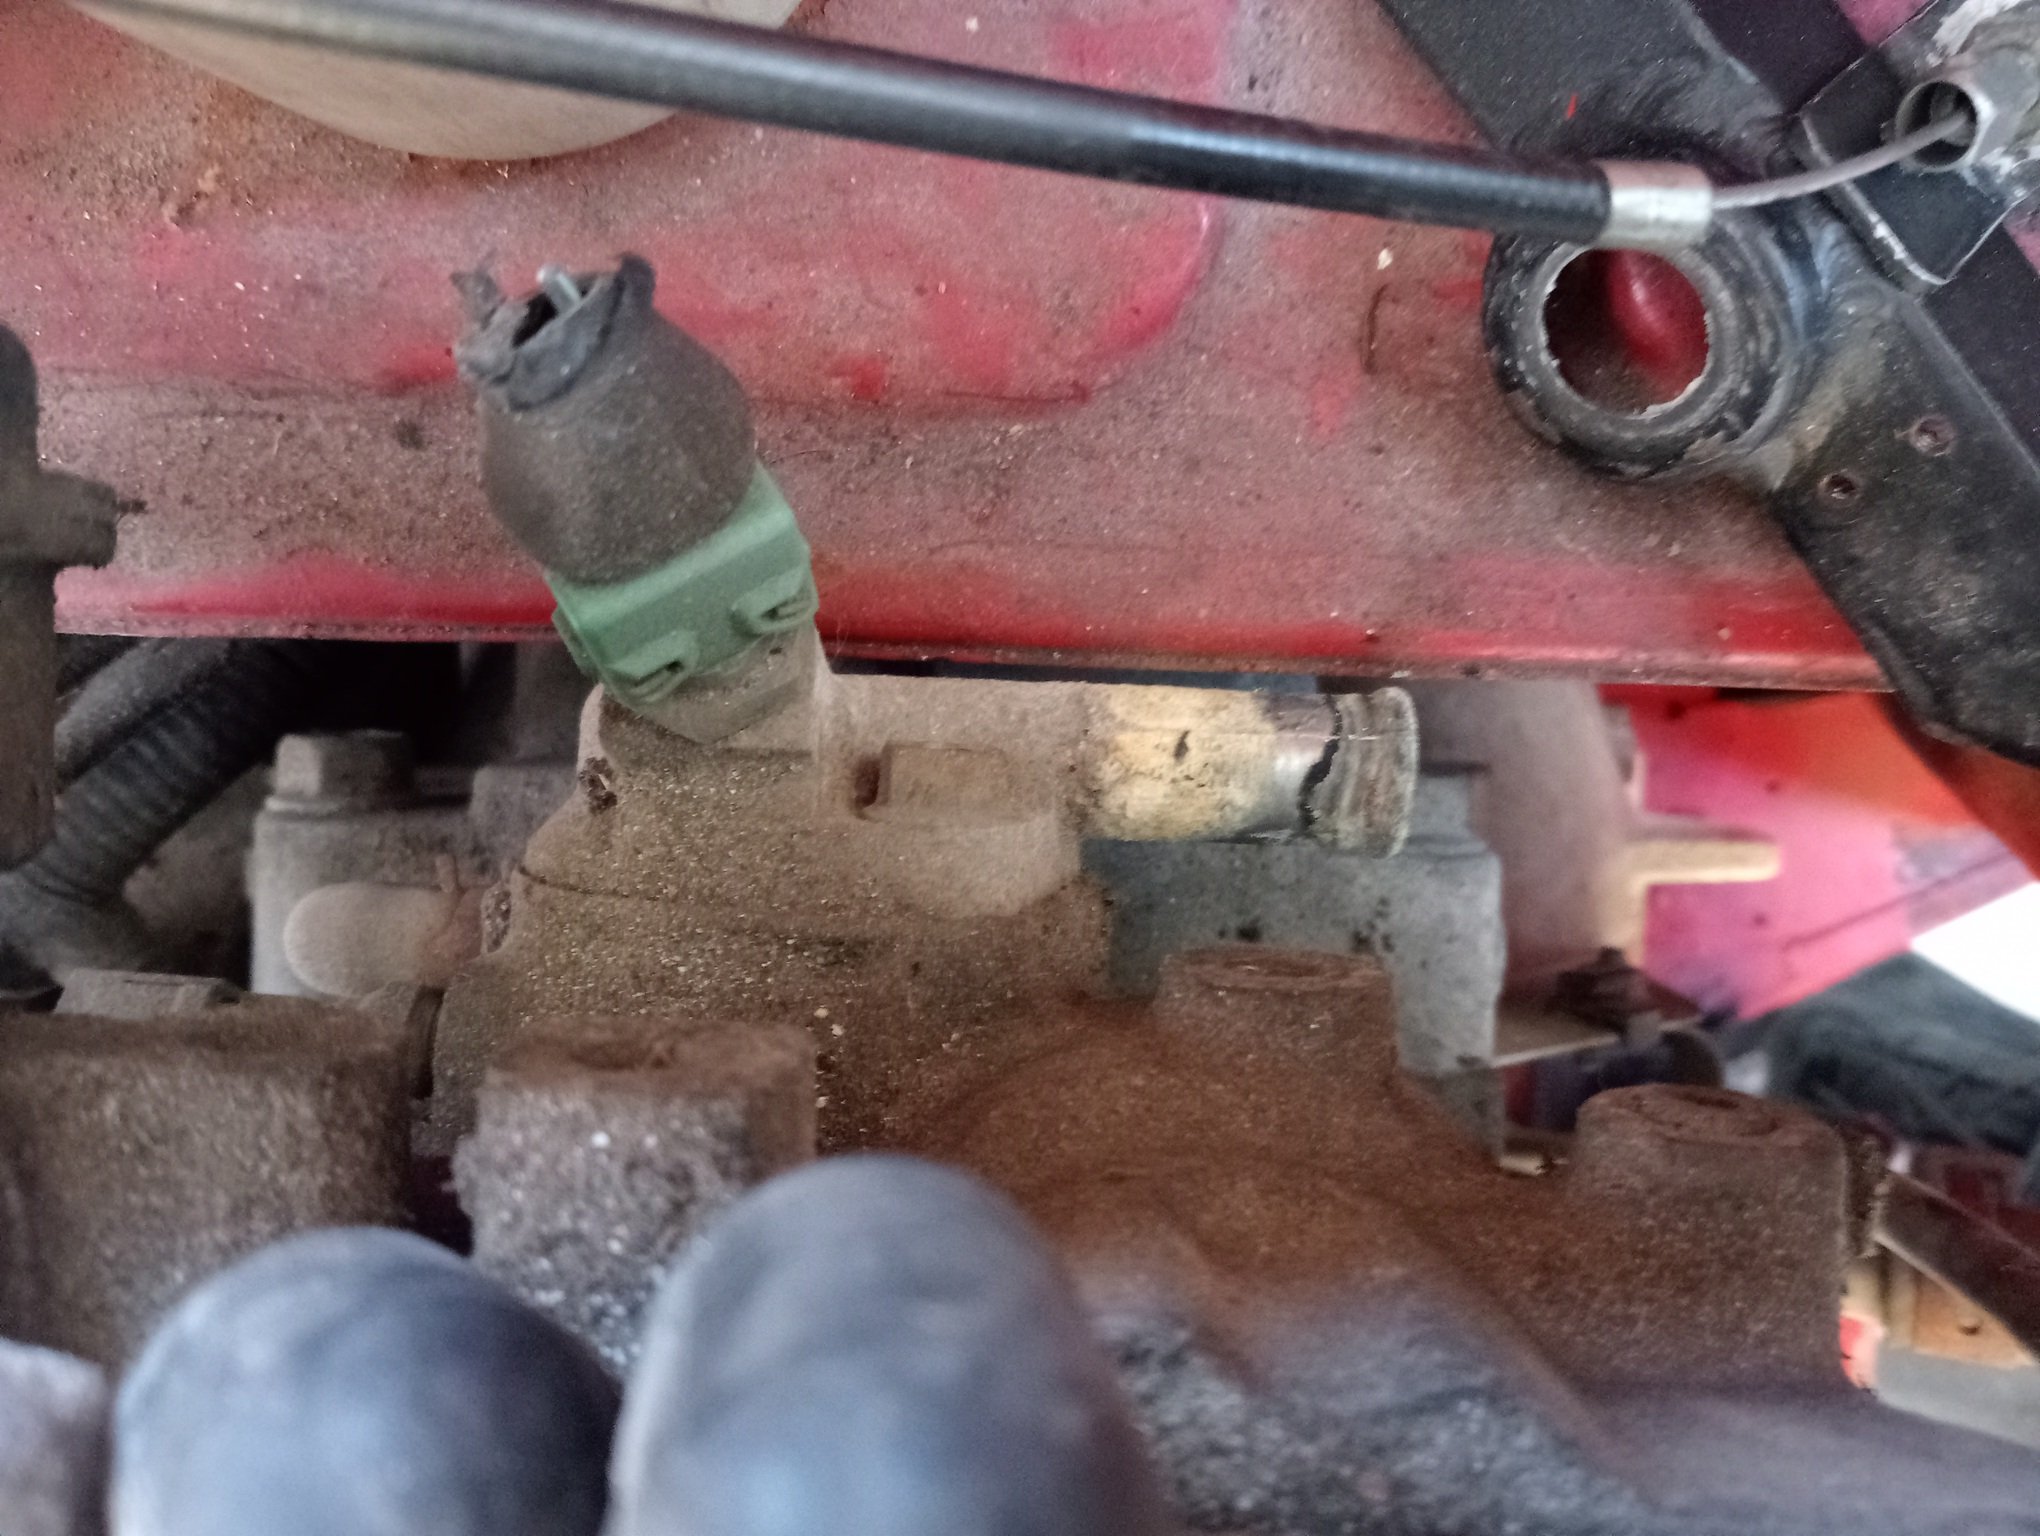
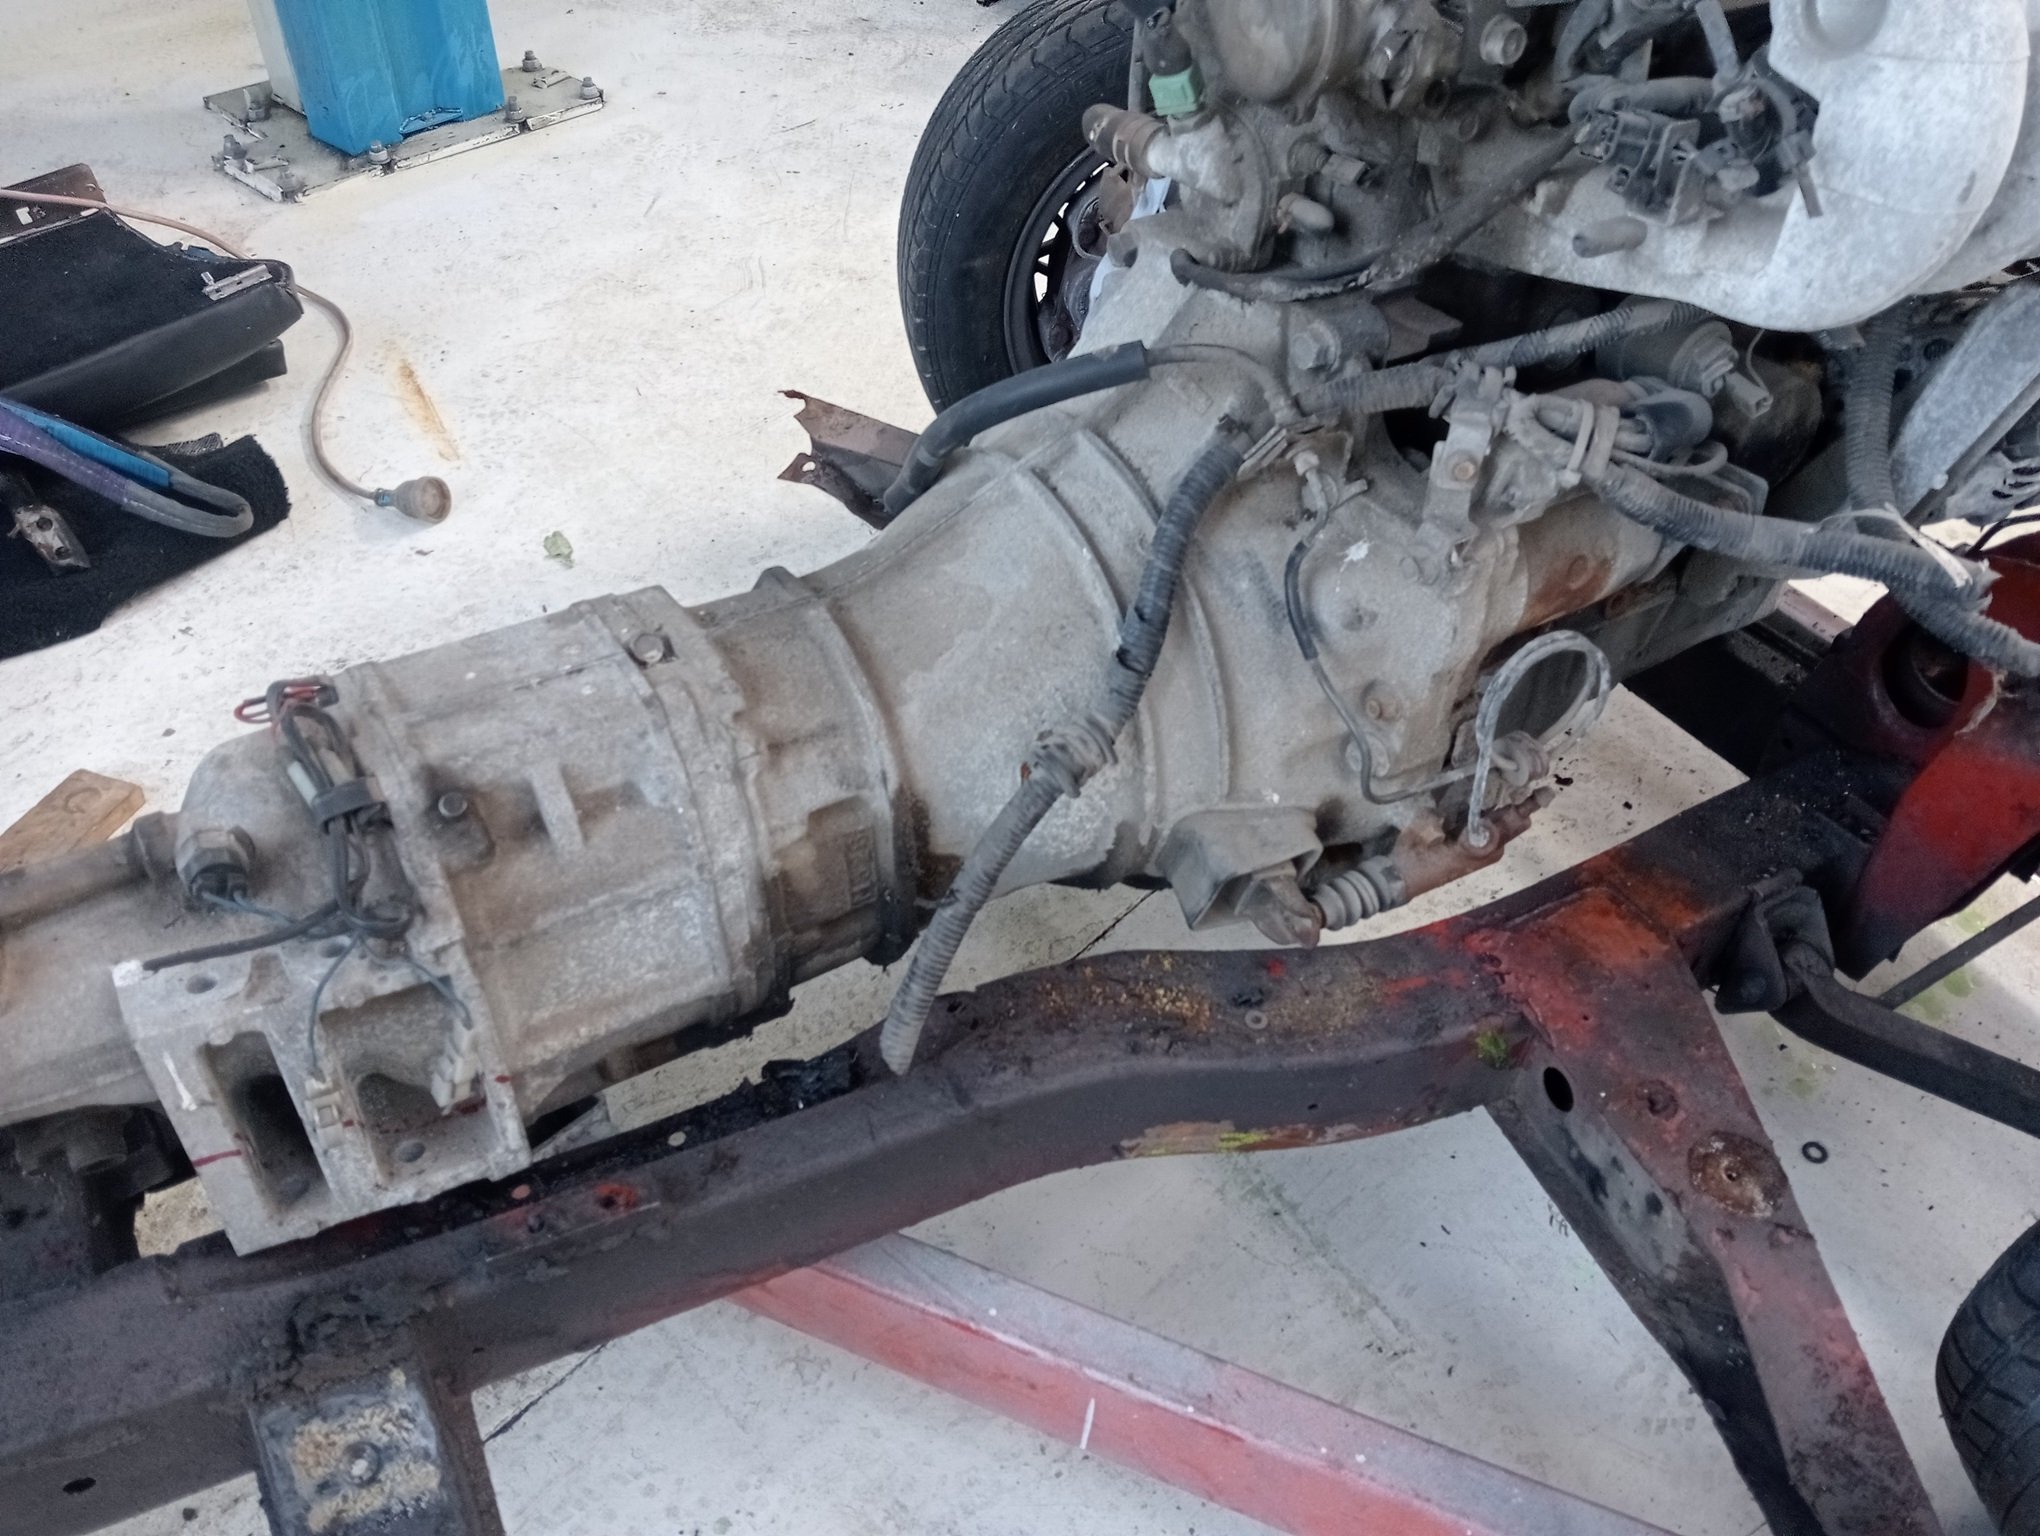
transmission fits the tunnel perfectly except the shifter is miles back, probably just about under the handbrake. No wiring was disconnected prior to this photo it was all legitimately just hanging its guts out like that since around 2012 there is a well documented mod to move the shifter forward but it's still not quite enough to get it back to the factory hole in the trans tunnel. the mod places the shifter about two inches aft of the mount points showing which would have it coming just through the wall of the tunnel. I decided I could do better by doing away with the mount points and bringing the shifter as far forward as possible. I wish I had just gone with the original modified point! the mechanism is EXTREMELY sensitive to misaligment and the selector rod will jam up if it is not completely, perfectly straight. right now the whole thing is sitting on a workbench jammed with shims and things-acting-as-shims, waiting for some brave soul to TIG some new mount points onto it. I might get a photo of the finished product, but let's just call it a work in progress with the aircon pulley mounted just over the steering rack and the larger alternator pully sitting just behind, this is the nearest pinch point - the heater (I think?) outlet at the back of the head just sits off from the firewall seam (pic is taken directly down at the rear of the engine). Once I'm assured that this is a heater line and nothing more I'll blank it off and move the temp probe. My heater is long gone
-
Gibbon's 1971 triumph GT6 that everyone told him not to mess with
gibbon replied to gibbon's topic in Projects and Build Ups
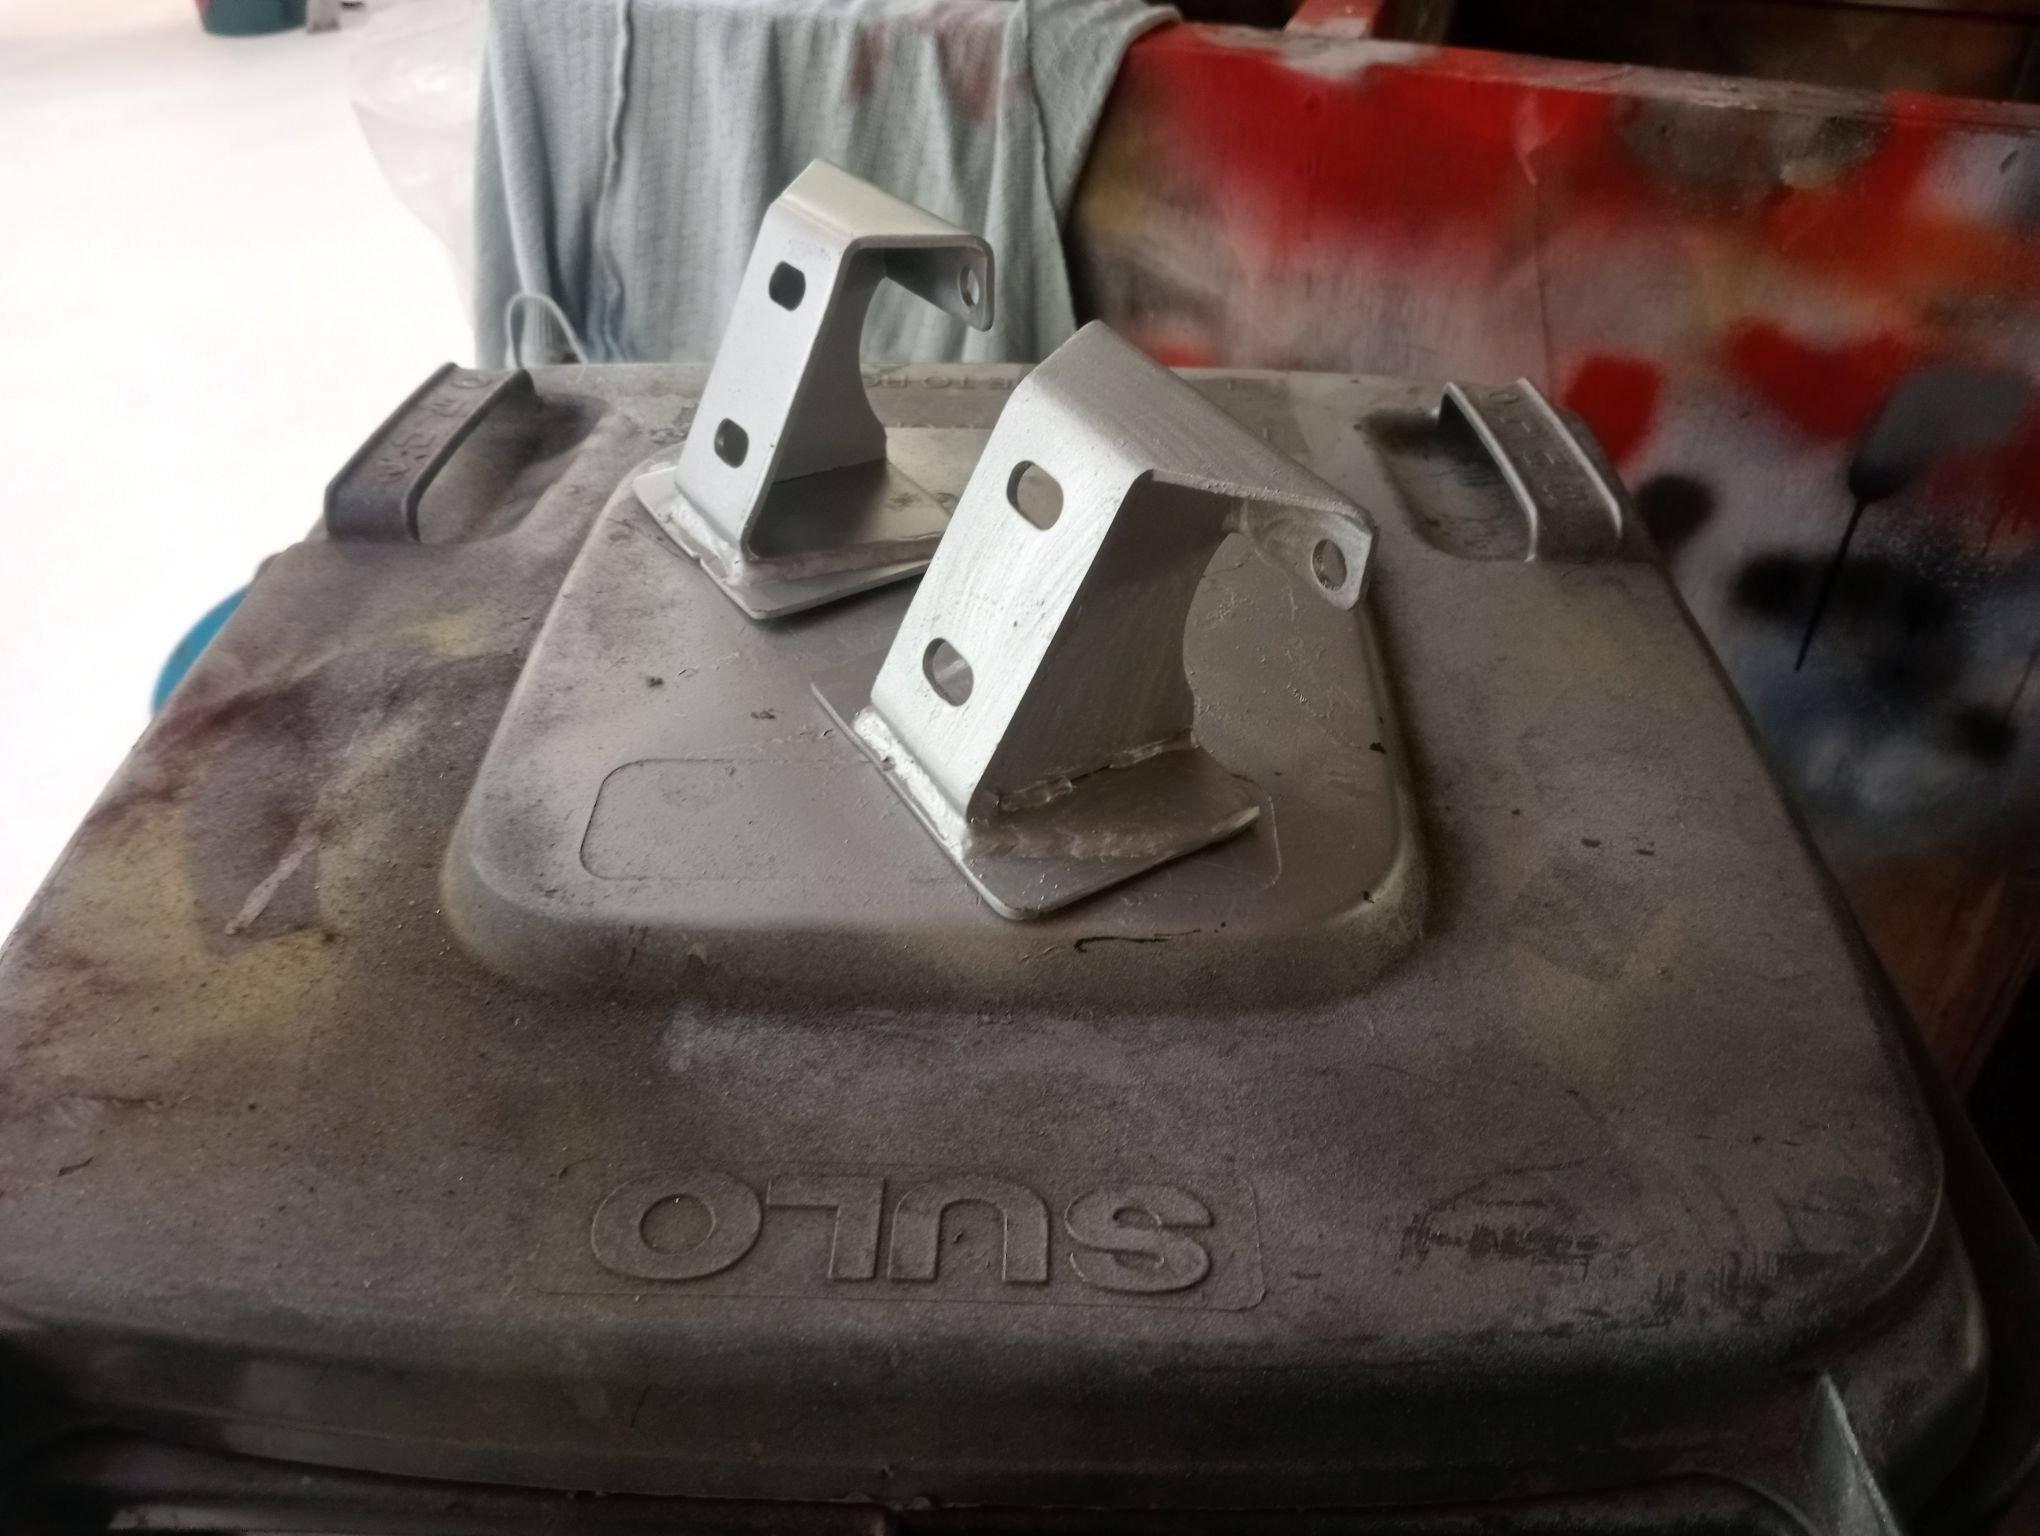
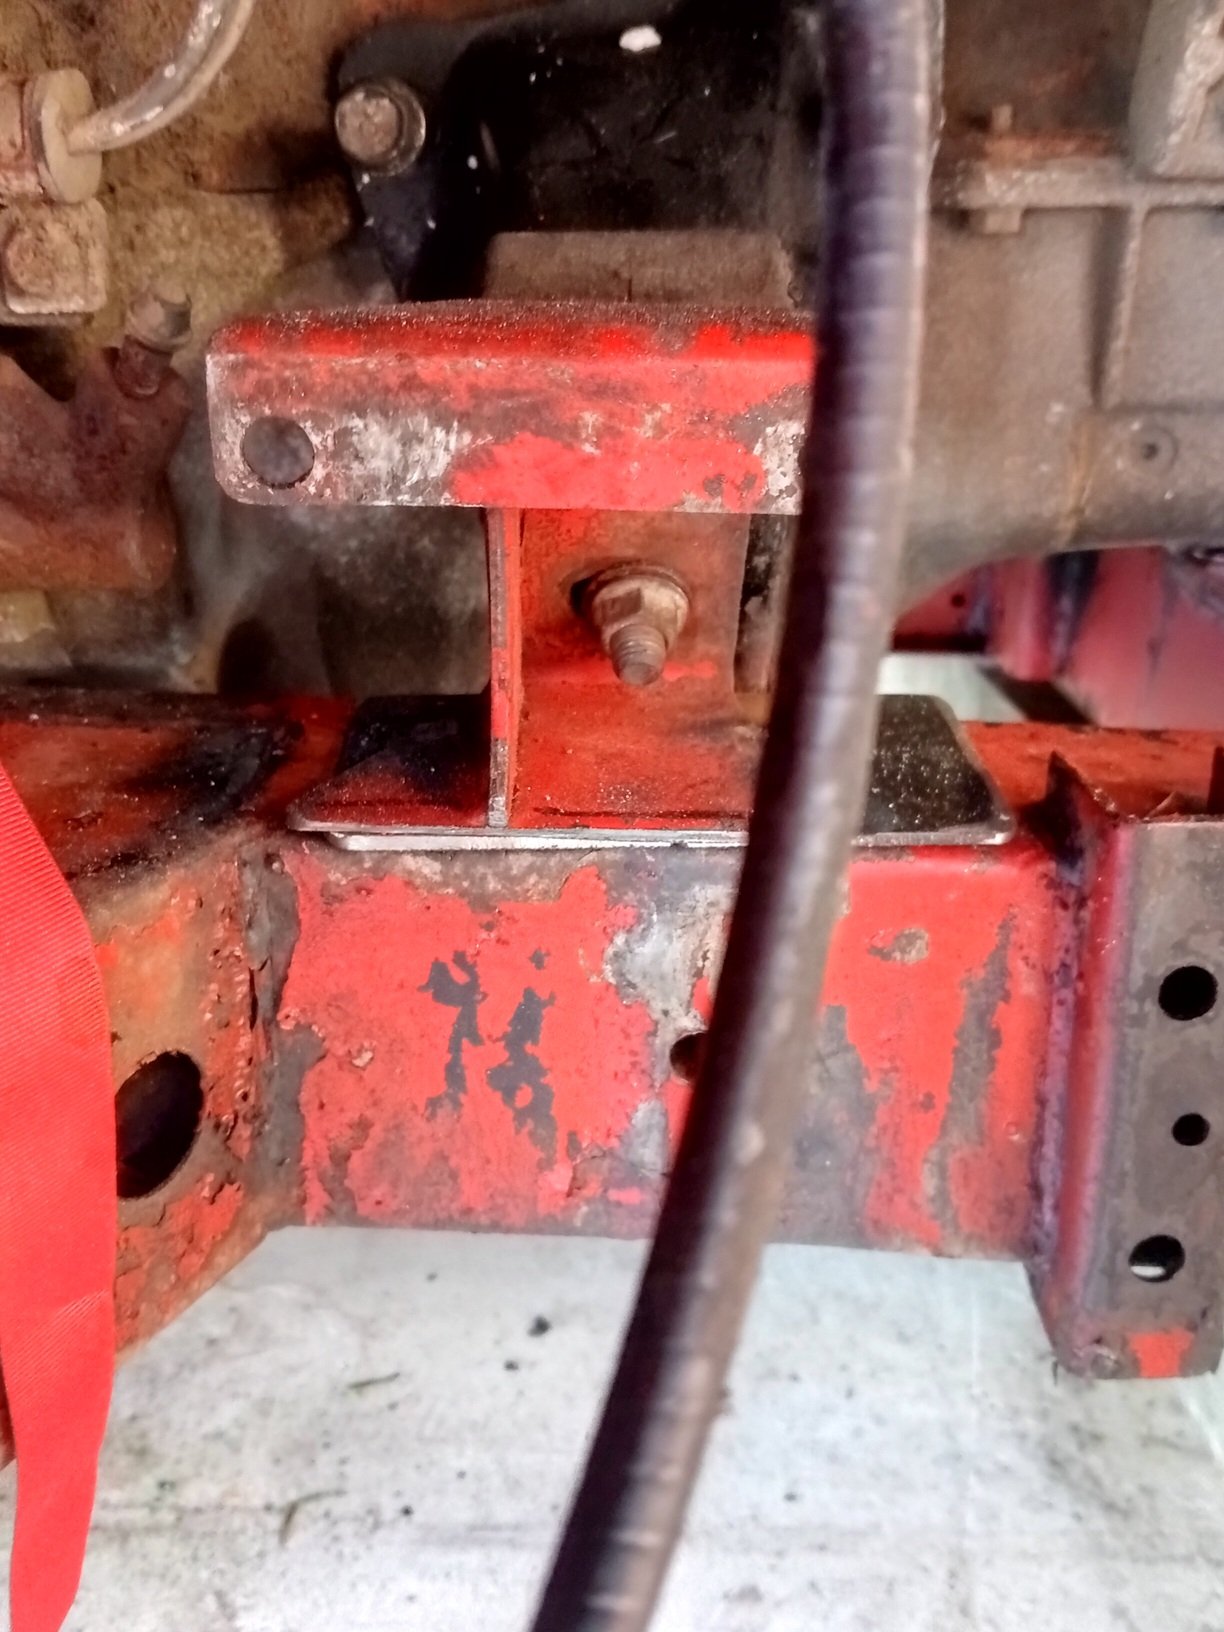
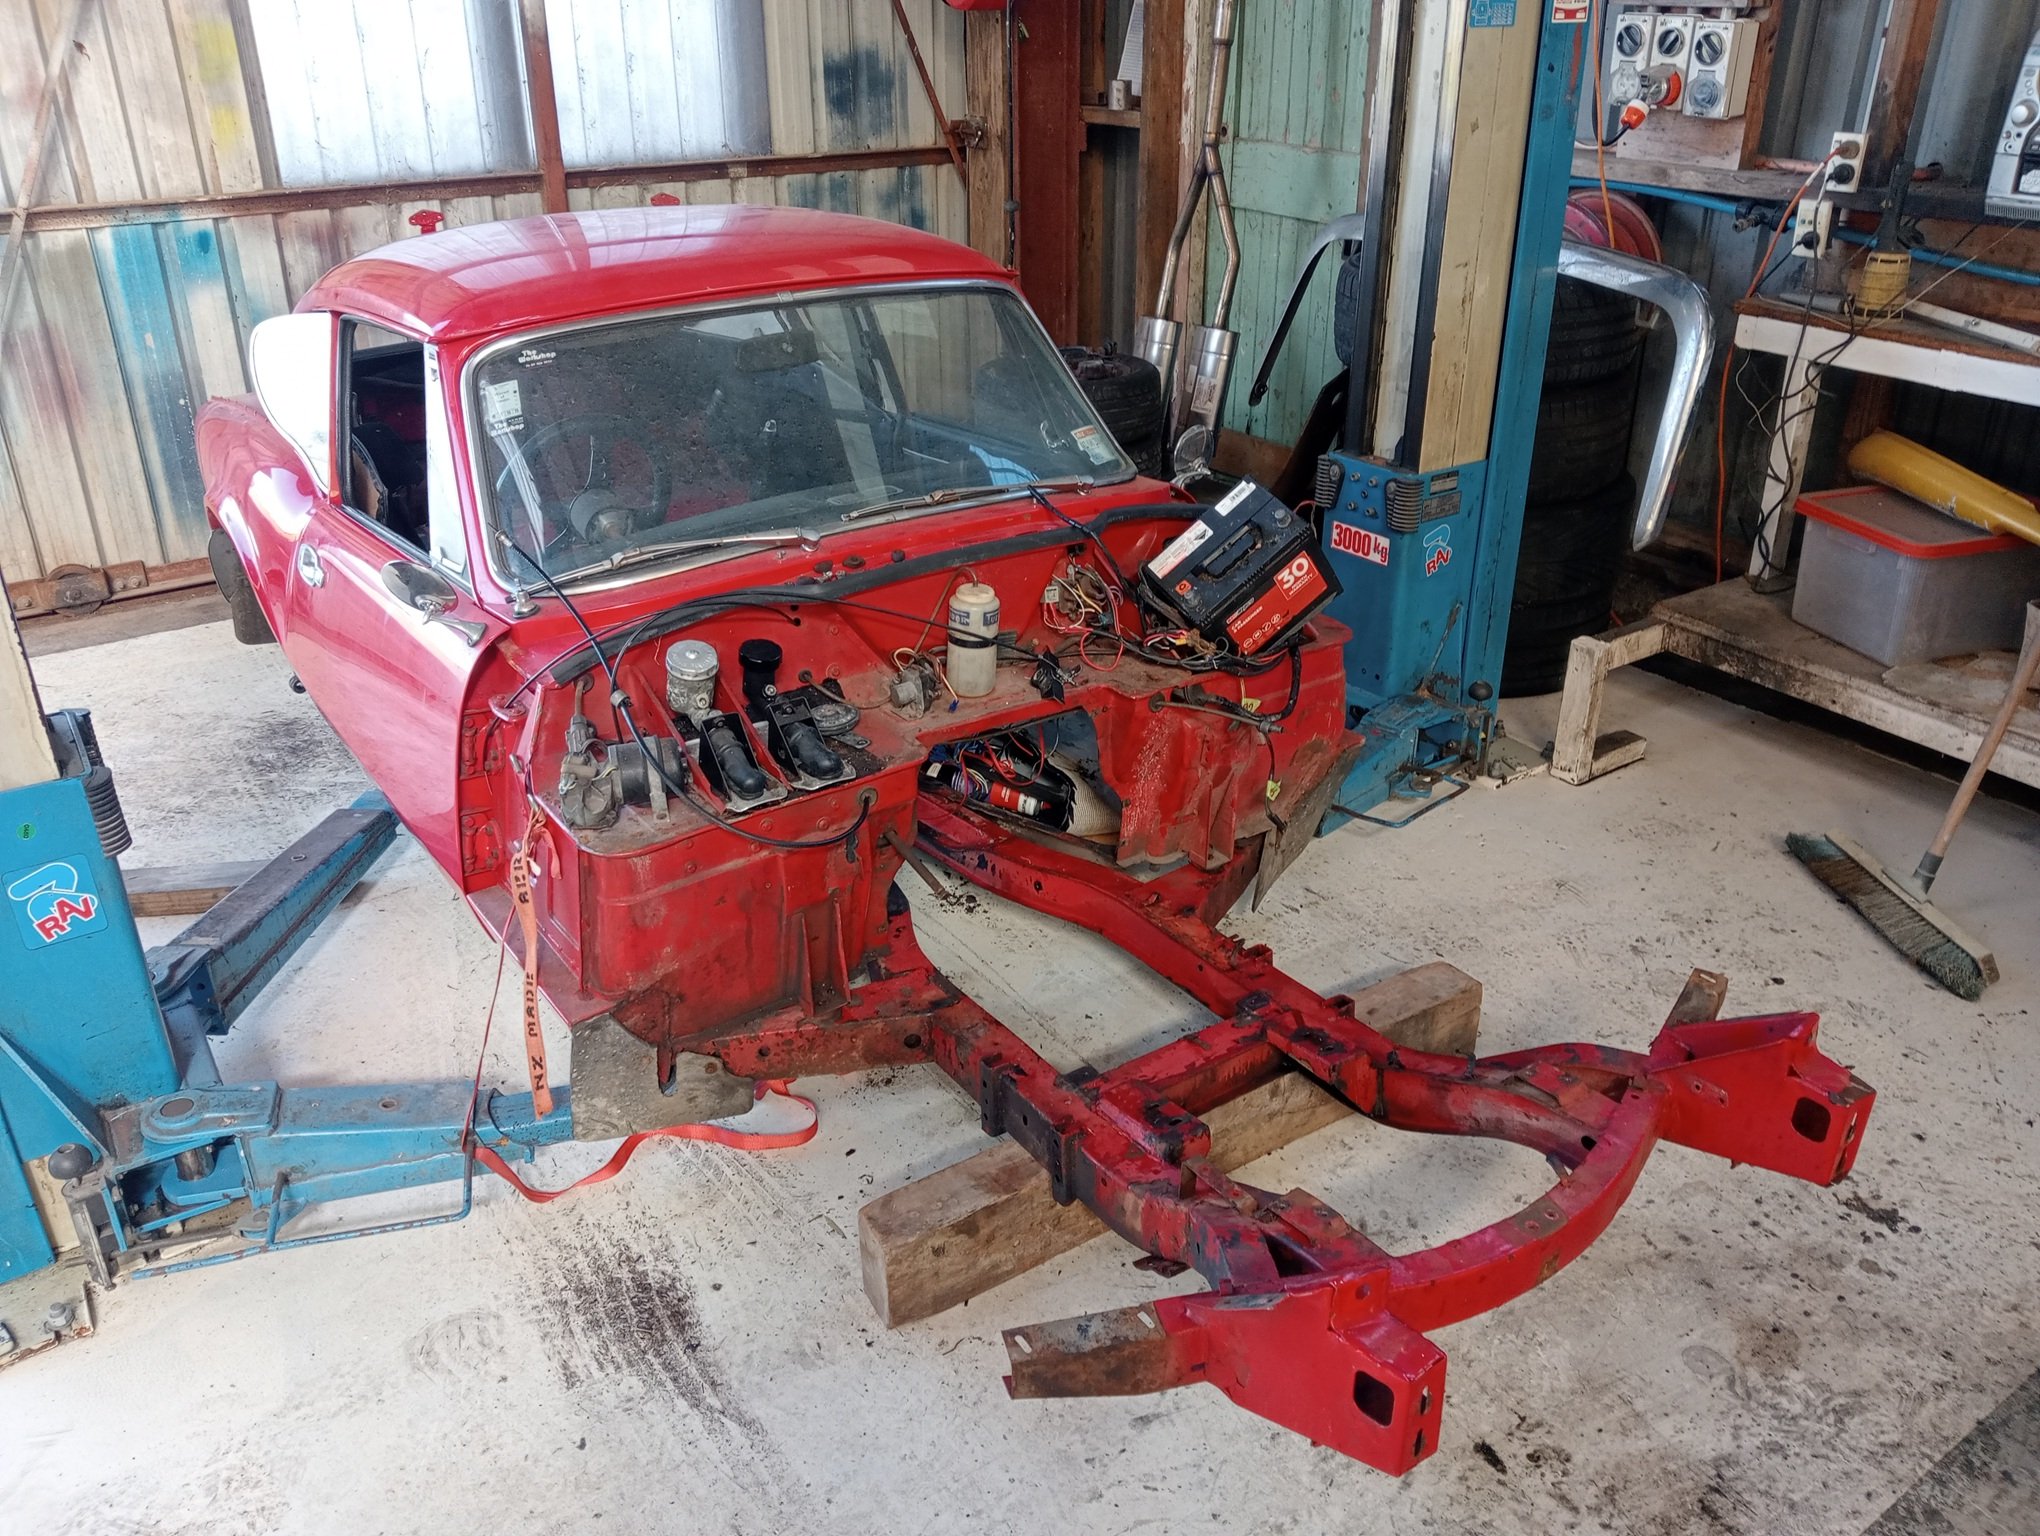
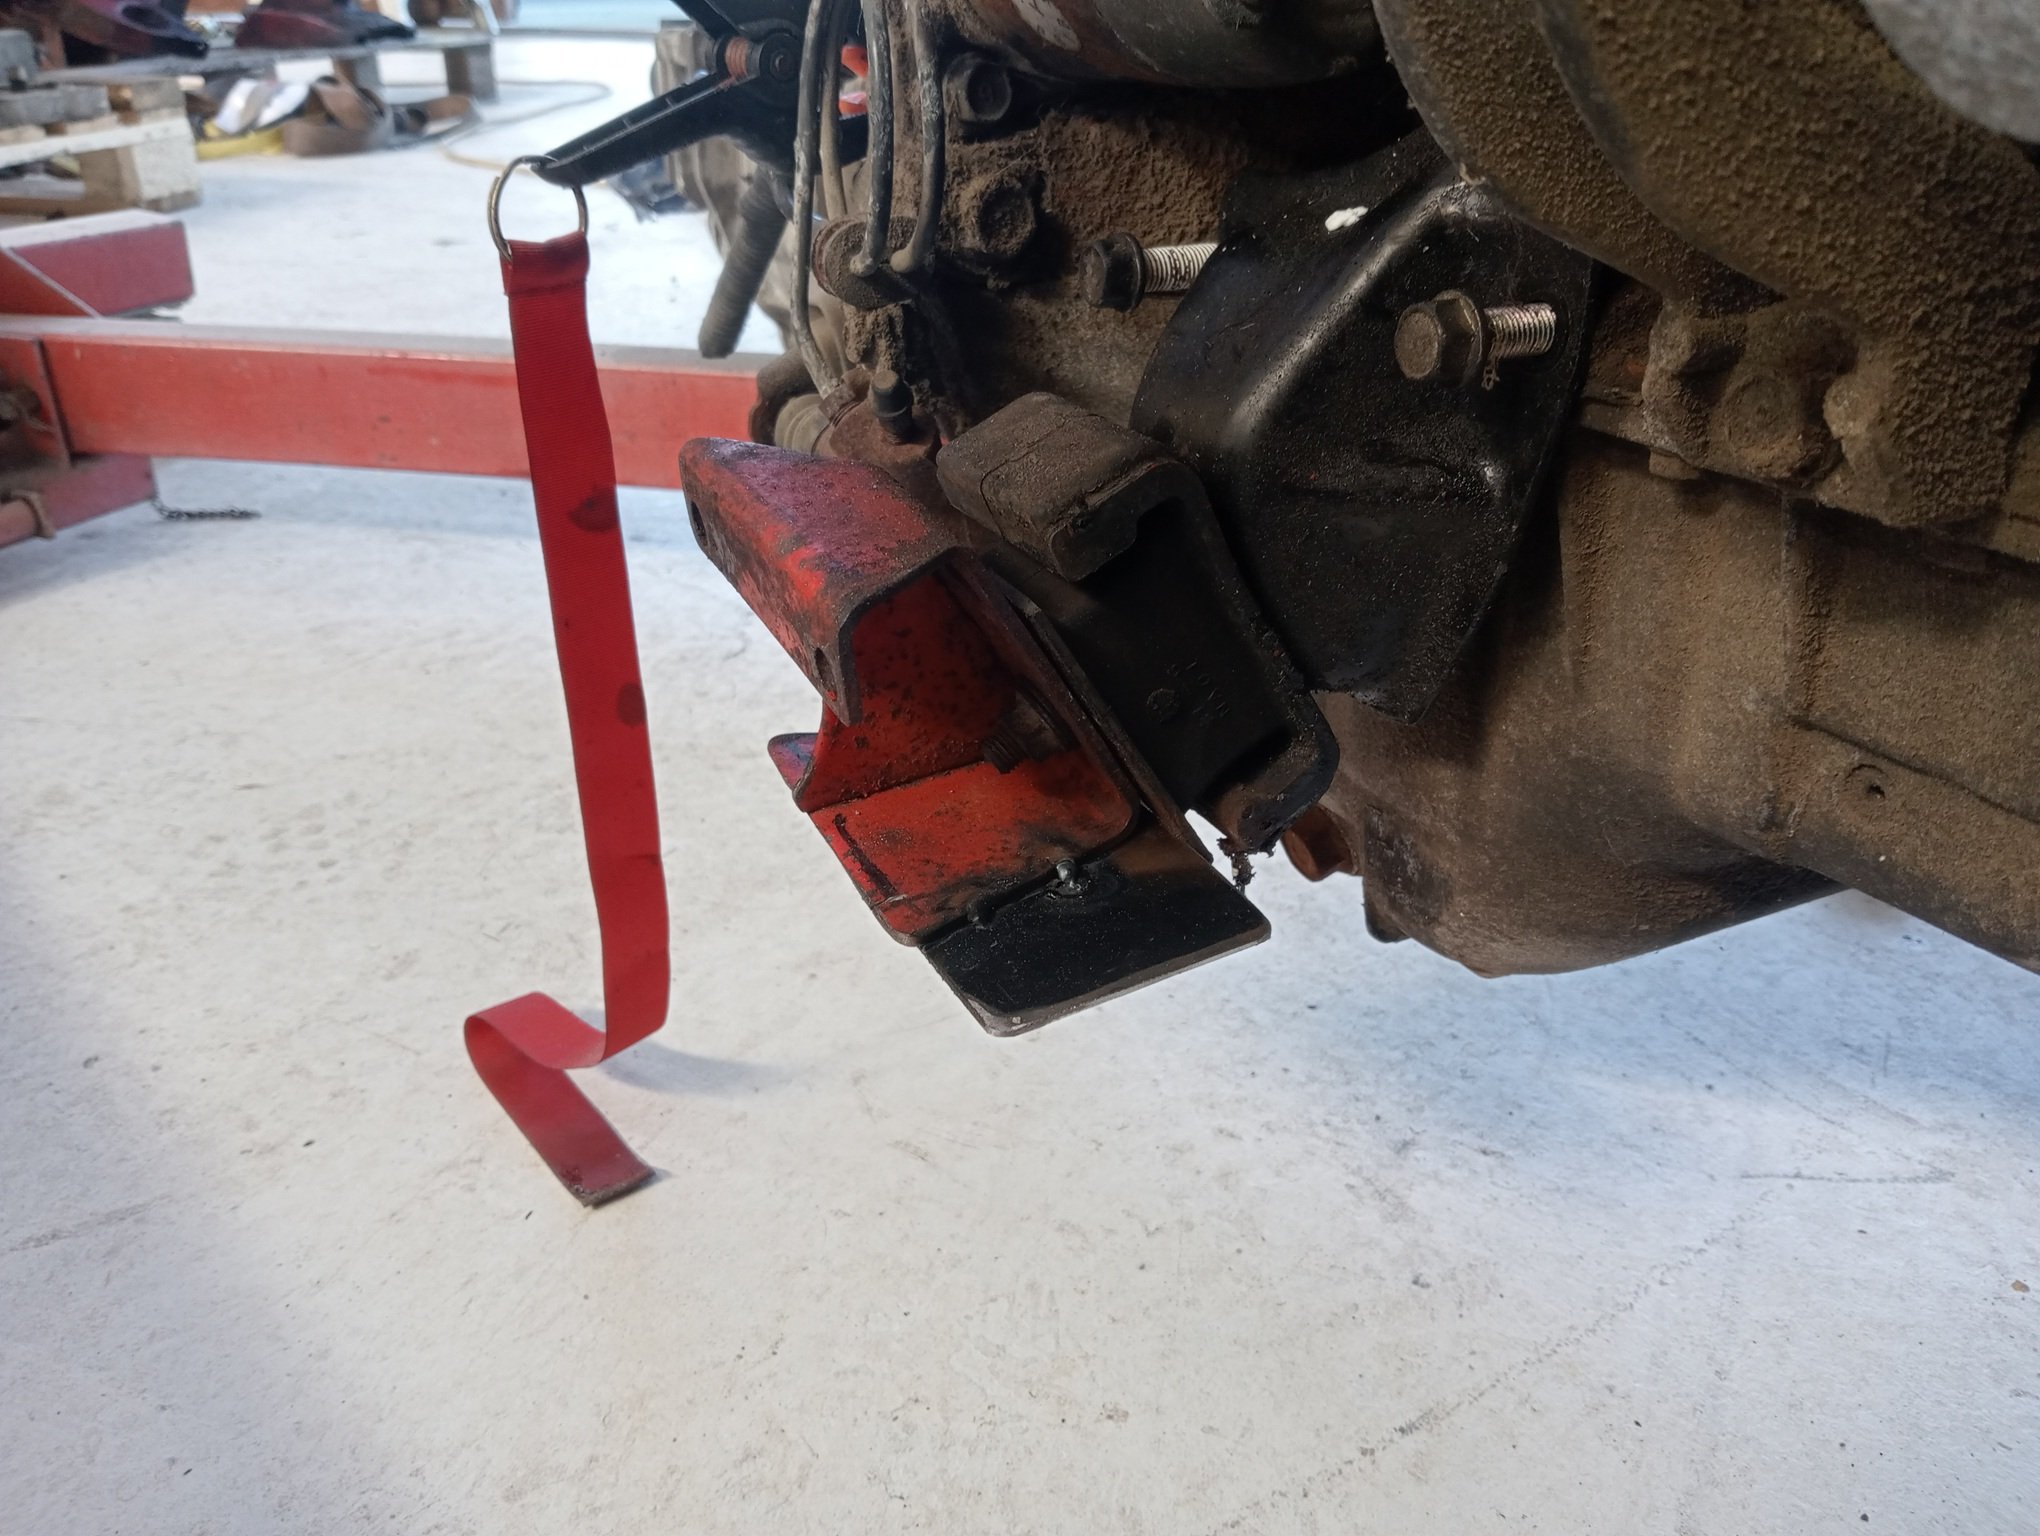
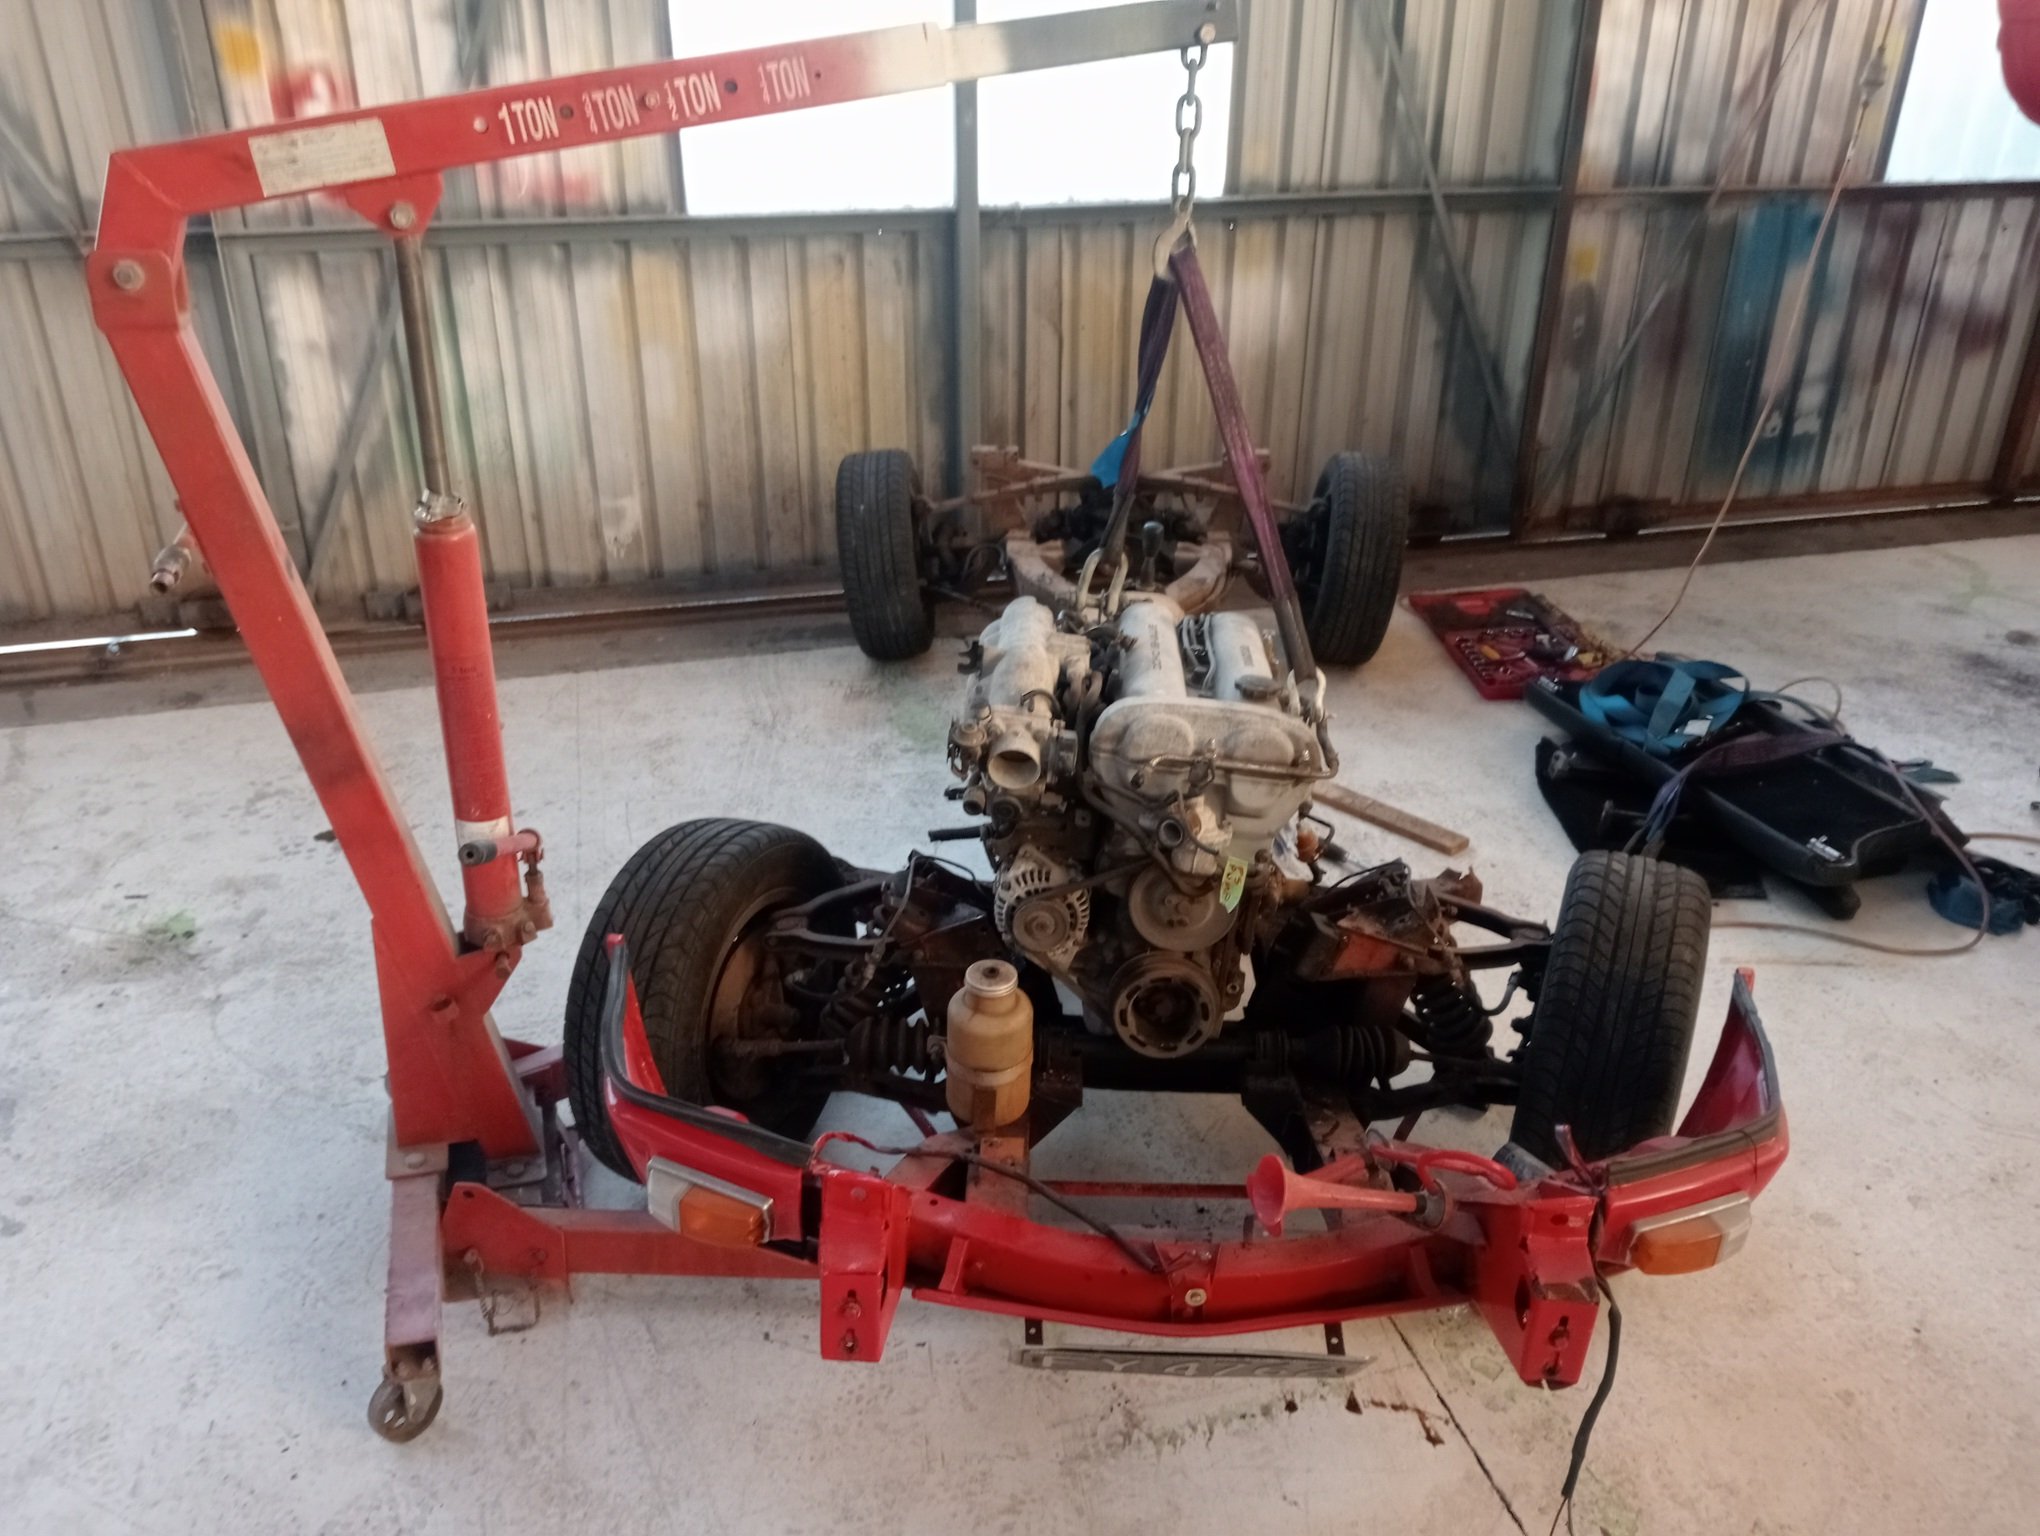
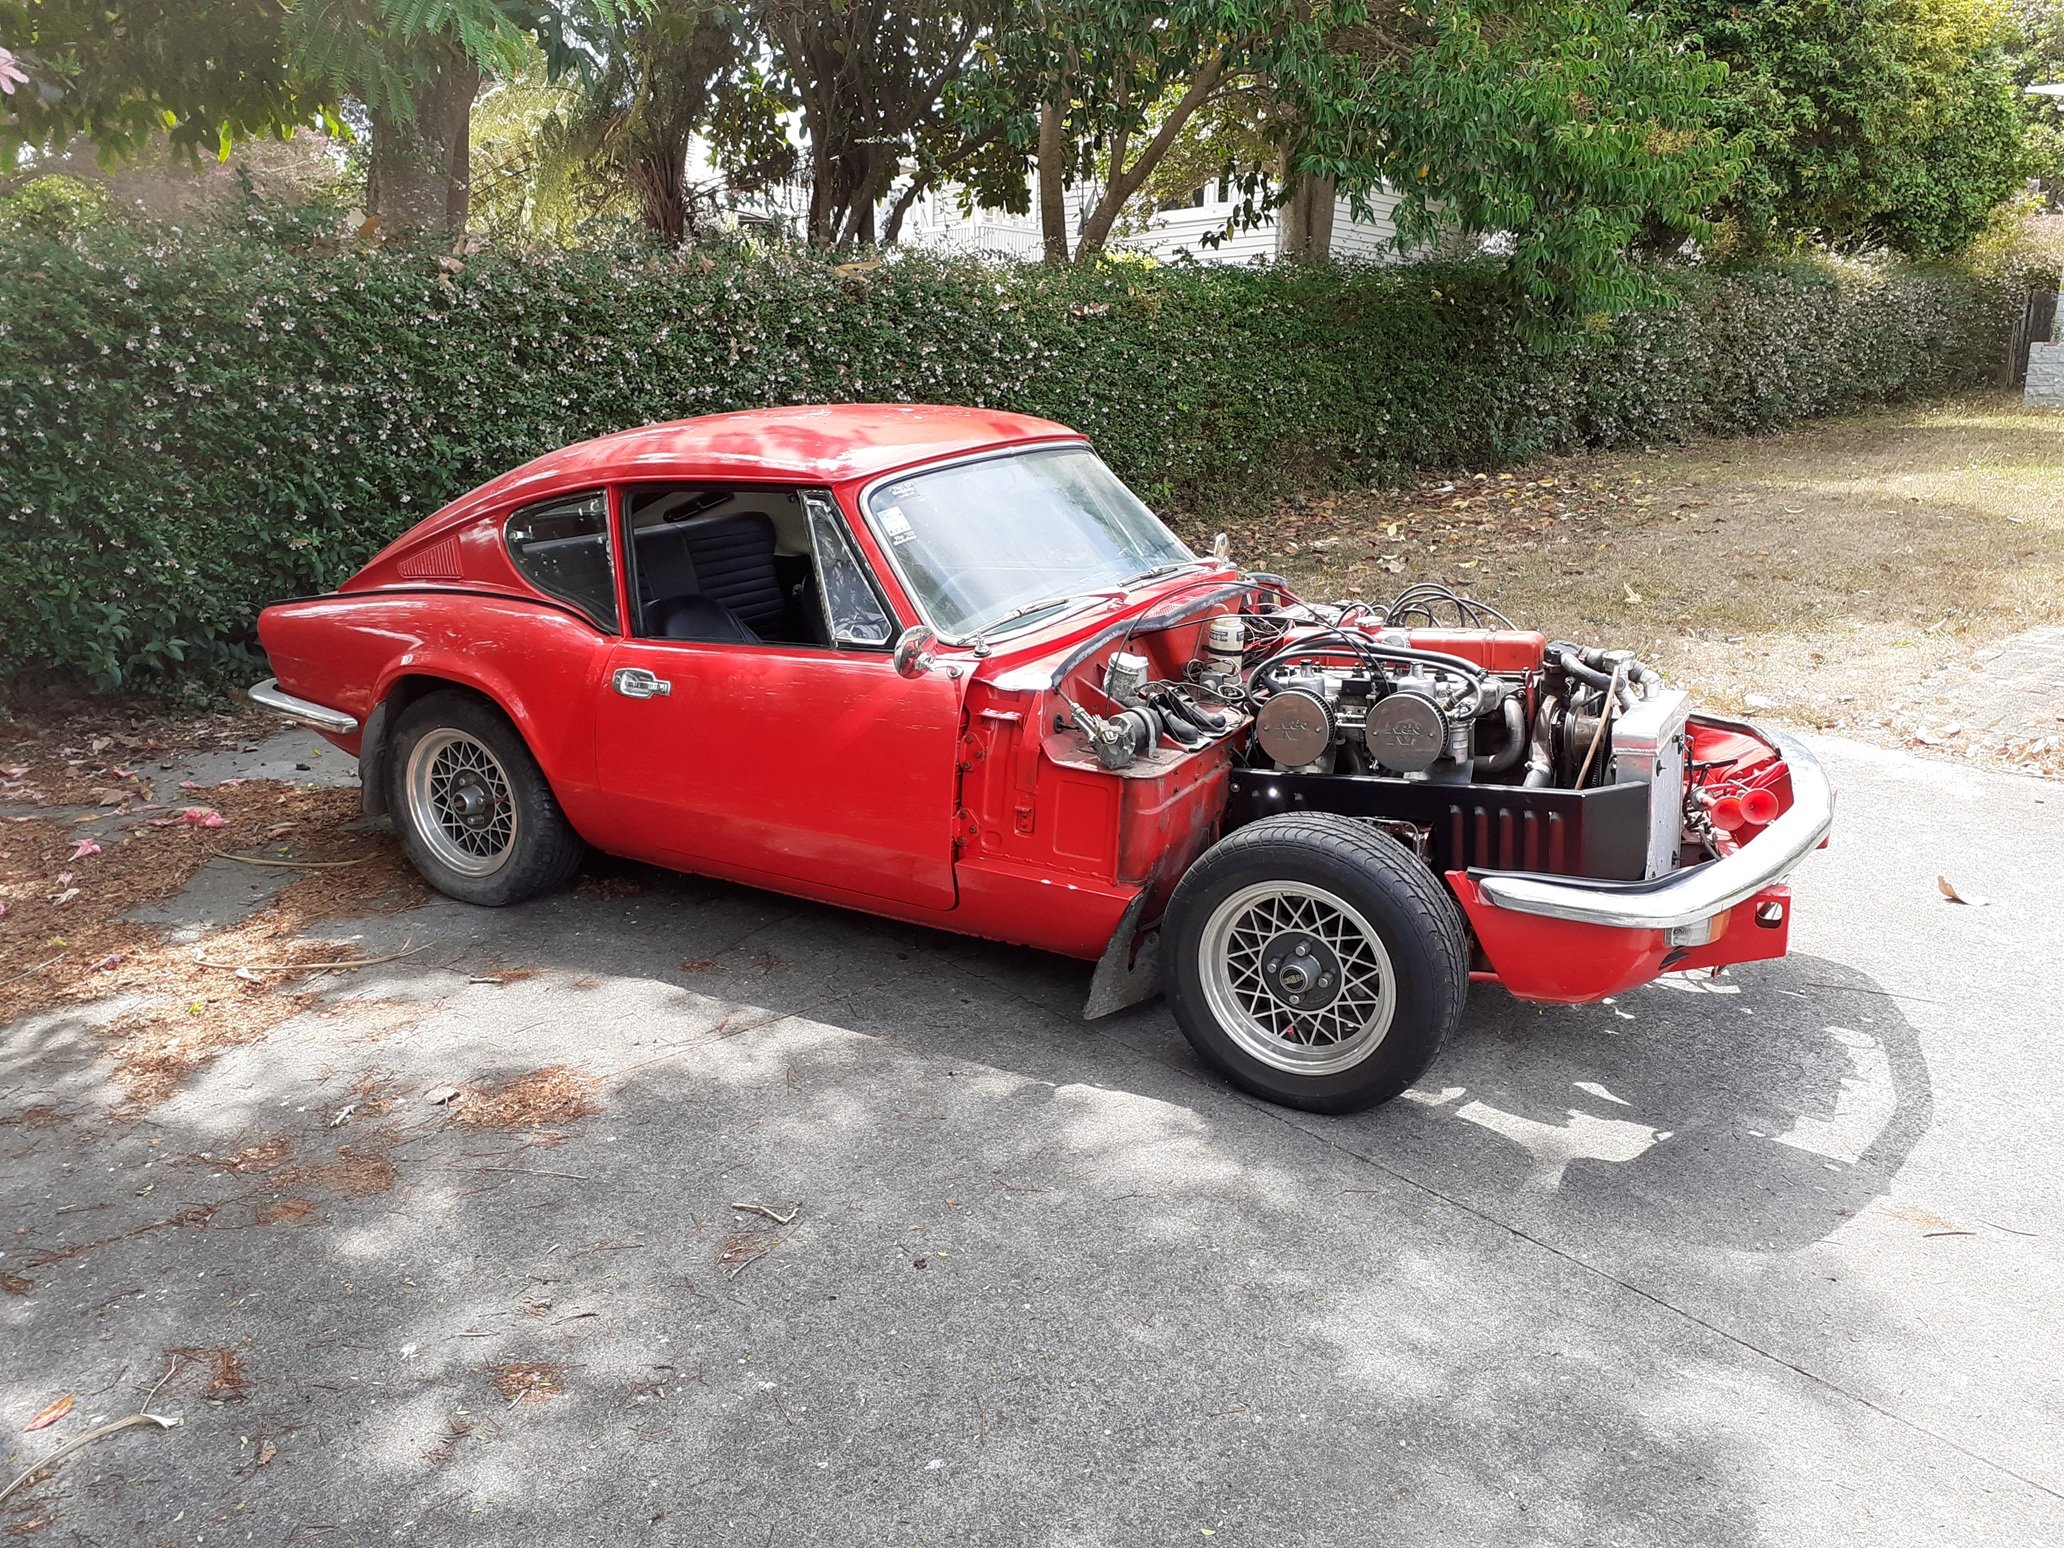
Having satisfied myself that there was nothing inherently wrong with the chassis fitment (as evidenced by others by the fact that's it's quite a common swap), most of the agonising I did was around how the engine would fit up to the body. most little triumph engine swaps end with a throwaway line like "and then I cut a hole in the body/firewall/chassis/made an ugly as hell transmission cover", which is something that I really want to avoid. so much so in fact, that I actually bothered to test-fit the body. so I'm juggling trying to avoid the chassis/bonnet/firewall, while trying to work out if I'm going to place the crank pulley over or behind the steering rack, while also being aware that the mx5 tailshaft is VERY long, putting the shifter farther and farther back, and the propshaft on a more and more marginal angle. But first, body momentarily back on; note the battery plonked back in place as ballast to stop the bastard trying to fall off the back of the hoist the gt6 engine mounts sit at 60 degrees and the mx5 engine mounts sit at 30 degrees. So a gt6 engine mount bracket on it's side becomes a 30 degree bracket and matches up to an mx5 engine pretty good. (did I mention I am impatient, and rough, and lazy) str8 in m8 no fukin worries
- 7 replies
-
- 14
-
-
Gibbon's 1971 triumph GT6 that everyone told him not to mess with
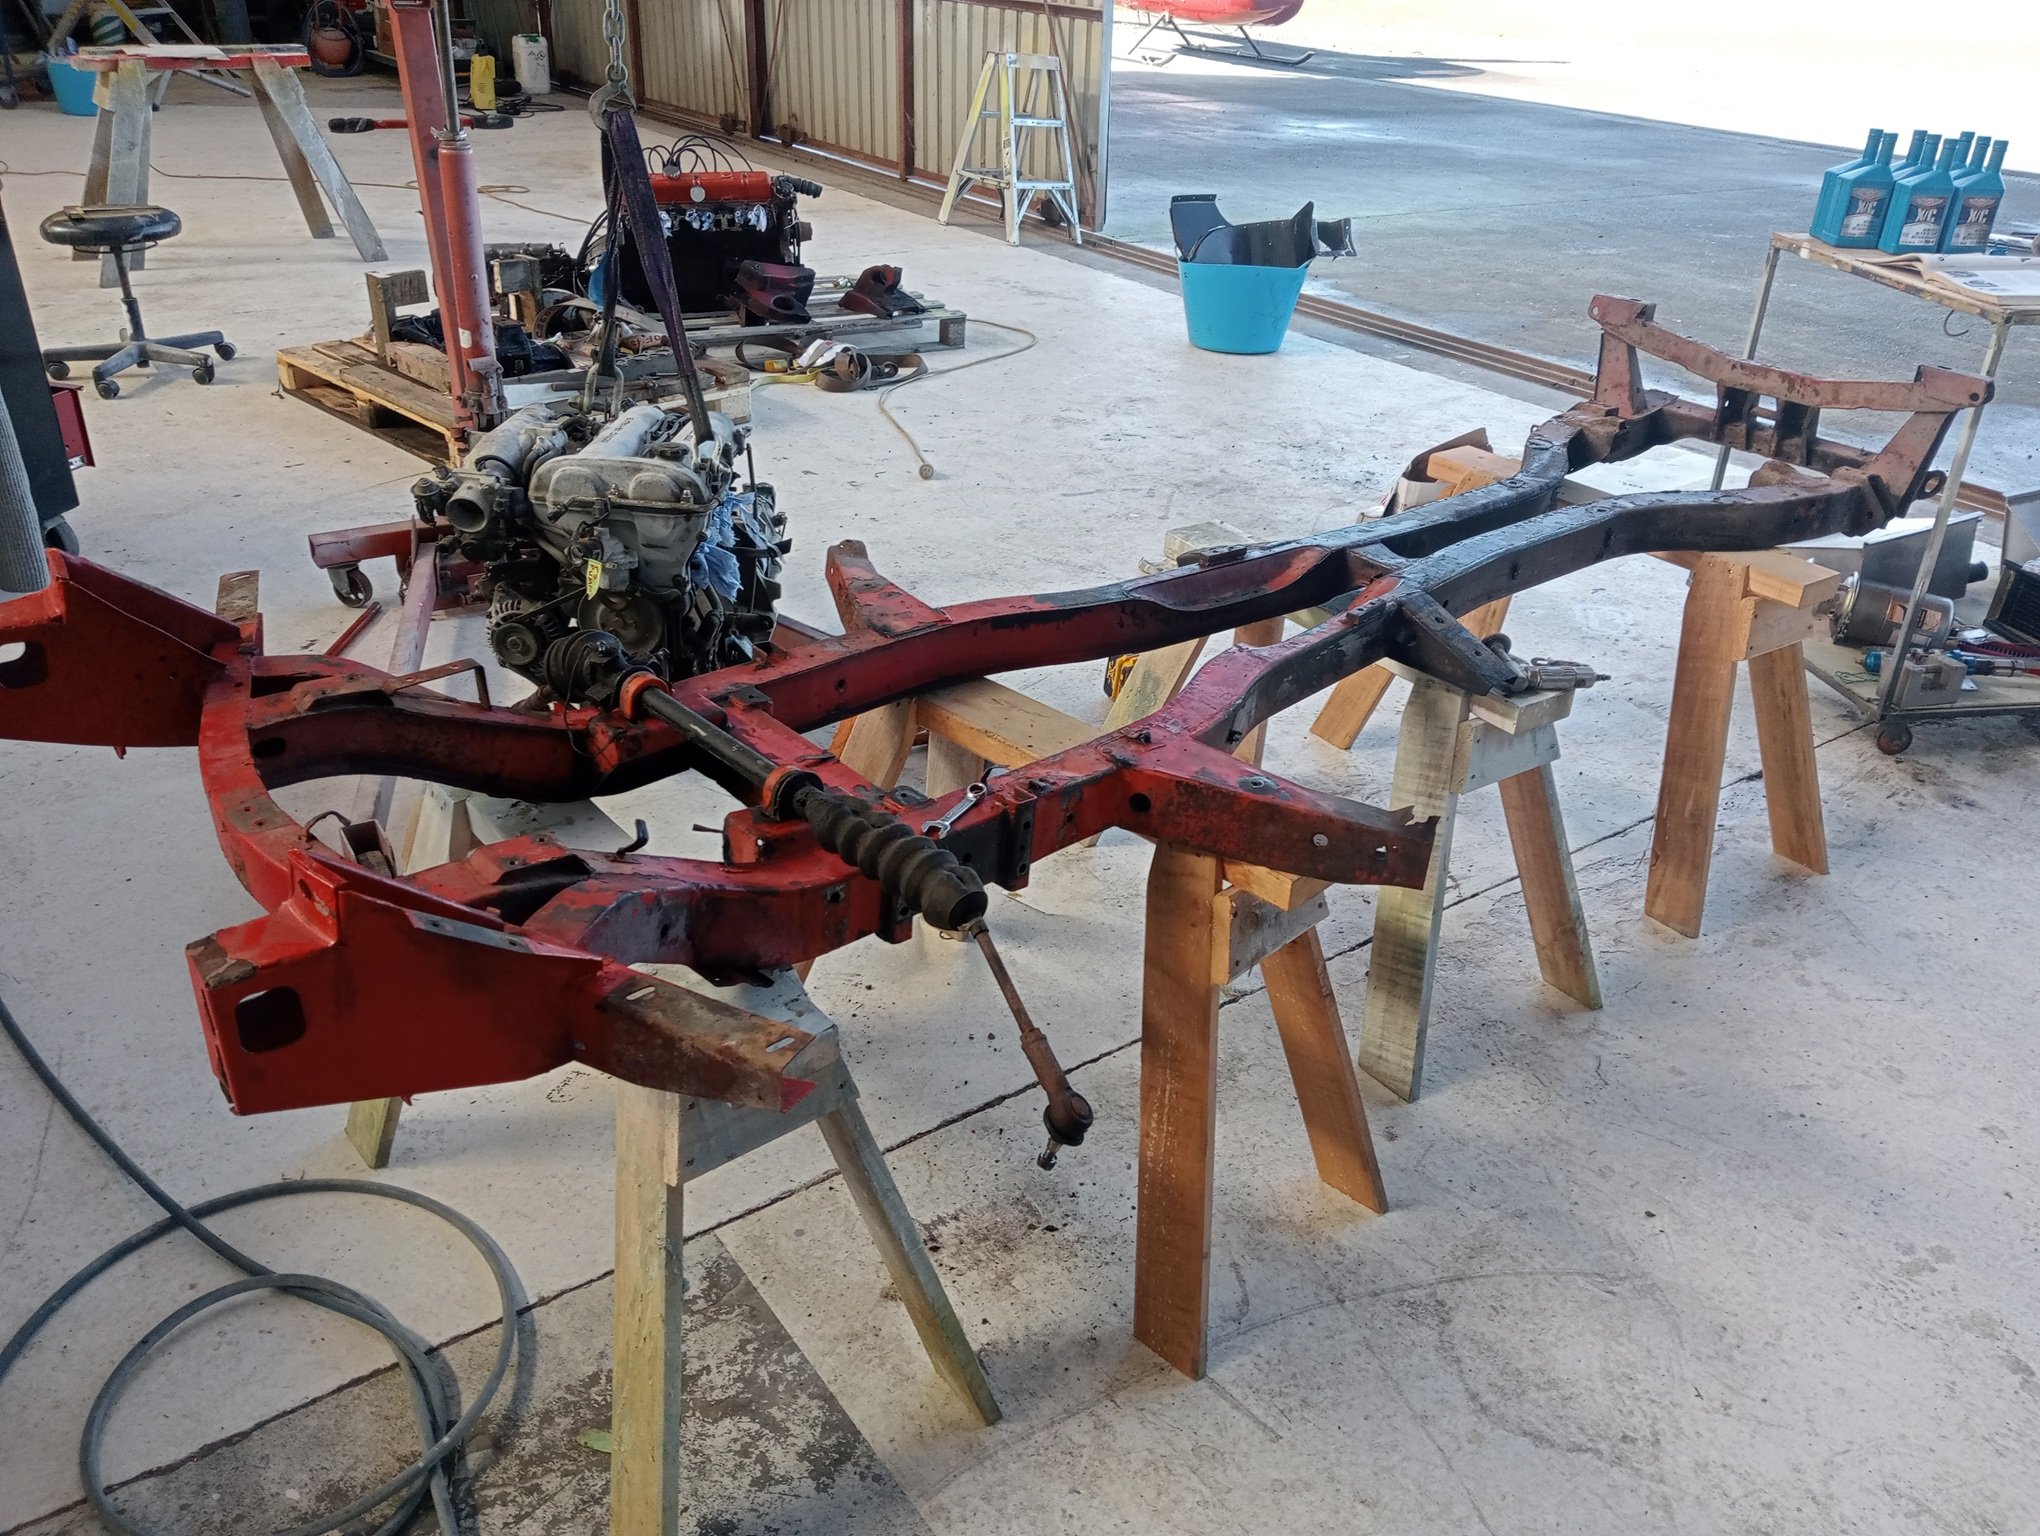
gibbon replied to gibbon's topic in Projects and Build Ups
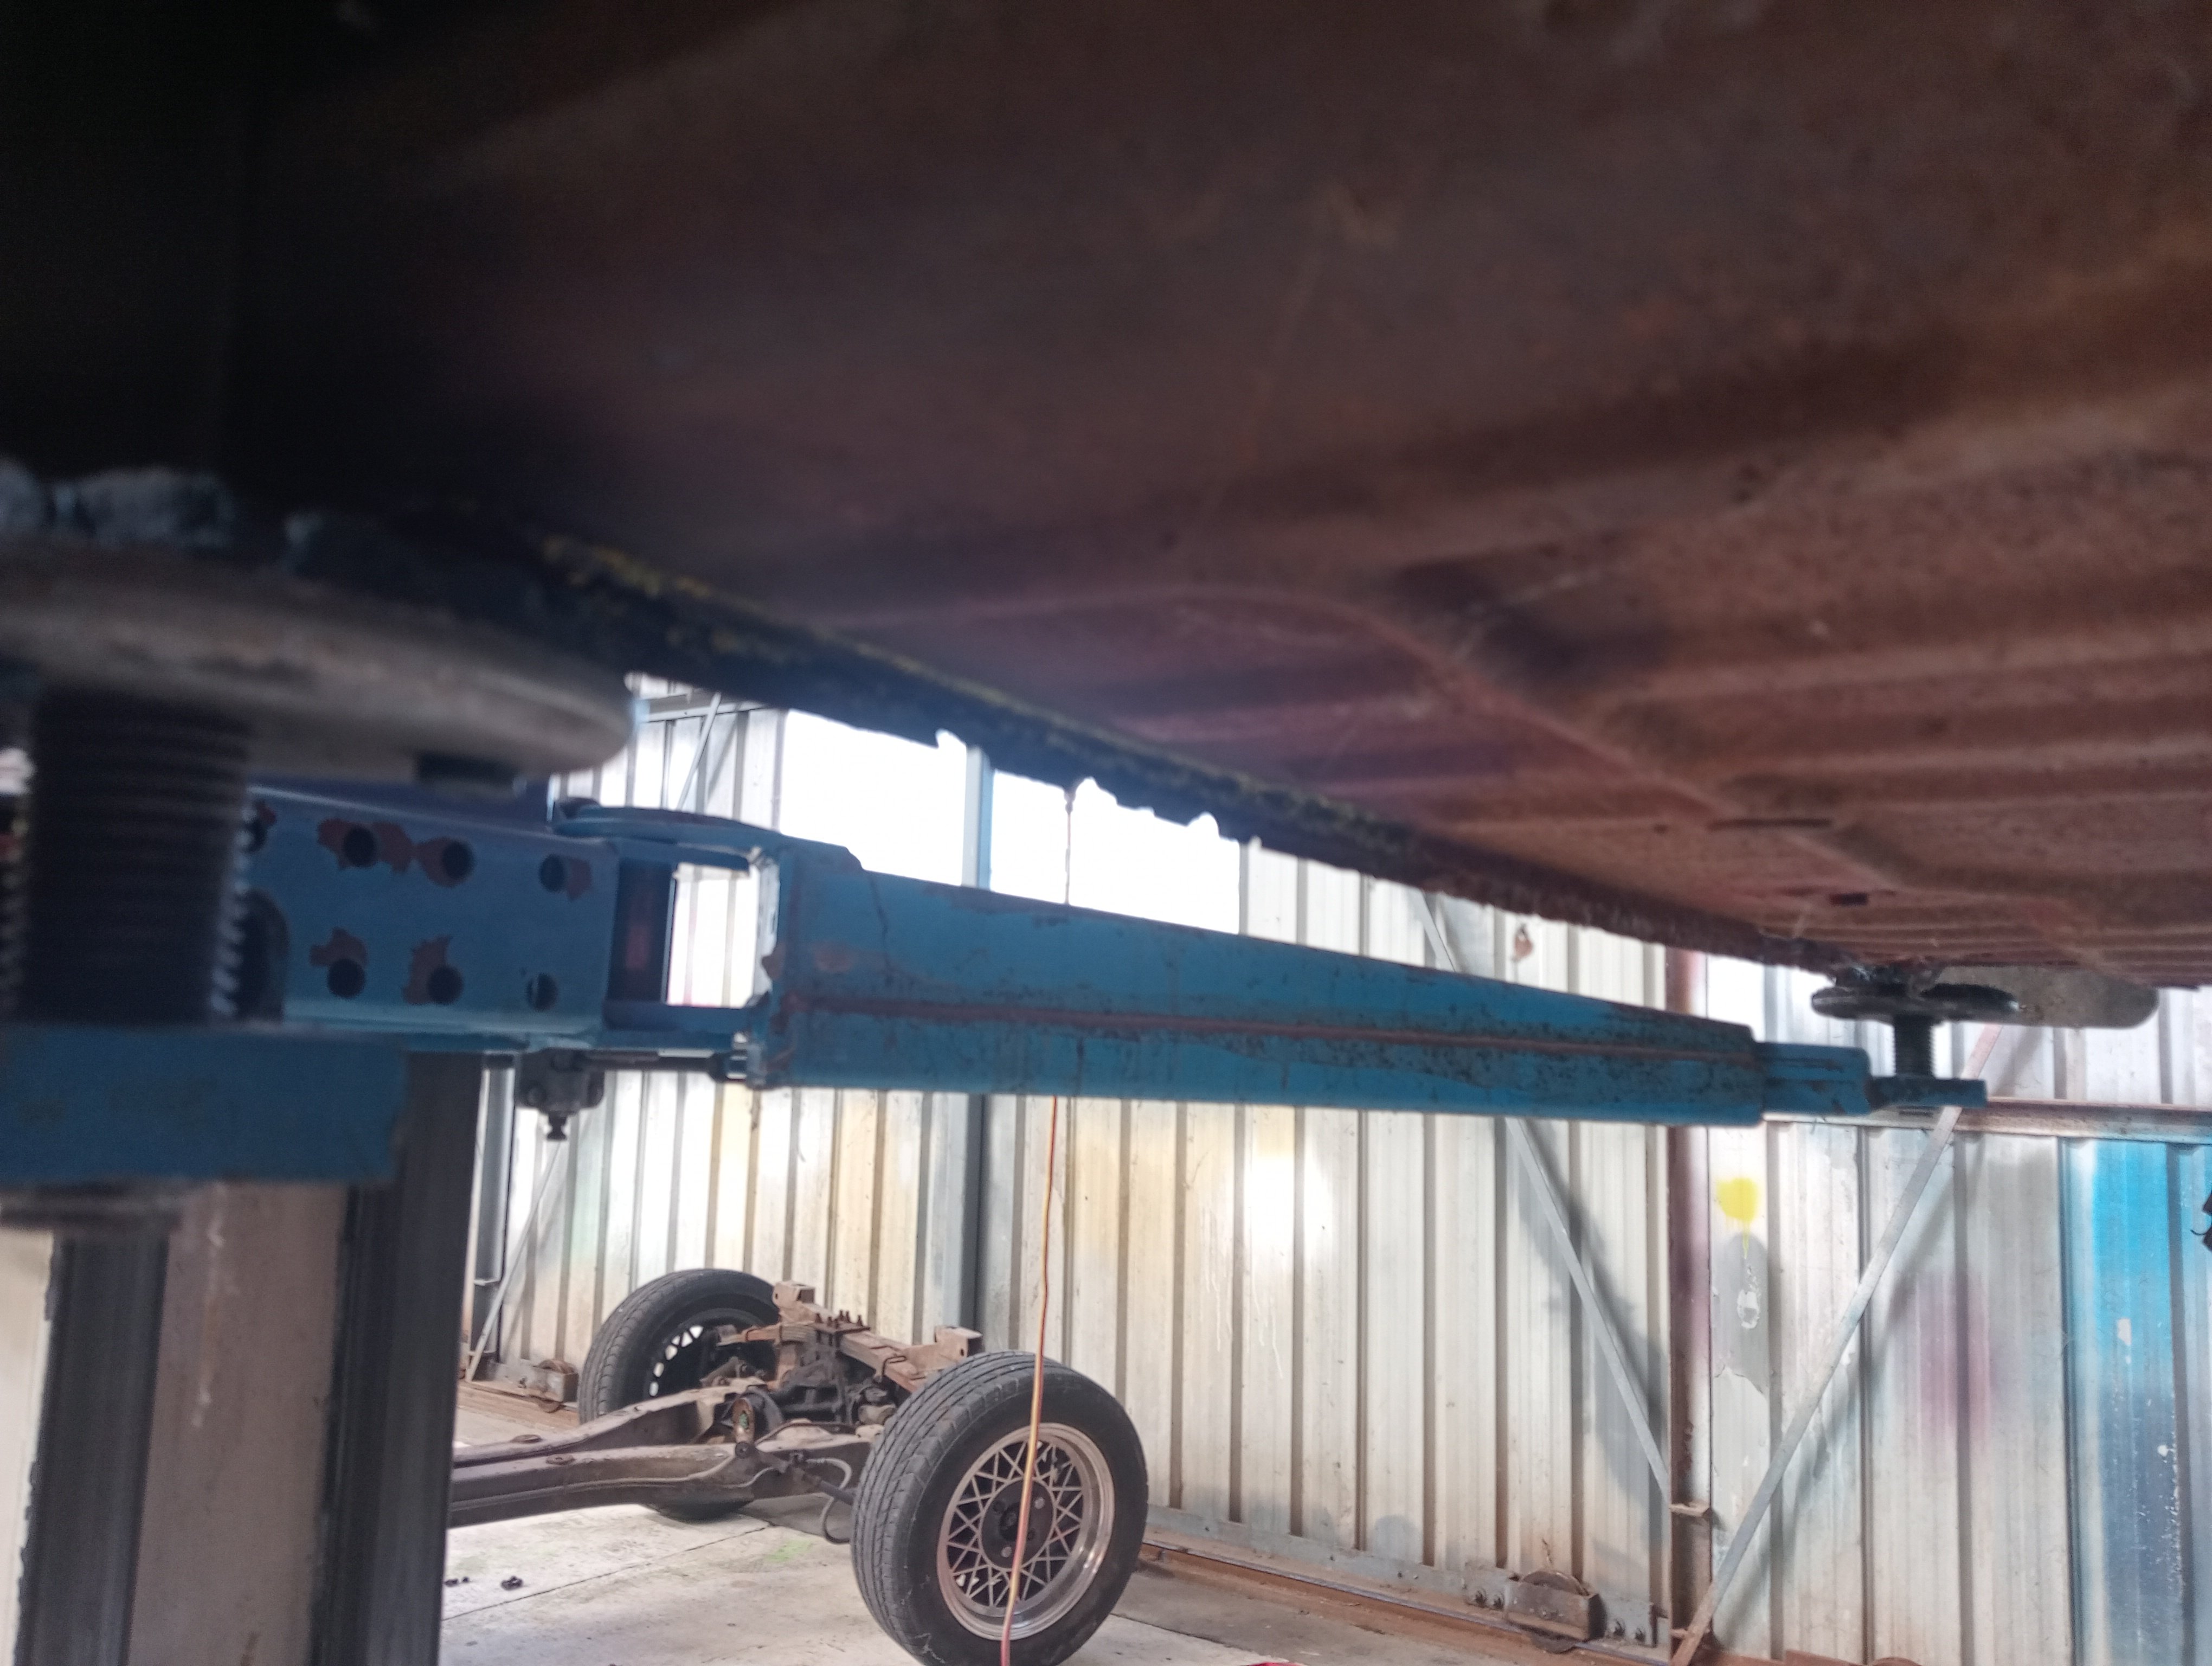
the engine plonks on and sits between the strut towers pretty good. the stock engine mounts are no good as they cater to two nonexistent cylinders. This pic has the engine rotated a little too far, it needs to be pretty flat to clear the bonnet as of the mounting plan at this time of writing the mx5 gearbox has some major alloy hanging off the side that needs to be dealt with as it fouls the frame. as far as I know any early rx7 tail housing will bolt on but I value money more than time at the moment so I just laid into it with a grinder and buzzed it all off. otherwise the clutch slave seems to clear OK and aside from a wee bracket on the other side, there are no clearance issues with the chassis that I can see With the initial "I just want to drop the engine on it and take a photo" frivolity out of the way I stripped everything off the chassis and carefully documented everything into piles of bits on the ground and piles of bits on various tables. I misplaced all my tools but some of the other guys were away so I borrowed theirs and misplaced them too. The chassis has a few cracks and the outboard ends of the outriggers are torn, the hoist might've got them on the way up, although they didn't appear to have any cushions installed between them and the body so they might've already been pulled up hard against the underside and distorted. was hoping to get it off to the sandblasters this week but they're busy, so I had no choice but to continue fiddling around with it
- 7 replies
-
- 13
-
-
Gibbon's 1971 triumph GT6 that everyone told him not to mess with
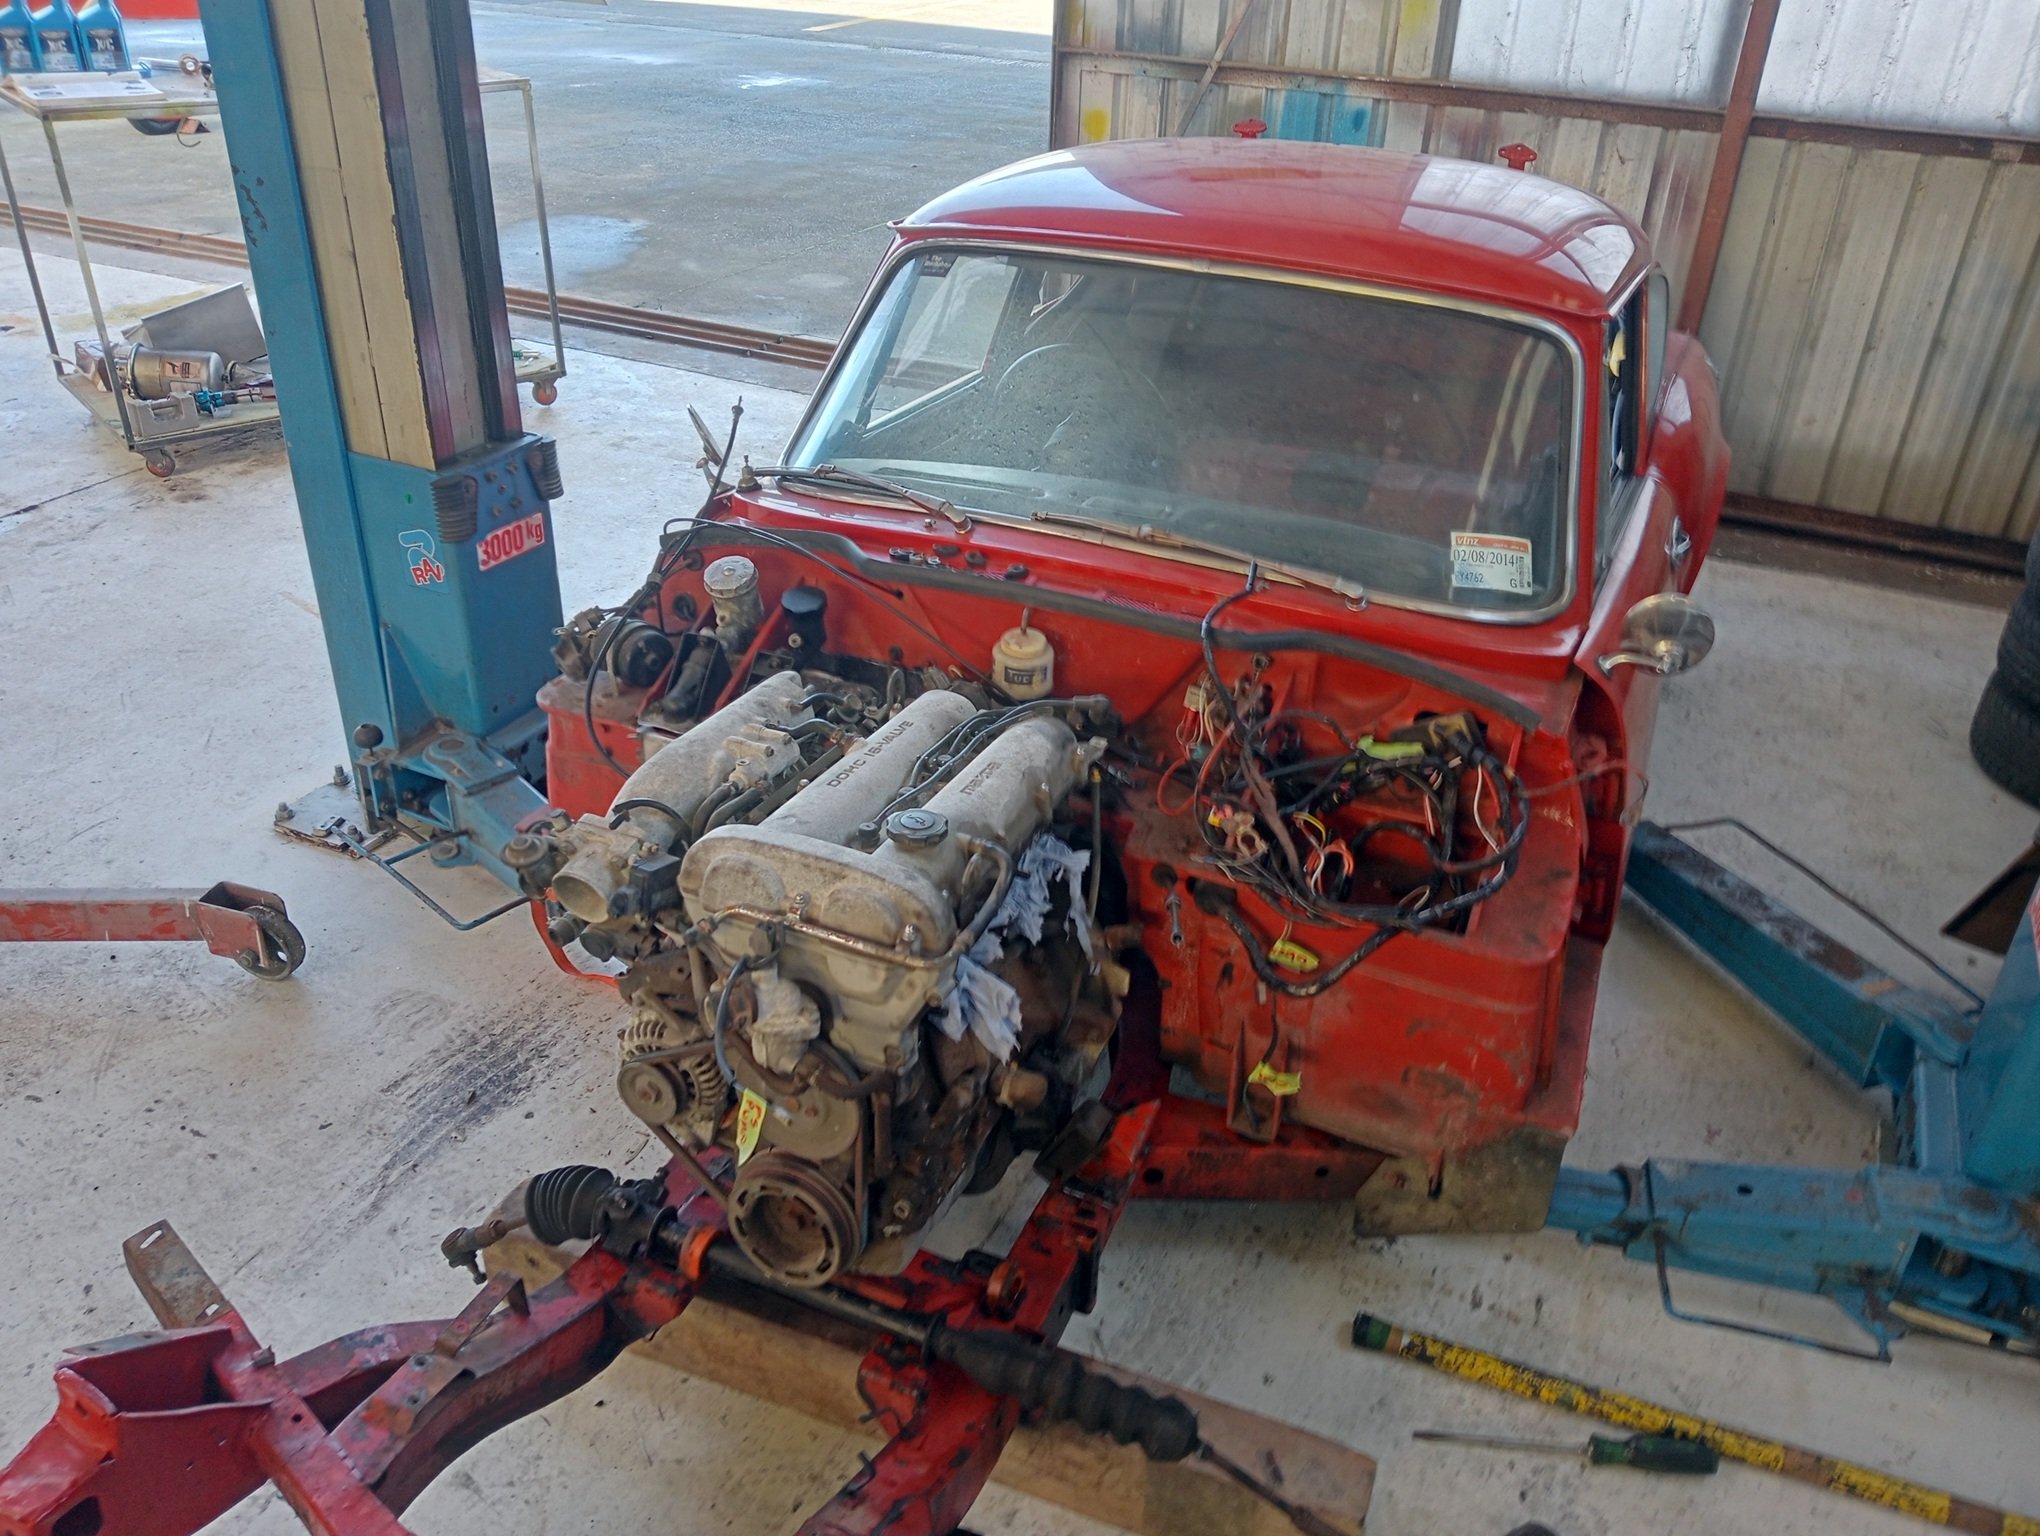
gibbon replied to gibbon's topic in Projects and Build Ups
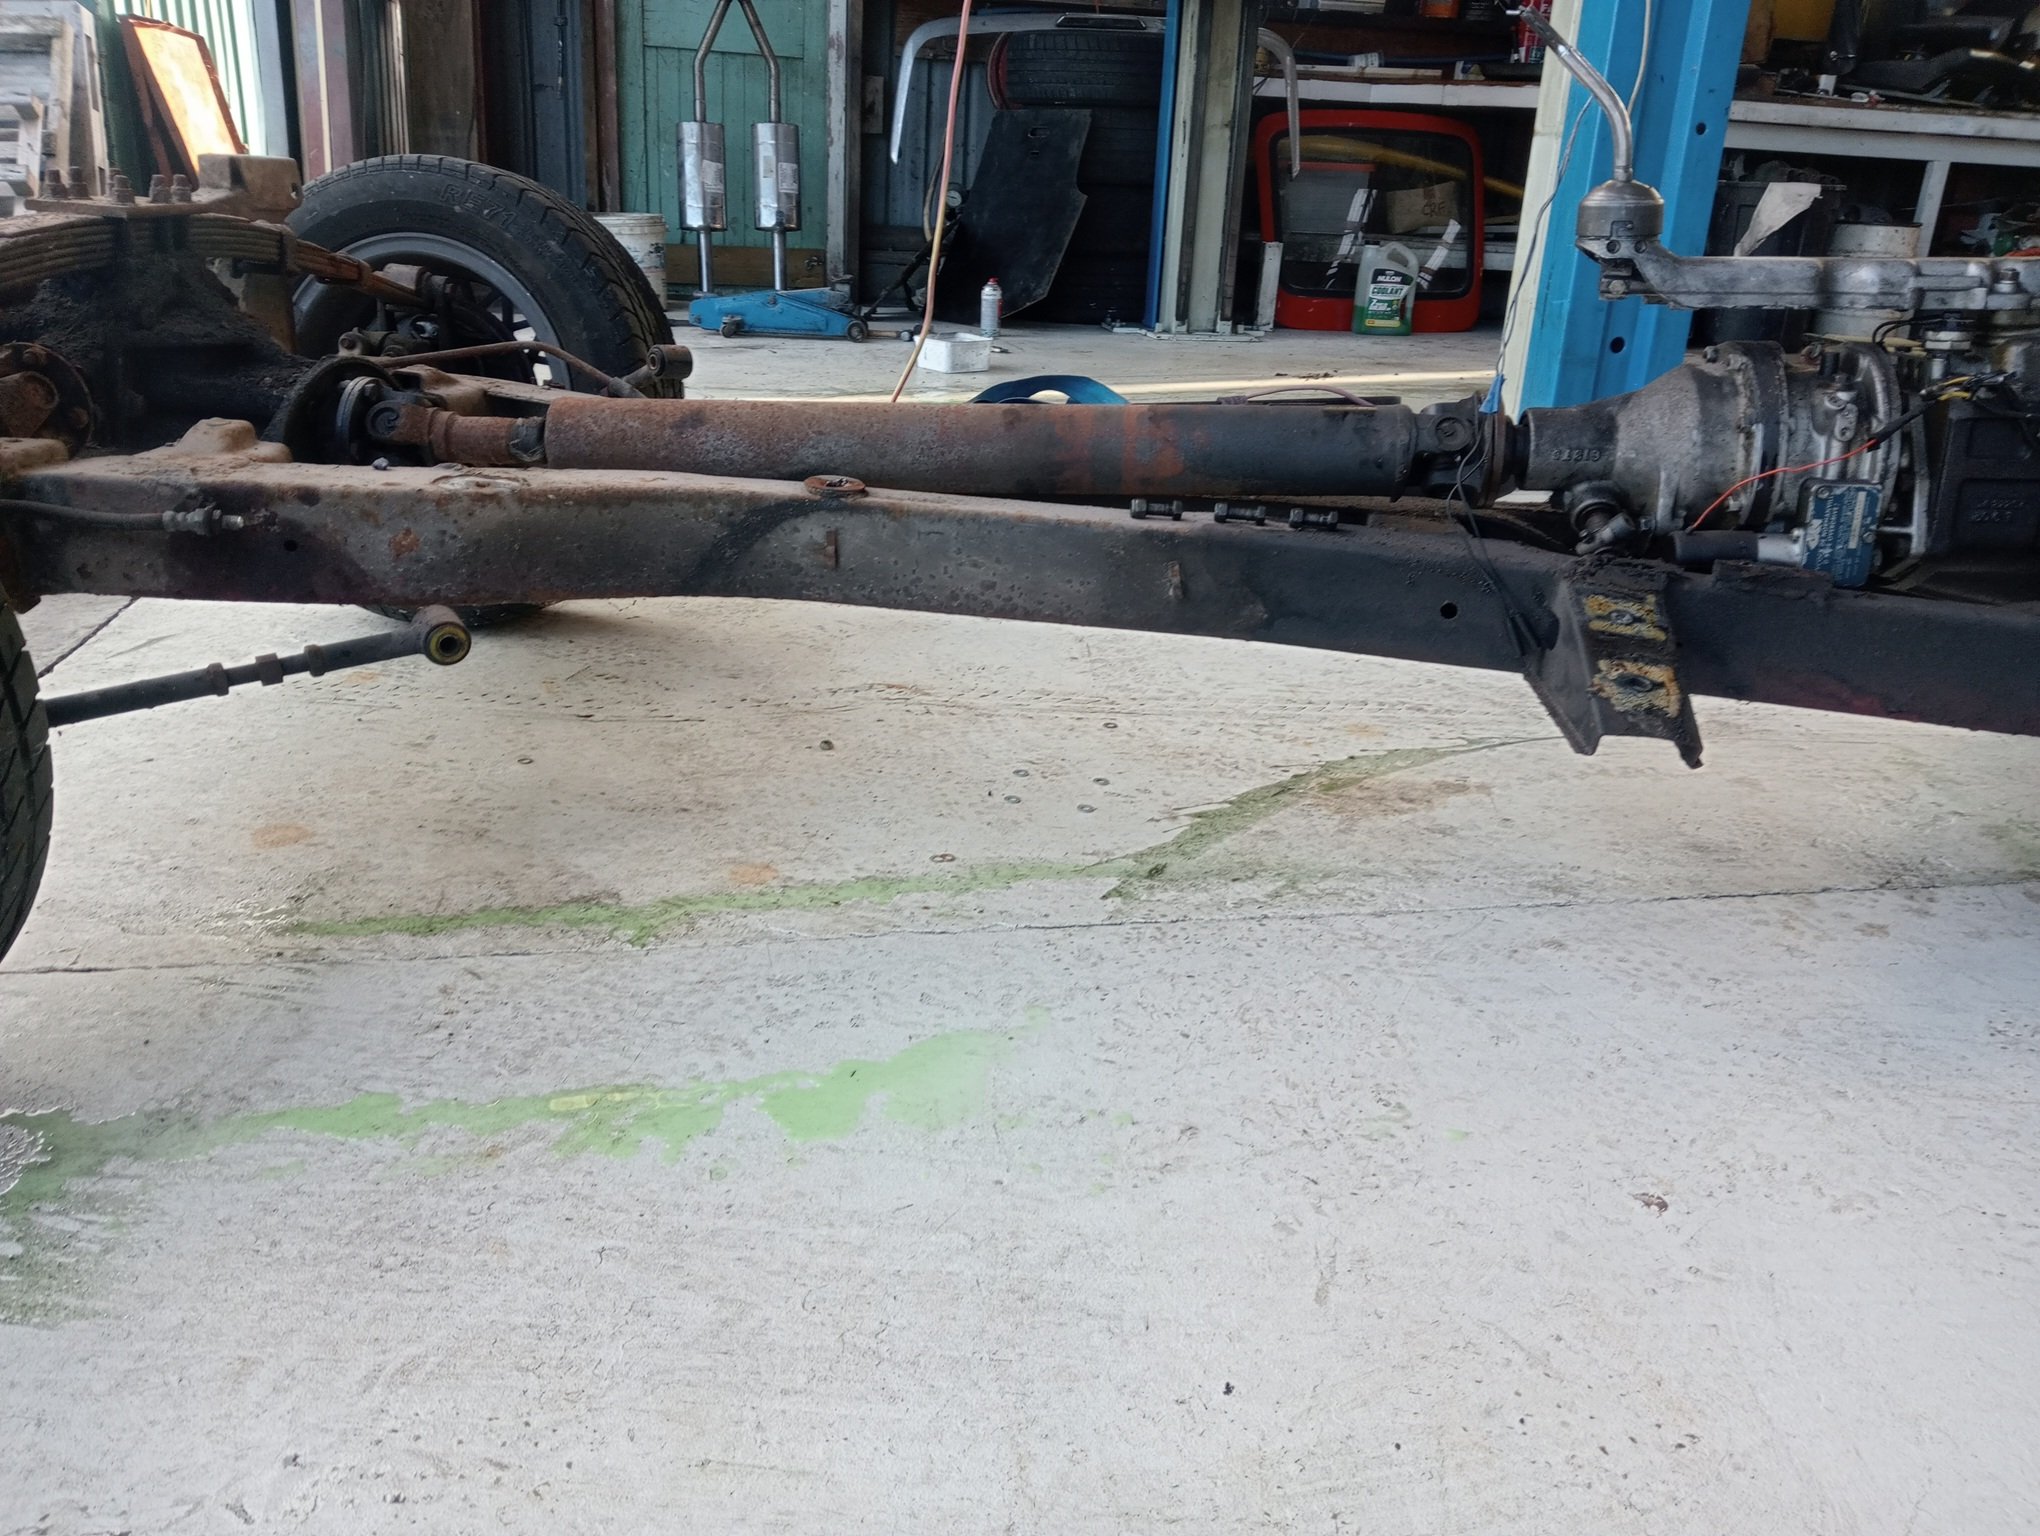
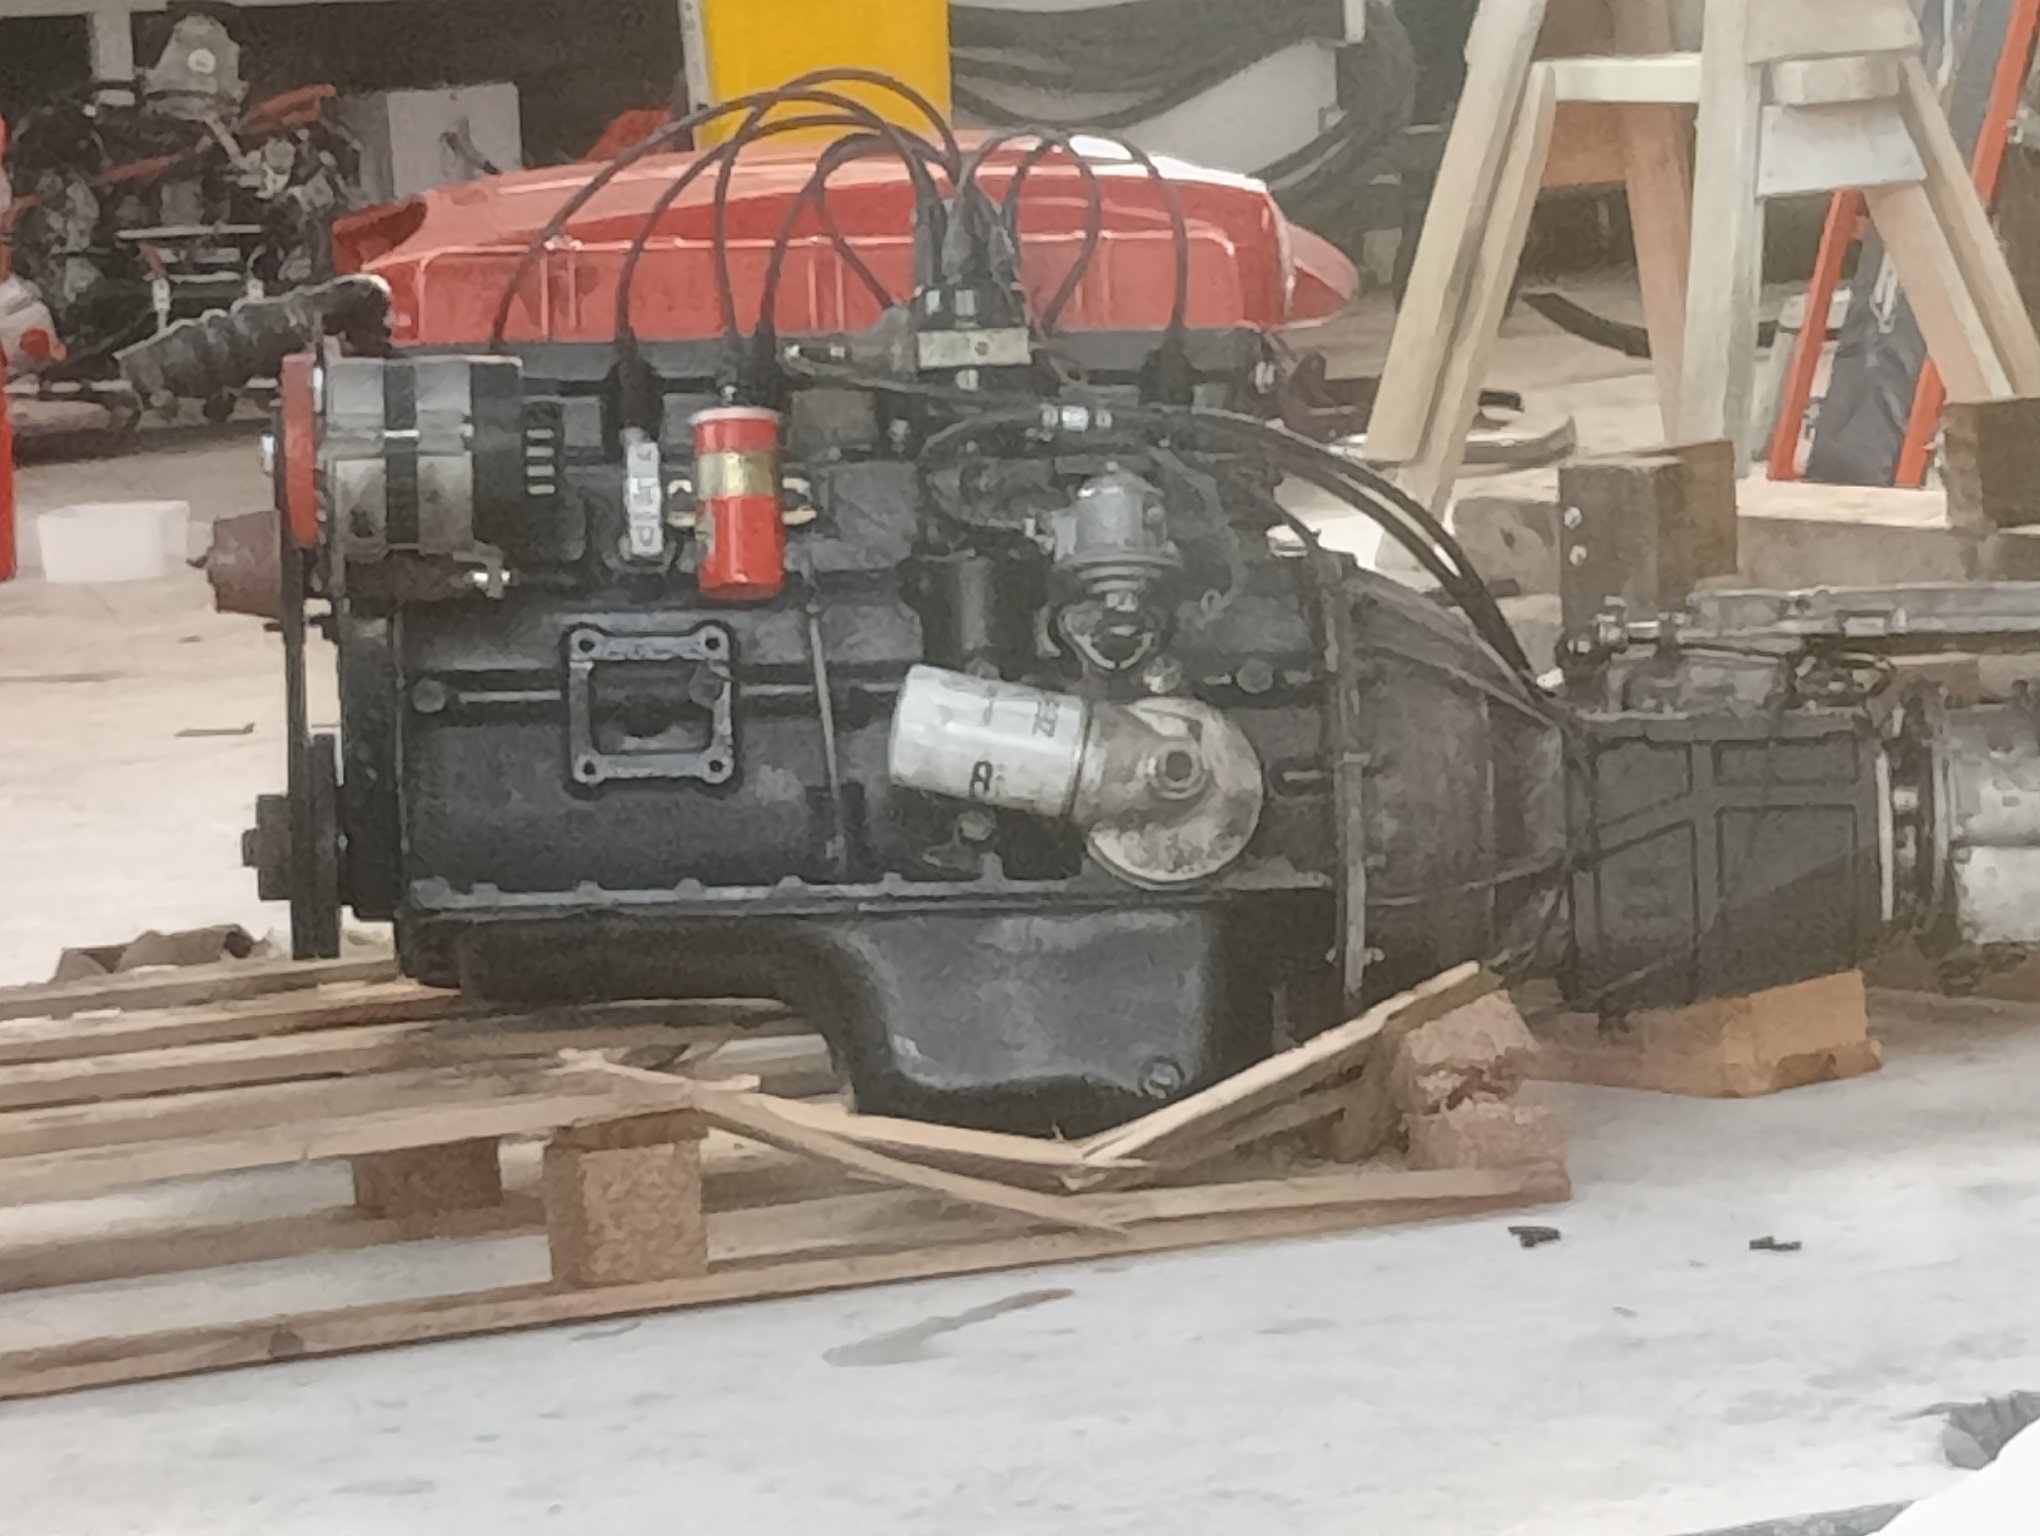
So I pulled the body. I had a GT6 "workshop manual" which was totally useless. Didn't even mention disconnecting the radius arms or rear suspension. I don't actually have a photo of it with the body off and engine still in because by the time the body was off there was pretty much nothing left to remove so I forged on and tore the motor out. only thing I had was this reference photo of the propshaft angle: the motor was then removed and carefully placed on a pallet which it immediately destroyed because it is the heaviest son of a bitch I have ever come across my phone decided to spruce up this photo, I don't know why
- 7 replies
-
- 19
-
-
-
oh where to begin. this little car has been a part of my life for almost two decades now. one decade where it was driven, and one where it languished in it's current state. Here's a photo from better times such a pretty, poorly designed car. anyway since another car took it's spot it's been relegated to hanging out in the workshop and generally getting in the way (luckily it's tiny). one day I woke up and thought we may as well sell it. so it looked it over, considered the rust in the sills and around the windscreen, how it's impossible to get into gear, how the brakes are jammed on, how the engine leaks like a sieve, doesn't like to start, makes weird noises when you select gears, has crankshaft play... and thought "why just sell it, when I could waste a lot of money on it and THEN sell it?" and so, this build began The plan, aside from a general refurb, is a 1.6L NA MX5 engine and transmission swap. Nothing that I am doing here is uncharted territory. The MX5 engine is considered one of the easiest swaps and everything has been done before is documented... well, everything is anecdotally documented. ie there's a lot of build threads that encompass what I'm doing, but they all seem to skip over the nitty-gritty and focus on the successful bits. I am not a fabricator. I am impatient, and rough, and careless. I'm going to try and make a note of all the bits and pieces that I wish I had seen prior to starting this swap in the hopes that it helps the next guy And if I totally fuck it up I'll just repost all the pictures in reverse order and pretend that I rescued the car from some butcher and restored it
- 7 replies
-
- 22
-
-
-
if I'm going to do it properly then I suppose I need to reserve all judgement until that outer sill is off and I can say for certain that the inner and stiffener are ok (I'm reasonably confident that they will be - this thing has rusted from the outside in, not the other way around). At that point I think I can weld new lower lips to the outer sill and stiffener, and re-flange the floor as you suggest. I suppose my original plan had the T section welded to the outer sill and floor, and butting up against the stub of the stiffener and the inner sill. The bodge of it would be that the top of the T wouldn't actually be fused to the stiffener. I guess I didn't want to unpick anything but yeah it's a keeper car so maybe I'll bite the bullet once the body is back on the frame. I do draw the line at replacing the whole floor just because of a rotten flange though What are my chances of getting the outer sill off in a reusable state? It looks like it just has tack welds at the front but I haven't checked out how the rest of it is held on
-
I'll get some tomorrow. Probably going to start a build thread anyway so the whole internet can watch the disaster unfold
-
dredging up a dead thread as I too have stumbled across the suspiciously cheap AMR500. Is anyone running/still running one? how are they holding up? what's the story with the donut racing video, what did they do wrong? the internet won't tell me.
-
here's the underside of my gt6. the seams where the sills and floor have large corroded away, as they come from the factory with a nice chrome capping that traps all the rain and lets it fester Both sides are the same. The thing is, it's ONLY the exposed part of the seam that's gone. The floors are fine otherwise, and I've borescoped the inner sills and they're fine too. and obviously I've hoisted the whole car and aside from the rusted seams folding at the hoist points, the body is still strong. Because the seams are combination of the floor panels, the inner and outer sill, and an internal stiffener, renewing it would mean replacing all of those parts, even though it's only the exposed lower inch that's rusted So would it be totally unreasonable to just grind the remainder of the seam off, fold up a long T section of approximate gauge, and weld it in it's place? Or is that too much of a bodge up?
-
hey @cletus just to save me asking the same question in the certs thread, what do you think about this, do aftermarket half shafts require a cert? Mine are "professionally manufactured" (according to the UK seller, who don't supply any kind of engineering declarations with the parts), and dmulally's are locally built