


Adoom
-
Posts
2199 -
Joined
-
Last visited
Posts posted by Adoom
-
-
Fine then!

I'll just use this broken chuck to weigh it down.
I got a bit overzealous with the tacking and melted one of the bushes a little bit.
But it's okay, it's just cosmetic.
The engine mounting plates are now bolted down properly. I had to shorten the bolts in the lathe. They were a bit too long because the original mount was a really thick aluminium casting.
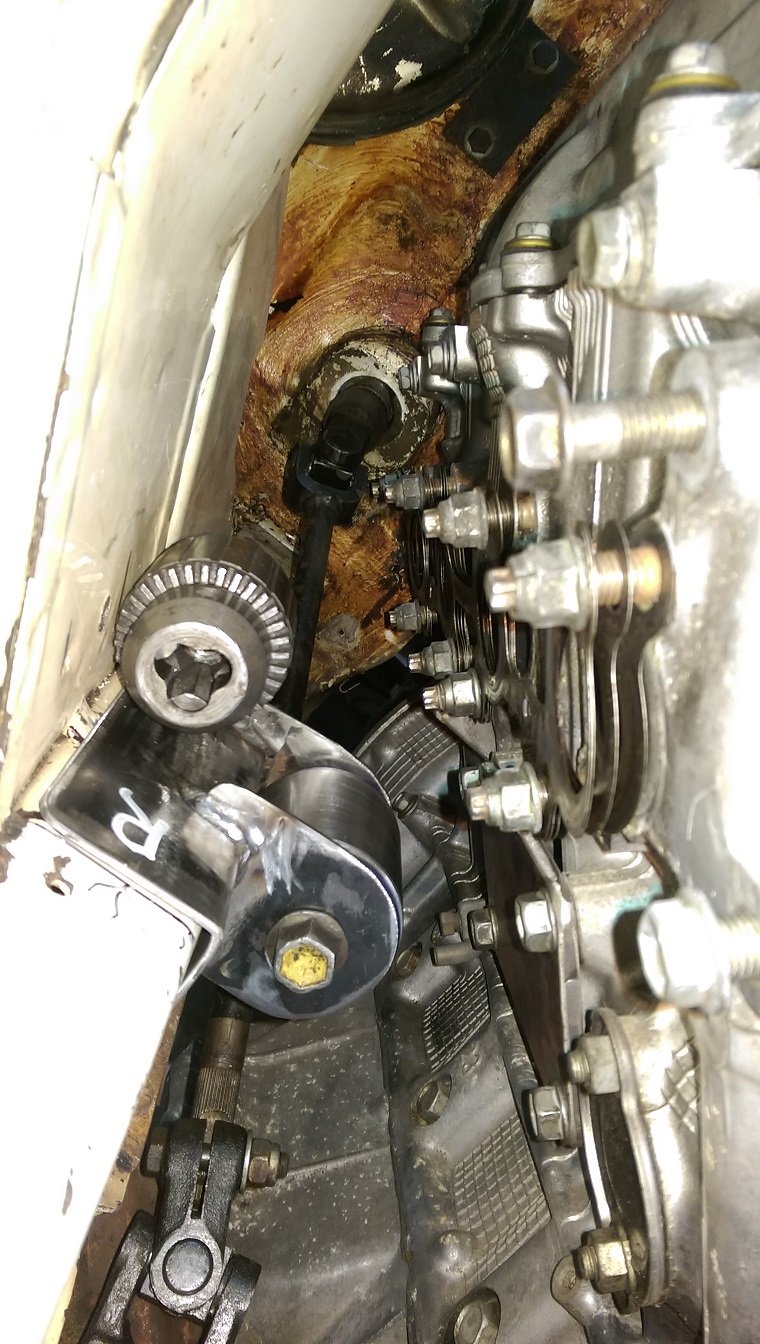
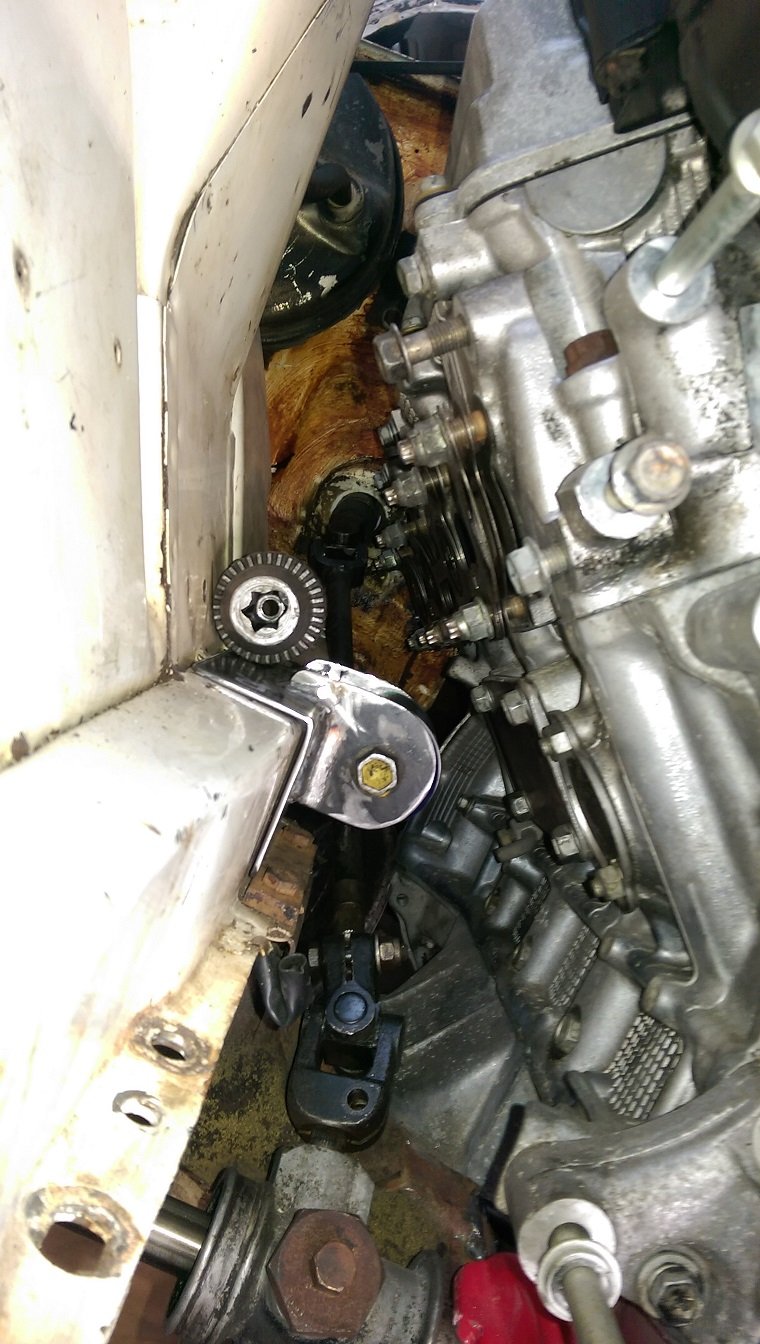
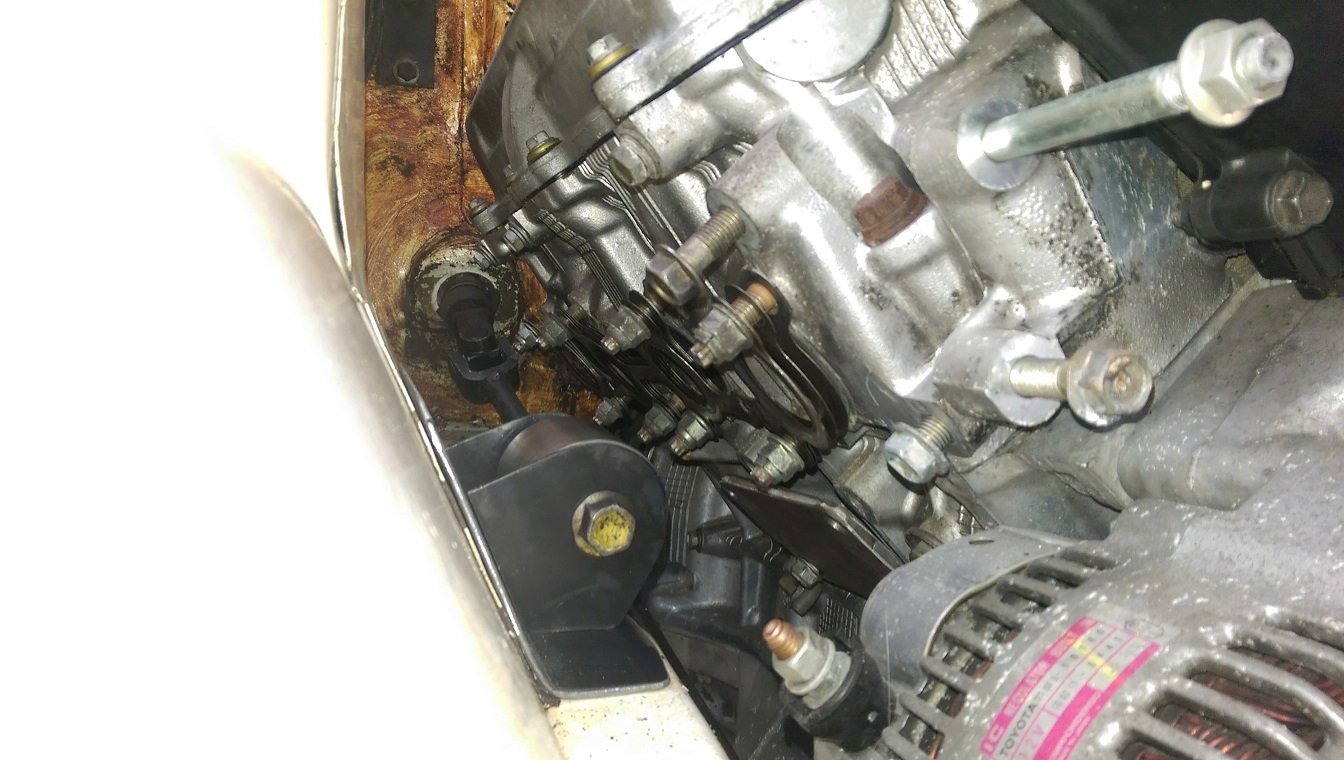
A bit more room for exhaust manifold. I'm afraid it's probably going to have to be a log style, there probably isn't room for 4-1, or 4-2-1.
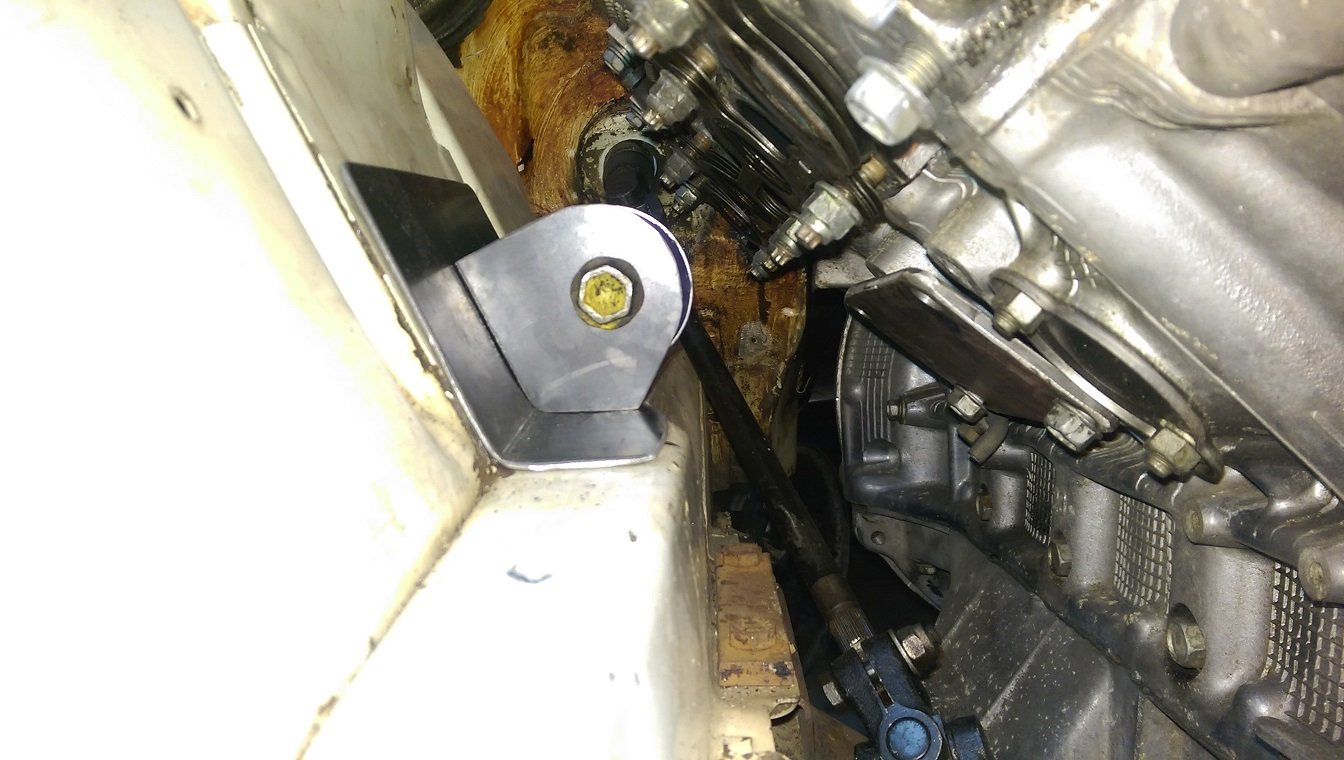
This is as low as it will go. Any lower and it's too close to the steering intermediate shaft.
-
 7
7
-
-
28 minutes ago, toy-mota said:
would i need to keep odo for a wof?
or i was looking at this?
frequency to voltage converter with a dc motor into the back
I've never had any problems with getting wofs. It's been like that for at least 4 years. You can buy speedos that take a pwm input and you get an odo. I think they are a few $100. I only used a tacho because I was looking for the cheapest possible solution, because racecar.
-
2 hours ago, flyingbrick said:
People should correct me if im wrong here but im sure even the guts from a tachometer could be installed behind ya factory cluster and fed pulses from the link to display speed 100% accurately.
Id just hotglue the guts in there and smugface
That's what I did. You just lose the odo.
-
1
-
-
9 minutes ago, Yowzer said:
Cutty weldy
So much cutty weldy it's easier to start from scratch.
-
1
-
-
15 minutes ago, cletus said:
they go so much better with even a basic set of headers
The engine did come with some fancy headers, but they are much too wide.
-
1 minute ago, kyteler said:
I'd trust a mount on a rail more than one on the inner guard.
That bit is actually pretty strong, it's the bottom of the strut tower, so it's got another ribbed reinforcing panel on the back of it that extends up to the top of the tower.
-
24 minutes ago, kyteler said:
Why wouldn't you mount off the side of the rail?
I didn't want them sticking out into the engine bay possibly getting in the way. But it looks like I'm going to have to.
-
40 minutes ago, Bling said:
Could you drop it down to sit on the crossmember / up against side of chassis rail?
Maybe. I put it on top of the rail because I thought it might get in the way when taking the engine out.
The reinforcing plate is going to be a PITA to make because there is a scallop in the rail for the steering intermediate shaft.
Putting the mount on the crossmember isn't really an option, steering is right in the way.
-
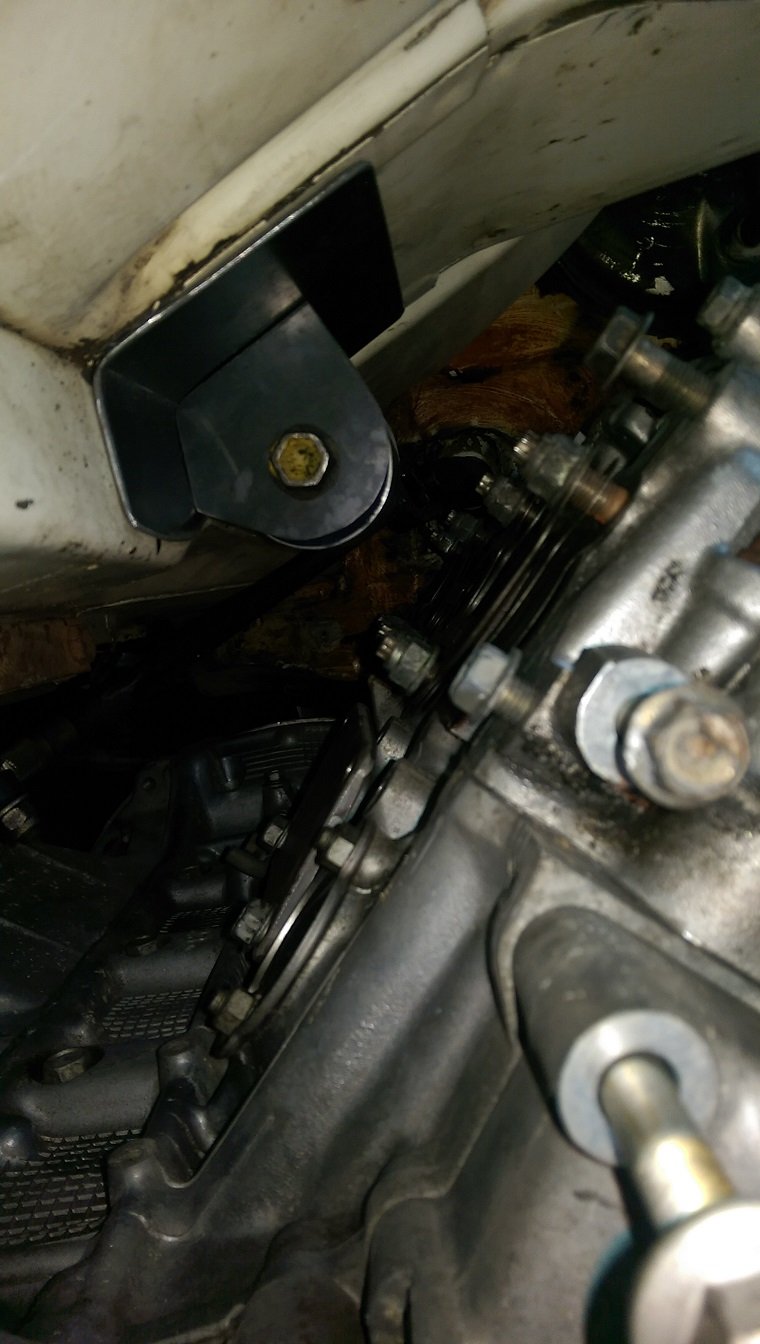
So, how close can my exhaust be to my urethane engine mount? I reckon I might be able to get 10mm clearance... maybe. Would a heat shield be sufficient? I've got fuck all room to play with.
-
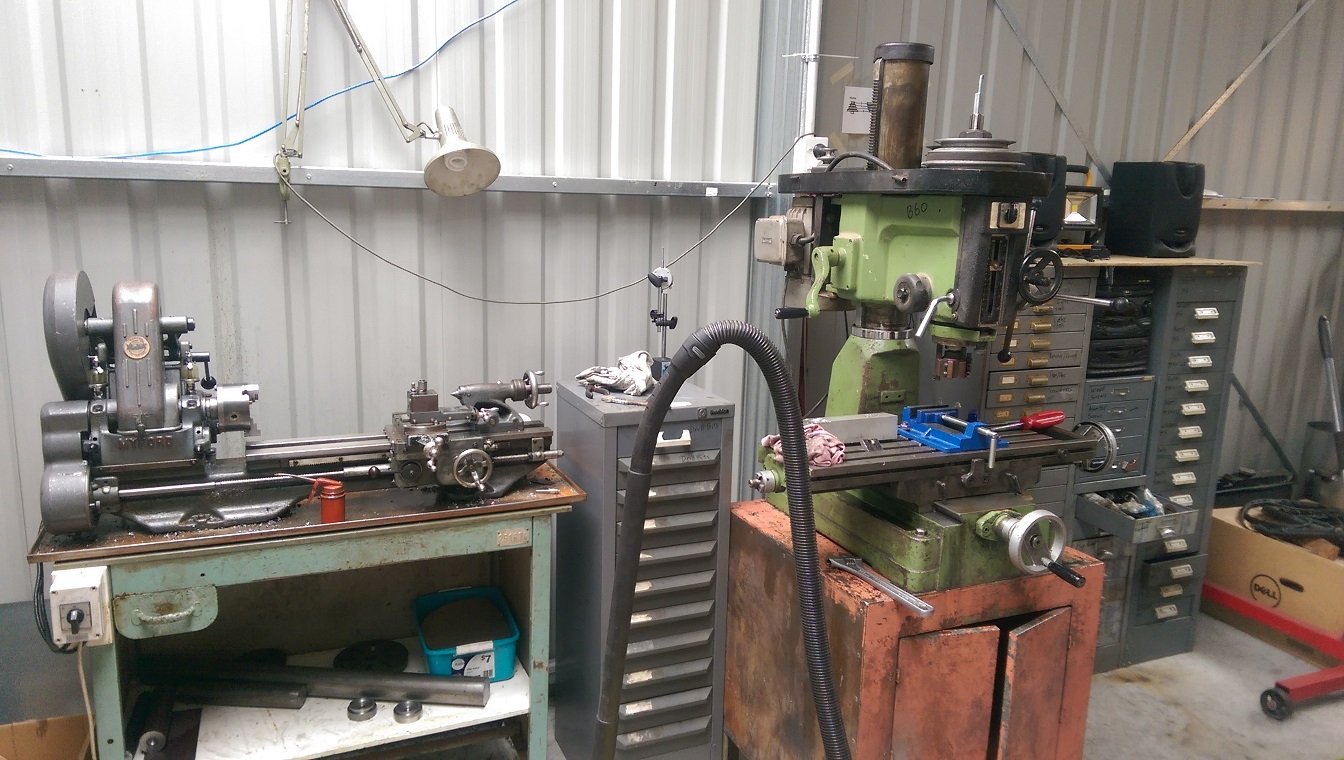
RIGHT! Now that I have a small lathe and small mill, I can finally start working on my engine mounts.
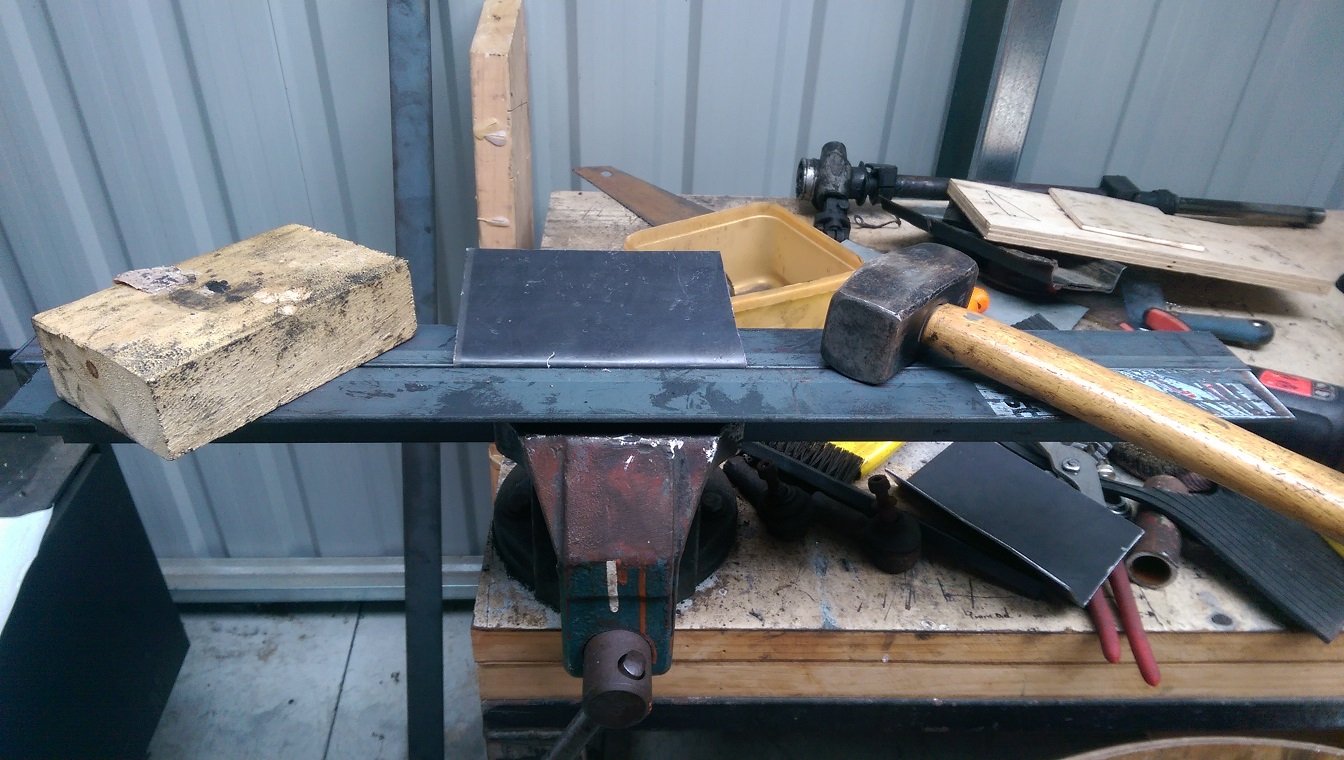
By cutting some 2.5mm plate with an angle grinder then putting it in the vice with two bits of angle, then bashing it with a hammer till it's the right shape.
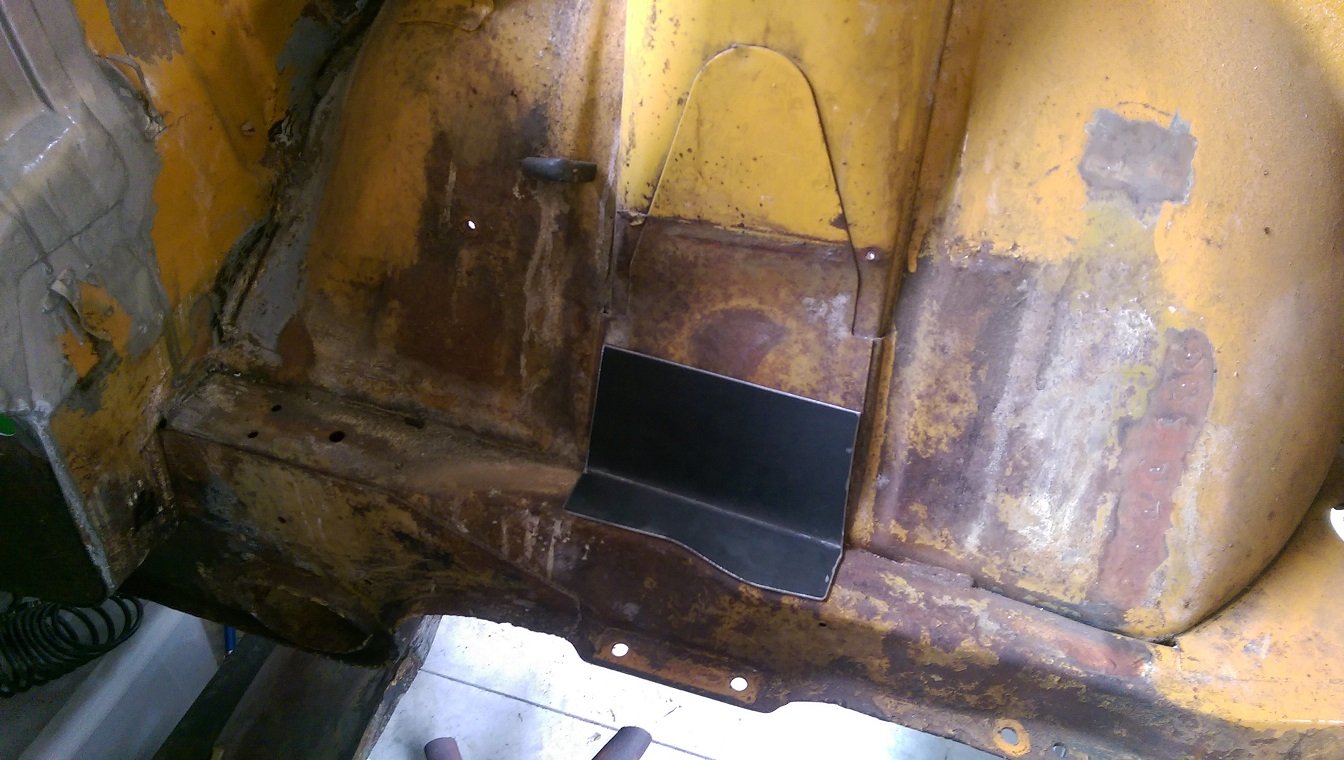
To fit here.
I'm mocking it up on the yellow one, cause there isn't an engine in the way.
To reinforce for a bracket to hold this.
Like this.
Here it is in the white one, you can see the mount plate half bolted to the block. But...
Now it's in there... the exhaust is going to be REALLY close to that urethane bush.... like 10mm close. Errrm. Heat shield? Back to the drawing board?
-
6
-
-
-
While on my way to get my mill drill on Saturday morning, I saw, in convoy, a light blue MK1 triumph, looked like @Gozza and a red MK2 like sheepers old one and possibly a TR7/8. Then some more old cars a bit later, maybe a TR4. They were heading south near Mt Bruce.
I leaned on the horn, in my shitty 90's white corolla towing a trailer.
-
FYI, mine was some random toyota, or maybe nissan, one from the wreckers.
-
I'm not sure what you mean. You keep your original faceplate. You just replace the internals, the bit you showed the photo of.
Does it look like this one? https://www.youtube.com/watch?v=W9jQHPqBWGM
Looks very similar to the one I modified in my starlet. I even kept the original lights in mine.
-
1
-
-
Find a tacho that does work with the link(most should) and retro fit it into the instrument cluster and put your faceplate on it.
That's what I did when I could not find a PWM speedo within my budget of no-money. I just carved out the plastic speedo housing, mounted tacho internals in the hole and screwed the speedo faceplate on it. The tuner calibrated it on the link when it was on the dyno. Only downside for me is no odometer.
Ideally you would have a spare instrument cluster in case you made a mess of things.
-
 1
1
-
-
3 minutes ago, Bling said:
I have come across similar areas on my project car. I am leaning towards doing nothing with such areas, they have lasted 35 years with nothing more than surface rust. My thought was that sealing any seams near it, could end up trapping moisture. Especially if you can't prep it 100% legit. Right or wrong, doing nothing works for me, I have enough proper rust problems to sort.
Tempted to Amazon source a full face 3m mask for relatively not much, for all paint chobs. Still need to get around to sourcing the epoxy primer too and some colour matched spray cans.
The triumph rusts quite badly around the front arches. At least my other shell is really bad there. I wanted to just brush something into the join to seal the metal(which is probably rusty), not really seal the seam. I suppose I'll just paint the areas I can prep and flood the rest with a waxoil/fishoil product.
-
7 minutes ago, Spencer said:
Brunox is garbage also.
You prep steel with mechanical abrasion of some kind until it’s white, or acid wash it if it’s pitted and can’t be blasted/sanded, then steel wool scrub and clean it. Two part epoxy primer brushed or sprayed and that is pretty much it, we keep going over this every other month. Epoxy primer doesn’t have any where near as much of the death cyanide like urethane it’s much safer to spray in that regard.
Would you still use epoxy primer if you wanted to paint an enclosed area that is very difficult to surface prep? Eg: The inside of the front guards on a Triumph 2000 are only accessible via the headlight hole, there is some light surface rust. I want to get something down in the join between the inner guard and the wheel arch to seal it...
-
I had one of those IAC valves retro fitted to my CA18ET with the link Storm, because the factory setup was weird and complicated. But it had trouble controlling the idle. It was not responsive enough, so when you got off the gas, the idle would go too low then too high then too low until it stabilised.
I ended making an adapter to fit a later model nissan IAC from the 90's. It fixed the response problem and was also much smaller.
-
2
-
-
- Popular Post
- Popular Post
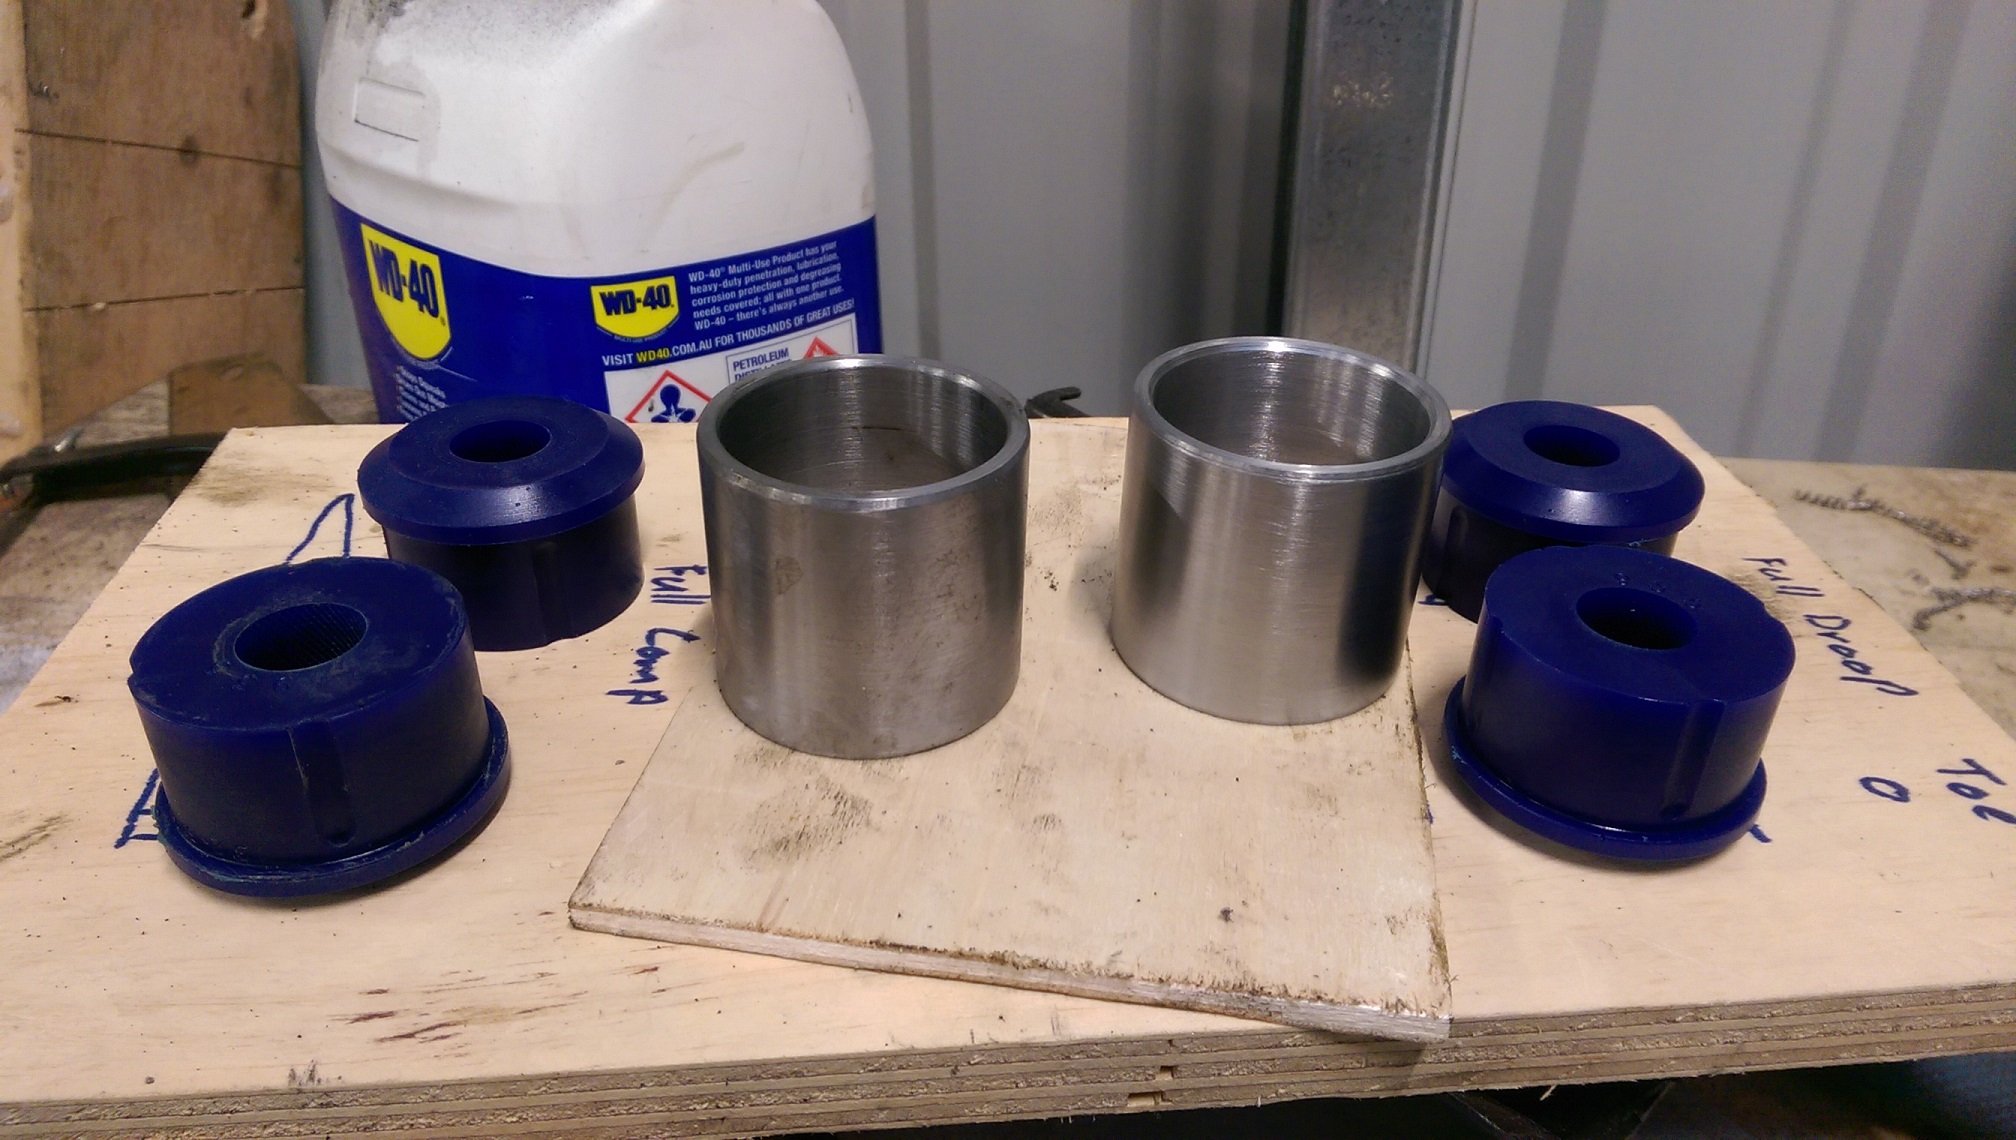
Mental note for next time: Buy bushes that fit a std thick wall tube size!
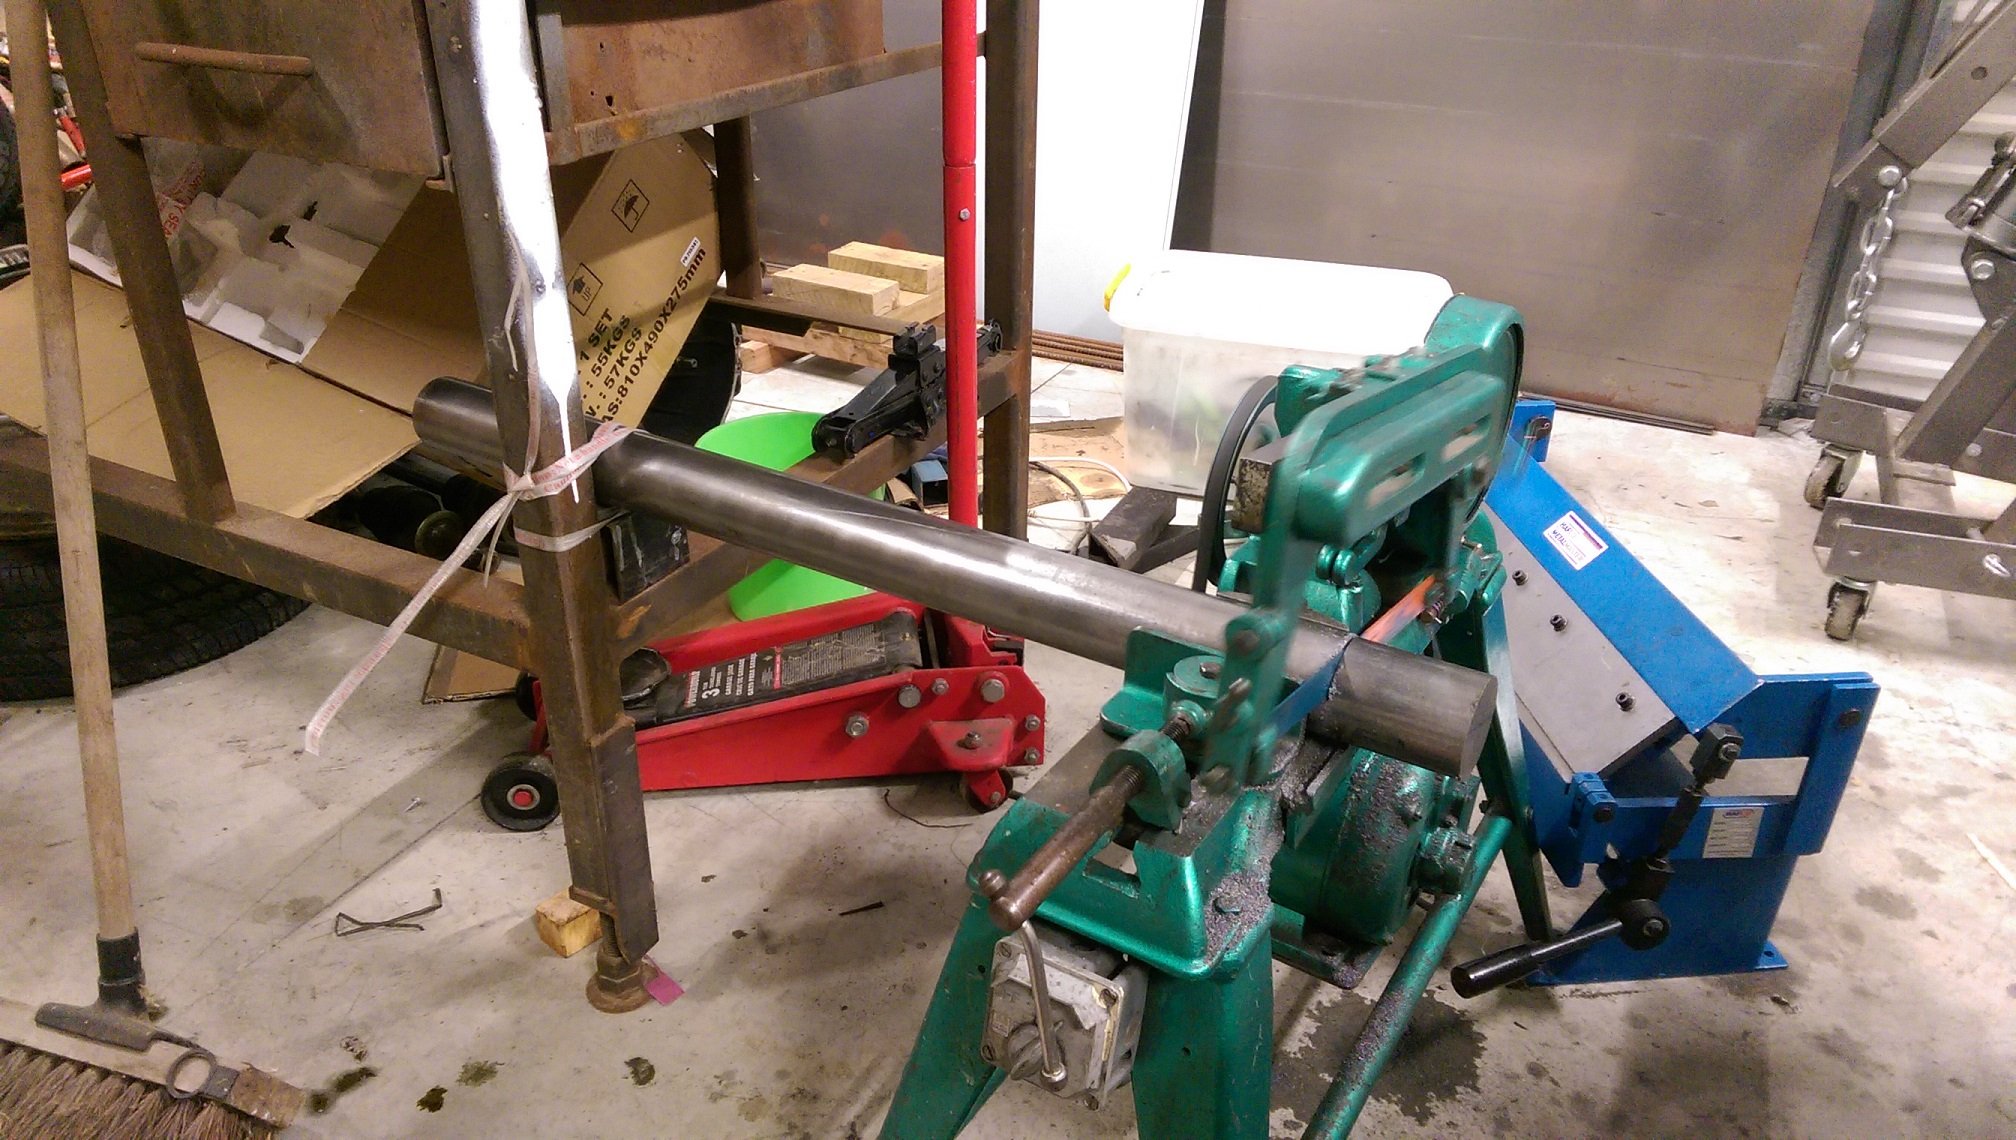
So I bought the bushes because they were close to the dimensions I wanted for engine mounts. But then I could not find any thick wall tube even close to the right size.
I can make some. I have a tiny lathe. How hard could it be... #FirstRealThingMadeInLathe
The bush diameter is 47mm.
The closest size bar stock I could find was 65mm.
It took a while to cut through with the power hacksaw. The saw would also walk and the bar fall off the shims fucking up the angle of the cut. I sorted that out!
I did the first cut with a blade with quite small teeth and it took fucking AGES! I broke that blade later, so when I cut the next one I used a blade with bigger teeth(it was all I had), it cut quite a bit faster. But it still took a really long time.
Then I whittled it down in the lathe. The deepest cut I found I could do was 20thou/0.5mm any deeper and it would jamb and break the carbide insert.
ELEVENTY BILLION HOURS later!
Actually the first one took 6-7 hours including cutting it off the big bar.
The 2nd one I spread over several days.
So glad I didn't fuck up the sizes and have to start again. Bushes fit perfectly.
-
16
-
 1
1
-
1 minute ago, ZEROPILOT said:
There's not much room under the hood with the master and booster installed since it now has a later model 16 valve 4 cam motor in there.
It's okay, you can say "4AGE" in here, it's a safe place. 4 cams! Where did you fit those?
-
2
-
-
I'm thinking I will weld the engine mounts to the chassis rails/strut tower in the Triumph 2000. Mainly because there isn't enough realestate available on the cross member.
I assume I will need to plate the area I want to weld the mounts to? Yes?
How thick should the plating be? is 1.6mm too thin?
I'm sure I saw a post somewhere with a mount like this ripped out and Cletus said it should have been stitch welded? But I cannot find the post.
-
If there was not much flow when bleeding the front. I would start at the master cylinder, remove the brake line, for the front system, from the master cylinder and pump the pedal, you should get a lot of fluid. If you do, reattach the line the line to the master cylinder, and disconnect the other end of it from the "splitter", pump the pedal. If you get lots of fluid, move to the next join and so on.
-
3
-
-
I came across a Triumph 2000 and 2.5PI FACTORY service manual on the tard. It's got loads more info and measurements and scale drawings in it than the Haynes/chiltons owners manual.
I specifically bought it for the chassis measurements diagram. The one you use to tell if the car is bent/twisted. Never seen that diagram anywhere before.
I'd like to scan the whole thing for prosperity but it's a ring binder of hundreds of double sided pages and some are double size fold out pages, so I can't really put it through the auto feed thing on the scanner. And there is some old sticky masking tape reinforcing some of the punched holes, so it probably won't survive going through the auto feed rollers. Long story short, I'll have to scan each page manually and it will take hours and hours.
-
4
-
-
16 hours ago, Transom said:
Not sure on the exact section but most engine will torque enough to close a 7 mm gap unless solid mounted
maybe one of our friendly cert dudes will stop by and clarify
Where are you looking/reading? I've just gone through the car construction manual and the only "clearance" reference I could find related to my situation is the 25mm+ clearance required between steel universals and the exhaust, before you need to have heat shields.


Adoom's 1972 Triumph 2000
in Projects and Build Ups
Posted
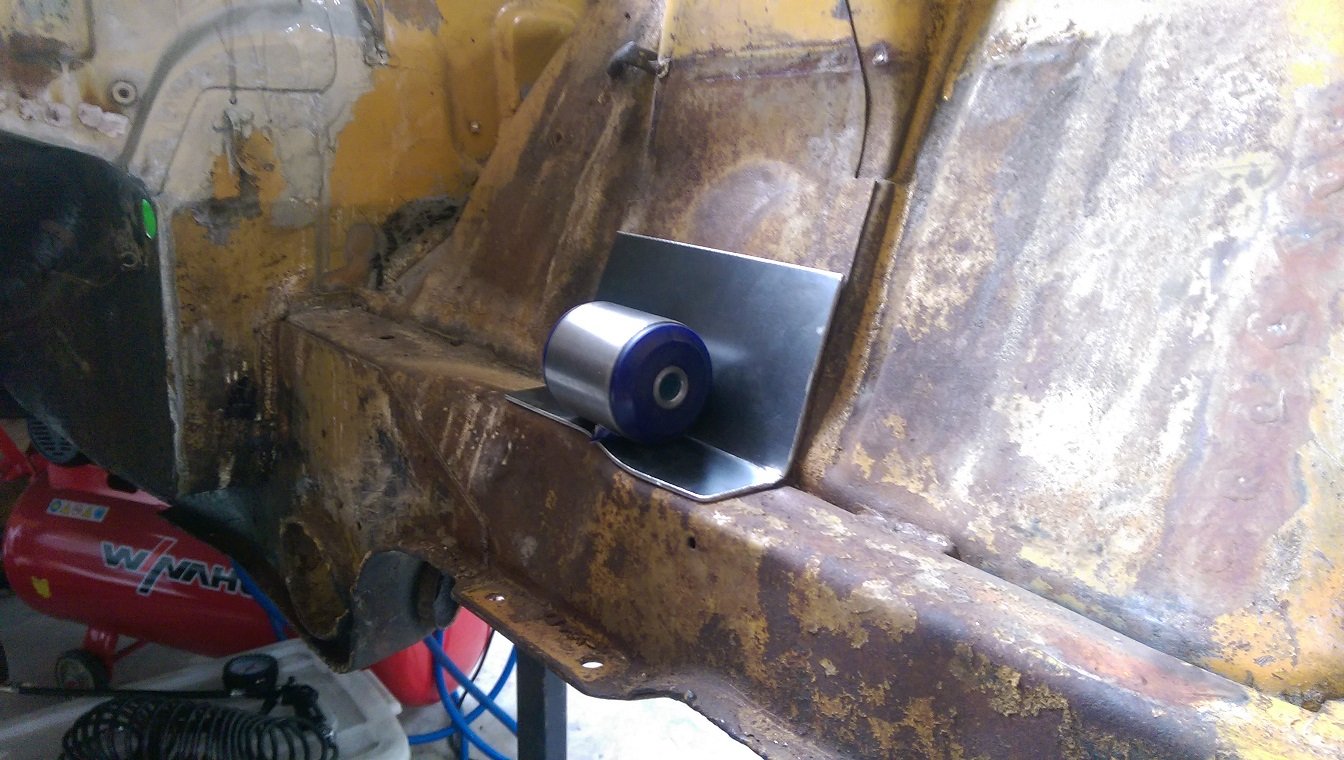
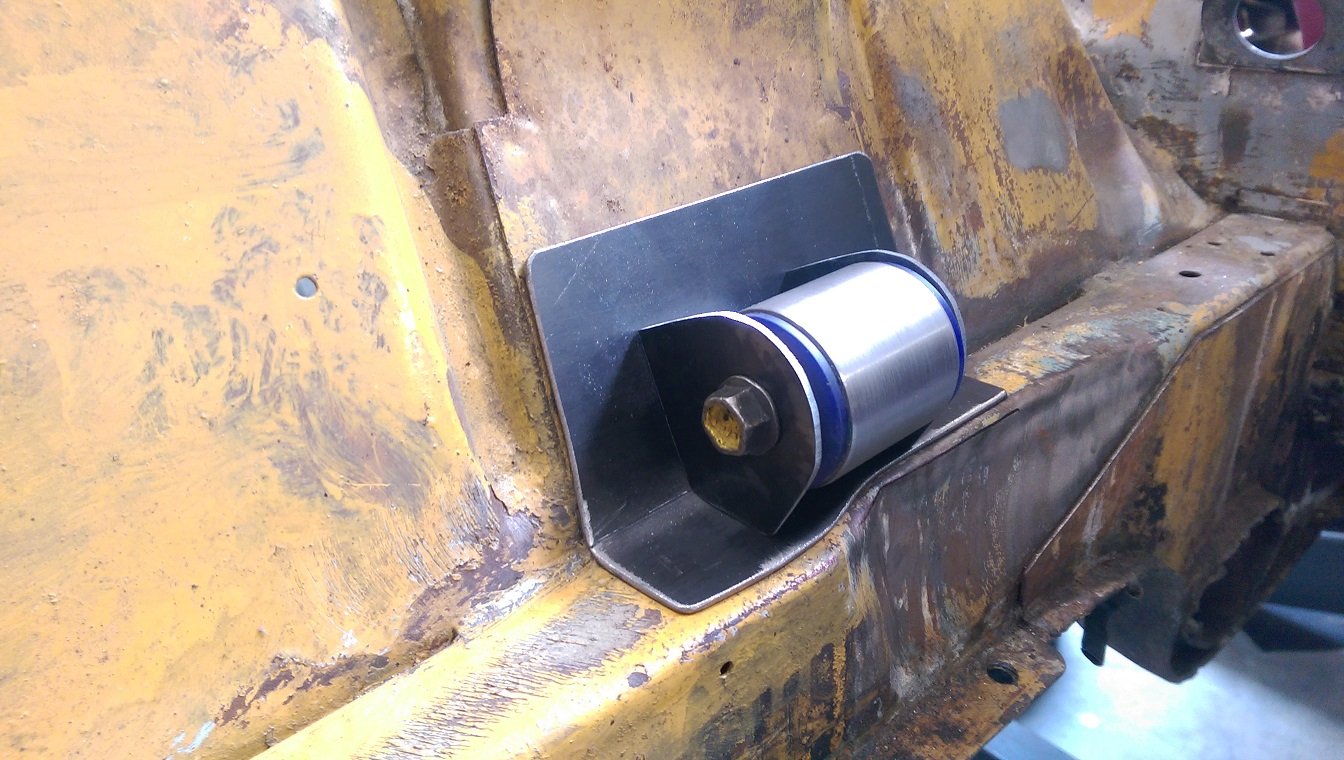
I've made the bracket for the driver side. I didn't want to make it too bulky and make it almost impossible to install the bolts. The welding warped the tube slightly, it's oval by about 0.5-0.75mm. Fortunately the bushes still fit okay.
I tacked a bit of 2.5mm flat between the tube and the plate to locate them, then unbolted it and removed the bushes so I could make the bracket from 5mm plate on the bench.
After letting it cool, I tested that the bushes still fit and the bracket was still the right shape to bolt back in. YAY, it still lines up with the holes!
I'll tidy up the welds a bit with the die grinder...
I've temporarily tacked the mount to the chassis rail so I know exactly where it needs to go for later. Because I need to remove the engine to get in there to clean it up for welding, then weld it.