Sorensin
-
Posts
699 -
Joined
-
Last visited
Everything posted by Sorensin
-
Sorensins 1986/5 Hoonda CityE jap rod
Sorensin replied to Sorensin's topic in Projects and Build Ups
This is a wheely short post Have put in the metal valves back in, just that little bit cooler than the black rubber ones. Also ordered some valve caps today which are coming from overseas so will probably be a week or two away. Not too sure how I feel about the colour yet, keen to get the tyres on and them on the car to get a real idea. -
Everytime I try do anything on a car!
-
Sorensins 1986/5 Hoonda CityE jap rod
Sorensin replied to Sorensin's topic in Projects and Build Ups
Opening all painted and ready to have a screen out back in. Roof all matte clear coated, hopefully it stays like this for many more years. The silver on a rails is lost very quickly so the roof retains it look, very happy with how well this went. Today I pulled the petrol flap off and had it sprayed some blue we had made up, the flap was scuffed and painted straight over all its bumps and chips leaving lots of blemishes to keep the rat look of the car. -
Sorensins 1986/5 Hoonda CityE jap rod
Sorensin replied to Sorensin's topic in Projects and Build Ups
progress! The roof rack had the worst of the loose black paint scraped off and had a light rub down to try and keep some black paint, it then had a semi gloss clear coat sprayed on. The semi gloss still had way to much gloss so that had a rub done and then a full matte clear coat was sprayed over. A few hours of cleaning up the old paint on these wheels and they finally get a prime, have started rubbing down the primer on the first wheel, hopefully will get some paint on these things tomorrow. The actual car has some paint around the screen opening and rails and clear over the roof, will try take some photos and upload asap. Also went out to the shed tonight and found the bonnet bulge I purchased a while ago and will fit that to the bonnet sometime soon. -
Sorensins 1986/5 Hoonda CityE jap rod
Sorensin replied to Sorensin's topic in Projects and Build Ups
reasonably unexciting update but it's and update! I had ordered a bosskit and steering wheel. The bosskit has turned up but I've since been told the wheel I ordered is no longer available So I've fitted my wheel from escort, I had to test the bosskit as it didn't list my car just other hondas of similar age. So if you know of a crazy (prefer blue) steering wheel I could obtain let me know! I've also cleaned out the gutter rails which had a bit much surface rust and the old sealer was lifting. The rails were cleaned up and etched, I have then resealed the gutter. Hopefully will find some time tomorrow to spray some silver round the screen opening and rails. The plan is to spray the opening and rails and try lose the colour very quickly to keep as much of the original patina look the roof has, then spray all the new silver and all the existing roof with a semi gloss clear coat. I've never done anything like this before so I really have no idea how it's going to go (others at work have there doubts about how well it will work), the issue is I can't rub down the roof before the clearcoat because I'd lose most of/all the staining from the rust. Edit: I've also nearly cleaned up two of the new wheel, I think they probably owe me close to three hours so far :/ but they're pretty much ready for paint. I think I'm going to go dark green it was that or red, I liked the silver but just not a fan of silver wheels on silver cars. -
Sorensins 1986/5 Hoonda CityE jap rod
Sorensin replied to Sorensin's topic in Projects and Build Ups
Fitting some fender mirrors Didn't get a photo but both mirrors are fitted and I've started to clean up one of the new wheels. I had hoped to get a wof before the weekend but thats not going to happen anymore but hopefully early next week so I can make the welly meet on thursday? -
Sorensins 1986/5 Hoonda CityE jap rod
Sorensin replied to Sorensin's topic in Projects and Build Ups
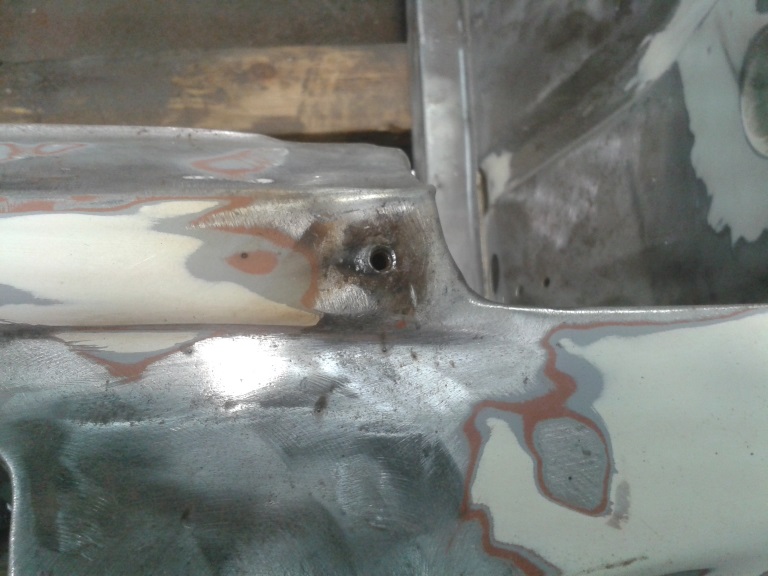
I'm really bad at this build thread thing but I've slowly been making some progress some welds around the screen opening All signs of rust cleaned away Some new steel patches put in all covered with some epoxy etch primer -
Discussion Thread So I took this to work to try get some work done on it so I can get it wof'd and back on the road! I was meant to do this Instead I did this, hopefully tomorrow might see some more practical work done but it will most likely see the other side get the same treatment and maybe some work on the new wheels for the back. [/url]
- 10 replies
-
- 17
-

-
Hey guys so I just started up my city with plans of taking it for a wof soon, my indicators, rear and dash lights are working fine but I have no head lights, instead when I turn my head lights on the front indicators turn on permanently(dash and tail lights light up as normal) and when I try to high beam the car stalls, unfortantly its very hard to see out in my garage tonight but I'm guessing its the headlight wiring/earth? Just hoping if someone has come across this before they could save me sometime and hassle in the morning and let me know what it is and how to sort it? cheers!
-
Hey trying to get my cityE back on the road, I need some wheels to achieve this. It's currently running which is fine on the front but requires small spacers at the back probably only needs 2-3mm but have 5mm spacers and its fine. Have been told I can't get a wof with the spaces so I need to buy, borrow, beg or trade for some wheels. I'm no wheel guru but I think i need the offset to be 34 or less(currently 38)? Any help at all would be awesome Would be happy with any 14" wheel 6 inches or wider that will poke further out away from the body than current wheels Finding something in wellington would be ideal as I'd like to get wof before the weekend but will consider anything. Thanks!
-
So as it's the night before I leave for Auckland I decided I better put this thing together. I've spend the night cleaning parts, polishing glass and tags, gluing tags, badges and glass and reassembling this thing back together. So this is it! Happy Birthday mum sorry I couldn't get it up to you for your actual birthday but here have a build thread about it.
- 10 replies
-
- 14
-
-
Got some red parts painted today and have taken things home to work on for the weekend and I'm starting to put it back together but realize I need to sort locks and cleaning some of the internals before I get any further.
-
So the panels have been rubbed down and the colour made, It was hard to get a good photo of the colour with the booth lights and a shitty cell phone camera, will try remember to take some proper pics with my camera when I get it home. So that's not me ^^ i'd actually use a mask when spraying poison into the air I'm breathing, also the colour is as mentioned above not shown very well here it looks more brown than it actually is. So the plan is tomorrow, paint the red and the black bits and then bring it home for reassembly in the weekend. Also when I have photos I'll mention how the front of the draw didn't work out quite how I would have liked I'll also have a go at using a razor blade to tidy up the gaps on the body where the paint has bridged a little, if I can't get that to look tidy I may try a very fine black pin stripe over all the joins.
-
Carefully removed the plates from this (last) panel, I'm going to try find the worlds smallest pop riveter to put them back on, the panels with a small piece of glass behind them really concern me though. The the front of the base I had previously left on the plate with the serial number deciding I didn't want to damage it butt his panel was in too bad of condition to not attend to or to try work around the plates left on. There is two of these (bakerlite?) panels on the cash register one of the front of the draw the other where you hand rests while using the machine, both were full of filth I've cleaned one so far it its been the most time consuming job so far. I tried using wax and grease remover as well as thinners to try just lift of the gunk but it wasn't working so I took to it with a razor blade and pick to help clean it out between the grooves then again cleaned it with thinners. These are going to be painted black but I thought it was important to clean them out properly because the tread isn't very deep and I didn't want to lose that look when they are primed then painted.
-
Some more progress Removed the glass from the outer shell, the glass is actual glass! It's missing one bit and it's all very thin I'd like to replace the missing piece but I'm not sure I'll be able to find somewhere to cut me a thin enough piece. While on the topic of fixing things on this, the cash register has two locks and zero keys, I know very little about locks, cheaper to try replace the whole mechanisms (very generic looking - will try to remember to take photos next time) from somewhere or to take to a locksmith to have keys made? There were two holes at the top of the machine, looks like someone possibly fixed something to the machine, I assume this because when I search for images of the cash register I can't find any with anything on the top. So I welded up the two holes and cleaned it up.
-
Sorensin's 1972 mk1 estate of the escort type
Sorensin replied to Sorensin's topic in Projects and Build Ups
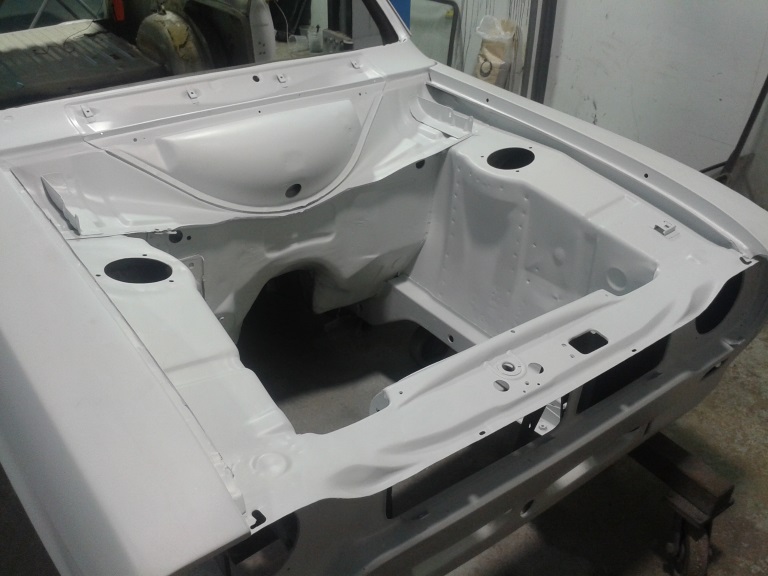
Ok sorry guys, have been really slack on updating this (and working on the car) I have painted the engine bay and refitted the engine and the car is now at home in my garage. The inside of the doors and been filled and painted and the outside ruffly filled but will probably require work once hung to make body lines match up. The outside of the tail gate has been filled twice as the first time the primer bubbled up, arguments over it being there was 1k etch used in spots where i sanded through when filling or humidity blisters, either way doesn't matter was striped back and redone without 1k primer and using the booth to prime, the inside seams were sealed up like the doors and the inside and outside of the tail gate have been painted. Did a little actual panel beating on the front guard and started to investigate why the wheels don't sit even;y in the rear guards but havn't sorted this yet. I have also finished my Bathroom which was a overlapping project and ate up a lot time, I have also started to clean up my garage so I can get some more solid work done on the escort. Hopefully I'll so some better updates with some more pictures soon! Every post needs a pic! -
The first few pieces all sanded down then epoxy etched and then primed Also managed to free up the jammed buttons so the buttons work fine now and had a good look inside, it appears there is still a couple bits broken, the link that lets you change between no-sale/cash isn't there and there is another piece/arm/link thing on the other side that looksl ike it should have a lever attached to it that would come out to the user and I can't quite tell where it would join but that's just sitting loose in the unit which is a little bit of a shame as these things are probably past me being able to fix now but its still awesome you can ring up cash amounts and it makes the bell go, you can also turn on and off the bell. All the mechanical working of this thing are insanely awesome.
- 10 replies
-
- 12
-
-
While pulling apart found a small fortune inside... at the rate I was pulling out stuck coins I thought the unit might end up paying for itself Ended up with a few coins of various ages and places but shy of them paying for the unit, one of the coins was a collectors millennium coin which is a little bit cool
-
So pulling it apart was all imperial which was fun Also someone had been in here before as a couple fasteners weren't matching
-
So my mum is turning old this year! (happy Birthday mum) and she likes old things so im tidying up a old cash register for her Birthday present. So this is the Beast! Purchased it as 'was going... until kids pushed multiple buttons at once and it jammed and the draw won't stay closed anymore...' so it's a bit of a gamble hopefully I can get it to go again. Elsa stickers came free!
-
Yes the heater is removed, any reason?
-
Hey people, i need to cut three pieces on wood which are 1.8mtrs long anything between 55-60mm(currently 70). Would greatly appreciate someone who could help with this for cash or beers? Thanks
-
yes but minimal, should try sort my life out do updates and get car sorted :/
-
Wellington Monthly Meet - Discussion thread
Sorensin replied to KKtrips's topic in Lower North Island Region
I hope these are as good as the ones at petone? How does one attempting beard life deal with the sticky mess that is ribs? -
Sorensin's 1972 mk1 estate of the escort type
Sorensin replied to Sorensin's topic in Projects and Build Ups
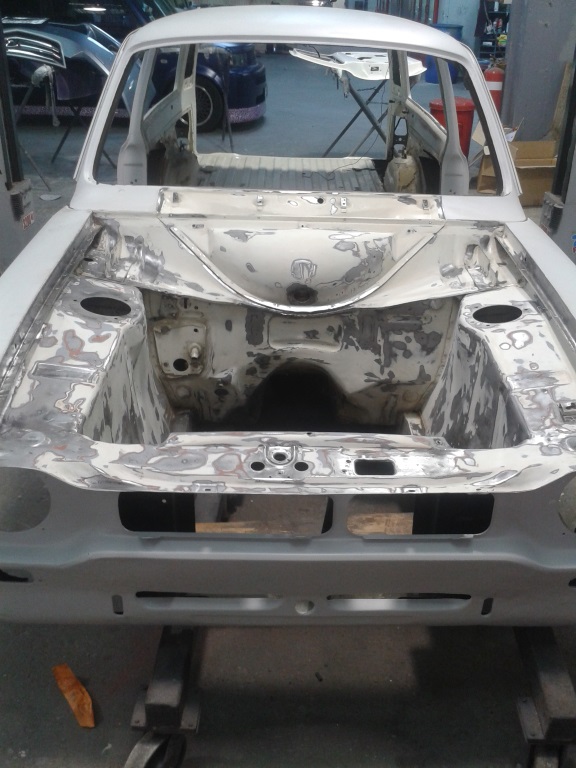
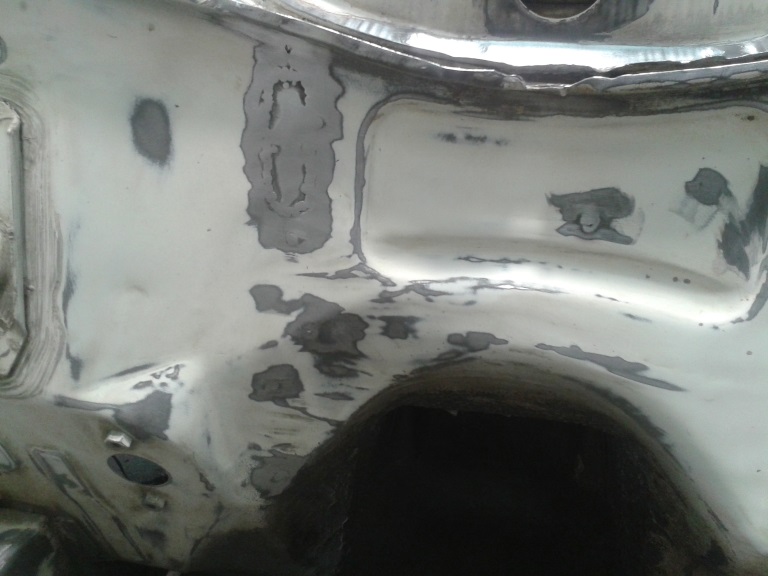
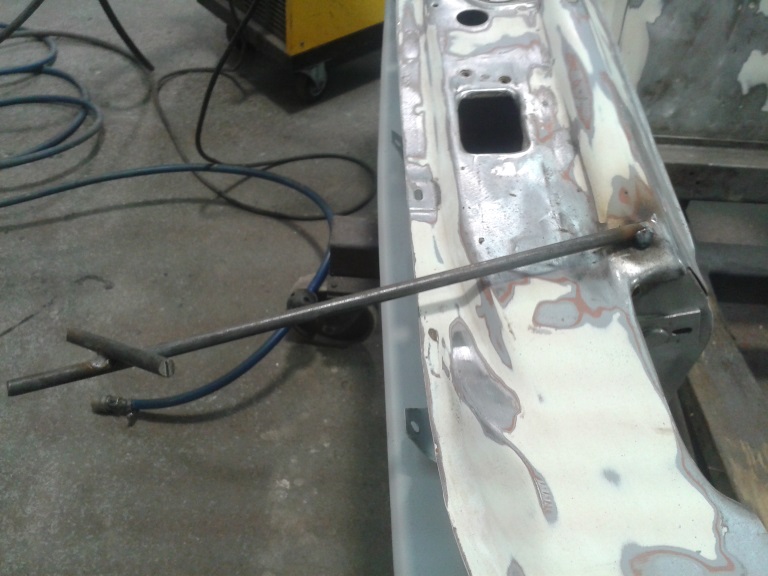
Last of the long overdue updates, some work on the engine bay. There was a broken off bolt at the front of the engine bay, it had been there for as long as I could remember I thought about just cutting it off and welding over it but I thought I'd be mega angry and past Matt if it turned out I wanted to used the hole further down the track so I welded a rod to it so I could wind it out. Success one extracted broken thread from a bolt. I finished feathering some edges and sanding off anymore signs of rust I could find, the engine bay then recieved a metal prep Followed by a couple coats of epoxy primer