yoeddynz
-
Posts
19,522 -
Joined
-
Last visited
-
Days Won
159
Content Type
Forums
Downloads
Events
Gallery
Everything posted by yoeddynz
-

Nissan Micra k11 - Mandy goes to a new happy home.
yoeddynz replied to yoeddynz's topic in Other Projects
We are intending to build a new garage in the yard next year. It will be sited next to the boat shed. Maybe 6 x 4 meters. Big enough for one car and a few bikes. Hannah wants to put up an old style sign on the front that says 'Nissan Maindealer" with a picture of Nelson Mandela in a Micra- 213 replies
-
- 11
-

-

-

-
Nissan Micra k11 - Mandy goes to a new happy home.
yoeddynz replied to yoeddynz's topic in Other Projects
oooh yes please! Not that we need another. But just in case... -
Nissan Micra k11 - Mandy goes to a new happy home.
yoeddynz replied to yoeddynz's topic in Other Projects
So we now have 3 micra children.... It was a lovely sunny day to make a trip to the big smoke that is Nelson city. We took the Imp, partly because the Argentinian girl selling this latest march acquisition wanted to see the it but mainly because I knew it would look cool convoying home together, yellow and blue- like a swedish flag. or like the jersey I wore to one of the oldschool nats- see if you can spot the blue... Had lunch and arranged to go pick up the latest march (yet to be named by us but was called Tweety by its owner). A bit of chat, handed over a wad of cash and took a photo... I got first drive heading home. Wow at all of the LOLs piloting a 1.0litre Micra with an auto box. Actually really neat about town- would be perfect for a city. But point it at a hill or into a good headwind and it has to put some real effort in. Not where near as peppy as a 1.3 manual but still neat enough. The car has a full set of lowering springs, I reckon maybe 30mm drop. They seem ok but it has not got the anti sway bars like our other two have and the subsequent rolling around corners is quite noticeable. LH speaker doesnt work and the original tape deck fitted is shite. Mustn't grumble. This car just looks so neat and I love the colour. Took some snaps on way home... Fuel time. Will be interesting to see if this little 1.0 uses less fuel because small engine or actually uses more because small engine working hard- especially when attached to a slush box. Oh - which I think is actually a normal 3 stage auto? I have only ever driven one cvt before - in a newer Tiida and it was distinctive in the way it worked. But the box in this little car (Mandy?) shifts up in stages, with a pronounced jolt, just like any other auto. I presumed that all K11 autos were CVT but maybe not? Hannah's smile (at the style/size/colour/correct amount of doors but not at the performance...)... Note how much lower it sits. We got home with Imp leading over the hill because I wanted to hoon it in the imp and this micra wont allow such fun. Took more pics. I'd have lined up the 2nd micra (megan?) but its battery was completely flat having sat unused for 2 weeks now. Whoops. So we pushed it into the shed and took these.. Found these in the new micras glove box (Mary?), all in Japanese but interesting and neat to have nonetheless... Hmmmmm. So three K11s in a row. We will just use Milly and the new one (Meredith?) for general trips out and about until after xmas since they are both road legal and then look to doing the big swap of parts. Will attempt to just do most in one hit and just enjoy a week of micra lego. I wonder when the 4th one will pop up?......- 213 replies
-
- 20
-
-
-
Alex and Hannahs bushblock shinanigans. Look at my deck..
yoeddynz replied to yoeddynz's topic in Other Projects
Cool- thanks mr deetee- glad you enjoyed the read. Its fun for me to post it up (its like a nice diary I can go back to) There will be heaps more happening over the next few months that's for sure -
Well that is a neat idea and I think we will all look forward to the updates!
-
Yay for a project thread finally!!! Wow @ the rust. Yes- you should buy a shrinker stretcher. I wish I had bought one years ago! Just buy it and think this- once you have finished your resto you can sell it on to the next person who needs one. Everyone wins. I bought one from Machinery house- I got the double headed one on a stand, worked using foot pedals, because nice to have two free hands. Plus its a pain swapping the jaws all the time between shrink and stretch. https://www.machineryhouse.co.nz/S2262 https://www.machineryhouse.co.nz/S2263?gclid=Cj0KCQjwreT8BRDTARIsAJLI0KJRbUiZ46_2w-t1EpOY_ir-ShXCqsf3NLOZBzuocM2R1hhuj6UuUx0aAo0PEALw_wcB
-
Oh cool! Me and hannah randomly met Ken when we moved back to NZ way back in 2010. Spotted his old place in lyttleton with Marinas outside, he spotted me foaming a bit and introduced himself. Became friends (without even having to dirty my hands with Marina ownership I might add....)
-
Hey Ken- thanks for popping over and posting up your thread! So cool to see cars rescued and see what bodges one can discover in the process. I'm waiting for the resident Marina foamer @locost_bryan to pop his head in and say hi!
-
Nissan Micra k11 - Mandy goes to a new happy home.
yoeddynz replied to yoeddynz's topic in Other Projects
Update from our spies out in the field... Our 3rd micra is on its way back from its last holiday with its current owner, an Argentinian girl who calls it her little canary...
- 213 replies
-
- 14
-
-
-
Alex and Hannahs bushblock shinanigans. Look at my deck..
yoeddynz replied to yoeddynz's topic in Other Projects
Woo hoo. It gets better. Sleep easy tonight little alex... -
Alex and Hannahs bushblock shinanigans. Look at my deck..
yoeddynz replied to yoeddynz's topic in Other Projects
yay! -
Alex and Hannahs bushblock shinanigans. Look at my deck..
yoeddynz replied to yoeddynz's topic in Other Projects
Ahhh ok. Yeah i see that now. So it is very similar to walnut. Previous land owner might have had found and dropped a tree here - there's a few different immigrants about! -
Alex and Hannahs bushblock shinanigans. Look at my deck..
yoeddynz replied to yoeddynz's topic in Other Projects
More progress. We have been delving into the large pile of rimu timber that was left on the land as part of the purchase. Most of it is good enough to use but there are bora holes in a fair bit. We are planing it down and then lobbing the swiss cheese bits into the firewood pile (it splits so perfectly for great kindling) Found this bit of random timber that I'm not sure what it is. It might be walnut? Or oak? its lovely and will be used as a feature piece either in this build or the next housetruck.. Its neat when you open the door- the workshop smells so strongly of just wood (not oily leaking British cars) and its currently looking like a carpentry workshop.. All lovely except for the dust that gets everywhere. I where a mask for pretty much all machine work- the dust can be so fine. I have heard that rimu dust can be quite harmful too? Back into the building. We finished the lounge room floor... Added a wall with a window rescued from that cabin and a rimu frame I made to suit... We are now building a wall along the side. I have a funky idea for one of the walls I'm quite excited about. We will finish a bit more wall and then move the remaining boxes of car bits etc off the workshop floor up stairs so we can make the storage floor that goes across the back- similar to this lounge floor but just one sheet wide. Birds. Mr Chaffy certainly does have a girlfriend. Mrs Chaffy is becoming tamer now and they both feed together on porridge in the morning. She aint (yet) quite so fat... A few mornings ago we had a Heron roosting up in a tall kanuka. I grabbed the big camera but only got one terrible photo before it spotted me , went all shy and flew away... There's a group of them nesting over in the pine trees opposite the truck across the field. I might try for photos but they are up really high. Snapped a pic of the two Keas flying overhead, still hanging about each evening... I really want to get better photos but without attracting their attention because they do love a fuss and we don't want them closer.- 575 replies
-
- 13
-
-
Yoeddynz's 1985 Hino N0915 housetruck build.
yoeddynz replied to yoeddynz's topic in Project Discussion
The idea with the next truck is that its not permanently attached so we can keep it on the road and use it if need be as a hauler. I'll be getting my tsl licence as needed. It might be that we only keep it legal for the summer months. The next truck wont be as long and will be way easier to 'pack up' for a trip. I'm just not a fan of petrol trucks. I like the sound of a diesel idling away This above is also why I'm happier to go for a slightly more modern truck to drive. The Hino is perfect in this respect but looking at similar trucks from the same era. -
Yoeddynz's 1985 Hino N0915 housetruck build.
yoeddynz replied to yoeddynz's topic in Project Discussion
Which Is why I'd be kicking tyres. Purely to be that annoying barry who let's on that he's interested but really only wants a test drive because he has always wondered just how nice sounding, but slow, a v8 petrol truck might be but has no intention to purchase. But i shouldn't because I'm better then that barry (as barry as i am) -
Yoeddynz's 1985 Hino N0915 housetruck build.
yoeddynz replied to yoeddynz's topic in Project Discussion
I like the internationals but not touching something petrol though. I imagine that is an ex- firetruck? The fire brigade we are in used to have an international with a v8 petrol. It was sold locally for $5k and is now owned by the local backpackers. He's not using it. I should really go kick its tyres.... -
Alex and Hannahs bushblock shinanigans. Look at my deck..
yoeddynz replied to yoeddynz's topic in Other Projects
The other day we went further up the main valley here and our friends let us pick apart this old cottage on their land. Sweet as cedar windows set into Rimu frames. There was also a big copper water cylinder there for grabs. We are going back to get the french doors before the place gets demolished by a digger. Shame really because the location is bloody amazing! By a river looking at the mountains. Then this afternoon we had a surprise visit from a fella here on oldschool who has been following the housetruck build and this thread. He's a builder and often has spare timber left over from housebuilds so he so very kindly thought that we could make use of it, along with a load of left over fastners etc! Far out- this was such an awesome gift to receive - the timber is exactly what we need to start with framing out the interior rooms in the mezz ! So a huge thanks goes out to Morris @CPR Sierra for going out of his way to help us out. He is restoring a sierra xr4i with a cossie body kit and I am hoping I have convinced him to start a build thread on here. I like sierras and its very rarely I ever see one about these days.- 575 replies
-
- 34
-
-
Nissan Micra k11 - Mandy goes to a new happy home.
yoeddynz replied to yoeddynz's topic in Other Projects
Nice but too big...thems belong in oz. I need 13" -
Alex and Hannahs bushblock shinanigans. Look at my deck..
yoeddynz replied to yoeddynz's topic in Other Projects
He sits on the steps below and just watches. Licks his lips but Chaffy is far too cunning. We actually think Kevin is somewhat used to Chaffy being around and is beginning to see him as part of the family. Fuck- who I am I trying to kid. He'd kill him- because once a cat always a cat. -
Alex and Hannahs bushblock shinanigans. Look at my deck..
yoeddynz replied to yoeddynz's topic in Other Projects
As promised here is Chaffy, the fat little Chaffinch this morning, waiting for his feed porridge... (I had to dust off the big boys camera to get this shot..)- 575 replies
-
- 27
-
-
-
Alex and Hannahs bushblock shinanigans. Look at my deck..
yoeddynz replied to yoeddynz's topic in Other Projects
4 months later and suddenly the grass starts growing at a rate my mowing cant keep up with, all the flowers are out, birds are singing madly. The bush has the most amazing fragrant scent - especially the Lemonwood trees which have amazing flowers. The Kanukas and Manukas will start flowering soon too. At night time, because the land is mainly hillside we can walk along the driveway and the smell is so strong coming down from the bush. We now have two Keas who have claimed our place as theirs in the last two weeks. They are getting closer to the truck and fuck I hope they dont discover its Butynol roof membrane or the nice new rubbers on my Imp. As awesome and comical as they are I do hope they get bored and piss off elsewhere. There's also some falcons about. Usually breeding up one of the gullies and this evening I watched one of them attacking a Hawk until it flew away. Its weird that they dont seem bothered by the Keas even though Keas will happily eat some meat (well mainly the fat that they like) We now have a resident Chaffinch called Chaffy and a Blackbird called ... Blackie. I know. Terrible. They hang about here all day with us. Each morning they call us and wait for their porridge scraps. Chaffy has become a comically fat little fucker. Properly round! I'll get a good photo- you'll laugh. He now has a mate (Mrs Chaffy.. please dont judge. It was an easy name) She is still a bit shy. We think they might have started nesting in one of the Kanuka trees next to the truck. Will be neat if we get baby Chafffinches (except for the bloody naming bit...). No other birds have seemed to have spotted the abundent food these 3 get each morning. Weird. It might be that Blackie does chase other birds away. But he's cool with Chaffy and they will spend all day together just pecking about the place, mates really. Its quite fun. Then we sold the housetruck and stuff started getting real busy here! (so its the perfect time to buy three Micras then.... ha) With the truck going end of next month we had to sort out a proper decent living arrangement pronto. We still have the cabin and that's a nice place to sleep. But to live out of for several months/maybe a year while we build another housetruck was going to get boring real quick. So we have been building the mezzanine in the workshop. Now I was going to post up the progress of that in the shed thread but since its more actually a sort of alternative house build that is going to take place it can stay here. Plus once the truck goes we have loads of other planned jobs to do about the yard. Terracing and landscaping the bank behind and above where the housetruck is parked, with a view to designing it around the next planned HT build. We are also going to get rid of the tin shed in the yard, put some concrete down and build a garage- big enough for the imp or Micra plus loads of old bicycles. Old bicycles that seem to be breeding around here (because N + 1) We also want to build a nice little funky glasshouse and landscape between there and the garage a cool chillout area because it gets the last of the yards sun in winter. Then there is the elephant in the room - the cabin on the ridge. Might actually start building the decking up there this summer now that the timber is up there. We've bought an 1800 litre tank for up there. That will be a fun day out.... Anyway- yeah busy. So the truck is now cof'd and but for a few tidy up jobs we can consider it gone. Better build some upstairs accommodation then. I had posted up a few pics in the shed thread so some of you will have already seen its beginnings - which involved a whole load of timber. A lot of it has come from our own land and was already milled, treated and stacked in the yard. We have been keeping it covered, stacked neatly on flitches and it was great to finally rip into using it. Most of our beams are from that pile. Then we sourced more local pine from a friends place around the corner from us. Finally we bought a load from a local sawmill up the Motueka valley including some lovely Macrocarpa. We ran it all through our thicknesser because it looks nicer and doesnt hold the dust like rough sawn timber does... (Also lots of nice shavings for the compost toilet too- although we dont use treated stuff in there) Bought a decent sized metal bender for a customers gate job a while back. Damn I wish I had one of these ages ago. Came in handy for parts of the steel feet for the posts.. The main mezz floor down one side went up and looked great. Finally our main plan for the workshop was happening! (its the reason we had gone for the highest knee height we could , in our budget).. Getting the hefty unwieldy 3.6m long 20mm strandfloor sheets up to the next level was made easier for us two when we had a hoist to use... With the flooring up on that side we had to build some stairs. We wanted to move the steel rack too so we could put up the posts for the second level over the entrance bay. Having that rack out of the way and moved further in would also make for easier entry with trucks (important really....) So off with all the steel and sorted through it.. Move the rack along, make new wooden shelves for the top so I could satisfy my inner ocd leanings and organise all the offcuts neatly... Then we had more steel delivered including a length of 100mm rhs for the stair design I had planned. Started building stairs... Finished the stair metal work, made some big Macrocarpa steps and while I painted the steel work Hannah painted the corner plywood a nice yellow... Then finally bolt the stairway in place and attach the wooden steps. Really happy with how they turned out. Solid as and with loads of space below to stash other annoying tools (shame really because its so neat without stuff under there but it is a bloody workshop after all...) Then clutter them up with stuff ... Now with some stairs we could fill the mezz with bikes... Better storage solutions will have to take place- we have some ideas involving skyhooks, ropes and pulleys. Stairs completed so we better start building the next level up down the front. This will be a posh carpeted lounge room where folk can gather to watch a movie from (gonna get a projector for the ceiling) or just listen to music/read/dote on cat. Kevin helped by keeping guard over his new favourite rug... We have put up the floor up there and its great. I'll get some pics tomorrow. Now we will start building walls and lining stuff out. Got heaps ofg nice pine and Rimu flooring to use for some wall lining. We want a sort of smart/rustic look to this whole build and it has to be practical because after we have finished living up there it will be used as a workspace for cleaner jobs and projects. Oh and hey there macho men - don't laugh but I actually fancy getting into some sewing and making my own clothes- I have always enjoyed sewing but its a pain to do anything decent when you don't have the clear room to lay stuff out. So that will be a thing. helloooooo Oh I must add- we are both genuinely very excited about a future model train build so we are planning things around that too ie walls with holes, where track might go. It wont be to the same amazing level as things like the Pendon model railway but hey- ya gotta start somewhere and this will be a good space to do so. It will run around the perimeter and not be dated to any particular age so we can different eras and so include model cars from the 60s through to now. I want to make a sci-fi type section with futuristic type buildings and monorail like stuff too. Dreams but gonna go for it- 575 replies
-
- 44
-
-
-
Nissan Micra k11 - Mandy goes to a new happy home.
yoeddynz replied to yoeddynz's topic in Other Projects
Cover it in oil like a good british car does.. -
Nissan Micra k11 - Mandy goes to a new happy home.
yoeddynz replied to yoeddynz's topic in Other Projects
Yeah I think quite a few have been converted however its not all plain sailing plus they are quite a heavy engine, even though all alloy. Spoil those Micra dynamics... I see a little turbo install in the future. Decided we will put the 1.0 and auto into Milly, the first micra and sell on for what ever we can get. Then split the second Micra (Madge?) down, use the nice bits needed to put into the 3rd Micra (Molly?) , keep all the other spares and scrap the shell (or build a really naff Micra trailer....) Lowering will take place but its gonna be subtle to start with... only last night we visited some friends up the Marahau Valley and it involves a ford crossing. No way the Imp would even go near it and a lowered Micra might scrape. Skid plates you say?...... -
Yoeddynz's 1985 Hino N0915 housetruck build.
yoeddynz replied to yoeddynz's topic in Project Discussion
https://www.trademe.co.nz/a/motors/trucks/other/listing/2822609524?bof=T6H92jRw 43,000 kms! Buy it and shorten the cab (because not hindered with sprogs...)
-
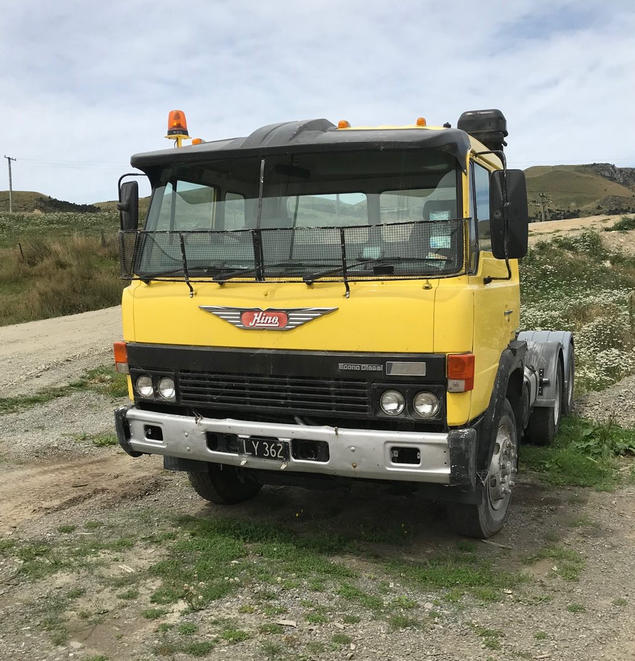
Yoeddynz's 1985 Hino N0915 housetruck build.
yoeddynz replied to yoeddynz's topic in Project Discussion
Hmmmmmmmm.. I like them in yellow. It would match the latest Micra https://www.trademe.co.nz/a/motors/trucks/tractor-units/listing/2810817781?bof=XFKug6kr