zep
-
Posts
4,743 -
Joined
-
Last visited
Content Type
Forums
Downloads
Events
Gallery
Everything posted by zep
-
Many years ago I had one made by Drive Inn in New Lynn. I'll probably have my new one made there too.
-
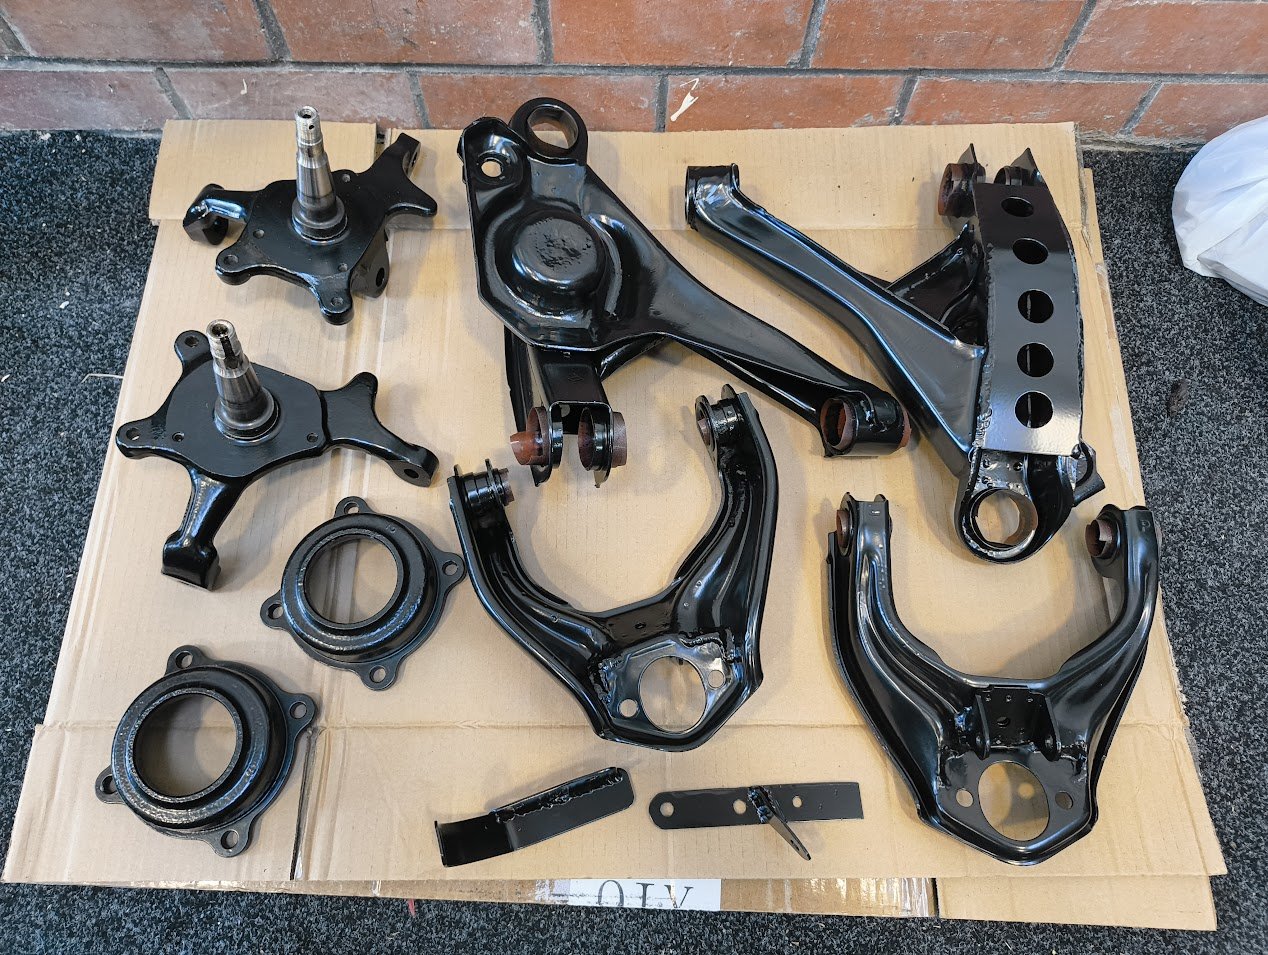
Got some bits back from the powdercoater. Unfortunately the masked up the front hubs wrong so are going to strip and redo them. Next stage is to fit the bearings and hubs to the axles and recheck my bump clearances now that I've moved the discs to the outside. I think it should be okay but if not, I don't think there is much more than a light massage in it.

- 76 replies
-
- 11
-

-
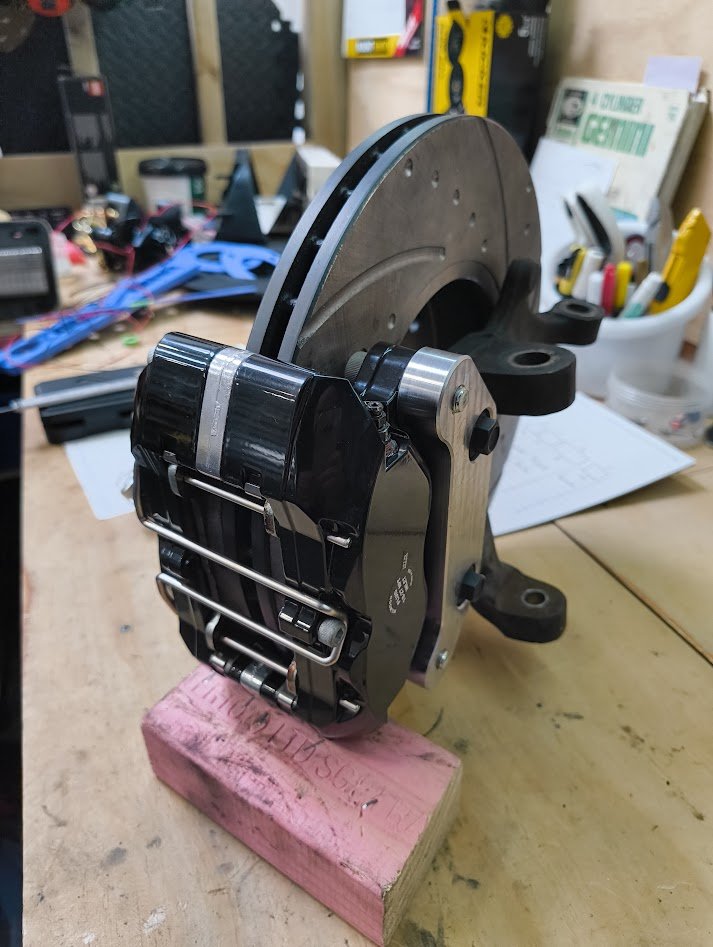
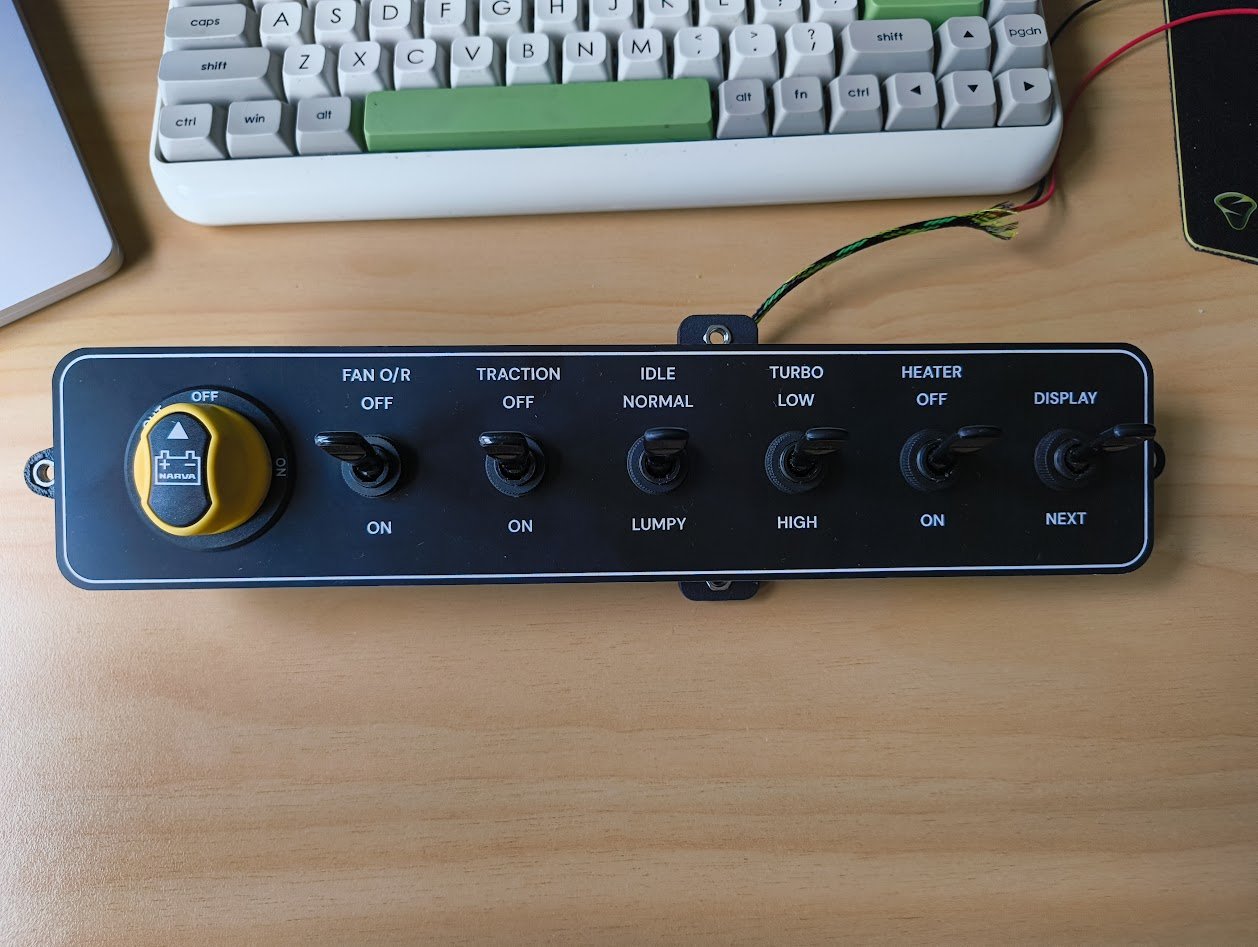
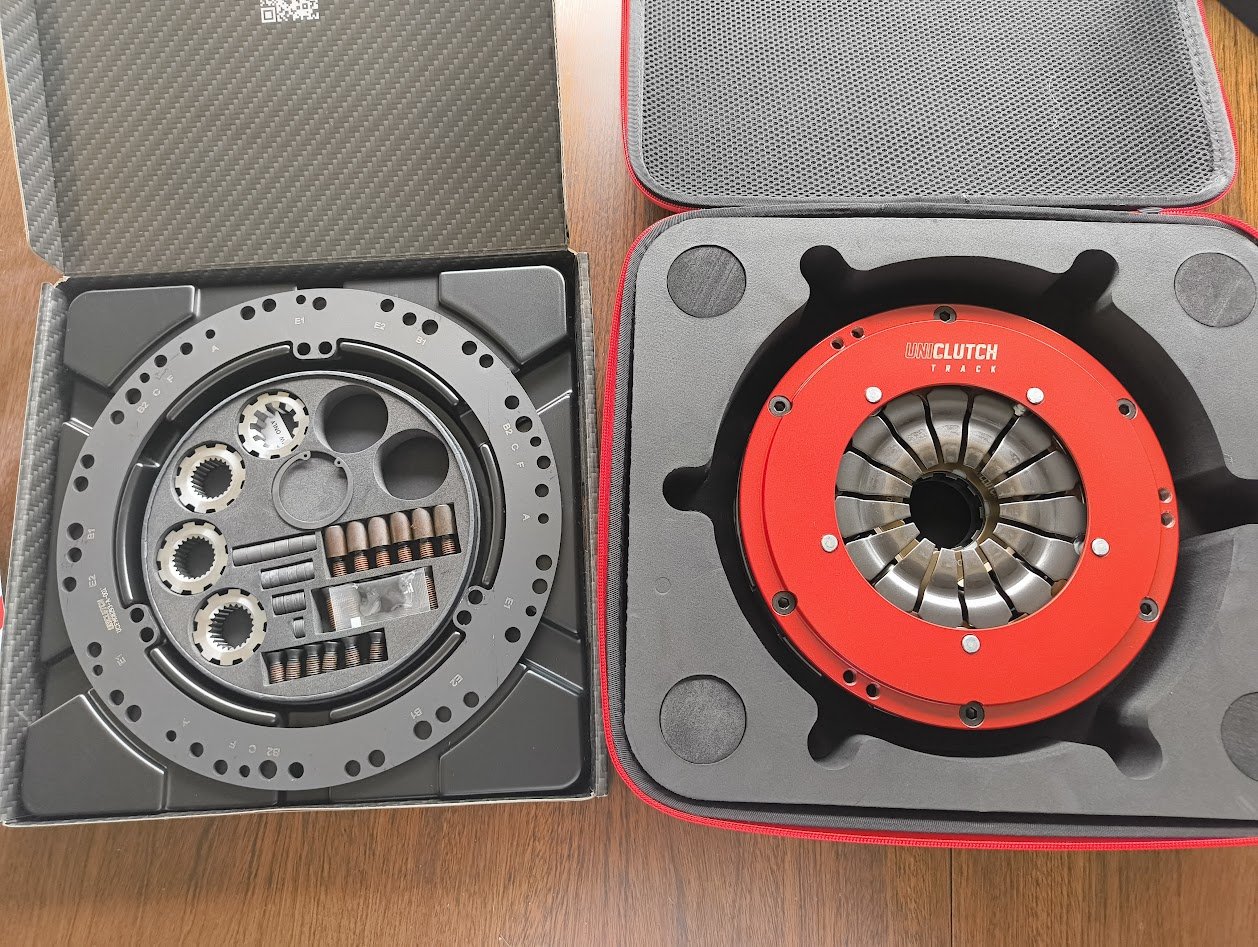
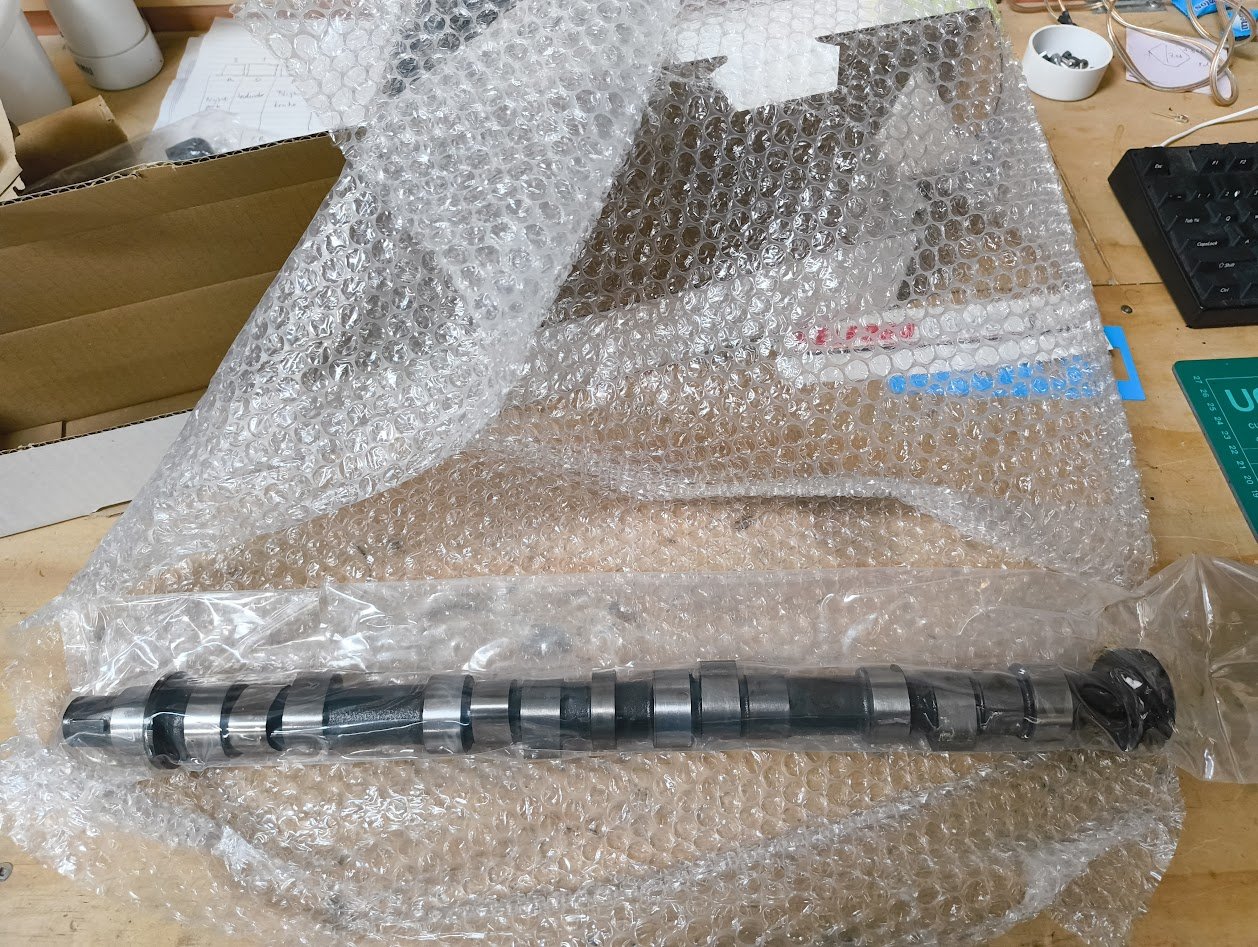
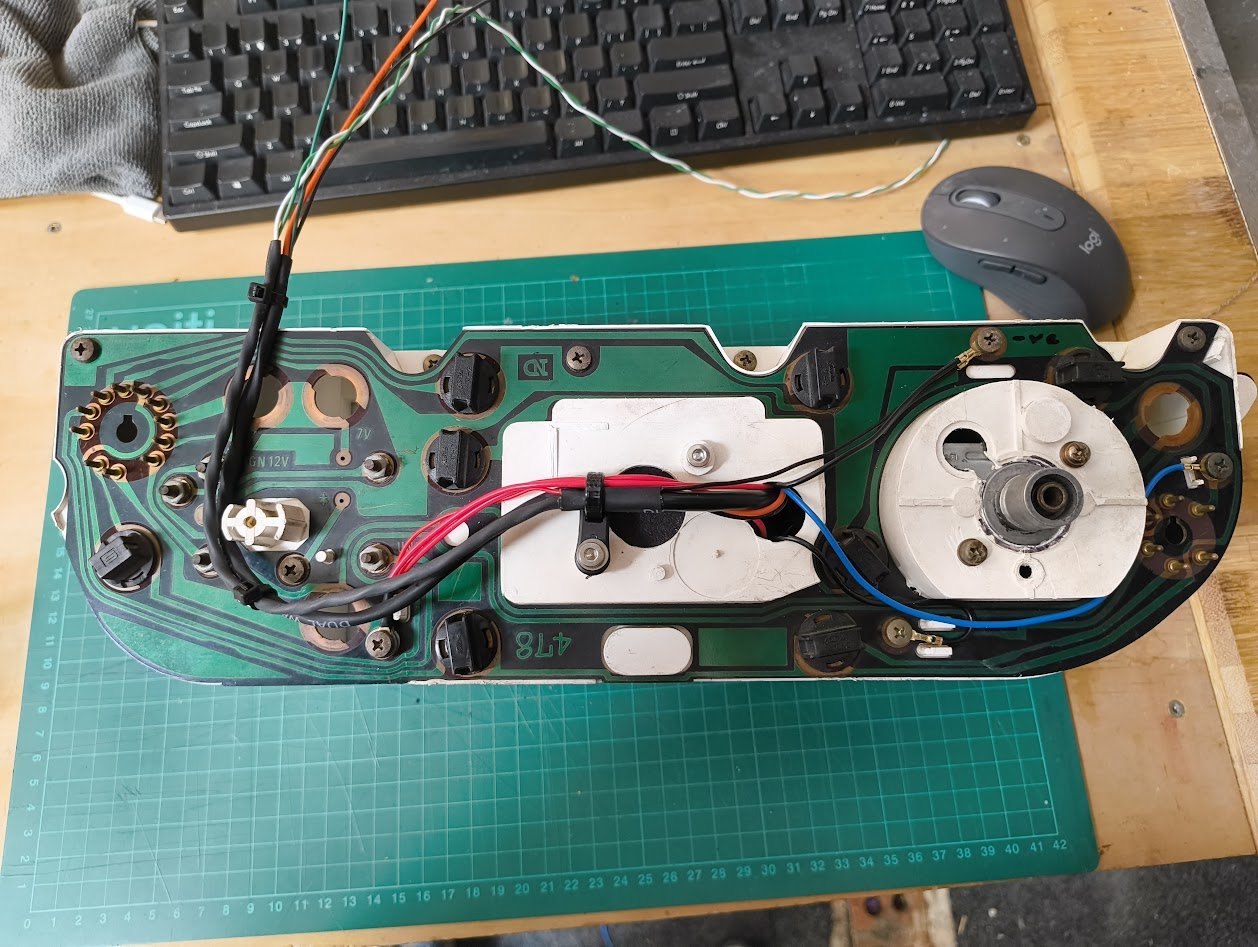
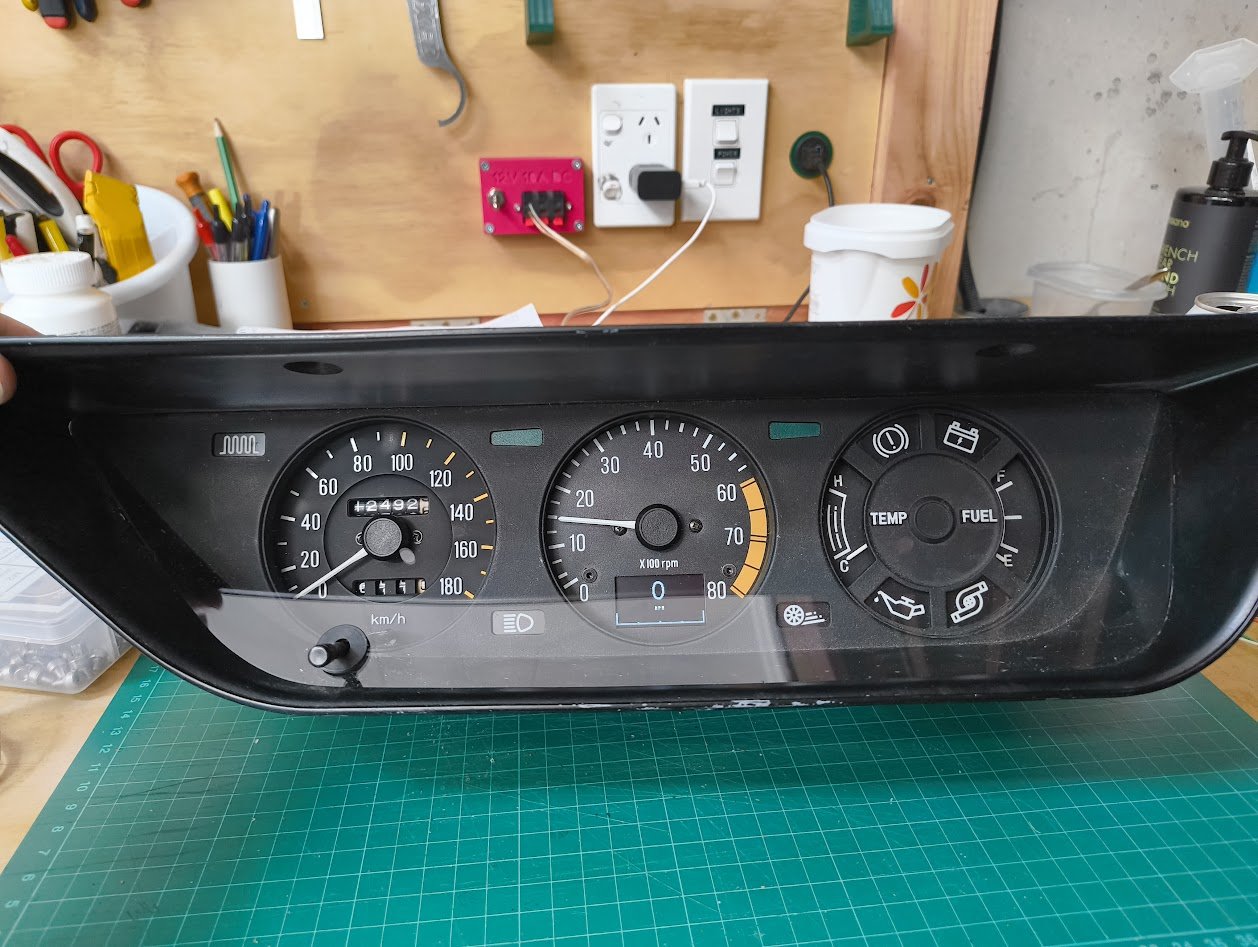
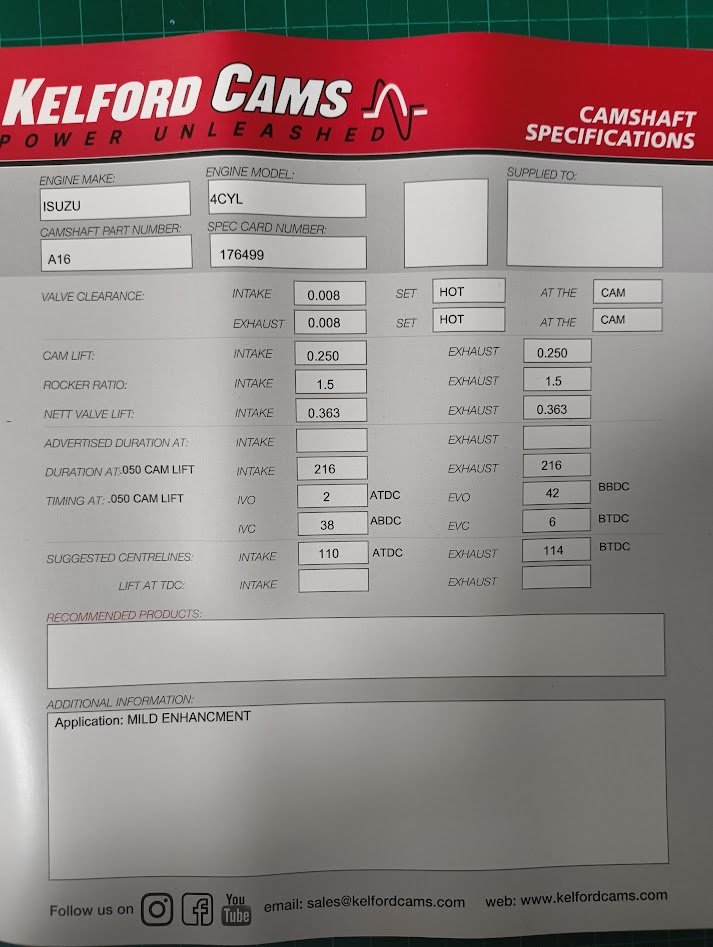
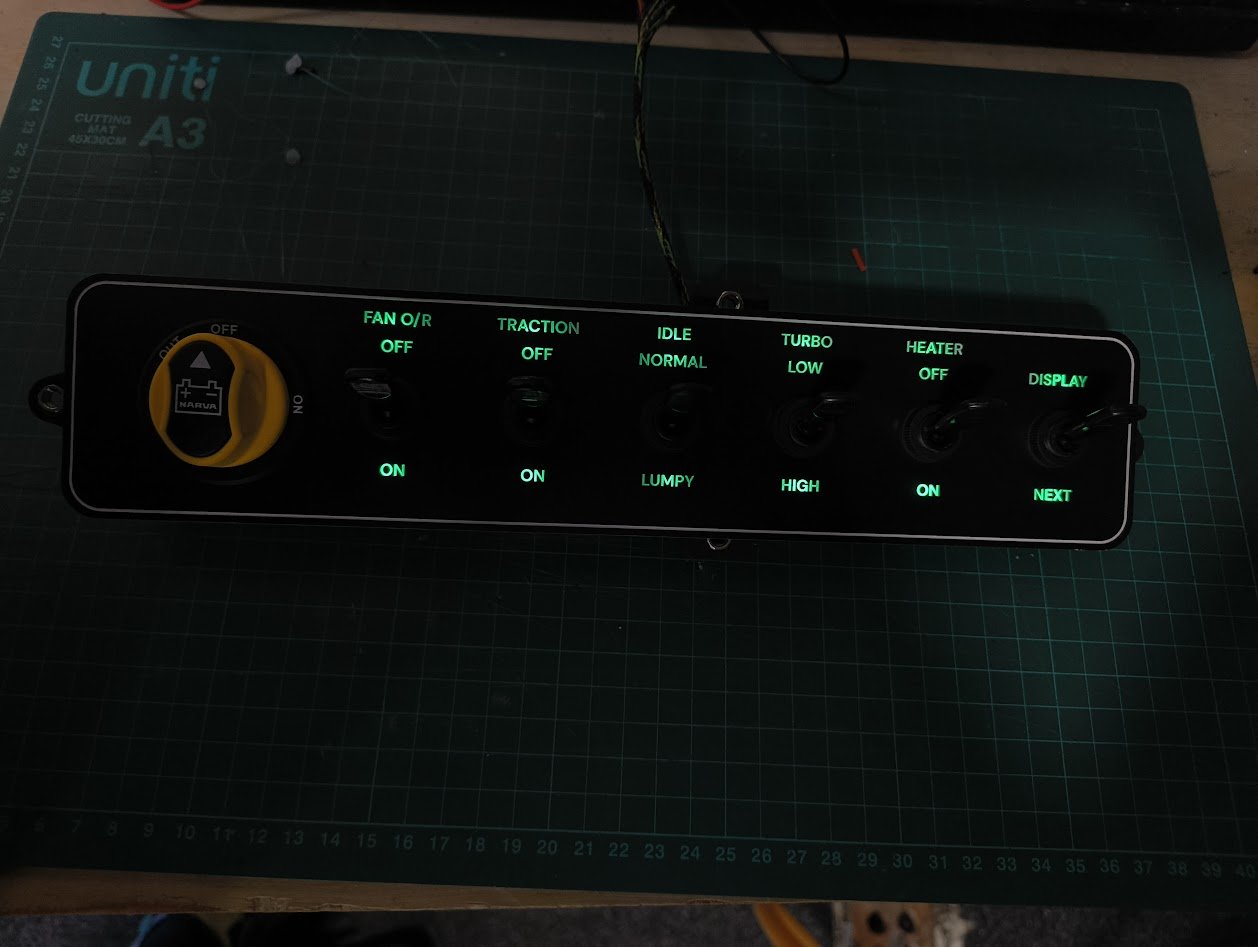
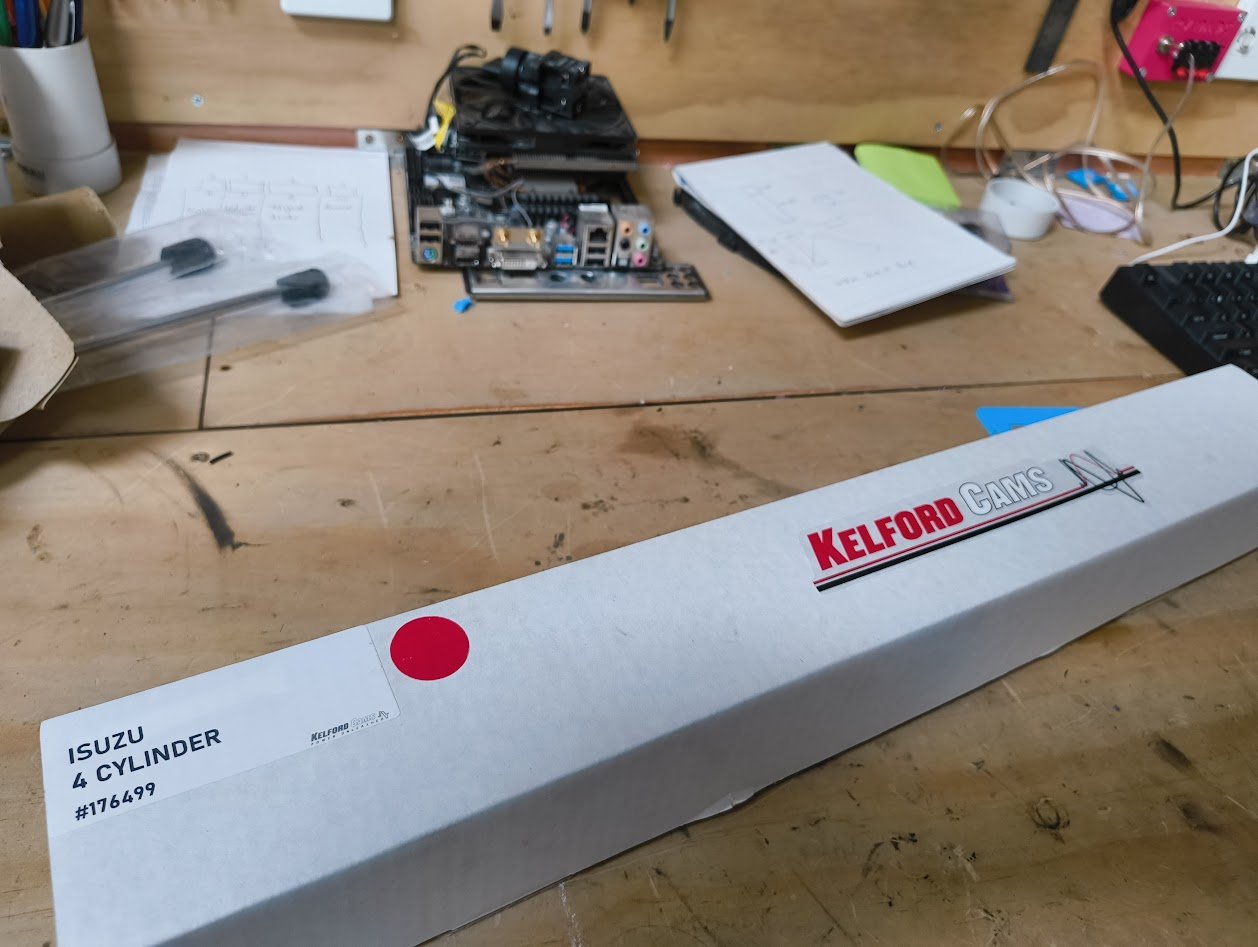
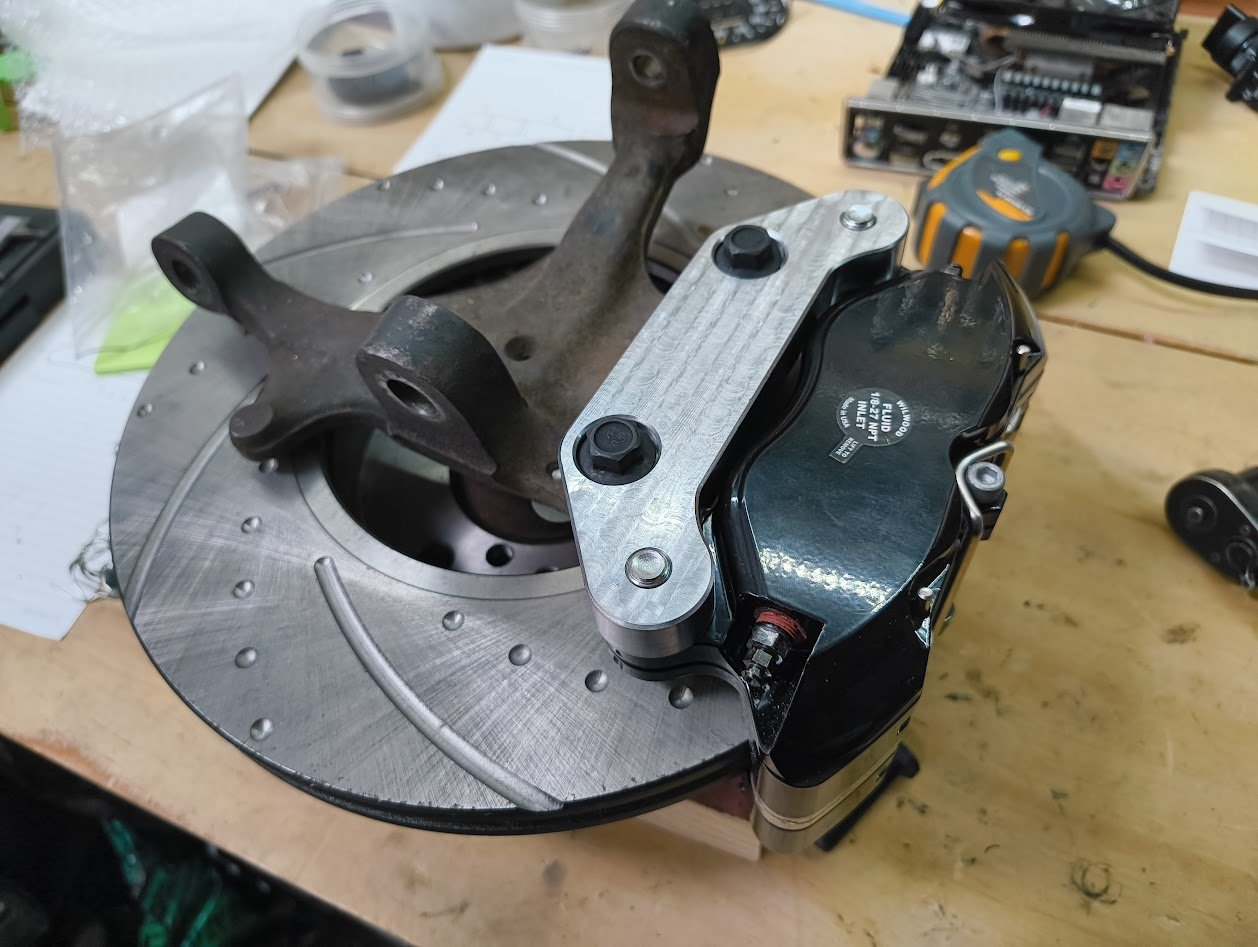
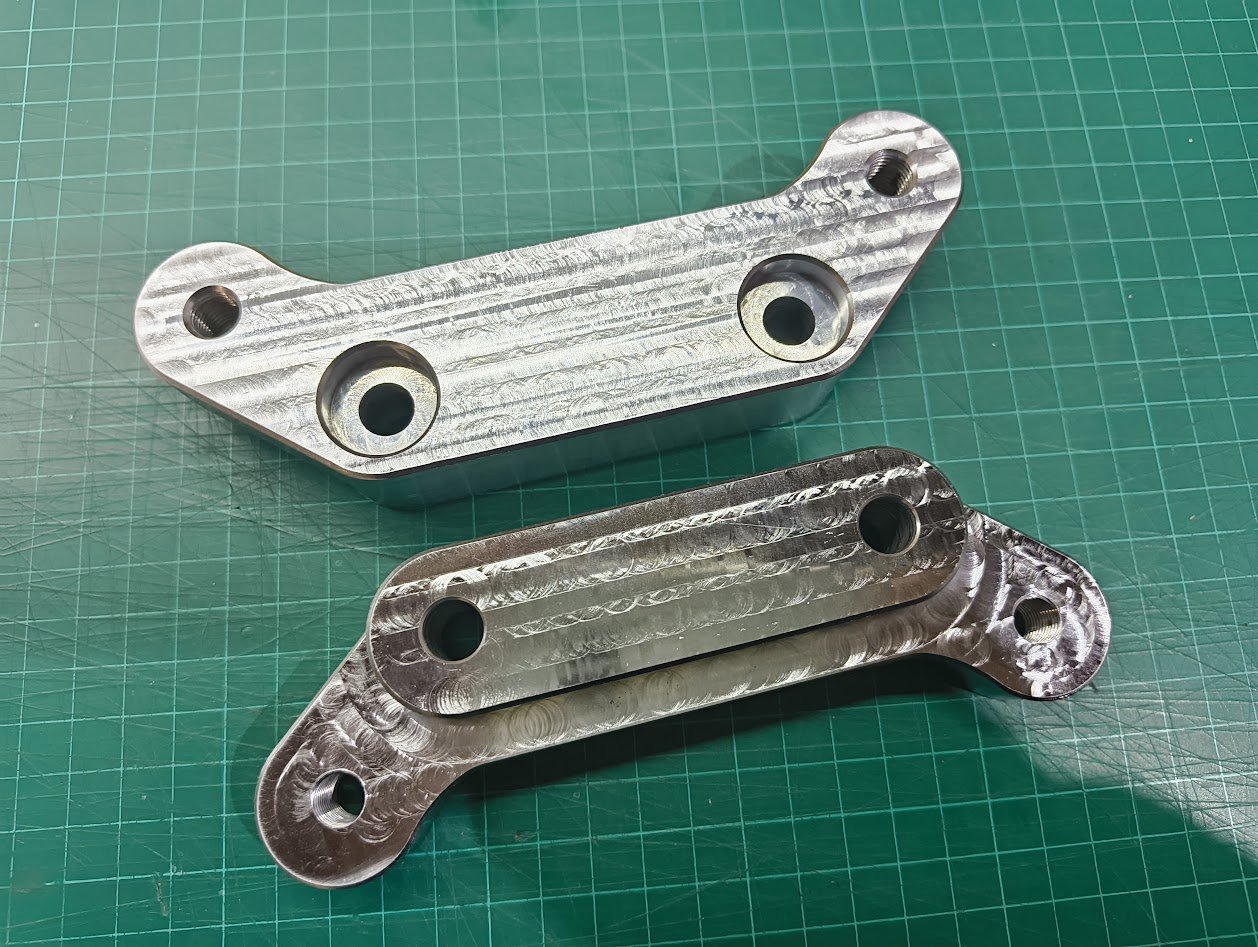
So it seems that time flies and not much gets done. It must be time for my biannual update. Where to start... After at least 5 years of changing my mind on how to achieve it, I've finally finished my "restomod" dash. I've swapped the locations of the tacho and speedo, made a new tacho face from stratch that mimics the factory option but has a GaugeArt CANBUS panel gauge in there. I've also changed all the coloured warning lights to white symbols on black with the appropriately coloured led behind them. E.g.: The rear is looking a bit more complex: Also finished the dash switch panel. I didn't take enough pics of all the development to make this work but I'm pretty stoked with how it turned out. I also finalised my front brake caliper adapters and had them machined: Seem to fit nicely: ' Next thing to do is finish the WSS sensor bracket and pickup ring. My 3d printer is out of action at the moment so I'm a bit delayed there. I got Kelford to regrind my cam in lieu of the bigboy billet cam that is still seemingly in hiatus in Aussie land: Bought a clutch: Lastly I've been working on a new heater system. Need to have the vents properly printed in carbon-nylon or ASA or something, and have the heater core mounting plate cut and folded. Other things that happened: - I had to redo the axles as I wanted to have the discs on the outside of the flange, rather than the inside. So with some help from @alfalfa on the tools at the New Plymouth pick a part to get me some Surf axles and Brian at Howatt Engineering, I've now got new, way nicer axles, ready to be reinstalled. - I've stipped a bunch of suspension components which are currently at the powder coater, including the axle bearing housing that will mean I can put it all back together soon. - I'm currently doing the thankless task of removing the underbody sealant so I can have the shell blasted - aiming to get it to the panelshop in June. - The engine is at the machinist and I'm having some custom 9:1 CR pistons made up by JE. Hopefully getting the head to the right people in the next few weeks for a port and valve upsize - I bought a hoist which I need to install in my garage. Requires some new concrete but also to be able to move the car, which I can't do right now... watch this space. That's about it. I've probably missed a lot of things, will update as I remember.
- 76 replies
-
- 26
-
-

-
I've had a good experience with them so far - perhaps partly because they were already working with another dude who is doing the full gamut of designing new cam profiles and rockers, etc, for Isuzu engines, so I kinda just jumped on the back of that.
-
So that means that the spring is now more compressed at the installed height. And I assume the binding length remains the same, so does that mean that shimmed springs reduce the lift potential?
-
I got mine from the UK, but also that was like 15 years ago! Locally, I feel like you might just need to have some existing shocks modified, otherwise the QA1 route might be okay if you can get the right lengths. If you look into companies like AVO, Spax, etc most should have a large selection of shocks - maybe a local distributor could get some in for you.
-
Thanks mate, this is a useful explanation. When you speak of installing the springs at a particular height, does this mean that they are shimmed to that height? I'm going to do a bit more investigation around this. Always a new can of worms to open with these projects eh?!
-
Hey everyone, I am trying to sort the valve train for my engine build, but I am getting conflicting information from different parties. I'd like to see where the OS opinions lay. This is for an Isuzu 4ZD1 with a 4ZE1 open chamber head. Exhaust valves are 36.9mm Inlet valves are 44.2mm Boost will be 30psi max (I think) First the cam specs - this is a regrind I had done by Kelford: Kelford have supplied some of their valve springs with the following specs: 90lbs, 225lbs @ 11mm lift coil bind @ 26.5mm Install height 41mm The Kelford rep assured me that these springs will be stiff enough, stating that they are the same as they use in their 650+hp big cam RB25DET builds. However, I am also in contact with an oldboy outfit who sells upgraded valve train parts for Isuzu engines, as I was looking at buying larger valves. He also sells valve springs and has heavily suggested that the Kelford springs will not be stiff enough and will drop valves, and that I should buy his valves. I don't think he is trying to pressure me into buying his parts, but appears legitimately concerned. Some of the communication I've had with him is below: I told him that I would still probably stick with the Kelford springs and the response was: Anyway, I am totally unsure on what to do with this conflicting information. One the one hand, Kelford have been working with a guy in the Gemini community to develop new cam profiles - I sent them a head of mine to help test (so I assume they measured the rocker ratio?) and they sent me these springs as a thank-you gift. On the other hand, the oldboy has been building turbo Isuzu engines for a long time and so I assume he knows what he's talking about. I would appreciate any input or thoughts on this. Obviously the end goal is not to destroy my valve train! Cheers
-
As above, I ended up going with Surf axles. They are super easy to find and have enough length for Howatt to work his magic. I didn't even really bother looking into the Hiace axles as it appeared that they were quite different.
-
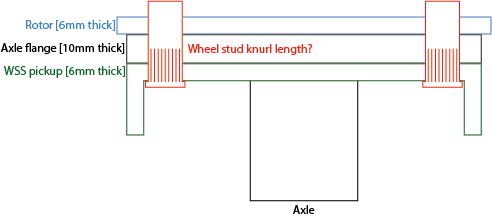
From what I've read, the teeth should be 6mm+. I was making the ring with bent up teeth, so the whole thing is made from 6mm steel. Thanks, this is useful. I will try to redesign it so that the WSS ring has a pocket for the studs.
-
I'm planning on putting a toothed WSS pickup ring behind my axle flanges. This means that the stud knurl will most probably engage into the ring fully and into the flange partially. I've looked at the manual but not found any guidance on how much knurl engagement is required, only that the stud can't spin. Is that all that is required?
-
I've called a few places and these are harder to find than expected. One place only had ABS axles and another would only sell me the entire rear unit for $2700!
-
For the cost, having Howat make me some new bespoke axles sounding like the best option really. If I need to take them thought TAC then I will. Based on what you and @RXFORD have said, it's pretty unlikely that they wouldn't pass.
-
Clint is happy with Howat modding the chromo ones but said that the TAC is most probably necessary for the billet Howat-made ones.
-
Thanks for that @johnny.race. Are the KUN16 and KUN26 the same? I would have to get the bearing holders too then, right? That's another cost on top! My understanding is that a 95-2004 Hilux/Surf axle is 732mm from the back of the flange to the end of the splines. If I took 80mm off this, would it be past the dipped part of the axle? Despite the unknowns about the material, I am leaning back towards the chromo axles (https://www.4wdbits.co.nz/ProductDetails.aspx?productID=6066). At least I know they have no dipped bit, I can buy different lengths and the spigot/brake register is solid. The other options is to get Howat to make me some of his flanged billet axles. $800 for a pair he said! He does this by making a non-flanged axle and shrinking a flange on. He reckons they are strong as - surely strong enough for a light car like the Gemini. The issue is that they would probably have to go through LVVTA TAC...
-
Hey mate, The hypotenuse needs to be 652mm - that's with a 153mm(ish) diameter mounting surface. I need my mounting surface to be about 124mm OD to fit the brake rotor over, so that would drop the hypotenuse length by a mm or two, perhaps. It's my Gemini which is already set up for the diff, I just need to replace the axles for cert. 4x100 - I realise this requires machining the back of the mounting face. Maximum 68.3mm spigot (the brake register?) - Because the 6 stud spigots are very large, Howat suggested he could fill it in and machine it down to the 68.3mm. Clint said this is okay for cert as long as there are receipts!
-
I've considered buying some new aftermarket axles which are stated to be chromoly. For some reason, Howat was hesitant that they actually would be and reckoned it wasn't worth spending $400 each on them when you could get OEM 2nd hand for like $150.
-
Awesome, thanks for the info - makes things a bit easier. Would definitely be useful to find those 4x4 shafts. Too bad I can't just wander around and pull them out of different cars in a yard!.
-
That would depend on the length of the axle I get, I guess. I think with my last ones, they weren't cut fully below where it gets thinner, but the machinist built it up.
-
Hello everyone, Because I rush into things, I'm needing to redo my Hilux axles. I need non-ABS 6 stud items and it seems like it might be easiest to find these in a Gen 1 or 2 Surf. Out of something like this: https://www.trademe.co.nz/a/motors/car-parts-accessories/toyota/other/listing/4993544547 I'll shorten and respline them, but will these fit my RN50 (I think) wheel bearing housings? According to the Amayama parts catalogues, the bearing housing is the same part number for both the KZN130 Surf and the LN50 Hilux. Or will this be okay? https://www.trademe.co.nz/a/motors/car-parts-accessories/toyota/other/listing/4991889906 There are SOOO many Hilux/Hilux-adjacent chassis numbers!
-
So this has caught up with me. I have an unmanufactured silver-on-black plate for the Gemini. However, you can only request manufacture for the plate if you have a currently registered (not on hold) car in the same name - which I don't. So I swapped the plate entitlement to my partner and have requested it to be manufactured for her car. But because I don't really want her driving around with my mint plate, I want to take it off immediately. What do I need to do? Just go to VTNZ and tell them we don't want p-plates on the car any more, and they'll issue a new regular plate?
-
Obviously a typo, but here's -15 degrees:
-
Holy shit I'm useless. Though I did find a Chevette Haines. Interesting that Chevettes get an extra 15 degrees of negative camber. The 75/76 TX Gemini in Aussie did have different front arms, so perhaps the 78 is different. I'll keep looking. It's a matter of 15 degrees!
-
There is no Haynes for the Gemini, and the Gregorys doesn't have it. Perhaps there is an Isuzu/Holden workshop manual somewhere...
-
Regarding camber rules, the guide says "A front or rear suspension system in a low volume vehicle must incorporate no more than half a degree (0 degrees 30mins/0°30’) more negative camber than that specified by the vehicle manufacturer". What happens with OS cars where this factory information is not available?